H-FS 800 - Slicer Herkules - Free user manual and instructions
Find the device manual for free H-FS 800 Herkules in PDF.
User questions about H-FS 800 Herkules
0 question about this device. Answer the ones you know or ask your own.
Ask a new question about this device
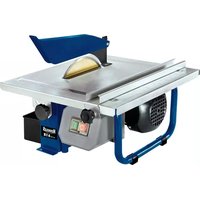
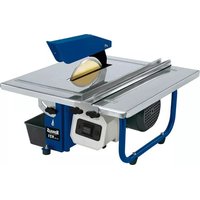
Download the instructions for your Slicer in PDF format for free! Find your manual H-FS 800 - Herkules and take your electronic device back in hand. On this page are published all the documents necessary for the use of your device. H-FS 800 by Herkules.
USER MANUAL H-FS 800 Herkules
GB Original operating instructions Tile Cutting Machine
natural_image
Interior view of a mechanical device with a cylindrical component and a flat top, labeled with number 17 (no readable text or symbols beyond labels)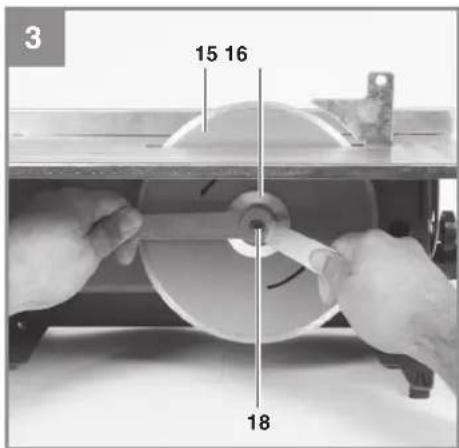
text_image
3 15 16 18-2-
text_image
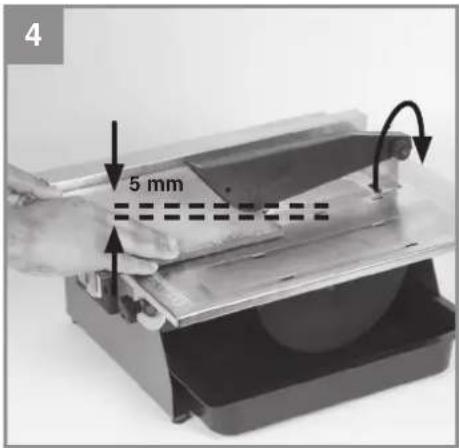
4 5 mm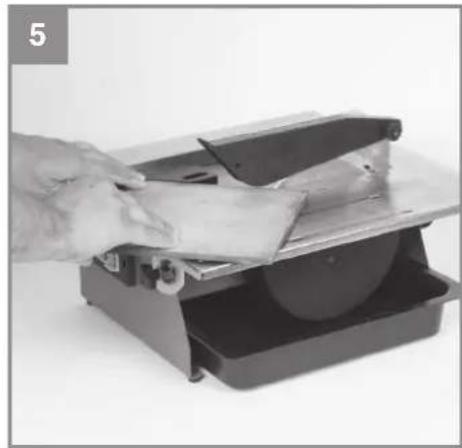
natural_image
Person using a metal cutting machine to cut or spread material, no visible text or symbols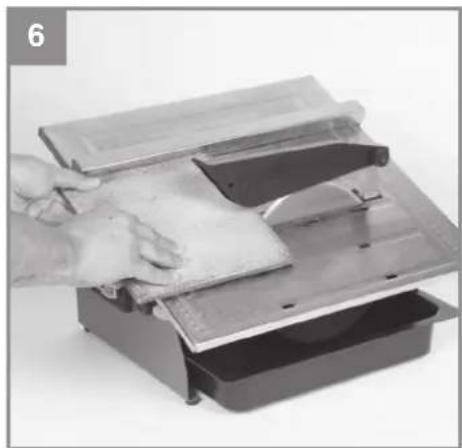
natural_image
Person cleaning a metal tray with a cloth, no visible text or symbols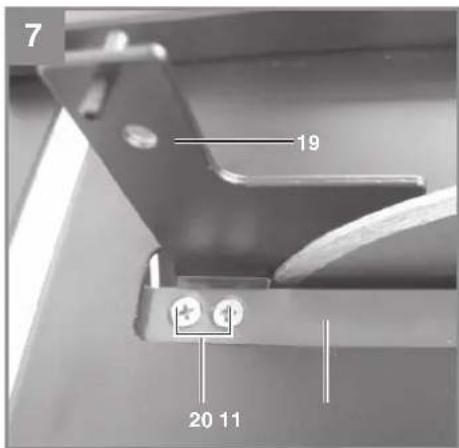
text_image
7 19 20 11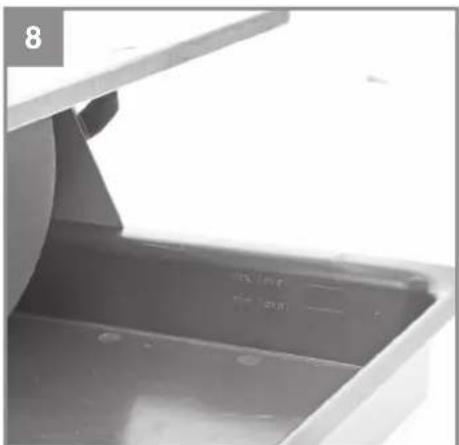
natural_image
Close-up of a metallic metal bracket with a flat top and a curved handle (no visible text or symbols)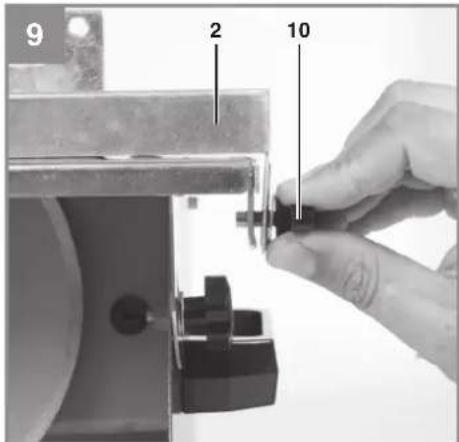
text_image
9 2 10DE

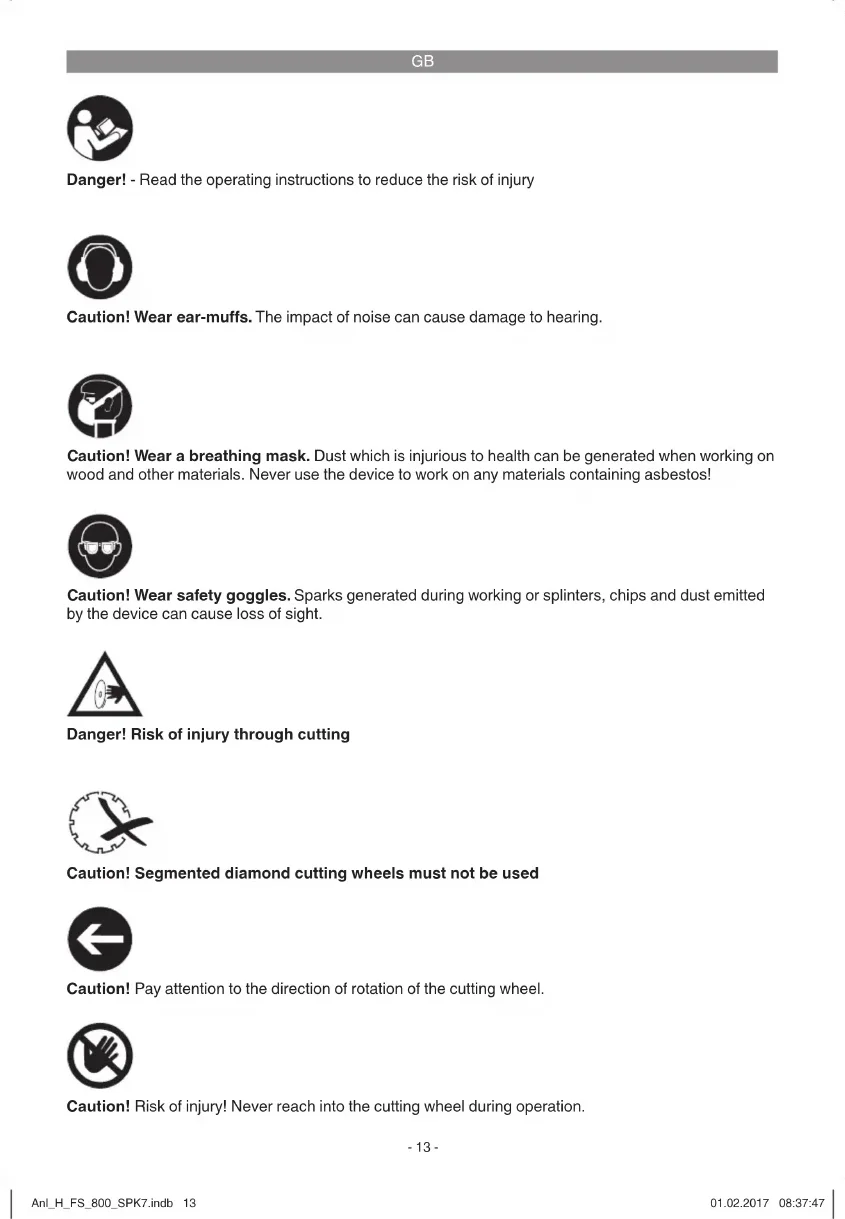
Danger! - Read the operating instructions to reduce the risk of injury

Caution! Wear ear-muffs. The impact of noise can cause damage to hearing.

Caution! Wear a breathing mask. Dust which is injurious to health can be generated when working on wood and other materials. Never use the device to work on any materials containing asbestos!

Caution! Wear safety goggles. Sparks generated during working or splinters, chips and dust emitted by the device can cause loss of sight.
Danger! Risk of injury through cutting

Caution! Segmented diamond cutting wheels must not be used

Caution! Pay attention to the direction of rotation of the cutting wheel.

Caution! Risk of injury! Never reach into the cutting wheel during operation.
GB
Danger!
When using the equipment, a few safety precautions must be observed to avoid injuries and damage. Please read the complete operating instructions and safety regulations with due care. Keep this manual in a safe place, so that the information is available at all times. If you give the equipment to any other person, hand over these operating instructions and safety regulations as well. We cannot accept any liability for damage or accidents which arise due to a failure to follow these instructions and the safety instructions.
1. Safety regulations
The corresponding safety information can be found in the enclosed booklet.
Danger!
Read all safety regulations and instructions.
Any errors made in following the safety regulations and instructions may result in an electric shock, fi re and/or serious injury.
Keep all safety regulations and instructions in a safe place for future use.
2. Layout and items supplied
2.1 Layout
- Angle stop
- Parallel stop
- Wheel guard
- Cutting table
- Water trough
- Housing
- Knurled screw for setting the angle
- Scale for miter cut
- Knurled screw for cutting wheel guard
- Thumb screw for parallel stop
- Holder for splitter
- On/Off switch
- Switch housing
- Carry-handle
- Diamond cutting wheel
- Outer fl ange
- Side cover
- Nut
- Splitter
- Fastening screws for splitter holder
2.2 Items supplied
Please check that the article is complete as specified in the scope of delivery. If parts are missing, please contact our service center or the sales outlet where you made your purchase at the latest within 5 working days after purchasing the product and upon presentation of a valid bill of purchase. Also, refer to the warranty table in the service information at the end of the operating instructions.
- Open the packaging and take out the equipment with care.
- Remove the packaging material and any packaging and/or transportation braces (if available).
- Check to see if all items are supplied.
- Inspect the equipment and accessories for transport damage.
- If possible, please keep the packaging until the end of the guarantee period.
Danger!
The equipment and packaging material are not toys. Do not let children play with plastic bags, foils or small parts. There is a danger of swallowing or suffocating!
• Original operating instructions
- Safetyinstructions
3. Technical data
AC motor 230 V\~50 Hz
Motor rating: 800 W S2 10 min
Motor speed: 2950 rpm
Insulation material class .... Class B
Protection type IP 54
Protection class ....I
Cut length: .... Unlimited
Jolly length: .... Unlimited
Cutting height 90°: 34 mm
Cutting height 45°: 17 mm
Cutting table-Dimensions .....395 mm x 385 mm
Diamond cutting wheel ..... 0 180 x 0 25.4 mm
Weight: 11 kg
GB
A load factor of S2 10 min (intermittent periodic duty) means that you may operate the motor continuously at its nominal power level (800 W) for no longer than the time stipulated on the specifications label (10 minutes ON period). If you fail to observe this time limit the motor will overheat. During the OFF period the motor will cool again to its starting temperature.
Idle speed
L_pA sound pressure level .....92 dB
L_wA sound power level .....105 dB
Keep the noise emissions and vibrations to a minimum.
- Only use appliances which are in perfect working order.
• Service and clean the appliance regularly.
• Adapt your working style to suit the appliance.
• Do not overload the appliance. - Have the appliance serviced whenever necessary.
- Switch the appliance off when it is not in use.
Caution!
Residual risks
Even if you use this electric power tool in accordance with instructions, certain residual risks cannot be rules out. The following hazards may arise in connection with the equipment's construction and layout:
- Lung damage if no suitable protective dust mask is used.
- Damage to hearing if no suitable ear protection is used.
- Health damage caused by hand-arm vibrations if the equipment is used over a prolonged period or is not properly guided and maintained.
4. Important information
Please read the operating instructions carefully and observe the information provided. It is important to consult these instructions in order to acquaint yourself with the equipment, its proper use and safety regulations.
Danger!
For safety reasons, the tile cutting machine is not to be used by children, young people under 16 years of age, or any other persons who are not acquainted with these operating instructions.
5. Intended use
The tile cutting machine is designed for the standard cutting of small and medium-size tiles (glazed tiles, ceramic tiles or similar) which can be accommodated by the size of the machine. It should never be used for cutting wood or metal. The machine should be used exclusively for its intended purpose. Any other use is deemed to be a case of misuse. The user/operator and not the manufacturer will be held liable for damage and/or injuries of any kind that result from such misuse. The machine is to be operated only with suitable cutting-off wheels. Saw blades should never be used. Compliance with the safety instructions, the assembly instructions, and advice and instructions on operation contained in the operating instructions also falls under the terms of intended use. All persons who use and service the equipment have to be acquainted with this manual and must be informed about the machine's potential hazards. In addition, strict compliance with the accident prevention regulations in force in your area, as well as all other general rules of health and safety at work, is imperative. The manufacturer's liability shall be deemed void if the machine is modified in any way and the manufacturer shall therefore accept no liability for any damages arising as a result of modifications. Even when the equipment is used as prescribed it is still impossible to eliminate certain residual risk factors. The following hazards may arise in connection with the machine's construction and design:
- Contact with the diamond cutting wheel where it is not covered.
- Contact with the diamond cutting wheel while it is turning.
• Defective diamond tips flying off the cutting wheel. - Kick-back of workpieces and parts of workpieces due to improper handling.
- Damage to hearing if ear-muffs are not used as necessary.
Please note that our equipment has not been designed for use in commercial, trade or industrial applications. Our warranty will be voided if the machine is used in commercial, trade or industrial businesses or for equivalent purposes.
GB
6. Before starting the equipment
- The machine has to be set up where it can stand firmly, e.g. on a work bench, or it must be bolted to a strong base.
- All covers and safety devices have to be properly fitted before the machine is switched on.
- It must be possible for the diamond wheel to run freely.
- Before you actuate the ON/OFF switch, make sure that the diamond wheel is correctly fitted and that the machine's moving parts run smoothly.
- Before you connect the machine to the power supply, make sure the data on the rating plate is the same as that for your mains.
- Before using the machine, check all of the parts for damage and replace any parts that are damaged. When replacing any parts or accessories, always carefully follow the instructions in this manual.
- For optimum performance and maximum safety, keep the machine clean at all times.
- Check the machine cable at regular intervals.
- While the machine is running, check the wearing parts and the fastenings of parts which may have become loose and check that all accessories are correctly fitted.
- Notice! The tile cutting machine is designed for use with water.
- Check that the water level is high enough to cover the diamond part of the wheel each time before you start a cutting operation and keep checking it during cutting as well. Fill/ refill the cooling water directly into the trough.
Assemble the equipment as shown in figures 1/2/3/7/9.
To replace the wheel when worn, proceed as follows:
• Pull out the power plug first.
• Take out the water trough (5). - Remove the side cover (17).
- Apply an 8 mm counterholder to block the motor shaft.
- Unscrew the lock nut (18) on the wheel flange (16) with a 19 mm wrench.
- Clean the wheel flange thoroughly once the wheel has been removed.
• Mount the new diamond cutting wheel on the
6.1 Assembly (Fig. 1/9)
6.2 Changing the diamond cutting wheel (Fig. 2/3)
cleaned flange, fit the outer flange (16) and tighten with the nut (18).
• Fasten the side cover (17) again.
Check that the diamond wheel rotates in the correct direction!
6.3 Adjusting the top wheel guard (Fig. 4)
- Move the wheel guard to approximately 5 mm above the tile you wish to cut. Lock the wheel guard (3) in position with the knurled screw (9) as shown in Fig. 1.
- Notice! The machine is fitted with a cutting wheel with a non-segmented edge.
6.4 Filling the cooling water tank (Fig. 8)
Fill the cooling water tank as follows:
- Pull out the cooling water tank (5) as far as the stop.
- Fill the tank as far as the corresponding markings (Fig. 8).
- To empty or clean the cooling water tank (5), remove it from the equipment. (This requires you to raise the equipment a little and to tilt the tank slightly.)
7. Operation
Important! If the cutting wheel becomes jammed, switch off the equipment and disconnect it from the power supply; only then are you allowed to remove the workpiece.
7.1 Even cutting (Fig. 1/4)
- Set the cutting width with the parallel stop (2) and lock in position with the thumb screws (10). The width of the workpiece can be read on the scale.
• For diagonal cuts (45°) use the angle stop (1).
Fig. 4 shows the correct position for your hands during even cutting. The rate of advance must not exceed the cutting capacity of the wheel. This is to make sure that no material comes off, as this may cause accidents or injuries.
Notice! Keep a constant check on the water level
GB
7.2 Making 45° miter cuts (jolly cuts) (Fig. 6)
- Position the table as shown in Fig. 6 and lock in position with the handles (7). Position the tile with the glazed side on the work surface and make sure that the diamond wheel does not touch the glaze on the tile. Correct the cutting guiding position if necessary.
- Fig. 6 shows the correct position for your hands during miter cutting to 45^ . The right hand holds the workpiece in contact with the diamond wheel while the left hand pushes the workpiece forward. The rate of advance must not exceed the cutting capacity of the wheel. This is to make sure that no material comes off, as this may cause accidents or injuries.
7.3 On/Off switch (Fig. 1)
- To switch on, press the „I“ on the On/Off switch (12).
- To switch off, press the „0“ on the On/Off switch (12).
8. Replacing the power cable
Danger!
If the power cable for this equipment is damaged, it must be replaced by the manufacturer or its after-sales service or similarly trained personnel to avoid danger.
9. Cleaning, maintenance and ordering of spare parts
Danger!
Always pull out the mains power plug before starting any cleaning work.
9.1 Cleaning
- Keep all safety devices, air vents and the motor housing free of dirt and dust as far as possible. Wipe the equipment with a clean cloth or blow it with compressed air at low pressure.
• We recommend that you clean the device immediately each time you have finished using it. - Clean the equipment regularly with a moist cloth and some soft soap. Do not use cleaning agents or solvents; these could attack the plastic parts of the equipment. Ensure that no water can seep into the device. The
ingress of water into an electric tool increases the risk of an electric shock.
9.2 Maintenance
There are no parts inside the equipment which require additional maintenance.
9.3 Ordering replacement parts:
Please quote the following data when ordering replacement parts:
• Type of machine
• Article number of the machine
• Identification number of the machine
- Replacement part number of the part required For our latest prices and information please go to www.isc-gmbh.info
10. Disposal and recycling
The unit is supplied in packaging to prevent its being damaged in transit. This packaging is raw material and can therefore be reused or can be returned to the raw material system.
The unit and its accessories are made of various types of material, such as metal and plastic. Defective components must be disposed of as special waste. Ask your dealer or your local council.
11. Storage
Store the equipment and accessories out of children's reach in a dark and dry place at above freezing temperature. The ideal storage temperature is between 5 and 30^ . Store the electric tool in its original packaging.
12. Transport
If you want to move the equipment to a different place, disconnect the equipment from the power supply and set it up in the new position you want to use it in.
GB

For EU countries only
Never place any electric power tools in your household refuse.
To comply with European Directive 2012/19/EC concerning old electric and electronic equipment and its implementation in national laws, old electric power tools have to be separated from other waste and disposed of in an environment-friendly fashion, e.g. by taking to a recycling depot.
Recycling alternative to the return request:
As an alternative to returning the equipment to the manufacturer, the owner of the electrical equipment must make sure that the equipment is properly disposed of if he no longer wants to keep the equipment. The old equipment can be returned to a suitable collection point that will dispose of the equipment in accordance with the national recycling and waste disposal regulations. This does not apply to any accessories or aids without electrical components supplied with the old equipment.
The reprinting or reproduction by any other means, in whole or in part, of documentation and papers accompanying products is permitted only with the express consent of the iSC GmbH.
Subject to technical changes
GB
Service information
We have competent service partners in all countries named on the guarantee certificate whose contact details can also be found on the guarantee certificate. These partners will help you with all service requests such as repairs, spare and wearing part orders or the purchase of consumables.
Please note that the following parts of this product are subject to normal or natural wear and that the following parts are therefore also required for use as consumables.
| Category Example | |
| Wear parts* | |
| Consumables* Cutting wheels | |
| Missing parts |
* Not necessarily included in the scope of delivery!
In the effect of defects or faults, please register the problem on the internet at www.isc-gmbh.info. Please ensure that you provide a precise description of the problem and answer the following questions in all cases:
• Did the equipment work at all or was it defective from the beginning?
• Did you notice anything (symptom or defect) prior to the failure?
• What malfunction does the equipment have in your opinion (main symptom)?
Describe this malfunction.
GB
Warranty certifi cate
Dear Customer,
All of our products undergo strict quality checks to ensure that they reach you in perfect condition. In the unlikely event that your device develops a fault, please contact our service department at the address shown on this guarantee card or the sales outlet from where you bought the device. Please note the following terms under which guarantee claims can be made:
- These guarantee terms apply to consumers only, i.e. natural persons intending to use this product neither for their commercial activities nor for any other self-employed activities. These warranty terms regulate additional warranty services, which the manufacturer mentioned below promises to buyers of its new products in addition to their statutory rights of guarantee. Your statutory guarantee claims are not affected by this guarantee. Our guarantee is free of charge to you.
- The warranty services cover only defects due to material or manufacturing faults on a product which you have bought from the manufacturer mentioned below and are limited to either the rectification of said defects on the product or the replacement of the product, whichever we prefer. Please note that our devices are not designed for use in commercial, trade or professional applications. A guarantee contract will not be created if the device has been used by commercial, trade or industrial business or has been exposed to similar stresses during the guarantee period.
-
The following are not covered by our guarantee:
-
Damage to the device caused by a failure to follow the assembly instructions or due to incorrect installation, a failure to follow the operating instructions (for example connecting it to an incorrect mains voltage or current type) or a failure to follow the maintenance and safety instructions or by exposing the device to abnormal environmental conditions or by lack of care and maintenance.
- Damage to the device caused by abuse or incorrect use (for example overloading the device or the use or unapproved tools or accessories), ingress of foreign bodies into the device (such as sand, stones or dust, transport damage), the use of force or damage caused by external forces (for example by dropping it).
-
Damage to the device or parts of the device caused by normal or natural wear or tear or by normal use of the device.
-
The guarantee is valid for a period of 60 months starting from the purchase date of the device. Guarantee claims should be submitted before the end of the guarantee period within two weeks of the defect being noticed. No guarantee claims will be accepted after the end of the guarantee period. The original guarantee period remains applicable to the device even if repairs are carried out or parts are replaced. In such cases, the work performed or parts fitted will not result in an extension of the guarantee period, and no new guarantee will become active for the work performed or parts fitted. This also applies if an on-site service is used.
-
To make a claim under the guarantee, please register the defective device at: www.isc-gmbh.info. Please keep your bill of purchase or other proof of purchase for the new device. Devices that are returned without proof of purchase or without a rating plate shall not be covered by the guarantee, because appropriate identification will not be possible. If the defect is covered by our guarantee, then the item in question will either be repaired immediately and returned to you or we will send you a new replacement.
Also refer to the restrictions of this warranty concerning wear parts, consumables and missing parts as set out in the service information in these operating instructions.
FR

7.1 Coupe plane (fi g 1/4)
7.1 Ravni rez (Slika 1/4)
Helirōhu tase L _pA 92 dB
Müratase L _WA ......105 dB
6.1 Monteerimine (Joonis 1/9)
Subject to change without notice
Archive-File/Record: NAPR013537
Documents registrar: Eric Page
Wiesenweg 22, D-94405 Landau/Isar
EH 02/2017 (01)