
HDBI H7A2TBEX-S - Tumble drier HAIER - Free user manual and instructions
Find the device manual for free HDBI H7A2TBEX-S HAIER in PDF.
User questions about HDBI H7A2TBEX-S HAIER
0 question about this device. Answer the ones you know or ask your own.
Ask a new question about this device
Download the instructions for your Tumble drier in PDF format for free! Find your manual HDBI H7A2TBEX-S - HAIER and take your electronic device back in hand. On this page are published all the documents necessary for the use of your device. HDBI H7A2TBEX-S by HAIER.
USER MANUAL HDBI H7A2TBEX-S HAIER

oppure accedendo al link: go.haier-europe.com/download-app
METTERELAMACCHINAINPAUSA
Built In Tumble Dryer
HDBI H7A2TBEX-S
Thank you for choosing this product.
We are proud to offer the ideal product for you and the best complete range of home appliances for your daily routine.

Please read and follow these instructions carefully and operate the machine accordingly. This booklet provides important guidelines for safe use, installation, maintenance and some useful advice for best results when using your machine. Keep all documentation in a safe place for future reference or for any future owners.
Please check that the following items are delivered with the appliance:
- Instruction manual
- Guarantee card
- Energy label
Check that no damage has occurred to the machine during transit. If it as, call for service by Customer Service Centre. Failure to comply with the above can compromise the safety of the appliance. You may be charged for a service call if a problem with your machine is caused by misuse or by incorrect installation.
To contact the Service, ensure that you have the unique 16-character code available, also called the "serial number". This code is a unique code for your product, printed on the sticker that can be found inside the door opening.
Environmental conditions
This appliance is marked according to the European directive 2012/19/EU on Waste Electrical and Electronic Equipment (WEEE).
WEEE contains both polluting substances (which can cause negative consequences for the environment) and basic components (which can be re-used). It is important to have WEEE subjected to specific treatments, in order to remove and dispose properly all pollutants, and recover and recycle all materials. Individuals can play an important role in ensuring that WEEE does not become an environmental issue; it is essential to follow some basic rules:
WEEE should not be treated as household waste;
- WEEE should be handed over to the relevant collection points managed by the municipality or by registered companies. In many countries, for large WEEE, home collection could be present.
In many countries, when you buy a new appliance, the old one may be returned to the retailer who has to collect it free of charge on a one-to-one basis, as long as the equipment is of equivalent type and has the same functions as the supplied equipment.
Contents
- GENERAL SAFETY RULES
- MOUNTING THE FURNITURE DOOR
- WATER CONTAINER
- DOOR AND FILTERS
- PRACTICAL HINTS
- REMOTE CONTROL (WI-FI)
- QUICK USER GUIDE
- CONTROLS AND PROGRAMMES
- TROUBLESHOOTING AND WARRANTY
1. GENERAL SAFETY RULES
- This appliance is intended to be used in household and similar applications such as:
- Staff kitchen areas in shops, offices and other working environments;
- Farm houses;
- By clients in hotels, motels and other residential type environments;
- Bed and breakfast type environments. A different use of this appliance from household environment or from typical housekeeping functions, as commercial use by expert or trained users, is excluded even in the above applications. If the appliance is used in a manner inconsistent with this it may reduce the life of the appliance and may void the manufacturer's warranty. Any damage to the appliance or other damage or loss arising through use that is not consistent with domestic or household use (even if located in a domestic or household environment) shall not be accepted by the manufacturer to the fullest extent permitted by law.
- This appliance can be used by children aged from 8 years and above and persons with reduced physical, sensory or mental capabilities or lack of experience and knowledge if they have been given supervision or instruction concerning use of the appliance
in a safe way and understand the hazards involved.
Children shall not play with the appliance. Cleaning and user maintenance shall not be made by children without supervision.
- Children should be supervised to ensure that they do not play with the appliance.
Children of less than 3 years should be kept away unless continuously supervised.

WARNING
Misuse of a tumble dryer may create a fire hazard.
This machine is solely for domestic use, i.e. to dry household textiles and garments.
- Ensure that the instructions for installation and use are fully understood before operating the appliance.
- Do not touch the appliance when hands or feet are damp or wet.
- Do not lean on the door when loading the machine or use the door to lift or move the machine.
- Do not continue to use this machine if it appears to be faulty.
- The tumble dryer is not to be used if industrial chemicals have been used for cleaning.
items are left at a temperature that ensures that the items will not be damaged.

WARNING
Do not use the product if the fluff filter is not in position or is damaged; fluff could be ignited.
- Lint and fluff must not be allowed to collect on the floor around the outside of the machine.

WARNING
Never stop a tumble dryer before the end of the drying cycle unless all items are quickly removed and spread out so that the heat is dissipated.

WARNING
Where the hot surface symbol is located the temperature rise during operation of the tumble dryer may be in excess of 60 degrees C.
- Always remove the plug before cleaning the appliance.
- The drum inside may be very hot. Always allow the dryer to complete the cool down period before removing the laundry.
- The final part of a tumble dryer cycle occurs without heat (cool down cycle) to ensure that the

WARNING
During transport ensure that the dryer is in an upright position, if it's necessary you can only flip in the side shown.
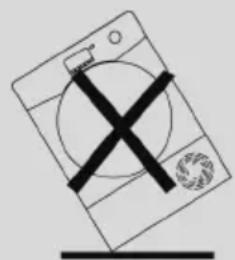
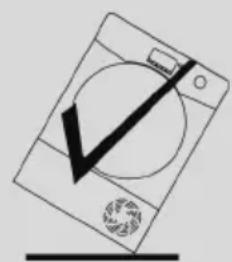
If the product is in different side, wait at least 4 hours before switching on so that the oil can flow back into the compressor. Failure to do this could result in damage to the compressor.
Installation
- Do not install the product in a low temperature room or in a room where there is a risk of frost occurring. At temperature around freezing point the product may not be able to operate properly: there is a risk of damage if the water is allowed to freeze in the hydraulic circuit (valves, hoses, pumps). For a better product performance the ambient room temperature must be between 5 - 35^ . Please note that operating in cold condition (between +2 and +5°C) might simply some water condensation and water drops on floor.
- NEVER install the dryer up near curtains.
- The appliance must not be installed behind a lockable door, a sliding door or a door with a hinge on the opposite side to that of the tumble dryer, in such way that a full opening of the tumble dryer door is restricted.
- For your safety, the appliance must be correctly installed. If there is any doubt about installation, call Service for advice.
- Once the machine is in place the feet should be adjusted to ensure that the machine is level.
Electrical connections and safety instructions
- The technical details (supply voltage and power input) are indicated on the product rating plate.
- Make sure that the electrical system is earthed, complies with all applicable law and that the (electricity) socket is compatible with the plug of the appliance. Otherwise, seek qualified professional assistance.
WARNING
The appliance must not be supplied through an external switching device, such as a timer, or connected to a circuit that is regularly switched on and off by a utility.
- Do not use adapters, multiple connectors and/or extensions.
- The plug should be accessible for disconnection after the appliance has been installed.
- Do not plug the machine in and switch it on at the mains until the installation is completed.
- If the supply cord is damaged, it must be replaced by the manufacturer, its service agent or similarly qualified persons in order to avoid a hazard.
Ventilation
- Adequate ventilation must be provided in the room where the tumble dryer is located to prevent gases from appliances burning other fuels, including open fires, being drawn into the room during operation of the tumble dryer.
Install the rear of the appliance close to a wall or vertical surface.
-
There should be a gap of at least 12 mm between the machine and any obstructions. The inlet and outlet air should be kept clear of obstruction.
-
Make sure carpets or rugs do not obstruct the base or any of the ventilation openings.
-
Prevent items from falling or collecting behind the dryer as these may obstruct the air inlet and outlet.
-
Exhaust air must not be discharged into a flue which is used for exhausting fumes from appliances burning gas or other fuels.
-
Check regularly that the air flowing around the dryer is not restricted, avoiding accumulation of dust and lint.
-
Check frequently the fluff filter after use, and clean, if necessary.

- Air outlet (depending on the model).
The Laundry
Always refer to the laundry care labels for directions on suitability for drying.
-
Fabric softeners, or similar products, should be used as specified by the fabric softener instructions.
-
Do not dry unwashed items in the tumble dryer.
-
Clothes should be spin dried or thoroughly wrung before they are put into the tumble dryer.
-
Clothes that are dripping wet should not be put into the dryer.
WARNING
Foam rubber materials can, under certain circumstances, when heated become ignited by spontaneous combustion. Items such as foam rubber (latex foam), shower caps, waterproof textiles, rubber backed articles and clothes or pillows fitted with foam rubber pads MUST NOT be dried in the tumble dryer.
WARNING
Do not tumble dry fabrics treated with dry cleaning fluids.
-
Glass fibre curtains should NEVER be put in this machine. Skin irritation may occur if other garments are contaminated with the glass fibres.
-
Items that have been soiled with substances such as cooking oil, acetone, alcohol, petrol, kerosene, spot removers, turpentine, waxes and wax removers should be washed in hot water with an extra amount of detergent before being dried in the tumble dryer.
-
Remove all objects from pockets such as lighters and matches.
- Lighters and matches must not be left in pockets and NEVER use flammable liquids near the machine.
Maximum load drying weight: see energy label. - To consult the product technical specification please refer to the manufacturer website.

WARNING
Fire hazard / Flammable materials.
- The appliance contains R290, an eco-sustainable refrigerating gas that is flammable. Keep open flames and sources of ignition away from the appliance.
- Check there is no visible damage on the appliance. Do not use the appliance if it is damaged.
- Should there be any kind of problem, please contact your specialised retailer or one of our customer support centres.
WARNING
Ensure that the openings on the appliance and the openings of the compartment the appliance is fitted in (for built-in models) are clear of obstructions.
WARNING
Do not damage the refrigerating circuit.
- Any repairs or interventions on the appliance must be carried out only by an authorised assistance service.
- Disposing of the device incorrectly could cause fires or poisoning.
- Dispose of the device correctly and do not damage the pipes used for the circulation of the refrigerating fluid.
2. MOUNTING THE FURNITURE DOOR
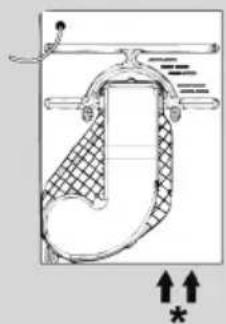
Regulate the height of the dryer The 4 adjustable feet allow the height of the dryer to be adjusted from 827~mm to a maximum of 847~mm . To adjust the height, you should rotate the adjustable feet, ensuring that the machine is level (figure 1).
Note: we suggest to put the dryer at the maximum height possible in order to avoid tilting, leaving at least 5 mm from the top of the furniture.
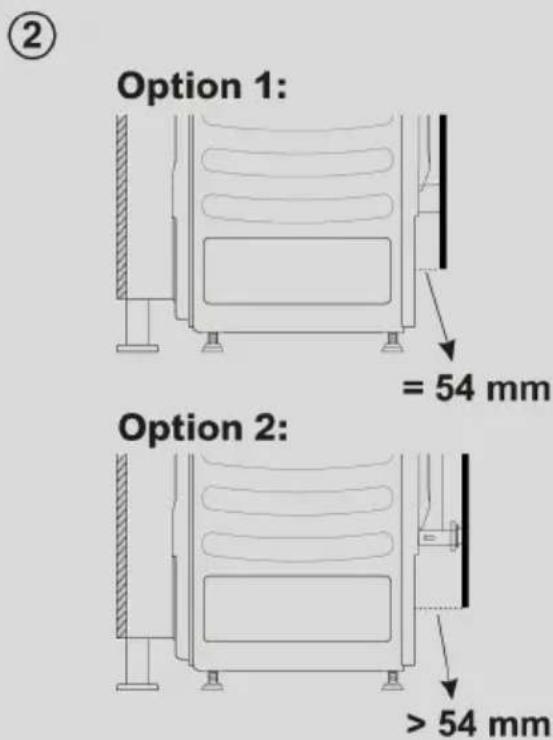
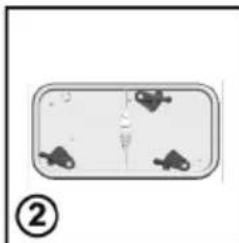
- Before fixing the hinges it's necessary to determine the depth of the dryer from the front part of the kitchen according to the depth of the kick plate (check picture) and chose the right installation option (figure 2).
Option 1 The position of the plinth of the dryer is set back less than 54mm from the front of the furniture.
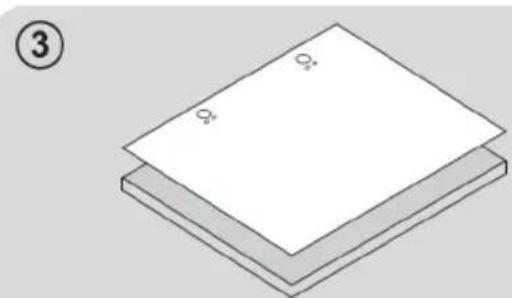
- Position the template onto the reverse of the furniture door. It is possible to mount the hinges and closure magnet on the right or left-hand side depending on your requirements. Mark the screw hole positions, then drill out these positions (figure 3).


Note: that distance does not consider the thickness of the kickplate of the kitchen.
We suggest mounting the furniture door so that it opens towards the left, same direction as the porthole door.
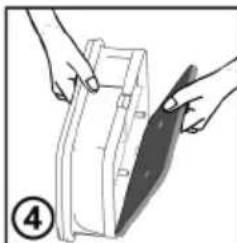
Fix the hinges in place (on the door) with the 4 screws provided (A) (figure 4).
Fix the magnet (B) in place using screw (C) (figure 4).
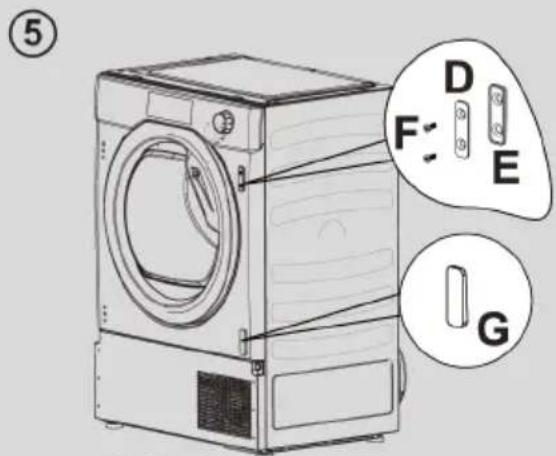
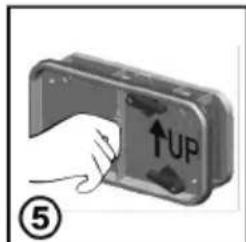
- Mount the plate (D) on the right or left-hand side, depending on your installation requirements (figure 5).
- Place the plastic support (E) under the plate and fix it in position with screw (F) (figure 5).
- Snap mount cap (G) in the lower position (figure 5).
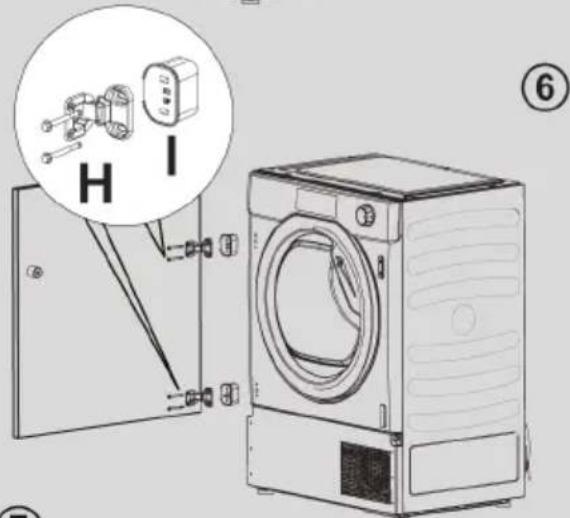
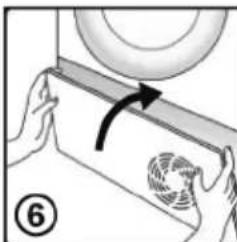
- Mount the furniture door to the front of the dryer using the hinges. Place the spacers under the hinges (I) (figure 6) and then fix in position with screw (H).
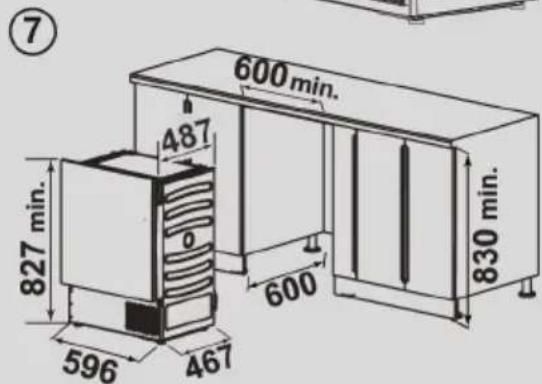
- Slide the dryer into an opening of the size indicated in the diagram (figure 7).

Option 2
The position of the plinth is set back more than 55 mm from the front of the furniture.
Note: components not supplied -hinges
supports
-door stop
- Firstly, slide the dryer into an opening of the size indicated in the diagram (figure 7).
Note: As soon as the hinges are fixed on the furniture it is not possible to slide the dryer in and out.
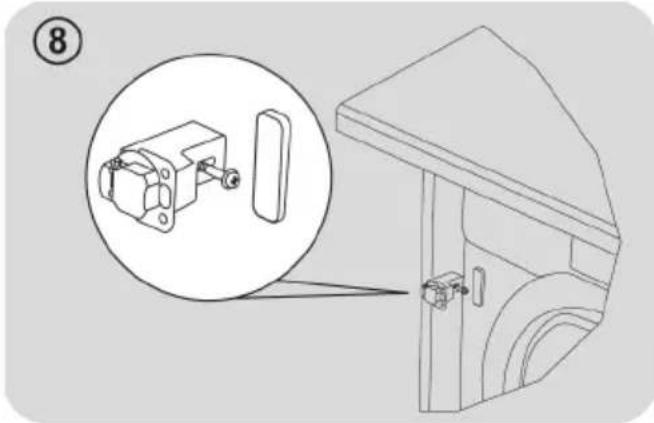
Fix the door to the furniture with standard hinges and supports (not supplied) and stop the door with a std hook (not supplied) (figure 8).

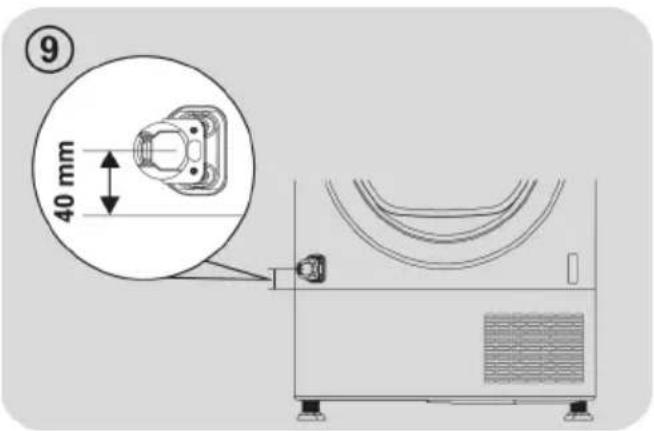
Pay attention to position
the bottom hinge 40 ~mm above the kick plate in order to facilitate its removal (figure 9).
-
Now it's possible to fix the hinges to the door of the furniture.
-
Use the N^ 4 mount caps (G) to cover all the holes on the front panel of the dryer.
GENERAL
- If the distance between the top of the dryer and the top of the furniture is more than 10 ~mm , fix the N^ 2 ~L metal brackets (K) to the furniture sides, to avoid possible tilting (figure 10).
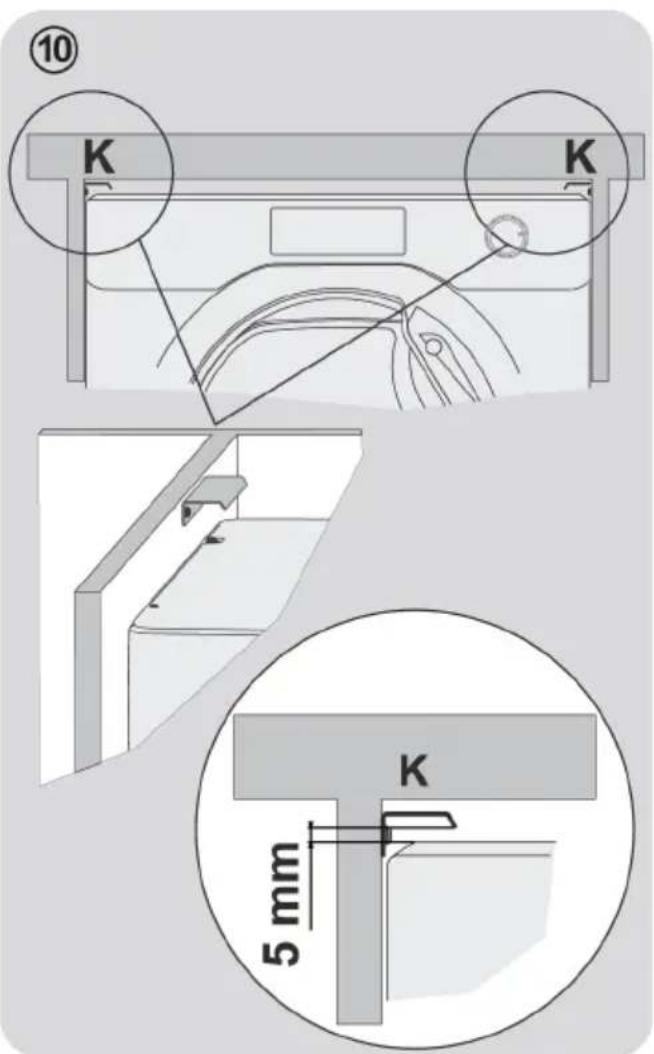
- A furniture plinth may be run across the front of the dryer, but its height will be dictated by the front kickplate.
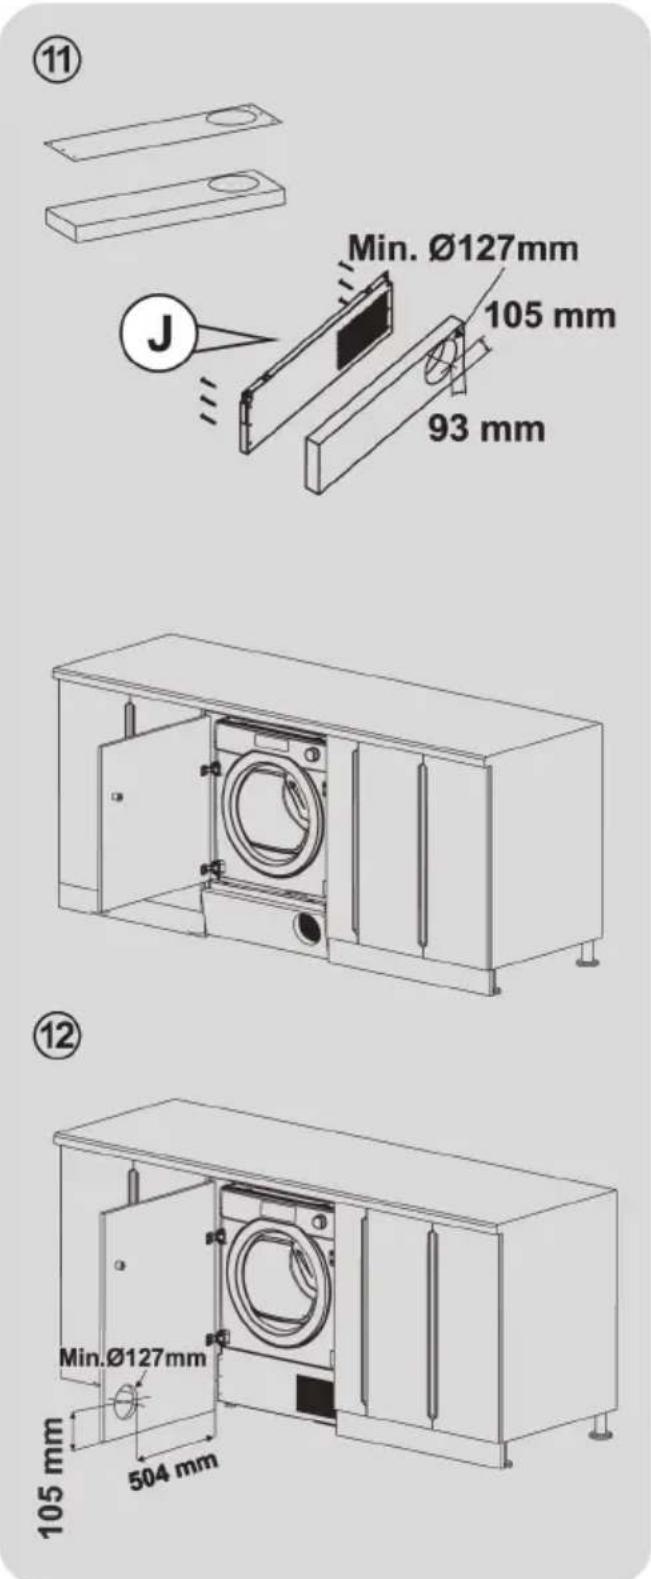
Plinth must have ventilation slots (min. Side/diameter 127 mm hole) according to the dimensions on fixing template. If the plinth is not high enough to accommodate the whole hole, cut only part of it.
- Place the template onto the reverse of plinth. Mark the screw hole positions, then drill out these positions (figure 11).
Fix the plinth to the kickplate using 6 screws provided (J). Note: it's possible only some types of kickplate (eg. wood or plastic). We suggest to check with the kitchen supplier.
Fix the kickplate to the dryer. - In case of using full door, door must have min. 0.127 ~mm hole across the slots of kickplate (figure 12).
WITHOUT the airflow ventilation hole in the furniture door/plinth we cannot guarantee the correct functionality of the appliance.
3. WATER CONTAINER
The water removed from the laundry during the drying cycle is collected in a container. When the container is full, an indicator light, or on some models a message on the display, will advise you that it MUST be emptied (however, we recommend to empty it after each drying cycle).
Very little water will collect during the first few cycles of a new machine as an internal reservoir is filled first.
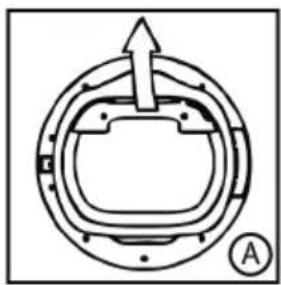
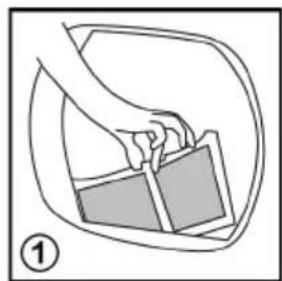
To remove the container tank in door drawer
-
Gently pull out the water container holding the handle (A). When it is full the water container will weigh about 6kg
-
Tilt the water container to empty the water out through the spout (B).
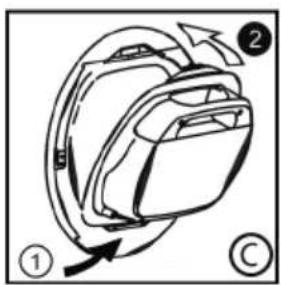
When empty, replace the water container back as shown; (C) first insert the base of the container into position as shown (1) then gentle push the top into position (2).
- Press the programme start button to restart the cycle.


4. DOOR AND FILTERS
Door
- Pull on handle to open the door.
- To restart the appliance, close the door and press the programme start button.

WARNING
When the tumble dryer is in use the drum and door may be VERY HOT.

WARNING
If you open the door mid cycle, before the cool-down cycle has completed, the handle may be hot. Please use extreme caution when attempting to empty the water reservoir during the cycle.
Filters
Clogged filters could increase the drying time and cause damages and expensive cleaning operation.
To maintain the efficiency of the dryer check that all filters are clean before each drying cycle.

WARNING
Do not use the tumble dryer without the filters.
Filter cleaning indicator light
It lights up when the cleaning of the filters is requested (the door and the lower filter).
Check and eventually clean the main filter and the lower one on the bottom of the appliance.
If the laundry is not drying check that the filters are not clogged.
If you clean filters under water, remember to dry them.

WARNING
Clean the filters before every cycle.
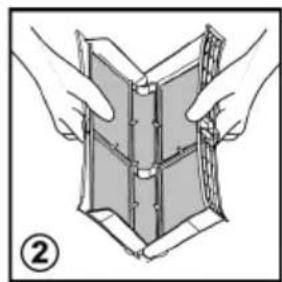
To clean the lint filter
- Pull the filter upwards.
- Open filter as shown.
- Gently remove lint using a soft brush or your fingertips.
- Snap the filter together and push back into place.
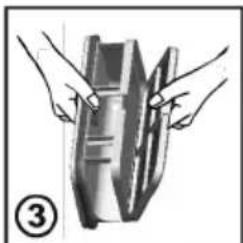
To clean the condenser filter
- Remove the kickplate.
- Turn the locking levers anti-clockwise and pull out the front cover.
- Gently remove the filter frame and clean any dust or fluff with a cloth from the filter. Do not use water to clean the filter.
- Remove the sponge gently from its place and then wash the sponge by holding it under a running tap turning it so to remove any dust or fluff.
- Refit the front cover ensuring it is in the correct way (as indicated by the arrow) and pushed firmly into place. Lock the levers by turning them clockwise.
- Refit the kickplate.

5. PRACTICAL HINTS
Before using the tumble dryer for the first time:
- Please read this instruction book thoroughly.
- Remove all items packed inside drum.
- Wipe the inside of the drum and door with a damp cloth to remove any dust which may have settled in transit.
Clothes preparation
Make sure that the laundry you are going to dry is suitable for drying in a tumble dryer, as shown by the care symbols on each item. Check that all fastenings are closed and that pockets are empty. Turn the articles inside out. Place clothes loosely in the drum to make sure that they don't get tangled.
Do not tumble dry
Silk, nylon stockings, delicate embroidery, fabrics with metallic decorations, garments with PVC or leather trimmings.

WARNING
Do not dry articles which have been treated with a dry cleaning fluid or rubber clothes (danger of fire or explosion).
During the last 15 minutes the load is always tumbled in cool air.
Energy saving
Only put into the tumble dryer laundry which has been thoroughly wrung or spin-dried. The drier the laundry the shorter the drying time thus saving electricity.
ALWAYS
- Check that the filter is clean before every drying cycle.
NEVER
- Put dripping wet items into the tumble dryer, this may damage the appliance.
Sort the load as follows
- By care symbols
These can be found on the collar or inside seam:

Suitable for tumble drying.

Tumble drying at high temperature.

Tumble drying at low temperature only.

Do not tumble dry.
If the item does not have a care label it must be assumed that it is not suitable for tumble drying.
- By amount and thickness
Whenever the load is bigger than the dryer capacity, separate clothes according to thickness (e.g. towels from thin underwear).
- By type of fabric
Cottons/linen: Towels, cotton jersey, bed and table linen.
Synthetics: Blouses, shirts, overalls, etc. made of polyester or polyamid, as well as for cotton/synthetic mixes.

WARNING
Do not overload the drum, large items when wet exceed the maximum admissible clothes load (for example: sleeping bags, duvets).
Cleaning the dryer
- Clean the filter and empty the water container after every drying cycle.
Regularly clean the condenser. - After each period of use, wipe the inside of the drum and leave the door open for a while to allow circulation of air to dry it.
- Wipe the outside of the machine and the door with a soft cloth.
DO NOT use abrasive pads or cleaning agents. - To prevent the door sticking or the buildup of fluff clean the inner door and gasket with a damp cloth after every drying cycle.
WARNING
The drum, door and load may be very hot.
WARNING
Always switch off and remove the plug from the electricity supply before cleaning this appliance.

WARNING
For electrical data refer to the rating label on the front of the dryer cabinet (with the door open).
6. REMOTE CONTROL (WI-Fl)
This appliance is equipped with Wi-Fi technology that allows you to control it remotely via App.
APPLIANCE PAIRING (ON APP)
- Download the hOn App on your device by framing the following QR code:

or by the link:
go.haier-europe.com/download-app
The App is available for devices running both Android and iOS, both for tablets and for smartphones.
Get all the details of the Wi-Fi functions by browsing the App in DEMO mode.
The frequency of the home Wi-Fi network has to be set on the 2.4 GHz band. You can not configure the machine if your home network is set to the 5 GHz band.
- Open the App, create the user profile (or log-in if it is already created previously) and pairing the appliance following the instructions on the device display.
TO ENABLE REMOTE CONTROL
- Check that the router is switched on and connected to the Internet.
- Load the laundry and close the door.
- Turn the programme selector to the
REMOTE CONTROL (Wi-Fi) position : the controls on the control panel will be disabled.
- Start the cycle using the app. When the cycle has been completed, turn off the machine by turning the programme selector to the OFF position.
TO DISABLE REMOTE CONTROL
- To exit REMOTE CONTROL mode while a cycle is underway, turn the programme selector to any position other than REMOTE CONTROL (Wi-Fi), without going through the OFF. The control panel on the appliance will be operative once again.
- With the door closed, turn the programme selector to the REMOTE CONTROL (Wi-Fi) position to control the appliance using the app once again. If there is a cycle underway, it will continue.
With the door opened, the REMOTE CONTROL will be disabled. To enable it again, close the door, turn the programme selector to any position other than REMOTE CONTROL and then select it again.
7. QUICK USER GUIDE
- Open the door and load the drum with laundry. Ensure that garments do not hinder closure of the door.
- Gently close the door pushing it slowly until you hear the door 'click' shut.
- Turn the programme selector dial to select the required drying programme (see the table of programmes).
- Press the programme start button. The dryer will start automatically.
- If the door is opened during the programme to check the laundry, it is necessary to press programme start to recommence drying after the door has been closed.
- When the cycle is nearing completion the machine will enter the cool down phase, the clothes will be tumbled in cool air allowing the load to cool down.
- Following the completion of the cycle the drum will rotate intermittently to minimize creasing. This will continue until the machine is switched OFF or the door is opened.
Do not open the door during the automatic programmes in order to obtain a proper drying.
Technical data
Power input / Power current fuse amp/
Supply voltage: see rating plate.
Maximum load: see energy label.
Energy class: see energy label.
8. CONTROLS AND PROGRAMMES
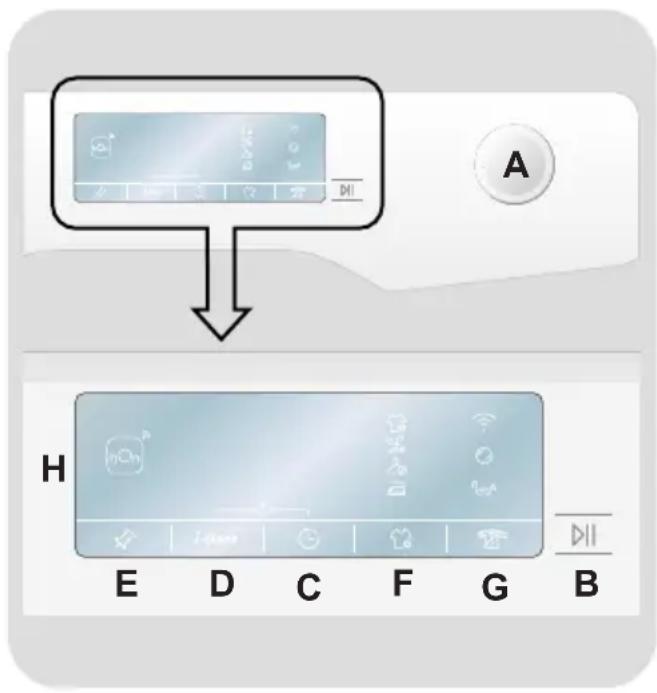

A PROGRAMME SELECTOR with OFF position
B START/PAUSE button
C DELAY START button
D I-TIME SELECTION/RAPID button
E MEMO button
F DRYING SELECTION button
G ANTI CREASE button
H DISPLAY
C+D CHILD LOCK

WARNING
Don't touch the buttons while inserting the plug because the machines calibrates the systems during the first seconds: touching the buttons, the machine couldn't work property. In this case, remove the plug and repeat the operation.
- To start the selected cycle with the preset parameters, press START/PAUSE. When the programme is running, the display will show the time to elapse.
- Moreover, if you want to modify the chosen programme, press the desired options buttons, modify the default parameters and then press START/ PAUSE button to start the cycle.
PROGRAMME SELECTOR with OFF position
- Rotating the programme selector in both directions it's possible to select the desired drying programme.
- To cancel the selections or switch off the appliance rotate the programme selector on OFF (remember to unplug the appliance).
First starting
- Language setting
- After connecting the machine to the network and turning it on, press the button "F" or "G" to see on the display the available languages. ENGLISH is always the first language shown.
- Select the desired language pressing the START/PAUSE button.
- Change the language
If you want to change the setting language you will have to press simultaneously "F" and "G" buttons for about 5 seconds. ENGLISH will appear on the display, and you will be able to choose a new language.
START/PAUSE button
Close the porthole BEFORE pressing the START/PAUSE button.
Only the options compatible with the set programme can be selected.
- After switching on the appliance, wait a few seconds for the programme to start running.
PROGRAMME DURATION
- When a programme is selected the display automatically shows the cycle duration, which can vary, depending on the options selected.
- Once the programme has started you will be kept informed constantly of the time remaining to the end of the drying cycle.
- The appliance calculates the time to the end of the selected programme based upon a standard loading, during the cycle, the appliance corrects the time to the humidity level of the load.
PROGRAMME END
- "END" ("End" on some models) will appear in the display at the end of the programme, it is now possible to open the door.
- At the end of the cycle, turn off the appliance by turning the programme selector to the OFF position.
The programme selector must ALWAYS be put in the OFF position at the end of the drying cycle before a new one can be selected.
PAUSING THE MACHINE
- Keep the START/PAUSE button pressed for about 2 seconds (the name of the programme and the residual time display will flash, showing that the machine is paused).
- Press the START/PAUSE button again to re-start the programme from the point it had been paused at.
CANCELLING THE SET PROGRAMME
- To cancel the programme, turn the programme selector to the OFF position.
If there is a break in the power supply whilst the machine is operating, when the power is restored, by pressing the START/PAUSE button, the machine will restart from the beginning of the phase it was in when the power was lost.
DELAY START button
- This button allows to delay the start of the programme from 30 minutes (1 hour on some models) to 24 hours in 30 minutes intervals (1 hour on some models). The delay selected is shown on the display.
After pressing the START/PAUSE button the time showed decrease minute after minute.
Opening of the porthole with delayed start set, after re-closing the porthole, press start again to resume the counting.
I-TIME SELECTION/RAPID button
It's possible transform a cycle from automatic to programmed, up to 3 minutes after the start of the cycle.
- The progressive pressure increases the time in 10 minute intervals. After this selection to reset the automatic drying functioning is necessary to switch off the dryer.
- In case of incompatibility, all indicator lights flash quickly for 3 times.
- If the programme selector is positioned on the rapid programmes, the progressive pressure of the key allows you to choose the cycle time between: 30-45-59 minutes.
MEMO button
This button allows you to store the options set on a cycle.
MEMORY:
select the programme and the desired options, then press the button MEMO for 3 seconds (before starting the cycle). The writing MEMO (all the digit on some models) will blink for 2 seconds and the options connected to the cycle selected will be set.
RECALL:
after the selection of the cycle press the button MEMO for recall the stored options (not the cycle).
The delay start function can't be memorized.
DRYING SELECTION button
- This button allows to set the desired dryness level editable option up to 3 minutes after the starting of the cycle:

Ready to Iron: it leaves the garments slightly wet to facilitate ironing.

Dry Hanger: to get garment ready to be hang.

Dry wardrobe: for laundry that can be directly stored.

Extra-dry: to get completely dry garments, ideal for full load.
- This appliances is equipped with Drying Manager function. On automatic cycles, each level of intermediate drying, prior to the reaching the selected one, is indicated by flashing the light indicator corresponding to the degree of drying reached.
In case of incompatibility, all indicator lights flash quickly for 3 times.
ANTI CREASE button
- During the cycle the option sets alternate movements of the drum to reduce the folds and automatically sets the drying level to "Ready to Iron". Moreover this option activate an anti-creases movement of the drum pre cycle in case of activation of the delay and at the end of drying cycle. It is activated every 10 minutes, up to 6 hours after the end of the drying cycle.
- To stop the movements set the programme selector to OFF. Useful when it's not possible to remove immediately the laundry.
CHILD LOCK
-
Pressing simultaneously the buttons "C" and "D" for about 2 seconds, the machine allows you to lock the keys. In this way, you can avoid making accidental or unwanted changes if a button on the display is pressed accidentally during a cycle.
The key lock can be simply cancelled by pressing the two buttons simultaneously again.
In case of opening of porthole with activated CHILD LOCK, the cycle stops but the lock is kept: to restart the cycle, you must remove the lock and press START/PAUSE again. -
CHILD LOCK can be modified at any time of the cycle.
Display
The display shows the remaining time for drying, the postponed time in case of delayed start selection and other notifications setting.
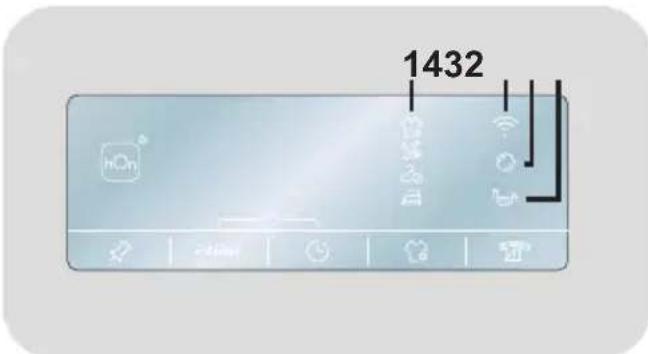
1) DRYING SELECTION INDICATOR LIGHTS
The indicator lights display the degrees of dryness that can be selected by the relevant button.
2) WATER CONTAINER INDICATOR LIGHT
It lights up when it's necessary to empty the condensate water tank.
3) FILTER CLEANING INDICATOR LIGHT
It lights up when the cleaning of the filters is requested (the door and the lower filter).
4) Wi-Fi INDICATOR LIGHT
- On models equipped with Wi-Fi, it indicates the status of the connection. It could be:
- FIXED ON: remote control enabled.
- SLOW FLASHING: remote control disabled.
-
QUICK FLASHING FOR 3 SECONDS, THEN OFF: the machine cannot connect to the home Wi-Fi network or has not yet been associated with the App.
-
SLOW BLINKING FOR 3 TIMES, THEN OFF FOR 2 SECONDS: reset of the Wi-Fi network (during the association with the App).
- ON FOR 1 SECOND, THEN OFF FOR 3 SECONDS: the door is open. Remote control cannot be activated.
Drying Guide
The standard cycle ECO COTTON DRY is the most energy efficient and best suited for drying normal wet cotton laundry.
| Maximum Drying Weight | |
| Cottons | Max. capacity declared |
| Synthetics or Delicates | Max. 3 kg |
Information for Test Laboratory
EN 61121 - Programme To Use
- STANDARD DRY ECO COTTON
- IRON DRY COTTON (WHITES - Ready to Iron)
EASY-CARE TEXTILE (SYNTHETICS - Dry Hanger)

WARNING
Clean the filters before every cycle.

WARNING
The real duration of drying cycle depends by the starting humidity level of the laundry due to spin speed, type and amount of load, cleanliness of filters and ambient temperature.
Table of programmes
| PROGRAMMES | Selectable Options | CAPACITY (kg) | DRYING TIME (min) | ||||||
| ○ | i-time | ||||||||
| ECO COTTON | √ | - | √ | - | - | Full * | |||
| WHITES | √ | √ | √ | √ | √ | Full * | |||
| JEANS | √ | - | √ | - | - | 3 * | |||
| DARKS & COLOURED | √ | - | √ | √ | √ | 3 * | |||
| SHIRTS | √ | - | √ | √ | √ | 2 * | |||
| SYNTHETICS | √ | √ | √ | √ | √ | 3 * | |||
| WOOL | √ | - | √ | - | - | 1 | 70' | ||
| SPORT PLUS | √ | - - | √ | √ | 3 * | ||||
| RAPID 30'-45'-59' | √ | √ | √ | - | - | 2 * | |||
| BABY | √ | √ | √ | √ | √ | 3 | 150' | ||
| XXL | XXL | √ | √ | √ | √ | √ | 4,5 | Max 220' | |
| REFRESH | √ | - - | -√ | 2 | 20' | ||||
| ANTIALLERGY | √ | √ | √ | - | - | 3 | Max 220' | ||
| EXTRA HYGIENE | √ | - | √ | √ | √ | 3 * | |||
| REMOTE CONTROL (Wi-Fi) Position that you have to select when you want to enable remote control through the App (via Wi-Fi). | |||||||||
- The real duration of drying cycle depends by the starting humidity level of the laundry due to spin speed, type and amount of load, cleanliness of filters and ambient temperature.
Please pay attention that overloading or bulky load can lead to door opening, in this case please reduce the load capacity to continue the drying cycle.
Description of programmes
To dry different types of fabrics and colors, the tumble dryer has specific programs to meet every need of drying (see table of programmes).
REMOTE CONTROL (WI-FI)
Position that you have to select when you want to enable/disable remote control through the App, via Wi-Fi. In this case, the start of cycle will take place through the App commands. More details in the REMOTE CONTROL (Wi-Fi) section.
ECOCOTTON
The cotton program (hang dry) is the most efficient program in energy consumption. Suitable for cottons and linens.
WHITES
The right cycle to dry cottons, sponges and towels.
JEANS
Dedicated to dry uniformly fabrics like jeans or denim. It's recommended flip over the garments before drying.
DARKS & COLOURED
A delicate and specific cycle to dry dark and coloured cotton or synthetics garments.
SHIRTS
This specifics cycle has been conceived to dry shirts minimizing tangles and folds thanks specific movements of the drum. It's recommended to take out the linens immediately after drying cycle.
SYNTHETICS
To dry synthetic fabrics that need an accurate and specific treatment.
WOOL
Woolen clothes: the program can be used to dry up to 1 kg of laundry (around 3 jumpers). It is recommended to reverse all clothes before drying. Timing can change due to dimensions and thickness of load and to spinning chosen during washing. At the end of the cycle, clothes are ready to be
worn, but if they are heavier, edges can be a bit wet: it is suggested to dry them naturally. It is recommended to unload clothes at the very end of the cycle. Attention: felting process of wool is irreversible; please dry exclusively with symbol "ok tumble" on the garment label. This programme is not indicated for acrylic clothes.
SPORT PLUS
Dedicated to technical garments for sport and fitness, drying gently with special care to avoid shrinking and deterioration of elastic fibers.
RAPID 30'-45'-59'
Quick Cycles allow you to have items ready in a short time, you can choose to dry them in 30,45,59 minutes.
BABY
This cycle is perfect for baby clothes, when an high hygiene level is expected.
XXL
Specific cycle dedicated to dry large linens e.g. curtains sheets and tableclothes. Thanks to a specifics movement of the drum the linens will be dry minimizing tangles and folds.
REFRESH
The perfect cycle to remove the smells from the linens smoothing creases.
ANTIALLERGY
One specifics cycle that dry and in the same time helps to reduce the main allergens as dust mites, pet hair, pollens and residual of powder detergents.
EXTRA HYGIENE
Special program for extra hygiene needs that assure low levels of bacteria.
9. TROUBLESHOOTING AND WARRANTY
What might be the cause of…
Defects you can remedy yourself
Before calling Service for technical advice please run through the following checklist. A charge will be made if the machine is found to be working or has been installed incorrectly or used incorrectly. If the problem persists after completing the recommended checks, please call Service, they may be able to assist you over the telephone.
Time display to end could change during drying cycle. The time to end is continuously checked during the drying cycle and the time is adjusted to give the best estimation time. The displayed time may increase or decrease during the cycle and this is normal.
Drying time is too long/clothes are not dry enough...
- Have you selected the correct drying time/programme?
- Were the clothes too wet? Were the clothes thoroughly wrung or spindried?
- Does the filter need cleaning?
Is the dryer overloaded?
The dryer does not operate...
- Is there a working electricity supply to the dryer? Check using another appliance such as a table lamp.
Is the plug properly connected to the mains supply?
Is there a power failure? -
Has the fuse blown?
Is the door fully closed?
Is the dryer switched on, both at the mains supply and at the machine? -
Has the drying time or the programme been selected?
- Has the machine been switched on again after opening the door?
- Has the machine stopped working because the water container is full and must be emptied?
The dryer is noisy...
- Switch off the dryer and contact Service for advice.
The filter cleaning indicator light is on...
- Does the filter need cleaning?
The water container indicator light is on...
- Does the water container need emptying?
Customer Service
Should there still be a problem with your dryer after completing all the recommended checks, please call Service for advice. They may be able to assist you over the telephone or arrange for a suitable appointment for an engineer to call under the terms of your guarantee. However, a charge may be made if any of the following applies to your machine:
Is found to be in working order.
- Has not been installed in accordance with the installation instructions.
- Has been used incorrectly.
Spares
Always use genuine spares, available direct from Service.
Service
To ensure the continued safe and efficient operation of this appliance we recommend that any servicing or repairs are only carried out by an Authorised Service engineer.
Warranty
The product is guaranteed under the terms and conditions stated on the certificate included with the product. The certificate has to be stored so as to be shown to the Authorized Customer Service Centre in case of need. You can also check the warranty conditions on our web site. To obtain assistance, please fill in the form on-line or contact us at the number indicated on the support page of our web site.
By placing the CF mark on this product, we are confirming compliance to all relevant European safety, health and environmental requirements which are applicable in legislation for this product.
To ensure safety when disposing of an old tumble dryer disconnect the mains plug from the socket, cut the mains power cable and destroy this together with the plug. To prevent children shutting themselves in the machine break the door hinges or the door lock.
The manufacturer declines all responsibility for any printing errors in the booklet included with this product. Moreover, it also reserves the right to make any changes deemed useful to its products without changing their essential characteristics.

Haier