
ZENIT B200 - Lamp Cameo - Free user manual and instructions
Find the device manual for free ZENIT B200 Cameo in PDF.
| Product type | Battery-powered outdoor LED wash projector |
| Brand | Cameo |
| Model | ZENIT B200 (CLZB200) |
| Power supply | 100-240 V AC, 50-60 Hz, power consumption 180 W |
| Battery | Rechargeable lithium-ion, 44.4 V, 6.71 Ah, 298 Wh |
| Battery runtime | Approximately 3 h at full power, up to 24 h with reduced brightness (Runtime function) |
| Charging time | Approximately 4 h for a full charge (0 % to 100 %) |
| LED | 21 x 15 W CREE RGBW high power |
| Beam angle | 21° (field 40°) |
| Luminous flux | 6600 lm (calibrated mode), luminous intensity 22100 lx at 1 m (without diffuser) |
| DMX connectivity | IP65 XLR 5-pin input and output |
| DMX protocols | DMX512, W-DMX™ (built-in), RDM compatible |
| DMX modes | CCT 2-channel, color macros 3-channel, RGB 8/16-bit, RGBW 8/16-bit, full access 8/16-bit, master/slave |
| Standalone functions | Automatic programs, color macros, static mode, variable color temperature, user presets, timed |
| Controls | OLED display, touch buttons (MODE, ENTER, UP, DOWN), IR remote control included |
| Strobe function | Yes, with adjustable speed |
| Dimmer | 16-bit, 4 selectable dimmer curves (linear, exponential, logarithmic, S-curve) |
| LED PWM frequency | Adjustable: 800 Hz, 1200 Hz, 2000 Hz, 3600 Hz, 12 kHz, 25 kHz |
| Protection rating | IP65 (water-resistant) |
| Ambient temperature | Mains operation: 0 °C to +40 °C; battery operation: -15 °C to +40 °C |
| Mounting | Built-in plastic feet, mounting omega included, truss mount possible |
| Dimensions (W x H x D, without bracket) | 377 x 256 x 140 mm |
| Weight | 9.2 kg |
| Included accessories | 1 m power cable with IP65 connector, IR remote control, feet, 1 mounting omega |
| Warranty | Check conditions on manufacturer's website |
Frequently Asked Questions - ZENIT B200 Cameo
User questions about ZENIT B200 Cameo
0 question about this device. Answer the ones you know or ask your own.
Ask a new question about this device
Download the instructions for your Lamp in PDF format for free! Find your manual ZENIT B200 - Cameo and take your electronic device back in hand. On this page are published all the documents necessary for the use of your device. ZENIT B200 by Cameo.
USER MANUAL ZENIT B200 Cameo
Featuring
WIRELESS SOLUTION
MADE IN SWEDEN

CREE LEDs

natural_image
Black and white photo of a Cameroon 3000 light bulb with 16 gold-yellow spherical lights (no text or symbols visible)ZENIT® B200
LED BATTERY OUTDOOR WASHLIGHT
CLZB200
CONTENTS / INHALTSVERZEICHNIS / CONTENU / CONTENIDO / TREŚĆ / CONTENUTO
ENGLISH
PREVENTIVE MEASURES 3
INTRODUCTION
CONNECTIONS, OPERATING AND DISPLAY ELEMENTS 6
OPERATION
IR REMOTE CONTROL 15
INSTALLATION
OPTIONAL ACCESSORIES 16
DMX TECHNOLOGY 17
TECHNICAL DATA 17
MANUFACTURER'S DECLARATIONS 19
DMX CONTROL 111
DEUTSCH
SICHERHEITSHINWEISE
EINFÜHRUNG
We have designed this product to operate reliably over many years. Please read this User's Manual carefully, so that you can begin making optimum use of your Cameo Light product quickly. Learn more about Cameo Light on our website WWW.CAMEOLIGHT.COM.
PREVENTIVE MEASURES
- Please read these instructions carefully.
- Keep all information and instructions in a safe place.
- Follow the instructions.
- Observe all safety warnings. Never remove safety warnings or other information from the equipment.
- Use the equipment only in the intended manner and for the intended purpose.
- Use only sufficiently stable and compatible stands and/or mounts (for fixed installations). Make certain that wall mounts are properly installed and secured. Make certain that the equipment is installed securely and cannot fall down.
- During installation, observ e the applicable safety regulations for your country.
- Never install and operate the equipment near radiators, heat registers, ovens or other sources of heat. Make certain that the equipment is always installed so that is cooled sufficiently and cannot overheat.
-
Never place sources of ignition, e.g., burning candles, on the equipment.
-
Ventilation slits must not be blocked.
-
This appliance is designed exclusively for indoor use, do not use this equipment in the immediate vicinity of water (does not apply to special outdoor equipment - in this case, observe the special instructions noted below). Do not expose this equipment to flammable materials, fluids or gases.
-
Make certain that dripping or splashed water cannot enter the equipment. Do not place containers filled with liquids, such as vases or drinking vessels, on the equipment.
-
Make certain that objects cannot fall into the device.
-
Use this equipment only with the accessories recommended and intended by the manufacturer.
-
Do not open or modify this equipment.
-
After connecting the equipment, check all cables in order to prevent damage or accidents, e.g., due to tripping hazards.
-
During transport, make certain that the equipment cannot fall down and possibly cause property damage and personal injuries.
-
If your equipment is no longer functioning properly, if fluids or objects have gotten inside the equipment or if it has been damaged in anot her way, switch it off immediately and unplug it from the mains outlet (if it is a powered device). This equipment may only be repaired by authorized, qualified personnel.
-
Clean the equipment using a dry cloth.
-
Comply with all applicable disposal laws in your country. During disposal of packaging, please separate plastic and paper/cardboard.
-
Plastic bags must be kept out of reach of children.
FOR EQUIPMENT THAT CONNECTS TO THE POWER MAINS:
-
CAUTION: If the power cord of the device is equipped with an earthing contact, then it must be connected to an outlet with a protective ground. Never deactivate the protective ground of a power cord.
-
If the equipment has been exposed to strong fluctuations in temperature (for example, after transport), do not switch it on immediately. Moisture and condensation could damage the equipment. Do not switch on the equipment until it has reached room temperature.
-
Before connecting the equipment to the power outlet, first verify that the mains voltage and frequency match the values specified on the equipment. If the equipment has a voltage selection switch, connect the equipment to the power outlet only if the equipment values and the mains power values match. If the included power cord or power adapter does not fit in your wall outlet, contact your electrician.
-
Do not step on the power cord. Make certain that the power cable does not become kinked, especially at the mains outlet and/or power adapter and the equipment connector.
-
When connecting the equipment, make certain that the power cord or power adapter is always freely accessible. Always disconnect the equipment from the power supply if the equipment is not in use or if you want to clean the equipment. Always unplug the power cord and power adapter from the power outlet at the plug or adapter and not by pulling on the cord. Never touch the power cord and power adapter with wet hands.
-
Whenever possible, avoid switching the equipment on and off in quick succession because otherwise this can shorten the useful life of the equipment.
-
IMPORTANT INFORMATION: Replace fuses only with fuses of the same type and rating. If a fuse blows repeatedly, please contact an authorised service centre.
-
To disconnect the equipment from the power mains completely, unplug the power cord or power adapter from the power outlet.
-
If your device is equipped with a Volex power connector, the mating Volex equipment connector must be unlocked before it can be removed. However, this also means that the equipment can slide and fall down if the power cable is pulled, which can lead to personal injuries and/or other damage. For this reason, always be careful when laying cables.
-
Unplug the power cord and power adapter from the power outlet if there is a risk of a lightning strike or before extended periods of disuse.
-
The device must only be installed in a voltage-free condition (disconnect the mains plug from the mains).
-
Dust and other debris inside the unit may cause damage. The unit should be regularly serviced or cleaned (no guarantee) depending on ambient conditions (dust etc., nicotine, fog) by qualified personnel to prevent overheating and malfunction.
-
Please keep a distance of at least 0.5 m to any combustible materials.
-
Power cables to power multiple devices must have a cross-section of at least 1.5 mm ^2 . Within the EU, the cables must correspond to H05VV-F, or similar. Suitable cables are offered by Adam Hall. With these cables, you can connect multiple devices via the power OUT connection to the power IN connection of an additional device. Make sure that the total current consumption of all connected devices does not exceed the specified value on all connected devices (label on the device). Make sure to keep power cable connections as short as possible.

CAUTION:
To reduce the risk of electric shock, do not remove cover (or back). There are no user serviceable parts inside. Maintenance and repairs should be exclusively carried out by qualified service personnel.

The warning triangle with lightning symbol indicates dangerous uninsulated voltage inside the unit, which may cause an electrical shock.

The warning triangle with exclamation mark indicates important operating and maintenance instructions.

The housing surface of the spotlight can heat up to temperatures as high as 70 °C in regular use. Ensure that it is not possible to come into contact with the housing unintentionally. Always allow sufficient time for the lamp to cool down before dismantling, carrying out maintenance work or charging etc.

Warning! This device is designed for use below 2000 metres in altitude.

Warning! This product is not intended for use in tropical climates.

Caution! Intense LED light source! Risk of eye damage. Do not look into the light source.

The spotlight is fitted with a rechargeable lithium-ion battery. Keep the spotlight well away from excessive heat and direct sunlight. Do not place it on or in heating appliances such as microwaves, ovens or radiators. Non-compliance can result in damage to the spotlight. If they overheat, batteries can catch fire and explode.

Never immerse the spotlight in water or other liquids. This could result in a fire, explosion or other dangerous situation.

Do not put the spotlight into a fire, as it could explode.

Do not drop the spotlight or allow it to be exposed to severe vibration or impact. Non-compliance can result in fire and explosion.

The spotlight has an integrated, non-removable rechargeable battery; do not attempt to remove the battery – the spotlight may not be opened. To have the rechargeable battery replaced, take the device to an authorised service centre.

Fully recharge the battery immediately after discharge. Batteries which are not fully charged will lose capacity, and their lifetime will be reduced. Only store the spotlight with a fully charged battery. If the spotlight is not used for an extended period of time, fully recharge the battery every six months. Do not charge the battery at ambient temperatures of less than 0 °C or more than 40 °C .
CAUTION! IMPORTANT INFORMATION ABOUT LIGHTING PRODUCTS!
- The product has been developed for professional use in the field of event technology and is not suitable as household lighting.
- Do not stare, even temporarily, directly into the light beam.
- Do not look at the beam directly with optical instruments such as magnifiers.
- Stroboscope effects may cause epileptic seizures in sensitive people! People with epilepsy should definitely avoid places where strobes are used.
BATTERY SAFETY
- Keep the battery poles away from conductive objects such as keys, jewellery and the like. This can lead to the battery being short-circuited, which can cause injuries and burns.
- Never alter the polarity of the battery contacts.
- Keep the battery well away from excessive heat and direct sunlight. Do not place it on or in heating devices such as microwaves, ovens or radiators. Batteries can explode if they overheat.
- Do not attempt to alter or adapt the battery or put foreign objects inside it and do not immerse it or allow it to come into contact with water or other liquids. This can result in a fire, explosion or other dangerous situation.
- If battery acid leaks, take care to ensure that it does not come into contact with skin or eyes. If this does happen, rinse immediately with clear water and seek medical advice.
- In the event of the battery deforming, changing colour or overheating during charging or storage, stop using the device immediately and remove the battery. If you continue to use the device, battery acid may leak or a fire or explosion may occur.
- Never throw batteries into a fire since they can explode. Damaged batteries can also explode.
- Dispose of used batteries in compliance with local regulations. Improper use of the battery can result in a fire, explosion or other dangerous situation.
- Never allow children or pets to chew or suck on the battery. This can result in damage or an explosion.
- Do not smash or pierce the battery and do not expose it to high pressure. This can result in short-circuiting or overheating.
- Never drop the device or the battery. If the device or battery is dropped, in particular on a hard surface, they can be damaged.
- If the standby time of the device decreases significantly, replace the battery.
- If the device has an integrated, non-removable battery, do not try to remove the battery since this may damage the device. Take the device to an authorised service centre to have the battery replaced.
INTRODUCTION
LED BATTERY OUTDOOR WASHLIGHT WITH W-DMX™
CLZB200
CONTROL FUNCTIONS:
2-channel CCT, 3-channel color macros, 3-channel RGB 8-bit, 4-channel RGBW 8-bit, 6-channel RGB 16-bit, 8-channel RGBW 8 Bit, 8-channel RGBW 16-bit, 10-channel full-access 8-bit, and 15-channel full-access 16-bit DMX control
Master/Slave operation
Standalone functions
IR remote control
W-DMX ^TM
FEATURES:
DMX-512. 21 x 15 W High Power CREE RGBW LEDs. W-DMX™. Battery operation with up to 24 hours running time. IR remote control included. Strobe. 16-bit dimmer. 4 dimmer curves. Colour temperature correction. Adjustable LED PWM frequency. Fast Access Feature. IP65-rated. IP65 5-pin DMX ports. Plastic feet. Omega mounting bracket included. Operating voltage 100–240 V AC. Power consumption 180W. 25°, 45°, 60° x 10°, 100° diffusers and barn-door available as an option.
The spotlight features the RDM standard (Remote Device Management). This remote device management system makes it possible to carry out status checks and configure RDM devices with an RDM-enabled controller.
CONNECTIONS, OPERATING AND DISPLAY ELEMENTS

1 POWER IN
IP65 power input socket with rubber sealing cap. Operating voltage 100 - 240 VAC / 50 - 60Hz. Connection via supplied power cable (when not in use, always close with rubber sealing cap).
2 POWER OUT
IP65 power output socket with rubber sealing cap. Facilitates power supply to other CAMEO lights. Ensure that the total current consumption of all connected devices does not exceed the value specified on the device in amperes (A) (when not in use, always close with the rubber sealing cap).
3 ON/OFF
Ensure that the battery is charged sufficiently or connect the lights correctly to the power supply. Move the switch to the down position to make the floodlight ready for operation. During the start-up process, "Welcome to Cameo", the model name and the software version will be shown consecutively on the display. When the switch is not in the down position, the floodlight is in standby mode. In both operating states, the battery is constantly being charged, as long as the floodlight is connected to the power supply correctly.
4 DMX IN
Male IP65 5-pin XLR socket for connecting a DMX control device (e.g. DMX console. When not in use, always close with the rubber sealing cap).
5 DMX OUT
Female IP65 5-pin XLR socket for sending DMX control signal (when not in use, always close with the rubber sealing cap).
6 OLED DISPLAY
Shows current operating mode, charging status of the battery and the menu items in the edit menu.
7 TOUCH-SENSITIVE CONTROLS
MODE – Press mode to access the selection menu for system settings. Press repeatedly to go back to the main display.
ENTER – Press ENTER to access the menu levels to make value changes, and to access the sub-menus. Confirm value changes by pressing ENTER.
UP and DOWN – Select individual menu items in the selection menu (DMX address, operating mode etc.) and in the sub-menus. Allow changes to the value of a menu item, such as the DMX address as required.
PRESSURE EQUALISATION ELEMENT
The pressure compensation element to prevent condensation forming inside the housing is located in the base of the device behind the cable feed to the LED unit. In order to ensure its proper function, the element must be protected from contamination.
PLEASE NOTE: In order to provide protection from spraying water, in accordance with protection class IP65, special IP65-rated XLR connectors must be used correctly with the DMX input and output sockets, or they must be closed using the rubber sealing caps. When connected correctly, or when sealed correctly with the rubber sealing caps, the POWER IN and POWER OUT sockets are protected from spraying water according to IP65.
OPERATION
PLEASE NOTE
- When the lamp is correctly connected to the mains supply and the standby switch is in the down position, "Welcome to Cameo", the model name and the software version are shown on the display consecutively during start-up. After this process, the lamp is ready for operation and starts in the previously enabled mode.
- If one of the DMX operating modes is activated and there is no DMX signal to the DMX input, the currently programmed DMX address is displayed and the characters on the display will begin to flash. The flashing stops when a DMX signal is present.
- Following approximately one minute of no input, the display automatically returns to the main display and the currently active mode is displayed.
- Fast Access Feature: In order to simplify the menu guide, the device has an intelligent menu structure that allows direct access to previously selected menu items and sub-menu items. 1. Press MODE and ENTER simultaneously for direct access to the last-edited sub-menu item, where you can make changes instantly as required (DMX starting address and all modes). 2. Press MODE for direct access to the last-selected and last-edited menu item. Press ENTER repeatedly to access the sub-menu items in order to change individual settings (DMX starting address and all modes).
- Before changing device settings, ensure that the control panel is dry and dust free, in order not to impair its functionality.
- The display can be rotated through 180^ by pressing UP when the main display is visible.
CHARGING THE BATTERY, OPERATING AND STORING THE SPOTLIGHT
- Once the spotlight is correctly connected to the power supply, the internal battery is charged. This means that the battery is also charged, if the spotlight is in use.
- The battery charge status is shown in the display when the device is switched on or in standby mode.
- Charge time from 0% to 100% charge status is approximately 4 hours.
- Battery life in full operation (RGBW at 100%) is approximately 3 hours. Use of individual colours and colour-change programmes gives much longer battery life. Battery life can be increased to up to 24 hours by reducing brightness accordingly.
- After about 300 charging cycles (0–100%), the battery will retain approx. 70% of its nominal capacity.
- The electronic battery management system protects against overcharging and deep discharging.
- The rechargeable battery may only be replaced with original equipment by an authorised service centre.
- Charge the battery of the Zenit B200 spotlight at ambient temperatures above 0°C and below 40°C.
- If the Zenit B200 spotlight is operated on the mains, ensure that the ambient temperature is not below 0^ and not above 40^ .
- If the Zenit B200 spotlight is operated on its internal battery, ensure that the ambient temperature is not below -15^ and not above 40^ .
- Charge the battery immediately after full discharge. Batteries which are not fully charged will lose capacity and their lifetime will be reduced.
- Store the spotlight only with a fully charged battery.
- If the spotlight is not used for a long time, recharge the battery every 6 months.
- To extend the lifetime of the battery, it is recommended that the battery is recharged as soon as possible and it is charged before its energy is completely discharged.
- In cold environments, battery life may be shorter than expected.
- Store the spotlight in cool and dry conditions to ensure optimal storage conditions for the battery.
MAIN DISPLAY
After the power-up process, the lamp is ready for operation and starts in the previously activated mode. The main display appears with the following information: current mode (e.g. DMX mode), W-DMX ^TM status, battery charge status and mains operation.

BATTERY CHARGE STATUS IN STANDBY MODE
To recharge the internal battery, connect the lamp to the mains with the supplied power cable. The battery charge status is indicated by the battery symbol on the display.
natural_image
Simple line drawing of a battery with five rectangular cells arranged horizontally (no text or symbols)W-DMX™
- To pair with W-DMX ^TM compatible transmitters, enable W-DMX ^TM in the device settings (Settings -> Wireless Setting -> W-DMX On Off -> On) and reset the W-DMX ^TM module (Receive Reset -> Yes). Start the pairing process as described in the operating instructions of the W-DMX ^TM transmitter. Pairing is then completed automatically.
- Connect a group of W-DMX™ devices to create a DMX universe. Disconnect all devices that are supposed to form the group (Settings -> Wireless Setting -> Receive Reset). Now activate a CLZB200 with a DMX controller via DMX cable and in the settings, select "Transmit" (Send) (Settings -> Wireless Setting -> Operating Mode -> Transmit). In the settings of the W-DMX™ devices to be controlled via W-DMX™, select "Receive" (Settings -> Wireless Setting -> Operating Mode -> Receive), pair them and confirm by selecting "Link" (Settings -> Wireless Setting -> Link -> Link) in the settings of the CLZB200 controlled via DMX cable. Pairing is then completed automatically.
- It is also possible to create a networked group of W-DMX™ devices via W-DMX™ and to operate them in master/slave mode to use. Disconnect all devices that are supposed to form the group (Settings -> Wireless Setting -> Receive Reset). Now, in the settings (Settings -> Wireless Setting -> Operating Mode) of the master unit select "Transmit" (send) and in the settings of the selected slave units, select "Receive". In the master unit, select the entry "Link" (Settings -> Wireless Setting -> Link -> Link) and confirm by pressing ENTER. Pairing of the devices is then completed automatically. In the master unit, select one of the standalone modes (Auto, Colour Macro, Static, Tunable White, User Colour) and control the slave units with it.
W-DMXTM STATUS
| W-DMXTMdeactivated | W-DMXTMas receiver activated, not coupled | W-DMXTMas receiver activated and device coupled, Transmitter off, or out of range | W-DMXactivated and coupled device, no DMX signal | W-DMXTMas reveicer activated and coupled device, DMX signal is present | W-DMXTMand transmission mode G3Arrow up = send operationDown arrow =Receive modeArrow flashing =CouplingFlashing stops = Coupled | W-DMXTMand transmission mode G4SArrow up = send operationDown arrow =Receive modeArrow flashing =CouplingFlashing stops =coupled |
SETTING DMX START ADDRESS (DMX ADDRESS)
Press MODE to access the selection menu. Using the UP and DOWN controls, select the menu item "DMX address" (observe arrow) and confirm with ENTER. The display will show a three-digit number field and you can use the UP and DOWN controls to configure the desired DMX start address. Confirm the entry with ENTER and press MODE to return to the main display (in the example, "DMX address 001").

CONFIGURING DMX MODE (DMX Mode)
Press MODE to access the selection menu. Using the UP and DOWN controls, select the menu item "DMX Mode" (observe arrow) and confirm with ENTER. In the sub-menu, you can now select between 9 different DMX operating modes with the UP and DOWN buttons. Confirm your selection with ENTER. Tables with the channel assignments can be found in these instructions under DMX CONTROL.

SETTING STANDALONE MODE
Press MODE to access the selection menu. Use UP and DOWN to select the menu item "Stand Alone" (observe arrow) and confirm with ENTER. In the sub-menu you can now select from the standalone modes "Auto", "Colour Macro", "Static", "Tunable White" and "User Colour" as well as the timer function "Timer" using UP and DOWN. Confirm your selection with ENTER.

AUTO MODE (programme 1 - programme 6)
The 6 different auto-programmes each comprise non-editable colour-change sequences. Brightness and speed are independently adjustable. Select auto mode as per the procedure previously described in SETTING STAND ALONE MODE and confirm with ENTER. Using the UP and DOWN controls, now select one of the 6 auto-programmes (observe arrow) and confirm with ENTER. To adjust brightness, use the UP and DOWN controls to select the menu item "Dim", and confirm with ENTER, then use the UP and DOWN controls to select the desired value between 000 and 255. Confirm with ENTER. To adjust the run speed, select the menu item "Speed", confirm with ENTER, and then select the desired value between 001 and 100. Confirm with ENTER. Press MODE four times to return to the main display (Mode Auto).

flowchart
graph TD
    A["Stand Alone"] --> B["Auto"]
    B --> C["Program 1"]
    C --> D["Program 2"]
    D --> E["Program 3"]
    E --> F["Program 4"]
    F --> G["Program 5"]
    G --> H["Program 6"]
    H --> I["Programme x"]
    I --> J["001"]
    I --> K["-"]
    I --> L["100"]
    M["Mode Auto"] --> N["255"]
    M --> O["100"]
COLOUR MACROS (Colour Macro)
15 different preset colour macros are available. Select colour macro mode as per the procedure previously described in SETTING OPERATION MODE and confirm with ENTER. Using the UP and DOWN controls, now select the desired colour preset (observe arrow) and confirm with ENTER (Colour Off = blackout). The display will show a three-digit number field and you can use the UP and DOWN controls to set the desired brightness between 000 and 100. Confirm with ENTER. Press MODE three times to return to the main display (colour macro mode).

STATIC MODE (Static)
The static mode allows the Dimmer, Strobe, R, G, B, W to be adjusted directly on the device with values between 000 and 255, in a similar way to with a DMX controller. In this way, an individual scene can be created without an additional DMX controller. Select static mode as per the procedure previously described in SETTING OPERATION MODE and confirm with ENTER. Using the UP and DOWN controls, now select the menu item that you wish to edit (observe arrow) and confirm with ENTER. The display will show a three-digit number field and you can use the UP and DOWN controls to configure the desired value between 000 and 255. Confirm with ENTER. Press MODE three times to return to the main display (static mode).

COLOUR TEMPERATURE (Tunable White)
The colour temperature mode enables you to configure the colour temperature from cold white to warm white (CTC) and the brightness (Dim) of the light directly on the device. Select the colour temperature mode as per the procedure previously described in SETTING STAND ALONE MODE and confirm with ENTER. Using the UP and DOWN controls, now select the menu item that you wish to edit (observe arrow) and confirm with ENTER. The display will show a three-digit number field and you can use the UP and DOWN controls to configure the desired value. Confirm with ENTER. Press MODE three times to return to the main display (Mode Tunable White).

USER PRESETS (User colour)
The operating mode "User Presets" allows you to store five individual colour presets of overall brightness, strobe and a colour mix of R, G, B and W directly in the device. Select the "User Colour" mode as per the procedure previously described in SETTING STAND ALONE MODE and confirm with ENTER. Use UP AND DOWN to select one of the stored presets Color1 to Color5 and confirm with ENTER and select the submenu item you want to edit (see arrows). Confirm with ENTER.
The display will show a three-digit number field and you can use the UP and DOWN controls to set the value as required between 000 and 255. Confirm by pressing ENTER again. When all settings are configured as required, press MODE 4 times to return to the main display (Mode User Colour).

TIMER FUNCTION (Timer)
The timer function allows the standalone modes "Colour Macro", "Static", "Tunable White" and "User Colour" to be timer controlled in such a way that the fade-in time can be set from 0 to 60 minutes, the dwell time from 1 to 24 hours and the fade-out time from 0 to 60 minutes. Time control starts immediately after activating the timer function in the previously activated standalone mode and remains active even if the spotlight is switched off and restarted. Select "Timer" by means of the procedure described above under CONFIGURE STANDALONE MODE and confirm with ENTER. Now select "Fade In", "Dwell Time" or "Fade Out" for the individual settings (observe arrow) and confirm with ENTER. The display will show a three-digit number field in each case. Use UP and DOWN to set the value as required from 000 to 060 or 001 to 024. Confirm by pressing ENTER again. Once all settings have been configured as required, activate the timer function by selecting the submenu item "Timer On/Off" using UP and DOWN, confirm with ENTER, select "On" and confirm again with ENTER (to deactivate the timer function, please select "Off" and confirm). Press MODE three times to return to the main display.

Please note: The timer function is suitable for use in master/slave mode via cable and W-DMX ^TM .
Press MODE to access the selection menu. Using the UP and DOWN controls, select the menu item "Slave" (observe arrow) and confirm with ENTER. Connect the slave and the master units (same model) with a DMX cable and enable one of the standalone modes on the master unit (Auto, Colour Macro, Static, Tunable White, User Colour). Now the slave unit will follow the master unit. If there is no control signal, the display characters will flash. Flashing stops as soon as a control signal is present.
Menu
DMX Address
DMX mode
Stand Alone
→ Slave
Settings
System Info
Timer


Mode
Slave
DEVICE SETTINGS (Settings)
Press MODE to access the selection menu. Using the UP and DOWN controls, select the menu item "Settings" (observe arrow) and confirm with ENTER.
Menu
DMX Address
DMX mode
Stand Alone
Slave
Settings
System Info
This will take you to the submenu for setting the following submenu items (see table, select with UP and DOWN, confirm with ENTER, change value or status with UP and DOWN, confirm with ENTER):
| Settings | ||||||
| Runtime = Increase battery life by up to 24 hours with correspondingly reduced brightness (calculated on full with 100% battery) | Off Function deactivated | |||||
| 4 hours - 24 hours Configure battery run time from 4 hours to 24 hours in 1 hour increments. | ||||||
| Wireless Setting = W-DMX settings (Wireless-DMX) | W-DMX On/Off On = W-DMX enabled | |||||
| Operating Mode Receive = W-DMX module as receiver | ||||||
| Receive = W-DMX module as sender | ||||||
| Transmitting Mode G3 = G3 broadcasting standard | ||||||
| G4S = G4S broadcasting standard | ||||||
| Link Link = pair with W-DMX units. W-DMX must be enabled on all devices, and the pairing with a transmitter be retained (Receive Reset). | ||||||
| Unlink = decoupling of all devices | ||||||
| Receive Reset No = Do not retain transmitter pairing | ||||||
| Yes = Retain transmitter pairing | ||||||
| Display Reverse = Flip display On Rotate display by 180° (e.g. for overhead) | installation) | |||||
| Off No display rotation | ||||||
| Display Backlight = Display lighting On | On permanently | |||||
| Off Deactivation after approximately 1 minute of inactivity | ||||||
| DMX Fail = Operating status with DMX signal fault | Hold Last command is retained | |||||
| Blackout Activates blackout | ||||||
| Full On All the LEDs have | 100% output | |||||
| Stand Alone Spotlight switches to the last selected stand-alone mode | ||||||
| AC Failure = Operating status in the event of a power failure | No Action Last commands retained | |||||
| Blackout Activates blackout | ||||||
| Full On All the LEDs have | 100% output | |||||
| Stand Alone Spotlight switches to the last selected stand-alone mode | ||||||
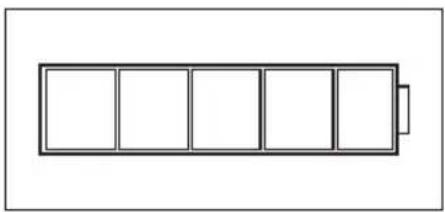
| Dimmer Curve = Dimmer curve Linear Light intensity increases linearly with DMX value | ||||||
| Exponential Light intensity can be finely adjusted at lower DMX values and broadly adjusted at higher DMX values | ||||||
| Logarithmic Light intensity can be broadly adjusted at lower DMX values and finely adjusted at higher DMX values | ||||||
| S-Curve Light intensity can be finely adjusted at lower and higher DMX values and broadly adjusted at medium DMX values | ||||||
| Dimmer Response | = | Dimmer sensitivity | LED | Lamp responds abruptly to changes in DMX value | ||
| Halogen Lamp behaves like a halogen spotlight with soft brightness changes | ||||||
| Color calibration | = Color calibration (If one of the DMX factory calibration modes is activated, no other calibration can be selected and the message "no possible change in this DMX Mode" will be shown on the display. If one of the DMX user calibration modes is activated, RAW can be selected as the alternative calibration.) | RAW R, G, B and W with maximum value 225 | ||||
| User calibration Individual colour calibration. Cross-mode brightness setting of the 4 LED groups RGBW with values from 000 - 255 | ||||||
| Factory calibration | Factory-default calibration of R, G, B, and W (across all operating modes). Select this setting to ensure the consistent-looking presentation of color macros in stand-alone mode and to control color macros with DMX | |||||
| Autolock | = Automatic locking of the controls | On | Automatic locking of the controls after approximately 1 minute of inactivity. Display shown upon attempted use: "Locked!" To unlock: Press and hold UP and DOWN simultaneously for approx. 5 seconds | |||
| Off | Automatic locking of the controls is disabled | |||||
| LED Frequency | = LED PWM frequency | 800Hz / 1200Hz / 2000Hz / 3600Hz / 12kHz / 25kHz | Configuration of LED PWM frequency | |||
| IR Remote | = Activate or deactivate control by IR remote control | On | IR remote control activated | |||
| Off | IR remote control deactivated | |||||
| Factory Reset | = Reset to factory settings | Reset Now! | Reset to factory settings: Confirm with ENTER. Cancel with MODE | |||
BATTERY RUN TIME (Runtime)
Battery life can be increased to up to 24 hours by reducing brightness accordingly (see table Settings). Battery life is calculated with spotlight on full and 100% battery charge status. Battery life is extended considerably if not all of the colours red, green, blue and white are activated (Full On), instead only red, for example.
DIMMER CURVES
SYSTEM INFORMATION (System Info)
Press MODE to access the selection menu. Using the UP and DOWN controls, select the menu item "System Info" (observe arrow) and confirm with ENTER.

Use the UP and DOWN controls to select the desired submenu item, and press ENTER to display the corresponding information.
| System Info | ||||
| Firmware = Displays device | firmware | Main CPU Vx.xx | ||
| LED driver Vx.xx | ||||
| Temperature = Displays temperature of LED unit | LED xx°C / xx°F | |||
| Unit °C (= display in degrees Celsius) | ||||
| °F (= display in degrees Fahrenheit) | ||||
| Operation Hours = Displays operating time xx:xx h Displays total operating time in hours and minutes | ||||
MANUAL LOCKING FUNCTION
In addition to the ability to protect the lamp automatically from accidental and unauthorised operation (see "Settings" - "Auto-lock"), the controls can also be locked manually. Press and hold the UP and DOWN controls simultaneously for approximately 5 seconds. If an attempt is made to change settings, "Locked!" will appear in the display and changing the lamp's settings via the controls is no longer possible. After approx. 1 minute, the current operating mode is displayed again. To unlock, press and hold the UP and DOWN controls simultaneously for approximately 5 seconds.
The display will show the previously displayed information.
IR REMOTE CONTROL

| Aim the infrared remote control directly at the infrared sensor on the front of the lamp. The maximum range is approximately 8 metres. In DMX and Slave modes, the remote control is deactivated. Battery for IR remote control = CR2025. | ||
 | Blackout | The blackout button is used to switch off all LEDs, regardless of operating mode enabled via the remote control. Press the blackout button again to reactivate the previously selected mode. |
 | Auto programme | Auto-Programmes 1 - 6. Programme selection with + and programme run speed with and SPEED + and - . Brightness setting with % and . + - |
 | Colour macro | Colour Macros 1-15. Selection with + and - |
 | Strobe | Strobe light for AUTO, FADE and MANUAL operating modes. Press STROBE activate. Strobe speed with and + - Press STROBE to deactivate strobe. |
 | Speed | Setting the running speed for Auto and Fade programmes. |
 | Individual colour macros | Individual colour macros 1-5. Selection with + - . |
 | Brightness | Press % and + to adjust brightness. |
 | Manual colour mix | Press MANUAL and prior to manually mix colours. Adjust intensity with + and - |
 | Fade programmes | Fade programmes Auto 1 - Auto 5. Programme selection with + and programme run speed with and SPEED + and - brightness setting with and % + and - |
 - -  | Colour preset | Direct selection of colour presets 0 to 9. |
INSTALLATION
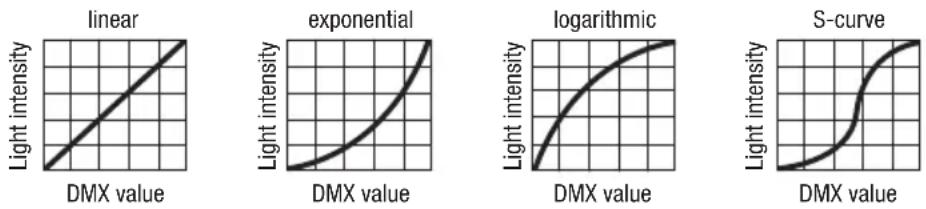
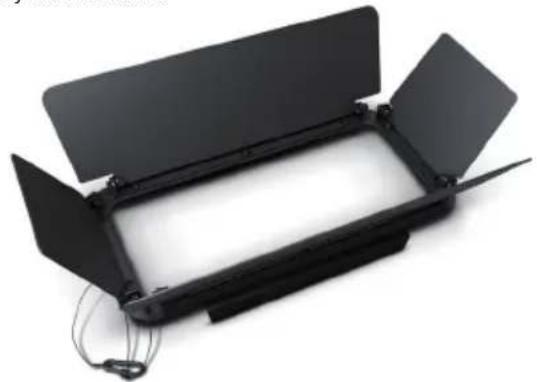
Thanks to its integrated plastic feet, the lamp can be positioned in a suitable location on a level surface. Installation on a traverse is carried out with an Omega bracket, mounted in the centre of the base of the device (A). A Omega bracket is included. Suitable beam clamps are available as an option. Ensure firm connections and secure the spotlight to the securing lug (B) with a suitable safety cable. Beam angle of the LED unit is independent of the device and is adjusted with the side-mounted thumb screws. Important: Overhead installation requires extensive experience, including the calculation of the load limits for the installation materials used and the regular safety inspection of all installation materials and lights. If you do not have these qualifications, do not attempt to perform an installation yourself. Refer instead to a qualified professional.
natural_image
3D rendering of a mechanical device with labeled parts A and B, showing internal components and a dashed arrow indicating direction (no text or symbols beyond labels)OPTIONAL ACCESSORIES
CLZW300B2004b
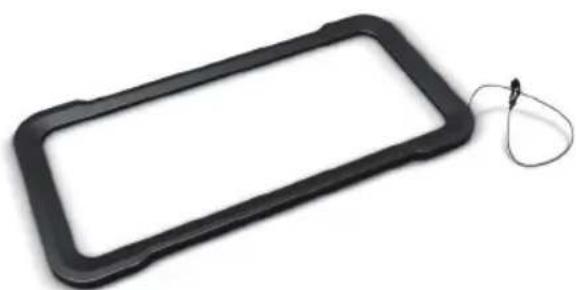
Barn doors – Tool-free installation by spring-loaded locking pins, safety cable included
natural_image
Black rectangular device with open lid and cable connectors, no visible text or symbolsCLZW300B200SMLSD40
45° diffuser
Tool-free installation via SNAPMAG® technology

natural_image
Black rectangular object with a coiled cable attached, isolated on white background (no text or symbols)CLZW300B200SMLSD20
25° diffuser
Tool-free installation via SNAPMAG® technology

natural_image
Black rectangular object with a string attached to its side, isolated on white background (no text or symbols)CLZW300B200SMLSD100
100° diffuser
Tool-free installation via SNAPMAG® technology
natural_image
Black rectangular object with a string attached to its side, isolated on white background (no text or symbols)CLZW300B200SMLSD6010
60^ × 10^ diffuser
Tool-free installation via SNAPMAG® technology

natural_image
Product image showing a black rectangular device connected to a black 3D camera with a blue LED array, alongside a small white tag labeled 'SNAPMAG TECHNOLOGY' (no text on device or background)SNAPMAG® FILTER FRAME NOT INCLUDED.
DMX TECHNOLOGY
DMX-512
DMX (Digital Multiplex) is the designation for a universal transmission protocol for communications between corresponding devices and controllers. A DMX controller sends DMX data to the connected DMX device(s). The DMX data is always transmitted as a serial data stream that is forwarded from one connected device to the next via the "DMX IN" and "DMX OUT" connectors (XLR plug-type connectors) that are found on every DMX-capable device, provided the maximum number of devices does not exceed 32 units. The last device in the chain needs to be equipped with a terminator (terminating resistor).

natural_image
Coiled black cable with two connectors and a terminal connector (no text or symbols visible)DMX CONNECTION
DMX is the common "language" via which a very wide range of types and models of equipment from various manufacturers can be connected with one another and controlled via a central controller, provided that all of the devices and the controller are DMX compatible. For optimum data transmission, it is necessary to keep the connecting cables between the individual devices as short as possible. The order in which the devices are integrated in the DMX network has no influence on the addresses. Thus the device with the DMX address 1 can be located at any position in the (serial) DMX chain: at the beginning, at the end or somewhere in the middle. If the DMX address 1 is assigned to a device, the controller "knows" that it should send all data allocated to address 1 to this device regardless of its position in the DMX network.
SERIAL CONNECTION OF MULTIPLE LIGHTS
- Connect the male XLR connector (3-pin or 5-pin) of the DMX cable to the DMX output (female XLR socket) of the first DMX device (e.g. DMX-Controller).
- Connect the female 3-pin XLR connector of the DMX cable connected to the first projector to the DMX input (male 3-pin socket) of the next DMX device. In the same way, connect the DMX output of this device to the DMX input of the next device and repeat until all devices have been connected. Please note that as a rule, DMX devices are connected in series and connections cannot be shared without active splitters. The maximum number of DMX devices in a DMX chain should not exceed 32 units.
The Adam Hall 3 STAR, 4 STAR, and 5 STAR product ranges include an extensive selection of suitable cables.
DMX CABLES
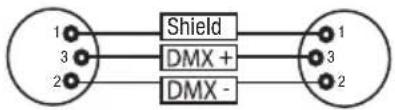
When fabricating your own cables, always observe the illustrations on this page. Never connect the shielding of the cable to the ground contact of the plug, and always make certain that the shielding does not come into contact with the housing of the XLR plug. If the shielding is connected to the ground, this can lead to short-circuiting and system malfunctions.
Pin Assignment
DMX cable with 3-pin XLR connectors: DMX cable with 5-pin XLR connectors (pin 4 and 5 are not used):
flowchart
graph LR
    A["1"] --> B["Shield"]
    C["3"] --> B
    D["2"] --> B
    B --> E["1"]
    B --> F["3"]
    B --> G["2"]

DMX TERMINATORS (TERMINATING RESISTORS)
To prevent system errors, the last device in a DMX chain needs to be equipped with a terminating resistor (120 ohm, 1/4 Watt).
3-pin XLR connector with a terminating resistor: K3DMXT3
5-pin XLR connector with a terminating resistor: K3DMXT5
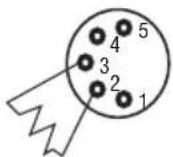
Pin Assignment
3-pin XLR connector: 5-pin XLR connector:

DMX ADAPTER
The combination of DMX devices with 3-pin connectors and DMX devices with 5-pin connectors in a DMX chain is possible with suitable adapters.
Pin Assignment
DMX Adapter 5-pin XLR male to 3-pin XLR female: K3DGF0020
Pins 4 and 5 are not used.
Pin Assignment
DMX Adapter 3-pin XLR male to 5-pin XLR female: K3DHM0020
Pins 4 and 5 are not used.

TECHNICAL DATA
Product number: CLZB200
| Product type: LED battery-powered wash light | |
| Type: Outdoor floodlight | |
| Color spectrum LED: RGBW | |
| Number of LEDs: 21 | |
| LED type: 15 W CREE | |
| LED PWM frequency: 800 Hz, 1200 Hz, 2000 Hz, 3600 Hz, 12 kHz, 25 kHz (adjustable) | |
| Beam angle: 21° (40° Field) | |
| DMX input: 5-pin male XLR, IP65 | |
| DMX output: | 5-pin female XLR, IP65 |
| DMX modes: | 2-channel CCT, 3-channel color macros, 3-channel RGB 8-bit, 4-channel RGBW 8-bit, 6-channel RGB 16-bit, 8-Kanal RGBW 8 Bit, 8-channel RGBW 16-bit, 10-channel full-access 8-bit, and 15-channel full-access 16-bit DMX control with master/slave mode |
| DMX functions: | Dimmer, dimmer fine, RGBW, RGBW fine, color macros, color change, color blend, strobe, dimmer curves, color temperature correction, dimming, LED PWM frequency |
| Standalone functions: | Color mixing, color macros, master/slave operation, automatic programmes, strobe, user color, tunable white, timer function |
| System settings: | W-DMX settings, display rotate 180°, runtime, display lighting, DMX fail, AC failure, dimmer curves, dimmer sensitivity, color calibration, display lock Function, LED PWM frequency, IR remote control, factory reset |
| Control: | DMX512, W-DMXTM, IR remote control, RDM-enabled |
Operating controls: Mode, Enter, Up, Down, ON/OFF switch
Display elements: OLED display
Operating voltage: 100–240 V AC/50–60 Hz
Power consumption: 180W
Battery voltage: 44.4 V
Battery capacity: 6.71 Ah
Battery power: 298 Wh
Battery charge time: 4h
Battery protection: Protection against overloading and deep discharge
Battery charging cycles: 300 charging cycles 0% -> 100% ☒ 70% capacity
Illuminance (@ 1m, without diffuser): 22100lx
Luminous flux (RGBW): 6600 lm (calibrated Mode)
Power connection: Input and output jacks, special IP65 (Max. Output 10A)
Ambient temperature during operation with internal battery: -15^ to +40^
Ambient temperature during operation with mains voltage: 0°C to +40°C
Housing material: Metal
Housing color: Black
Housing cooling: Convection
IP rating: IP65
Dimensions (W x H x D, 377 x 256 x 140mm without bracket):
Weight: 9.2kg
Additional features: 1 m power cable with special IP65 plug, IR remote control, feet and 1x Omega bracket included. 25°, 45°, 60° x 10°, 100° diffusers and barn-door available as an option
MANUFACTURER'S DECLARATIONS
MANUFACTURER'S WARRANTY & LIMITATIONS OF LIABILITY
You can find our current warranty conditions and limitations of liability at: https://cdn-shop.adamhall.com/media/pdf/Manufacturers-Declarations-CAMEO_DE_EN_ES_FR.pdf. To request warranty service for a product, please contact Adam Hall GmbH, Adam-Hall-Str. 1, 61267 Neu Anspach / Email: Info@adamhall.com / +49 (0)6081 / 9419-0.

CORRECT DISPOSAL OF THIS PRODUCT
(valid in the European Union and other European countries with a differentiated waste collection system)
This symbol on the product, or on its documents indicates that the device may not be treated as household waste. This is to avoid environmental damage or personal injury due to uncontrolled waste disposal. Please dispose of this product separately from other waste and have it recycled to promote sustainable economic activity. Household users should contact either the retailer where they purchased this product, or their local government office, for details on where and how they can recycle this item in an environmentally friendly manner. Business users should contact their supplier and check the terms and conditions of the purchase contract. This product should not be mixed with other commercial waste for disposal.
FCC STATEMENT
This device complies with Part 15 of the FCC Rules. Operation is subject to the following two conditions:
(1) This device may not cause harmful interference, and
(2) This device must accept any interference received, including interference that may cause undesired operation
CE Compliance
Adam Hall GmbH states that this product meets the following guidelines (where applicable):
R&TTE (1999/5/EC) or RED (2014/53/EU) from June 2017
Low voltage directive (2014/35/EU)
EMV directive (2014/30/EU)
RoHS (2011/65/EU)
The complete declaration of conformity can be found at www.adamhall.com.
Furthermore, you may also direct your enquiry to info@adamhall.com.
DEUTSCH
natural_image
Simple line drawing of a battery with five vertical slots and one terminal block (no text or symbols)W-DMXTM
FARBTEMPERATUR (Tunable White)
BENUTZER-PRESETS (User Color)
natural_image
3D model of a mechanical device with labeled components A and B, showing internal components and a dashed arrow indicating direction (no text or symbols beyond labels)OPTIONALES ZUBEHÖR
CLZW300B2004B
natural_image
Exterior view of a black rectangular electronic device with open lid and visible wiring (no text or symbols)CLZW300B200SMLSD40
45° Streuscheibe
natural_image
Black rectangular object with a coiled cable attached, isolated on white background (no text or symbols)CLZW300B200SMLSD100
100° Streuscheibe
natural_image
Black rectangular object with a coiled cable attached, isolated on white background (no text or symbols)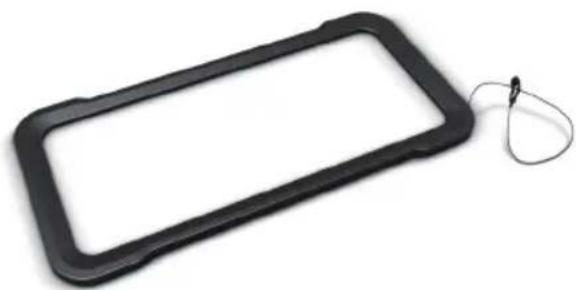
natural_image
Black rectangular object with a coiled cable attached, isolated on white background (no text or symbols)CLZW300B200SMLSD6010
natural_image
Product image showing a black rectangular device with a tag and a digital camera unit with glowing blue components (no visible text or symbols)SNAPMAG® FILTER FRAME NOT INCLUDED.
DMX TECHNIK
DMX-512
natural_image
Coiled black cable with two connectors and a terminal connector (no text or symbols visible)DMX-VERBINDUNG:
DMX-Adapter 5-Pol XLR male auf 3-Pol XLR female: K3DGF0020
natural_image
Simple line drawing of a battery with five rectangular cells, no text or symbols presentW-DMX™
RÉGLAGE DU MODE DE FONCTIONNEMENT STANDALONE
TEMPÉRATURE DE COULEUR (Tunable White)
natural_image
3D rendering of a mechanical device with labeled parts A and B, showing internal components and a dashed arrow indicating direction (no text or symbols beyond labels)ACCESSOIRES DISPONIBLES EN OPTION
CLZW300B2004B
natural_image
Black rectangular electronic device with open lid and metal clamps, no visible text or symbolsCLZW300B200SMLSD40
Diffuseur 45°
natural_image
Black rectangular object with a string attached to its side, isolated on white background (no text or symbols)CLZW300B200SMLSD100
Diffuseur 100°
natural_image
Black rectangular object with a coiled cable attached, isolated on white background (no text or symbols)
natural_image
Black rectangular object with a coiled cable attached, isolated on white background (no text or symbols)CLZW300B200SMLSD6010
Diffuseur 60° x 10°
natural_image
Product image showing a black rectangular device with a cable and a digital camera unit with glowing blue light (no visible text or symbols)SNAPMAG® FILTER FRAME NOT INCLUDED.
TECHNIQUE DMX
DMX-512
natural_image
Coiled black cable with two connectors and a terminal pin (no text or symbols visible)PROTOCOLE DMX
(Valid in the European Union and other European countries with waste separation)
natural_image
Simple line drawing of a battery with five rectangular cells, no text or symbols presentW-DMX™
TEMPERATURA DE COLOR (Tunable White)
natural_image
3D rendering of a mechanical component with labeled parts A and B, showing internal structure and mounting features (no text or symbols beyond labels)natural_image
Exterior view of a black rectangular electronic device with open lid and visible wiring (no text or symbols)CLZW300B200SMLSD40
Difusor de 45°
natural_image
Black rectangular object with a looped cable attached, resembling a device tag or clip (no text or symbols visible)CLZW300B200SMLSD100
Difusor de 100°
natural_image
Black rectangular object with a looped cable attached, isolated on white background (no text or symbols)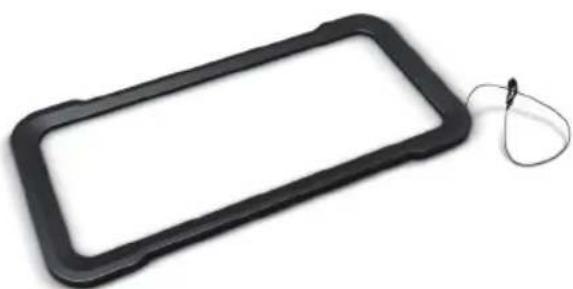
natural_image
Black rectangular object with a looped cable attached, isolated on white background (no text or symbols)CLZW300B200SMLSD6010
Difusor de 60° x 10°
natural_image
Coiled black cable with two connectors and a terminal pin (no text or symbols visible)CONEXIONADO DMX
natural_image
Simple line drawing of a battery with five rectangular cells arranged horizontally (no text or symbols)W-DMX™
TEMPERATURA BARWOWA (Tunable White)
USTAWIENIA WSTĘPNE UŻYTKOWNIKA (User Color)
natural_image
3D rendering of a mechanical device with labeled components A and B, showing internal components and a dashed arrow indicating direction (no text or symbols beyond labels)OPCJONALNE AKCESORIA
CLZW300B2004B
natural_image
Black rectangular electronic device with open lid and cable connectors (no visible text or symbols)CLZW300B200SMLSD40
Dyfuzor 45°
natural_image
Black rectangular object with a coiled cable attached, isolated on white background (no text or symbols)CLZW300B200SMLSD100
Dyfuzor 100°
natural_image
Black rectangular object with a looped cable attached, isolated on white background (no text or symbols)
natural_image
Black rectangular object with a looped cable attached, isolated on white background (no text or symbols)CLZW300B200SMLSD6010
Dyfuzor 60° x 10°
natural_image
Product image showing a black rectangular device with a cable and a digital camera unit with glowing blue light (no visible text or symbols)SNAPMAG® FILTER FRAME NOT INCLUDED.
TECHNIKA DMX
DMX-512
natural_image
Coiled black cable with two connectors and a terminal pin (no text or symbols visible)ZŁĄCZE DMX:
natural_image
Simple line drawing of a battery with five rectangular cells, no text or symbols presentW-DMX™
PRESET UTENTE (User Color)
natural_image
3D rendering of a mechanical device with labeled components A and B, showing internal components and a dashed arrow indicating direction (no text or symbols beyond labels)ACCESSORI OPZIONALI
CLZW300B2004B
natural_image
Black rectangular electronic device with open lid and cable, no visible text or symbolsCLZW300B200SMLSD40
natural_image
Black rectangular object with a looped cable attached, isolated on white background (no text or symbols)CLZW300B200SMLSD100
natural_image
Black rectangular object with a looped cable attached, isolated on white background (no text or symbols)
natural_image
Black rectangular object with a looped cable attached, isolated on white background (no text or symbols)CLZW300B200SMLSD6010
Diffusore 60° x 10°
natural_image
Coiled black cable with two connectors and a terminal pin (no text or symbols visible)COLLEGAMENTO DMX:
| 8 CH User-Calibrated 16 Bit | ||||||
| Ch. Function Values Sub-Group | ||||||
| 1 Red | 000 - 255 0% to 100% | Red | ||||
| 2 Red | fine 000 - 255 0% to 100% | |||||
| 3 Green | 000 - 255 0% to 100% | Green | ||||
| 4 Green | fine 000 - 255 0% to 100% | |||||
| 5 Blue | 000 - 255 0% to 100% | Blue | ||||
| 6 | Blue fine | 000 - 255 0% to 100% | ||||
| 7 | White 000 - 255 0% to 100% | White | ||||
| 8 | White fine | 000 - 255 0% to 100% | ||||
| 6 CH Factory-Calibrated 16 Bit | ||||||
| Ch. Function Values Sub-Group | ||||||
| 1 Red | 000 - 255 0% to 100% | Red | ||||
| 2 Red | fine 000 - 255 0% to 100% | |||||
| 3 Green | 000 - 255 0% to 100% | Green | ||||
| 4 Green | fine 000 - 255 0% to 100% | |||||
| 5 Blue | 000 - 255 0% to 100% | Blue | ||||
| 6 | Blue fine | 000 - 255 0% to 100% | ||||
| 4 CH User-Calibrated 8 Bit | ||||||
| Ch. Function Values Sub-Group | ||||||
| 1 Red | 000 - 255 0% to 100% | Red | ||||
| 2 Green | 000 - 255 0% to 100% | Green | ||||
| 3 Blue | 000 - 255 0% to 100% | Blue | ||||
| 4 | White 000 - 255 0% to 100% | White | ||||
| 3 CH Factory-Calibrated 8 Bit | ||||||
| Ch. Function Values Sub-Group | ||||||
| 1 Red | 000 - 255 0% to 100% Red | |||||
| 2 Green | 000 - 255 0% to 100% Green | |||||
| 3 Blue | 000 - 255 0% to 100% Blue | |||||
| 3 CH Color Macros | ||||||
| Ch. Function Values Sub-Group | ||||||
| 1 Dimmer 000 - 255 0% to 100% | Dimmer | |||||
| 2 | Strobe functions | 000 - 005 Strobe open | Multifunctional strobe | |||
| 006 - 010 Strobe closed | ||||||
| 011 - 033 Pulse random slow -> fast | ||||||
| 034 - 056 Ramp up random slow -> fast | ||||||
| 057 - 079 Ramp down random slow -> fast | ||||||
| 080 - 102 Random strobe effect slow -> fast | ||||||
| 103 - 127 | Strobe break effect, 5s......1s (short burst with break) | |||||
| 128 - 250 Strobe slow -> fast <1Hz - 20Hz | ||||||
| 251 - 255 Strobe open | ||||||
| 3 | Color Macros | 000 - 005 Color off | Color Macros | |||
| 006 - 013 Red | ||||||
| 014 - 021 Amber | ||||||
| 022 - 029 Yellow warm | ||||||
| 030 - 037 Yellow | ||||||
| 038 - 045 Green | ||||||
| 046 - 053 Turquoise | ||||||
| 054 - 061 Cyan | ||||||
| 062 - 069 Blue | ||||||
| 070 - 077 Lavender | ||||||
| 078 - 085 Mauve | ||||||
| 086 - 093 Magenta | ||||||
| 094 - 101 Pink | ||||||
| 102 - 109 Warm White | ||||||
| 110 - 117 White | ||||||
| 118 - 125 Cold White | ||||||
| 126 - 127 Color Jumping stop | ||||||
| 128 - 191 | Color Jumping speed slow -> fast / color 1 -> 12 | |||||
| 192 - 255 | Color Fading speed slow -> fast / color 1 -> 12 | |||||
| 2 CH CCT Factory-Calibrated | ||||||
| Ch. Function Values Sub-Group | ||||||
| 1 Dimmer 000 - 255 0% to 100% | Dimmer | |||||
| 2 | Color Temperature | 000 | - | 255 | Cold -> warm | Color Temperature |
EN: (1*) After the adjustments have been made, set the value to 000 to avoid disturbance by endless function call.
DE: (1*) Nachdem die Einstellungen vorgenommen wurden, stellen Sie den Wert auf 000 ein, um Störungen durch endlosen Funktionsaufruf zu vermeiden.
FR: (1*) Une fois les ajustements effectués, réglez la valeur sur 000 pour éviter les perturbations par appel de fonction sans fin.
ES: (1*) Después de realizar los ajustes, establezca el valor en 000 para evitar perturbaciones mediante una llamada de función sin fin.
PL: (1*) Po dokonaniu ustawień ustaw wartość na 000, aby uniknąć zakłóceń przez niekończące się wywołanie funkcji.
IT: (1*) Dopo aver effettuato le regolazioni, impostare il valore su 000 per evitare disturbi causati da una chiamata a funzione infinita.

- ZENIT® B200
- CONTENTS / INHALTSVERZEICHNIS / CONTENU / CONTENIDO / TREŚĆ / CONTENUTO
- ENGLISH
- DEUTSCH
- PREVENTIVE MEASURES
- FOR EQUIPMENT THAT CONNECTS TO THE POWER MAINS:
- CAUTION:
- CAUTION! IMPORTANT INFORMATION ABOUT LIGHTING PRODUCTS!
- BATTERY SAFETY
- INTRODUCTION
- LED BATTERY OUTDOOR WASHLIGHT WITH W-DMX™
- CONTROL FUNCTIONS:
- FEATURES:
- POWER IN
- POWER OUT
- ON/OFF
- DMX IN
- DMX OUT
- OLED DISPLAY
- TOUCH-SENSITIVE CONTROLS
- PRESSURE EQUALISATION ELEMENT
- OPERATION
- PLEASE NOTE
- CHARGING THE BATTERY, OPERATING AND STORING THE SPOTLIGHT
- MAIN DISPLAY
- BATTERY CHARGE STATUS IN STANDBY MODE
- W-DMX™
- SETTING DMX START ADDRESS (DMX ADDRESS)
- CONFIGURING DMX MODE (DMX Mode)
- SETTING STANDALONE MODE
- AUTO MODE (programme 1 - programme 6)
- COLOUR MACROS (Colour Macro)
- STATIC MODE (Static)
- COLOUR TEMPERATURE (Tunable White)
- USER PRESETS (User colour)
- TIMER FUNCTION (Timer)
- DEVICE SETTINGS (Settings)
- BATTERY RUN TIME (Runtime)
- SYSTEM INFORMATION (System Info)
- MANUAL LOCKING FUNCTION
- INSTALLATION
- OPTIONAL ACCESSORIES
- CLZW300B2004b
- CLZW300B200SMLSD40
- CLZW300B200SMLSD20
- CLZW300B200SMLSD100
- CLZW300B200SMLSD6010
- DMX TECHNOLOGY
- DMX-512
- DMX CONNECTION
- SERIAL CONNECTION OF MULTIPLE LIGHTS
- DMX CABLES
- Pin Assignment
- DMX TERMINATORS (TERMINATING RESISTORS)
- DMX ADAPTER
- TECHNICAL DATA
- MANUFACTURER'S DECLARATIONS
- MANUFACTURER'S WARRANTY & LIMITATIONS OF LIABILITY
- CORRECT DISPOSAL OF THIS PRODUCT
- FCC STATEMENT
- CE Compliance
- W-DMXTM
- FARBTEMPERATUR (Tunable White)
- BENUTZER-PRESETS (User Color)
- OPTIONALES ZUBEHÖR
- DMX TECHNIK
- DMX-VERBINDUNG:
- RÉGLAGE DU MODE DE FONCTIONNEMENT STANDALONE
- TEMPÉRATURE DE COULEUR (Tunable White)
- ACCESSOIRES DISPONIBLES EN OPTION
- TECHNIQUE DMX
- PROTOCOLE DMX
- TEMPERATURA DE COLOR (Tunable White)
- CONEXIONADO DMX
- TEMPERATURA BARWOWA (Tunable White)
- USTAWIENIA WSTĘPNE UŻYTKOWNIKA (User Color)
- OPCJONALNE AKCESORIA
- TECHNIKA DMX
- ZŁĄCZE DMX:
- PRESET UTENTE (User Color)
- ACCESSORI OPZIONALI
- COLLEGAMENTO DMX:
Brand : Cameo
Model : ZENIT B200
Category : Lamp