
CMMT25165 - Flashlight Craftsman - Free user manual and instructions
Find the device manual for free CMMT25165 Craftsman in PDF.

| Brand | Craftsman |
| Model | CMMT25165 |
| Product Type | Rechargeable Flashlight |
| Power Supply | Li-Ion 18650 battery, 5 V DC via USB-C |
| Luminous Output (Articulated Head LED) | 400 lumens |
| Luminous Output (Articulated Head Floodlight) | 50 lumens |
| Luminous Output (Front Floodlight) | 150 lumens |
| Runtime (Articulated Head LED) | 3 hours |
| Runtime (Articulated Head Floodlight) | 35 hours |
| Runtime (Front Floodlight) | 10 hours |
| Charge Time | 1 to 4 hours depending on power source |
| Charging Temperature Range | 4 °C to 40 °C |
| Operating Temperature Range | -10 °C to 60 °C |
| Charge Indicator | LED indicators (flash during charging, steady when finished) |
| Lighting Modes | 3 modes: LED head, floodlight head, front floodlight |
| Articulated Head | Rotation 0°-180° with 10 fixed positions |
| Built-in Magnets | At the base and head for attachment to metal surfaces |
| Clip | Integrated at the base, retractable |
| Hanging Hook | Integrated, adjustable, for hanging on pipes or cables |
| Charging | USB-C port under cover |
| Maintenance | Clean with a damp cloth and mild soap; do not immerse |
| Repairability | Not user-repairable; LED and battery non-replaceable |
| Included Accessories | USB cable (USB-C to USB-A) |
| Warranty | 2-year limited, 90-day refund |
| Recycling | Battery recyclable via RBRC® program |
Frequently Asked Questions - CMMT25165 Craftsman
User questions about CMMT25165 Craftsman
0 question about this device. Answer the ones you know or ask your own.
Ask a new question about this device
Download the instructions for your Flashlight in PDF format for free! Find your manual CMMT25165 - Craftsman and take your electronic device back in hand. On this page are published all the documents necessary for the use of your device. CMMT25165 by Craftsman.
USER MANUAL CMMT25165 Craftsman
English (original instructions) 3
text_image
Technical diagram of a device with numbered parts and close-up insets for assembly or maintenance.Components
1 Multi function button
2 Housing
3 USB-C charging port cover
4 USB-C charging port
5 Articulating head
6 Articulating head LED
7 Articulating head spot light LED
8 Articulating head magnet
9 Spot light LED
10 Base magnet
11 Clamp
12 Clamp indents
13 Hang hook
14 USB cable
15 USB plug
16 USB-C plug
17 Charging LEDs
Composants
text_image
Technical diagram of a mechanical device with numbered components and internal structure labels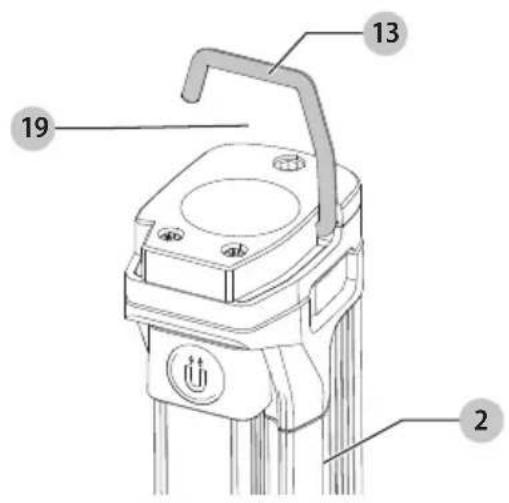
text_image
13 19 2WARNING: Read all safety warnings and all instructions. Failure to follow the warnings and instructions may result in electric shock, fire and/or serious injury.

WARNING: To reduce the risk of injury, read the instruction manual.
Intended Use
Your CRAFTSMAN, CMMT25165 has been designed for household, consumer use only.
DO nOT use under wet conditions or in presence of flammable liquids or gases.
DO nOT let children come into contact with the tool. Supervision is required when inexperienced operators use this tool.
Definitions: Safety Alert Symbols and Words
This instruction manual uses the following safety alert symbols and words to alert you to hazardous situations and your risk of personal injury or property damage.
DANGER: Indicates an imminently hazardous situation which, if not avoided, will result in death or serious injury.
WARNING: Indicates a potentially hazardous situation which, if not avoided, could result in death or serious injury.
CAUTION: Indicates a potentially hazardous situation which, if not avoided, may result in minor or moderate injury.
(### without word) Indicates a safety related message.
NOTICE: Indicates a practice not related to personal injury which, if not avoided, may result in property damage.

WARNING: To reduce the risk of injury, read the instruction manual.
SAFETY INSTRUCTIONS
When using an electrical light, basic precautions should always be followed, including the following:
WARNING: Do not attempt to modify or repair the light.
WARNING: Do not charge the battery at ambient temperatures below 40 °F (4 °C) or above 104 °F
(40 °C). Follow all charging instructions and do not charge the battery outside of the temperature range specified in the instructions. Charging improperly or at temperatures outside of the specified range may damage the battery and increase risk of fire.
- Shock Hazard. To protect against risk of electrical shock, do not put charging base in water or other liquid.
- Do not allow to be used as a toy. Close attention is necessary when used near children.
- Do not use if damaged. If light is not working as it should, has been dropped, damaged, left outdoors, or dropped into water, return it to a service center.
- Do not incinerate the light even if it is severely damaged. The batteries can explode in a fire.
- Do not pull or carry by charging cord, use charging cord as a handle, close a door on charging cord, or pull charging cord around sharp edges or corners.
- Keep charging cord away from heated surfaces.
- Do not allow the cord to hang over the edge of a table or counter or touch hot surfaces. The unit should be placed or mounted away from sinks and hot surfaces.
- Do not unplug by pulling on cord. To unplug, grasp the plug, not the cord.
- Do not handle charging cord, including charger plug with wet hands.
- Do not charge the unit outdoors.
- Leaks from battery cells can occur under extreme conditions. If the liquid, which is a 20–35% solution of potassium hydroxide, gets on the skin (1) wash quickly with soap and water or (2) neutralize with a mild acid such as lemon juice or vinegar. If the liquid gets into the eyes, flush them immediately with clean water for a minimum of 10 minutes. Seek medical attention.
Additional Safety Warnings
a) Do not use a battery or light that is damaged or modified. Damaged or modified batteries may exhibit unpredictable behavior resulting in fire, explosion or risk of injury.
b) Do not expose a battery to fire or excessive temperature. Exposure to fire or temperature above 266 °F (130 °C) may cause explosion.
SAVE THESE INSTRUCTIONS
Specific Safety Rules for Lights
WARNING: Do not place the light in a position which may cause anyone to intentionally or unintentionally stare into the light. Serious eye injury could result.
WARNING: Fire hazard. Do not operate light or other near flammable liquids or in gaseous or explosive atmospheres. Internal sparks may ignite fumes causing personal injury.
IMPORTANT SAFETY INSTRUCTIONS
WARNING: When using the light, basic precautions should always be followed, including the following:
a) To reduce the risk of injury, close supervision is necessary when a light is used near children.
b) To reduce the risk of electrical shock, do not put light in water or other liquid. Do not place or store light where it can fall or be pulled into a tub or sink.
c) Turn the light off when not in use.
d) Do not operate any light after it malfunctions or is dropped or damaged in any manner.
Return light to the nearest authorized service facility for examination, repair, or electrical or mechanical adjustment.
e) This light is intended for indoor and outdoor use.
EnglisH
Additional Safety Rules for Hand Held Lights
- Do not submerge hand held light in any liquid.
- Do not wash light or battery with water or allow water to get inside light or battery.
- Do not operate without lens cover assembly attached.
The label on your tool may include the following symbols. The symbols and their definitions are as follows:
V....volts
Hz ......hertz
or DC.....direct current
A.....amperes
Ah.....amp hours
\~ or AC......alternating current
⚠️ ......safety alert symbol
class III luminaire
▲......visible radiation do not stare into the light
readall documentation
do not expose to rain
BATTERIES
The battery pack is not fully charged out of the carton. Before using the product, read the safety instructions below and then follow the charging procedures outlined.
nOTE: If the product is unused for approximately 90 days, fully charge the battery to help prolong the life of the battery.
Important Safety Instructions for All Integral Battery Charging
WARNING: Read all safety warnings, instructions, cautionary markings for the battery, USB cable and product. Failure to follow the warnings and instructions may result in electric shock, fire and/or serious injury.
WARNING: Only charge product using a certified p#ar adapter that is compliant with applicable country regulations and international/regional safety standards. Using adapters that do not meet applicable safety standards could result in injury.
- The provided USB cable is not intended for any uses other than charging CRAFTSMAN rechargeable tools with USB-C ports. Charging other types of tools may cause their batteries to overheat and burst, resulting in personal injury, property damage, fire, electric shock or electrocution.
- DO NOT expose USB cable to water, rain or snow.
- Pull by the plugs rather than the cord when disconnecting the USB cable. This will reduce the risk of damage to the plugs and cord.
- Make sure that the cord is located so that it will not be stepped on, tripped over or otherwise subjected to damage or stress.
- DO NOT use a USB cable with a damaged cord or plugs. Have them replaced immediately.
- Foreign materials of a conductive nature, such as, but not limited to, grinding dust, metal chips, steel wool, aluminum foil or any buildup of metallic particles should be kept away from the USB and USB-C plugs and port.
• Always unplug the USB cable from the power supply when there is no tool attached to it.
Charging Procedure (Fig. B)
WARNING: Do not use tool while it is connected to the Usable.
- Pull the USB-C charging port cover 3 away from the tool.
- Insert the USB-C plug 16 into the charging port 4.
- Plug the USB plug 15 into any USB port (such as on a computer or wall adapter). Charging is complete in 1 to 4 hours depending on power supply rating.
- The charging LEDs 17 will continuously blink while charging.
- Charging is complete when the all of the charging LEDs 17 remains continuously ON. The battery can be left charging or the USB cable can be disconnected.
Hot/Cold Delay
When the tool detects that the battery is too hot or too cold, it automatically starts a hot/cold delay, suspending charging until the battery has reached an appropriate temperature. The tool then automatically switches to charging mode. This feature ensures maximum battery life.
- A cold battery may charge at a slower rate than a warm battery.
- The hot/cold delay will be indicated by the charging LEDs 17 remaining OFF.
- Once the battery has reached an appropriate temperature, the charging LEDs 17 will continuously blink, indicating that the tool has resumed the charging procedure.
Electronic Protection System
Li-Ion tools are designed with an Electronic Protection System that will protect the battery against overloading, overheating or deep discharge. The tool will automatically turn off and the battery will need to be recharged.
Important Charging Notes
- The tool may become warm to the touch while charging. This is a normal condition, and does not indicate a problem. To facilitate the cooling of the tool after use, avoid placing the tool in a warm environment such as in a metal shed or an uninsulated trailer.
- If the tool does not charge properly, take the tool and USB cable to your local service center.
- You may charge a partially used battery whenever you desire with no adverse effect on the tool.
State of Charge Indicator (Fig. A, C)
The CMMT25165 is equipped with a state of charge indicator. This can be used to display the current level of charge in the battery during use and during charging. It does not indicate tool functionality and is subject to variation based on product components, temperature and end-user application.
Checking State of Charge (Fig. C)
- When the LED light is ON, the four charging LEDs 17 will illuminate, indicating the percent of charge in the battery.
- When all four illuminate, the tool is fully charged. When one illuminates, charge is low.
• If none illuminate, charge battery.
SPECIFICATIONS
| CMMT25165 | ||
| Voltage V | DC | 5 |
| Battery type | 18650Li-lon | |
| Lumens | ||
| Articulating head LED Im 400 | ||
| Articulating head spot light LED Im 50 | ||
| Spot light LED Im 150 | ||
| LUX at two meters | ||
| Articulating head LED Ix 45 | ||
| Articulating head spot light LED Ix 5 | ||
| Spot light LED Ix 230 | ||
| Run Time When Fully Charged | ||
| Articulating head LED | hour | 3 |
| Articulating head spot light LED | hour | 35 |
| Spot light LED | hour | 10 |
| Charging temperature range | 40 °F – 104 °F4 °C – 40 °C | |
| Operating temperature range | 14 °F – 140 °F-10 °C – 60 °C | |
| Storage temperature range | 14 °F – 140 °F-10 °C – 60 °C | |
OPERATION
CAUTION: Do not stare into the LEDs. Serious eye injury could result.
Multi Function Button (Fig. A)
The LED lights 6, 7, 9 have one brightness setting.
- Press the multi function button 1 once to activate the articulating head LED 6.
- Press the multi function button 1 a second time to activate the articulating head spot light LED 7.
- Press the multi function button 1 a third time to turn the LEDs OFF.
- Press and hold the multi function button 1 once to activate the spot light LED 9.
- Press the multi function button 1 again to turn the LEDs OFF.
Articulating Head (Fig. A, D, E)
The articulating head 5 pivots in ten fixed positions from 0^-180^ and then swivels and rotates in position from 0^-180^ .
- To move the articulating head 5 pivot the end of the articulating head 5 upwards away from the housing 2.
- To adjust the beam of the articulating head LED 7, swivel and rotate the articulating head 5 by twisting it into position.
Magnets (Fig. A)
CAUTION: When the LED light hangs by the magnet, do not shake the LED light or the object from which it hangs. Do not hang the work LED light overhead or from anything that is not secure. Personal injury or property damage may occur.
CAUTION: Only use the magnet for hanging the LED light. The magnet are not intended to support additional weight. Do not attach or hang anything additional to the LED light or risk of breakage may occur.
The CMMT25165 has a two built in magnets. The base magnet 10 located at the base of the housing 2 and the articulating head magnet 8 located on the tip of the articulating head.
- The magnets 8 and 10 are intended for catching small metal parts such as screws and bolts.
- The base magnet 10 is also intended to hold the light in place on solid metal surfaces.
Clamp (Fig. A, F)
CAUTION: Ensure area between extended clamp and LED light is clear before releasing hook. Keep your fingers out of the area between the clamp and the LED light when it retracts.
- To access the clamp 11, use the clamp indents 12 to pull the clamp from the base of the light housing so that it extends out from the housing 2.
- Place the object you want to clamp into the clamp opening 18 slowly allow the clamp to slide back into the housing 2 until the object is securely held in place.
Hang Hook (Fig. A, G)
CAUTION: When the LED light hangs by the hang house, do not shake the LED light or the object from which it hangs. Do not hang the LED light overhead or from any electrical wires or anything that is not secure. Personal injury or property damage may occur.
CAUTION: Only use the hang hook for hanging the LED light. The hang hook is not intended to support additional weight. Do not attach or hang anything additional to the LED light or risk of breakage may occur.
CAUTION: Do not use the hang hook to reach with or to support your weight in any situation.
The built in hang hook 13 can be attached to anchored hoses, pipes, tubes or cables in the space you are working in.
- To access the hang hook 13, rotate the hang hook 13 away from the housing 2 until the hang hook opening 19 is exposed.
- Place the hose, pipe, tube or cable in your work space into the hang hook.
NOTE: Ensure the LED light housing is fully secured and will not slide off the anchored hose, pipe, tube or cable before proceeding. - To remove the hang hook 13 from the anchored hose, pipe, tube or cable, grasp the hang hook 13 and slide the anchored hose, pipe, tube or cable from the hang hook opening 19.
- Secure the hang hook 13 into place onto the housing 2.
MAINTENANCE
Your CRAFTSMAN product has been designed to operate over a long period of time with a minimum of maintenance. Continuous satisfactory operation depends upon proper care and regular cleaning.
Cleaning
WARNING: Never use solvents or other harsh chemicals for cleaning the non-metallic parts of the tool. These chemicals may weaken the plastic materials used in these parts. Use a cloth dampened only with water and mild soap. Never let any liquid get inside the tool; never immerse any part of the tool into a liquid.
Accessories
WARNING: Since accessories, other than those carried by CRAFTSMAN, have not been tested with this product, use of such accessories with this product could be hazardous. To reduce the risk of injury, only CRAFTSMAN recommended accessories should be used with this product.
There are no accessories for this product.
Repairs
The work light is not serviceable. The LED light bulbs and battery cannot be replaced by the user.
The RBRC® Seal
Please take your CRAFTSMAN with a spent battery to an authorized CRAFTSMAN service center or to your local retailer for recycling. In some areas, it is illegal to place spent battery packs in the trash. You may also contact your local recycling center for information on where to drop off the spent battery pack. Do not place in curbside recycling. For more information visit www.call2recycle.org. or call the toll free number in the RBRC® Seal. RBRC® is a registered trademark of Call 2 Recycle, Inc.

Register Online
Thank you for your purchase. Register your product now for:
- WARRANTY SERVICE: Registering your product will help you obtain more efficient warranty service in case there is a problem with your product.
- CONFIRMATION OF OWNERSHIP: In case of an insurance loss, such as fire, flood or theft, your registration of ownership will serve as your proof of purchase.
- FOR YOUR SAFETY: Registering your product will allow us to contact you in the unlikely event a safety notification is required under the Federal Consumer Safety Act.
- Register online at www.craftsman.com/registration
Two Year Limited Warranty
CRAFTSMAN will repair or replace, without charge, any defects due to faulty materials or workmanship for two years from the date of purchase. This warranty does not cover part failure due to normal wear or tool abuse. For further detail of warranty coverage and warranty repair information, visit www.craftsman.com or call 1-888-331-4569. This warranty does not apply to accessories or damage caused where repairs have been made or attempted by others. THIS LIMITED WARRANTY IS GIVEN IN LIEU OF ALL OTHERS, INCLUDING THE IMPLIED WARRANTY OF MERCHANTABILITY AND FITNESS FOR A PARTICULAR PURPOSE, AND EXCLUDES ALL INCIDENTAL OR CONSEQUENTIAL DAMAGES. Some states do not allow limitations on how long an implied warranty lasts or the exclusion or limitation of incidental or consequential damages, so these limitations may not apply to you. This warranty gives you specific legal rights and you may have other rights which vary in certain states or provinces.
90 DAY MONEY BACK GUARANTEE
If you are not completely satisfied with the performance of your CRAFTSMAN product for any reason, you can return it within 90 days from the date of purchase with a receipt for a full refund – no questions asked.
LATIN AMERICA: This warranty does not apply to products sold in Latin America. For products sold in Latin America, see country specific warranty information contained in the packaging, call the local company or see website for warranty information.
FREE WARNING LABEL REPLACEMENT: If your warning labels become illegible or are missing, call 1-888-331-4569 for a free replacement.
--- o DC.....corriente directa
A.....ampéres
Ah......amperios hora
\~ o AC...... corriente alterna