
SV501P - Telescope SVBONY - Free user manual and instructions
Find the device manual for free SV501P SVBONY in PDF.

| Product Type | Telescope |
| Brand | SVBONY |
| Model | SV501P |
| Optical Design | Refractor |
| Aperture | 70 mm (2.8") |
| Focal Length | 400 mm |
| Focal Ratio | f/5.7 |
| Optical Coatings | Multi-coated |
| Finder Scope | 5x24 |
| Diagonal | Correct image prism -45° 1.25" |
| Supplied Eyepiece | 20 mm 1.25" |
| Apparent Field of View (20 mm) | 50° |
| Angular Field of View (20 mm) | 2.5° |
| Linear Field of View (20 mm) | 131/44 ft/1000 yds |
| Close Focus (20 mm) | 19' (5.8 m) |
| Tripod | SVBONY SV101, black |
| Maximum Tripod Length | 138 cm (54.3") |
| Folded Tripod Length | 45 cm (17.7") |
| Highest Useful Magnification | 168x |
| Limiting Stellar Magnitude | 11.7 |
| Optical Tube Length | 43 cm (17") |
| Power | None (manual) |
| Maintenance and Cleaning | Clean lenses with a suitable solution (60% isopropyl alcohol + 40% distilled water) and a soft cloth. Do not disassemble the instrument. |
| Safety | Never observe the Sun. Small parts: keep out of reach of children under 10 years old. |
| Approved Accessories | List available at www.Svbony.com |
Frequently Asked Questions - SV501P SVBONY
User questions about SV501P SVBONY
0 question about this device. Answer the ones you know or ask your own.
Ask a new question about this device
Download the instructions for your Telescope in PDF format for free! Find your manual SV501P - SVBONY and take your electronic device back in hand. On this page are published all the documents necessary for the use of your device. SV501P by SVBONY.
USER MANUAL SV501P SVBONY
natural_image
Black and white SVBONY telescope on a tripod, no visible text or symbols on the instrument bodyhs
CONTENTS
INTRODUCTION 1
SOLAR WARNING 1
WHAT'S IN THE BOX 1
ASSEMBLING YOUR TELESCOPE 2
Setting up the Tripod 2
Attaching the Telescope Tube to the Tripod 3
Moving the SV501P Manually 4
Installing the Diagonal & Eyepiece 4
Installing the Finderscope....5
Aligning the Finderscope 5
TELESCOPE MAINTENANCE 5
Care and Cleaning of the Optics 6
TECHNICAL SPECIFICATIONS....6
Congratulations on your purchase of SVBONY SV501P. The SV501P is made of the highest quality materials to ensure stability and durability. All this adds up to a telescope that gives you a lifetime of pleasure with a minimal amount of maintenance.
This telescope was designed with traveling in mind offering exceptional value. The SV501P features a compact and portable design with ample optical performance. Your SV501P is ideal for terrestrial as well as very casual astronomical observation.
For more information about after sales, please visit our website www.svbony.com
Some of the standard features of the SV501P include:
- Coated glass optical elements for clear, crisp images.
- Erect image diagonal so that your views are correctly oriented.
- Smooth functioning altazimuth mount with easy pointing to located objects.
- Preassembled aluminum full size photographic tripod ensures a stable platform.
- Quick and easy no-tool set up.
- The telescope and tripod fit inside the standard backpack for easy traveling.
Take time to read through this manual before embarking on your journey through the Universe. It may take a few observing
sessions to become familiar with your telescope, so you should keep this manual handy until you have fully mastered your
telescope's operation. The manual gives detailed information regarding each step as well as needed reference material and
helpful hints to make your observing experience simple and pleasurable as possible.
Your telescope is designed to give you years of fun and rewarding observations. However, there are a few things to consider
before using your telescope that will ensure your safety and protect your equipment.
- Never look directly at the Sun with the naked eye or with a telescope unless you have the proper solar filter. Permanent and irreversible eye damage may result.
- Never use your telescope to project an image of the Sun onto any surface. Internal heat build-up can damage the telescope and any accessories attached to it.
- Never use an eyepiece solar filter or a Herschel wedge. Internal heat build-up inside the telescope can cause these devices to crack or break, allowing unfi itered sunlight to pass through to the eye.
- Do not leave the telescope unsupervised, either when children are present or adults unfamiliar with the correct operating procedures of your telescope are present.
We recommend saving your telescope box so it can be used to store the telescope when it is not in use. Unpack the box carefully as some parts are small. Use the parts list below to verify that all parts and accessories are present.
text_image
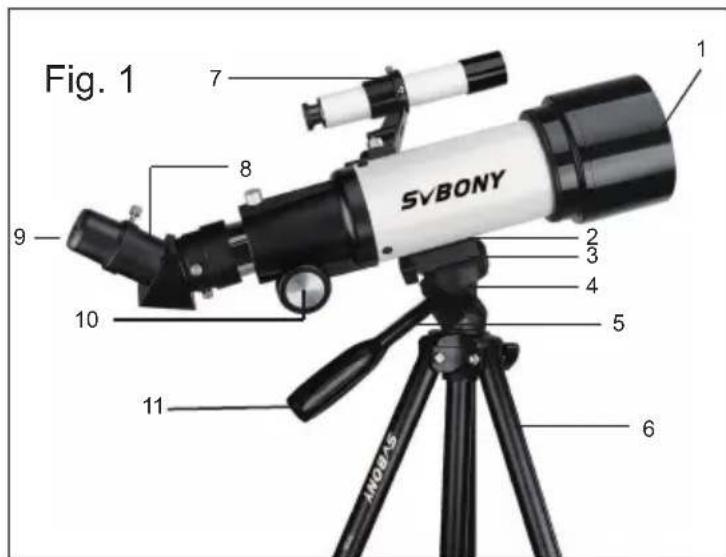
Fig. 1 SVBONY 1 2 3 4 5 6 7 8 9 10 11 MOSA5- Objective Lens
- Telescope Optical Tube
- Tripod Head Platform
- Azimuth Locking Knob
- Central Column Locking Knob
- Tripod
- Finderscope
- 45-degree Correct-Image Prism Diagonal
- Eyepiece
- Focus Knob
- Pan Handle
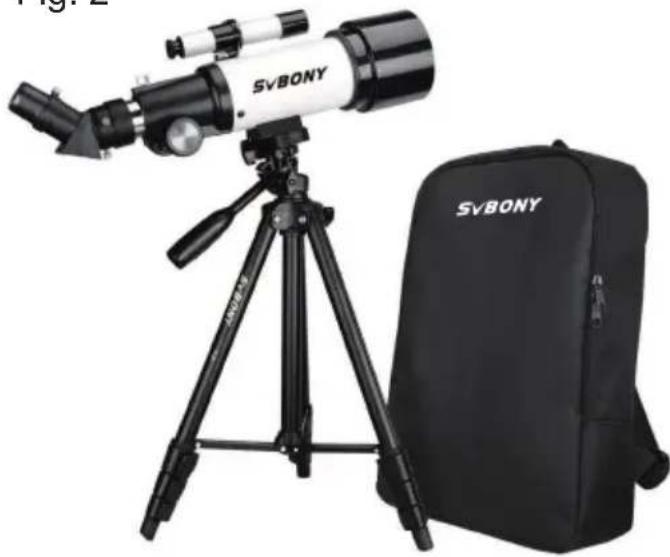
Fig. 2
natural_image
SvBONY telescope setup with tripod and backpack (no visible text or symbols on main subject)This section covers the assembly instructions for your SVBONY SV501P. Your telescope should be set up indoor the first time so that it is easy to identify the various parts and familiarize yourself with the correct assembly procedure before attempting it outdoor.
The SVBONY SV501P comes in one box. The pieces in the box are – telescope optical tube, tripod, erect image diagonal, 20 mm eyepiece, 5x24 finderscope with bracket (all packed in the travel backpack).
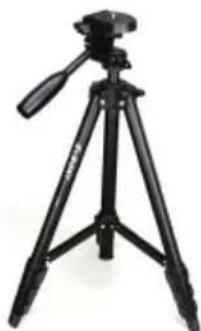
- The tripod comes preassembled so that the set up is very easy.
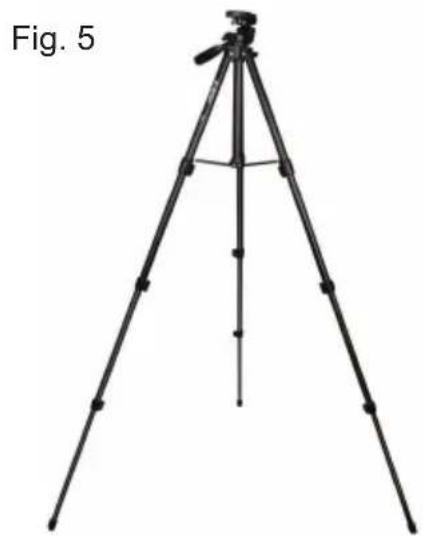
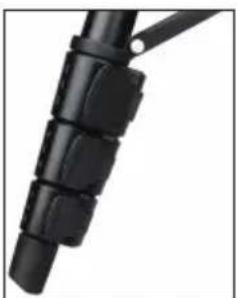
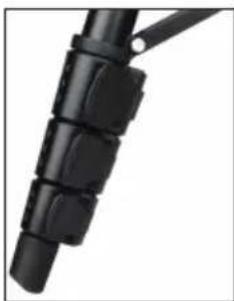
- Stand the tripod upright and pull the tripod legs outward until each leg is fully extended (Figure 3).
- You can raise the tripod legs to the height you desire. At the lowest level the height is about 17.7" (45 cm) and extends to about 54.3" (138 cm).
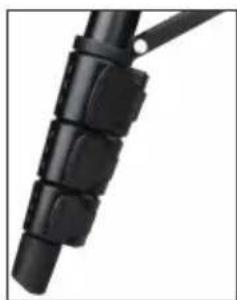
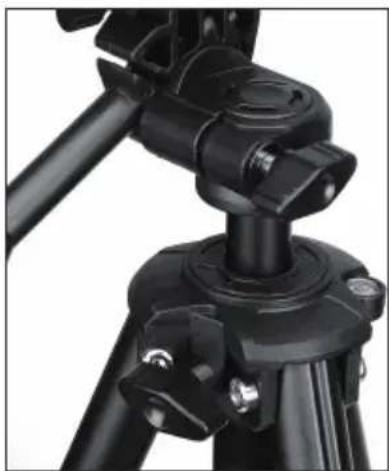
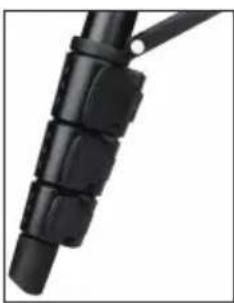
- To raise the height of the tripod, you unlock the tripod leg lock clamps at the bottom of each tripod leg (Figure 4) by opening the clamp for each section by pulling outward. Once a clamp is unlocked, then pull the tripod leg out as far as it will go and then close the leg lock to secure it. Continue doing this for each tripod leg and each section to raise the height to the level you desire. A fully extended tripod looks similar to the image in Figure 5. With all the legs raised up on all sections, the height will be about 54.3" (138 cm).
Fig. 3
Fig. 4
natural_image
Black tripod with adjustable arm and tripod base (no visible text or symbols)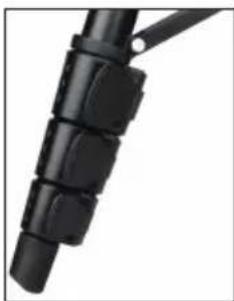
natural_image
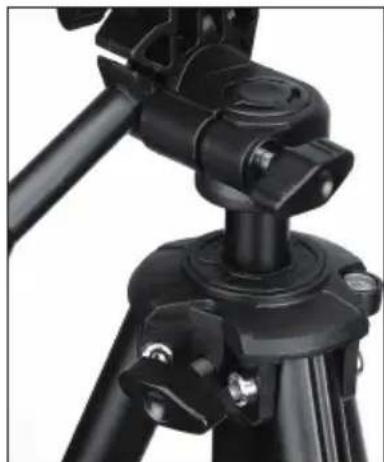
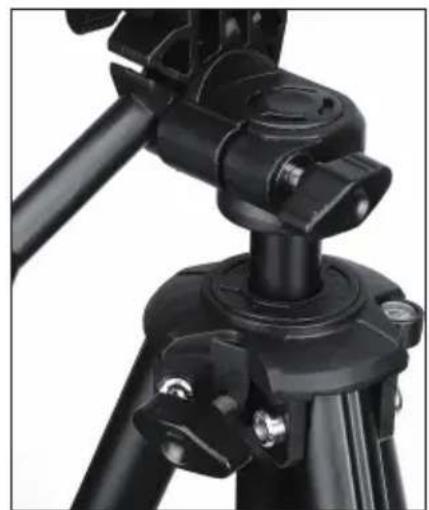
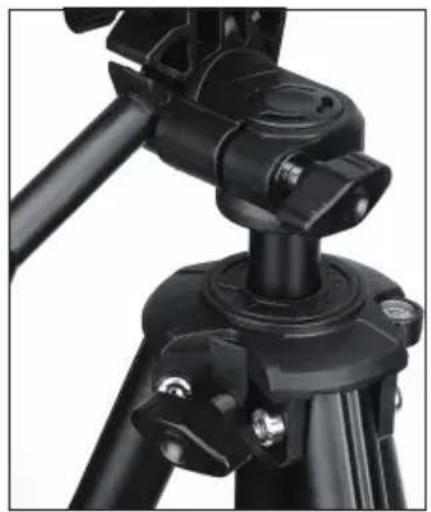
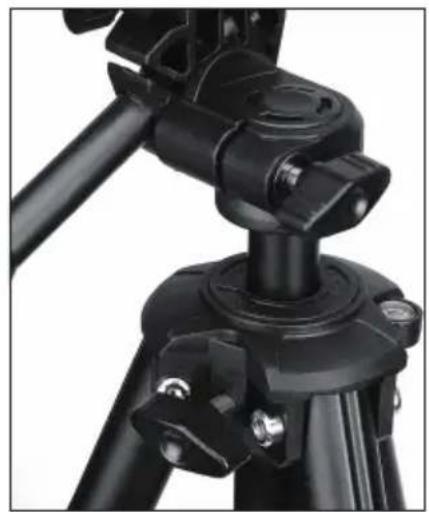
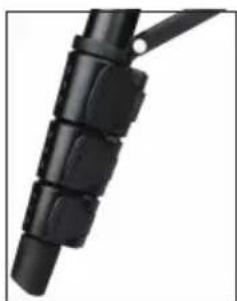
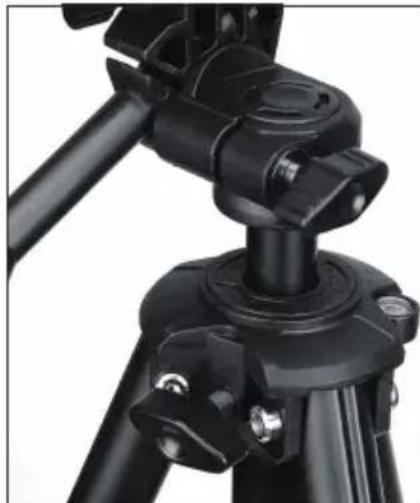
Close-up of a black mechanical component with segmented parts (no visible text or symbols)- If you want to raise the tripod height up further you must use the central column locking knob which is the knob located at the bottom left in Figure 6. Turn the locking knob counterclockwise until loose. Then, pull up on the head of the tripod and the central column will move up. Continue pulling to the height you desire and then tighten the locking knob. When the central column is raised up as far as it will go, then the maximum height possible is achieved – 63" (160 cm)
natural_image
tripod-mounted camera setup with tripod base and tripod legs, labeled 'Fig. 5' (no other text or symbols)Fig. 6
natural_image
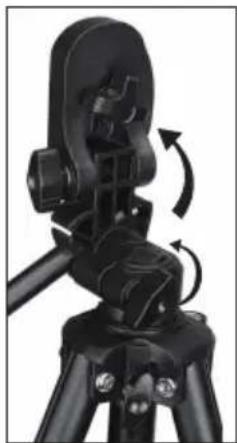
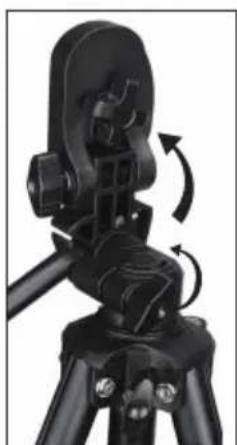
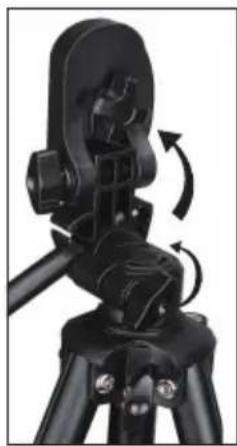
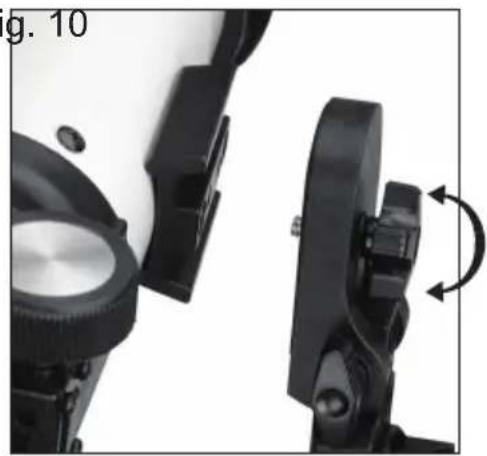
Close-up of a black tripod-mounted camera mount with adjustable base and adjustment knobs (no text or symbols visible)The telescope optical tube attaches to the tripod by using the mounting bracket on the bottom of the optical tube and the mounting platform of the tripod. Before starting make sure all of the knobs on the tripod are locked.
- Remove the protective paper covering the optical tube.
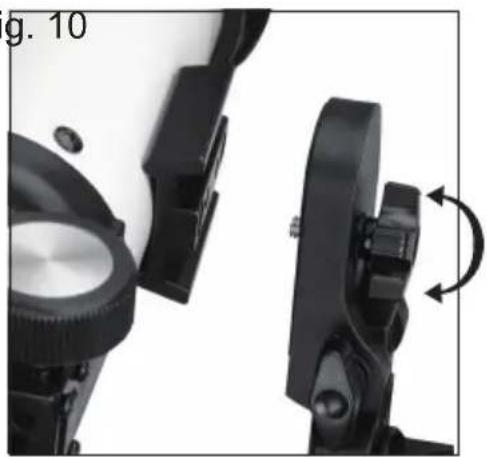
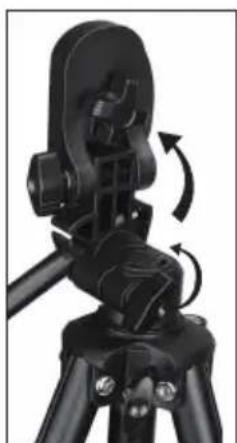
- Loosen the top right knob (Figure 7) by turning it counterclockwise. This allows you to tilt the tripod platform up 90° as shown in Figure 8. After tilting the platform up, tighten the knob to secure it in place.
-
Figure 9 shows the bottom of the optical tube, the tripod platform, and where they will attach to each other.
-
Under the center of the tripod platform, you will see a knob (Figure 9) that contains a 14 × 20 screw to attach the platform to the telescope optical tube.
-
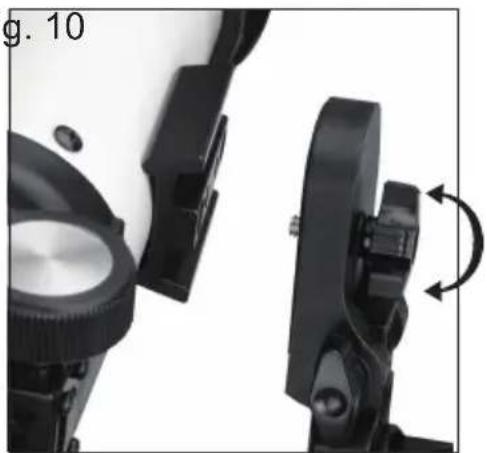
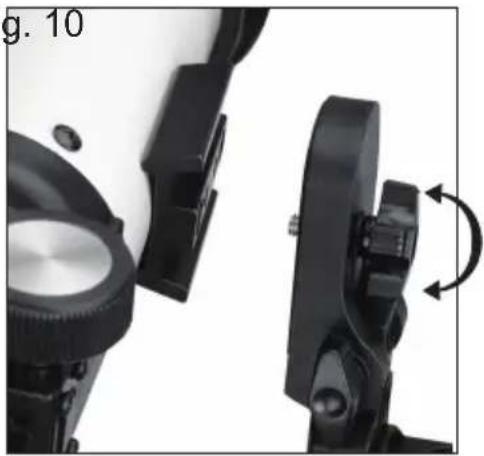
You can put the 14 × 20 screw into the threaded holes of the SV501P (it doesn't matter which one you use) in the mounting bracket of the telescope optical tube whereas Hold the optical tube with one hand while threading the screw clockwise until tight with the other hand. Now the assembly will look like Figure 10.
-
Lastly, loosen the knob for the tripod platform and lower the platform down to the level position. Then, tighten the knob securely.

natural_image
Close-up of a black tripod-mounted camera mount with adjustable base and adjustment knob (no visible text or symbols)Fig. 7

natural_image
Close-up of a black tripod-mounted device with mechanical components and rotational arrows indicating motion (no text or symbols visible)Fig. 8
Fig. 9 Fig. 10
natural_image
Close-up of a black mechanical device with adjustment arrows indicating rotation (no text or symbols)
natural_image
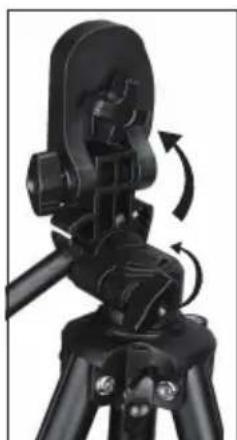
Close-up of black mechanical clamps and brackets (no visible text or symbols)The SV501P is easy to move wherever you want to point it. The up and down (altitude) is controlled by the Pan Handle Control Knob (Figure 1). The side-to-side (azimuth) is controlled by the Azimuth Locking Knob (top left knob in Figure 7).
Both knobs are loosened when turned counterclockwise and tightened when turned clockwise. When both knobs are loose you can find your objects easily (through the finderscope which is discussed shortly) and then lock the controls.
The diagonal is a prism that diverts the light at a right angle to the light path of the telescope. This allows you to observe in a position that is more comfortable than if you had to look straight through. The SV501P diagonal is an erect image model that corrects the image to be right side up and oriented correctly left-to-right which is much easier to use for terrestrial observing. Also, the diagonal can be rotated to any position which is most favorable for you. To install the diagonal and eyepiece:
-
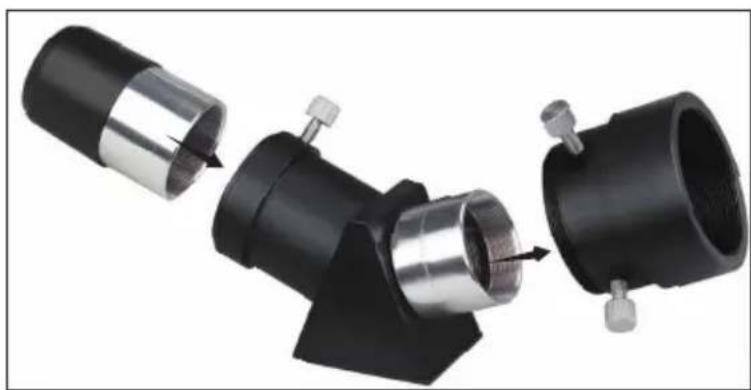
Make sure the two thumbscrews on the rear of the telescope tube do not protrude into the opening before installation, the plug up cap is removed from the opening at the rear of the telescope tube, and the caps are removed from the barrels on the diagonal. Insert the small barrel of the diagonal all the way into the rear opening of the telescope tube (Figure 11). Then tighten the two thumbscrews.
-
Put the chrome barrel end of one of the eyepieces into the diagonal and tighten the thumb screw. When doing this make sure the thumbscrew is not protruding into the diagonal before inserting the eyepiece.
-
The eyepieces can be changed to other focal lengths by reversing the procedure in step 2 above.
Fig. 11
natural_image
Mechanical assembly showing three connected components with metal parts and a valve, no visible text or symbolsFig. 12
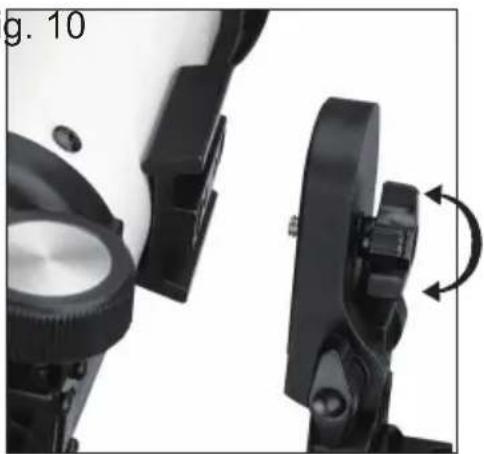
- Locate the finderscope (it will be mounted in the finderscope bracket).
- Remove the knurled nuts on the threaded posts on the telescope tube (Figure 12).
- Mount the finderscope bracket by placing it over the posts protruding from the optical tube and then holding it in place thread on the knurled nuts and tightening them down.
- Note that the finderscope should be oriented so that the larger diameter lens is facing toward the front of the telescope tube.
- Remove the lens caps from both ends of the finderscope.
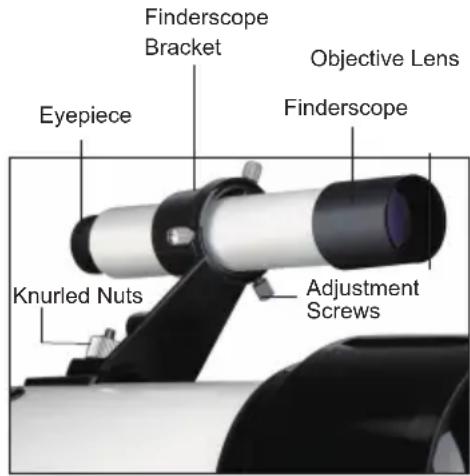
text_image
Finderscope Bracket Objective Lens Eyepiece Finderscope Knurled Nuts Adjustment Screws- Locate a distant daytime object and center it in the low power (20 mm) eyepiece in the main telescope.
- Look through the finderscope (the eyepiece end of the finderscope) and take notice of the position of the same object.
- Without moving the main telescope, turn the adjustment thumbscrews (Figure 12) located around the finderscope bracket until the crosshairs of the finderscope are centered on the object chosen with the main telescope.
- If the image through the finderscope is out of focus, rotate the eyepiece of the finderscope for a clear view.
Note: Objects viewed through a finderscope are upside down and backwards which is normal.
FOCUSING
To focus your SV501P turn the focus knob located near the rear of the telescope (see Figure 1). Turning the knob counterclockwise allows you to focus on an object that is farther than the one you are currently observing.
Turning the knob clockwise from you allows you to focus on an object closer than the one you are currently observing.
Note: Remove the front lens cap of the SV501P optical tube prior to attempting your observation.
Note: If you wear corrective lenses (specifi cally glasses), you may want to remove them when observing with an eyepiece attached to the telescope. If you have astigmatism, corrective lenses should be worn at all times.
While your telescope requires little maintenance, there are a few things to remember that will ensure your telescope performs at its best.
Occasionally, dust and/or moisture may build up on the objective lens of your telescope. Special care should be taken when cleaning any instrument so as not to damage the optics.
If dust has built up on the optics, remove it with a brush (made of camel's hair) or a can of pressurized air. Spray at an angle to the glass surface for approximately two
to four seconds. Then, use an optical cleaning solution and white tissue paper to remove any remaining debris. Apply the solution to the tissue and then apply the tissue paper to the optics. Low pressure strokes should go from the center of the lens (or mirror) to the outer portion. Do NOT rub in circles!
You can use a commercially made lens cleaner or mix your own. A good cleaning solution is isopropyl alcohol mixed with distilled water. The solution should be 60% isopropyl alcohol and 40% distilled water. Or, liquid dish soap diluted with water (a couple of drops per one quart of water) can be used.
Occasionally, you may experience dew build-up on the optics of your telescope during an observing session. If you want to continue observing, the dew must be removed, either with a hair dryer (on low setting) or by pointing the telescope at the ground until the dew has evaporated.
If moisture condenses on the inside of the optics, remove the accessories from the telescope. Place the telescope in a dustfree environment and point it down. This will remove the moisture from the telescope tube.
To minimize the need to clean your telescope, replace all lens covers once you have finished using it. Since the cells are NOT sealed, the covers should be placed over the openings when not in use. This will prevent contaminants from entering the optical tube.
Internal adjustments and cleaning should be done only by the SVBONY repair department. If your telescope is in need of internal cleaning, please call the factory for a return authorization number and price quote.
Note: Specifications are subject to change without notice or obligation.
| TECHNICAL | Model |
| SPECIFICATIONS | SVBONY SV501P |
| Optical Design | Refractor |
| Aperture | 70 mm (2.8") |
| Focal Length | 400 mm |
| Focal Ratio | f/5.7 |
| Optical Coatings | Multi-coated |
| Finderscope | 5x24 |
| Diagonal | Correct-Image Prism -45° 1.25" |
| Eyepieces | 20 mm 1.25" |
| Barlow Lens – 3x 1.25" | N/A |
| Apparent Field of View | 20 mm @ 50° |
| Angular Field of View | 20 mm @ 2.5° |
| Linear Field of View :ft/1000 yards | 20 mm @ 131/44 |
| Near Focus w/20 mm Eyepiece | 19' (5.8 m) |
| Photo Tripod | SVBONY SV101 Tripod Black |
| Altitude Locking Knob | Yes |
| Maximum Length | 138cm/54.3in. |
| Folded length | 45cm/17.7in |
| Highest Useful Magnifi cation | 168x |
| Limiting Stellar Magnitude | 11.7 |
| Optical Tube Length | 17" (43 cm) |
| WARNING | Do not view the sun or other intense light with your products or even with the naked eye; Otherwise there may be permanent eye damage.Kids need to be used under the guardianship of adults to avoid the unnecessary damage.Do not put the plastic package a place your kids can reach. If not, the kids may put the plastic into the mouth and suffer from suffocating. |
Care and Clean:
The item do not need routine maintenance other than making sure that the objective lenses and eyepieces are kept clean. Dirty objectives and/or eyepieces mean less light transmission and loss of brightness as well as unsharp images. Keep your optics clean! When not using your item, store those in the case provided.
Usage Notice:
- Store the product in a ventilated, dry, clean place or put it in a dry box.
- If there are dust and other dirt on the optical lens, use a professional cleaning kit to clean it. Do not wipe it directly with a cloth and a hard brush.
- Please do not disassemble or repair the product yourself. If you need to repair it, please contact our professional after-sales department.
- Do not use non-waterproof products in wet environments, use waterproof products in wet environments, and dry them after use.
- When viewing indoors, please do not close the window and watch it through the window, which will reduce the product observation effect.
Avoid Choking Hazard

Small Parts. Not for children under 10 years.

- This item meets the regulatory standards when used with the Svbony accessories supplied or designated for the product.
- For a list of Svbony-approved accessories for your item, visit the following website: http://www.Svbony.com
前書き
ソーラー警告 8
バッケージ内容....8
望遠鏡を組み立てる....9
三脚をセットアップ……9
natural_image
Black SVBONY telescope on tripod with a black backpack nearby (no visible text or symbols)natural_image
Black tripod with adjustable arm and handle, no visible text or symbolsFig. 4
natural_image
Close-up of a black mechanical component with segmented body and handle (no visible text or symbols)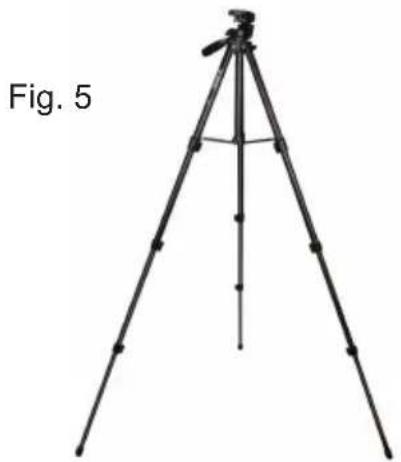
natural_image
tripod-mounted surveying instrument with tripod legs and tripod base, labeled Fig. 5 (no text or symbols on the device itself)Fig. 6
natural_image
Close-up of a black tripod with adjustable mechanical components (no visible text or symbols)natural_image
Close-up of a black tripod-mounted camera mount with adjustable boom and adjustment knobs (no visible text or symbols)Fig. 7

natural_image
Close-up of a black tripod-mounted device with rotational arrows indicating motion (no text or symbols visible)Fig. 8
Fig. 9 Fig. 10
natural_image
Close-up of a camera lens assembly with adjustment mechanism (no text or symbols visible)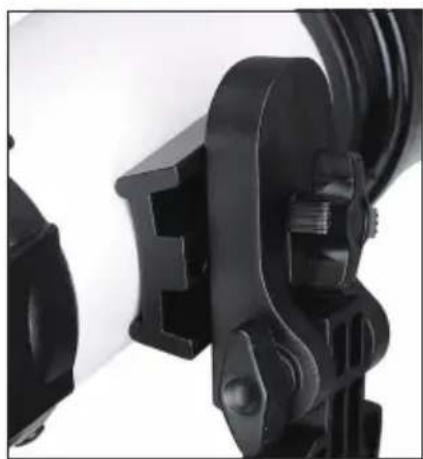
natural_image
Close-up of black mechanical clamps and brackets (no visible text or symbols)natural_image
Savon II telescope setup with a black tripod and a black backpack, labeled 'Fig. 2' (no text on instrument or background)natural_image
Black tripod with tripod-mounted camera and tripod handle (no text or symbols visible)Fig. 4
natural_image
Close-up of a black mechanical component with segmented parts (no visible text or symbols)natural_image
tripod-mounted camera setup with tripod base and tripod legs, labeled 'Fig. 5' (no other text or symbols)Fig. 6
natural_image
Close-up of a black tripod-mounted camera mount with adjustable clamps and mounting hardware (no text or symbols visible)natural_image
Close-up of a black tripod-mounted camera mount with adjustable boom and adjustment knobs (no visible text or symbols)Fig. 7
natural_image
Close-up of a black tripod-mounted camera with directional arrows indicating motion (no text or symbols)Fig. 8
natural_image
Mechanical assembly diagram showing three connected components with metal parts and a valve (no text or symbols visible)Fig. 12
DÉPLACEMENT MANUEL DU SVBONY SV501P 25
INSTALLATION DU RENVOI COUDÉ ET DE L'OCULAIRE 25
INSTALLATION DU FINDERSCOPE 26
ALIGNEMENT DU FINDERSCOPE.... 26
ENTRETIEN DU TÉLESCOPE 27
ENTRETIEN ET NETTOYAGE DES ÉLÉMENTS OPTIQUES.... 27
SPÉCIFICATIONS TECHNIQUES.... 28
natural_image
SvBONY telescope on tripod with backpack, no visible text or symbols on the instrument itselfnatural_image
Black tripod with tripod-mounted camera and tripod-mounted stand (no text or symbols visible)Fig. 4
natural_image
Close-up of a black mechanical component with segmented parts (no visible text or symbols)natural_image
tripod-mounted surveying instrument with tripod legs and tripod base, labeled Fig. 5 (no text or symbols on the device itself)Fig. 6
natural_image
Close-up of a black tripod-mounted camera mount with adjustable base and mounting feet (no text or symbols visible)natural_image
Close-up of a black tripod-mounted camera mount with adjustable base and adjustment knob (no visible text or symbols)Fig. 7
natural_image
Close-up of a black tripod-mounted device with rotational arrows indicating motion (no text or symbols visible)Fig. 8
natural_image
Close-up of a camera lens assembly with adjustment arrows indicating rotation (no text or symbols)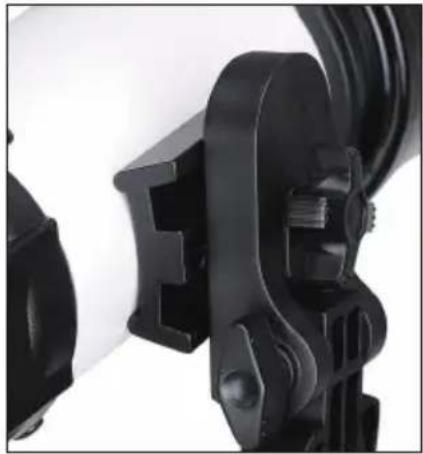
natural_image
Close-up of black camera lens components with no visible text or symbolsnatural_image
Mechanical assembly diagram showing three connected components with metal fittings and a central shaft (no text or symbols visible)Fig. 12
natural_image
SvBONY telescope setup with tripod and backpack (no visible text or symbols on the device itself)natural_image
Black tripod with tripod-mounted camera and tripod-mounted stand (no visible text or symbols)Fig. 4
natural_image
Close-up of a black mechanical component with segmented parts (no visible text or symbols)natural_image
tripod-mounted surveying instrument with tripod legs and tripod base, labeled Fig. 5 (no text or symbols on the device itself)Fig. 6
natural_image
Close-up of a black tripod-mounted camera mount with adjustable base and mounting feet (no text or symbols visible)natural_image
Close-up of a black tripod-mounted camera mount with adjustable grip and mounting bracket (no visible text or symbols)Fig. 7
natural_image
Close-up of a black tripod-mounted mechanical device with rotational arrows indicating motion (no text or symbols visible)Fig. 8
Fig. 9 Fig. 10
natural_image
Close-up of a camera lens assembly with adjustment arrows indicating rotation (no text or symbols)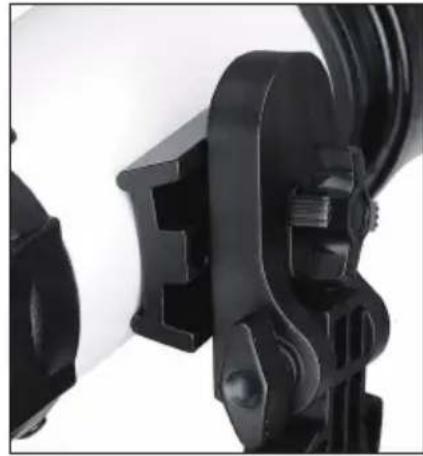
natural_image
Close-up of black mechanical clamps and connectors (no visible text or symbols)natural_image
Mechanical assembly diagram showing three connected components with metal parts and a valve (no text or symbols)Fig. 12
natural_image
Exterior view of a SVBONY telescope on a tripod with a black backpack nearby (no text or symbols visible on the instrument body)natural_image
Black tripod with adjustable arm and tripod base (no text or symbols visible)Fig. 4
natural_image
Close-up of a black mechanical component with segmented body and handle (no visible text or symbols)natural_image
tripod-mounted camera setup with tripod base and tripod legs (no text or symbols visible)Fig. 6
natural_image
Close-up of a black tripod-mounted camera mount with adjustable base and mounting bracket (no text or symbols visible)natural_image
Close-up of a black tripod-mounted camera mount with adjustable base and adjustment knobs (no visible text or symbols)Fig. 8
natural_image
Close-up of a black tripod-mounted camera with visible mechanical components and rotational arrows (no text or symbols)Fig. 9 Fig. 10
natural_image
Close-up of a camera lens assembly with adjustment mechanism (no text or symbols visible)
natural_image
Close-up of black mechanical clamps and connectors (no visible text or symbols)natural_image
Mechanical assembly diagram showing three connected components with metal parts and a valve (no text or symbols visible)(SÓLO PARA EL TRAVEL SCOPE 70)
natural_image
SvBONY telescope setup with tripod and backpack (no visible text or symbols on the instrument body)natural_image
Black tripod with tripod-mounted sensor and handle, labeled 'Fig. 3' (no other text or symbols)Fig. 4
natural_image
Close-up of a black mechanical component with segmented body and handle (no visible text or symbols)natural_image
tripod-mounted tripod with tripod legs and tripod base, labeled 'Fig. 5' (no other text or symbols)Fig. 6
natural_image
Close-up of a black tripod-mounted camera mount with adjustable base and adjustment knobs (no text or symbols visible)natural_image
Close-up of a black tripod-mounted camera mount with adjustable head and tripod base (no visible text or symbols)Fig. 7
natural_image
Close-up of a black tripod-mounted camera with visible mechanical components and rotational arrows (no text or symbols)Fig. 8
Fig. 9 Fig. 10
natural_image
Close-up of a camera lens assembly with adjustment mechanism (no text or symbols visible)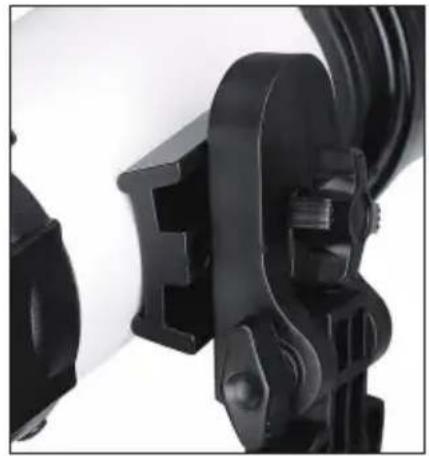
natural_image
Close-up of a black mechanical clamp or bracket component (no visible text or symbols)natural_image
Mechanical assembly showing three connected components with metal parts and a valve, no visible text or symbols| Warranty Card | |
| Product Model | |
| Purchasing Date | |
| Defect Reason | |
| Dealer Name | |
| Telephone | |
| User's Name | |
| User's Address | |
| User's Email | |
Remarks:
- This guarantee card should be kept by the user, no replacement if lost.
- Most new products carry a one-year manufacturer's warranty from the date of purchase.
- The user can get warranty and after-sales service as below:
- Contact the seller where you buy.
- For warranty service, you will need to provide a receipt proof of purchase from the actual seller for verification
Exclusions from Warranty Coverage:
- To any product damaged by accident.
- In the event of misuse or abuse of the product or as a result of unauthorized alterations or repairs.
- If the serial number has been altered, defaced, or removed.

natural_image
Recycling symbol with four arrows forming a triangle (no text or labels)MADE IN CHINA
Hong Kong Svbony Technology Co., Ltd
Add: Unit B, 5th Floor, Gallo Commercial Building,
114-118 Lockhart Road, Wanchai, Hong Kong
Facebook: facebook.com/svbony
E-mail: info@svbony.com
Web: www.svbony.com
说明书要求
尺寸:145*210mm
印刷:
1、黑白印刷
装订:
1、骑马钉
纸张材质:
1、双胶纸
本页无需印刷