
4822 - Chopper Hobart - Free user manual and instructions
Find the device manual for free 4822 Hobart in PDF.
| Product Type | Electric Meat Grinder |
| Brand | Hobart |
| Model | 4822 |
| Motor Power | 1 1/2 HP (1.12 kW) |
| Grinding Capacity (1/8 inch plate) | 16 lb/min (7.25 kg/min) |
| Capacity with Hopper Cylinder (optional) | 20-22 lb/min (9-10 kg/min) |
| Power Supply | Single-phase or three-phase depending on model (grounded plug) |
| Protection | Mandatory grounding |
| Drive Type | Worm gear with drive hub |
| Main Components | Feed pan, pusher, cylinder, worm, knife, plate, retaining ring |
| Cylinder Material | Stainless steel (not confirmed, deduced) |
| Standard Plate Diameter | 1/8 inch (3 mm) |
| Cleaning | Nylon brush, hot detergent, disinfectant (sodium hypochlorite 200 ppm) |
| Lubrication | Food-grade mineral oil on cylinder, ring, knife, worm |
| Drainage | Drain holes at hub and cylinder to be checked periodically |
| Air Filter | Under the base, clean with cloth or brush if dusty |
| Safety | Unplug before cleaning or maintenance; never run empty without meat |
| Installation | Screw feet to chassis, no anchoring required; check rotation direction |
| Recommended Use | Cut meat into strips, feed without pusher if possible; do not overtighten retaining ring |
| Periodic Maintenance | Complete cleaning after each day of service or after prolonged inactivity |
| After-Sales Service | Contact your local authorized Hobart service |
Frequently Asked Questions - 4822 Hobart
User questions about 4822 Hobart
0 question about this device. Answer the ones you know or ask your own.
Ask a new question about this device
Download the instructions for your Chopper in PDF format for free! Find your manual 4822 - Hobart and take your electronic device back in hand. On this page are published all the documents necessary for the use of your device. 4822 by Hobart.
USER MANUAL 4822 Hobart
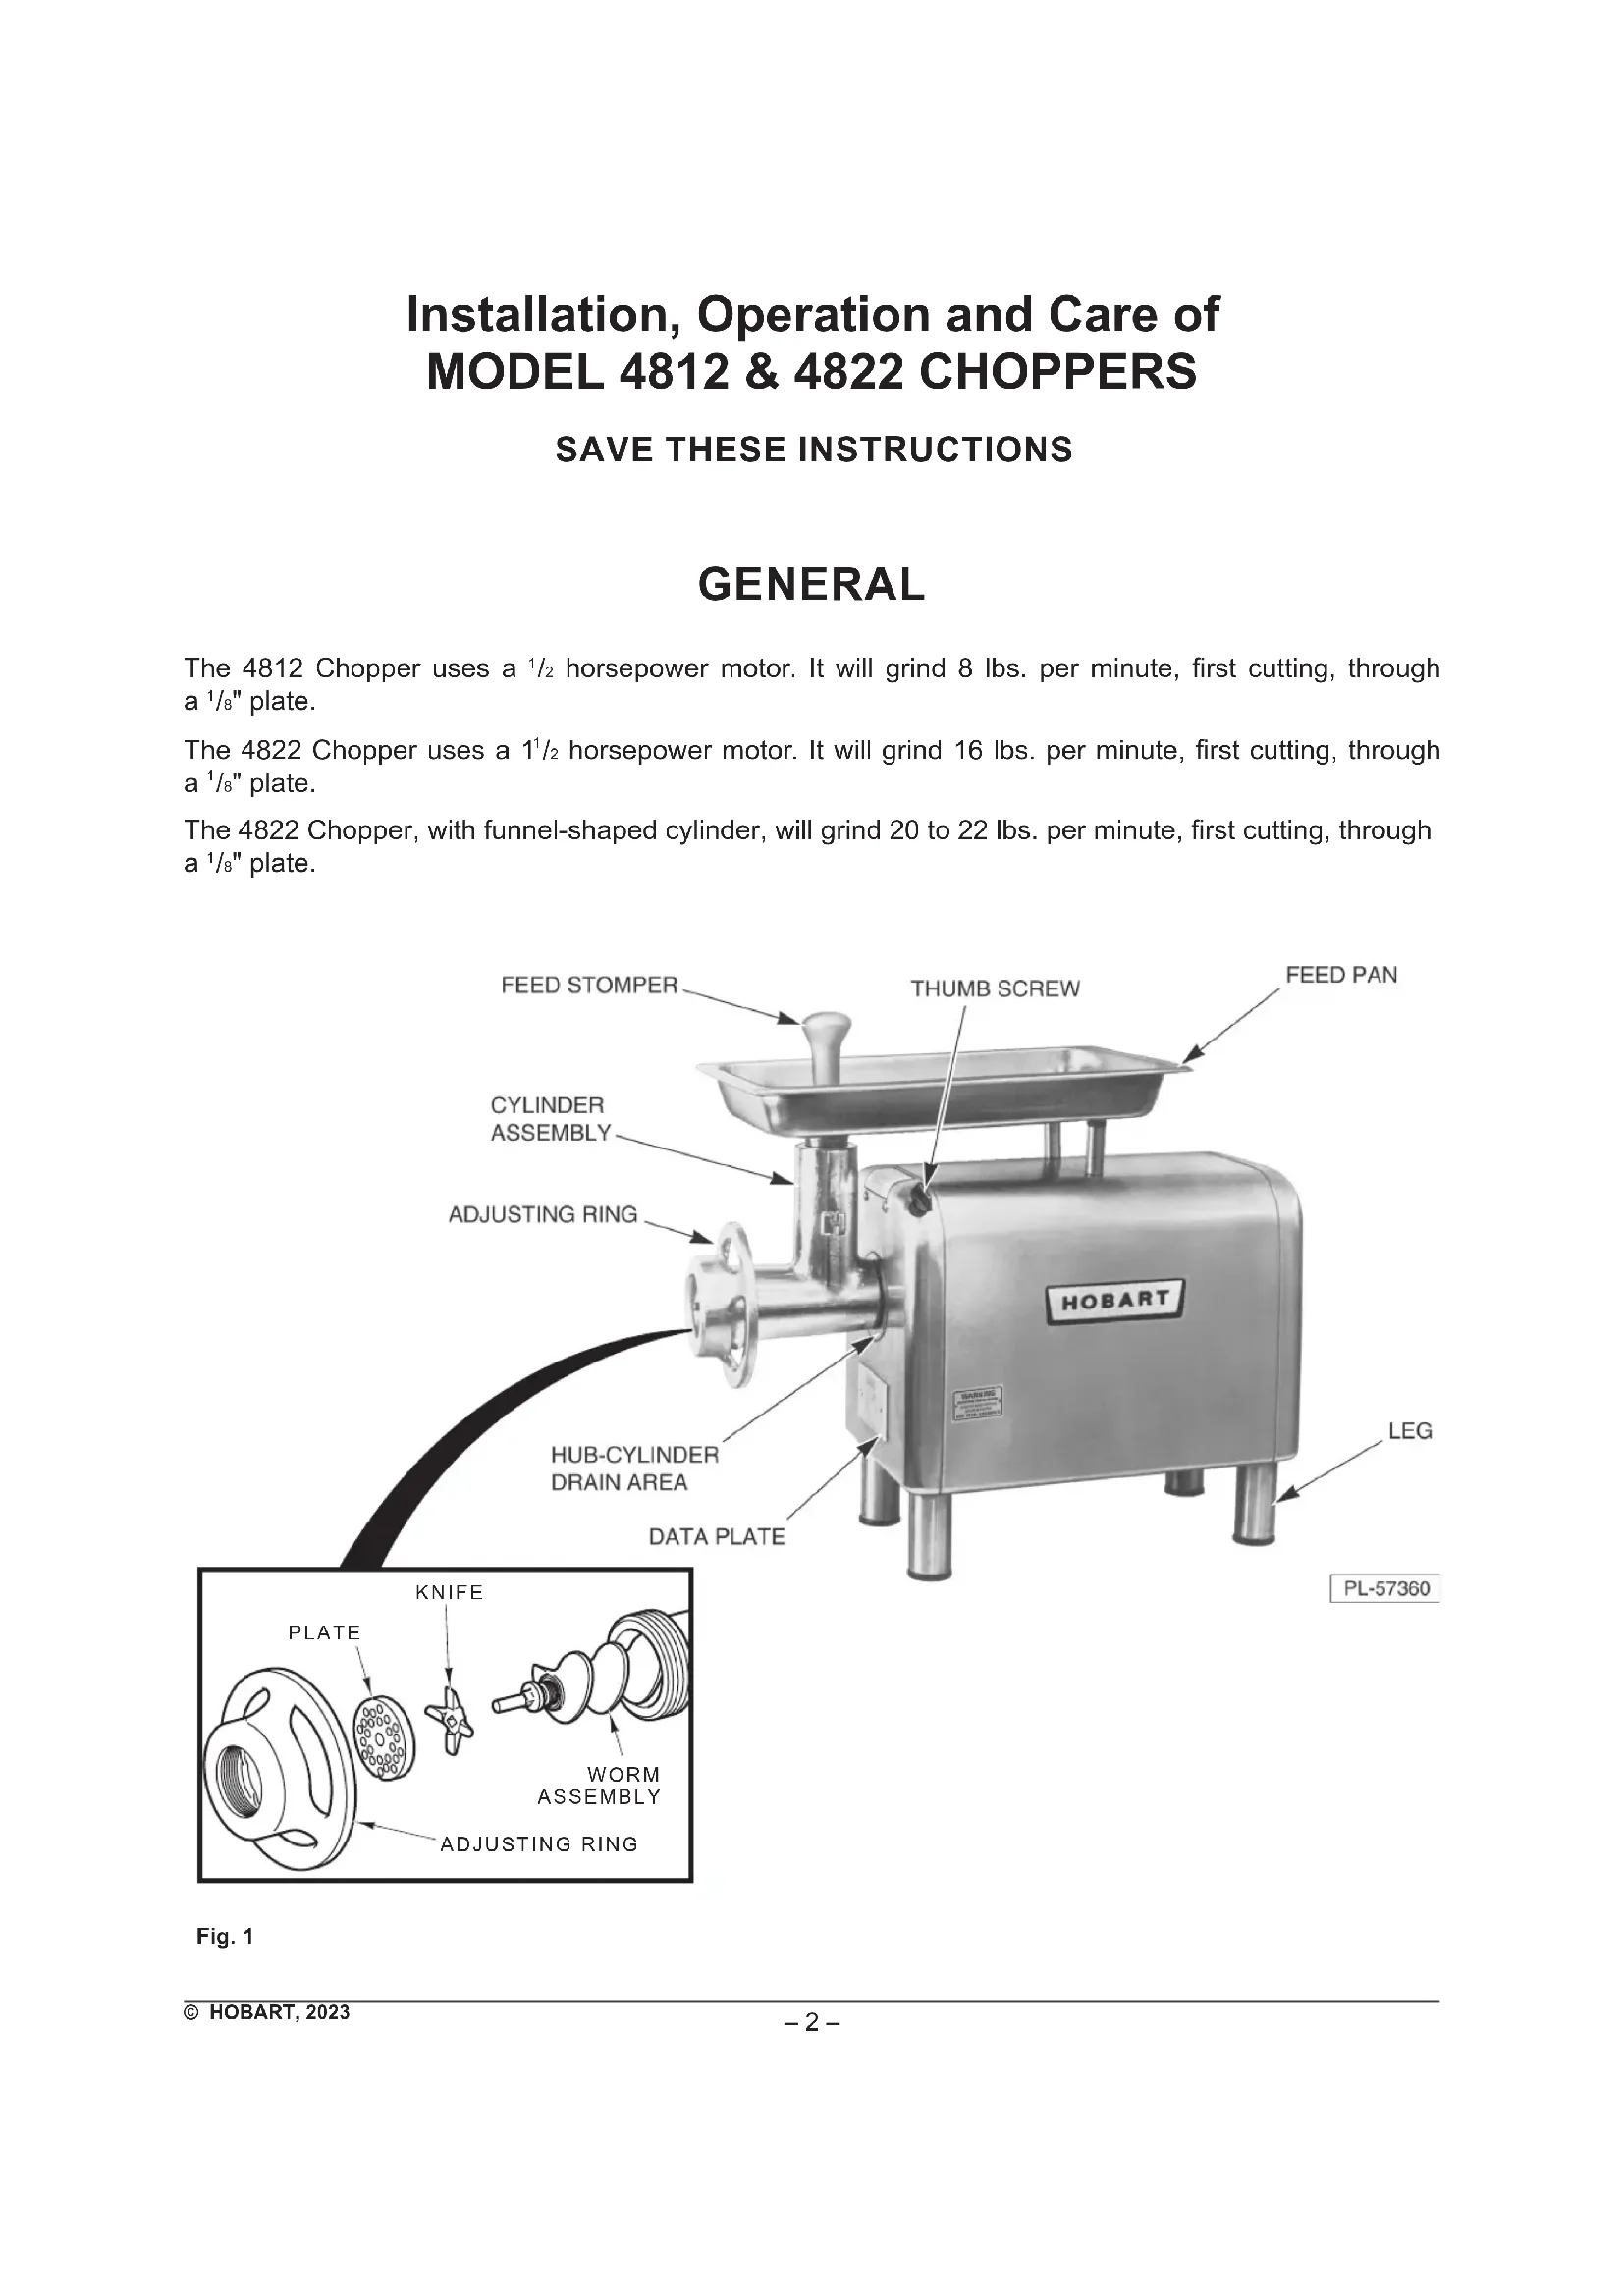
Installation, Operation and Care of MODEL 4812 & 4822 CHOPPERS
SAVE THESE INSTRUCTIONS
GENERAL
The 4812 Chopper uses a ^1/2 horsepower motor. It will grind 8 lbs. per minute, first cutting, through a ^1/8 " plate.
The 4822 Chopper uses a 1^1/2 horsepower motor. It will grind 16 lbs. per minute, first cutting, through a 1/8" plate.
The 4822 Chopper, with funnel-shaped cylinder, will grind 20 to 22 lbs. per minute, first cutting, through a 1/8 plate.
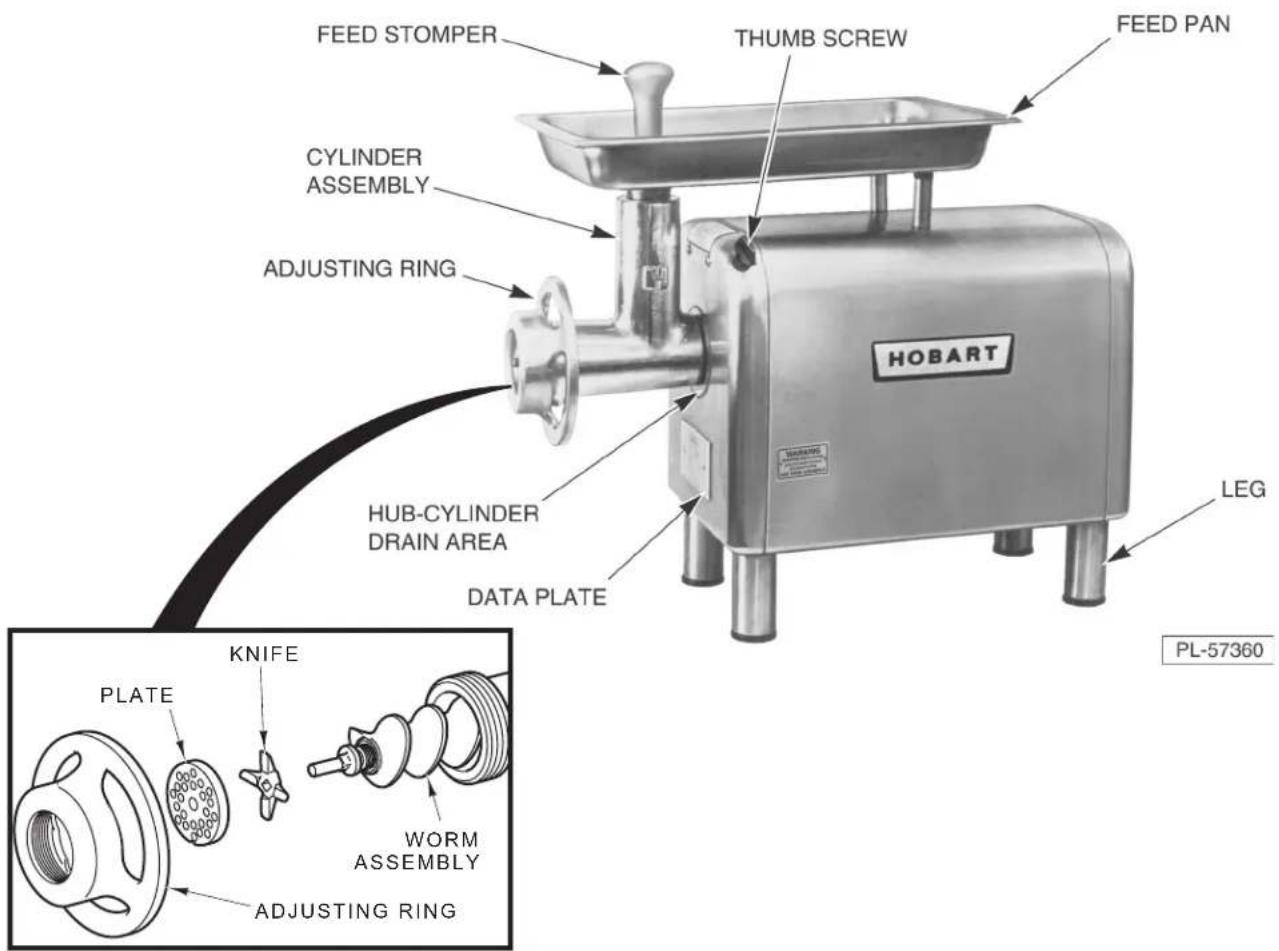
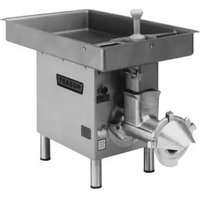
Fig. 1
INSTALLATION
UNPACKING
Remove the carton from around the machine. Remove the four bolts holding the machine to the skid. Unpack the chopper cylinder assembly.
The chopper was inspected before leaving the factory. The carrier assumes full responsibility for the safe delivery upon acceptance of the shipment. Check for possible shipping damage immediately after receipt.
If the chopper is found to be damaged, complete the following steps;
- Carrier must be notified within five business days of receipt.
- Carrier's local terminal must be notified immediately upon discovery (note time, date, and who was spoken to), and follow up and confirm with written or electronic communication.
- All original packing materials must be kept for inspection purposes.
- The chopper cannot have been moved, installed, or modified.
- Notify Hobart customer care at (800) 333-7447.
Prior to installation, test the electrical service to make sure that it agrees with the specifications on the machine data plate.
The four leg assemblies (Fig. 1) are removed and packed in a separate carton for shipment. Unpack and assemble these legs by screwing them into the four tapped holes of the frame. The rubber feet on these legs cushion the machine. Under normal operation, the machine need not be bolted down.
ELECTRICAL CONNECTIONS
⚠ WARNING The electrical cord on this machine is equipped with a grounding-type plug which must be connected to a properly grounded receptacle. If the receptacle is not the proper grounding type, contact an electrician. Do not remove the grounding prong from the plug.
Choppers with three phase motors should be connected so that the hub drive runs counterclockwise facing the cylinder assembly.
A check must be made to verify correct direction of rotation. Energize machine momentarily by turning switch ON then OFF.
If rotation is incorrect, disconnect plug from electrical outlet, disassemble the plug and interchange any two power leads (not the green ground lead). Then reassemble the plug and recheck.
CLEANING
WARNING Unplug chopper power cord before cleaning.
The chopper must be thoroughly cleaned and sanitized after installation and before being placed into service.
Cleaning Supplies (Not Provided)
Recommended cleaning and sanitizing supplies include:
- A 12" handle nylon brush that will slide through the cylinder
- A two compartment pail for cleaning solutions
• A pail for sanitizing solution - A scrap pail
- Clean cloths
- A spray bottle
NOTE: When using detergents and sanitizers, follow manufacturer's instructions. Rinse with clean water.
Prepare a hot detergent solution in one side of the two compartment pail. Fill the other compartment with warm potable rinse water.
Mix a sanitizing solution by adding one tablespoon of sodium hypochlorite bleach (5.25%) to one gallon of water in a pail. This makes a 200 ppm solution. Use this solution to fill the spray bottle as well as the pail for sanitizing.
Thoroughly clean and sanitize the feed pan, feed stomper, chopper cylinder assembly, worm assembly, knife, plate, adjusting ring and machine housing. Refer to Fig. 1 for component identification.
NOTE: After cleaning, apply a light coat of food grade mineral oil to the cylinder, adjusting ring, knife, plate and worm before reassembly.
ASSEMBLY
Check to assure the hub and hub drive are clean and clear of any obstruction. Insert the cylinder assembly with a slight twisting motion toward the left. The cylinder stop pin will contact the side of the hole that receives it. Tighten the thumb screw.
NOTE: Upon disassembly it is only necessary to loosen the thumb screw about three turns. It should never be removed.
Slide the worm into the cylinder and rotate until the square shank of the worm locks into the hub drive. Install the knife with cutting edges facing out, and the plate, making sure the notch aligns with the pin in the bottom of the cylinder. Thread the adjusting ring on hand tight. Install the feed pan and feed stomper.
NOTE: On the model 4822 with funnel-shaped cylinder, tighten the feed pan thumb screw (Fig. 2), holding the pan securely to the chopper cylinder assembly.
NOTICE The knife and plate depend on meat for lubrication. Therefore, the chopper should never be operated without meat.
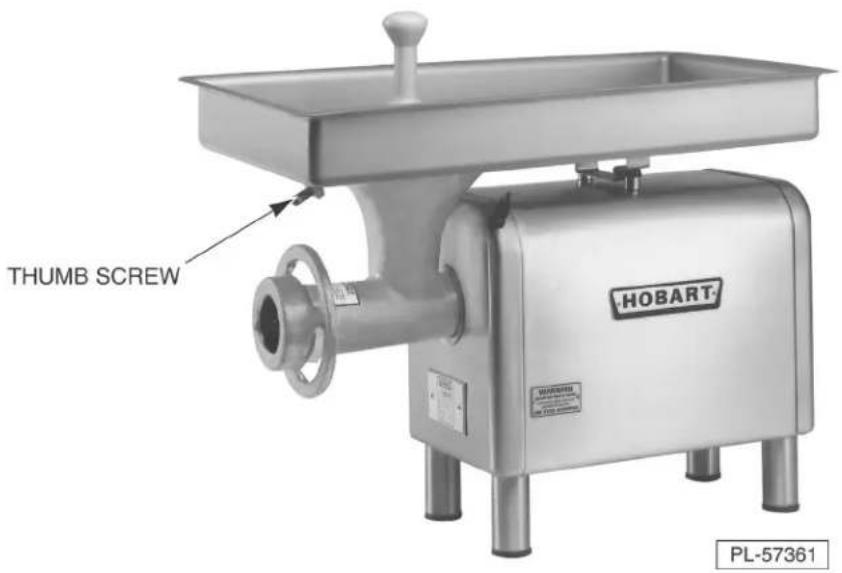
Fig. 2
OPERATION
Cut the meat into strips, turn the machine ON and feed the meat strips into the chopper, using the feed stomper only as needed. If the strips are cut to proper size, they will feed without assistance from the feed stomper, allowing both hands of the operator free to feed meat. When running meat through the chopper a second time, more speed is attained by feeding small quantities at a time than by trying to force large amounts with the feed stomper.
The feed pan should always be kept in place on the cylinder. It not only makes regular feeding easy, but keeps the chopper attachment ready for immediate use. The fineness to which the meat is cut is governed by the size of the holes in the perforated plate, not by the tension put on the adjusting ring. Do not tighten the adjusting ring more than hand tight.
MAINTENANCE
⚠ WARNING Unplug chopper power cord before cleaning, servicing or removing parts. Replace parts before use.
MACHINE CLEAN UP
The machine should be thoroughly cleaned at the end of an operating day or after being idle for an extended period of time. Refer to CLEANING for proper procedure.
HUB AND CYLINDER DRAIN
Hub Drain
A drain slot in the trim washer allows any meat juices to drain from the hub. This slot should be inspected periodically to make sure that it is free of obstructions. A small brush can be used to remove any material which may have accumulated.
Cylinder Drain
A drain hole at the bottom end of the cylinder allows any meat juices to drain. This hole should be inspected periodically to make sure that it is free of obstructions. A small wire can be used to remove any material which may have accumulated.
AIR INTAKE
Under normal operating conditions the motor air intake screen, located in the base of the chopper, will need little or no attention. However, in some installations where sawdust or other foreign materials are present in the air, this intake screen may become partially or completely covered. Where an adverse dust condition does exist, periodically check the screen and wipe clean with a rag or brush as required.
STORAGE
The chopper should be completely cleaned and covered with a towel or other suitable cover when it is not to be used in the immediate future.
SERVICE
Contact your local Hobart authorized service office for any repairs or adjustments needed on this equipment.
PICADORAS 4812 Y 4822
MODELO
4812 ML-136151
ML-136152
4822 ML-136125
ML-136126
HOBART
701 S. RIDGE AVENUE
TROY, OHIO 45373
937 332-3000
www.hobartcorp.com
4822

4812


- Installation, Operation and Care of MODEL 4812 & 4822 CHOPPERS
- GENERAL
- INSTALLATION
- UNPACKING
- ELECTRICAL CONNECTIONS
- CLEANING
- WARNING Unplug chopper power cord before cleaning.
- Cleaning Supplies (Not Provided)
- ASSEMBLY
- OPERATION
- MAINTENANCE
- MACHINE CLEAN UP
- HUB AND CYLINDER DRAIN
- Hub Drain
- Cylinder Drain
- AIR INTAKE
- STORAGE
- SERVICE
- PICADORAS 4812 Y 4822
Brand : Hobart
Model : 4822
Category : Chopper