
4812 - Chopper Hobart - Free user manual and instructions
Find the device manual for free 4812 Hobart in PDF.
| Product type | Professional electric meat grinder |
| Brand | Hobart |
| Model | 4812 |
| Category | Grinder |
| Motor power | 0.373 kW (0.5 hp) |
| Rated voltage | 230 V / 1 phase / 50 Hz |
| Full load current | 2.9 A |
| Recommended fuse | 10 A |
| Grinding capacity | 3.63 kg/min (first grind with 3 mm plate) |
| Rotation speed | 1425 rpm (50 Hz) |
| Noise level | Less than 70 dB(A) |
| Weight (body only) | 39 kg |
| Weight (with grinder head) | 51 kg |
| Shipping dimensions (body) | 65.5 x 40.5 x 58.5 cm |
| Ambient temperature | 0 °C to 40 °C |
| Appliance category | Category 1 |
| Protection rating (IP) | IP35 |
| Materials | Carbon steel for plates and knives, plastic for pusher |
| Main functions | Meat grinding, sausage making (accessories included) |
| Safety | Zero voltage safety device (no automatic restart), emergency stop (red button), overload protection (thermal relay) |
| Maintenance and cleaning | Daily cleaning with detergent and disinfection, draining of meat juices, nylon brush recommended |
| Spare parts available | Knives, plates, worm screws, rings, pushers, switches, motor, etc. |
| Repairability | Authorized Hobart technicians, inspection contract possible |
Frequently Asked Questions - 4812 Hobart
User questions about 4812 Hobart
0 question about this device. Answer the ones you know or ask your own.
Ask a new question about this device
Download the instructions for your Chopper in PDF format for free! Find your manual 4812 - Hobart and take your electronic device back in hand. On this page are published all the documents necessary for the use of your device. 4812 by Hobart.
USER MANUAL 4812 Hobart
natural_image
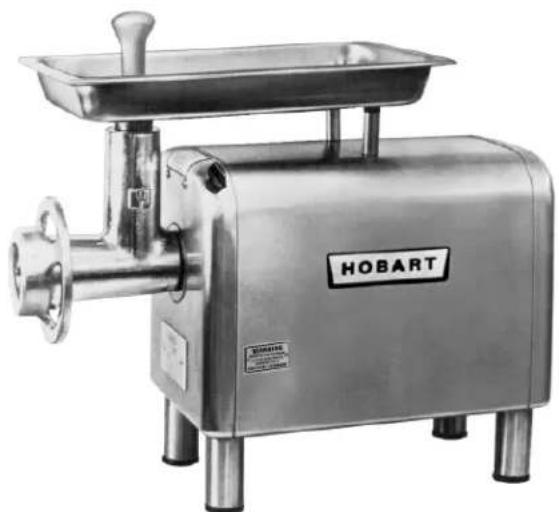
Industrial stainless steel robotic meat maker (HOBART) with no visible text or symbols on the device itself.MODEL
4812
ML-136159
Page 1 - English
Page 17 - French
Page 33 - German
INSTALLATION AND OPERATION MANUAL MANUEL D'INSTALLATION ET D'UTILISATION INSTALLATIONS UND BEDIENUNGSANLEITUNG
ENGLISH / CONTENTS
| 4812 CE Mincer Section Page | ||
| Safety Information 1.0 3 | ||
| Safety Guidelines 1.1 3 | ||
| Warning Symbols 1.2 3 | ||
| Liability 1.3 3 | ||
| Foreword 2.0 4 | ||
| General Information 3.0 4 | ||
| Caring for Our Environment 4.0 4 | ||
| Packaging Material 4.1 4 | ||
| Disposal of Your Old Appliance 4.2 4 | ||
| Mincer Dimensions 5.0 5 | ||
| Table 1 Technical Information 6.0 6 | ||
| Installation 7.0 7 | ||
| Un-Packing | 7.1 7 | |
| Location | 7.2 7 | |
| Electrical Installation | 7.3 7 | |
| Commissioning and Operating Instructions | 8.0 8 | |
| Operator Training 8.1 8 | ||
| Using for the First Time | 8.2 8 | |
| Component Identification: | 8.3 | 8 |
| Assembly of Mincing End and Feed Pan | 8.4 9 | |
| Operation | 9.0 9 | |
| Controls | 9.1 9 | |
| Mincing | 9.2 9 | |
| Cleaning and Sanitizing | 10.0 | 10 |
| Maintenance | 11.0 | 11 |
| Fault Finding | 12.0 | 12 |
| Recommended Spares | 13.0 | 13 |
| Notes | 14.0 | 14 |
| Service Contact Numbers | 15.0 | 15 |
1.0 SAFETY INFORMATION
The procedures and precautions contained in this manual are understood to apply to the machinery only when it is used in the prescribed manner. If the machinery is used other than in the recommended manner, the operator will be responsible for his/her own safety and for the safety of the other persons who may be involved.
The information in this manual has been prepared to assist the operator to understand, maintain, and operate the mincer. In order to prevent accidents, read, understand and follow all the precautions and warnings contained in this manual before installation or operating for the first time. This manual must be studied to obtain a clear understanding of the mincer and its capabilities.
1.1 SAFETY GUIDELINES
- Do not hose or pressure clean this appliance. It is vital to adhere to the cleaning instructions detailed in this manual.
- Do not remove any covers or loosen any fittings whilst the machine is operating.
- Ensure this manual is kept in an easily accessible place for future reference near the mincer.
- All operators must be trained in the safe operation of the mincer and its components.
- Ensure the electrical supply has been isolated before attempting to service or move the mincer.
- Rotating machinery and electricity are potentially hazardous and may cause injury if sufficient precautions are not taken prior to operating or servicing the machine.
- Always have your miner and attachments regularly serviced; at least twice a year, depending on frequency of use.
1.2 WARNING SYMBOLS
To identify the safety messages in this manual, the following symbols have been used.
⚠ WARNING The “Warning” symbol is found primarily where the corresponding information is important for the safe use of the machinery.

The electrical hazard symbol is used when there are risks of an electrical nature. Prior to servicing the machinery, always disconnect the power cable from the mains supply.
1.3 LIABILITY
Installations and repairs which are not carried out by Authorized technicians or the use of other than original spare parts, and any technical alterations to the machine, may affect the warranty set out in the standard conditions of sale.
2.0 FOREWORD
Hobart reserves the right to alter the design of their products without prior notice. Whilst every effort is made to ensure this publication reflects the latest design, the Company cannot guarantee full compliance. Take pride in your 4812 Mincer - keep it clean and in good mechanical and electrical condition.
3.0 GENERAL INFORMATION
The information and instructions contained in this manual may not cover all details or variations in the equipment, not provide for every eventuality to arise with installation, operation, or maintenance. If additional information is required, please contact your local Hobart office.
The Model 4812 Mincer has a 0.37 kw (0.5 hp) electric motor. The 4812 will grind meat at a rate of 3.63 kg per minute (8 pounds), first cut through a plate with 3 mm (1/8 inch) diameter holes.
The machine is rated to operate on 230 volts/50 hertz/1 phase electrical supply. The mincer is fitted with a “no volt release” safety feature to prevent automatic restarting after a supply failure or disconnection from the mains.
4.0 CARING FOR OUR ENVIRONMENT
4.1 PACKAGING MATERIAL
The pallet and protective polyethylene packing film have been selected from materials that are environmentally friendly for disposal or can be recycled. Instead of throwing them away, please ensure they are recycled.

natural_image
Simple line drawing of a recycling symbol (three chasing arrows), no text or labels present.4.2 DISPOSAL OF YOUR OLD APPLIANCE
Old appliances contain materials that can be recycled. Please contact your local waste collection centre; scrap merchant or local Hobart office about potential recycling schemes.
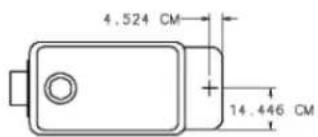
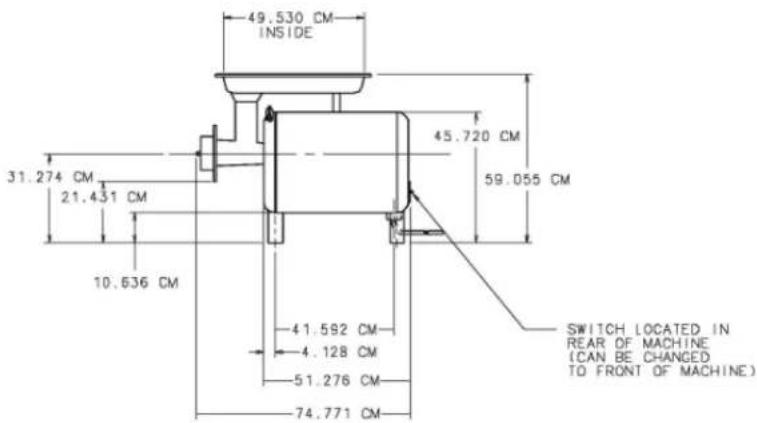
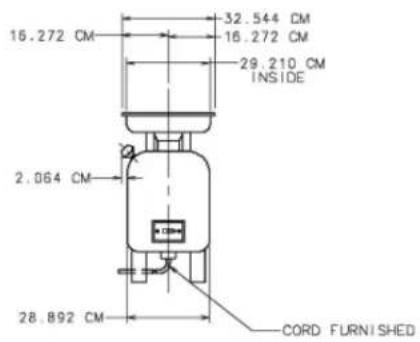
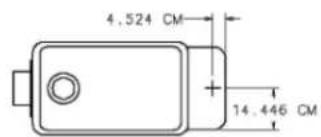
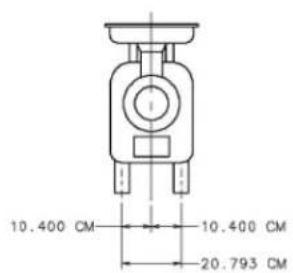
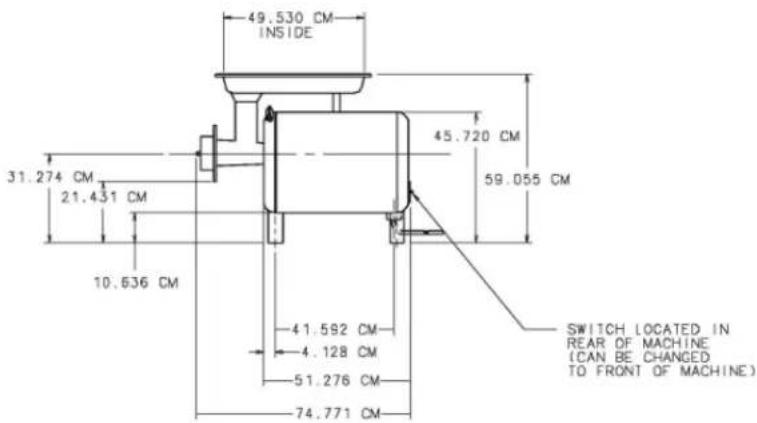
5.0 MINCER DIMENSIONS
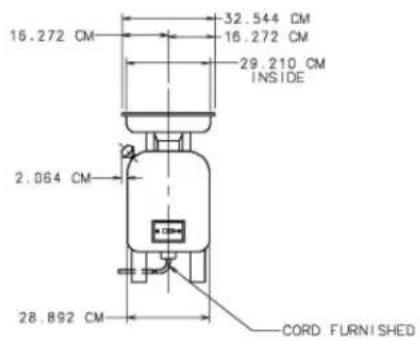
| STANDARD ELECTRICAL SPECIFICATIONS | |||
| VOLTAGE | HZ | PH | USAGE |
| 230 | 50 | 1 | EUROPE/CE |

6.0 TABLE 1 TECHNICAL INFORMATION
| Description Units 4812 | ||
| Motor kW (hp) .373 (.5) | ||
| Maximum speed of rotating part (50Hz) rpm 1425 | ||
| Nominal electrical supply Volts/Hz/ph 230/50/1 | ||
| Full load current at above voltage Amps 2.9 | ||
| Locked rotor current at above voltage Amps 15 | ||
| Recommended fuse size Amps 10 | ||
| Minimum ambient temperature | °C | 0 |
| Maximum ambient temperature | °C | 40 |
| Attachment hub drive size | -- | #12 |
| Mincer weight (body only) | Kg (Lbs) | 39 (86) |
| Mincer with chopping end weight | Kg (Lbs) | 51 (122) |
| Noise level | dB (A) | ##less than 70 |
| Shipping weight (body only) | Kg (Lbs) | 48 (105) |
| Mincing end, shipping weight | Kg (Lbs) | 10.2 (23) |
| Shipping dimensions (carton with body only) | LxWxH cm | 65.5 x 40.5 x 58.5 |
| Storage conditions. Temperature and humidity. | °C,% RH | +5 to +38,85 |
| Class of appliance | -- | Class 1 |
| Enclosure IP rating | -- | IP35 |
In accordance with EN-ISO 12001:1996.
7.0 INSTALLATION
7.1 UN-PACKING
Whenever possible the mincer should be transported to the installation position in the packaging provided to avoid damage. Do not use a sharp knife to cut into the box as damage to the machine may occur. Check for possible shipping damage. If the unit is found to be damaged, save the packaging material and contact your nearest Hobart sales office. Before installing, verify that the electrical service agrees with the specifications on the rating plate located on the front panel of the mincer below the drive hub.

With the machine in the vicinity of its final position, remove carton from around the machine. Remove the four bolts holding the machine to the skid. Unpack the mincer attachment carton.
After removing the skid, screw the threaded studs of the four legs (provided) into the tapped holes in the four corners of the base. The rubber feet on these legs cushion the machine. Under normal operation, the machines does not need to be bolted down.
7.2 LOCATION
WARNING The mincer is not suitable for outdoor installation and must not be installed where a water jet could be used for cleaning. The mincer must only be operated by trained staff and must be installed in a area where the use and maintenance is restricted to trained personnel.
The mincer must be installed on a horizontal flat surface level to a minimum of 1mm in a 1 metre side to side and front to back. Select a suitable flat surface that can support the weight of the mincer and feed pan when full (refer to table 1 for weights and page 5 for dimensions).
7.3 ELECTRICAL INSTALLATION

The electrical installation of the mincer must conform to the local electricity board regulations. When installed in the United Kingdom the installation must be in accordance with the current edition of the IEE Regulations for electrical equipment in buildings and must conform to the requirements of the Electricity at work act.
A competent person must carry out the electrical installation.
The technical data shown in Table 1, page 6 details the electrical requirements for the mincer. Ensure that the electrical power supply agrees with the machine specification prior to connection.
The mincer is equipped with a three-wire power supply cord ready for installation of an appropriate grounding-type attachment plug. The plug and its mating receptacle must be properly grounded. Contact an electrician. Provide proper fuse or circuit breaker protection.
8.0 COMMISSIONING AND OPERATING INSTRUCTIONS
Take time to explain the correct operation and cleaning of the mincer to the users, referring to this manual. Leave this manual with the operator and explain that it is important to use it for further reference.
8.2 USING FOR THE FIRST TIME
The mincer must be cleaned and sanitized before use. Refer to Cleaning and Sanitizing, page 10.
8.3 COMPONENT IDENTIFICATION:
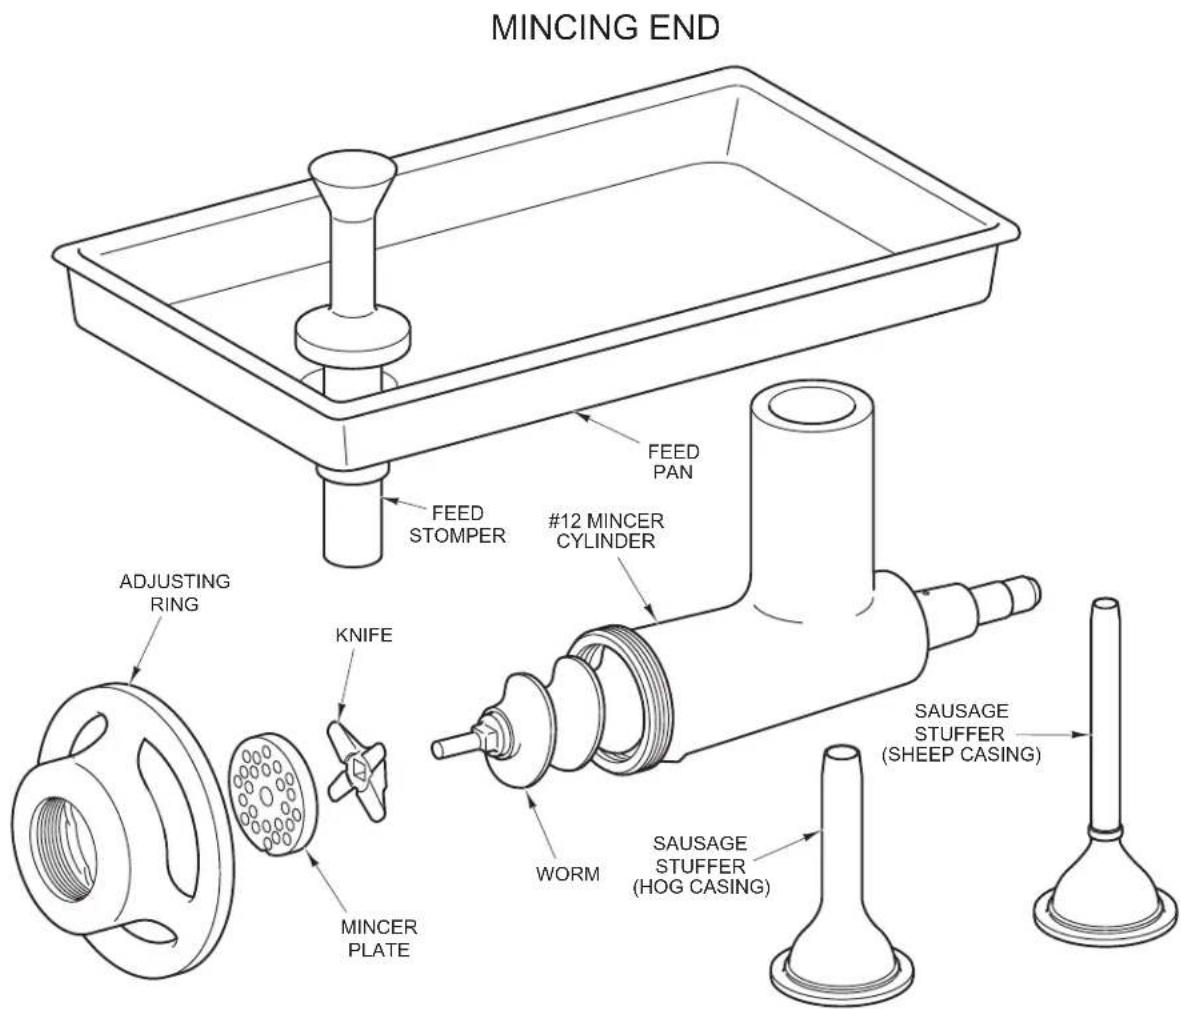
Figure 1
8.4 ASSEMBLY OF MINCING END AND FEED PAN
Make sure the drive hub and socket are clean and clear of any obstruction. Insert the socket end of the cylinder into the drive hub with a slight twisting motion toward the left. The mincer cylinder stop pin in the attachment will contact the side of the hole that receives it. Tighten the thumb screw to secure the mincer cylinder in place.
Removing the mincer cylinder requires loosening the thumb screw three complete turns. The thumb screw should never be removed. Slide the worm into the cylinder and rotate it until the square shank of the worm locks into the hub drive. Install the knife on the end of the worm with the cutting edges out, followed by the grind plate (Fig. 1). The notch on the grind plate aligns with the pin in the bottom of the mincer cylinder. Thread the adjusting ring on the mincer cylinder hand tight. Install the feed pan and feed stomper.
NOTICE The knife and plate depend on meat for lubrication. Therefore, the mincer should never be operated without meat.
9.0 OPERATION
9.1 CONTROLS
Main power switch:
I (green) ---- Push turns mincer motor ON.
0 (red) ---- Push turns mincer motor OFF
9.2 MINCING
Cut the meat into strips.
Turn the machine ON.
Feed the meat into the mincer using the feed stomper only as needed.
If the strips are cut to the proper size, they will feed without assistance from the stomper; allowing both hands of the operator free to feed the meat. When running meat through the mincer a second time, more speed is attained by feeding small quantities at a time rather than by trying to force large amounts with the feed stomper. The feed pan should always be kept in place on the cylinder. It not only makes regular feeding easy, but it keeps the mincer attachment ready for immediate use. The fineness to which the meat is cut is governed by the size of the holes in the perforated Grind Plate, not by the tension put on the Adjusting Ring. Do not tighten the Adjusting Ring more than hand tight. Between uses, remove the entire mincer end and feed pan and place them in the refrigerator for re-use; or, clean and sanitize, if required.
10.0 CLEANING AND SANITIZING
⚠ WARNING Disconnect the mains electricity supply before cleaning or servicing this machine.
Remove the following parts for cleaning; Feed Pan, Adjusting Ring, Grind Plate, Knife, Worm, and Mincer Cylinder.
The mincer must be thoroughly cleaned and sanitized after installation and before being placed into service.
Cleaning Supplies (Not Provided)
Recommended cleaning and sanitizing supplies include:
- A 12" handle nylon brush that will slide through the cylinder
- A two compartment pail for cleaning solutions
• A pail for sanitizing solution - A scrap pail
- Clean cloths
- A spray bottle
NOTE: When using detergents and sanitizers, always refer to the chemical manufacture's safety data sheet for hazard, handling, and first aid information. Wear suitable gloves and eye / face protection.
Prepare a hot detergent solution in one side of the two compartment pail. Fill the other compartment with warm potable rinse water.
Mix a sanitizing solution by adding one tablespoon of sodium hypochlorite bleach (5.25%) to one gallon of water in a pail. This makes a 200 ppm solution. Use this solution to fill the spray bottle as well as the pail for sanitizing.
Thoroughly clean and sanitize the feed pan, feed stomper, mincer cylinder assembly, worm assembly, knife, plate, adjusting ring and machine housing. Refer to Fig. 1 for component identification.
NOTE: After cleaning, apply a light coat of food grade mineral oil to the cylinder, adjusting ring, knife, plate and worm before reassembly.
To reassemble, refer to section 8.4, page 9.
11.0 MAINTENANCE
⚠ WARNING Unplug mincer power cord before cleaning, servicing or removing parts. Replace parts before use.
MACHINE CLEAN UP
The machine should be thoroughly cleaned at the end of an operating day or after being idle for an extended period of time. Refer to CLEANING for proper procedure (previous section).
HUB AND CYCLINDER DRAIN
Hub Drain
A drain slot in the trim washer allows any meat juices to drain from the hub. This slot should be inspected periodically to make sure that it is free of obstructions. A small brush can be used to remove any material which may have accumulated.
Cylinder Drain
A drain hole at the bottom end of the cylinder allows any meat juices to drain. This hole should be inspected periodically to make sure that it is free of obstructions. A small wire can be used to remove any material which may have accumulated.
AIR INTAKE
Under normal operating conditions the motor air intake screen, located in the base of the mincer, will need little or no attention. However, in some installations where sawdust or other foreign materials are present in the air, this intake screen may become partially or completely covered. Where an adverse dust condition does exist, periodically check the screen and wipe clean with a rag or brush as required.
STORAGE
The mincer should be completely cleaned and covered with a towel or other suitable cover when it is not to be used in the immediate future.
12.0 FAULT FINDING
| Fault Possible cause | |
| Machine will not start. Circuit break | ker tripped, check fuse or circuit breaker.Internal overload tripped, motor overload will auto reset after cooling. |
| Product has poor appearance, comes out soft or mushy. | Knife and/or plate worn, replace knife and plate or End ring loose, tighten end ring, hand tight only. |
| Motor comes on, but worm shaft will not turn. | End ring too tight, tighten end ring hand tight only, or foreign object caught in cylinder, remove cylinder and worm to inspect for cause of binding. |
13.0 RECOMMENDED SPARES
| 087711-232-1 Pushbutton on/off switch | |
| 914288 Contactor | |
| 914287 Overload | |
| 077643-00002 Ring-Adjusting | |
| 015881 Worm Assy. | |
| 119760-00001 Cylinder Assembly | |
| 122554 Stomper | |
| 122555 Pan-Feed | |
| 004221 Washer-Worm Thrust | |
| 004839-00001 Washer-Cylinder Thrust | |
| 295181 Stuffer-Sausage (Sheep Casing) | |
| 295180 Stuffer-Sausage (Hog Casing) | |
| 108197-00004 Thumb Screw Assy. | |
| 914767 Trim Washer (Attachment Hub) | |
| 065140 Gasket (Attachment Hub) | |
| 083681 Foot-Rubber | |
| 290481-00019 Housing-50 Hertz | |
| 064965-00008 Panel-Front Housing | |
| 064805-00008 Panel-Rear Housing | |
| 914759-00001 Motor Assy. | |
| 914157 Hub Adapter | |
| 914156 Seal-oil | |
| 016423-00001 Mincer Plate (1/8" Dia. Holes)(Carbon Steel) | |
| 016424-00001 Mincer Plate (3/16" Dia. Holes)(Carbon Steel) | |
| 016425-00001 Mincer Plate (1/4" Dia. Holes)(Carbon Steel) | |
| 016423-00002 Mincer Plate (1/8" Dia. Holes)(Stay Sharp) | |
| 016424-00002 Mincer Plate (3/16" Dia. Holes)(Stay Sharp) | |
| 016425-00002 Mincer Plate (1/4" Dia. Holes)(Stay Sharp) | |
| 290339 Knife-Mincer | |
14.0 NOTES
15.0 SERVICE CONTACT NUMBERS
Hobart trained service technicians strategically located at national Hobart service branches are prepared to give you fast, efficient and reliable service. Protect your investment by having a Hobart inspection contract, which assures the continued, efficient operation of your Hobart machines, spares and accessories. For disposal of mincer, contact Hobart Service Centre for return details.
For further details please contact: -
| Department | Telephone | Facsimile |
| SALES: 07002 101 101 | 02088 864 396 | |
| SERVICE 07002 202 202 | 01733 371 709 | |
| SPARES 07002 303 303 | 01733 371 332 |
HOBART
natural_image
Industrial stainless steel robotic meat maker (HOBART) with no visible text or symbols on the device itself.Modèle
4812
ML-136159
Page 1 - Anglais
Page 17 - Français
Page 33 - Allemand
INSTALLATION AND OPERATION MANUAL MANUEL D'INSTALLATION ET D'UTILISATION INSTALLATIONS UND BEDIENUNGSANLEITUNG
FRANÇAIS / TABLE DES MATIERES
natural_image
Simple line drawing of a recycling symbol with three chasing arrows (no text or labels)4.2 ELIMINATION DE VOS ANCIENS APPAREILS
5.0 DIMENSIONS DU HACHOIR
| STANDARD ELECTRICAL SPECIFICATIONS | |||
| VOLTAGE | HZ | PH | USAGE |
| 230 | 50 | 1 | EUROPE/CE |
Légende :
Cord furnished : Cordon fourni
Switch located in rear of machine (can be changed to front of machine):
Fournitures de nettoyage (non fournies)
natural_image
Industrial stainless steel robotic meat maker (HOBART) with no visible text or symbols on the device itself.Modell
4812
ML-136159
Seite 1 - Englisch
natural_image
Simple line drawing of a recycling symbol with three chasing arrows (no text or labels)4.2 ENTSORGUNG IHRES ALTGERÄTES
Cord furnished : Kabel
Switch located in rear of machine (can be changed to front of machine):


- MODEL
- 4812
- SAFETY INFORMATION
- SAFETY GUIDELINES
- WARNING SYMBOLS
- LIABILITY
- FOREWORD
- GENERAL INFORMATION
- CARING FOR OUR ENVIRONMENT
- PACKAGING MATERIAL
- DISPOSAL OF YOUR OLD APPLIANCE
- MINCER DIMENSIONS
- In accordance with EN-ISO 12001:1996.
- INSTALLATION
- UN-PACKING
- LOCATION
- ELECTRICAL INSTALLATION
- COMMISSIONING AND OPERATING INSTRUCTIONS
- USING FOR THE FIRST TIME
- COMPONENT IDENTIFICATION:
- ASSEMBLY OF MINCING END AND FEED PAN
- OPERATION
- CONTROLS
- MINCING
- CLEANING AND SANITIZING
- Cleaning Supplies (Not Provided)
- MAINTENANCE
- MACHINE CLEAN UP
- HUB AND CYCLINDER DRAIN
- Hub Drain
- Cylinder Drain
- AIR INTAKE
- STORAGE
- FAULT FINDING
- RECOMMENDED SPARES
- NOTES
- SERVICE CONTACT NUMBERS
- HOBART
- Modèle
- ELIMINATION DE VOS ANCIENS APPAREILS
- DIMENSIONS DU HACHOIR
- Légende :
- Fournitures de nettoyage (non fournies)
- Modell
- ENTSORGUNG IHRES ALTGERÄTES
Brand : Hobart
Model : 4812
Category : Chopper