CL15-G - Laser level Toolcraft - Free user manual and instructions
Find the device manual for free CL15-G Toolcraft in PDF.
| Product Type | Cross-line laser level |
| Brand | Toolcraft |
| Model | CL15-G |
| Dimensions (L x W x H) | 76 x 63 x 54 mm |
| Weight (without batteries) | 195 g |
| Power Supply | 3 AAA batteries (not included) |
| Operating Time | approx. 4 h |
| Maximum Range | up to 12 m |
| Leveling Accuracy | ±0.5 mm/m |
| Self-leveling Range | ±4° |
| Leveling Time | < 4 s |
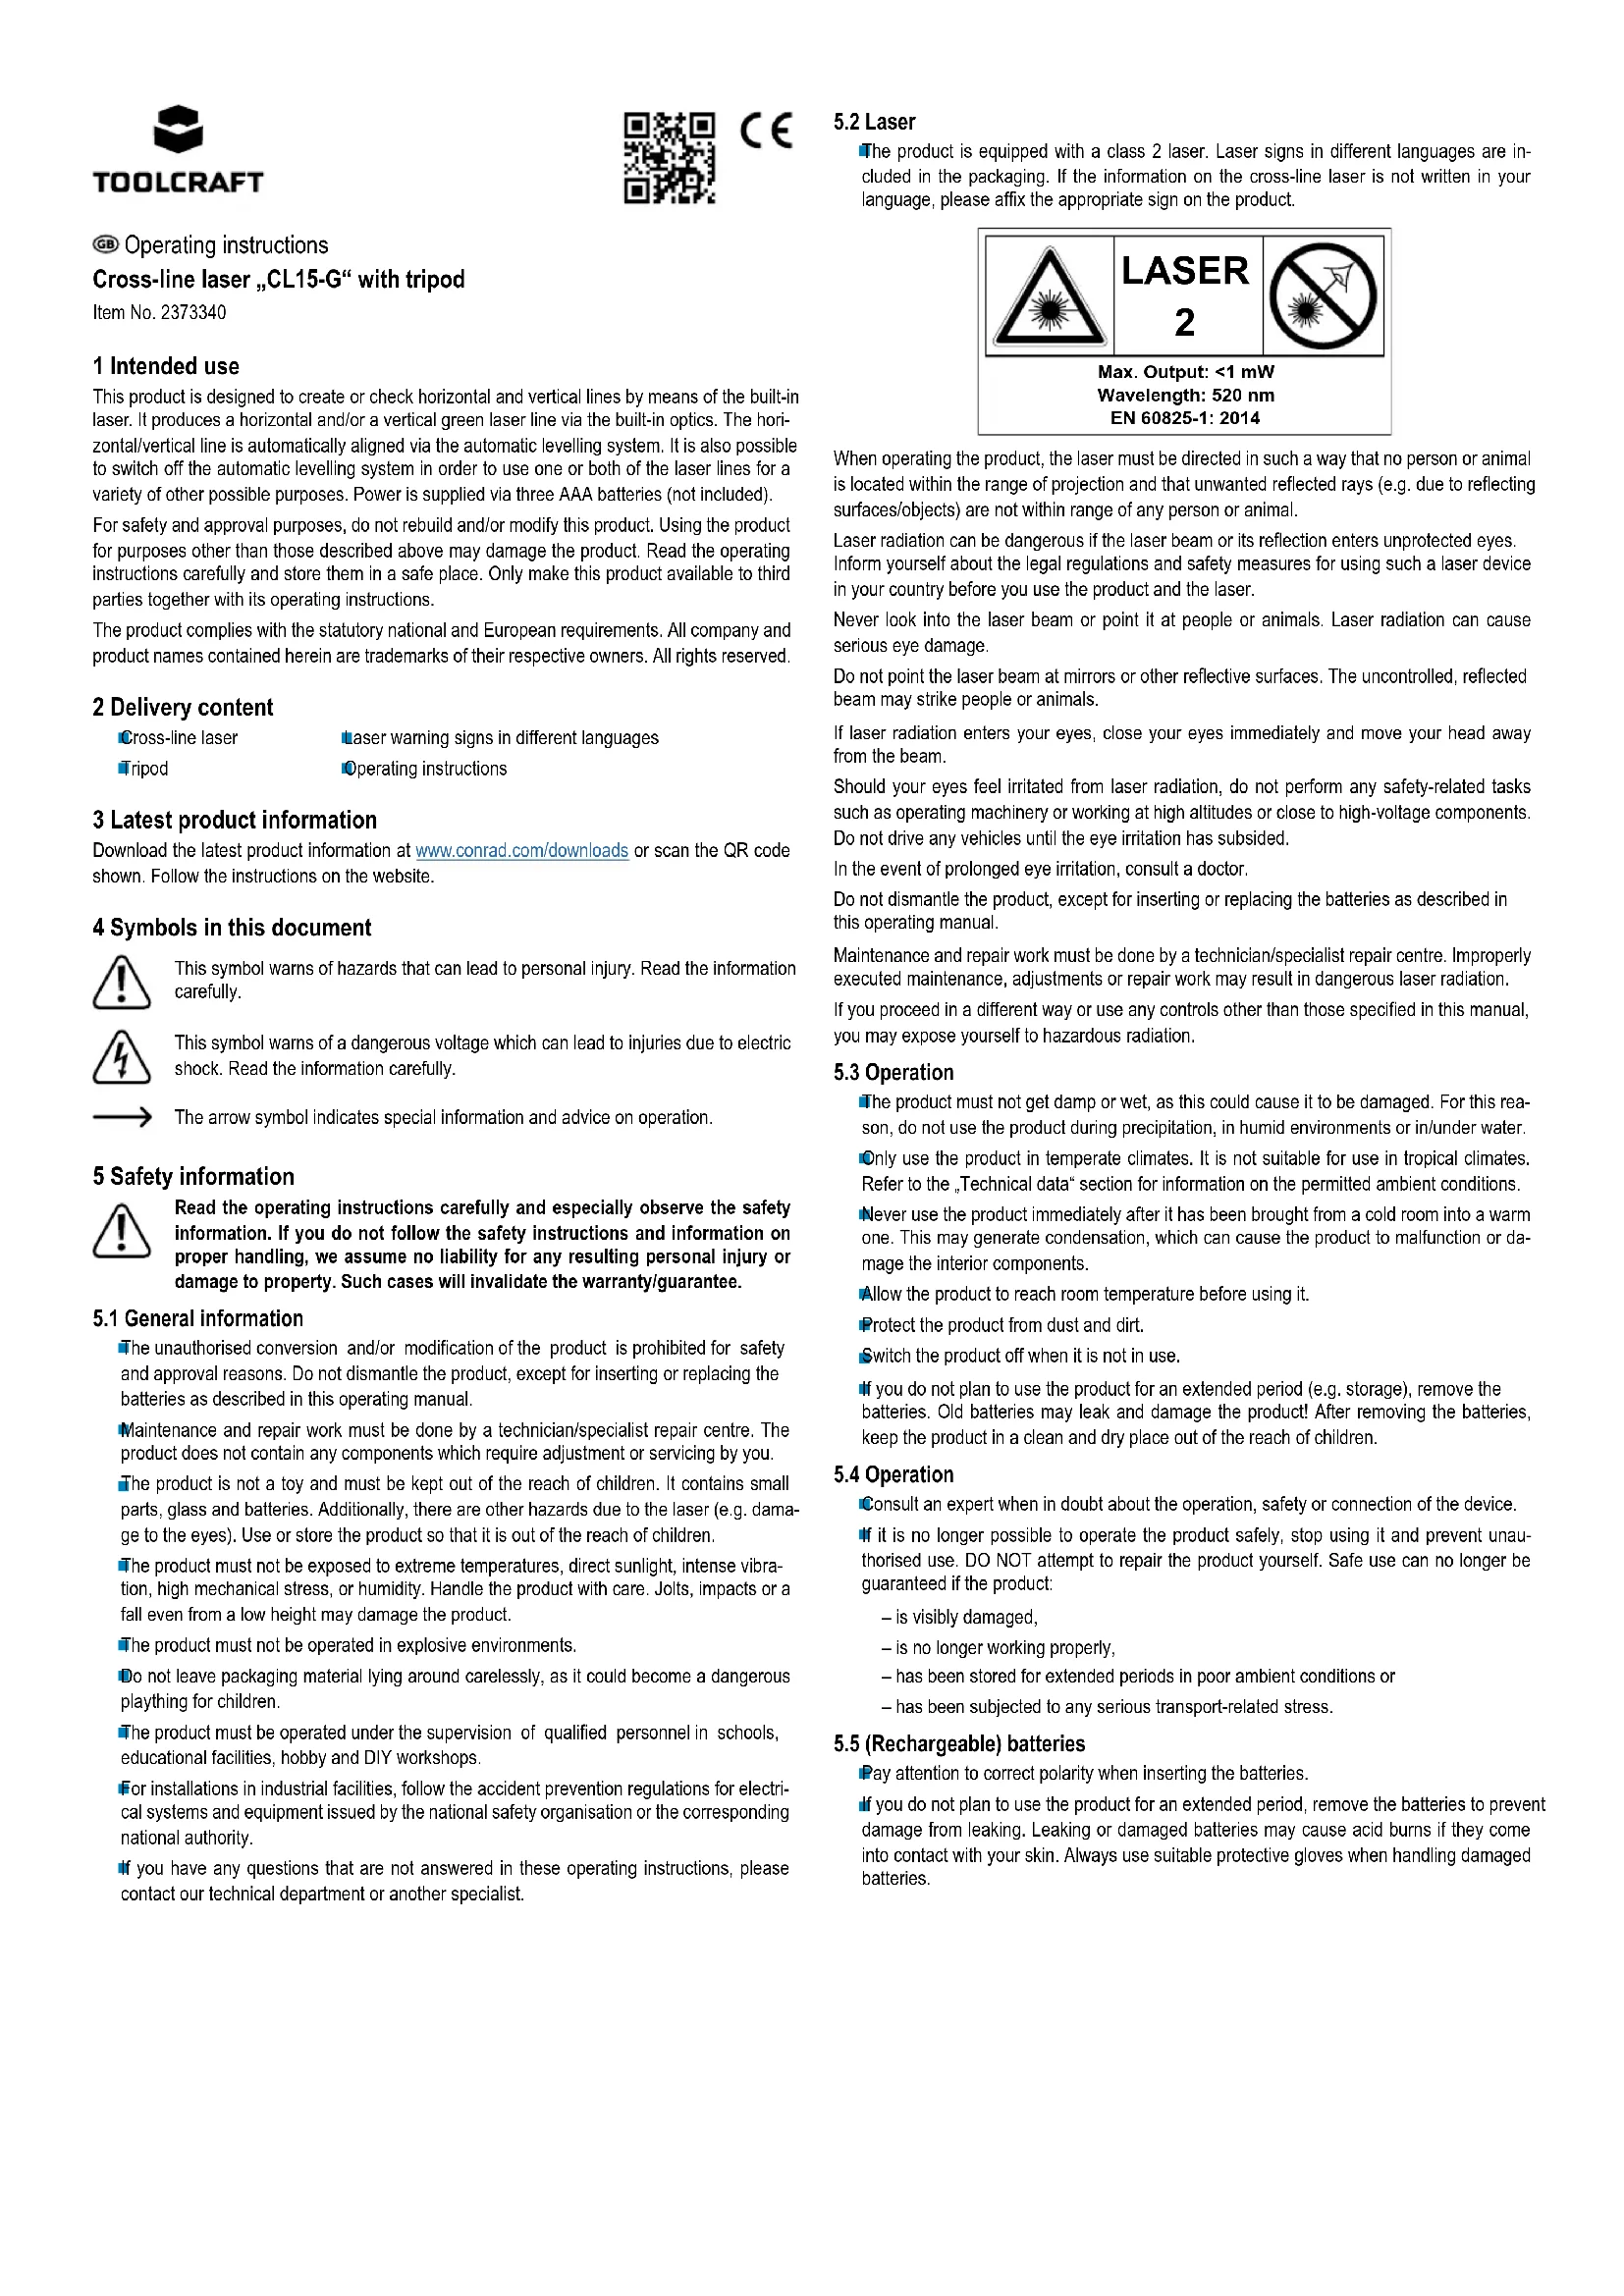
| Laser Class | 2 |
| Laser Output Power | < 1 mW |
| Laser Wavelength | 520 nm (green) |
| Tripod Thread | 6.35 mm (1/4") |
| Maximum Tripod Height | 67 cm |
| Operating Conditions | 0 to 50°C, < 80% RH |
| Storage Conditions | -10 to 70°C, < 80% RH |
| Self-leveling | Yes, ±4° |
| Manual Mode | Yes (disable self-leveling) |
| Maintenance | Damp cloth, no harsh chemicals |
| Safety | Laser class 2, avoid eye contact |
| Repair | By a qualified technician |
Frequently Asked Questions - CL15-G Toolcraft
User questions about CL15-G Toolcraft
0 question about this device. Answer the ones you know or ask your own.
Ask a new question about this device
Download the instructions for your Laser level in PDF format for free! Find your manual CL15-G - Toolcraft and take your electronic device back in hand. On this page are published all the documents necessary for the use of your device. CL15-G by Toolcraft.
USER MANUAL CL15-G Toolcraft
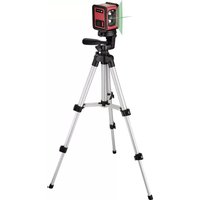
Cross-line laser ,CL15-G" with tripod
Item No. 2373340
1 Intended use
This product is designed to create or check horizontal and vertical lines by means of the built-in laser. It produces a horizontal and/or a vertical green laser line via the built-in optics. The horizontal/vertical line is automatically aligned via the automatic levelling system. It is also possible to switch off the automatic levelling system in order to use one or both of the laser lines for a variety of other possible purposes. Power is supplied via three AAA batteries (not included).
For safety and approval purposes, do not rebuild and/or modify this product. Using the product for purposes other than those described above may damage the product. Read the operating instructions carefully and store them in a safe place. Only make this product available to third parties together with its operating instructions.
The product complies with the statutory national and European requirements. All company and product names contained herein are trademarks of their respective owners. All rights reserved.
2 Delivery content
Cross-line laser
Laser warning signs in different languages
Tripod
Operating instructions
3 Latest product information
Download the latest product information at www.conrad.com/downloads or scan the QR code shown. Follow the instructions on the website.
4 Symbols in this document

This symbol warns of hazards that can lead to personal injury. Read the information carefully.

This symbol warns of a dangerous voltage which can lead to injuries due to electric shock. Read the information carefully.

The arrow symbol indicates special information and advice on operation.
5 Safety information

Read the operating instructions carefully and especially observe the safety information. If you do not follow the safety instructions and information on proper handling, we assume no liability for any resulting personal injury or damage to property. Such cases will invalidate the warranty/guarantee.
5.1 General information
The unauthorised conversion and/or modification of the product is prohibited for safety and approval reasons. Do not dismantle the product, except for inserting or replacing the batteries as described in this operating manual.
Maintenance and repair work must be done by a technician/specialist repair centre. The product does not contain any components which require adjustment or servicing by you.
The product is not a toy and must be kept out of the reach of children. It contains small parts, glass and batteries. Additionally, there are other hazards due to the laser (e.g. damage to the eyes). Use or store the product so that it is out of the reach of children.
The product must not be exposed to extreme temperatures, direct sunlight, intense vibration, high mechanical stress, or humidity. Handle the product with care. Jolts, impacts or a fall even from a low height may damage the product.
The product must not be operated in explosive environments.
Do not leave packaging material lying around carelessly, as it could become a dangerous plaything for children.
The product must be operated under the supervision of qualified personnel in schools, educational facilities, hobby and DIY workshops.
For installations in industrial facilities, follow the accident prevention regulations for electrical systems and equipment issued by the national safety organisation or the corresponding national authority.
If you have any questions that are not answered in these operating instructions, please contact our technical department or another specialist.
5.2 Laser
The product is equipped with a class 2 laser. Laser signs in different languages are included in the packaging. If the information on the cross-line laser is not written in your language, please affix the appropriate sign on the product.
When operating the product, the laser must be directed in such a way that no person or animal is located within the range of projection and that unwanted reflected rays (e.g. due to reflecting surfaces/objects) are not within range of any person or animal.
Laser radiation can be dangerous if the laser beam or its reflection enters unprotected eyes. Inform yourself about the legal regulations and safety measures for using such a laser device in your country before you use the product and the laser.
Never look into the laser beam or point it at people or animals. Laser radiation can cause serious eye damage.
Do not point the laser beam at mirrors or other reflective surfaces. The uncontrolled, reflected beam may strike people or animals.
If laser radiation enters your eyes, close your eyes immediately and move your head away from the beam.
Should your eyes feel irritated from laser radiation, do not perform any safety-related tasks such as operating machinery or working at high altitudes or close to high-voltage components. Do not drive any vehicles until the eye irritation has subsided.
In the event of prolonged eye irritation, consult a doctor.
Do not dismantle the product, except for inserting or replacing the batteries as described in this operating manual.
Maintenance and repair work must be done by a technician/specialist repair centre. Improperly executed maintenance, adjustments or repair work may result in dangerous laser radiation.
If you proceed in a different way or use any controls other than those specified in this manual, you may expose yourself to hazardous radiation.
5.3 Operation
The product must not get damp or wet, as this could cause it to be damaged. For this reason, do not use the product during precipitation, in humid environments or in/under water.
Only use the product in temperate climates. It is not suitable for use in tropical climates. Refer to the "Technical data" section for information on the permitted ambient conditions.
Never use the product immediately after it has been brought from a cold room into a warm one. This may generate condensation, which can cause the product to malfunction or damage the interior components.
Allow the product to reach room temperature before using it.
Protect the product from dust and dirt.
Switch the product off when it is not in use.
If you do not plan to use the product for an extended period (e.g. storage), remove the batteries. Old batteries may leak and damage the product! After removing the batteries, keep the product in a clean and dry place out of the reach of children.
5.4 Operation
Consult an expert when in doubt about the operation, safety or connection of the device.
¶it is no longer possible to operate the product safely, stop using it and prevent unauthorised use. DO NOT attempt to repair the product yourself. Safe use can no longer be guaranteed if the product:
- is visibly damaged,
-is no longer working properly, - has been stored for extended periods in poor ambient conditions or
has been subjected to any serious transport-related stress.
5.5 (Rechargeable) batteries
Pay attention to correct polarity when inserting the batteries.
If you do not plan to use the product for an extended period, remove the batteries to prevent damage from leaking. Leaking or damaged batteries may cause acid burns if they come into contact with your skin. Always use suitable protective gloves when handling damaged batteries.
Batteries must be kept out of reach of children. Do not leave batteries lying around, as there is risk that children or pets swallow them.
Batteries must always be replaced/exchanged at the same time. Mixing old and new batteries in the device can lead to battery leakage and device damage.
Batteries must not be dismantled, short-circuited or thrown into open flames. Never attempt to recharge non-rechargeable batteries. This may cause an explosion!
Make sure that the cable is not pinched, kinked or damaged by sharp edges.
Always lay cables so that nobody can trip over or become entangled in them. Risk of injury!
The product can be powered with rechargeable batteries. However, the operating time is reduced due to the lower voltage (non-rechargeable battery = 1.5 V, rechargeable battery = 1.2 V).
We therefore recommend operating the product only with high-quality alkaline batteries to ensure long and reliable operation.
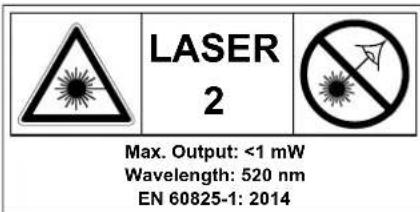
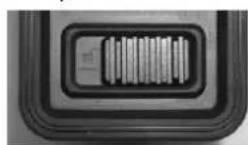
6 Operating elements
1 Laser window
2 Power button with LED (red and green)
3 Battery cover
4 Sliding switch
5 Tripod mount
7 Inserting / replacing batteries
Slide the battery cover on the rear of the cross-line laser outwards (A), and then remove it carefully.
Insert three AAA batteries, observing the correct polarity. The positive pole is marked on the batteries and the battery compartment.
Replace the cover and slide it until it clicks into place.
8 Operating the product
8.1 Using the tripod
The cross-line laser can be fastened to the supplied tripod via the tripod socket (5) on the underside.
The height of the tripod can be adjusted. Align the tripod mounting plate horizontally with the built-in level.
8.2 Using the automatic levelling system
Place the cross-line laser on a horizontal and stable surface or mount it on a tripod.
Move the sliding switch (4) to the closed lock position. The laser will switch on.

When the cross-line laser is outside the self-levelling range, the power button (2) will light up red and the laser lines will flash.
The power button (2) will light up green when the cross-line laser is within the self-leveling range of ± 4^ .
The levelling process is complete when the laser lines stop moving. You can now, for example, mark a horizontal and/or a vertical line on the wall in order to lay tiles, etc.
To switch off the laser, move the sliding switch (4) to the "open lock" position.
The lasers will be disabled and the mechanics of the automatic levelling system inside the cross-line laser will be fixed in place. The cross-line laser is now switched off.

8.3 Operating the laser without the automatic levelling system
→ This mode of operation can be used, for example, to project a diagonal line onto a wall in order to mark the positions of several pictures on the wall.
You can hold the cross-line laser in your hand or use the supplied tripod to fix the cross-line laser in a diagonally inclined position.
Press the power button (2). The laser is now switched on and ready for use.
To switch off the laser, press the power button (2) again.

When the automatic levelling system is switched off, the laser lines do not mark any horizontal or vertical line, because the mechanical system inside the cross-line laser cannot move freely and align itself!
8.4 LED status display
The LED on the power button indicates different operating statuses, which are shown in the following table.
| Status Green Red Laser | |||
| Battery empty Off Flashing Off | |||
| Levelling OK On Off On | |||
| Out of the levelling range | Off | On | Flashing |
| Automatic levelling off | Off On | On |
8.5 Checking the vertical line
Place the device approximately 5 m away from a wall. Fasten a plumb bob to the wall with a 2.5 m long cord and make sure that the plumb bob can swing freely. Switch on the device and align the vertical laser with the plumb line. The accuracy is within the specified tolerance if the distance between the laser line and the plumb line is not more than ± 2.5 mm.
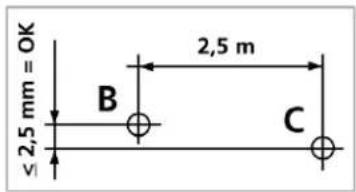
8.6 Checking the horizontal line
Set up the device approximately 5m from a wall and switch on the laser. Mark point B on the wall. Turn the laser cross approximately 2.5m to the right and mark point C. Check that the distance between the horizontal lines to point C and point B is within ± 2.5mm . Repeat the process by turning the laser to the left.
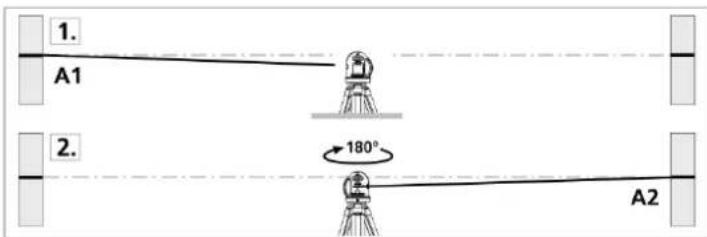
8.7 Checking the calibration
To check the laser calibration, place the device in between 2 walls, which must be at least 5 metres apart. Turn the device on with automatic levelling enabled. For optimal calibration results, mount the device on a tripod.
- Mark point A1 on the wall.
- Rotate the device 180^ and mark point A2. You now have a horizontal reference between points A1 and A2.
- Place the device as close as possible to the wall at the height of point A1.
- Rotate the device 180^ and mark point A3. The difference between points A2 and A3 is the tolerance.
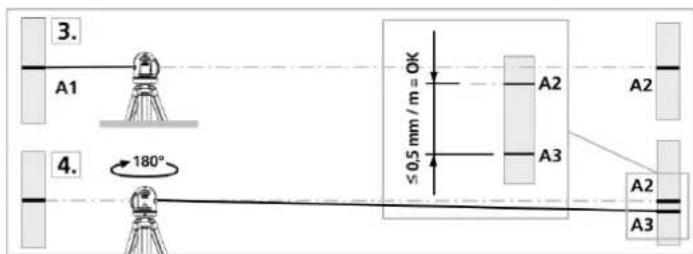
If A2 and A3 are more than 0.5mm / m apart, adjustment is required (at a distance of 4m , this corresponds to value of 2mm ). In this event, contact your authorised dealer.
9 Cleaning and maintenance
This product does not require any user maintenance; never attempt to dismantle it (except for inserting or replacing the batteries as described in these operating instructions). Servicing or repair work may only be carried out by a specialist.
Turn off the product before cleaning, ensuring that the laser lines are switched off.
Do not use aggressive cleaning agents, as these can cause discolouration. To prevent scratch marks, do not press too strongly on the surface when cleaning.
If the device is dusty, clean it with a brush before wiping it with a damp cloth.
10 Disposal
10.1 Product

Electronic devices are recyclable waste and must not be disposed of in household waste. At the end of its service life, dispose of the product in accordance with the applicable regulatory guidelines.
Remove any inserted batteries and dispose of them separately from the product.
10.2 Batteries
As the end user, you are required by law to return all used batteries (Battery Directive). They must not be placed in household waste.

Batteries containing hazardous substances are labelled with these symbols to indicate that disposal in household waste is forbidden. The abbreviations for heavy metals in batteries are: Cd=Cadmium, Hg=Mercury, Pb=Lead (marked on batteries, e.g., under the rubbish bin symbol shown to the left).
Used batteries can be returned to collection points in your municipality, our stores or any battery retailer. You thus fulfil your statutory obligations and contribute to environmental protection. Before disposal, the exposed contacts of batteries must be fully covered with a piece of adhesive tape to prevent short-circuits. Even if batteries are depleted, the remaining energy may present a hazard in the event of a short-circuit (bursting, severe heating, fire, explosion).
11 Technical Data
Power Supply Battery: 3 x AAA, 1.5 V/DC
(not included)
Operating time.. Approx. 4 hrs (depending on the batteries used)
Working range. Up to approx. 12m (depending on the ambient light)
Automatic levelling accuracy. ± 0.5mm / m
Self-levelling range. ± 4^
Automatic levelling time<4 s
Laser class 2
Laser output power. <1 mW
Laser wavelength 520 nm
Tripod Tripod socket: 6.35 mm (1/4") height max. 67 cm
Operating conditions. 0 to 50^, < 80% RH (non-condensing),
max. 4000 m N.N.
Storage conditions. -10 to 70^, < 80% RH (non-condensing)
Dimensions (L x W x H) 76 x 63 x 54 mm
Weight 195 g (without batteries)
Mode d'emploi
Alimentation.. .pile:3xAAA,1,5V/CC
(non includes)