USER MANUAL Q27WCF JVC
Operating Instructions
natural_image
Modern flat-screen monitor displaying a scenic mountain landscape under a blue sky with clouds (no text or symbols visible)
HDMI®
HIGH-DEFINITION MULTIMEDIA INTERFACE
natural_image
Abstract pattern of black and white diagonal lines on white background (no text or symbols)
natural_image
Diagram showing a cable being inserted into a TV screen, with no text or symbols present.
natural_image
Technical line drawing of a computer monitor with no visible text or symbols
natural_image
Line drawing of two hands holding a blank board with a circular symbol above (no text or labels)
natural_image
Line drawing of a flat-screen monitor with a stand at the bottom (no text or symbols)


V. Position (mode VGA)
natural_image
Symbol of a trash bin crossed with no text or labels, accompanied by a black rectangular block below (no readable text or symbols)
Hotline Darty France
natural_image
Diagram showing a cable connecting a wall-mounted device to a monitor screen, with no text or symbols present.
natural_image
Line drawing of two hands holding a blank rectangular object with a diagonal line above them (no text or symbols)
natural_image
Line drawing of a flat-screen monitor with a stand at the bottom (no text or symbols)
V. Positie (VGA-modus)
bar
| Rating | Color |
|---|---|
| A | Green |
| B | Light Green |
| C | Yellow-Green |
| D | Yellow |
| E | Orange |
| F | Orange |
| G | Red |
28 kWh/1000h

ПОДАТОЗ
VERWIJDERING

natural_image
Technical line drawing of a mechanical component or bracket with no visible text or symbols
natural_image
Diagram showing a cable being inserted into a TV screen, with no text or symbols present.
natural_image
Line drawing of two hands holding a blank rectangular object with a circular symbol above (no text or symbols present)
natural_image
Line drawing of a flat-screen monitor with a stand at the bottom (no text or symbols)

Modo eco
| ~ | Corriente alterna |
| --- | Corriente directa |
natural_image
Diagram showing a cable connecting a wall-mounted device to a monitor, with no text or symbols present.
natural_image
Technical line drawing of a mechanical component with no visible text or symbols
natural_image
Line drawing of two hands holding a blank document with a circular symbol above (no text or symbols present)
natural_image
Line drawing of a flat-screen monitor with a stand at the bottom (no text or symbols)
Modo ECO
LIMPEZA E MANUTENÇ ã O
bar
| Rating | Color |
|---|---|
| A | Green |
| B | Light Green |
| C | Yellow-Green |
| D | Yellow |
| E | Orange |
| F | Orange |
| G | Red |
28 kWh/1000h
ПОЛГАТОЗ
ELIMINAÇ Â O


This product is manufactured, distributed, serviced and warranted exclusively by Etablissements DARTY et Fils.
“JVC” is the trademark of JVCKENWOOD Corporation, used by Etablissements DARTY et Fils under license.
[European Union]
Dear Customer,
This apparatus is in conformance with the valid European directives and standards regarding electromagnetic compatibility and electrical safety.
The Adopted Trademarks HDMI, HDMI High-Definition Multimedia Interface, and the HDMI Logo are trademarks or registered trademarks of HDMI Licensing Administrator, Inc. in the United States and other countries.
WARNINGS
- Ventilation
Allow at least a 10 cm gap all around the product.
- The ventilation should not be impeded by covering the ventilation openings with items, such as newspapers, table-cloths, curtains, etc.
- No naked flame sources, such as lighted candles, should be placed on the apparatus.
- The apparatus shall not be exposed to dripping or splashing and that no objects filled with liquids, such as vases, shall be placed on the apparatus.
- Where the MAINS plug or an appliance coupler is used as the disconnect device, the disconnect device shall remain readily operable.
SAFETY PRECAUTION
- Read these instructions carefully before using this equipment and keep them for future reference.
• Always handle the monitor with care when moving it.
- Never remove the rear cover. This monitor contains high-voltage parts. You may be seriously injured if you touch them.
- Do not use the product near water. To reduce the risk of fire or electric shock, do not expose this apparatus to rain or moisture.
- Avoid exposing the monitor to direct sunlight or another heat source. Orient the screen away from direct sunlight to reduce glare.
- Avoid touch the screen. Skin oils are difficult to remove.
- Do not rub or apply pressure to the monitor panel, as it may permanently damage the screen.
- Do not place this product on an unstable cart, stand or table.
- Do not block any ventilation openings.
- Do not install near heat sources such as radiators, heat registers, stoves, or other devices that produce heat.
- Place the monitor in a well ventilated area. Do not place anything on the monitor that prevents heat dissipation.
- Do not place heavy objects on the monitor, video cable or power cord.
- If smoke, an abnormal noise, or a strange odor is present, immediately switch the monitor off.
- Protect the power cord from being tread upon or pinched, particularly at the plug. Be sure that the power outlet is located near the apparatus so that it is easily accessible.
- Only use attachments/accessories specified by the manufacturer.
- Unplug this apparatus when it will be unused for long periods of time.
• Refer all servicing to qualified service personnel.

To reduce the risk of electrical shock, do not open the unit. No user serviceable parts inside. Refer servicing to qualified service personnel.

This symbol indicates that a dangerous voltage constituting a risk of electric shock is present within this unit.

This symbol indicates that there are important operating and maintenance instructions in the literature accompanying this unit.
 | Class II equipmentTo identify equipment meeting the safety requirements specified for Class equipment according to IEC 61140.This symbol indicates that a safety connection to electrical earth (ground) not required. |
 | For indoor use only |
 | Use only power supplies listed in the instruction manual. |

This mark is applied to show the equipment conforms to European safety a electromagnetic compatibility standards.
The letters 'CE' signify that products sold in the EEA have been assessed t meet high safety, health, and environmental protection requirements.
PACKAGE CONTENTS
Please check the following items are present when you unpack the box, and save the packing materials in case you need to transport the monitor in the future.
- Monitor
- Stand base
- Stand body
- Cover plate
- Power adapter
- HDMI cable
- Screws
- User manual
ASSEMBLING THE STAND
Step 1
Lay the monitor on a cloth with the panel facing down to prevent the panel from being damaged.
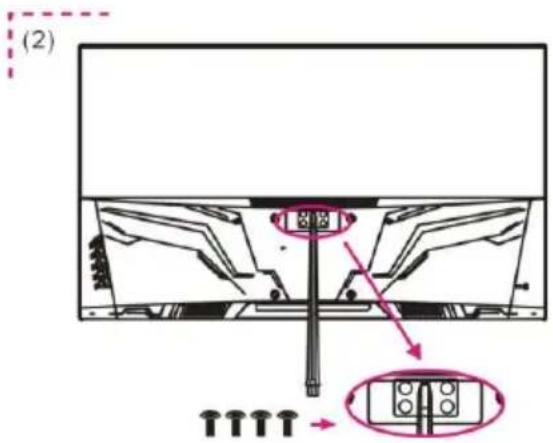
Step 2
Align the Stand Body with the screw holes on the back of the monitor. Then tighten the supplied screws as shown.
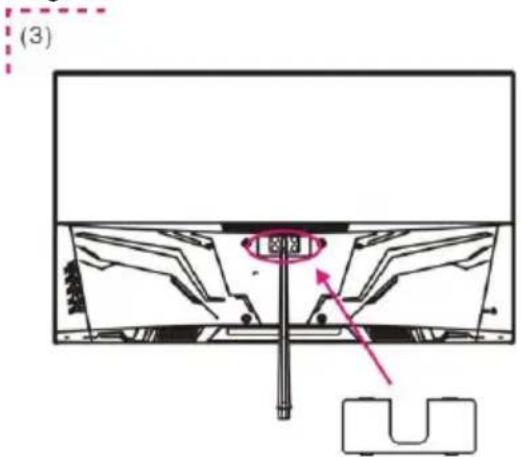
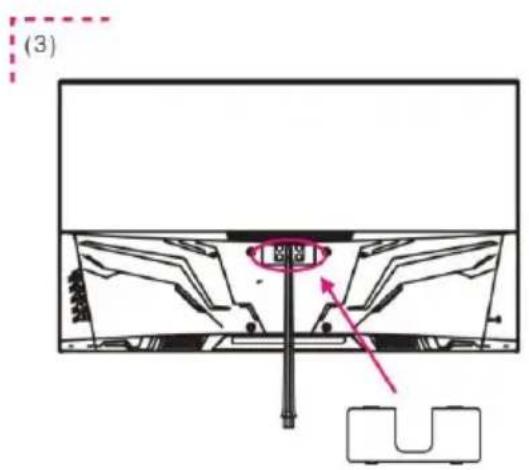
Step 3
Attach the Cover Plate to the back of the monitor.
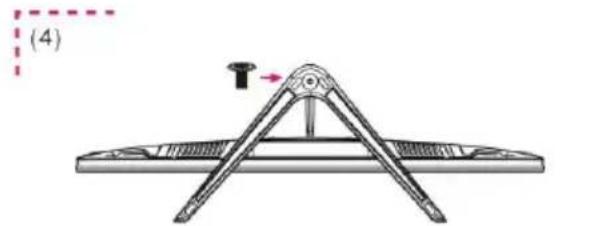
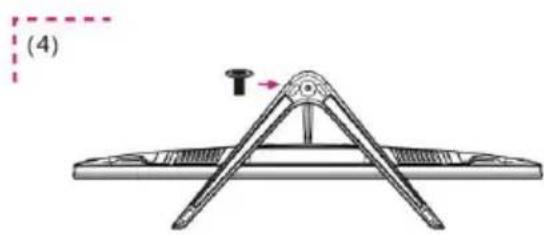
Step 4
Align the Stand Base with Stand Body. Then tighten the supplied screw as shown.

natural_image
Mechanical diagram of a folding tool with a base and handle, labeled (4), showing no text or symbols beyond the label.
② Press the upper end of cover plate until it secures in place.
① Attach the cover plate to the back from the bottom end, aligning the groove of the cover plate with the stand body.
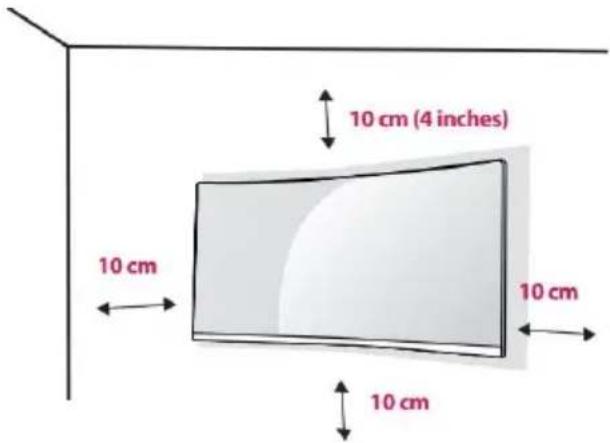
WALL MOUNTING
Before installing the monitor on the wall, please detach the stand from the monitor.

- To ensure sufficient ventilation, Install the monitor at least 10 cm (4 inches) away from the wall and leave about 10 cm of space at each side of the monitor.
- Please consult a professional technician for wall mount installations. The manufacturer accepts no liability for installations not performed by a professional technician.
- Place a clean, dry and lint-free cloth on a flat, stable surface.
- Gently lay the monitor on the cloth with the screen facing down.
- Identify the four wall mounting screw holes on the back of the monitor.
- Install the wall mounting bracket (not supplied) on the back of the monitor and attach the monitor to the wall according to the mounting bracket's instructions.
- Make sure that all screws (not supplied) are tightened and secured properly.

NOTE :
- Use the wall mounting bracket and screws that conform to VESA standards.
- For more information, please refer to the user manual for the wall mounting bracket.
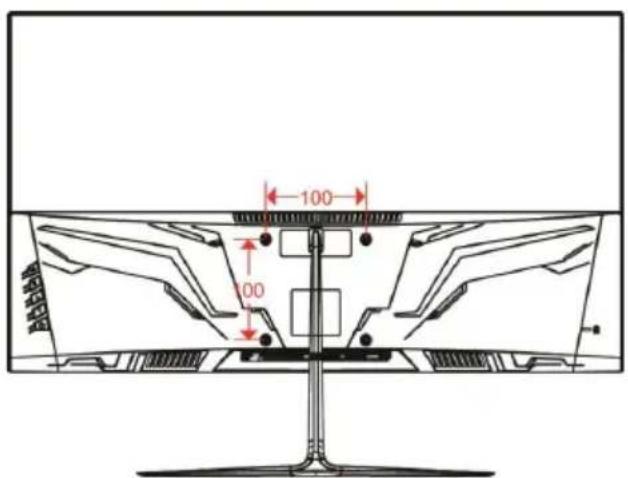
Wall mount: 100 × 100 ~mm
Screw size: M4 x 10 mm
CONNECTION

Make sure both the monitor and device to be connected are switched off.
HDMI Connection
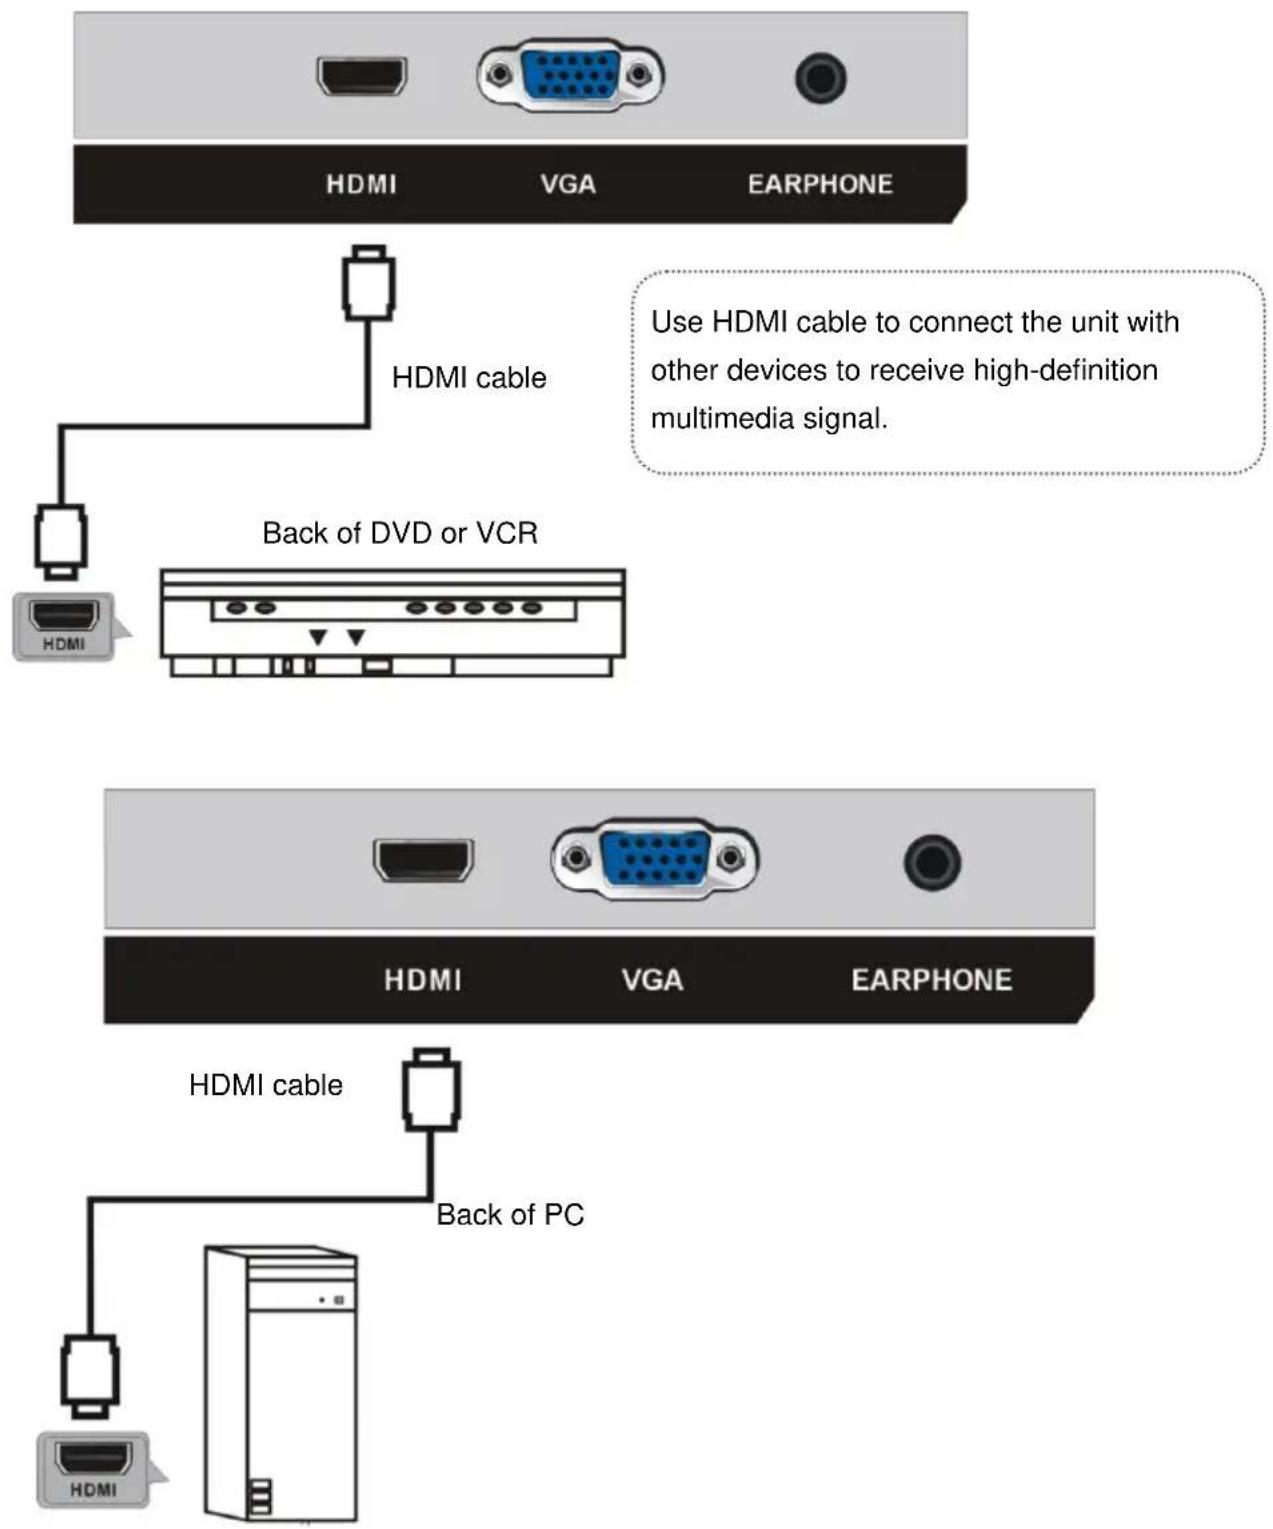
EARPHONE CONNECTION
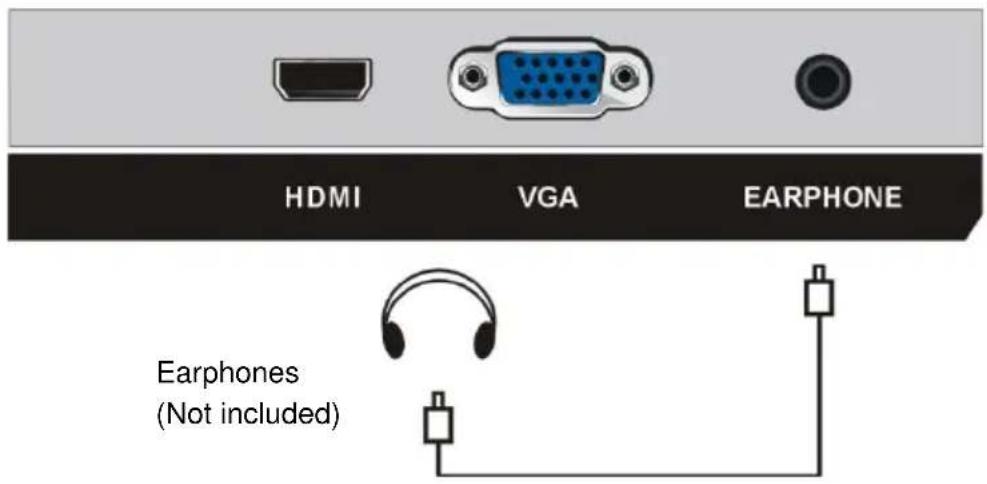
To prevent possible hearing damage, do not listen at high volume levels for long periods.
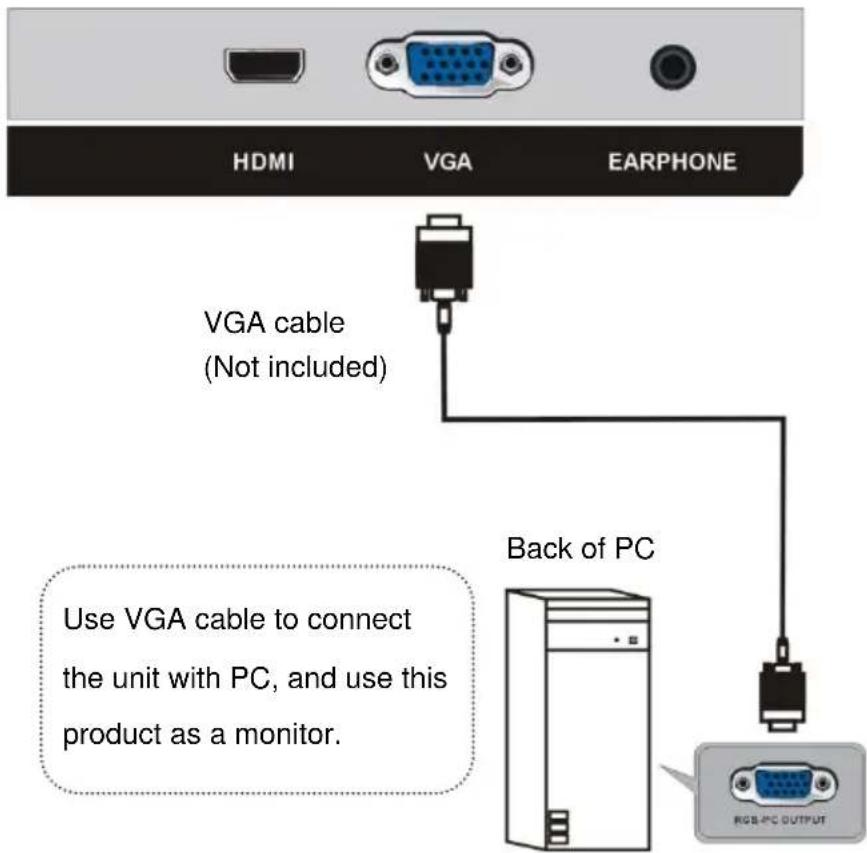
VGA Connection
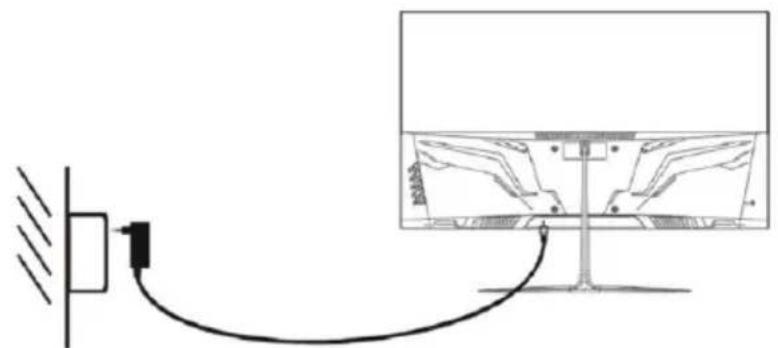
Power Connection
natural_image
Diagram showing a cable connecting a wall-mounted device to a monitor, with no visible text or symbols.
Turn on the monitor first, then the computer.
-
Insert one end into the power jack on the back of the monitor.
-
Plug the other end of the adapter into the mains socket.
Using the Kensington Lock
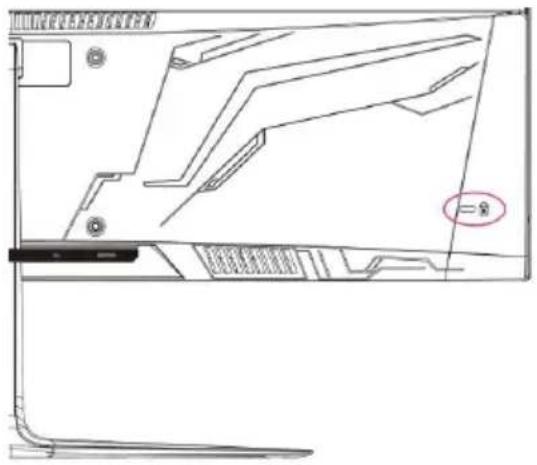
The connector for the Kensington security system is located at the back of the monitor.
Connect the monitor to a table using the Kensington security system cable (not supplied).
For more information on installation and usage, refer to the Kensington lock user manual or visit the website at http://www.kensington.com.
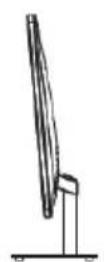
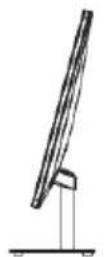
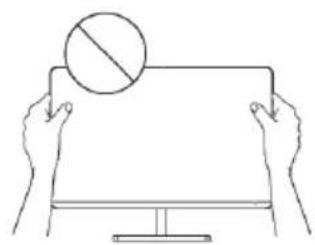
ADJUSTING THE ANGLE
natural_image
Line drawing of two hands holding a blank board with a circular symbol above (no text or labels)
• Drawings are for reference only and please refer to the actual monitor.
- The angle of the screen can be adjusted forward 5^ or backward 15^ for a comfortable viewing experience.
- Be careful not to touch or press the screen area when adjusting the angle of the monitor.
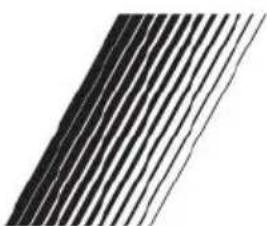
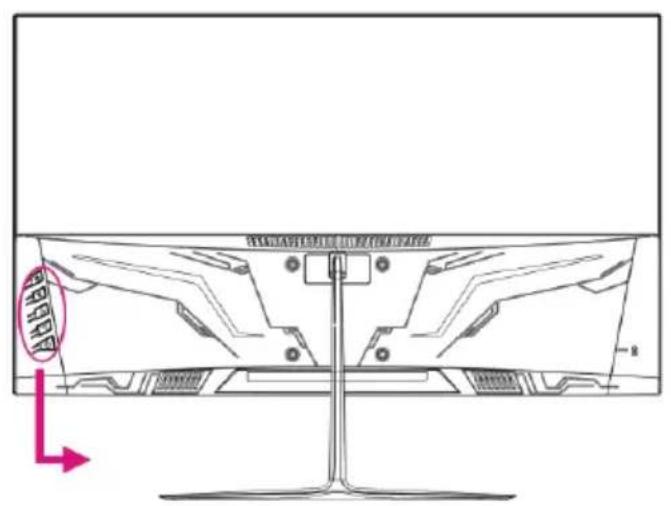
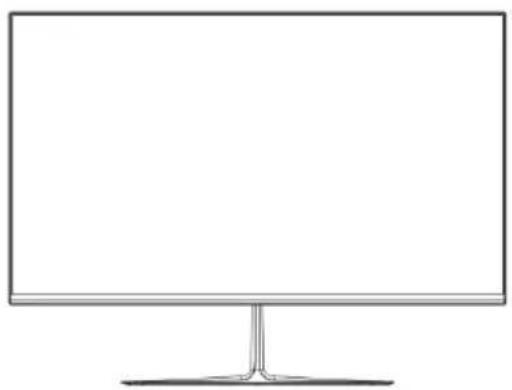
USER CONTROLS
natural_image
Line drawing of a flat-screen monitor with a stand at the bottom (no text or symbols)
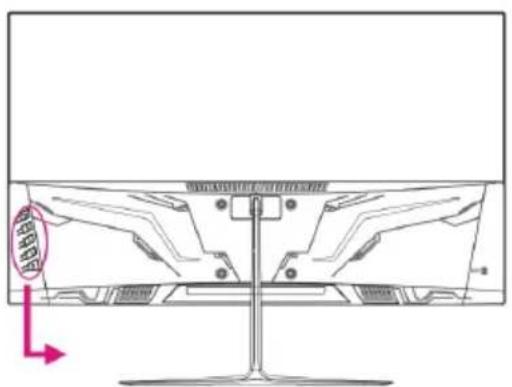
natural_image
Technical line drawing of a monitor with front panel and side-mounted stand, showing internal components (no text or symbols)
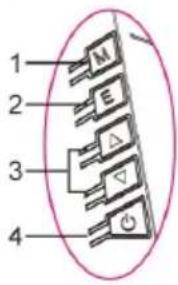
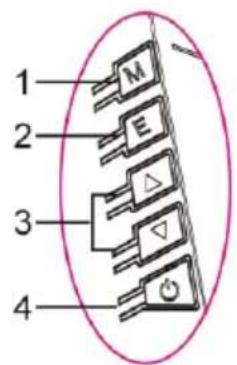
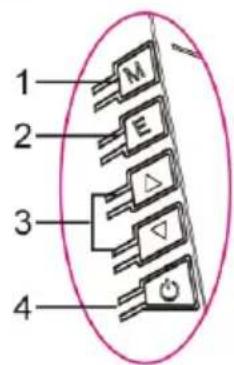
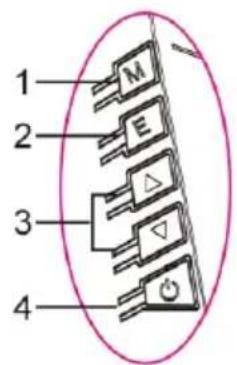
- M (MENU) button – Press this button to enter menu setting page.
- E (EXIT) button – Press this button to return to previous setting page.
- ▲/▼ button - In menu setting page, press this button to select an option or adjust the value.
- POWER button – Press this button to power ON/OFF the monitor.
- Press M (MENU) button to display the main menu.
- Press ▲/▼ button to select desired option.
- Press MENU button again to enter sub-menu.
- Press ▲/▼ button to adjust highlighted option.
- Press E (EXIT) button to return to previous setting page.
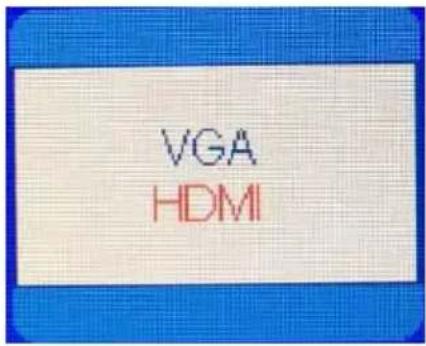
- Press E button to display the Input Source, then press M button to confirm your selection.
- This item is used to select an input source.
2. Luminance
- Press M button to display the main menu.
- Press ▲/▼ button to select Luminance.
- Press M button to enter sub-menu.
- Press ▲/▼ button to select desired option of sub-menu.
Brightness
- Press ▲/▼ button to select Brightness and press M button to confirm your selection.
- This item is used to adjust the value of Brightness by pressing ▲/▼ button.
Contrast
- Press ▲/▼ button to select Contrast and press M button to confirm your selection.
- This item is used to adjust the value of Contrast by pressing ▲/▼ button.

Eco Mode
- Press ▲/▼ button to select Eco Mode and press M button to confirm your selection.
- This item is used to select desired Eco mode by pressing ▲/▼ button.
(Options: Standard/Movie/Game/Internet)
DCR
- Press ▲/▼ button to select DCR and press M button to confirm your selection.
- This item is used to turn on/off Dynamic Contrast Ratio by pressing ▲/▼ button.
Overdrive
- Press ▲/▼ button to select overdrive and press M button to confirm your selection.
- This item is used to select desired overdrive by pressing ▲/▼ button.
(Options: Off/Strong/Medium/Weak)
- Overdrive setting allows users to change response time so as to eliminate the trailing of images on the screen while dealing with the rapidly moving objects on the screen.
- It is mainly used for gamers who are playing fast-paced games to achieve the best response time that can deliver smoother moving graphics.
3. Image Setup
H. Position (VGA mode)
- Press ▲/▼ button to select H. Position and press M button to confirm your selection.
- This item is to adjust the image horizontal position by pressing ▲/▼ button.
V. Position (VGA mode)
- Press ▲/▼ button to select V. Position and press M button to confirm your selection.
- This item is to adjust the image vertical position by pressing ▲/▼ button.
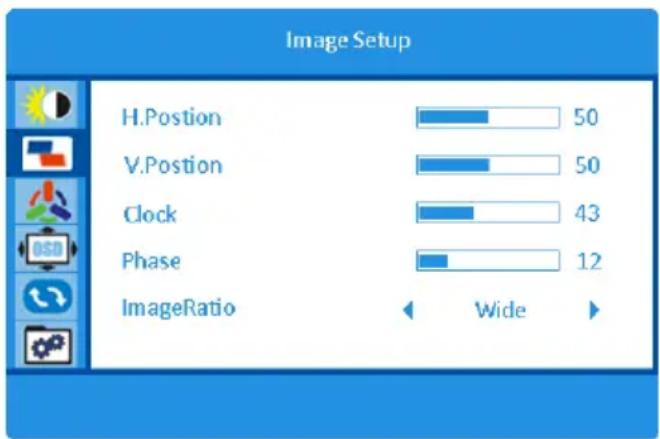
Clock (VGA mode)
- Press ▲/▼ button to select Clock and press M button to confirm your selection.
- This item is to adjust the picture clock to reduce the vertical noise by pressing ▲/▼ button.
Phase (VGA mode)
- Press ▲/▼ button to select Phase and press M button to confirm your selection.
- This item is to adjust the picture phase to reduce the horizontal noise by pressing ▲/▼ button.
Image Ratio (VGA & HDMI modes)
- Press ▲/▼ button to select Image Ratio and press M button to confirm your selection.
- This item is used to adjust the image aspect ratio by pressing ▲/▼ button.
(Options: Wide/4:3)
4. Color Setup
Color Temp.
- Press ▲/▼ button to select Color Temp and press M button to confirm your selection.
- This item is used to select desired Color Temp by pressing ▲/▼ button. (Options: Warm/User/Cool/Normal)

Red
- Press ▲/▼ button to select Red and press M button to confirm your selection.
- This item is to finely tune red color temperature by pressing ▲/▼ button.
Green
- Press ▲/▼ button to select Green and press M button to confirm your selection.
- This item is to finely tune green color temperature by pressing ▲/▼ button.
Blue
- Press ▲/▼ button to select Blue and press M button to confirm your selection.
- This item is to finely tune blue color temperature by pressing ▲/▼ button.
Low Blue Mode
- Press ▲/▼ button to select Low Blue Mode and press M button to confirm your selection.
- This item is to select desired low blue mode by pressing ▲/▼ button.
(Options: Off/Strong/Medium/Weak)
5. OSD Setup
Language
- Press ▲/▼ button to select Language and press M button to confirm your selection.
- This item is used to select the language Display by OSD menu by pressing ▲/▼ button.
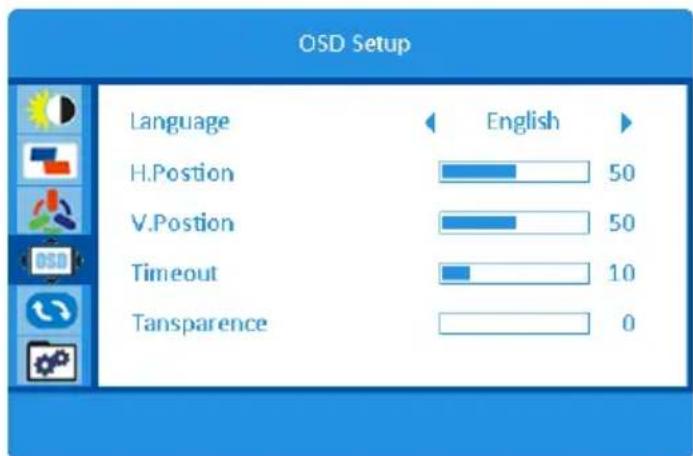
H. Position
- Press ▲/▼ button to select H. Position and press M button to confirm your selection.
- This item is to adjust OSD horizontal position by pressing ▲/▼ button.
V. Position
- Press ▲/▼ button to select V. Position and press M button to confirm your selection.
- This item is to adjust OSD vertical position by pressing ▲/▼ button.
Timeout
- Press ▲/▼ button to select Timeout and press M button to confirm your selection.
- This item is to adjust display time by pressing ▲/▼ button.
Transparence
- Press ▲/▼ button to select Transparence and press M button to confirm your selection.
- This item is to adjust OSD transparency by pressing ▲/▼ button.
6. Reset
Auto Config (VGA mode)
- Press ▲/▼ button to select Auto Config and press M button to confirm your selection.
- This item is to adjust the horizontal / vertical position, focus and clock of the Image automatically.
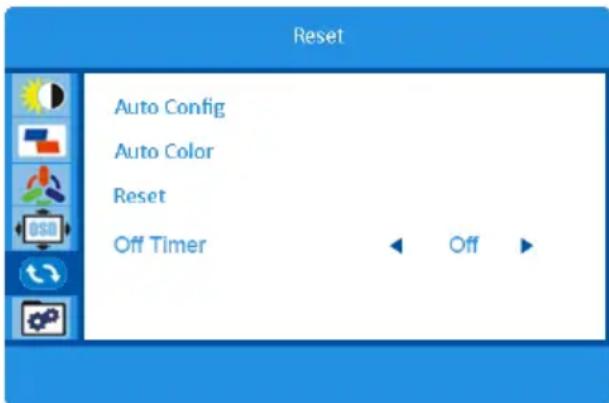
Auto Color (VGA mode)
- Press ▲/▼ button to select Auto Color and press M button to confirm your selection.
- This item is used to adjust white balance.
Reset
- Press ▲/▼ button to select Reset and press M button to confirm your selection.
- This item is used to restore to factory setting.
Off Timer
- Press ▲/▼ button to select Off Timer and press M button to confirm your selection.
- The item is used to set a shutdown timer. (Option: 1\~24h)
This monitor is set to be turned off automatically in 4 hours after you turned on display if there is no adjustment to display.
- Press ▲/▼ button to select Input Select and press M button to confirm your selection.
- This item is used to select the input source.
(Options: HDMI/VGA)
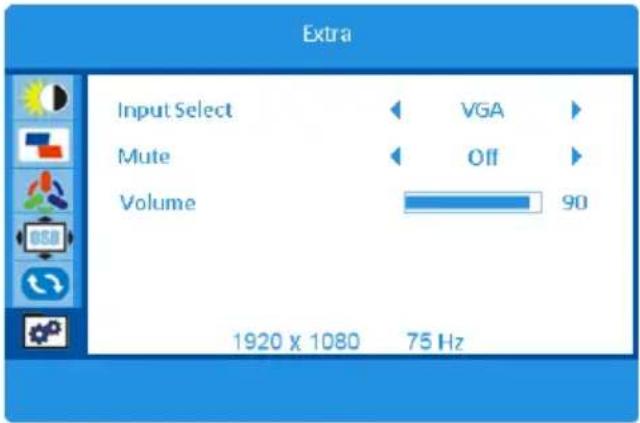
Mute
- Press ▲/▼ button to select Mute and press M button to confirm your selection.
- This item is used to turn on/off mute function.
Volume
- Press ▲/▼ button to select Volume and press M button to confirm your selection.
- This item is used to adjust the volume level.
TROUBLESHOOTINGS
| Symptom | Remedy |
| No power | Make sure the power cord is connected properly. |
| No image | Make sure the power cord is connected properly.Make sure the signal cable is securely connected.When LED light indicates red, this monitor is in STANDBY mode. Please move your personal mous to see if the image resumes. |
| Abnormal colors | Please adjust the RGB color. |
| The image bounces or a wave pattern is present. | Remove any electrical device or appliance that may cause interference. |
CLEANING AND MAINTENANCE
Switch off and unplug the monitor from the mains socket before cleaning.
Wipe the housing with a soft damp cloth.
Wipe any dust off the screen periodically with a soft, clean and dry cloth. Do not use any fluid as this may damage the screen.
Do not immerse the monitor in water or any other liquid.
Never use any abrasive or chemical detergents.
SPECIFICATIONS
| Display color | Up to 1,07 billion colors supported |
| Brightness | 250 cd/m2 |
| Contrast ratio | 1000:1 static1000000:1 dynamic |
| View angle | 178° horizontal178° vertical |
| Response time | 12 ms |
| Factory Support Mode | 640 x 480 @ 60/75 Hz800 x 600 @ 60/75 Hz1024 x 768 @ 60/75 Hz1280 x 1024 @ 60/75 Hz1440 x 900 @ 60 Hz1680 x 1050 @ 60 Hz1920 x 1080 @ 60 Hz |
| HDMI Timing (Video) | 480P @ 60 Hz576P@50Hz720P @ 50/60 Hz1080P @ 50/60 Hz1440P @ 60 Hz |
| Dimensions(Width x Height x Depth) | With stand: 614 x 463 x 188 mmWithout stand: 614 x 359 x 41 mm |
| Net weight | With stand: 3.55 kgWithout stand: 3.275 kg |
External power supply
| Information published | Value and precision | Unit |
| Manufacturer's name or trade mark, commercial registration number and address | DONG GUAN HP-POWER TECHNOLOGY., LIMITEDNo.9, Hepan Road, Tangxia Town, Dongguan City, Guangdong, P.R.China |
| Model identifier | HP36A-1203000-AE |
| Input voltage | 100-240 | V |
| Input AC frequency | 50/60 | Hz |
| Output voltage | 12,0 | V |
| Output current | 3,0 | A |
| Output power | 36,0 | W |
| Average active efficiency | 87,43 | % |
| Efficiency at low load (10 %) | 82,10 | % |
| No-load power consumption | 0,077 | W |
| ~ | Alternating current |
| --- | Direct current |
PRODUCT INFORMATION SHEET
| Parameter | Parameter value and precision | Unit |
| Supplier's name or trade mark | JVC | |
| Supplier's address | Etablissements Darty & fils ©,9 Rue des Bateaux-Lavoirs,94200 Ivry-sur-Seine, France |
| Model identifier | Q27WCF | |
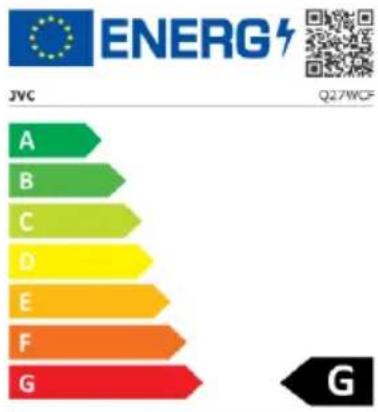
| Energy efficiency class for standard Dynamic Range (SDR) | G | |
| On mode power demand for Standard Dynamic Range (SDR) | 28 | W |
| Energy efficiency class (HDR) | n.a. | |
| On mode power demand in High Dynamic Range (HDR), if implemented | n.a. | W |
| Off mode, power demand, if applicable | 0,3 | W |
| Standby mode power demand, if applicable | 0,5 | W |
| Networked standby mode power demand, if applicable | n.a. | W |
| Electronic display category | monitor | |
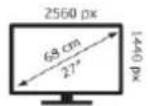
| Size ratio | 16 | : | 9 | integer |
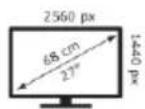
| Screen resolution (pixels)Horizontal and vertical pixels | 2560 | x | 1440 | pixels |
| Screen diagonal | 68 | cm |
| Screen diagonal | 27 | inches |
| Visible screen area | 20,031 | dm^2 |
| Panel technology used | LCD | |
| Automatic Brightness Control (ABC) available | NO | |
| Voice recognition sensor available | NO | |
| Room presence sensor available | NO | |
| Image refresh frequency rate (default) | 60 | Hz |
| Minimum guaranteed availability of software and firmware updates (from the date of end of the placement on the market) | 8 | Years |
| Minimum guaranteed availability of spare parts (from the date of end of the placement on the market) | 7 | Years |
| Minimum guaranteed product support | 7 | Years |
| Minimum duration of the general guarantee offered by the supplier | 2 | Years |
| Power supply type | External/Standardised external | |
| External standardised power supply |
| i | Supported standard name HP36A-1203000-AE |
| ii | Input voltage | 100-240 | V |
| iii | Output voltage | 12 | V |
bar
| Rating | Value |
| :--- | :--- |
| A | 1 |
| B | 2 |
| C | 3 |
| D | 4 |
| E | 5 |
| F | 6 |
| G | 7 |
28 kWh/1000h
PROVATI
DISPOSAL


As a responsible retailer we care about the environment. As such we urge you to follow the correct disposal procedure for the product, packaging materials and if applicable, accessories. This will help conserve natural resources and ensure that the materials are recycled in a manner that protects health and the environment.
You must follow laws and regulations about disposal. Waste electrical products must be disposed of separately from household waste when the product reaches the end of its life. Contact the store where you bought the product and your local authority to learn about disposal and recycling.
We apologise for any inconvenience caused by minor inconsistencies in these instructions, which may occur as a result of product improvement and development.