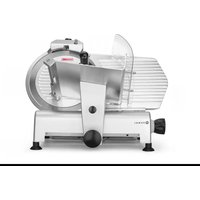
210017 - Electric slicer Hendi - Free user manual and instructions
Find the device manual for free 210017 Hendi in PDF.

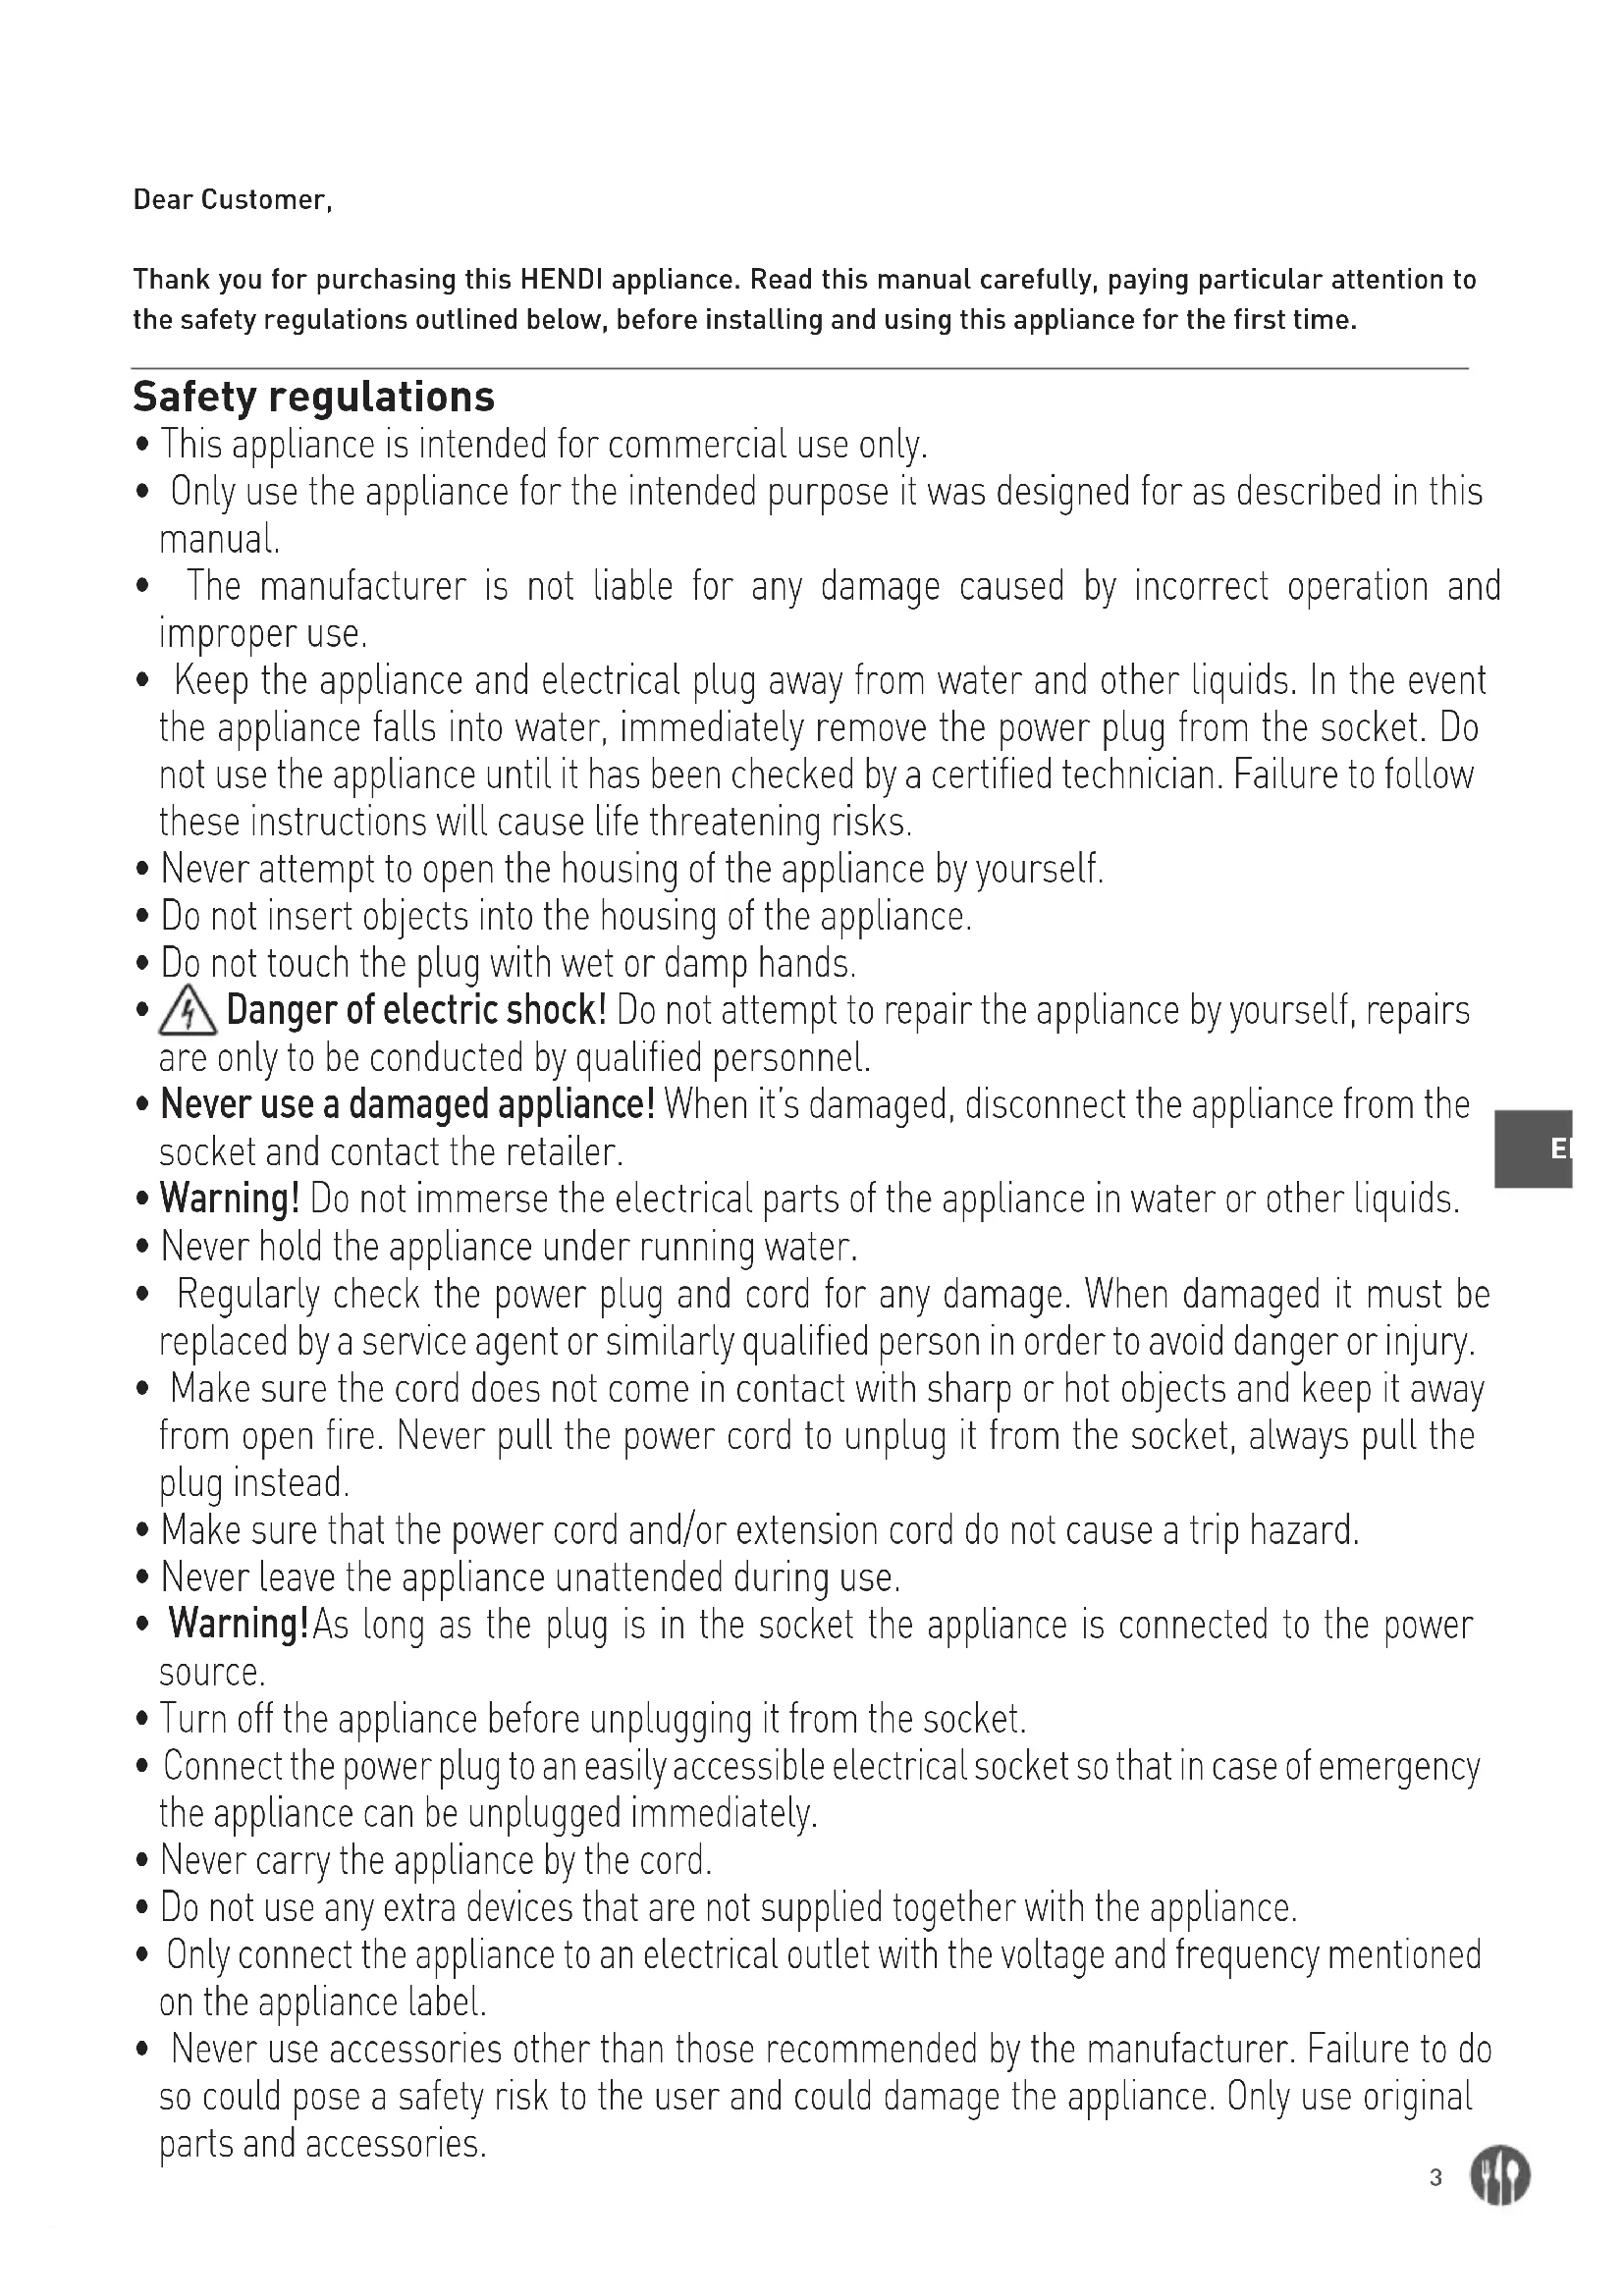


| Product type | Professional electric slicer |
| Brand | Hendi |
| Model | 210017 |
| Dimensions (L × D × H) | 600 × 480 × 450 mm |
| Net weight | 26 kg |
| Power supply | 220-240 V ~ 50 Hz |
| Power consumption | 420 W |
| Blade diameter | 300 mm |
| Protection class | I (grounded) |
| Protection rating (IP) | IP33 |
| Noise level | < 70 dB(A) |
| Adjustable slice thickness | Yes, by graduated knob |
| Integrated sharpener | Yes, with fine and coarse wheels |
| Safety systems | Microswitches, safety relays, motor thermal protection |
| Blade material | Stainless steel |
| Removable carriage | Yes, for easy cleaning |
| Intended use | Slicing meat, cheese, bread (boneless and thawed products) |
| Maintenance and cleaning | Daily cleaning with water and neutral detergent; disassembly possible |
| Warranty | 12 months |
| Included accessories | Sharpener, protective plate, holding bracket |
Frequently Asked Questions - 210017 Hendi
User questions about 210017 Hendi
0 question about this device. Answer the ones you know or ask your own.
Ask a new question about this device
Download the instructions for your Electric slicer in PDF format for free! Find your manual 210017 - Hendi and take your electronic device back in hand. On this page are published all the documents necessary for the use of your device. 210017 by Hendi.
USER MANUAL 210017 Hendi
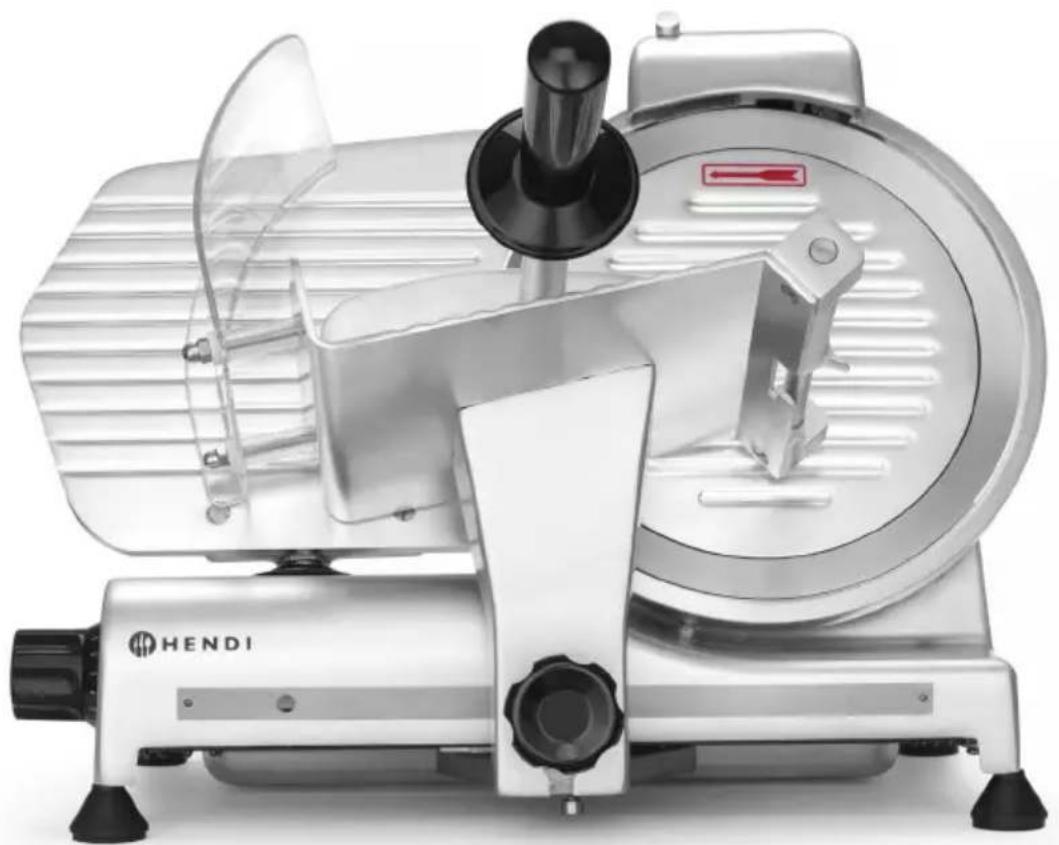
You should read this user manual carefully before using the appliance.
Thank you for purchasing this HENDI appliance. Read this manual carefully, paying particular attention to the safety regulations outlined below, before installing and using this appliance for the first time.
Safety regulations
- This appliance is intended for commercial use only.
- Only use the appliance for the intended purpose it was designed for as described in this manual.
- The manufacturer is not liable for any damage caused by incorrect operation and improper use.
- Keep the appliance and electrical plug away from water and other liquids. In the event the appliance falls into water, immediately remove the power plug from the socket. Do not use the appliance until it has been checked by a certified technician. Failure to follow these instructions will cause life threatening risks.
- Never attempt to open the housing of the appliance by yourself.
- Do not insert objects into the housing of the appliance.
- Do not touch the plug with wet or damp hands.
- Danger of electric shock! Do not attempt to repair the appliance by yourself, repairs are only to be conducted by qualified personnel.
- Never use a damaged appliance! When it's damaged, disconnect the appliance from the socket and contact the retailer.
- Warning! Do not immerse the electrical parts of the appliance in water or other liquids.
- Never hold the appliance under running water.
- Regularly check the power plug and cord for any damage. When damaged, it must be replaced by a service agent or similarly qualified person in order to avoid danger or injury.
- Make sure the cord does not come in contact with sharp or hot objects and keep it away from open fire. Never pull the power cord to unplug it from the socket; always pull the plug instead.
- Make sure that the power cord and/or extension cord do not cause a trip hazard.
- Never leave the appliance unattended during use.
- Warning! As long as the plug is in the socket, the appliance is connected to the power source.
- Turn off the appliance before unplugging it from the socket.
- Connect the power plug to an easily accessible electrical socket so that in case of emergency the appliance can be unplugged immediately.
- Never carry the appliance by the cord.
- Do not use any extra devices that are not supplied together with the appliance.
- Only connect the appliance to an electrical outlet with the voltage and frequency mentioned on the appliance label.
- Never use accessories other than those recommended by the manufacturer. Failure to do so could pose a safety risk to the user and could damage the appliance. Only use original parts and accessories.
- This appliance should not be operated by persons with reduced physical, sensory or mental capabilities, or persons that have a lack of experience and knowledge.
- This appliance should, under any circumstances, not be used by children.
- Keep the appliance and its power cord out of reach of children.
- WARNING: ALWAYS switch off the appliance and unplug from power socket before cleaning, maintenance or storage.
Special Safety Regulations
CAUTION! Unplug before cleaning, maintenance or repair! - CAUTION! Two-person handling required! CAUTION! Read instruction manual before operation, cleaning or maintenance! - The food to be sliced must be thawed, unpacked and free from bones before it can be sliced with the appliance. Do not use the appliance for slicing frozen food, vegetables or for any other purpose. - Use the appliance only as described in the manual. - Any other use might lead to damage to the appliance or personal injury. - This appliance should be operated by trained personnel. - Do not place the appliance on a heating object (gasoline, electric, charcoal cooker, etc.) Keep the appliance away from any hot surfaces and open flames. Always operate the appliance on a level, stable, clean, heat-resistant and dry surface. - Danger of injury! Care is needed when handling the blade, especially when removing the blade for cleaning. Wear protective gloves (not supplied) if necessary. - Caution! Securely route the power cord if necessary in order to prevent unintentional tripping over and falling. - Do not use the appliance before it is properly assembled with the blade, blade guard and the food holder. - Do not use the appliance near explosive or flammable materials, credit cards, magnetic discs or radios. - Never bypass any safety interlocks on the appliance. - WARNING: Keep all ventilation openings in the appliance clear of obstruction. - WARNING: ALWAYS switch OFF the appliance and unplug from electrical power supply before cleaning, maintenance or storage. - WARNING: ALWAYS keep hands, long hair and clothing away from the moving parts. - Allow at least 20 cm spacing around the appliance for ventilation purpose during use. - WARNING! Take great care when handling the cutting discs. Wear protective gloves (not supplied) if necessary.
Intended use
- This appliance is intended for professional use.
- The appliance is designed only for slicing foodstuff, e.g. meats, cheese, breads, etc. Any other use may lead to damage to the appliance or personal injury.
- Operating the appliance for any other purpose shall be deemed a misuse of the device. The user shall be solely liable for improper use of the device.
Grounding installation
This appliance is classified as protection class I and must be connected to a protective ground. Grounding reduces the risk of electric shock by providing an escape wire for the electric current.
This appliance is fitted with a power cord that has a grounding wire and grounded plug. The plug must be plugged into an outlet that is properly installed and grounded.
Information on the slicer
General precautions
- The slicer must be operated only by highly qualified people who are fully aware of the safety measures described in this manual.
- In case of personnel rotation, training is to be provided in advance.
- Although the slicer is equipped with safety devices in the dangerous points, it is recommended not to touch the blade and the moving components.
- Before starting cleaning and maintenance operations, disconnect the slicer plug from the supply.
- Assess the residual risks carefully when protection devices are removed to carry out cleaning and maintenance.
- Cleaning and maintenance require great concentration.
- A regular control of the electric supply cord is absolutely necessary; a worn-out or damaged cord can expose users to great electric shock hazard.
- If the slicer shows malfunctions, it is recommended not to use or attempt to repair the device; please call the "SERVICE CENTRE".
- Do not use the slicer for frozen products, meat and fish with bones and any products other than foodstuffs.
- Do not use the slicer without the meat pusher when the meat is nearly finished.
- Do not place yourself in a dangerous position, the blade may cause injuries.
The manufacturer and/or the seller is not liable in the following cases:
- if the slicer has been tampered by non-authorized personnel;
- if some parts have been substituted by non-original spare parts;
- if the instructions included in this manual are not followed accurately;
- if the slicer is not cleaned and oiled with the right products.
Safety systems installed in the slicer
The slicer is equipped with:
- a micro-switch which stops the slicer in case the tie rod for blade guard is removed; the micro-switch prevents from restarting the slicer if the guard has not been set in the switch-off position.
- a relay in the control box which requires the restart of the slicer when a power cut occurs.
Even though slicers are provided with electrical and mechanical protections (when the slicer is operating and for maintenance and cleaning operations), there are still RESIDUAL RISKS that cannot be eliminated completely; these risks are specified in this manual under WARNING. The blade and other parts of the machine can cause cuts and injuries.
- Attach the hand guard.
1. Place both screws in the carriage.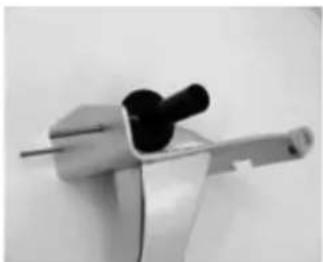
2. Attach the hand guard.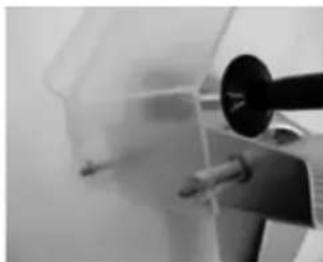
3. Place the two washers over the white bolts.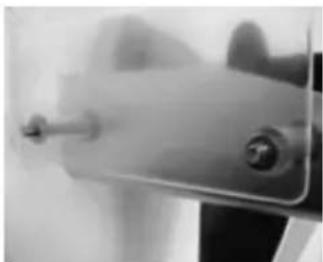
4. Screw on the two dome nuts.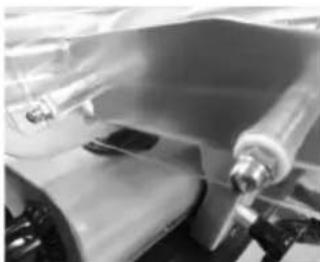
NOTE! You are advised not to use the appliance if the hand guard is not attached as instructed! These are safety features that will prevent possible injury. If you do not attach these features, there will be a risk of injury.
Instructions for use
- Position the appliance so that the on/off switch is facing the user. If the blade sharpener has not been installed, proceed as follows:
- Position the blade sharpener in its support so that the blade does not extend between the gears.
- Tighten the safety screw on the blade sharpener.
- Note! The appliance is equipped with a safety switch and will turn off automatically if the sharpening device is removed)
- Push the plug in the wall socket.
- Turn the dial with the graduated scale to the desired slice thickness.
- Switch ON the appliance by pressing the "WHITE [I]" button of the ON/OFF switch.
- Put the food product on the carriage and adjust the clamp to hold the product firmly in place. Make sure the product is positioned against the stop plate.
- Once the product has been sliced, switch OFF the appliance by pressing the "BLACK (0)" button of the ON/OFF switch.
- Turn the thickness dial back to "0".
How to Lock the Slicer
1. Turn the knob in the anti-clockwise direction.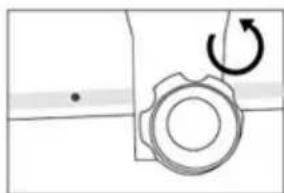
2. Continue to turn the knob until it is loosened COMPLETELY.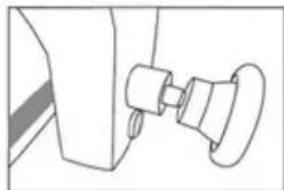
3. Move the carriage to the proper position; the slicer will be locked automatically.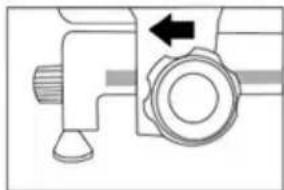
How to Unlock the Slicer
1. Turn the knob in the clockwise direction to unlock the slicer. The knob should be turned COMPLETELY to tighten the carriage.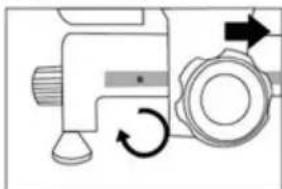
Sharpening the Blade
WARNING: Before proceeding with blade sharpening, remain alert to the RESIDUAL RISKS (see Electrical safety system) that refer to the hazard of injury if the instructions below are not followed.
The blade must be sharpened periodically and as soon as it becomes blunt; the detailed instructions below are to be followed:
- Clean the blade accurately with alcohol to remove grease after the plug has been disconnected from the socket.
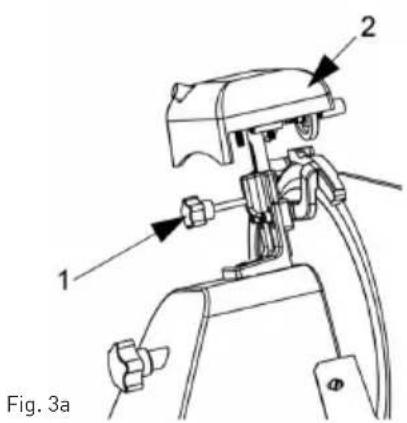
- Unscrew the knob (1, Fig. 3a), lift (a) the sharpener (2, Fig. 3a) up to the locking position and rotate it 180°.
Then let it move to the end so that the blade is positioned between the two sharpeners. Lock the knob.
- Switch on the slicer by pushing the button "I" (ON).
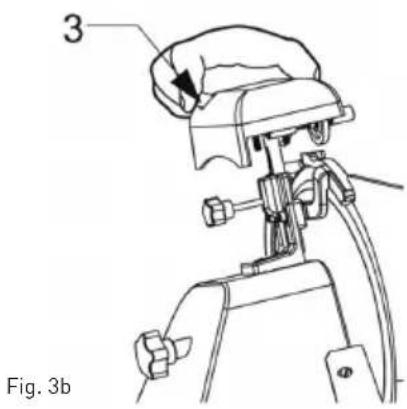
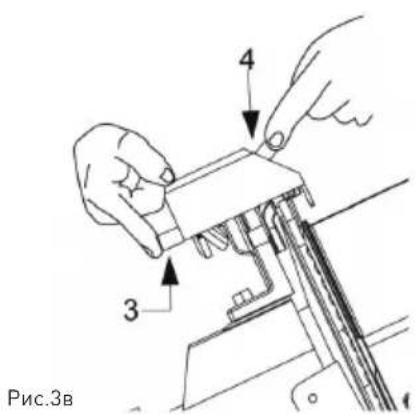
- Push the small button [3, Fig. 3b], let the blade rotate against the sharpener for 30/40 sec. to produce a sharp burr on the blade edge.
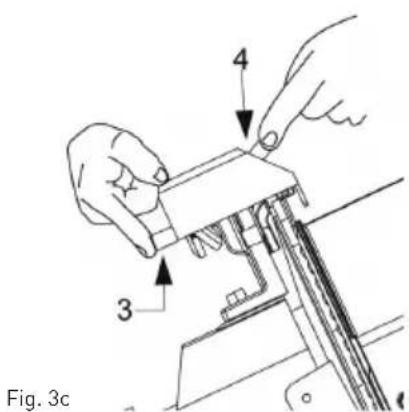
- Push buttons simultaneously for 3/4 seconds [1 and 2, Fig. 3c] and then leave them simultaneously.
- It is recommended to clean the sharpeners upon the end of sharpening (see Cleaning of the sharpener).
- Once sharpening has been completed, return the slice to its original setting with the reverse procedure.
- After sharpening, the blade should be cleaned (see Cleaning of the blade guard and blade).
NOTE: Do not prolong the burring operation beyond 3/4 sec. in order to prevent the dangerous twisting of the blade cutting edge.
The blade should be replaced when it cannot be sharpened any further or when the gap between edge of the blade and the blade guard exceeds 6 mm.
Ordinary cleaning - General features
- The slicer cleaning must be carried out at least once a day or more frequently, if necessary.
- Cleaning must be extremely accurate for those parts of the slicer which are directly or indirectly in contact with foodstuffs.
- The slicer must not be cleaned with water-cleaner and high pressure water jets; use water and neutral detergent instead. Do not use other detergents. Tools, brushes and other devices likely to damage the slicer's surface must not be used.
Before carrying out any cleaning operation it is necessary to:
- disconnect the power supply plug from the socket to isolate the slicer from the rest of the electric circuit completely;
- set the dial knob adjusting the plate to the "0" position.
WARNING: Pay attention to residual risks due to cutting and/or sharp edges. Wear protective gloves (not supplied) if necessary.
Slicer cleaning procedure Cleaning of the food tray
The carriage (food tray + arm + stem) is easily removable:
- set the dial knob in the "0" position [1]
- set the carriage (2) at the end of its run (a) near the controls;
- unscrew the screw(3), slide the carriage upwards (b);
- after having removed the carriage, it is possible to clean accurately the food tray with hot water and neutral detergent [pH 7].
Carriage removal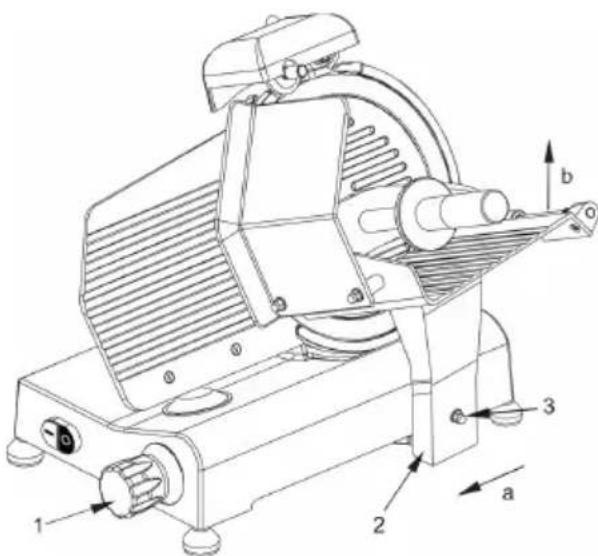
Cleaning of the blade guard and blade
- Remove the blade guard cover by unscrewing the pin at the back of the appliance (see Fig. 4).
WARNING: The blade cleaning must be carried out with a wet cloth with metal gloves on.
To clean the opposite surface of the blade it is necessary to remove the blade (see Fig. 5).
The blade is to be removed as follows:
Disassemble the blade guard (see Fig. 5); - remove the sharpener (a) and turn the thickness blade with the dial knob to make the Plexiglas blade removal tool (b) (not supplied) adhere to the blade; - loosen the 3 or 4 screws (f) (according to the model) that fix the blade.
Fig. 4 - Blade guard removal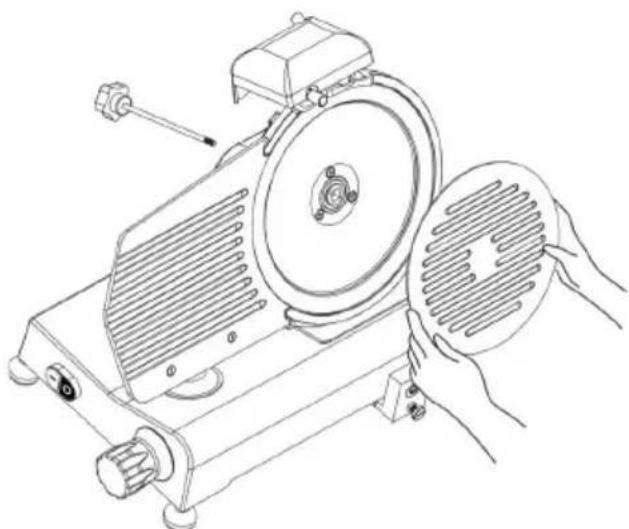

- Lean the Plexiglas blade removal tool on the blade to obtain the coupling of the blade holes with the two screws (e), turn the blade until it reaches the correct position.
- Slightly tighten the screw [e].
WARNING: The blade guard must be cleaned with hot water and neutral detergent.
Fig. 5 - Assembling the Plexiglas blade removal tool (b)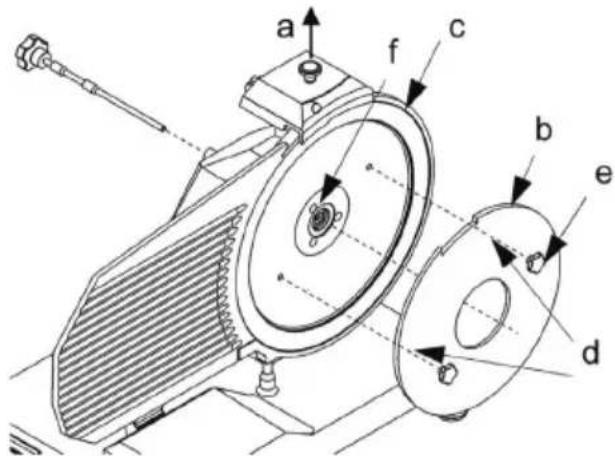
Cleaning of the sharpener
The sharpener cleaning operation is carried out by rubbing the grinding moles with a brush. The moles must be placed in the safety position which
means that they must be turned towards the side opposite to the blade.
Cleaning of the deflector
To remove the deflector unscrew the two screws (a) locking the deflector (see Fig. 6).
Clean the deflector with hot water and neutral detergent.
Fig. 6 - View of the deflector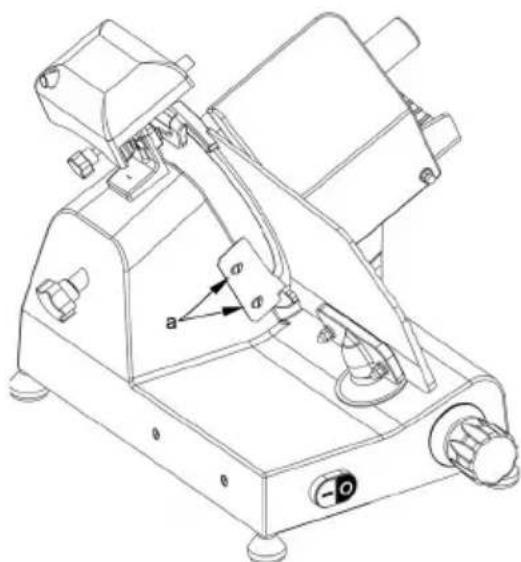
Maintenance
General features
Before starting maintenance it is necessary to:
- Disconnect the power supply cord plug from the socket to isolate the slicer from the electric circuit completely.
- Place the dial knob adjusting the thickness plate in the "0" position.
Belt
The belt is not to be adjusted. Generally, it must be replaced after 3 or 4 years; in this case please call your authorized "SERVICE CENTER".
Feet
Feet may deteriorate and lose elasticity, thus reducing the stability of the slicer. In this case they must be replaced. Call your authorized "SERVICE CENTER" to replace the feet.
Power supply cord
Periodically check the power supply cord for any symptoms of worn-out and, if this is the case, please call the "SERVICE CENTER" to have it replaced.
Blade
Check that the blade does not lose more than 10 mm of its original diameter. To have it replaced call the "SERVICE CENTER".
Sharpener - grinding moles
Check that the grinding moles retain their abrasive property during sharpening operations. Call the "SERVICE CENTRE" if it is necessary to replace the grinding moles to prevent the blade damage.
Lubrication of sliding guides
From time to time, pour some oil drops onto the round sliding guide along which the carriage moves back and forth. This operation can be performed through the opening (OIL) next to the dial knob.
Label of the push-button panel
If the labels of the push-button panel have been damaged, call the "SERVICE CENTER" for replacement.
Machine disposal
Putting the machine out of service
If for some reason there is a necessity to put the machine out of service, make sure nobody can use
it: disconnect it from the mains and eliminate any the electrical connections.
Storage
- Before storage, always make sure the appliance has already been disconnected from the electrical outlet and cooled down completely.
- Store the appliance in a cool, clean and dry place.
Troubleshooting
If the appliance does not function properly, please check the table below for the solution. If you are still unable to solve the problem, please contact the supplier/service provider.
| Problem Possible cause | Use Solution | |
| Appliance does not slice evenly | Blunt blade Sharpen blade | |
| Dirty appliance Clean the appliance | ||
| Appliance stops slicing | Overheated motor Let the machine cool off for an extended period. The motor's safety thermostat will reset itself automatically. | |
| Carriage does not slide | Dirty slide bar Clean the slide bar and lubricate with Vaseline | |
| Some food stick to the blade. | Switch off the appliance & unplug it. Let it come to a complete stop. Remove any blockage. Wipe the blade with a damp cloth. | |
| Blade stops when product is being cut | v-belt worn out or dirty | Contact the supplier. |
When in doubt, always contact your supplier!
Circuit diagram for 210000, 210017, 210031, 210048, 210086, 970294
AC voltage input: AC220-240V 50Hz

M: Motor
T: Transformer
C: Capacitor
PE: Protective earthing [Grounding]
L: Live
N: Neutral
SB1, SB2: Switch
KC: Relay
HL: Indicator lamp
ST: Thermal cut-out
SQ1, SQ2: Micro switch
Part list (Item no: 210000, 210031, 210048, 210086, 970294)
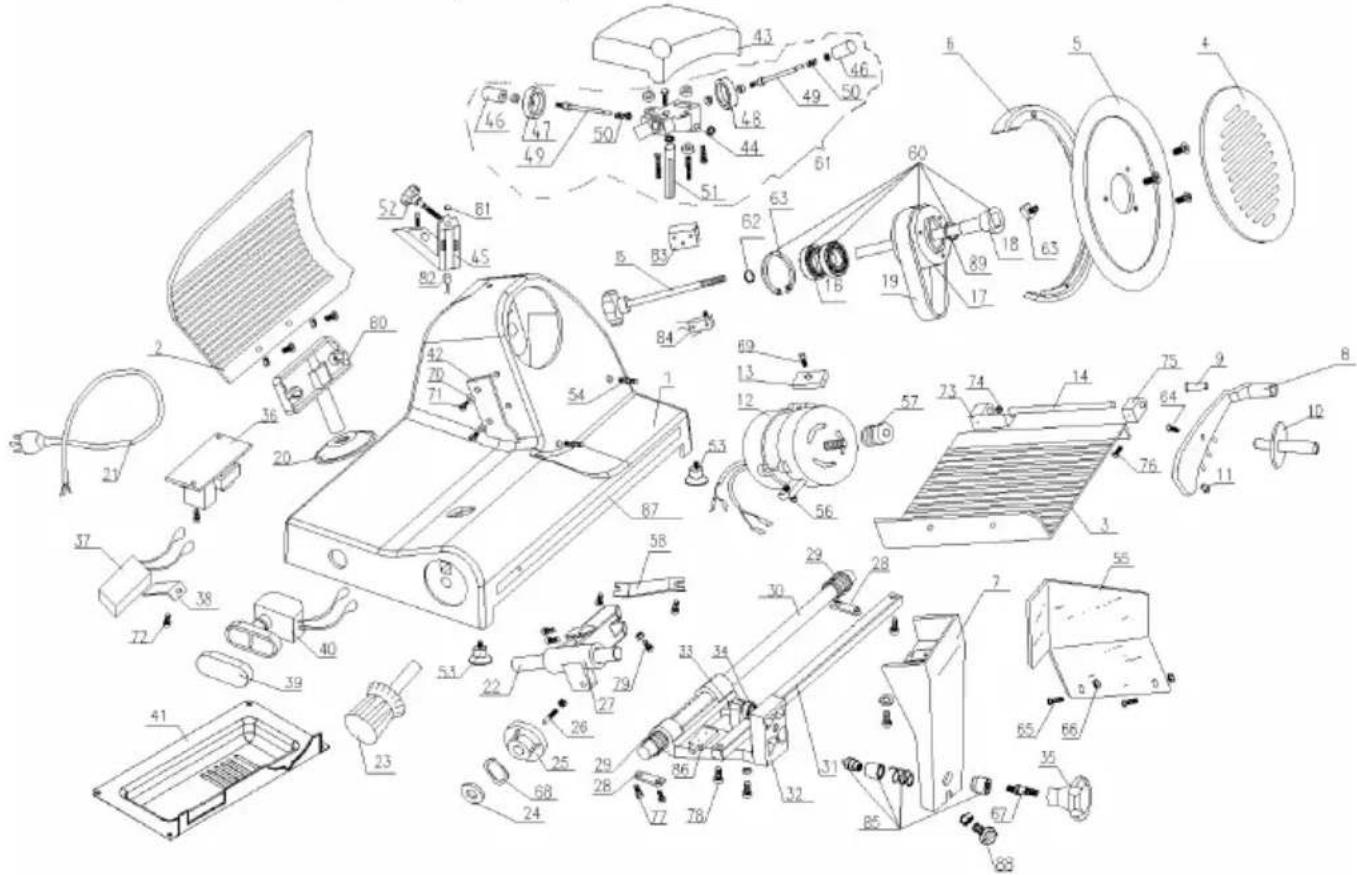
EN
| Part no. | Part name Quantity Part no. Part name | Quantity | |||
| 1 Encloser 1 20 Slide mulch 1 | |||||
| 2 Active clapboard 1 21 Power line 1 | |||||
| 3 Food salver 1 22 Slide axle 1 | |||||
| 4 Blade guard disc 1 23 Knob with scale 1 | |||||
| 5 Blade | 1 24 Spring gasket | 1 | |||
| 6 Blade guarding ring | 1 25 Cam | 1 | |||
| 7 Tray bracket | 1 26 Cam osculant | staff | 1 | ||
| 8 Food and fixed-arm | 1 27 Slider | 1 | |||
| 9 Fixed-arm bushing | 1 28 Slide axle briquetting | 2 | |||
| 10 | Fixed-arm handle | 1 | 29 | Spring of towing bracket axle | 2 |
| 11 | Plastic granule | 1 | 30 | Towing bracket axle | 1 |
| 12 | Motor | 1 31 Quad rate axis | 1 | ||
| 13 | Motor briquetting | 1 | 32 | Towing bracket | 1 |
| 14 | Fixed-arm pin Ø12×185 | 1 | 33 | M8×35Hexagonal screw | 1 |
| 15 | Blade guard bolts | 1 | 34 | Ball bearing 607 | 1 |
| 16 | Ball bearing 6202 | 2 | 35 | Towing bracket cover knob | 1 |
| 17 | Blade belt wheel Ø66 | 1 36 Relay | 1 | ||
| 18 | Pin of belt wheel | 1 37 Capacitor 1 | |||
| 19 | BeltSV.330 | 2 | 38 | Capacitor retainer | 1 |
| 39 Button | mulch 1 65 Fixed-arm handle bolt 1 | ||||
| 40 Button | switch 1 66 Finger baffle bolt 2 | ||||
| 41 Motherboard 1 67 Finger baffle nut 2 | |||||
| 42 Meatscraper 1 68 Bracket knob bolt | 1 | ||||
| 43 Sharper mulch | 1 69 U | ndee spring | gascket | 1 | |
| 44 Sharper base of subassembly | 1 70 M | otor impacted bolt | 1 | ||
| 45 Sharper base of assembled | 1 71 Meat scraping shim | 2 | |||
| 46 Button of sharpener | 2 72 Meat scraper bolt | 2 | |||
| 47 Fine grinding wheel Ø45 | 1 73 C | capacitor fixation clamp bolt | 1 | ||
| 48 Crude grinding wheel Ø45 | 1 74 Tray bearing cover A | 1 | |||
| 49 Pin of rubbing stone | 2 75 Meat board bracket | 1 | |||
| 50 Spring | 2 76 Tray bearing cover B | 1 | |||
| 51 Pin of sharpener bracket | 1 77 C | cross recessed countersunk head M6×12 | 2 | ||
| 52 Sharper tighten knob 1 78 Slide axle briquetting bolt | 4 | ||||
| 53 Active clapboard mandril | 1 79 Quadrate axis locking screw | 2 | |||
| 54 Rubber foot | 4 80 Sider adjust bolt | 1 | |||
| 55 Pin of blade guarding ring | 2 81 Magnet | 1 | |||
| 56 Meat blocking board | 1 82 Magnet switch | 1 | |||
| 57 Slide axle bracket | 2 83 Aluminium block | 1 | |||
| 58 Small belt wheel of motor | 1 84 Microswitch | ||||
| 59 Slide driver | 1 85 Stainless steel lock | 1 | |||
| 60 Belt wheel setting 1 86 Limited block | 1 | ||||
| 61 Sharper setting | 1 87 Stainless steel bar | 1 | |||
| 62 Ø15 Spring gasket for bearing | 1 88 Set screw for tray bracket | 1 | |||
| 63 Ø15 Spring gasket for bearing | 1 89 L seal | 1 | |||
| 64 Blade guard disc square-head nut | 1 |
C

C
Grounding installation
| Teile-Nr. | Teilename Menge Teile-Nr. | Teilename | me Menge | |||
| 137 Relay | 165 Ø 47Spring gasket for hole 1 | |||||
| 138 Spring | of sliding axle 2 166 Blade guard disc square-head nut 1 | |||||
| 139 Towing | bracket sliding axle 1 167 Fixed-arm handle bolt 1 | |||||
| 140 Quadrate axis 1 168 Finger baffle bolt | 2 | |||||
| 141 Towing | bracket 1 169 Finger baffle nut | 2 | ||||
| 142 Button | of towing bracket 1 170 Bracket knob bolt | 1 | ||||
| 143 Sharper mulch | 1 171 Bracket knob nut | 1 | ||||
| 144 Button | 2 172 Bracket bottom bolt | 1 | ||||
| 145 Fine grinding wheel Ø45 | 1 173 Quadrate axis locking screw | 2 | ||||
| 146 Pin of burr cleaning wheel 2 174 Slide axle | briquetting bolt | 4 | ||||
| 147 Spring | of burr cleaning wheel 2 175 Slide axle bolt | 1 | ||||
| 148 Crude grinding wheel Ø45 | 2 176 Ø 12 Under spring gasket | 1 | ||||
| 149 Sharper tighten knob | 1 177 Meat scraping shim | 2 | ||||
| 150 Supporting base of outer ring | 1 178 Meat scraper bolt | 1 | ||||
| 151 Ø 4.75 Wheel | 1 179 Fulcrum bearing shim | 2 | ||||
| 152 Pin of rubbing stone | 1 180 Fulcrum bearing bolt | 2 | ||||
| 153 Sharper base of subassembly 1 181 Steel | nless steel lock | 1 | ||||
| 154 pin of blade guading ring | 2 182 Magnet 1 | |||||
| 155 Pin of food tray | 1 183 Magnet switch | 1 | ||||
| 156/156A Meat blocking board 1 | 184 Limited block | 1 | ||||
| 157 Bracket of sliding axle | 1 185 Microswitch | 1 | ||||
| 158 Small belt wheel of motor | 1 186 Tray bearing cover A | 1 | ||||
| 159 Slide transmitting wheel 1 187 Tray bearing | cover B | 1 | ||||
| 160 Towing bracket handle | 1 188 Fulcrum bearing shim | 1 | ||||
| 161 Sliding axle608 | 1 189 Oil seal 1 | |||||
| 162 Belt wheel setting | 1 190 Stainless steel bar | 1 | ||||
| 163 Sharper setting | 1 191 Set screw for tray bracket | 1 | ||||
| 164 Ø 20Spring gasket for bearing | 1 |
[Input (I): BKN; Output (O): BbIK]
5 Cutting blade 6 Product adjustment device 7 Axle cover 8 Blade 9 Carriage lock 10 Protective cover
(Not shown)
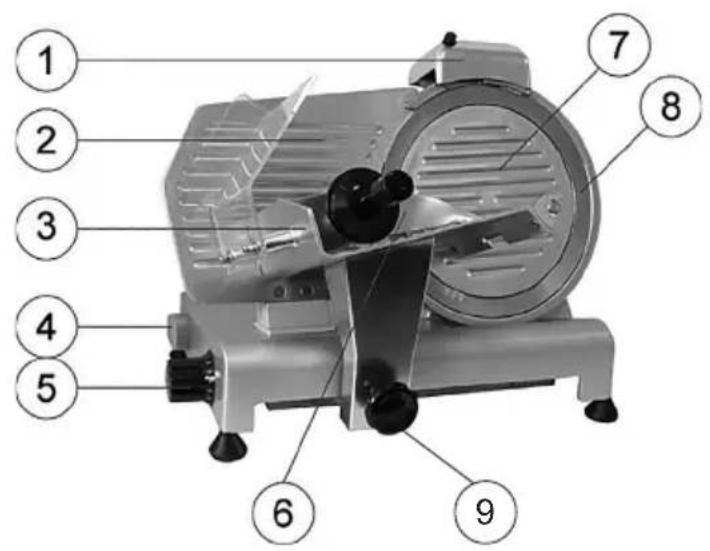
RU
- Make sure there are no missing parts. Otherwise, contact the supplier.
- Remove packaging material. Keep the packaging if you plan to store the device in the future. It is necessary to check the device for completeness and damage during transport. In case of incomplete delivery or damage, contact the supplier immediately. Such a device must not be used. (See warranty).
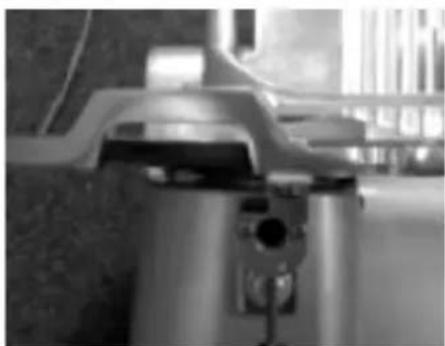
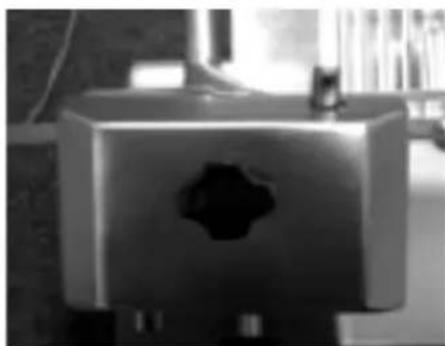
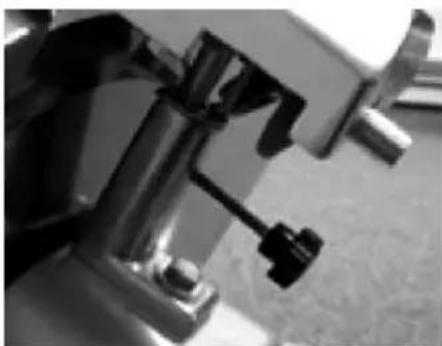
Clean the blade. Caution: it is very sharp! (If necessary, use gloves, not included in the kit) Leave free space of at least 10 cm around the device to ensure proper ventilation. - Install the device in such a way as to ensure free access to the plug. - If the loading device is not installed, proceed according to the instructions below:
1. Insert 2. Install the loading
device in such a way that the blades do not protrude between the cutting blades.
- Tighten the handle to make the loading device immovable. Before using the device, make sure that the loading device is securely fastened.
WARNING! The device is equipped with an emergency switch. If it is not installed, the device must not be used.
- Tighten the protective handles.
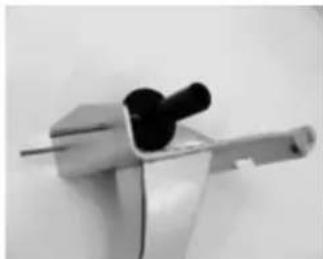
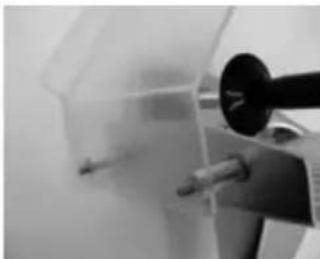
- Install two screws in the carriage.
2. Install the protective screen.
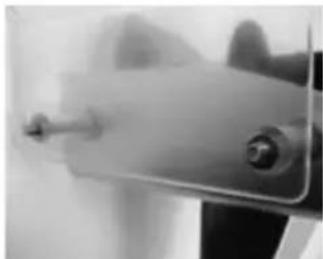
3. Install the two wing screws.
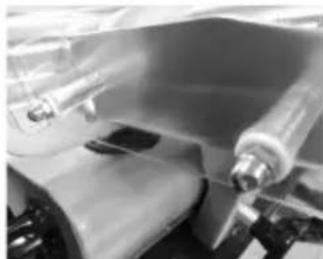
- Tighten the two blind nuts.
WARNING! It is recommended not to use the device if the protective screen or handles are not installed as shown above! The screen must protect the operator from injury. If the screens are not installed, there is a risk of injury.
- Install the device in such a way that the switch is directed towards the operator.
- If the locking device is not installed, proceed according to the following recommendations:
- Install the locking device holder so that the blade does not protrude beyond the limiting stones.
- Tighten the locking screw on the locking device. Warning! If it is equipped with an emergency switch, it will automatically turn off the device when the locking device is removed.
Plug the plug into a power outlet. - Turn the handle to set the required cutting depth. Turn on the device by pressing the white (1) button of the switch. - Place the product on the carriage and install the clamping device so that the product is held firmly in place. Make sure the product is against the side edge of the carriage. After finishing cutting, turn off the device by pressing the black (0) button of the switch. - Set the handle to the "0" position.
Blocking the slicer
1 Turn the handle counterclockwise.
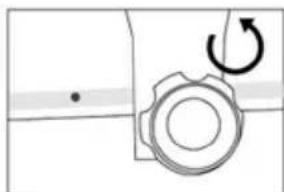
2 Turn the handle until it is completely free.
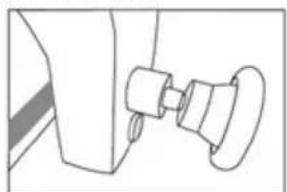
3 Done. The slicer locks automatically.
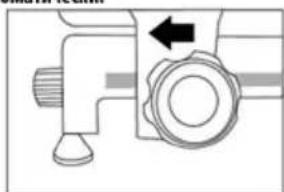
Unblocking the slicer
1 Turn the handle counterclockwise to unblock the slicer. The handle must be turned until the carriage stays in the stable position.
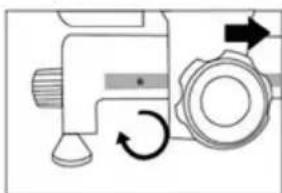
Positioning the food pusher
WARNING: Pushers intended for food can only be placed on the tray if the adjustment handle is set to position "0". Also pay attention to the blade and sharp edges.
The procedure is as follows:
- After placing the food on the tray, it should be pushed against the base, blocking it with its shoulder using the holders;
- Turn the adjustment handle to obtain the desired slice thickness. To avoid accidents, the person operating the slicer must stand facing the device in the correct position: leaning with the right hand on the clamping device for the food, and keeping the left hand near the deflector (do not touch the blade); the body must be perpendicular to the work surface (see Fig. 1a).
WARNING: Pay special attention: no part of the body can have contact with the blade (see Fig. 1b);
- Press the ON button and evenly push the carriage (tray for food + clamping device for food + pusher) towards the blade, without pressing the food with the clamping device, because it presses against the base with its own weight. The blade will easily cut the food, and the slices will pass through the deflector and fall onto the tray (see Fig. 2); do not use the slicer without food;
- After cutting the food, set the adjustment handle to position "0" and turn off the device, setting the switch to position "0"; sharpen the blade as soon as the cut slices become uneven or with jagged edges, and the cutting becomes difficult (see blade sharpening).

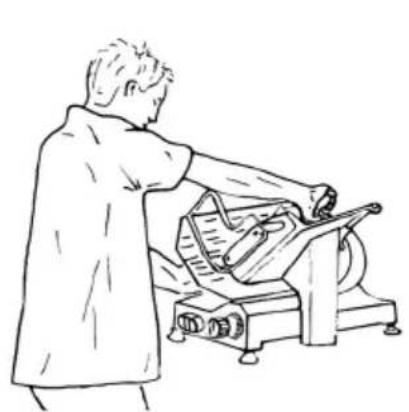
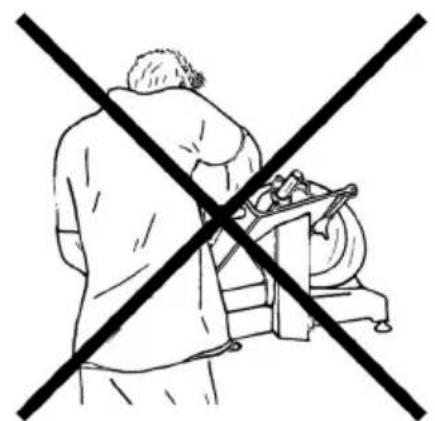
Fig. 1a - Correct position; Fig. 1b - Incorrect position; Fig. 2 - Cutting food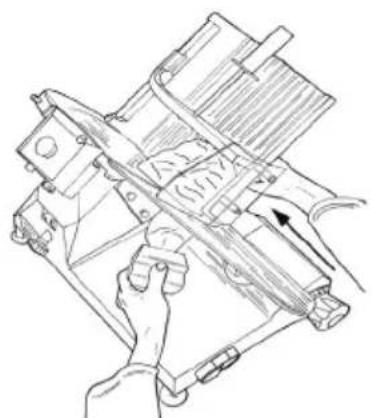
Sharpening the knife
CAUTION: Before sharpening, please pay attention to the residual risk (see Electrical Safety System), which may lead to the risk of injury if the instructions below are not followed.
The knife should be sharpened from time to time when it becomes dull. It is necessary to perform the following steps:
- After disconnecting the power supply from the outlet, carefully clean the knife with a cloth to remove any dirt; turn the handle (item 1, Fig. 3a), lift the sharpening device (item 2, Fig. 3a) to the position where it locks, and turn it 180 degrees.
Then press it down to the end so that the knife blade fits between the sharpening stones. Lock the handle;
- Turn on the slicer by switching the button to the "ON" position;
- Press the button (item 3, Fig. 3b), allowing the knife blade to pass through the sharpening device for about 30/40 seconds, until burrs appear on the knife blade;
- Press the buttons (items 3 and 4, Fig. 3b) simultaneously for 3-4 seconds, then release them simultaneously. Fig. 3b; it is recommended to clean the sharpening stones (see Cleaning the sharpening device);
- After sharpening, return the slicer to its original
- position by moving it in the reverse direction.
- After sharpening the knife, it is necessary to wash the slicer knife (see Cleaning the knife and knife guard).
WARNING: Do not remove burrs for more than 3-4 seconds to avoid the danger of damaging the cutting edge. Replace the blade if it is no longer possible to sharpen the knife, or when the distance between the edge of the blade and the knife guard exceeds 6 mm.
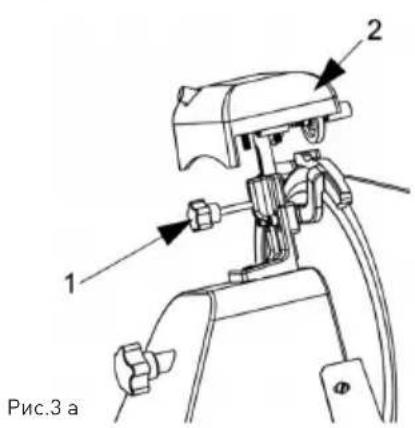
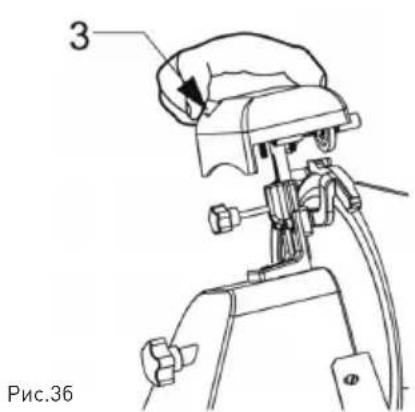
Standard knife
General characteristics
The slicer should be washed at least once a day or more often, depending on needs. Washing should be especially thorough for those parts of the slicer that have direct or indirect contact with food. The slicer must not be cleaned with water jets or high-pressure water, nor with neutral detergents. Do not use other cleaning agents. Do not use tools, brushes, or other objects that could damage the surface of the slicer.
Before starting, it is necessary to:
- Disconnect the plug from the socket to completely disconnect the appliance from the mains; set the adjustment knob to position "0". WARNING: Pay attention to residual risk caused by sharp or pointed surfaces. If necessary, wear protective gloves (not supplied).
Cleaning the appliance
Cleaning the tray for liquids
The carriage (liquid flow + foam + cream) can be disassembled as follows:
- Set the adjustment knob to position "0" (1).
- Place the carriage (item 2) at the end of the stroke (item a), working with the control elements;
- Turn the screw (item 3), move the carriage upwards (item b);
- After removing the carriage, thoroughly clean the tray for liquids with a neutral liquid detergent (pH 7).
Disassembling the carriage.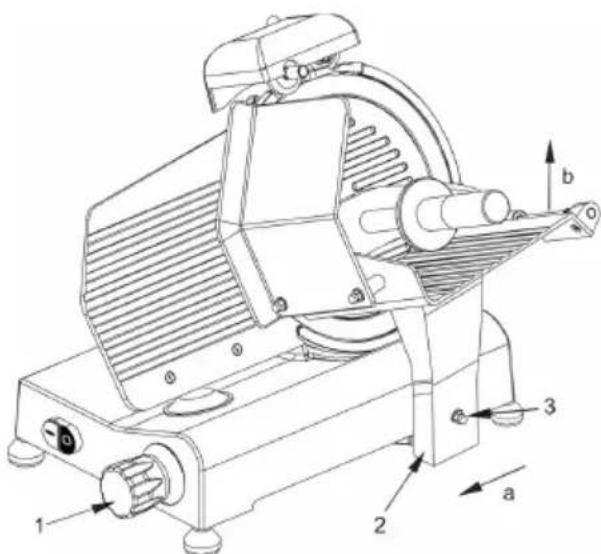
Cleaning the knife and the knife holder
- Remove the cover of the axle by unscrewing the screw on the rear side of the device (see Fig. 4).
WARNING: Clean the knife with a damp cloth while wearing metal gloves.
To clean the knife from the other side, it must be removed (see Fig. 5).
The knife is removed as follows:
Replace the blade guard [see Fig. 5]; install the locking device (a) and turn the adjusting knob so that the device for sharpening (b) (not included) fits against it;
loosen 3 or 4 [depending on the model] screws [f] securing the blade; - attach the sharpening device (b) so that the two screws (e) fit into the holes in the blade, turn the blade until it is in the desired position: - lightly tighten the screw (e).
CAUTION: The blade guard should be washed with warm water and a mild detergent.

Fig. 4 - Removing the blade guard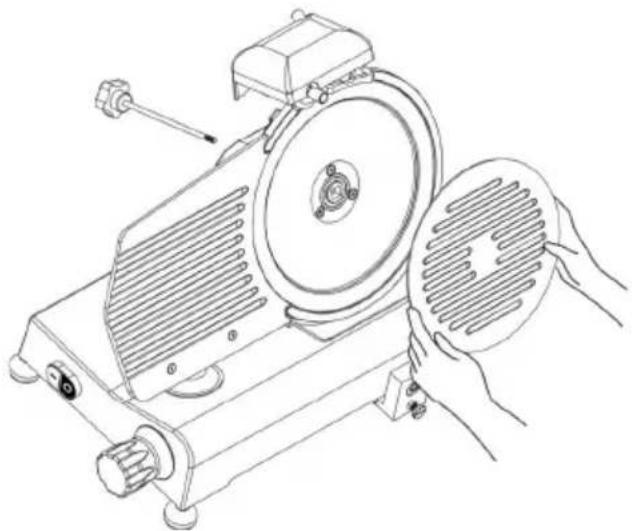
Fig. 5 - Installing the sharpening device (b) for the blade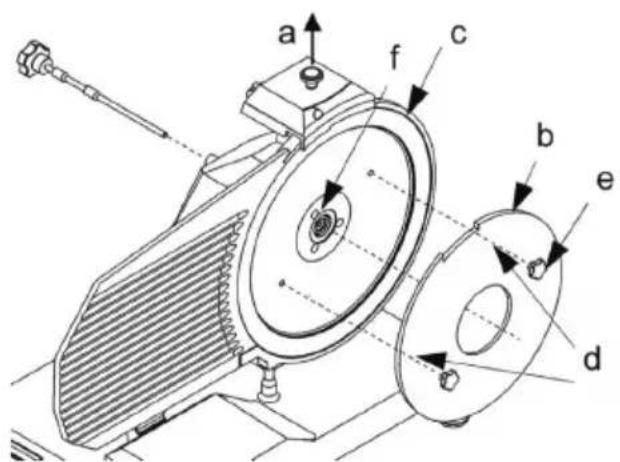
Cleaning the locking device
Cleaning the locking device consists of cleaning the locking stones and the latch. The stones of the locking device must be blocked.
Cleaning the deflector
To remove the deflector, loosen the two screws (a) (see Fig. 6).
Wash the deflector with warm water and a mild detergent.
Bath, that is, they must be on the opposite side of the blade.
Fig. 6 - Removing the deflector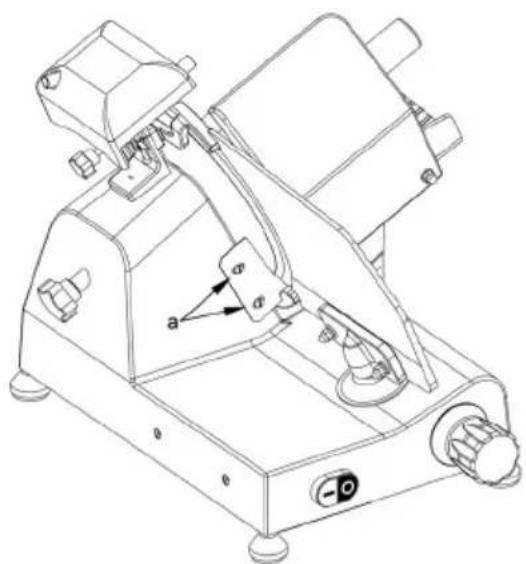
Technical maintenance
General characteristics
Preventive maintenance:
Disconnect the device from the power outlet to completely disconnect the slicer from the network.
- Set the cutting thickness adjustment knob to the "0" position.
Belt
Do not adjust the belt. Usually it is replaced after 3-4 years; in this case, you should contact an authorized service center.
Knife
The knife may become damaged and lose its elasticity, which has a negative impact on the stability of the slicer. In this case, it should be
replaced. You should contact an authorized service center.
Power cord
Periodically check the condition of the power cord, and if necessary, contact an authorized service center to replace it.
Knife
Check that the knife has not worn down by more than 10 mm compared to its original diameter. For knife replacement, contact an authorized service center.
Sharpening device
Check that the required abrasive properties are maintained during sharpening. To avoid damaging the knife, it should be replaced periodically. For this, contact an authorized service center.
Guide lubrication
From time to time, apply a few drops of oil to the circular guide along which the carriage slides. You can perform these actions through the opening (OIL) next to the adjustment handle.
Label on the device

If the device label is damaged, contact an authorized service center to have it replaced.
Disposal of the device
Removing a faulty device
If for any reason it becomes necessary to remove the device from service, make sure that no one will be using it.
Disconnect it from the mains and remove the electrical connections.
Storage
- Before storing the device, disconnect it from the electrical outlet and allow it to cool completely.
- The device should be stored in a clean, dry, and cool place.
Diagnostics and troubleshooting
If the device does not work properly, use the following table to find a solution. If you cannot solve the problem, contact the supplier / service specialist.
in a way that does not harm health or the environment.
For more information on where to take used equipment for disposal, contact your local waste collection company. The manufacturer/importer does not accept responsibility for recycling or processing waste in an environmentally safe manner, either directly or within the framework of the state system.

Read this manual carefully before using the HENDI device. Keep this manual for future reference, paying special attention to the safety rules described below, before installation and first use of this device.
Safety rules
Read the operating instructions carefully before using the appliance and keep them for future reference. Use the appliance only for the purpose for which it was designed, as described in this manual. - The manufacturer is not liable for any damage resulting from incorrect use or misuse. Keep the appliance and the power plug away from water and other liquids. If the appliance falls into water, immediately unplug the power cord from the outlet. Do not use the appliance until it has been checked by a qualified technician. Failure to follow these instructions may pose serious risks to life. - Never attempt to open the appliance housing yourself. Do not insert objects into the appliance housing. Do not touch the plug with wet or damp hands. Risk of electric shock! Do not attempt to repair the appliance yourself; repairs must only be carried out by qualified personnel. - Never use a damaged appliance! If it is damaged, unplug the appliance from the outlet and contact the retailer. - Warning! Do not immerse the electrical parts of the appliance in water or other liquids. - Never hold the appliance under running water. - Regularly check the power plug and the cable for any damage. In case of damage, it must be replaced by the manufacturer, its service agent, or similarly qualified persons to avoid a hazard. - Make sure that the cable does not come into contact with hot or sharp objects and keep it away from open flames. Never pull the power cable to unplug it from the outlet; always pull the plug. - Ensure that the power cable and/or extension cable do not pose a tripping hazard. Never leave the appliance unattended during use. - Warning! As long as the plug is in the outlet, the appliance is connected to the power supply. Turn off the appliance before unplugging it from the outlet. - Place the appliance so that the plug is easily accessible, so that it can be disconnected immediately if necessary. - Never carry the appliance by the cable. Do not use accessories that are not supplied with the appliance.
- Use only original spare parts from the manufacturer. If this is not done, it may pose a risk to the user and may cause damage to the device. Use only authorized spare parts and accessories. This device should not be used by persons with reduced physical, sensory or mental capabilities, or lack of experience and knowledge. This device must not, under any circumstances, be used by children. Keep the device and its power cord away from children.
- WARNING: Before operating the device and before removing it from the charger, for maintenance or storage.
Simple Safety Rules
CAUTION! Remove from the charger before cleaning, maintenance and repair. DANGER! Requires handling by adults! CAUTION! Read the instructions before use, cleaning and maintenance!
- Before cutting food, it must be cooled, cleaned and deboned before cutting with the device. Do not use the device for cutting frozen food, vegetables or for any other use. Use the device only for the purpose described in this manual. Any other use may lead to damage to the device or injury. The device must be handled only by trained personnel. Do not place the device on hot surfaces (stoves, radiators, etc.). Keep the device away from heat sources and open flames. Always use the device on a flat, stable, clean, heat-resistant and dry surface. Risk of injury! Care is required when handling the blade, especially when removing it for cleaning. Wear protective gloves (if provided) if necessary.
- CAUTION! Guide the power cord safely, if necessary, to avoid tripping. Do not use the device until it is fully assembled with the blade and the pusher. Do not use the device near flammable or explosive materials, gas stoves, magnetic induction cooktops. Do not disconnect the safety connections of the device.
- WARNING: Remove all obstacles around all openings of the device.
- WARNING: Before cleaning, maintenance, or repair, disconnect the device from the power supply and unplug it from the outlet.
- WARNING! Keep hands, hair, and clothing away from moving parts.
- Leave at least 20 cm of free space around the device for ventilation during use.
- WARNING! Be especially careful when handling the blades. Wear protective gloves (if provided), if necessary.
Intended Use
The device is intended for professional use. This device is designed only for cutting food, e.g., meat, cheese, bread, etc. Any other use may result in damage to the device or injury. Any other use may cause damage to the device or injury.
The use of the device for any other purpose is considered unsafe. The user is solely responsible for improper use of the device.
Installation location
This device is classified as protection class I and must be connected to a protective earth. The installation must be carried out by a qualified electrician, providing a proper grounding for the electrical system. This device is equipped with a
power cord that has a grounding plug. The plug must be connected to an outlet that is properly installed and grounded.
GR
Information regarding the device: General safety instructions
The appliance may only be used by persons who have full knowledge of the safety instructions presented in this manual. - In case of personnel change, it is training beforehand. Even if the appliance is equipped with safety devices at dangerous points, it is recommended not to touch the hot surfaces and moving parts. - Before starting, check and maintain the functions, remove the appliance from the socket. Pay attention to any risk of removal of protective devices in order to continue cleaning and maintenance. - Cleaning and maintenance require special
concentration.
Regular checking of the power supply is particularly necessary; a damaged or worn cable may cause electric shock to users. If the appliance shows any damage, before further use of the appliance it is recommended to call the SERVICE AND MAINTENANCE CENTER. Do not use this appliance for frozen products, meat, fish, poultry, and other products, or for food derivatives.
Do not use the appliance without the meat guard, when the meat is almost ready. Do not place your body in dangerous positions, as it may cause injuries.
The manufacturer and/or the seller do not assume any liability in the following cases:
- in cases where the appliance is repaired by unauthorized personnel, if any parts have been replaced with non-original spare parts,
- if the instructions described in this manual are not followed correctly,
- if the appliance is not cleaned and remains with food residues.
Has been engineered and manufactured in conformity to harmonized standards:/
Designed and manufactured in accordance with harmonized standards:/
It has been designed and manufactured in accordance with harmonized standards:/
Designed and manufactured in accordance with harmonized standards:/
Designed and manufactured in accordance with harmonized standards:
Meets the essential requirements as described in: /
Technical documentation available at the company's headquarters: /
210031,210048,210000,210017,970294,210086
Meat Slicer / Schneidemaschine / Snijmachine / Krajalnica / Trancheuse
/ Affettatrice / Feliator / Cnaiepe / Mnxavn konnc aaivniKov / Struhac /
Slicermesa/na maso
HENDI
EN55014-1:2017+A11:2020
EN 55014-2:2015
ENIEC61000-3-2:2019
EN61000-3-3:2013+A1:2019
EN 60204-1:2018
EN ISO 12100:2010
EN 1974:1998-A1:2009
HENDI B.V.
Innovatielaan 6
6745 XW De Klomp, The Netherlands
HENDI B.V.
Innovatielaan 6
6745 XW De Klomp, The Netherlands
Tel: +31 317 681 040
Email: info@hendi.eu
HENDI Polska Sp. z o.o.
ul. Firmowa 12
62-023 Robakowo, Poland
Tel: +48616587000
Email: info@hendi.pl
HENDI GmbH
Ehring 15
HENDI Romania S.R.L.
Str. 13 decembris 94A, Hala 14
Braşov, 500164, Romania
Tel: +40 268 320330
Email: office@hendi.ro
PKS HENDI South East Europe SA
5 Metsovou Str.
18346 Moschato, Athens, Greece
Tel: +30 210 4839700
Email: info@pks-hendi.com
HENDI Italia S.R.L.
Via Leonardo da Vinci 4
39100 Bolzano [BZ], Italy
Tel: +39 800 727 438
Email: office.italy@hendi.eu
HENDI HK Ltd.
1201, 12/F Exchange Tower
33 Wang Chiu Road, Kowloon Bay, Hong Kong
Tel: +852 2154 2618
Email: info-hk@hendi.eu
Find HENDI on internet:
www.hendi.com
www.facebook.com/HendiToolsforChefs
https://www.linkedin.com/company/hendi-tools-for-chefs/
www.youtube.com/HendiEquipment
- Changes, printing and typesetting errors reserved.
- Changes and printing errors reserved. Changes and printing errors reserved.
- The manufacturer reserves the right to make changes and printing errors in the instructions.
- Variations and printing errors reserved.
- Errors in changes, printing, and layout reserved.
- Rights reserved with respect to modifications and printing errors. -Changes, printing, and layout errors reserved. -Rights reserved with respect to modifications and printing errors.
- Changes, printing, and typographical errors reserved. Changes, printing, and errors in writing are reserved.

- SAFETY REGULATIONS
- SPECIAL SAFETY REGULATIONS
- INTENDED USE
- GROUNDING INSTALLATION
- INFORMATION ON THE SLICER
- GENERAL PRECAUTIONS
- SAFETY SYSTEMS INSTALLED IN THE SLICER
- INSTRUCTIONS FOR USE
- HOW TO LOCK THE SLICER
- HOW TO UNLOCK THE SLICER
- SHARPENING THE BLADE
- ORDINARY CLEANING - GENERAL FEATURES
- SLICER CLEANING PROCEDURE CLEANING OF THE FOOD TRAY
- CLEANING OF THE BLADE GUARD AND BLADE
- WARNING: THE BLADE CLEANING MUST BE CARRIED OUT WITH A WET CLOTH WITH METAL GLOVES ON
- WARNING: THE BLADE GUARD MUST BE CLEANED WITH HOT WATER AND NEUTRAL DETERGENT
- CLEANING OF THE SHARPENER
- CLEANING OF THE DEFLECTOR
- MAINTENANCE
- GENERAL FEATURES
- BELT
- FEET
- POWER SUPPLY CORD
- BLADE
- SHARPENER - GRINDING MOLES
- LUBRICATION OF SLIDING GUIDES
- LABEL OF THE PUSH-BUTTON PANEL
- MACHINE DISPOSAL
- PUTTING THE MACHINE OUT OF SERVICE
- STORAGE
- TROUBLESHOOTING
- RU
- BLOCKING THE SLICER
- UNBLOCKING THE SLICER
- SHARPENING THE KNIFE
- STANDARD KNIFE
- GENERAL CHARACTERISTICS
- CLEANING THE APPLIANCE
- CLEANING THE TRAY FOR LIQUIDS
- CLEANING THE KNIFE AND THE KNIFE HOLDER
- WARNING: CLEAN THE KNIFE WITH A DAMP CLOTH WHILE WEARING METAL GLOVES
- CAUTION: THE BLADE GUARD SHOULD BE WASHED WITH WARM WATER AND A MILD DETERGENT
- CLEANING THE LOCKING DEVICE
- CLEANING THE DEFLECTOR
- TECHNICAL MAINTENANCE
- KNIFE
- POWER CORD
- SHARPENING DEVICE
- GUIDE LUBRICATION
- LABEL ON THE DEVICE
- DISPOSAL OF THE DEVICE
- REMOVING A FAULTY DEVICE
- DIAGNOSTICS AND TROUBLESHOOTING
- SAFETY RULES
- SIMPLE SAFETY RULES
- INSTALLATION LOCATION
- INFORMATION REGARDING THE DEVICE: GENERAL SAFETY INSTRUCTIONS
Brand : Hendi
Model : 210017
Category : Electric slicer