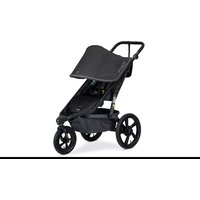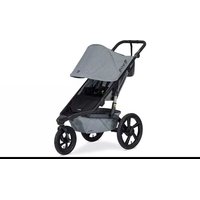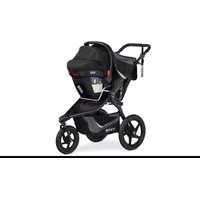
Rambler - Stroller BOB Gear - Free user manual and instructions
Find the device manual for free Rambler BOB Gear in PDF.


User questions about Rambler BOB Gear
0 question about this device. Answer the ones you know or ask your own.
Ask a new question about this device
Download the instructions for your Stroller in PDF format for free! Find your manual Rambler - BOB Gear and take your electronic device back in hand. On this page are published all the documents necessary for the use of your device. Rambler by BOB Gear.
USER MANUAL Rambler BOB Gear
BOB Gear® recommends that you register your stroller at bobgear.com/registration. This will allow us to notify you directly if there are any product recalls.
For updates to this user guide, warranty and other recent product notifications, please visit bobgear.com periodically or any time before making approved changes or adding approved equipment to your stroller.
Contents
Safety Information 2
Warnings 2
Important Notes 3
Stroller Features 4
Age Guidelines. 5
Stroller Assembly 5
Unpacking the Stroller 5
Stroller Wheels. 5
Stroller Operation 7
Unfolding and Folding. 7
Choosing Walk or Jog Mode 8
Checking Tire Pressure 9
Adjusting the Tracking. 9
Adjusting the Shock Setting 10
Setting the Parking Brake 10
Securing the Child in the Seat 11
Using the Wrist Strap 12
Reclining the Seat 12
Positioning the Canopy 12
Using the Accessory Adapter 13
Care and Maintenance 13
Regular Inspections 13
Cleaning 13
Storing the Stroller 13
Stroller Accessories 14
Limited Warranty 15
Safety Information
WARNING!
Failure to follow all warnings and instructions could result in SERIOUS INJURY or DEATH.
Read these instructions carefully before using this product. To ensure proper use, store this user guide in a convenient place so it can be consulted often.
- Never leave child unattended.
- The maximum weight capacity of the stroller (child plus luggage weight) is 75 lbs (34kg) . Maximum child height is 44 inches (112cm) . Do not exceed the maximum weight or height, as stroller will become unstable and tip resulting in serious injury.
- Avoid serious injury from falling or sliding out. Always use seat harness.
- Do not attach parcels or bags to the handlebar or frame of stroller except those recommended by BOB Gear by Britax, as stroller can become unstable and tip over.
- Child may slip into leg openings and strangle. Never use in reclined carriage position unless child is harnessed.
- FALL HAZARD - Wheel can detach and cause tip over. Pull on the wheel to assure it is securely attached.
- Do not overload the low boy cargo basket. Maximum weight is 10 lbs (4.5 kg).
- FALL HAZARD from tip over - Before running, jogging, or walking fast, LOCK the front wheel from swiveling.
- Avoid finger entrapment or injury. Always ensure any child occupants or bystanders are away from the stroller while folding or unfolding.
- Do not park on inclines. The parking brake is intended to park the stroller on flat surfaces only. Parking on inclines may result in tip over or runaway stroller.
- The parking brake is not designed as a stopping brake. The parking brake should not be used to slow or stop the stroller because doing so could cause the stroller to stop abruptly, resulting in loss of control.
Always set the parking brake when stroller is not moving. - Never load or unload the stroller without the parking brake set.
-
Check the front wheel before each use of the stroller to ensure it is properly secured. Failure to secure the front wheel can cause the wheel to vibrate, wobble, or become detached from the stroller.
-
Never use with low tire pressure or deflated tires as this could result in loss of control. Inflating tires above the maximum inflation pressure embossed on the tire can damage the rim and/or tire, resulting in loss of control and injury.
- Use extreme caution when using stroller on uneven and/or unpaved, wet, or slick surfaces, as these conditions create additional hazards and can lead to a loss of stability, resulting in serious injury.
- Do not use stroller on stairs, escalators, moving vehicles, or steep inclines. Stroller can tip over.
- Do not wear roller skates or inline skates while pushing stroller.
- Always jog with the stroller seat in the fully upright position. Jogging with the seat in reclined positions may result in a loss of stability.
- When seat is fully reclined, backward tip-over is more likely, and may result in injury to stroller occupant.
- Always use wrist strap to prevent being separated from stroller.
- Never allow child to stand in stroller.
- Do not modify the stroller or any labels. Doing so voids the warranty and could lead to a dangerous condition.
Important Notes
- Before and during use, always make sure the child's hands and feet are away from wheels.
- Never pull stroller backward up stairs. Doing so could damage the suspension system, leading to frame failure.
- Protect stroller when transporting or shipping to prevent damage to stroller and stroller components. Check closely for damage after transporting or shipping.
- Discontinue using stroller if damaged or if any parts are missing.
- It is best to store your stroller indoors when it is not in use. Extended exposure to rain or the sun's ultraviolet rays can fade and damage the fabric, tires, and plastic parts.
BOBGear RAMBLER User Guide
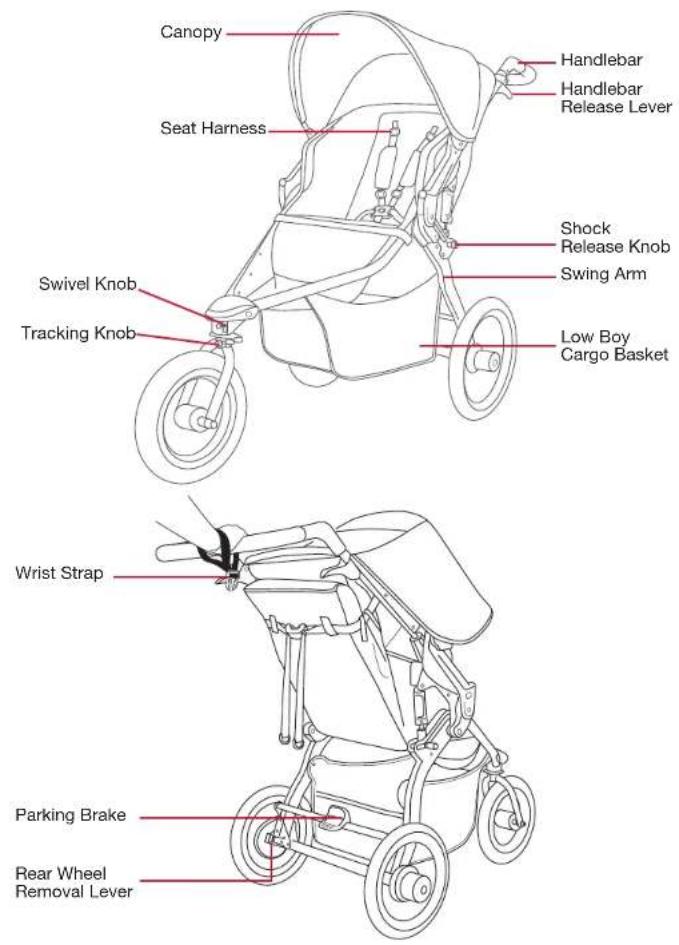
Stroller Features
Actual product may vary from images
Age Guidelines
Prior to first use, consult with your pediatrician regarding suitability of stroller use with your child.
Please note that infants incapable of holding their head up must have additional head and neck support to ride safely and comfortably. From 0-8 weeks, or as recommended by your pediatrician, the use of an infant car seat and adapter is encouraged.
Children are unique and develop at different rates. Most may not have the neck strength for jogging or off-road motion until 8 months of age. For jogging or off-road stroller use, BOB Gear by Britax recommends you limit use of this stroller to children over the age of 8 months.
Please refer to the below table for age/use guidelines:
| RECOMMENDED STROLLER USE | |
| 0 - 8 Weeks Walk Only | with Infant Car Seat & Adapter* |
| 8 Weeks - 8 Months Walk Only | |
| 8 Months - 5 Years Jo | gging/Off-Road |
See BOB Infant Car Seat Adapter User Guide for maximum occupant weight.
Stroller Assembly
Unpacking the Stroller
WARNING!
Remove all packaging materials and discard to avoid choking and suffocation hazards.
Stroller Wheels
Rear Wheel Installation
- Unlock Parking Brake Prior to installing the rear wheels, position the parking brake in the unlocked position.
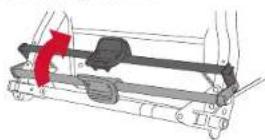
- Insert Rear Wheel Stub Axle Insert the rear wheel's stub axle into the hole in the rear dropout until a "click" is heard.
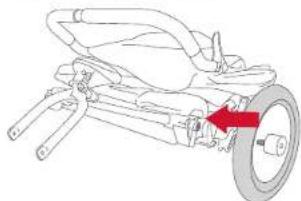
IMPORTANT: If no click is heard, the wheel may not be secure in the attachment bracket and may detach during operation. Pull on wheel to ensure proper installation.
BOBGear RAMBLER User Guide
Rear Wheel Removal
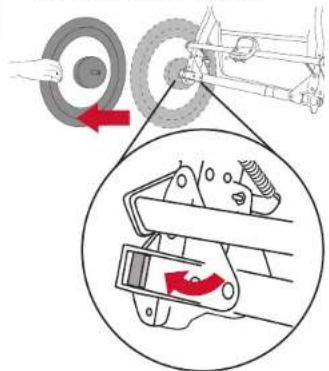
- Unlock Parking Brake Prior to removing the rear wheels, position the parking brake in the unlocked position.
- Remove Wheel Raise the wheel a few inches off the ground, pull the release lever, and pull the wheel out of the rear wheel attachment bracket.
Front Wheel Installation
- Remove Through Axle and Hex Wrench From Storage Bag
Remove nut from through axle.
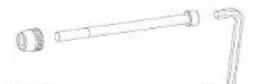
Nut Through Ax
Hex Wrench
- Rotate Front Fork Into Jog Mode
Rotate the front fork until it locks into jog mode. See page 8.
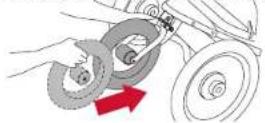
- Insert Front Wheel
When facing the front of the stroller, insert the wheel between the fork and align the wheel hub with the holes in the fork blades.
- Insert Through Axle
Insert the through axle into the fork and through the wheel hub, then install the nut to the opposite side.
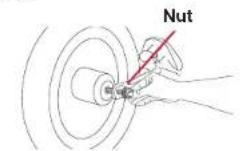
- Tighten Through Axle
Hold the nut in place, and use the hex wrench provided to fully tighten the through axle. Pull on wheel to check that it is securely installed and does not wobble.
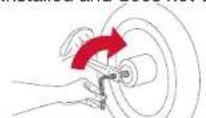
WARNING!
Check the front wheel before each use of the stroller to ensure it is properly secured. Failure to secure the front wheel can cause the wheel to vibrate, wobble, or become detached from the stroller.
FALL HAZARD - Wheel can detach and cause tip over. Pull on the wheel to assure it is securely attached.
Front Wheel Removal
- Rotate Front Fork Into Jog Mode
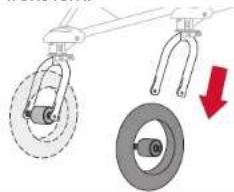
Rotate the front fork until it is into jog mode. See page 8. - Remove Through Axle Hold the nut in place and use the hex wrench to loosen the through axle. Then remove the through axle from the front wheel and fork.
- Remove Front Wheel Raise the front wheel a few inches off the ground and tap the top of the wheel with the palm of your hand to knock the wheel out of the front fork.
Stroller Operation
Unfolding and Folding
Unfolding the Stroller
- Unbuckle the wrist strap
- Lift Red Frame Release Handle Keep tires on ground as stroller swing arm begins to swing open.
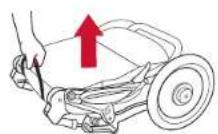
NOTE: Stroller swing arm will swing open and snap into an open and locked position.
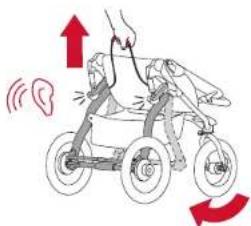
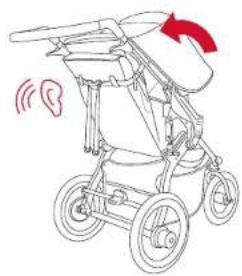
- Open Stroller
Lift handlebar up and back until stroller snaps into locked and upright position.
Folding the Stroller
- Lock Parking Brake Set parking brake in locked position.
- Remove Child From Seat
- Empty Stroller Remove contents from low boy cargo basket.
BOBGear RAMBLER User Guide
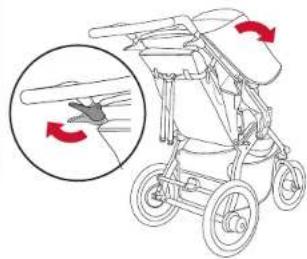
4. Rotate Handlebar
Squeeze both handlebar release levers simultaneously. Rotate handlebar forward into seat.
- Lift Red Frame Release Handle Using a short, quick tug, lift red frame release handle up. Keep tires on ground as stroller collapses toward front wheel.
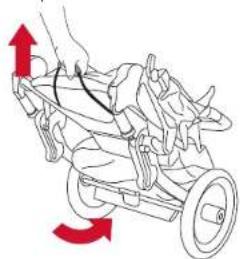
6. Lay Stroller Flat
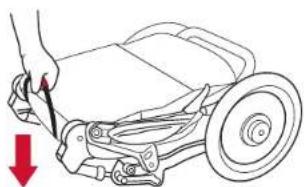
7. Secure Folded Stroller
Use wrist strap buckle to secure stroller in folded position.
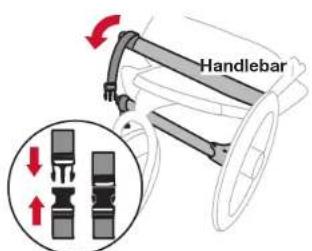
8.Make It Smaller
Take off the front and rear wheels to make it even smaller. See Rear Wheel Removal and Front Wheel Removal on page 6.
Choosing Walk or Jog Mode Walk Mode Jog Mode
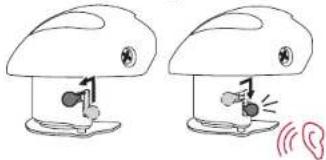
Walk Mode
Slide swivel knob up and to the left. Fork/wheel will now rotate 360 degrees.
NOTE: Stroller is shipped in walk mode.
Jog Mode (Jogging/Off-Road)
Slide swivel knob upward and to the right. Knob will slide into downward position. Rotate fork/wheel until it snaps into forward position.
If the front fork is in jog mode, it will be locked and will not swivel left or right as it does in walk mode.
WARNING!
FALL HAZARD from tip over
Before running, jogging, or walking fast, LOCK the front wheel from swiveling.
Checking Tire Pressure
Plastic wheels are rated to a maximum tire inflation pressure of 30 pounds per square inch (psi). The maximum inflation pressure is embossed on the wheel next to the valve stem.
Adjusting the Tracking
If stroller pulls left or right when the front wheel is in jog mode and stroller is on flat terrain, adjust tracking as outlined in the following steps.
1. Empty Stroller
Remove contents from low boy cargo basket.
2. Remove Child From Seat
3. Check Tire Pressure
- Set Stroller to Jog Mode Slide swivel knob to right. Knob will slide into downward position. Rotate fork/wheel until it snaps into forward position. See Choosing Walk or Jog Mode at left.
- Place Stroller On Level Ground Find a stretch of level ground about 16 feet (4.9m) long.
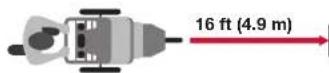
6. Align Rear Wheel Axles
Align stroller so rear wheel axles are perpendicular to a straight line.
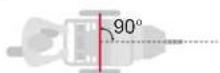
7. Test Alignment
Push stroller straight forward and release to see if stroller veers right or left. Repeat push test several times.

If stroller consistently pulls to left or right, see Fine Tuning the Tracking.
Fine Tuning the Tracking
If Stroller pulls LEFT
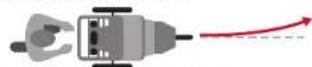
If your stroller pulls LEFT, turn tracking knob counterclockwise up to one half turn.
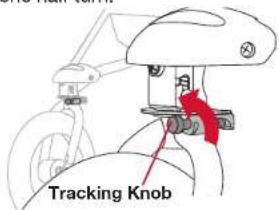
If Stroller pulls RIGHT
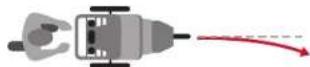
If your stroller pulls RIGHT, turn tracking knob clockwise up to one half turn.
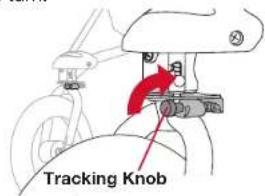
REPEAT roll test and adjust as needed until stroller rolls straight.
BOBGear RAMBLER User Guide
Adjusting the Shock Setting
- Remove Child From Seat
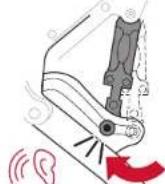
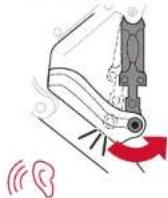
- Set Shock Setting Depress shock release knob and simultaneously pull toward back of stroller, sliding knob into preferred position. Knob will snap into place when in correct position.
Position 1 is a SOFTER shock setting recommended for children 40~lbs (18.1~kg) or less.
Position 2 is a FIRMER shock setting recommended for children weighing 41 to 75 lbs (18.2 - 34 kg)
NOTE: Every time the stroller is folded, stroller shocks default to position 1.
- REPEAT on opposite side.
Setting the Parking Brake
The parking brake prevents the stroller from moving while loading and unloading. The parking brake is not designed as a stopping brake.
To set the parking brake, press down on the foot pedal - making sure the locking pin fully engages the locking disk.
LOCKED POSITION
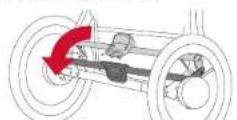
To ensure the brake is set properly, attempt to roll the stroller forward and backward after setting the brake. If the stroller will not roll, the brake is set properly.
To release the parking brake, lift up on the foot pedal with your foot until the brake bar springs up into the fully unlocked position.
UNLOCKED POSITION
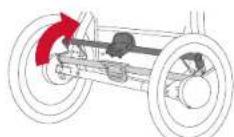
Securing the Child in the Seat
- Set Parking Brake Rotate parking brake down into locked position.
NOTE: Rear wheels should not rotate when parking brake is set.
- Place Child In Seat Slip one shoulder strap over each shoulder. Position buckle strap between legs.
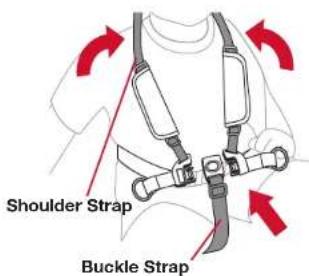
- Fasten Shoulder Straps Insert both shoulder strap tongues into the buckle.
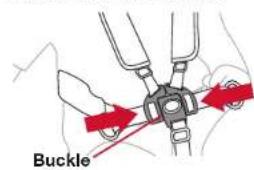
NOTE: Buckle strap should be adjusted to have a snug fit.
- Adjust Shoulder Strap Height Adjust height of shoulder strap to fit just above child shoulder height.
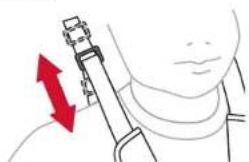
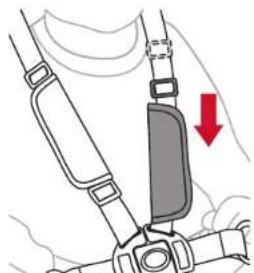
- Adjust Shoulder Straps Slide comfort pads down for access to buckles. Slide buckle up or down to adjust straps. Seat harness should fit snug and be comfortable.
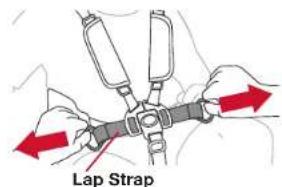
- Tighten Lap Strip Adjust lap strap to fit snug and be comfortable.
BOBGear RAMBLER User Guide
Using the Wrist Strap
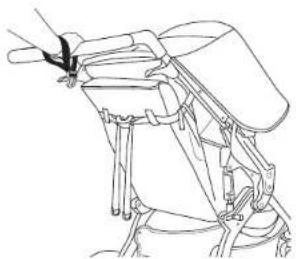
- Slip Loop of Strap Securely Onto Wrist The wrist strap is designed to help prevent the stroller from rolling away should you lose your grip on the stroller. When using the stroller, make sure the strap is securely looped over your wrist.
Reclining the Seat
IMPORTANT: Set parking brake before making any seat adjustments.
- Recline Seat Squeeze the recline button and pull the seat back down into the desired position.
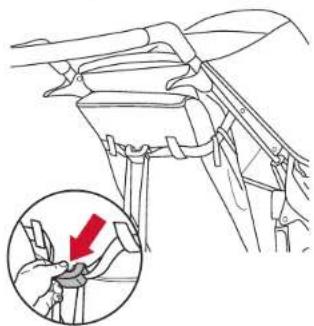
- Return To Upright Position Grab the rings on either side of the recline button and pull the straps out to the sides to raise the seat.

WARNING!
When seat is fully reclined, backward tip-over is more likely, and may result in injury to stroller occupant.
Positioning the Canopy
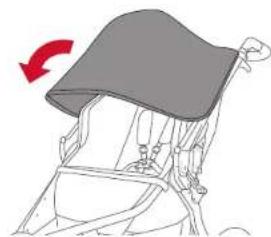
- Extend Canopy Rotate canopy away from handlebar for additional shade.
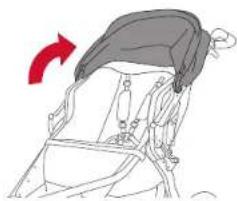
- Retract Canopy Push canopy toward handlebar.
Using the Accessory Adapter
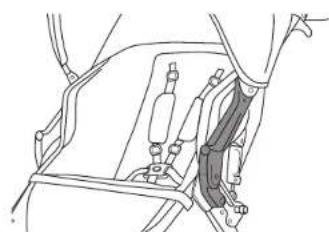
This BOB stroller is equipped with an accessory adapter providing easy attachment for BOB Stroller accessories like the snack tray or infant car seat adapter. The accessory adapter also allows for many accessories to remain attached when the stroller is folded. See Stroller Accessories on page 13 of this manual for more information on all available accessories.
Care and Maintenance
Regular Inspections
We recommend inspecting your stroller before every use.
- Verify tire pressure.
- Verify all screws, attachment points and fasteners are tight
- Check all wheels to be sure they are securely attached.
- Check for tears or excessive wear in the fabric.
Cleaning
The fabric has a stain resistant treatment that makes most cleanups easy.
Use a sponge with a solution of mild soap and cold water (maximum temperature of 100^/ 38^
- Rinse thoroughly with clean water to remove soap, then air dry.
- Do not use detergent or abrasive cleansers.
- Do not pressure wash.
Storing the Stroller
It is best to store your stroller indoors when it is not in use. Extended exposure to rain or the sun's ultraviolet rays can fade and damage the fabric, tires, and plastic parts.
BOBGear RAMBLER User Guide
Stroller Accessories
BOB offers a complete line of accessories for your stroller. Visit our website for full details.
- Handlebar Console
Place snacks, water and cell phone conveniently at your fingertips. The Handlebar Console attaches easily and securely. Includes two water bottle holders and a storage pocket.
- Handlebar Console with Tire Pump
Keeps stroller tires inflated, beverages insulated, and items organized. A convenient, onthe-go tire pump is included, compatible for all BOB pneumatic stroller tires. Beverages stay cold or warm with insulated bottle holders, and phones, snacks and other essentials stay organized in the substantial center pocket. Compatible with BOB single strollers only.
- Weather Shield
The Weather Shield's water resistant design helps to protect your child from rain and wind while still allowing a view of the world.
Sun Shield
The Sun Shield's specially designed mesh screen reduces the sun's harmful rays and helps to provide a barrier to wind and flying insects.
- Infant Car Seat Adapter
The BOB Infant Car Seat Adapter allows you to easily attach leading infant car seat models to a BOB Stroller utilizing the BOB Accessory Adapter feature. Folds with stroller.
- Snack Tray
The Snack Tray easily inserts into any BOB Stroller utilizing the BOB Accessory Adapter feature, placing snacks and sippy cups at your child's fingertips. Folds with stroller.
- Stroller Travel Bag
Designed with heavy duty material to protect your stroller and fits in the bag without removing the wheels. Features a removable shoulder strap for comfortable carrying.
- Stroller Strides Fitness Kit
Turn your BOB stroller into an exercise machine. The handlebar console attaches easily and securely, and includes one water bottle holder and a zippered pocket. Fitness Kit includes a Stroller Strides Exercise Manual, exercise tubing, and a coupon for one free week of Stroller Strides classes by Fit4Mom.
Limited Warranty
We take pride in the workmanship of BOB Gearby Britax and strive to manufacture the best products possible. Therefore, we warrant our strollers against defects in material and workmanship for the periods and parts set forth below, subject to the conditions listed below. Since no product is indestructible, it does not cover defects attributable to or resulting from normal wear, abuse or alteration.
Frame and Components
The frame is warranted for two years. Components and fabric are warranted for one year. Warranties are only valid from date of original purchase. Proof of purchase is required to exercise this warranty. Labor and freight charges are not included. BOB Gear by Britax reserves the right to discontinue or change fabrics, parts, models or products, or to make substitutions.
Normal Wear
Normal wear, corrosion, neglect, abuse, accidents, improper assembly or maintenance, or the installation of parts or accessories not compatible with the original intended use of the stroller, as sold, are not covered by this warranty. Tires and tubes are not covered under the limited warranty.
To the extent permitted by law, this limited warranty is the only express or implied warranty applicable to this BOB Gear product and is warranted by Britax Child Safety, Inc. Any implied warranties, including warranties of merchantability and fitness shall be limited in scope and duration in accordance with this limited warranty.
Warranty Claims
Warranty claims must be made through BOB Gear by Britax customer service.
This warranty is limited to the repair or replacement of the defective part. BOB Gear by Britax shall in no event be responsible for consequential or special damages.
Product Registration
Visit bobgear.com/registration to register your stroller.
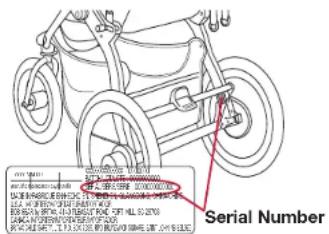
Serial Number
Open the stroller. From the back of stroller, look on the inside of the right swing arm.
BIENVENUE À BOB® GEAR
© 2019 Britax Child Safety, Inc.
(888)427-4829
(704) 409-1699
bobgear.com
All rights reserved. Printed in China. This product and its components are subject to change without notice.