EFB 675 - Vacuum Cleaner CFH - Free user manual and instructions
Find the device manual for free EFB 675 CFH in PDF.
| Product type | Electric joint brush |
| Brand | CFH |
| Model | EFB 675 |
| Supply voltage | 230-240 V ~, 50 Hz |
| Nominal power | 400 W |
| No-load speed | 1800 rpm |
| Max. brush diameter | 110 mm |
| Net weight | 2.20 kg |
| Sound pressure level | 83 dB(A) |
| Sound power level | 91 dB(A) |
| Vibrations (main handle) | 2.20 m/s² |
| Electrical protection | Earth leakage circuit breaker ≤30 mA |
| Included brushes | 1 metal brush + 1 plastic brush |
| Adjustments | Telescopic extension, adjustable auxiliary handle |
| Warranty | 2 years |
| Intended use | Removal of weeds between stones and slabs |
| Maintenance | Clean with damp cloth and mild soap; replace worn brushes |
| Safety | Do not use in rain; wear goggles and hearing protection |
| Repairability | Cable replacement by a professional; carbon brushes by an electrician |
Frequently Asked Questions - EFB 675 CFH
User questions about EFB 675 CFH
0 question about this device. Answer the ones you know or ask your own.
Ask a new question about this device
Download the instructions for your Vacuum Cleaner in PDF format for free! Find your manual EFB 675 - CFH and take your electronic device back in hand. On this page are published all the documents necessary for the use of your device. EFB 675 by CFH.
USER MANUAL EFB 675 CFH
text_image
Labeled diagram of a mechanical device with numbered parts for identificationnatural_image
Close-up of a mechanical tool with a handle and arrow indicating rotation (no text or symbols)natural_image
Three-step mechanical assembly diagram showing progressive machining process from a circular component to a cylindrical part (no text or symbols)natural_image
Sequence of mechanical components showing progressive assembly from a circular component to a final motor-like device (no text or symbols visible)Montage der Bürste
natural_image
Three-step diagram showing a car wheel being cut, then so, and finally holding a brake disc (no text or symbols)natural_image
Diagram of a mechanical component with directional arrows indicating rotation or movement (no text or symbols)natural_image
Symbol of a trash bin crossed with no text or numbers, representing waste sorting or disposal (no text present)Garantie
natural_image
Close-up of a mechanical clamp or tool with a 12-degree angle indicator and rotational arrow (no text or symbols)natural_image
Sequence of mechanical assembly steps showing a curved component being processed into a cylindrical housing (no text or symbols visible)De borstel monteren
natural_image
Three-step automotive assembly process showing wheel rim, disc brake, and end mill (no text or symbols)natural_image
Diagram of a mechanical component with directional arrows indicating rotation or movement (no text or symbols)natural_image
Symbol of a trash bin with crossed lines indicating no waste or restriction, and a solid black rectangle below (no text or labels)Garantie
text_image
Labeled diagram of a handheld device with numbered parts for identificationflowchart
graph LR
    A["Initial mechanical component"] --> B["Assembly Step 1"]
    B --> C["Assembly Step 2"]
    C --> D["Assembly Step 3"]
    D --> E["Assembly Step 4"]
natural_image
Close-up of a mechanical clamp or tool with a 12-degree angle indicator and rotational arrow (no text or symbols)natural_image
Three-step mechanical assembly diagram showing progressive assembly from a circular component to a cylindrical component (no text or symbols)natural_image
Sequence of mechanical components showing progressive assembly from left to right, no text or symbols presentAssemblez la brosse
natural_image
Three-step diagram showing a car wheel rolling down, hand turning a disc, and finally holding a brake disc (no text or symbols)natural_image
Diagram of a mechanical component with directional arrows indicating rotation or movement (no text or symbols)natural_image
Symbol of a trash bin crossed with no text or numbers, representing waste sorting or disposal (no text present)Garantie
Explanation of the warning signs on the equipment (see Fig. 1)
- Important.
- Read the directions for use before operating the tool.
- Wear goggles and ear protectors.
- Do not use the tool in rain or snow. Do not expose the tool to wet conditions.
- Keep all other persons away from the working area.
- Beware of objects ricocheting out of the guard.
- Switch off tool and pull out the power plug before carrying out any cleaning or maintenance work.
- Rotating parts. Keep your hands and feet away from the brush.
GENERAL POWER TOOL SAFETY WARNINGS
Warning! Read all safety warnings, instructions, illustrations and specifications provided with this power tool.
Failure to follow all instructions listed below may result in electric shock, fire and/or serious injury.
Save all warnings and instructions for future reference.
The term "power tool" in the warnings refers to your mains-operated (corded) power tool.
Work area safety
a) Keep work area clean and well lit. Cluttered or dark areas invite accidents.
b) Do not operate power tools in explosive atmospheres, such as in the presence of flammable liquids, gases or dust. Power tools create sparks which may ignite the dust or fumes.
c) Keep children and bystanders away while operating a power tool. Distractions can cause you to lose control.
Electrical safety
a) Power tool plugs must match the outlet. Never modify the plug in any way. Do not use any adapter plugs with earthed (grounded) power tools. Unmodified plugs and matching outlets will reduce risk of electric shock.
b) Avoid body contact with earthed or grounded surfaces, such as pipes, radiators, cookers and refrigera-
tors. There is an increased risk of electric shock if your body is earthed or grounded.
c) Do not expose power tools to rain or wet conditions.
Water entering a power tool will increase the risk of electric shock.
d) Do not abuse the cord. Never use the cord for carrying, pulling or unplugging the power tool. Keep cord away from heat, oil, sharp edges or moving
parts. Damaged or entangled cords increase the risk of electric shock.
e) When operating a power tool outdoors, use an extension cord suitable for outdoor use. Use of a cord suitable for outdoor use reduces the risk of electric shock.
f) If operating a power tool in a damp location is unavoidable, use a residual current device (RCD) protected supply. Use of an RCD reduces the risk of electric shock.
Personal safety
a) Stay alert, watch what you are doing and use common sense when operating a power tool. Do not use a power tool while you are tired or under the influence of drugs, alcohol or medication. A moment of inattention while operating power tools may result in serious personal injury.
b) Use personal protective equipment. Always wear eye protection. Protective equipment such as dust mask, non-skid safety shoes, hard hat, or hearing protection used for appropriate conditions will reduce personal injuries.
c) Prevent unintentional starting. Ensure the switch is in the off-position before connecting to power source and/or battery pack, picking up or carrying the tool.
Carrying power tools with your finger on the switch or energising power tools that have the switch on invites accidents.
d) Remove any adjusting key or wrench before turning the power tool on. A wrench or a key left attached to a rotating part of the power tool may result in personal injury.
e) Do not overreach. Keep proper footing and balance at all times. This enables better control of the power tool in unexpected situations.
f) Dress properly. Do not wear loose clothing or jewellery. Keep your hair, clothing and gloves away from moving parts. Loose clothes, jewellery or long hair can be caught in moving parts.
g) If devices are provided for the connection of dust extraction and collection facilities, ensure these are connected and properly used. Use of dust collection can reduce dust-related hazards.
h) Do not let familiarity gained from frequent use of tools allow you to become complacent and ignore tool safety principles. A careless action can cause severe injury within a fraction of a second.
Power tool use and care
a) Do not force the power tool. Use the correct power tool for your application. The correct power tool will do the job better and safer at the rate for which it was designed.
b) Do not use the power tool if the switch does not turn it on and off. Any power tool that cannot be controlled with the switch is dangerous and must be repaired.
c) Disconnect the plug from the power source and/or the battery pack from the power tool before making any adjustments, changing accessories, or storing power tools. Such preventive safety measures reduce the risk of starting the power tool accidentally.
d) Store idle power tools out of the reach of children and do not allow persons unfamiliar with the power tool or these instructions to operate the power tool. Power tools are dangerous in the hands of untrained users.
e) Maintain power tools. Check for misalignment or binding of moving parts, breakage of parts and any other condition that may affect the power tool's operation. If damaged, have the power tool repaired before use. Many accidents are caused by poorly maintained power tools.
f) Keep cutting tools sharp and clean. Properly maintained cutting tools with sharp cutting edges are less likely to bind and are easier to control.
g) Use the power tool, accessories and tool bits etc. in accordance with these instructions, taking into account the working conditions and the work to be performed. Use of the power tool for operations different from those intended could result in a hazardous situation.
h) Keep handles and grasping surfaces dry, clean and free from oil and grease. Slippery handles and grasping surfaces do not allow for safe handling and control of the tool in unexpected situations.
Service
a) Have your power tool serviced by a qualified repair person using only identical replacement parts. This will ensure that the safety of the power tool is maintained.
SPECIFIC SAFETY RULES
Reduce noise generation and vibration as much as possible!
Use only equipment that is in good condition. Maintain and clean the equipment regularly. Adapt your way of working to the equipment. Do not overload the equipment. Have the equipment checked if necessary. Switch off the equipment when not in use. Wear gloves.
Even if you use this electric power tool in accordance with the instructions, certain residual risks cannot be eliminated. The following hazards may arise in connection with the equipment's construction and layout:
- Lung damage if no suitable protective dust mask is applied.
- Damage to hearing if no suitable ear protection is applied.
- Health damage caused by hand-arm vibrations if the equipment is used over a longer period or is not properly guided and maintained.
Before starting the equipment
Before you connect the equipment to the power supply make sure that the data on the rating plate is identical to the supply voltage. Always pull out the power plug before making adjustments to the equipment.
INTENDED USE
The equipment is designed to remove weeds from between paving stones and slabs. It is not intended for use on sensitive surfaces like tiles. The equipment is to be used only for its prescribed purpose. Any other use is deemed to be a case of misuse. The user/operator and not the manufacturer will be liable for any damage or injuries of any kind caused as a result of this. Please note that our equipment has not been designed for use in commercial, trade or industrial applications. Our warranty will be voided if the equipment is used in commercial, trade or industrial businesses or for equivalent purposes
PARTS

text_image
Labeled diagram of a handheld device with numbered parts for identification- ON / OFF switch
- Cable-strain relief clamp
3/4. Telescopic extension knob - Guard hood
- Brush
- Guide wheel
- Auxiliary handle
- Ergonomic handle
PACKAGE CONTENTS
1 x EFB 675 e-joint brush
1 x plastic locking knob
1 x guard hood
1 x guide wheel + screw
1 x wire brush
1 x plastic brush
Securing screws and nuts
1 x user manual
TECHNICAL DATA
| Model No. EFB 675 | |
| Voltage / Frequency 230V-240V~, 50Hz | |
| Input Power 400W | |
| No Load Speed 1,800 rpm | |
| Max. brush diameter 110 mm | |
| Net Weight 2,20kg | |
| A-weighted sound pressure level LPA | 83dB(A) |
| A-weighted sound power level LWA | 91dB(A) |
| Uncertainty K 3dB(A) | |
| Vibration(in accordance with EN 62841-1) | Main handle: 2,20m/s2 |
| Uncertainty K 1,5 m/s2 | |
The declared vibration total value and the declared noise emission values have been measured in accordance with a standard test method and may be used for comparing one tool with another. The declared vibration total value may also be used in a preliminary assessment of exposure.
Warning!
The vibration and noise emission during actual use of the power tool can differ from the declared total value depending on the ways in which the tool is used, in particular, what kind of work piece is machined.
It is necessary to identify safety measured to protect the operator that are based on an estimation of exposure in the actual conditions of use (taking account of all parts of the operating cycle such as the times when the tool is switched off and when it is running idle in addition to the trigger time)
Try to minimize the impact of vibration and noise. Exemplary measures to reduce vibration exposure include wearing gloves while using the tool, limiting working time, and using accessories in good condition.
ASSEMBLING
Assemble auxiliary handle (see Figure)

flowchart
graph LR
    A["Initial component"] --> B{Rotation}
    B --> C["Step 1"]
    C --> D["Step 2"]
    D --> E["Step 3"]
    E --> F["Step 4"]
    F --> G["Step 5"]
Assemble the auxiliary handle to the mount provided, then secure the auxiliary handle with the help of the screw and the adjustment lock provided.
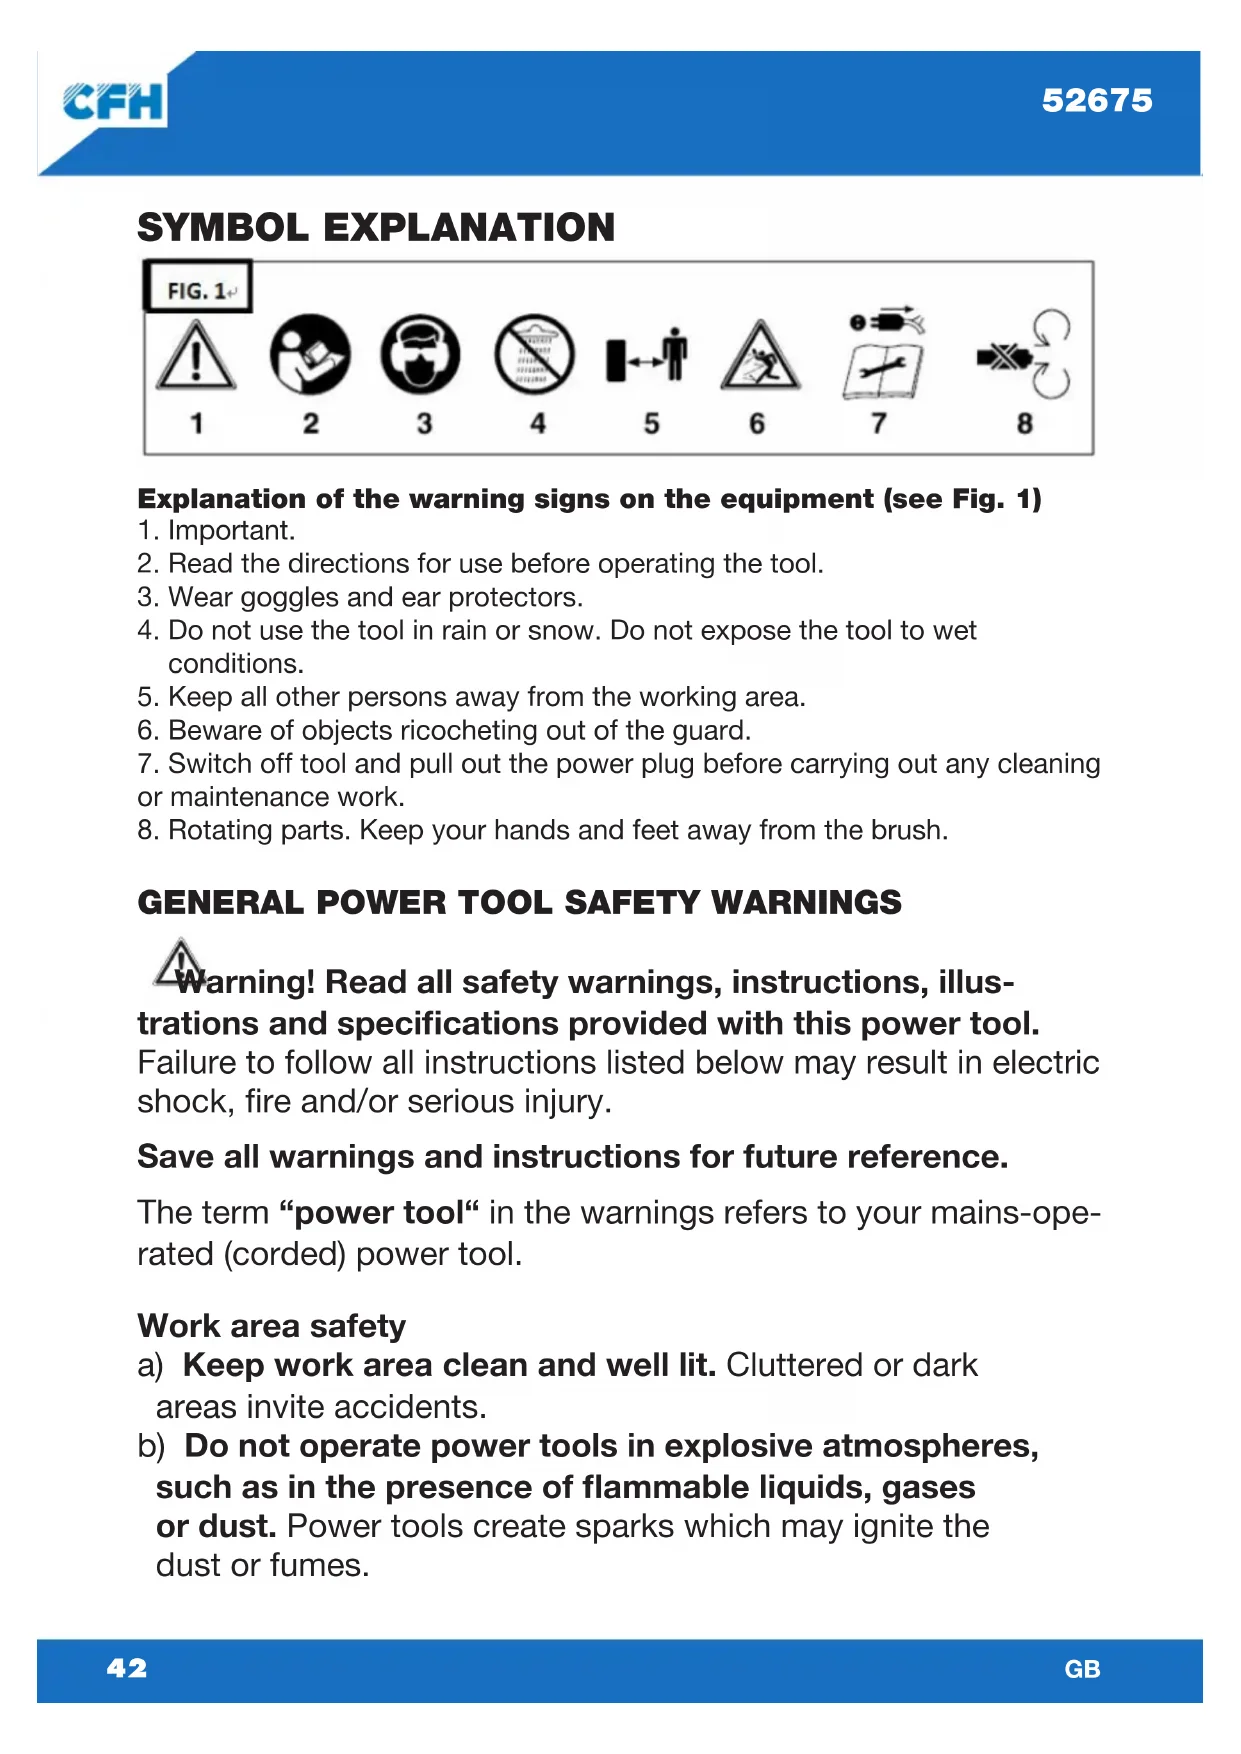
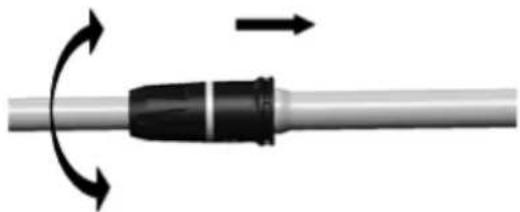
Adjusting the angle of auxiliary handle (see Figure)
natural_image
Close-up of a mechanical tool with a handle and arrow indicating rotation (no text or symbols)Undo the adjustment lock knob for the auxiliary handle until it can be moved forwards or backwards without any great resistance. Set the required position and tighten the lock knob again.
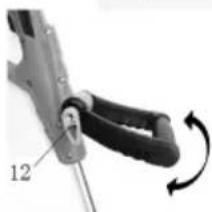
Assemble the guide wheel (see Figure)
Take guide wheel to the aperture in the main housing, and then secure the bolt.
natural_image
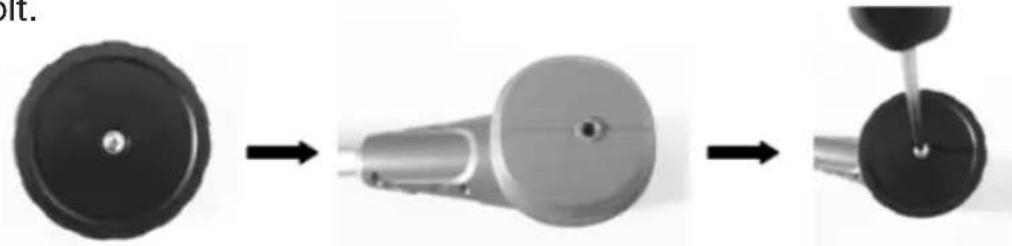
Sequence of mechanical components showing a cylindrical part being processed into a cylindrical body, with a drop in the final component (no text or symbols visible)Assemble the guard hood (see Figure)
Put the guard hood on main housing, Use 3pcs ST4 x 12 screw to secure guard hood.

natural_image
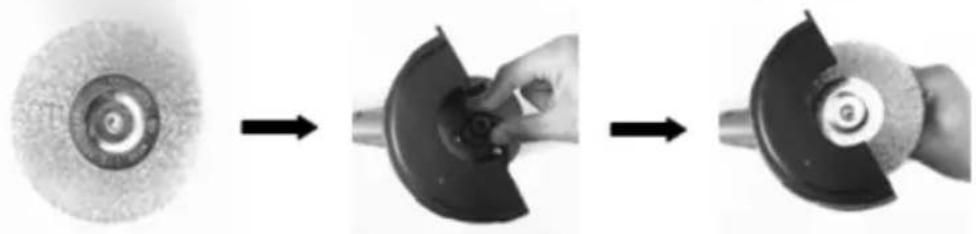
Sequence of black mechanical components showing progressive assembly from left to right, no text or symbols presentAssemble the brush
Standard we have 1pc wire brush and 1pc plastic brush in package box. Press the quick-grip holder, and then put the brush, ensure the hex shaft into the hole, release the grip holder.
natural_image
Sequence of four images showing a car wheel and disc assembly process, no text or symbols presentHeight adjustment of telescopic extension (see Figure)
natural_image
Diagram of a mechanical component with directional arrows indicating rotation or movement (no text or symbols)Undo the union nut until the e-joint brush handle can be moved in and out freely. Now set the required working height and secure the handle in this position by tightening the union nut again.
OPERATION
The tool can be plugged into any socket-outlet (with 230 V AC) that is equipped with a 10A fuse or higher. The socket-outlet has to be safeguarded by an earth leakage circuit breaker (ELCB). The operating current must not exceed 30mA. Insert the tool plug into the power cord coupling (extension). Secure the power cable with the strain-relief clip found on the equipment. To switch on the equipment hold the safety lock-off and press and hold the ON/OFF switch. To switch off, release the ON/OFF switch.
One wire brush and one plastic brush are supplied with the equipment. The wire brush is suited for use on robust surfaces and obstinate weeds. We recommend using the plastic brush for light vegetation and surfaces too sensitive for the steel brush.
Important
Always carry out a short trial run to check out possible effects on the surfaces of the paving stones or slabs before starting with your work. Never use the equipment on very sensitive surfaces, for example tiles.
Important
Only use brushes which are in good condition. Replace excessively worn or damaged brushes immediately.
Always use both hands to operate the equipment.
Guide the equipment along the joints at a walking pace.
For uniform results, carry out your work at a constant speed.
If necessary, guide the equipment along the same joint several times.
MAINTENANCE AND STORAGE
Replacing the power cable
If the power cable for this equipment is damaged, it must be replaced by the manufacturer or its after sales service or a similarly trained person to remain safe to use.
Cleaning, maintenance and ordering of spare parts
Always pull out the power plug before starting any cleaning work.
Cleaning
Keep all safety devices, air vents and the motor housing free of dirt and dust as far as possible. Wipe the equipment with a clean cloth or blow it down with compressed air at low pressure. We recommend that you clean the equipment immediately after you use it. Clean the equipment regularly with a damp cloth and some soft soap. Do not use cleaning agents or solvents; these may be aggressive to the plastic parts in the equipment. Ensure that no
water can get into the interior of the equipment. Clean the guard hood with a brush upon evidence of dirt and grime.
Carbon brushes
In case of excessive sparking, have the carbon brushes checked only by a qualified electrician.
Important
The carbon brushes should not be replaced by anyone but a qualified electrician
Servicing
There are no parts inside the equipment which require additional maintenance.
Storage
Store the equipment and accessories out of children's reach in a dark and dry place at above freezing temperature. The ideal storage temperature is between 5^ and 30^ . Store the electric tool in its original packaging.
Disposal
Dear customer, please help us to avoid waste. Should you ever wish to dispose of this item, please bear in mind that many of its components are made from valuable raw materials and they can be recycled. Never dispose of power tools in your household waste. In accordance with European Directive 2012/19/EU on Waste Electrical and Electronic Equipment and its implementation in national laws, waste electrical and electronic equipment must be collected separately from other waste and disposed of in an environmentally sound manner, for example by returning it to a recycling centre.
natural_image
Symbol of a trash bin with crossed lines indicating no waste, and a solid black rectangle below (no text or labels)Guarantee
You have a 2-year guarantee on this device, which starts from the date of purchase. Please keep the original receipt in a safe place. This document is required as proof of purchase. If a material or manufacturing defect occurs within 2 years of the date of purchase of this product it will be repaired or replaced by us at our discretion and free-of-charge. This guarantee requires that the defective device and the proof of purchase (receipt) are presented within the 2-year period and that a brief written description explaining the nature of the defect and when it occurred is also included. If the defect is covered by our guarantee, the repaired product will be returned to you or a new product will be sent to you. Please contact us by email at: info@cfh-gmbh.de in the event of a guarantee claim. We will get in touch with you as quickly as possible.
Nur für EU-Länder
For EU countries only
This device may be used by children 8 years of age or older and by persons with reduced physical, sensory or mental abilities or lack of experience and knowledge, if they are supervised or have been instructed in the safe use of the device and understand the resulting hazards. Do not allow children to play with the appliance. Cleaning and user maintenance must not be carried out by children without supervision.