
POWX900 - Hoist PowerPlus - Free user manual and instructions
Find the device manual for free POWX900 PowerPlus in PDF.
| Product type | Electric cable hoist |
| Brand | PowerPlus |
| Model | POWX900 |
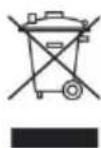
| Intended use | Lifting and lowering heavy loads for domestic (non-professional) use |
| Supply voltage | 230 V~, 50 Hz |
| Rated power | 500 W |
| Rated current | 2.18 A |
| Max load capacity (single cable) | 100 kg |
| Max load capacity (double cable) | 200 kg |
| Lifting speed (single cable) | 8 m/min |
| Lifting speed (double cable) | 4 m/min |
| Max lifting height (single cable) | 12 m |
| Max lifting height (double cable) | 6 m |
| Cable diameter | 3.0 mm |
| Protection rating | IP54 |
| Duty cycle | S3 20% (2 min work, 8 min rest) |
| Weight | 10.5 kg |
| Sound level (LwA) | 71 dB(A) |
| Warranty | 36 months |
| Control | Wired remote control with emergency stop switch |
| Safety features | Limit switches, thermal protector, mechanical brake, emergency stop switch |
| Cable material | Steel |
| Electrical protection class | Class I (grounding required) |
Frequently Asked Questions - POWX900 PowerPlus
User questions about POWX900 PowerPlus
0 question about this device. Answer the ones you know or ask your own.
Ask a new question about this device
Download the instructions for your Hoist in PDF format for free! Find your manual POWX900 - PowerPlus and take your electronic device back in hand. On this page are published all the documents necessary for the use of your device. POWX900 by PowerPlus.
USER MANUAL POWX900 PowerPlus
natural_image
Yellow POWERPLUS robotic device with attached black and red components, no visible text or symbols on the device itself.
| NL | NEDERLANDS | VERTAALDE VERSIE VAN DE ORIGINELE HANDLEIDING |
| FR | FRANÇAIS | TRADUCTION DU MODE D'EMPLOI D'ORIGINE |
| EN | ENGLISH | ORIGINAL INSTRUCTION MANUAL |
| DE | DEUTSCH | ÜBERSETZUNG DER ORIGINAL-BETRIEBSANLEITUNG |
| ES | ESPAÑOL | TRADUCCIÓN DEL MANUAL DE INSTRUCCIONES ORIGINAL |
| IT | ITALIANO | TRADUZIONE DEL MANUALE DI ISTRUZIONI ORIGINALE |
| PT | PORTUGUÊS | TRADUÇÃO DO MANUAL DE INSTRUÇÕES ORIGINAL |
| NO | NORSK | OVERSETTELSE AV ORIGINAL BRUKERVEILEDNING |
| DA | DANSK | OVERSÆTTELSE AF DEN ORIGINALE BRUGSVEJLEDNING |
| SV | SVENSKA | ÖVERSÄTTNING AV DEN URSPRUNGLIGA BRUKSANVISNINGEN |
| FI | SUOMI | ALKUPERÄISEN OHJEKIRJAN KÄÄNNÕS |
| EL | Ελληνικά | Μετάφραση του πρωτότυπου εγχειριδίου οδηγιών |
| HR | HRVATSKI | PRIJEVOD ORIGINALNOG PRIRUČNIKA S UPUTAMA ZA RAD |
| SR | SRPSKI | PREVOD ORIGINALNOG UPUTSTVA ZA UPOTREBU |
| CS | ČESKY | PŘEKLAD ORIGINÁLNÍHO NÁVODU K POUŽITÍ |
| SK | SLOVENČINA | PREKLAD NÁVODU NA POUŽÍVANIE Z ORIGINÁLU |
| RO | ROMÂNÃ | TRADUCEREA MANUALULUI DE INSTRUCTIUNI ORIGINALE |
| PL | POLSKI | TŁUMACZENIE ORYGINALNEJ INSTRUKCJI OBSŁUGI |
| HU | MAGYAR | AZ EREDETI KEZELÉSI UTASÍTÁS FORDÍTÁSA |
| RU | РУССКИЙ | ОРИГИНАЛЬНАЯ ИНСТРУКЦИЯ ПО ЭКСПЛУАТАЦИИ |
| BG | БЪЛГАРСКИ | ПРЕВОД НА ОРИГИНАЛНОТО РЪКОВОДСТВО |
Fig A
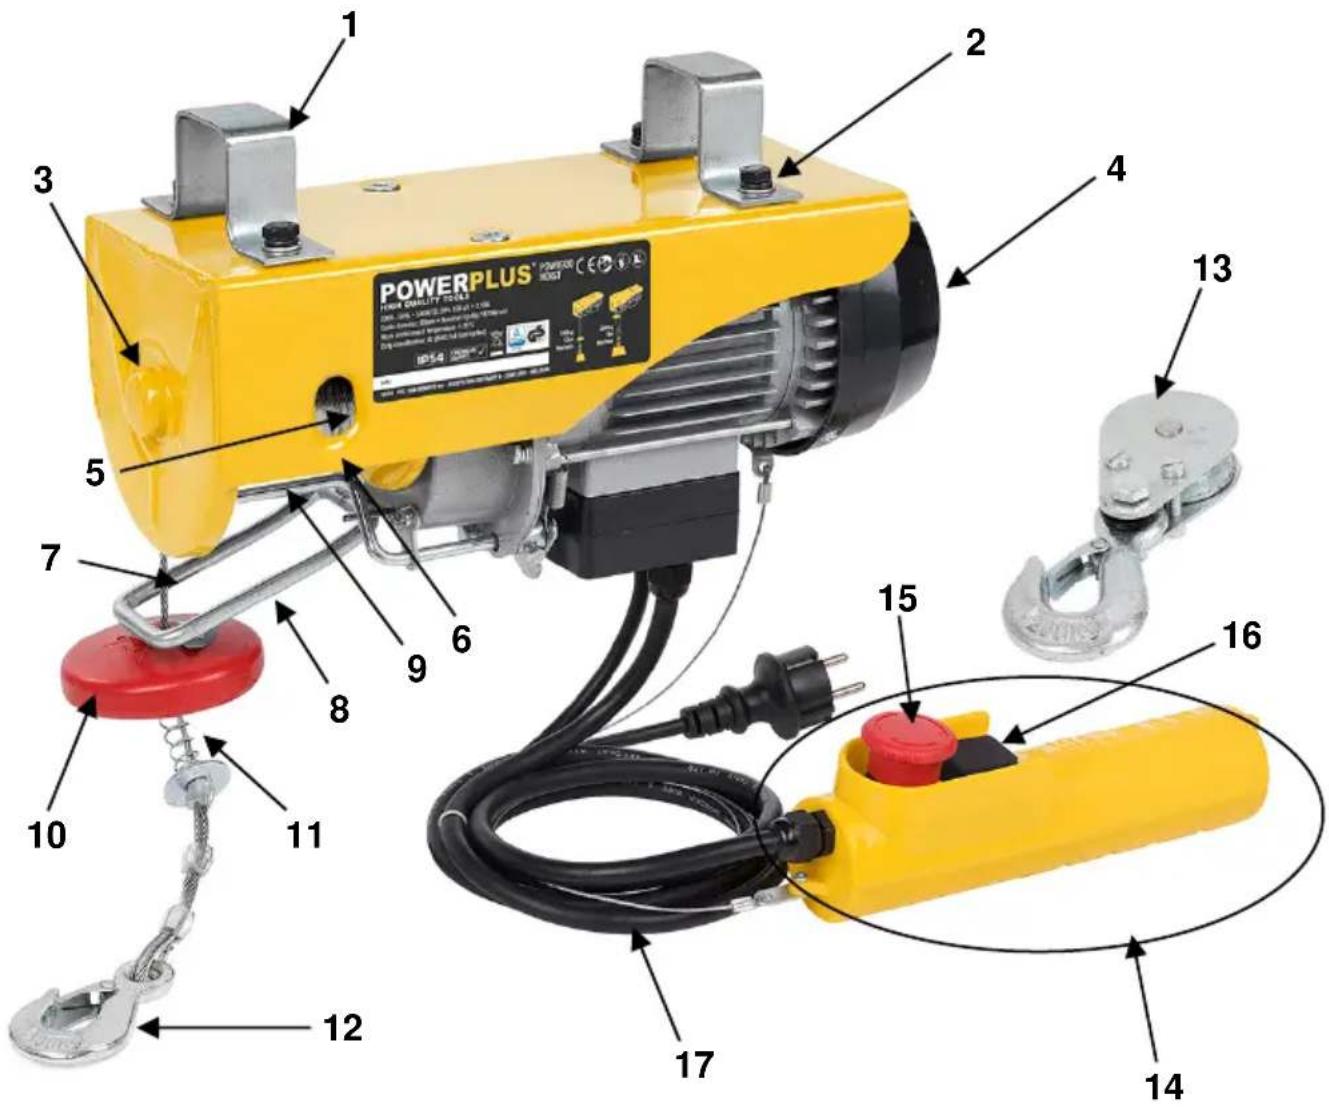
Fig 1
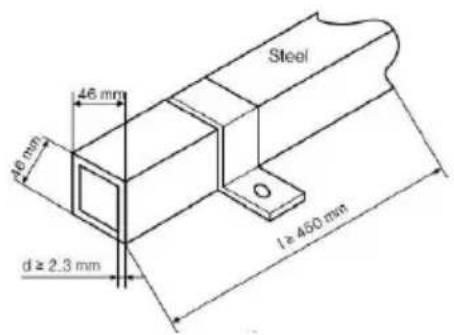
Fig 2

natural_image
Technical line drawing of a mechanical assembly with mounting holes and a central component (no text or symbols)Fig 3
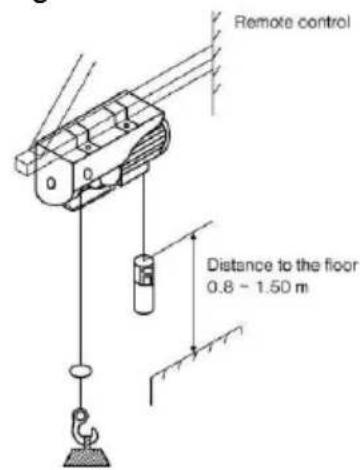
Fig 4

Fig 5

Fig 6

natural_image
Simple line drawing of a wavy horizontal band with diagonal hatching and a small curved mark at the end (no text or symbols)Cable is split

natural_image
Two abstract line drawings of terrain or geological formations, one with hatched shading and the other with a shaded curved shape (no text or symbols)Cable was bent
1 BEOOGD GEBRUIK 2
2 BESCHRIJVING (FIG. A) 2
3 INHOUD VAN DE VERPAKKING 2
4 TOELICHTING VAN DE SYMBOLEN 2
5 ALGEMENE VEILIGHEIDSVOORSCHRIFTEN 3
13 PROBLEEMOPLOSSING 10
14 GARANTIE 11
15 MILIEU 11
16 CONFORMITEITSVERKLARING 12
ELEKTRISCHE TAKEL POWX900
1 BEOOGD GEBRUIK
2 BESCHRIJVING (FIG. A)
13 PROBLEEMOPLOSSING
16/06/2022, Lier - Belgium
9.1 Régime intermittent
16 DÉCLARATION DE CONFORMITÉ
C ∈

VARO N.V. - Vic. Van Rompuy N.V. Joseph Van Instraat 9 - BE2500 Lier - BELGIQUE, déclare que :
16/06/2022, Lier - Belgium
1 INTENDED USE 2
2 DESCRIPTION (FIG. A) 2
3 PACKAGE CONTENT LIST....2
4 SYMBOLS 2
5 GENERAL POWER TOOL SAFETY WARNINGS .... 3
5.1 Working area....3
5.2 Electrical safety....3
5.3 Personal safety .... 3
5.4 Power tool use and care....4
5.5 Service....4
6 EXTRA SAFTY INFORMATION ....4
7 BEFORE EVERY USE 5
8 INSTALLATION....6
9 OPERATION....6
9.1 Intermittent rating ....7
9.2 Overload (Only for POWX901-POWX902-POWX903) 7
9.3 Operation with double cable (Fig 5)....8
10 CLEANING AND MAINTENANCE....8
11 TECHNICAL DATA 8
12 NOISE....9
13 PROBLEM-SOLVING 9
14 WARRANTY....10
15 ENVIRONMENT 10
16 DECLARATION OF CONFORMITY 11
ELECTRIC CABLE HOIST POWX900
1 INTENDED USE
This cable hoist is used to hoist and lower loads. It is the ideal tool for interior design hoisting, construction site loading, repair shop loading and so on. Not suitable for professional use.

WARNING! For your own safety, read this manual and general safety instructions carefully before using the appliance. Your power tool should only be passed on together with these instructions.
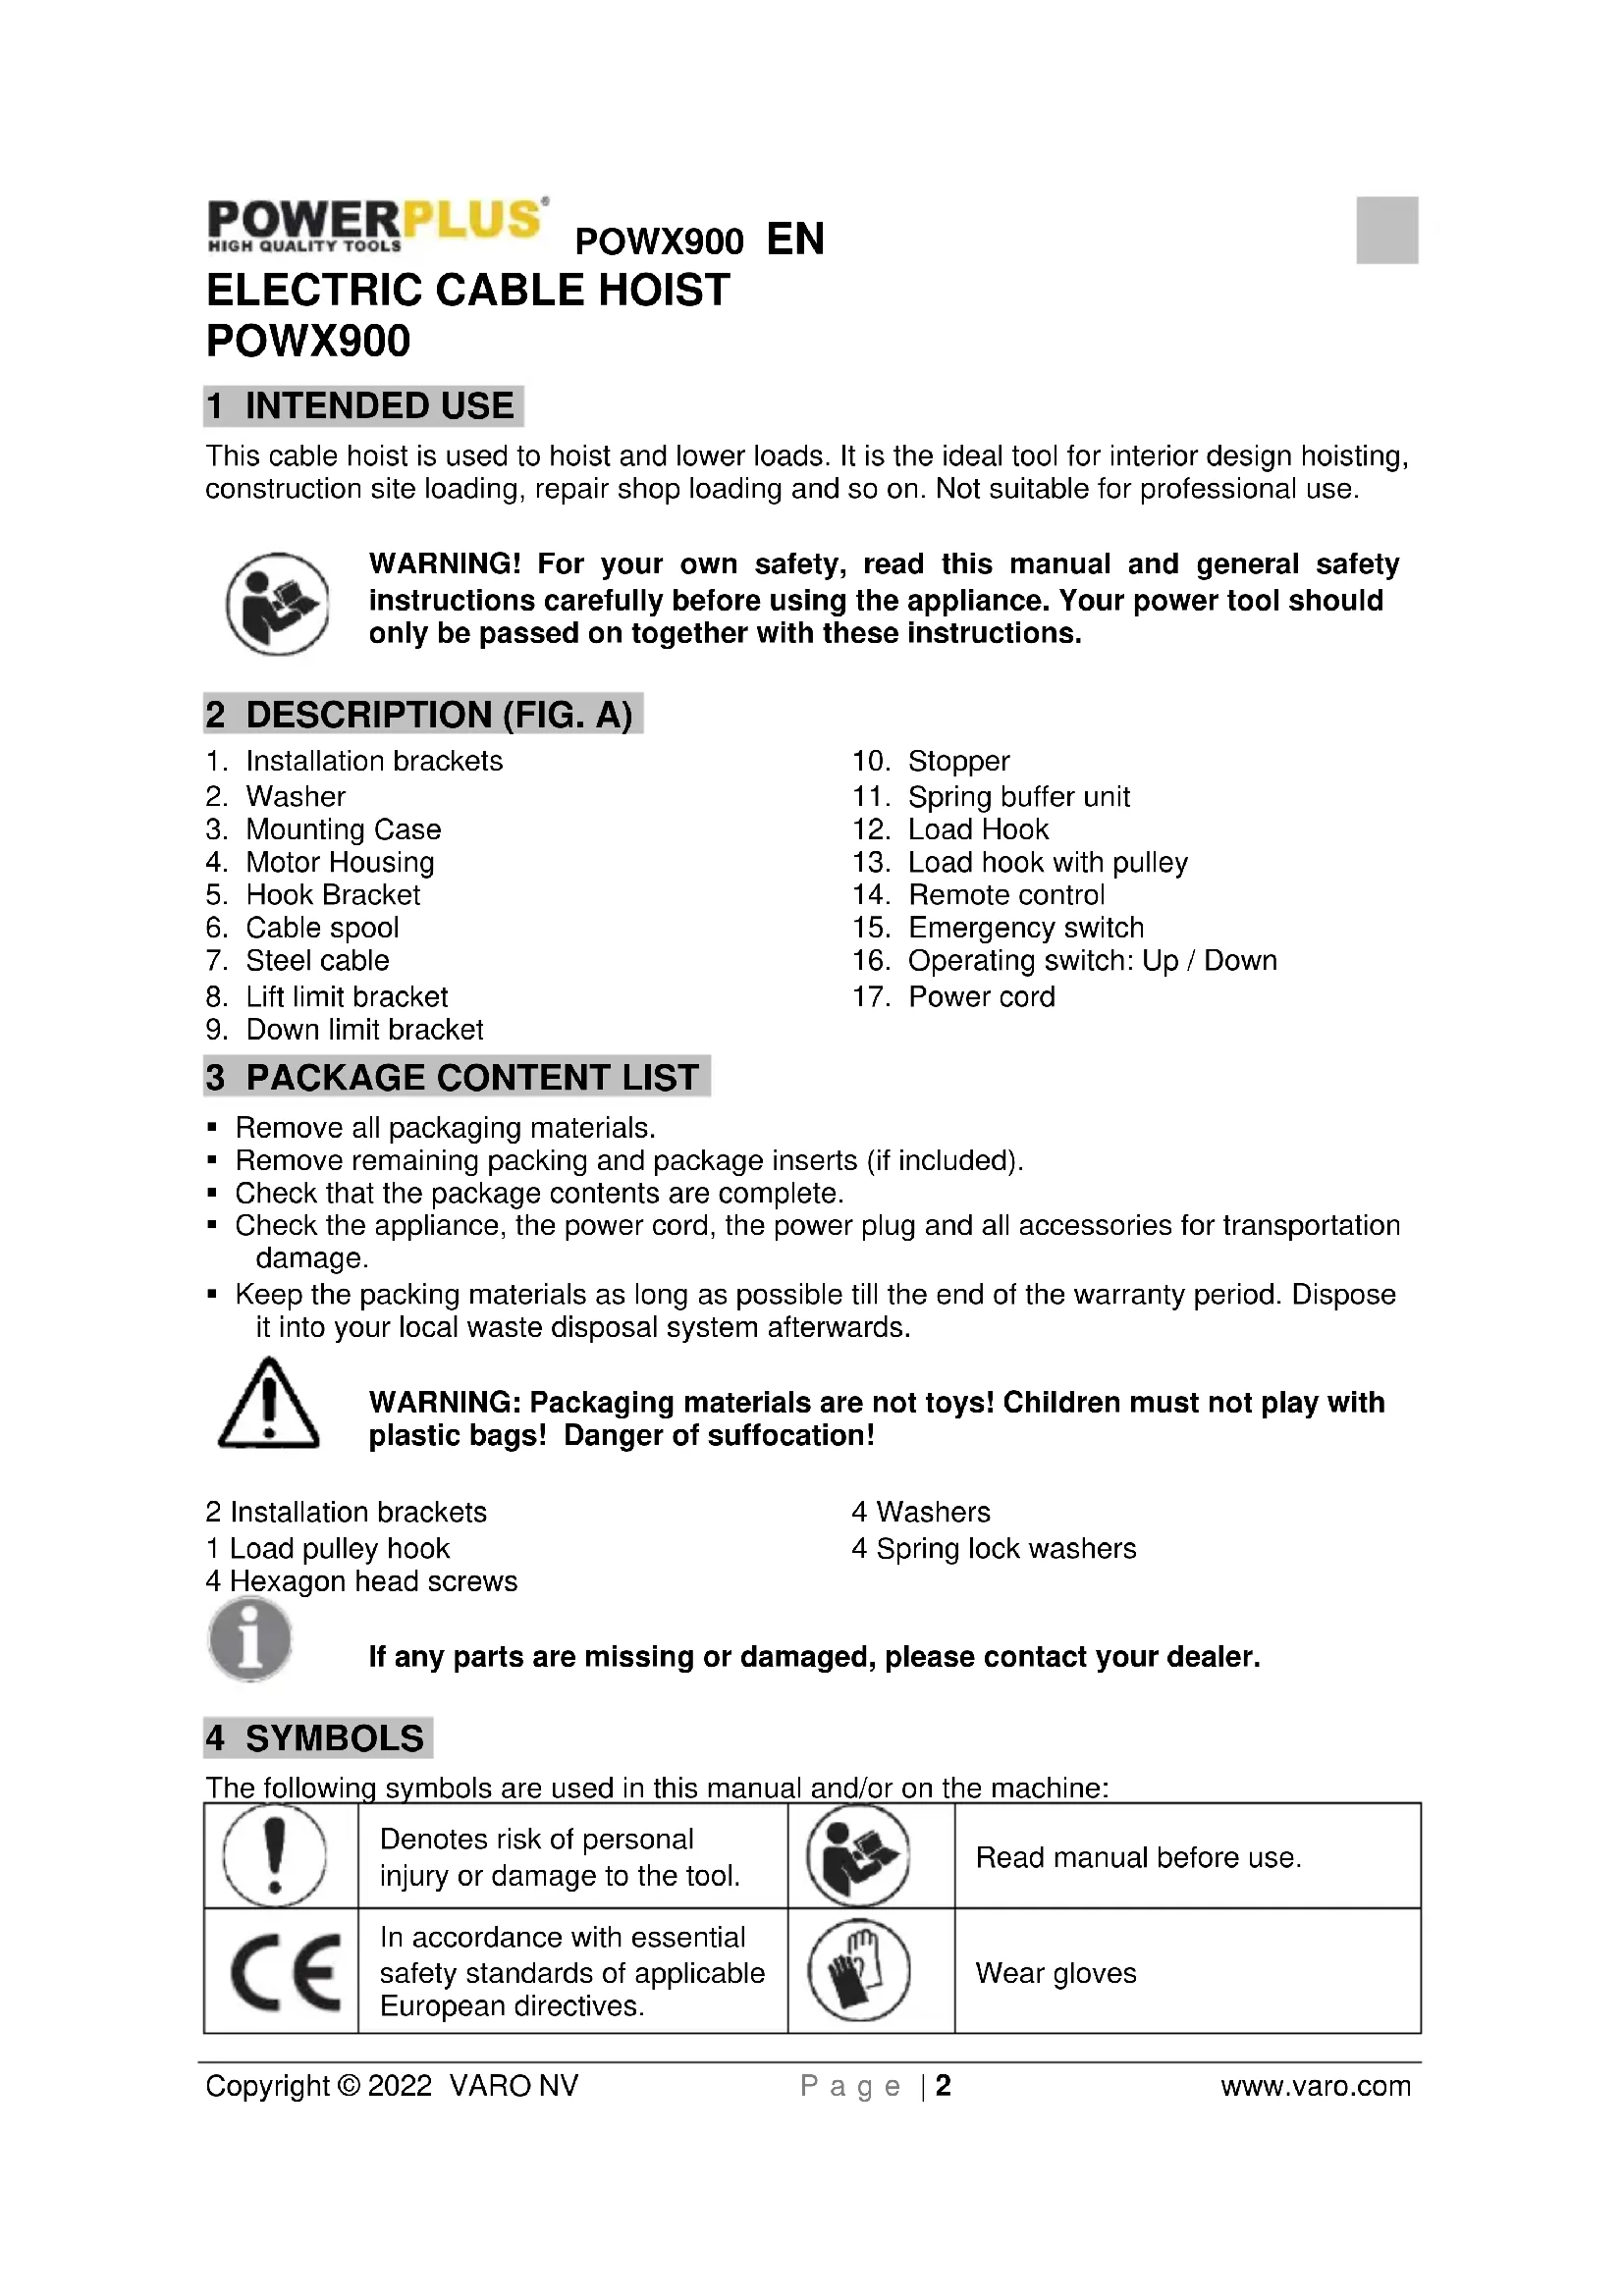
2 DESCRIPTION (FIG. A)
- Installation brackets
- Washer
- Mounting Case
- Motor Housing
- Hook Bracket
- Cable spool
- Steel cable
- Lift limit bracket
-
Down limit bracket
-
Stopper
- Spring buffer unit
- Load Hook
- Load hook with pulley
- Remote control
- Emergency switch
- Operating switch: Up / Down
- Power cord
3 PACKAGE CONTENT LIST
- Remove all packaging materials.
- Remove remaining packing and package inserts (if included).
- Check that the package contents are complete.
- Check the appliance, the power cord, the power plug and all accessories for transportation damage.
- Keep the packing materials as long as possible till the end of the warranty period. Dispose it into your local waste disposal system afterwards.

WARNING: Packaging materials are not toys! Children must not play with plastic bags! Danger of suffocation!
2 Installation brackets
1 Load pulley hook
4 Hexagon head screws
4 Washers
4 Spring lock washers

If any parts are missing or damaged, please contact your dealer.
4 SYMBOLS
The following symbols are used in this manual and/or on the machine:
 | Denotes risk of personal injury or damage to the tool. |  | Read manual before use. |
 | In accordance with essential safety standards of applicable European directives. |  | Wear gloves |

Wearing of protective shoes advised

Electrical products must not be disposed with the domestic waste.
5 GENERAL POWER TOOL SAFETY WARNINGS
Read all safety warnings and instructions. Failure to heed warnings and follow instructions may result in electric shock, fire and/or serious injury. Keep safety warnings and instructions for future reference. The term "power tool" in the safety warnings refers to your mains-operated (corded) power tool or battery-operated (cordless) power tool.
5.1 Working area
- Keep working area clean and well lit. Untidy and dark areas can lead to accidents.
- Do not operate power tools in potentially explosive surroundings, for example, in the presence of inflammable liquids, gases or dust. Power tools create sparks which may ignite the dust or fumes.
- Keep children and bystanders at a distance when operating a power tool. Distractions can cause you to lose control of it.
5.2 Electrical safety

Always check that the power supply corresponds to the voltage on the rating plate.
- Power tool plugs must match the outlet. Never modify the plug in any way. Do not use adapter plugs with earthed power tools. Unmodified plugs and matching outlets will reduce the risk of an electric shock.
- Avoid body contact with earthed surfaces such as pipes, radiators, kitchen ranges and refrigerators. There is an increased risk of an electric shock if your body is earthed.
- Do not expose power tools to rain or wet conditions. If water gets inside a power tool, it will increase the risk of an electric shock.
- Do not damage the cord. Never use the cord for carrying, pulling or unplugging the power tool. Keep the cord away from heat, oil, sharp edges or moving parts. Damaged or entangled cords increase the risk of an electric shock.
- When operating a power tool outdoors, use an extension cable suitable for outdoor use. Using a cord suitable for outdoor use reduces the risk of an electric shock.
- If operating a power tool in a damp location is unavoidable, use a power supply protected by a residual current device (RCD). Using an RCD reduces the risk of an electric shock.
5.3 Personal safety
- Stay alert, watch what you are doing and use common sense when operating a power tool. Do not use a power tool when you are tired or under the influence of drugs, alcohol or medication. A moment of inattention when operating a power tool may result in serious personal injury.
- Use safety equipment. Always wear eye protection. Using safety equipment such as a dust mask, non-skid safety shoes, a hard hat, or hearing protection whenever it is needed will reduce the risk of personal injury.
- Avoid accidental starts. Ensure the switch is in the off position before inserting the plug. Carrying power tools with your finger on the switch or plugging in power tools when the switch is in the on position makes accidents more likely.
-
Remove any adjusting keys or spanners before turning on the power tool. A spanner or key left attached to a rotating part of the power tool may result in personal injury.
-
Do not reach out too far. Keep your feet firmly on the ground at all times. This will enable you retain control over the power tool in unexpected situations.
- Dress properly. Do not wear loose clothing or jewellery. Keep your hair, clothing and gloves away from the power tool. Loose clothes, jewellery or long hair can become entangled in the moving parts.
- If there are devices for connecting dust extraction and collection facilities, please ensure that they are attached and used correctly. Using such devices can reduce dust-related hazards.
5.4 Power tool use and care
- Do not expect the power tool to do more than it can. Use the correct power tool for what you want to do. A power tool will achieve better results and be safer if used in the context for which it was designed.
- Do not use the power tool if the switch cannot turn it on and off. A power tool with a broken switch is dangerous and must be repaired.
- Disconnect the plug from the power source before making adjustments, changing accessories, or storing power tools. Such preventive safety measures reduce the risk of starting the power tool accidentally.
- Store power tools, when not in use, out of the reach of children and do not allow people who are not familiar with the power tool or these instructions to operate it. Power tools are potentially dangerous in the hands of untrained users.
- Maintain power tools. Check for misalignment or jammed moving parts, breakages or any other feature that might affect the operation of the power tool. If it is damaged, the power tool must be repaired. Many accidents are caused by using poorly maintained power tools.
- Keep cutting tools sharp and clean. Properly maintained cutting tools with sharp cutting edges are less likely to jam and are easier to control.
- Use the power tool, accessories and cutting tools, etc., in accordance with these instructions and in the manner intended for the particular type of power tool, taking into account the working conditions and the work which needs to be done. Using a power tool in ways for which it was not intended can lead to potentially hazardous situations.
5.5 Service
- Your power tool should be serviced by a qualified specialist using only standard spare parts. This will ensure that it meets the required safety standards.
6 EXTRA SAFTY INFORMATION

ATTENTION! Never use the machine to transport persons or animals!
Never stand or work under a hoisted load.
- Keep the immediate working environment clean.
- Please consider environmental influences. Ensure good illumination for your workspace. Do not use the device in potential fire hazard, easily flammable fluids or explosive surroundings, do not expose it to unnecessary weather influences, such as rain, damp, sun exposure, dust or cold.
■ Protect yourself from electrical shock. - Keep this device away from unauthorized persons.
- Store the cable hoist in a proper manner when it is not in use. Store the machine at a dry high or lockable place, out of the reach of children.
- Do not overload the cable hoist, in any case! Please do not exceed the maximum load capacity (see data plate, not load hook!). Do not use 2 or more machines to load same object.
- Forbid to lift an attached/fixed object.
- Don't use the machine in aggressive environments or under low temperatures.
- Wear safety clothes. Never wear loose clothing or jewellery; this could be caught by movable parts of the machine. Safety equipment (such as rubber gloves, non-slip footwear, hearing and hair protection and etc.) is recommended when working.
- Only use the power cord (17) for its intended use. Never carry the tool or pull on the power cord (17) and never pull on the cord to disconnect the power plug from the power outlet. Keep the power cord (17) away from heat, oil and sharp edges. Check the power cord (17) before every use for damages. Never use the cable hoist, if the cord is worn out, knotted itself, or has a kink. Allow the cord to be replaced by a qualified professional.
- Please be sure to maintain upright body position. Ensure a safe position and always maintain your balance, and not at an extreme angle.
- Disconnect the cable hoist from the power network when not in use and prior to performing any maintenance.
■ Always work carefully and with a due amount of caution.
■ Use only the manufacturer recommended accessories.
- Have your cable hoist repaired only by a qualified electrician. This power tool complies with applicable safety regulations.
- Be sure to hoist the loads with lowest speed from the ground. And the cable should be tense but not unwound when start loading from the ground.
- The micro switch is not allowed to be used as an off-switch or be dismantled. The micro switch is a safety device to prevent that the weight is lifted over the boundary.
- If the brakes stop functioning and the load lowers quickly, one should press the off-switch immediately and then the On-switch. After unloading, please send the machine in for repairs to a qualified professional.
- Do not leave the load hanging in the air long-term, to prevent the deformation of the pieces. While the machine is in operation do not carry out any repairs or inspections.
- It is prohibited to change any part of the pulley or to disassemble it.
- Depending on the frequency of use, after 20 hours of total operation or at least once a year, the machine must be taken in for a thorough maintenance.
■ Make sure to operate the emergency switch (15) to stop the machine in case of dangerous and emergent situation. Reset the emergency switch (15) head to operation status in the direction of the arrow (clockwise) until the danger has passed.
7 BEFORE EVERY USE

Attention! The cable hoist is designed only for domestic use! It is not intended for professional applications. This device can be operated without hazards only if you read this user manual and safety instructions and closely follow all instructions.
Prior to start-up operation, please be sure to make some preparations:
■ Make sure the voltage of your power network complies with the voltage listed on the data plate and that the device is equipped with the correct power plug.
- Please make no-loading test before start-up operation at first, and please check:
-a, The flexibility of the operating switch (16) to insure the controlling of the hoisting and lowering of the load hook (12).
-b. The flexibility of lift limit bracket (8) to make sure the cut-off of circuit.
-c. The flexibility of down limit bracket (9) to make sure the cut-off circuit when the steel cable (7) is nearly used up.
– d. Any abnormal sounds when start-up operation.
-e. The steel cable (7) is possible damaged (split or bent), change the cable immediately.
- Please check the brake before operating after load.
POWX900 EN
- Please inspect the load hook (12) before operation is possible damaged or distortional, replace it in time.
■ Operation using a residual current protective device (Emergency Switch, 15) offers additional protection. - Please be sure to the enough lubricant on parts. Daub the lubricant on the load hook (12) cable drum shaft, slow down box, and bearing every half a year.
- Please daub the lubricant on the nesting of cable drum shaft when replace the steel cable (7) every time. Immediately replace the cable if damaged.
- Please perform any rework and maintenance tasks only if the power plug is disconnected.
- Please inspect the device for transportation damages. Immediately report any possible damages to your seller.
8 INSTALLATION
- Install the cable hoist on a steel beam (Fig 2). Use only the enclosed installation brackets (1) which can be attached to the top of the mounting casing (3) using the screws, washers and spring lock washers. The steel beam must be able to withstand at least double the rated weight of the machine. Contact a professional installer for best results.
- The steel beam must have the following dimension: 46 x 46 mm, a wall thickness of at least 2.3 mm and a length of at least 450 mm (Fig 1).
- The steel beam must be securely anchored in a wall. The anchor must be installed correspondingly sturdy in order to be able to withstand the load.
■ Please be sure that the machine is installed level and not slanted. - The remote control (14) must be easily accessible at all times and must therefore be installed at a distance to the floor of between 0.8 m and 1.5 m (Fig 3).
- Insert the load hook (12) into the hook bracket (5) of the mounting casing (3) when using the load hook with pulley (13).
- The electric pulley will be attached at the top. Attach the pulley with bearer frame on the crossbar. The girder is then attached to the support columns. The support columns must be, in accordance with the requirements of the customer, properly secured on the working area. The support columns must be installed to be sturdy and stable. Also be able to withstand a nominal load long-term.
9 OPERATION
- Prior to starting work, please be sure that the steel cable (7) is wound up exactly, layer next to layer on the cable spool (6). Never unwind the cable completely!
- Unwind the cable only to the point that at least 3 more layers are located on the drum.
- If the red indicator mark is visible, please stop the cable hoist immediately and do not continue to unwind the cable!
■ Always wind the cable as shown in Fig. 4.

Note: When replace the wire rope, be sure to pull rope into the square hole of rope drum, and then pull it out from the round hole. With that wind the rope two circles and then pull it to the edge which is side of rope drum and fix it.
- The cable hoist is operated using the remote control (14). When operating the upper position of the switch, the load is hoisted up. When operating the lower position, the load is lowered. Never switch directly from hoisting to lowering or vice versa. Always stop the cable hoist prior to changing directions.
- Operate the Emergency switch (15) to immediately stop the cable hoist in case of an emergency and to secure against restart. To reset the device to operational status, first
turn the Emergency switch (15) clockwise, which will unlock the Emergency switch (15). The cable hoist is now operational.
- The cable hoist is designed with limit configuration to limit stop. When load hook (12) is hoisting up to topmost position, the stopper (10) touch the lift limit bracket (8), the micro switch of lift limit bracket (8) can cut off the circuit and make the motor stop to insure the safety of operations. When load hook (12) is lowering down nearly to use up the cable (7), the micro switch of down limit bracket (9) start work and cut off the circuit and make the motor stop.

Attention! If the cable has been unwound to the point where the red micro switch is visible, the cable hoist must be stopped. Under no circumstances should the cable be unwound past this point'
- If the cable hoist cannot hoist a load immediately, switch it off immediately to prevent damages and accidents.
- Please be sure that the load is securely fastened to the load hook (12-13). Maintain the largest possible distance to the load and steel cable (7) during operation.
- Upon lowering a load, please remember that the cable hoist may still unwind a few more centimetres after it was stopped. Therefore, please stop in sufficient time.
- Please be sure that the steel cable (7) cannot be moved more than 15° to the side.
- The cable hoist can be operated with a single or double cables, therefore the permissible rated load, see Technical Specifications, can vary.
■ After unpacking the items, check to make sure that all pieces and accessories correspond with the directions. Check to see if the cable hoist has any dents or damage, if the cable connections have any defects and if the motor shows any signs of rain or water damage. - The cable hoist uses a single-phase energy power supply. The nominal voltage is 230V + 20%, the nominal frequency is 50Hz + 1%. The motor must be safely grounded. In the circuitry of the power supply an over-current protection must be installed.
■ After connecting the power supply, the pulley can then be raised and lowered in Jog-mode. One can raise and lower start-up during a dry-run. First when the up and down movement is stable and the brakes work flawlessly, once can test the pulley with a dummy load.
9.1 Intermittent rating
This machine is designed for operating type S3 20% - 10 min (periodic intermittent operation). The relative duty cycle is 20%, which means that the device can be operated at rated load for 2.0 minutes during each operating cycle and must then be switched off for 8.0 minutes to cool off. The device can therefore be continuously used for a duration of 20% of the total operating cycle of 10 minutes at rated load.
9.2 Overload (Only for POWX901-POWX902-POWX903)
- The cable hoist is not suitable for continuous operation. The motor is protected from overload and overheating by a temperature switch.
- If the permissible operating time is exceeded, the motor temperature will increase and the temperature switch will shut the cable hoist off. The temperature switch will automatically switch back on after a cooling phase.
- In case of a strain on the cable hoist with a lesser load, the operating time will increase and the cooling time will decrease.

Attention! In case of direct exposure to sunlight, the temperature of the casing will increase significantly, which will also decrease the permissible operating time. It is therefore possible that the temperature switch will
switch off after a short time period and the cable hoist will shut down. Please wait until the device is cooled off.
9.3 Operation with double cable (Fig 5)
- Loosen the nuts of the 3 screws located on the load hook with pulley (13) and remove the cover plate located on the side. Place the steel cable (7) around the deviating shaft and reattach the cover plate and nuts. Please be sure that the load hook with pulley (13) is installed properly and that the nuts are securely tightened.
- Please insert the load hook (12) attached to the cable into the hook bracket (5) of the mounting casing (3).
10 CLEANING AND MAINTENANCE
- Disconnect the power plug prior to performing any work on the device.
- Clean the device using a damp cloth and some liquid soap. Never use cleaning agents or solvents, these could damage the device's plastic parts.
- Regularly inspect the total length of the steel cable (7) for damages as well as the functionality of the limit bracket (Wind cable hoist until the stopper (10) activates the limit bracket of the micro switch).
- If the steel cable (7) is damaged (split or bent, fig 6), a professional must replace it using original replacement parts.
- During assembly of the cable, it is imperative to remember the stopper in order to ensure a secure limit stop.
- Inspect the free movement of all mechanical components after the power plug has been disconnected.
- Replace lost parts only with original parts.
- Return the device to your seller to ensure professional recycling.
11 TECHNICAL DATA
| Rated voltage | 230v~ |
| Rated frequency | 50 Hz |
| Power rating: | 500W |
| Rated current | 2.18 A |
| Max. loading capacity | |
| -for single cable | 100 kg |
| -for double cable | 200 kg |
| Cable speed | |
| -for single cable | 8m/min |
| -For double cable | 4m/min |
| Hoisting height | |
| -for single cable | 12 m |
| -For double cable | 6 m |
| Cable diameter | 3,0 mm |
| Protection rating | IP54 |
| Motor category | A1 |
| Work duty | ED: 20% |
| Protection rating | I |
| Weight | 10.5 kg |
12 NOISE
Noise emission values measured according to relevant standard. (K=3)
Acoustic power level LwA
71 dB(A)
13 PROBLEM-SOLVING
| Common Malfunction | Cause | Solution |
| The operating switch is used but the motor does not turn | It is not plugged into the power supply.The wires are broken or ripped.Switch MalfunctionThe capacitor is burned through.End-switch has not been reset or a micro switch errorThe thermal switch has suffered a wire break. | Connect the item to the power supply.Check the wires and plug it in again to the outlet.Repair switch or change itChange your capacitorCheck the end-switch and replace the limit switch.Wait until the item cools down, or replace the thermal switch. |
| The operation switch switch has been activated. The motor is very loud, can however not pick-up the load. | The voltage offered is too small.The capacitor has become damaged.The brake is not completely open. | Adjust the work, depending on the power supply.Change power supply.Allow the machine to be repaired from a qualified repair service |
| After a power loss the brakes do not hold or the machine slips down | The air between the brakes is too largeThe brake spring is ripped.The brake disk is lockedThe brake disk is at the start already dirty. | Allow the machine to be repaired from a qualified repair service. |
| The noise of the machine becomes louder | Badly oiledAfter a long use, the cogwheel and bearings are damaged.Badly installed or dent | Oil/Grease machine officially.Change the cogwheel or bearings.Check installed parts or let a qualified person check this |
| The cable hoist has too much voltage. | Earthed error or is not possibleThe internal connectors are touching the housing | Checked earthed wires and properly connect them.Check all internal connections |
| End-switch is not functioning. | The end-switch is defectEnd-switch is blocked | Switch off or changeCheck, repair, and change End switch |
14 WARRANTY
- This product is warranted for a 36-month period effective from the date of purchase by the first user.
- This warranty covers all material or production flaws excluding: batteries, chargers, defective parts subject to normal wear & tear such as bearings, brushes, cables, and plugs, or accessories such as drills, drill bits, saw blades, etc. ; damage or defects resulting from maltreatment, accidents or alterations; nor the cost of transportation.
- Damage and/or defects resulting from inappropriate use also do not fall under the warranty provisions.
- We also disclaim all liability for any bodily injury resulting from inappropriate use of the tool.
- Repairs may only be carried out by an authorised customer service centre for Powerplus tools.
- You can always obtain more information at the number 00 32 3 292 92 90.
- Any transportation costs shall always be borne by the customer, unless agreed otherwise in writing.
- At the same time, no claim can be made on the warranty if the damage of the device is the result of negligent maintenance or overload.
- Definitely excluded from the warranty is damage resulting from fluid permeation, excessive dust penetration, intentional damage (on purpose or by gross carelessness), inappropriate usage (use for purposes for which the device is not suitable), incompetent usage (e.g. not following the instructions given in the manual), inexpert assembly, lightning strike, erroneous net voltage. This list is not exhaustive.
- Acceptance of claims under warranty can never lead to the prolongation of the warranty period nor commencement of a new warranty period in case of a device replacement.
■ Devices or parts which are replaced under the warranty therefore remain the property of Varo NV.
- We reserve the right to reject a claim whenever the purchase cannot be verified or when it is clear that the product has not been properly maintained. (Clean ventilation slots, carbon brushes serviced regularly, etc.).
- Your purchase receipt must be kept as proof of date of purchase.
- Your appliance must be returned undismantled to your dealer in an acceptably clean state, (in its original blow-moulded case if applicable to the unit), accompanied by proof of purchase.
15 ENVIRONMENT
Should your appliance need replacement after extended use, do not discard it with the household rubbish but dispose of it in an environmentally safe way. Waste produced by electrical machine items should not be handled like normal household rubbish. Please recycle where recycle facilities exist. Check with your Local Authority or retailer for recycling advice.
VARO N.V. - Vic. Van Rompuy N.V. Joseph Van Instraat 9 - BE2500 Lier - BELGIUM, declares that,
product: Electric cable hoist
trade mark: POWERplus
model: POWX900
is in conformity with the essential requirements and other relevant provisions of the applicable European Directives, based on the application of European harmonized standards. Any unauthorized modification of the apparatus voids this declaration.
European Directives (including, if applicable, their amendments up to the date of signature);
2014/30/EU
2006/42/EC
2011/65/EU
European harmonized standards (including, if applicable, their amendments up to the date of signature);
EN14492-2:2019
EN60204-32:2008
EN55014-1:2017
EN55014-2:2015
EN IEC61000-3-2 : 2019
EN61000-3-3 : 2013
Keeper of the Technical Documentation : Philippe Vankerkhove, VARO – Vic. Van Rompuy N.V.
The undersigned acts on behalf of the company CEO,
Mertens Ludo
Ludo Mertens
Regulatory Affairs – Compliance Manager
16/06/2022, Lier - Belgium
16/06/2022, Lier - Belgium
Regulatory Affairs – Compliance Manager
16/06/2022, Lier - Belgium
16/06/2022, Lier - Belgium
1 TILSIGTET BRUG....2
2 BESKRIVELSE (FIG. A) 2
3 MEDF∅LGENDE INDHOLD 2
4 SYMBOLER....3
5 ALMINDELIGE SIKKERHEDSANVISNINGER FOR EL-VÆRKT∅J
3
5.1 Arbejdsområde....3
5.2 Elektrisk sikkerhed .... 3
5.3 Personlig sikkerhed....4
5.4 Omhyggelig håndtering og anvendelse af el-værktøjer 4
5.5 Service....4
6 EKSTRA SIKKERHEDSOPLYSNINGER 5
7 INDEN ARBEJDET PÅBEGYNDES 6
8 INSTALLATION....6
9 BETJENING 7
9.1 Vurdering for intermitterende brug....8
9.2 Overbelastning(Kun til POWX901-POWX902-POWX903)....8
9.3 Betjening med dobbelt kabel (Fig. 5)....8
10 RENG∅RING OG VEDLIGEHOLDELSE......8
11 TEKNISKE DATA....9
12 ST∅J....9
13 PROBLEML∅SNING....9
14 GARANTI....10
15 MILJ∅....11
16 KONFORMITETSERKLÆRING....11
KABELSPIL POWX900
1 TILSIGTET BRUG
16/06/2022, Lier - Belgium
1 AVSEDD ANVÄNDNING 2
2 BESKRIVNING (FIG. A) 2
3 FÖRPACKNINGSINNEHÅLL 2
4 SYMBOLER....3
5 ALLMÄNNA SÄKERHETSANVISNINGAR FÖR ELEKTRISKA VERKTYG....3
5.1 Arbetsplatsen....3
5.2 Elektrisk säkerhet 3
5.3 Personlig säkerhet....4
5.4 Användning och skötsel av elektriska verktyg 4
5.5 Service....4
6 EXTRA SÄKERHETSANVISNINGAR 5
7 FÖRE VARJE ANVÄNDNINGSTILLFÄLLE....6
8 INSTALLATION....6
9 ANVÄNDNING....7
9.1 Intermittent drift ....8
9.2 Överbelastning (gäller endast POWX901-POWX902-POWX903)......8
9.3 Drift med dubbel vajer (Fig. 5)....8
10 RENGÖRING OCH UNDERHÅLL 8
11 TEKNISKA DATA....9
12 BULLER 9
13 FELSÖKNING 9
14 GARANTI....10
15 MILJÖHÄNSYN....11
16 FÖRSÄKRAN OM ÖVERENSSTÄMMELSE....11
ELVINSCH POWX900
1 AVSEDD ANVÄNDNING
3 FÖRPACKNINGSINNEHÅLL
16/06/2022, Lier - Belgium
16/06/2022, Lier - Belgium
1 NAMJENA 2
2 OPIS (SL. A) 2
3 POPIS SADRŽAJA PAKETA 2
4 SIMBOLI 2
5 OPĆA UPOZORENJA O SIGURNOSTI RUKOVANJA
ELEKTRIČNIM ALATIMA....3
5.1 Radno mjesto....3
5.2 Električna sigurnost....3
5.3 Osobna sigurnost .... 3
5.4 Uporaba i održavanje električnog alata ....4
5.5 Servis....4
6 POSEBNE SIGURNOSNE INFORMACIJE 4
7 PRIJE SVAKE UPORABE 5
8 UGRADNJA....6
9 RAD 6
9.1 Omjer intermitencije 8
9.2 Preopterećenje (samo za POWX901-POWX902-POWX903)....8
9.3 Rad sa dvostrukim čeličnim užetom (slika 5)....8
10 ČIŠĆENJE I ODRŽAVANJE 8
11 TEHNIČKI PODACI 9
12 BUKA....9
13 RJEŠAVANJE PROBLEMA 9
14 JAMSTVO....10
15 OKOLIŠ 11
16 IZJAVA O SUKLADNOSTI 11
ELEKTRIČNA DIZALICA SA ČELIČNIM UŽETOM POWX900
1 NAMJENA
Ova električna dizalica sa čeličnim užetom koristi se za podizanje i spuštanje tereta. Idealan je alat za unutarnje radove, podizanje i spuštanje tereta na mjestu gdje se izvode građevinski radovi, u servisnim radionicama i slično. Nije prikladno za profesionalnu uporabu.

UPOZORENJE! Prije uporabe alata, a radi vaše vlastite sigurnosti pažljivo pročitajte ovaj priručnik i opće upute o sigurnosti. Ove upute čine sastavni dio opreme električnog alata, pa i u slučaju prodaje drugom vlasniku.
2 OPIS (SL. A)
- Nosači za ugradnju
- Podloška
- Kućište za ugradnju
- Kućište motora
- Nosač kuke
- Valjak za namotavanje užeta
- Čelično uže
- Graničnik za podizanje
-
Graničnik za spuštanje
-
Odbojnik
- Opruga odbojnika
- Kuka za teret
- Kuka za teret s koloturnikom
- Daljinski upravljač
- Sigurnosna sklopka
- Radna sklopka: gore / dolje
- Kabel za napajanje
3 POPIS SADRŽAJA PAKETA
16/06/2022, Lier - Belgium
1 NAMENJENA UPOTREBA....2
2 OPIS (SL. A)....2
3 SPISAK SADRŽAJA PAKOVANJA 2
4 SIMBOLI 3
5 OPŠTA BEZBEDNOSNA UPUTSTVA ZA ELEKTRIČNE ALATE.3
5.1 Radna oblast 3
5.2 Električna bezbednost....3
5.3 Lična bezbednost....4
5.4 Korišćenje i održavanje električnog alata ....4
5.5 Servisiranje 4
6 DODATNE BEZBEDNOSNE INFORMACIJE ....5
7 PRE SVAKE UPOTREBE 6
8 MONTAŽA 6
9 RAD 7
9.1 Isprekidan rad 8
9.2 Preoptecenje (samo za POWX901-POWX902-POWX903)....8
9.3 Rad sa dvostrukim užetom (Sl. 5)....8
10 ČIŠĆENJE I ODRŽAVANJE 8
11 TEHNIČKI PODACI 9
12 BUKA....9
13 REŠAVANJE PROBLEMA 10
14 GARANCIJA....11
15 ŽIVOTNA SREDINA....11
16 IZJAVA O USKLAĐENOSTI....12
ELEKTRIČNO VITLO SA UŽETOM POWX900
1 NAMENJENA UPOTREBA
Ovo električno vitlo sa užetom se koristi za dizanje i spuštanje tereta. Ono je idealan uređaj za podizanje tokom radova na enterijeru, na gradilištu, u radionicama za popravku itd. Nije pogodno za profesionalnu upotrebu.

16/06/2022, Lier - Belgium
16/06/2022, Lier - Belgium
1 ZAMÝŠL'ANÉ POUŽITIE 2
2 POPIS (OBR. A) 2
3 OBSAH BALENIA 2
4 SYMBOLY 3
5 VŠEOBECNÉ BEZPEČNOSTNÉ VAROVANIA PRE ELEKTRICKÉ NÁRADIE....3
5.1 Pracovná plocha 3
5.2 Elektrická bezpečnost 3
5.3 Osobná bezpečnost......4
5.4 Používanie elektrického náradia a starostlivost' oň....4
5.5 Servis....5
6 ŠPECIÁLNE BEZPEČNOSTNÉ INFORMÁCIE....5
7 PRED KAŽDÝM POUŽITÍM 6
8 INSTALÁCIA 6
9 PREVÁDZKA....7
9.1 Prerušovaná prevádzka 8
9.2 Pretaženie (iba pre POWX901-POWX902-POWX903) 8
9.3 Prevádzka s dvojitým lanom (obr. 5)....8
10 ČISTENIE A ÚDRŽBA 8
11 TECHNICKÉ ÚDAJE......9
12 HLUK 9
13 RIEŠENIE PROBLÉMOV....9
14 ZÁRUKA....10
15 ŽIVOTNÉ PROSTREDIE....11
16 VYHLÁSENIE O ZHODE 11
ELEKTRICKÝ LANOVÝ ZDVIHÁK POWX900
1 ZAMÝŠL'ANÉ POUŽITIE
16/06/2022, Lier - Belgium
16/06/2022, Lier - Belgium
16/06/2022, Lier - Belgium
16/06/2022, Lier - Belgium
natural_image
Yellow PowerPlus robotic device with attached cable and power plug (no visible text or symbols)varo
WWW.VARO.COM
DESIGNED AND MARKETED BY VARO
©copyright by varo
VARO - VIC. VAN ROMPUY nv
JOSEPH VAN INSTRAAT 9 - 2500 LIER - BELGIUM

- ELEKTRISCHE TAKEL POWX900
- BEOOGD GEBRUIK
- BESCHRIJVING (FIG. A)
- Régime intermittent
- DÉCLARATION DE CONFORMITÉ
- C ∈
- ELECTRIC CABLE HOIST POWX900
- INTENDED USE
- DESCRIPTION (FIG. A)
- PACKAGE CONTENT LIST
- SYMBOLS
- GENERAL POWER TOOL SAFETY WARNINGS
- Working area
- Electrical safety
- Personal safety
- Power tool use and care
- Service
- EXTRA SAFTY INFORMATION
- ATTENTION! Never use the machine to transport persons or animals!
- Never stand or work under a hoisted load.
- BEFORE EVERY USE
- POWX900 EN
- INSTALLATION
- OPERATION
- Attention! If the cable has been unwound to the point where the red micro switch is visible, the cable hoist must be stopped. Under no circumstances should the cable be unwound past this point'
- Intermittent rating
- Overload (Only for POWX901-POWX902-POWX903)
- Attention! In case of direct exposure to sunlight, the temperature of the casing will increase significantly, which will also decrease the permissible operating time. It is therefore possible that the temperature switch will
- Operation with double cable (Fig 5)
- CLEANING AND MAINTENANCE
- NOISE
- WARRANTY
- ENVIRONMENT
- KABELSPIL POWX900
- TILSIGTET BRUG
- ELVINSCH POWX900
- AVSEDD ANVÄNDNING
- FÖRPACKNINGSINNEHÅLL
- ELEKTRIČNA DIZALICA SA ČELIČNIM UŽETOM POWX900
- NAMJENA
- OPIS (SL. A)
- POPIS SADRŽAJA PAKETA
- ELEKTRIČNO VITLO SA UŽETOM POWX900
- NAMENJENA UPOTREBA
- ELEKTRICKÝ LANOVÝ ZDVIHÁK POWX900
- ZAMÝŠL'ANÉ POUŽITIE
Brand : PowerPlus
Model : POWX900
Category : Hoist