
ELKESS-100L - Boiler Aquamarin - Free user manual and instructions
Find the device manual for free ELKESS-100L Aquamarin in PDF.

| Product type | Electric storage water heater |
| Brand | Aquamarin |
| Model | ELKESS-100L |
| Capacity | 100 liters |
| Power supply voltage | 220-240 V~ |
| Rated power | 1500 W |
| Maximum working pressure | 0.8 MPa (8 bar) |
| Frequency | 50 Hz |
| Maximum water temperature | 75 °C |
| Thermal efficiency | >90% |
| Protection rating | IPX4 |
| Tank material | Sapphire silicon stainless steel |
| Heat retention | Up to 48 hours |
| Safety valve | Included, one-way (0.8 MPa) |
| Connection | BSP 1/2 inch |
| Mounting type | Wall-mounted, with expansion bolts |
| Minimum installation distance | 200 mm from floor or ceiling |
| Maintenance space | 50 cm around the appliance |
| Included accessories | 2 expansion bolts, safety valve, manual |
| Safety functions | Overheating protection, thermal cutoff, safety valve |
| Recommended maintenance | Regular draining, descaling, valve check |
| Common spare parts | Safety valve, heating element, seals |
| Warranty | Consult the manufacturer |
Frequently Asked Questions - ELKESS-100L Aquamarin
User questions about ELKESS-100L Aquamarin
0 question about this device. Answer the ones you know or ask your own.
Ask a new question about this device
Download the instructions for your Boiler in PDF format for free! Find your manual ELKESS-100L - Aquamarin and take your electronic device back in hand. On this page are published all the documents necessary for the use of your device. ELKESS-100L by Aquamarin.
USER MANUAL ELKESS-100L Aquamarin
natural_image
Front view of a rectangular appliance with a circular emblem on the top and a small base (no text or symbols visible)DEAR CUSTOMER,
Thank you for choosing our product. Please read this manual carefully before assembling or using the product to avoid damage caused by improper use. Please pay special attention to the safety instructions. If the product is passed on to third parties, this manual has to be passed on along with the product.
ESTIMADO CLIENTE,
natural_image
Simple line drawing of a trash bin with crossed lines indicating no waste or discharge (no text or symbols)CARACTÉRISTIQUES DU PRODUIT
STRUCTURE DU PRODUIT
natural_image
Symbol of a trash bin crossed with diagonal lines, representing waste sorting or disposal (no text or labels)| Symptom Cause Solution | ||
| Indicator light does not light up | 1. The Power source not connected2. Indicator damaged3. The overheating sensor activated | Get the professional technician to check the electrical wiring and indicators |
| Water Temperature not warm enough | 1. The element is defective2. Temperature controller malfunction3. No power to water heater | 1. Replace the element2. Call customer service for repair3. Check power supply |
| No water from the warm water tap | 1. Main water valve not turn on | 2. Turn on the main water |
| Water leakage 1. Leaking from plumbing connection2. Leaking at gasket | 1. Tighten the connection2. Tighten the element or replace the gasket | |
| Electrical mains tripped 1. Element short circuit 1. Replace element | ||
SECURITY CHARACTERISTICS
The max inlet pressure is 0.8Mpa.
- Following warning sentences:
If the supply cord is damaged it must be replaced by the manufacturerer, its service agent or similarly qualified persons in order to avoid a hazard.
- The pressure-relief device is to be operated regularly to remove lime deposits and to verify that is not blocked
- CAUTION: In order to avoid a hazard due to inadvertent resetting of the thermal cut-out, this appliance must be not supplied through an external switching device, such as a timer, or connected to a circuit that is regularly switched on and off by the utility.
- This appliance can be used by children aged from 8 years and above and persons with reduced physic sensory or mental capabilities or lack of experience and knowledge if they have been given supervision instruction concerning use of the appliance in a sate way and understand the hazard involved. Children shall not play with the appliance, cleaning and users maintenance shall not made by children without supervision.
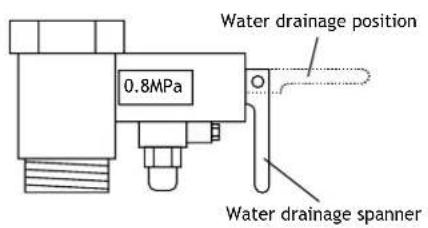
- This electrical water heater must be installed with a mono-directional safety vale at the inlet pipe (blue indicator) when the tank's pressure is over 0.8MPa. This will automatically activate the safety valve. Water will exit at the drain pipe outlet (Diagram 1). In any condition, this outlet must not be blocked.
If there is a need to empty the water in the tank, first close the mains water. Remove the fixed screw nail on the safety valve. Lift up the plastic handle (see Diagram 2) to let the water flow out naturally.
MAINTENANCE
- All maintenance operation must be carried out by a qualified personnel.
- Before contacting the customer service, make sure the suspected failure is not caused by a temporary lack of water.
- To discharge the water completely from the tank, remove the safety valve from the water heater. Before removing the valve, the power of the heater needs to be switched off for the tank to cool down (outlet connection must also be disconnected).
EN
ELECTRICAL CONNECTION
- The electrical connection must be done by a qualified electrician.
- The electrical supply is connected directly to the connector provided with the earth connection. The ground wire must be green/yellow in color and attached to the terminal marked by the symbol (see the symbol in manuals).
- The heater must be connected to the electricity supply that out of reach from the person using the shower.
- All wiring must conform to local requirements. If in doubt, please consult a qualified electrician.
Note: The installation should be completed by a suitably qualified person.
The installation should be completed by a suitably qualified person. All plumbing connections must be completed before making the electrical connec-tions. Fill the tank with water and turn on the tap to let the water exiting out from the tank until all the air has been wxpelled out. Switch electricity on after water tank is full of water.
- This appliance can be used by children aged from 8 years and above and persons with reduced physical, sensory or mental capabilities or lack of experience and knowledge if they have been given supervision or instruction concerning use of the appliance in a safe way and understand the hazards involved. Children shall not play with the appliance. Cleaning and user maintenance shall not be made by children without supervision.
- If the supply cord is damaged, it must be replaced by the manufacturer, its service agent or similarly qualified persons in order to avoid a hazard.
- The water may drip from the discharge pipe of the pressure-relief device and that this pipe must be left open to the atmosphere.
- The pressure-relief device is to be operated regularly to remove lime deposits and to verify that it is not blocked.
- A discharge pipe connected to the pressure-relief device is to be installed in a continuously downward direction and in a frost-free environment.
EN
Diagram 5
EN
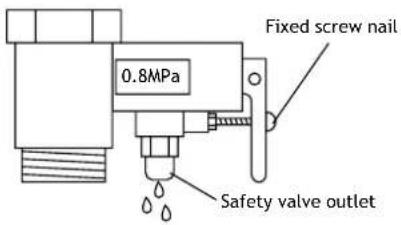
Diagram 1 Diagram 2
- Check all the piping connection for leakage before turning on the electric power of the heater.
- Make sure that the tank is fully filled up with water, otherwise it will cause the heating elements to be damaged.
- Turn on the mains electrical power supply and then adjust the temperature knob clockwise for higher temperature and anti-clockwise for lower temperature.
- The water heater needs to be turn on for a certain period of time to reach the acceptable temperature.
- During the heating process, it's normal to see a slight drip at the safety valve. Please do not cover up the safety valve outlet hole.
- Connect this outlet hole to a discharge pipe. Water may drip from the discharge pipe of the safety valve, tehrefore this pipe must be exposed to the atmosphere.
- The safety valve is to be operated regularly (preferably at least every six months) to remove lime deposit and to ensure that it is not blocked.
THE PRODUCT FEATURES
- Unique profile
- Sapphire golden silicon tank which is rust-proof, erosion-proof and with higher efficiency and having a longer life span.
- Energy saving with minimum heat loss. The water temperature is able to be maintained up to 48 hours after the electricity is switched off.
- Rate power heating: 1500W.
EN
TECHNICAL REFERENCE DATA
| Rated Volume 30L, 40L, 50L, 60L, 70L, 80L, 100L | |||
| Rated Voltage 220-240 V ~ Rated Power 1500 W | |||
| Rated Pressure 0.8 MPa Rated Frequency 50 Hz | |||
| Rated Water Temperature | 75 °C Heating Efficiency >90% | ||
| Water-proof Degree IPX4 Structure | Mode Hermetically closed typed water storage style | ||
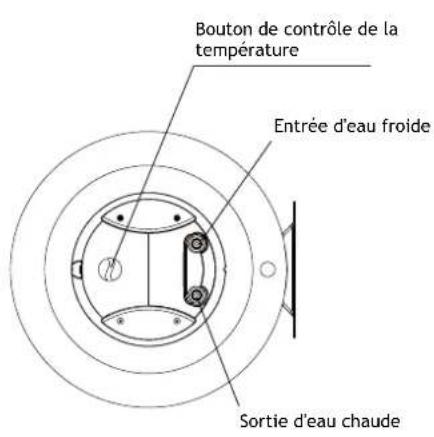
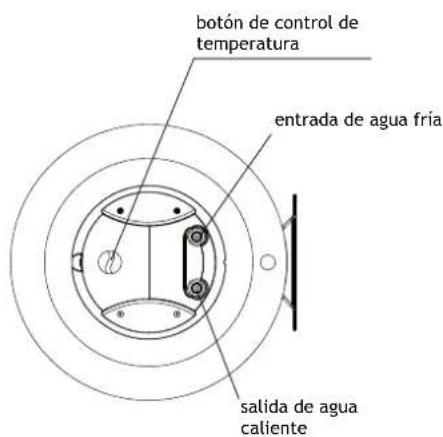
PRODUCT STRUCTURE
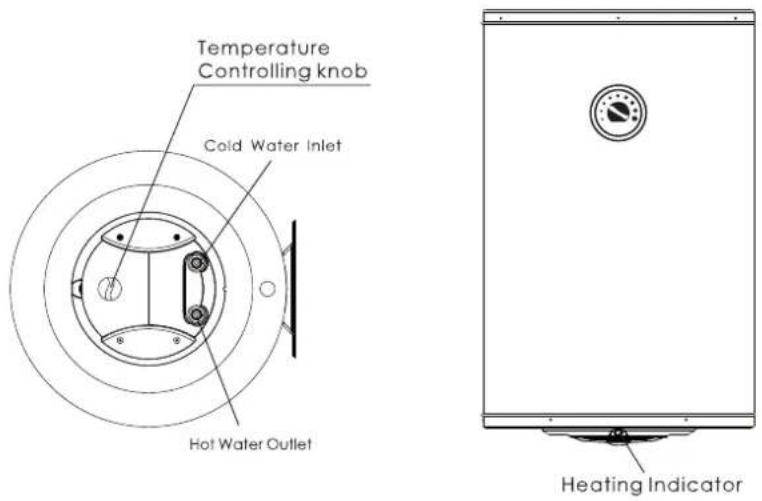
Diagram 3
INSTALLATION INSTRUCTIONS
- The installation for electrical and plumbing work must be carried out by qualified personnel, according to the installation instructions and in compliance to the local authority regulations.
- Unit has to be installed as near as possible to the service points, in order to reduce heat loss along the pipes. To facilitate maintenance, allow a distance of 50cm for easy access to the electrical parts.
EN
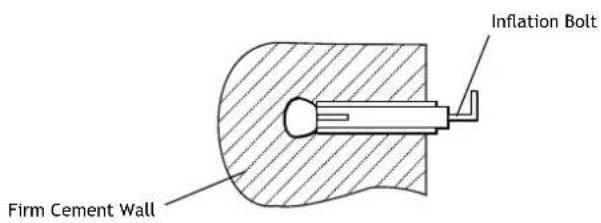
- This electrical water heater should be mounted on a solid cement wall, preferably where it is close to the power source's sockets and water source.
- Please use our company's fitted accessories to mount this electric water heater.
- Before determining the bolt hole's position, you should ensure that the heater is more than 200mm from the ground or ceiling board. This will leave space for maintenance when necessary.
- Assembling method: After selecting the proper fixing positions, use the inflating bolt to secure the naging board firmly, then hook the electric water heater.
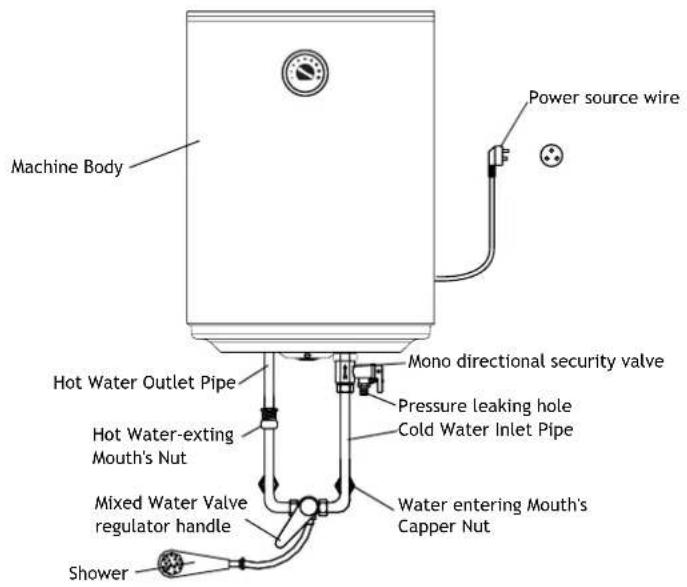
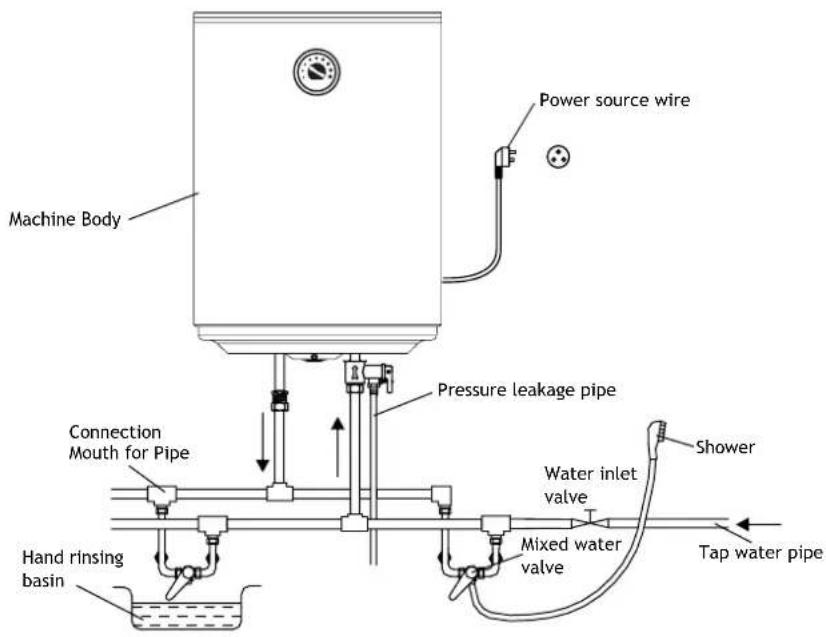
PIPE CONNECTION
- All piping parts are BSP 1/2". Wind some white tape at the thread sector of the inlet pipe (marked blue).
- Fix the safety valve to the inlet pipe and then connect it to the cold water pipe of the mains.
- Install a water drainpipe to the safety valve to drain away water discharge. (drain pipe joint outlet - diagram 5).
- Install the drainpipe in a continuously downward direction and in a frost free environment.
- Connect the hot water pipe (market red) to the outlet pipe.
- Do not over-tighten the safety valve and all pipes joint as it may cause damage to he joints.
- Make sure all pipes are clean before installing the taps and showers.
ENVIRONMENTAL PROTECTION
natural_image
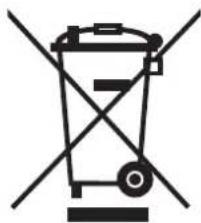
Pure electrical circuit lines without any symbolsPlease dispose of the unit, its accessories and packaging environmentally friendly and do not dispose of them with household garbage. Within the EU, this symbol indicates that this product may not be disposed of with household waste. This article contains valuable recyclable materials and should be fed to a recycling system to protect the environment and human health that could be damaged from uncontrolled waste disposal. Please dispose of the product
using appropriate collection systems or send the product for disposal to the place where you bought it. From there the product will then be delivered to recycling. Recycling alternative to returning the product: As an alternative to returning the item, the owner is obligated to contribute to the proper recycling in case of property disposal. To do so, the used appliance can also be handed over to a collection point which performs a disposal according to the national recycling management and waste law. To receive information regarding public collection points, please contact the responsible local authority.
Reference to our WEEE registration number: We have registered with the German registry Stiftung Elektro-Altgeräte Register (EAR Foundation), Nordostpark 72, 90411 Nürnberg as a manufacturer and distributor of electrical and / or electronic equipment under registration number (WEEE Reg. No. DE): DE 23337695.
EN
FF Europe E-Commerce GmbH
EC Declaration of Conformity
We Herewith declare,
that the following product complies with the appropriate basic safety and health requirement of the EC Directive based on its design and type, as brought into circulation by us. This declaration relates exclusively to the products in the state in which it was placed on the market and excludes components which are added and/or operations carried out subsequently by the final user. In case of alternation of the product, not agreed upon by us, this declaration will lose its validity.
Product description: Storage Electric Water Heater
Product type (Model): ELKESS-30L, ELKESS-50L, ELKESS-80L, ELKESS-100L,
ELKESS-30L-A, ELKESS-50L-A, ELKESS-80L-A, ELKESS-100L-A, ELKESS-30L-S,
ELKESS-50L-S, ELKESS-80L-S, ELKESS-100L-S
Rated Voltage: 220 - 240 V
Applicable EC directive:
• Electromagnetic Compatibility Directive (2014/30/EU)
• Low Voltage Directive (2014/35/EU)
Applicable harmonized standards:
• EN 55014-1:2017
• EN 55014-2:2015
• EN 61000-3-2:2014
• EN 61000-3-3:2013
• EN 60335-2-21:2003+A1:2005+A2:2008
• EN 60335-1:2012+A11:2014+A13:2017
• EN 62233:2008
Chief Executive Officer: Jürgen Röder
Authorized signature:
FF Europe E-Commerce GmbH
ESTRUCTURA DEL PRODUCTO
natural_image
Symbol of a trash bin crossed with diagonal lines, representing waste sorting or restriction (no text present)natural_image
Symbol of a trash bin crossed out by two diagonal lines (no text or labels)PRODUCT FICHE according to EU-Regulation No. 811&812-2013
Packaging details: This item is shipped in 1 package
Produced for: FF Europe E-Commerce GmbH, Dr.-Robert-Murjahn-Str. 7, 64372 Ober-Ramstadt / Germany