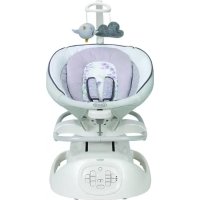
Sway2Me - Baby swing GRACO - Free user manual and instructions
Find the device manual for free Sway2Me GRACO in PDF.

| Product Type | Baby Swing and Portable Bouncer Seat |
| Brand | Graco |
| Model | Sway2Me |
| Maximum weight (swing mode) | 11 kg (25 lb) |
| Maximum weight (bouncer mode) | 8 kg (18 lb) |
| Maximum height (swing mode) | 76.2 cm (30 in) |
| Maximum height (bouncer mode) | 68.2 cm (27 in) |
| Recommended age (swing) | Up to approximately 9 months or 11 kg |
| Recommended age (bouncer) | Until child attempts to sit up or 8 kg |
| Power | 3 AA batteries (LR6-1.5 V) or AC adapter (wall plug included) |
| Swing speeds | 6 adjustable speeds |
| Vibration | Yes, 3 levels: Low/Off/High |
| Music and nature sounds | Yes, multiple melodies and sounds, adjustable volume (6 levels) |
| Timer | Yes, adjustable |
| Favorite function | Yes, saves a sequence (swing, sounds, timer) |
| Restraint system | Adjustable 3-point harness |
| Seat recline | 2 positions: full recline (up to 4 months) and more upright position |
| Seat positions (swing) | 3 positions (facing you, facing forward, etc.) |
| Cushion cleaning | Machine washable per label, do not use bleach |
| Frame cleaning | Mild soap and warm water, no bleach or harsh detergent |
| Replacement parts | Contact Graco customer service |
| Certifications | FCC Part 15, ICES-3 (B) |
Frequently Asked Questions - Sway2Me GRACO
User questions about Sway2Me GRACO
0 question about this device. Answer the ones you know or ask your own.
Ask a new question about this device
Download the instructions for your Baby swing in PDF format for free! Find your manual Sway2Me - GRACO and take your electronic device back in hand. On this page are published all the documents necessary for the use of your device. Sway2Me by GRACO.
USER MANUAL Sway2Me GRACO
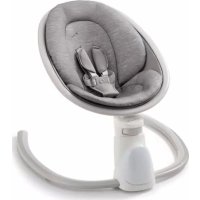
Sway2Me™ Swing with Portable Bouncer
5-C Product Registration (USA)
Prevent serious injury or death: Failure to follow these warnings and the assembly instructions could result in serious injury or death.
- PLEASE SAVE OWNER'S MANUAL FOR FUTURE USE.
- THIS PRODUCT REQUIRES ADULT ASSEMBLY. Follow assembly instructions carefully. If you experience any difficulties, please contact the Customer Service Department.
STRANGULATION HAZARD:
- DO NOT suspend strings over the product or attach strings to toys.
- DO NOT place product in any location where there are cords, such as window blind cords, drapes, phone cords, etc.
- Strings can cause strangulation. DO NOT place items with a string around your child's neck, such as hood strings or pacifier cords.
• DO NOT USE THIS PRODUCT if it is damaged or broken.
SWING MODE:
FALL and STRANGULATION
HAZARDS: Infants have suffered head injuries falling from swings and have strangled in straps.
• ALWAYS use restraints. Adjust to fit snugly.
- STOP using product when infant attempts to climb out (approximately 9 months) or reaches 25 lb (11 kg), whichever comes first.
- Stay near and watch infant during use. This product is not safe for sleep or unsupervised use. If infant falls asleep, remove infant as soon as possible and place infant on a firm, flat sleep surface such as a crib or bassinet.
- Never carry swing with infant in it.
SUFFOCATION HAZARDS: Young infants have limited head and neck control. If the seat is too upright, infant's head can drop forward and compress the airway.
- ALWAYS keep swing seat fully reclined until infant is at least 4 months old AND can hold up head without help.
WARNING
BOUNCER/CARRIER MODE:
- READ ALL INSTRUCTIONS BEFORE ASSEMBLY AND USE OF THIS PRODUCT.
- PLEASE SAVE OWNER'S MANUAL FOR FUTURE USE.
FALL HAZARD:
Babies have suffered skull fractures falling while in and from bouncers.
• Use bouncer ONLY on floor.
• ALWAYS use restraints and adjust to fit snugly at all times.
- Child's movement can slide product. Use only on floor. Never place product near edges of counter tops, tables or other elevated surfaces.
STRANGULATION HAZARD:
• Children have STRANGLED in loose or partially buckled harness straps. Fully restrain the child at all times.
SUFFOCATION HAZARD: Babies have suffocated: When product was placed on a soft surface and tipped over and/or when used as a sleep product.
- NEVER place product on beds, sofas, cushions or other soft surfaces.
- Stay near and watch infant during use. This product is not safe for sleep or unsupervised use. If infant falls asleep, remove infant as soon as possible and place infant on a firm, flat sleep surface such as a crib or bassinet.
To prevent falls and suffocation:
• ALWAYS use restraints and adjust to fit snugly at all times.
- STOP using bouncer when baby starts trying to sit up or has reached 18 lb (8 kg), whichever comes first.
- DO NOT place product near water and moisture. Do not use the product near possible wet areas, such as a bathtub, shower, wash basin, sink, laundry tub, swimming pool, wet basement, etc.
- NEVER use this product as a means to transport an infant in a motor vehicle.
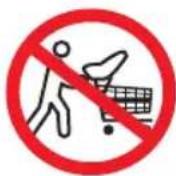
- FALL HAZARD:
The carrier can fall from the shopping cart. Do not use on shopping cart.
• Maximum recommended height is 27 inches (68.2 cm) and weight is 18 lb (8 kg).
WARNING
FOR SAFE BATTERY USE:
Keep the batteries out of children's reach.
Any battery may leak battery acid if mixed with a different battery type, if inserted incorrectly (put in backwards) or if all batteries are not replaced at the same time.
Discard leaky batteries immediately. When discarding batteries, be sure to dispose of them in the proper manner, according to your state and local regulations.
To prevent battery leaks, which can burn skin and eyes:
• Always replace the entire set of batteries at one time.
- Never mix old and new batteries, or batteries of different brands or types.
- Remove batteries when storing product for a long time.
- Dispose of used batteries immediately.
Recommended type batteries—alkaline disposables,3-AA (LR6-1.5V). Change batteries when product ceases to operate satisfactorily.
WARNING
Changes or modifications to this unit not expressly approved by the party responsible for compliance could void the user authority to operate the equipment.
This device complies with part 15 of the FCC Rules. Operation is subject to the following two conditions: (1) This device may not cause harmful interference, and (2) this device must accept any interference received, including interference that may cause undesired operation.
NOTE: This equipment has been tested and found to comply with the limits for a Class B digital device, pursuant to Part 15 of the FCC Rules. These limits are designed to provide reasonable protection against harmful interference in a residential installation. This equipment generates, uses and can radiate radio frequency energy and, if not installed and used in accordance with the instructions, may cause harmful interference to radio communications.
However, there is no guarantee that interference will not occur in a particular installation. If this equipment does cause harmful interference to radio or television reception, which can be determined by turning the equipment off and on, the user is encouraged to try to correct the interference by one or more of the following measures:
- Reorient or relocate the receiving antenna.
- Increase the separation between the equipment and receiver.
- Connect the equipment into an outlet on a circuit different from that to which the receiver is needed.
- Consult the dealer or an experienced radio/TV technician for help.
This Class B digital apparatus meets all requirements of the Canadian Interference-Causing Equipment Regulations. CAN ICES-3 (B) /NMB-3 (B).
▲MISE EN GARDE
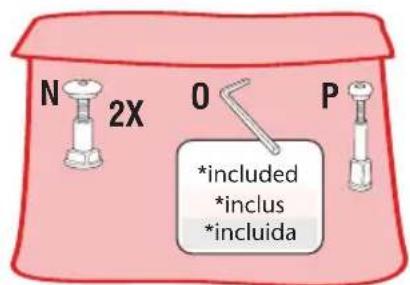
Check that you have all the parts for this model BEFORE assembling your product. If any parts are missing, call Customer Service.
Tools required:
Allen Wrench*
natural_image
Simple line drawing of a curved pipe or tube with a labeled point 'E' (no text or symbols on the diagram itself)
Styles may vary Les styles peuvent varier Los estilos pueden variar
text_image
N 2X O P *included *inclus *incluida* Red bag contains hardware, do not discard * La bolsa roja contiene las herramientas, no la deseche
2-B Features on Certain Models
DO NOT use any other accessories with this product.
Only use this body support on this swing. Never use this body support on any other product.
natural_image
Diagram of a medical device with internal organs and highlighted red areas (no text or labels)Only use harness covers on this swing. Never use harness covers on any other product.
• Swing Mode: (3 Positions)
25 lb (11 kg) 30 inches (76.2 cm)
natural_image
Line drawing of a mechanical device with a top-mounted sensor and base mount (no text or symbols)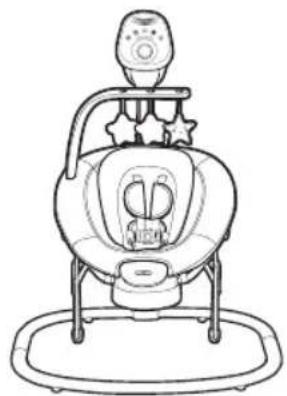
natural_image
Line drawing of a futuristic scientific instrument with a central body and surrounding components (no text or symbols)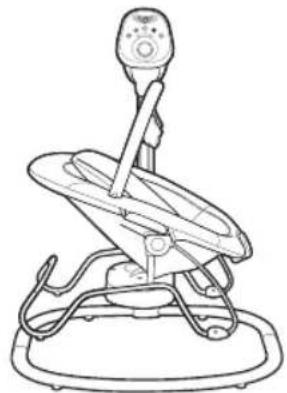
natural_image
Line drawing of a desktop microphone with stand and keyboard (no text or symbols)Bouncer Mode: 18 lb (8 kg) 27 inches (68.2 cm)
natural_image
Line drawing of a baby car seat with star decorations (no text or symbols)3-A Assembling Bouncer Legs
natural_image
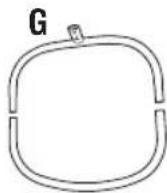
Simple line drawing of a coiled or braided object with three curved ends, enclosed in a rounded square frame (no text or symbols)3-BSeatAssembly
natural_image
Technical diagram of a car interior showing steering wheel, dashboard, and seatbelt mechanism (no text or labels)- Attach two long webbing straps to frame by inserting in slots.
- Fixer deux longues sangles au cadre en les insérant dans les fentes.
-
Conecte las dos correas tejidas largas al armazón insertándolas en las ranuras.
-
Slide top of frame into top seat fabric. DO NOT attach snaps on seat pad.
- Faire glisser le haut du cadre dans le tissu supérieur du siège. NE PAS fixer les boutons-pression du coussin de siège.
- Deslice la parte superior del armazón en la tela superior del asiento. NO sujete los broches de la almohadilla del asiento.
- Attach center straps to seat mount by inserting into slots.
- Fixer les sangles centrales au support du siège en les insérant dans les fentes.
- Conecte las correas centrales al montante del asiento insertándolas en las ranuras.
- Wrap bottom of seat pad around frame. DO NOT attach snaps on seat pad
- Enrouler le bas du coussin de siège autour du cadre. NE PAS fixer les boutons-pression du coussin de siège.
- Envuelva la parte inferior de la almohadilla del asiento alrededor del armazón. NO sujete los broches de la almohadilla del asiento.
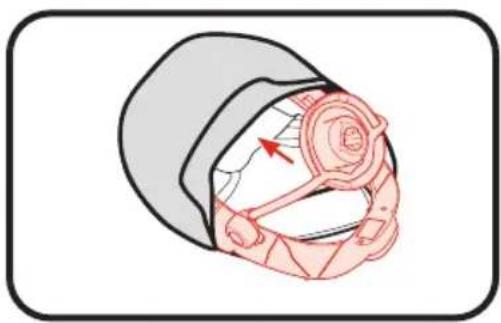
natural_image
Illustration of a medical device with a red arrow pointing to a circular component (no text or symbols)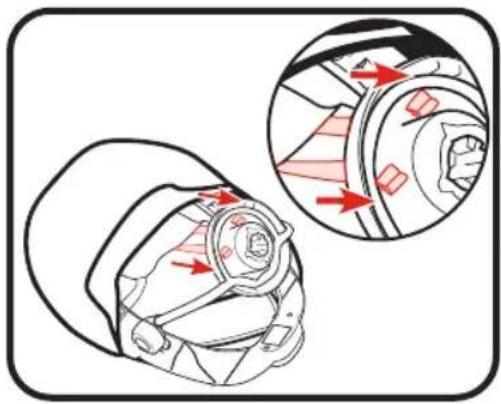
natural_image
Technical illustration of a helmet assembly with red arrows indicating motion or force direction (no text or symbols)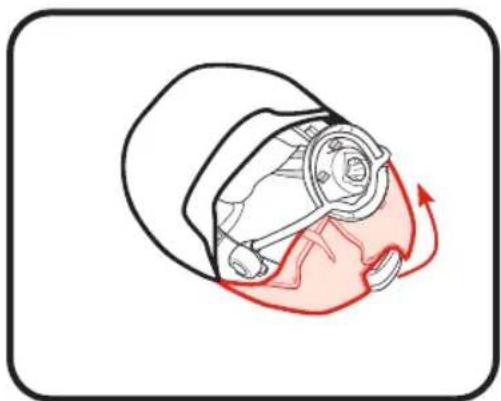
natural_image
Diagram of a mechanical component with red motion arrows indicating movement or force (no text or symbols)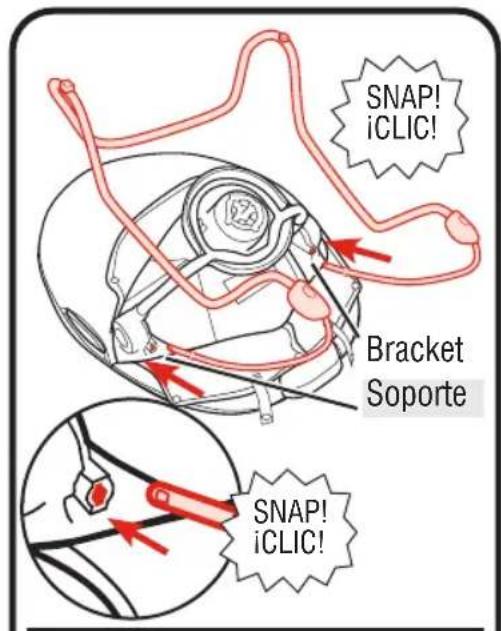
text_image
SNAP! iCLIC! Bracket Soporte SNAP! iCLIC!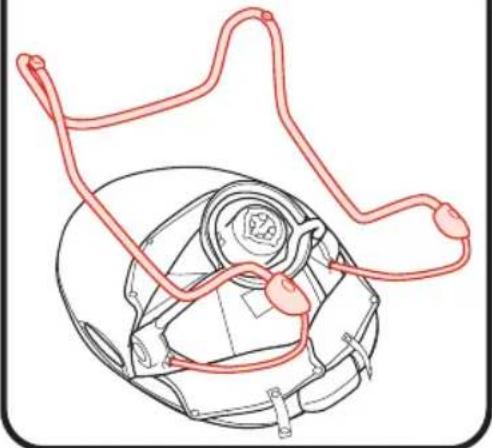
natural_image
Technical line drawing of a helmet with red wiring, no text or symbols present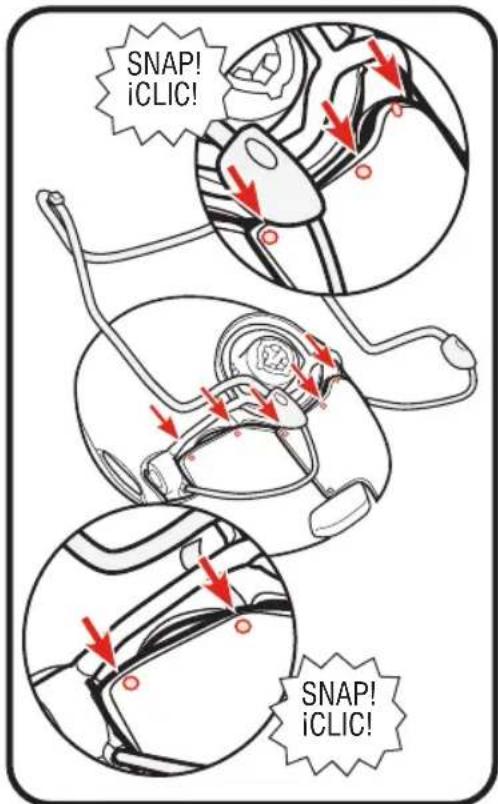
text_image
SNAP! iCLIC! SNAP! iCLIC!- Insert leg tube (C) (D) into holes in leg bracket.
CHECK legs are attached by pulling on them.
text_image
Diagram illustrating car wheel steering and steering maneuver with red arrows indicating rotational direction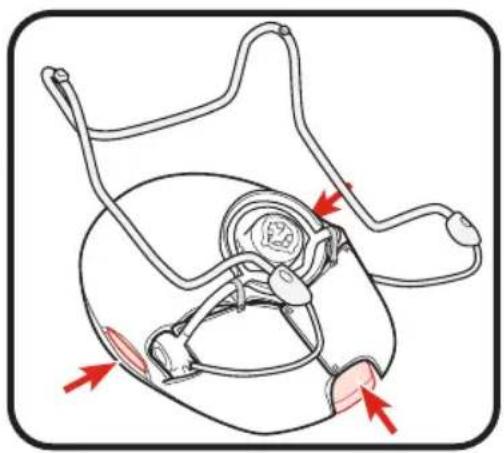
natural_image
Diagram of a medical device with red arrows indicating directional movement or force points (no text or labels)natural_image
Diagram showing a red curved tube inserted into a car body with a small circular mark at the base (no text or symbols)natural_image
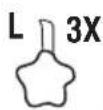
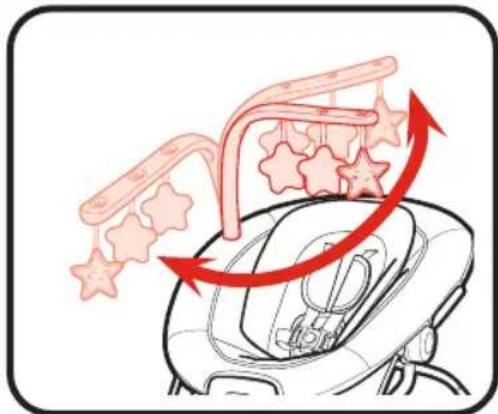
Illustration of a hand using a tool to lift three pink star-shaped objects on a vehicle (no text or symbols)-
Attach toys (L) as shown.
-
Installer les jouets (L), tel qu'illustré.
-
Instale los juguetes (L) como se indica.
natural_image
Illustration of a baby car interior with arrows indicating movement or flow, surrounded by star patterns (no text or symbols)natural_image
Illustration of a medical or laboratory device with a vertical rod inserted into a basin, showing fluid flow direction (no text or symbols)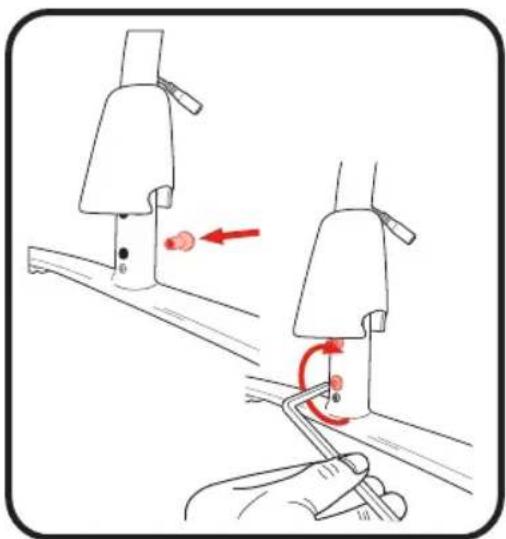
natural_image
Illustration of a hand using a tool to adjust or install a mechanical component, with red arrows indicating motion direction (no text or symbols present)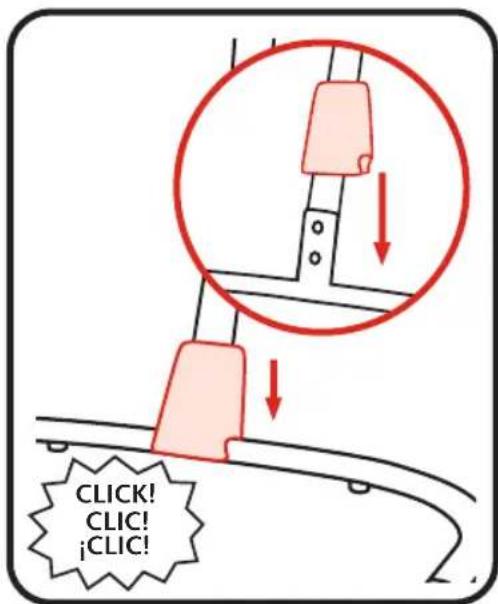
text_image
Medical illustration showing a catheter insertion procedure with labeled parts and directional arrows indicating movement.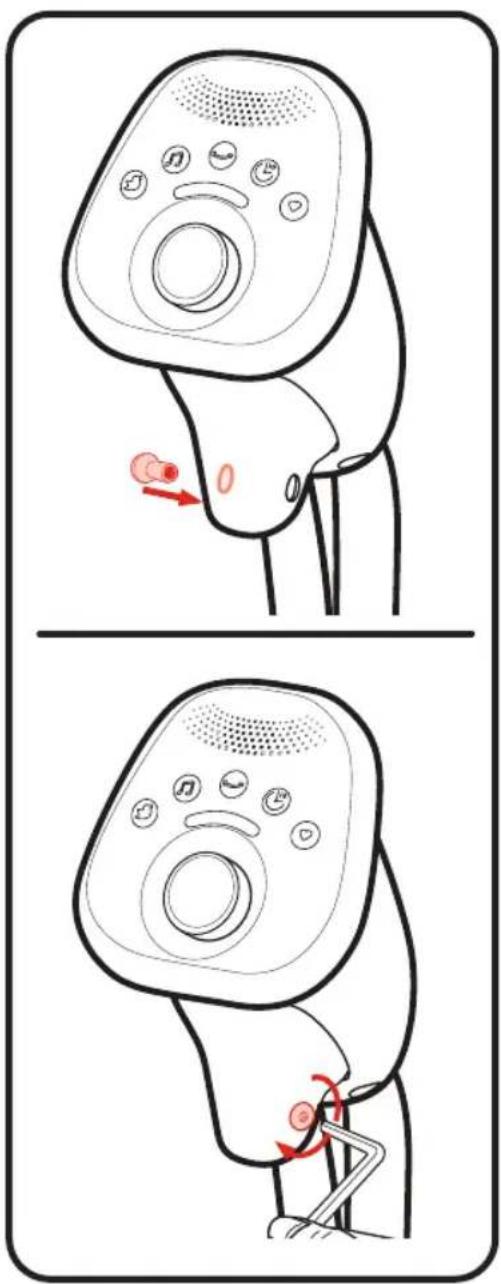
text_image
Diagram illustrating a medical procedure on a device with labeled parts and directional arrows indicating movement or force.
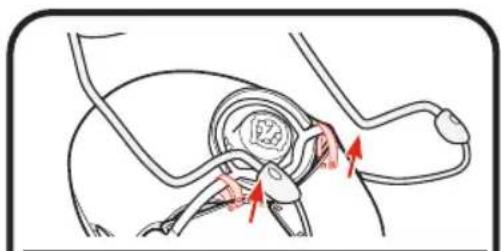
natural_image
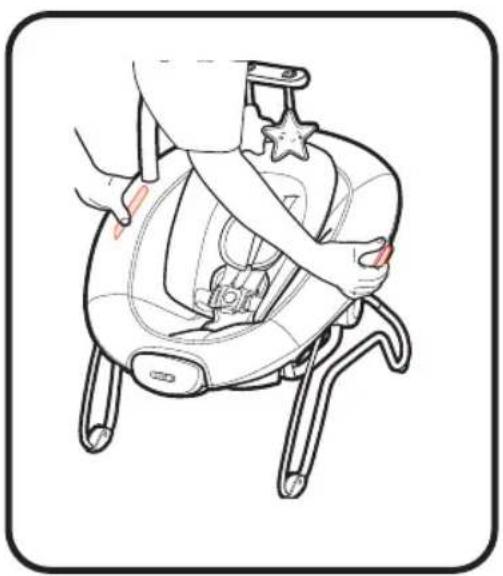
Line drawing of a desktop computer stand with a scroll wheel and base tray (no text or symbols)- Hold bouncer by handles and attach bouncer to mount in center of hanger tube.
CHECK to make sure the bouncer is properly placed into the swing base.
text_image
Diagram of a baby care device with a baby seat and pump, showing a red arrow indicating the insertion point.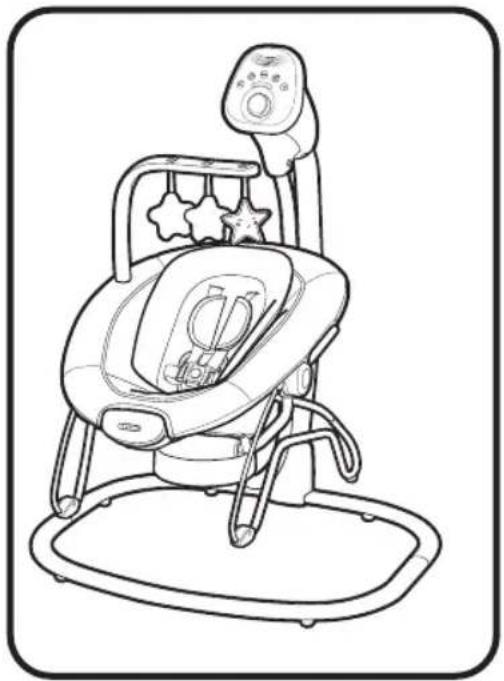
natural_image
Line drawing of a baby care chair with star-shaped buttons and a tray (no text or symbols)• Ensamblaje
3 Assembly Assemblage
4-A To Adjust Seat Positions
- Réglage de la position du siège
- Cómo ajustar la posición del asiento
natural_image
Illustration of a baby car seat with red motion arrows indicating movement (no text or symbols)To adjust seat position, rotate seat into 1 of 3 positions.
natural_image
Three line drawings of a baby car seat with a child, shown from different angles (no text or symbols)4-B To Adjust Recline (2 positions)
- Réglage de l'inclinaison (2 positions)
- Para ajustar la reclinación (2 posiciones)
ALWAYS use most reclined position until infant is at least 4 months old and can hold up head without help. Use the more upright position for older, more active infants.
Squeeze buttons on mount on sides of seat and rotate up or down.
natural_image
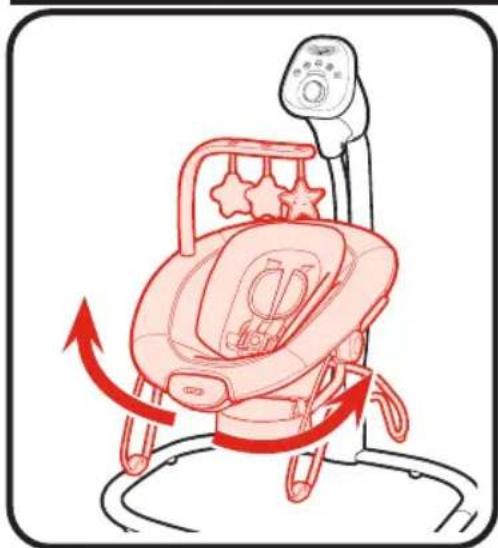
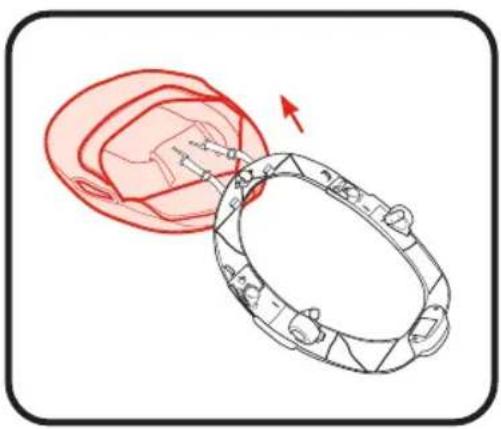
Illustration of a car seatbelt with a close-up inset showing the grip detail (no text or symbols)4-C To Remove Bouncer
natural_image
Illustration of a baby in a baby seat being adjusted for a device, with no text or symbols present.- Pick up seat to remove from swing.
- Soulever ensuite le siège pour le retirer de la balançoire.
- Levante el asiento para sacarlo del columpio.
natural_image
Line drawing of a person wearing a seatbelt and holding an object, with no visible text or symbols4-D • To Secure Child
Falling Hazard: Always use the seat belt.

MISE EN GARDE
text_image
Diagram illustrating a lock mechanism with red arrows indicating clockwise motion and directional arrows for movement or positioning.
text_image
Diagram illustrating four types of seatbelt buckle lock mechanism with red directional arrows indicating movement or force.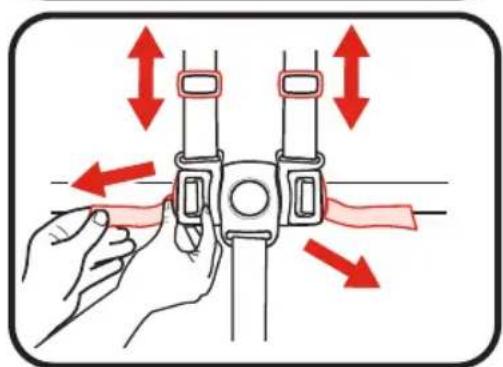
text_image
Diagram illustrating how to adjust a belt buckle, showing red directional arrows indicating movement or force.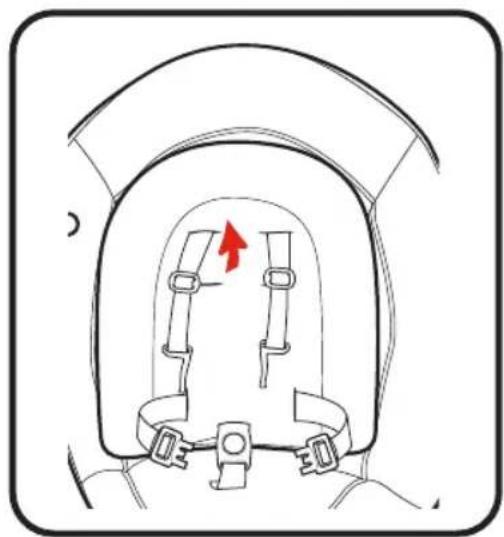
natural_image
Diagram of a car seatbelt with a red arrow indicating the seatbelt (no text or symbols present)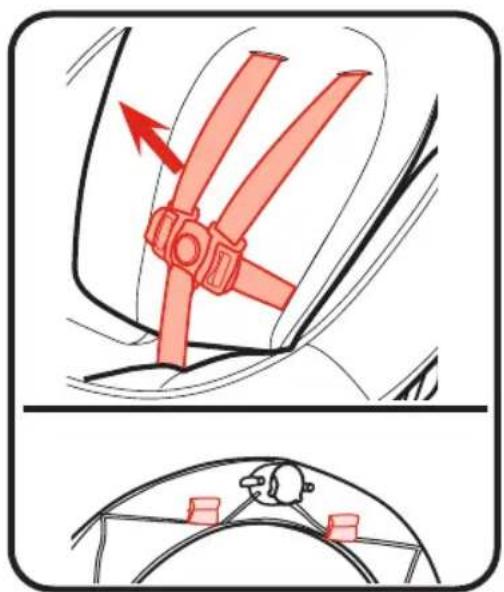
natural_image
Diagram showing a red propeller inside a car seat with directional arrows, and a small diagram of a person on a bridge (no text or symbols)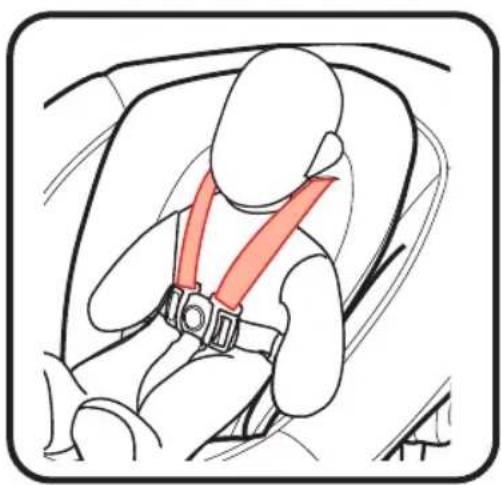
natural_image
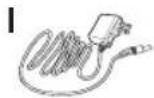
Illustration of a person wearing a car seatbelt, no text or symbols presentDO NOT place product near water and moisture. Do not use the product near possible wet areas, such as a bathtub, shower, wash basin, sink, laundry tub, swimming pool, wet basement, etc.
DO NOT use the AC adapter if it has been exposed to liquids, has been dropped, or is damaged.
Protect the power cord. Place it so it is not walked on or pinched by furniture or other items.
WARNING
Strangulation Hazard: Keep this cord out of the reach of children. DO NOT use with an extension cord. Use only power cord provided.
MISE EN GARDE
text_image
Diagram illustrating cable routing and charging process on a car seat, showing cable routing and charging steps with red arrows.4-F Swing Controls
- Commandes de la balançoire
- Controles del columpio

WARNING
avoid serious injury from falling or sliding out. Always use restraint system. After fastening buckles, adjust belts to get a snug fit around your infant.

MISE EN GARDE
natural_image
Diagram of a microfluidic device with labeled ports and a red arrow pointing to a central circular component (no text or symbols present)PRESS and RELEASE APPUYER et RELÂCHER PULSE y SUELTE
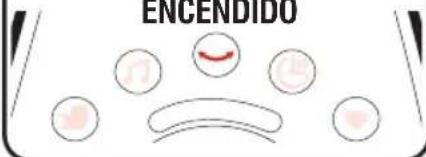
Main Power ON
• Alimentation principale EN MARCHE
- Interruptor principal
ENCENDIDO
text_image
ENCENDIDOTO TURN SWING ON: Press and release control knob to turn Main Power ON. Swing Button will illuminate BLUE.
POUR METTRE LA BALANÇOIRE EN
natural_image
Diagram of a microfluidic cell with labeled components and a red arrow pointing to the core (no text or symbols present)HOLD 2 seconds MAINTENIR 2 secondes MANTENGA PRESIONADO 2 segundos
Main Power OFF
• Alimentation principale COUPÉE
- Interruptor principal APAGADO
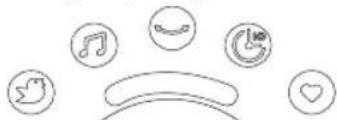
natural_image
Simple line drawings of a smiley face with musical notes, heart symbols, and a curved line (no text or labels)TO TURN SWING OFF: Press and HOLD control knob to turn Main Power OFF.
All buttons will turn off.
TO TURN SWING MOTION ON: While swing button is highlighted blue, rotate the dial clockwise to choose one of six swing speeds identified by indicator lights. Change setting if needed by moving the dial clockwise for faster speeds or counter-clockwise for slower.
POUR METTRE LE MOUVEMENT DE
TO TURN SWING MOTION OFF: Turn dial counter-clockwise until all indicator lights are off OR press and hold Swing button until all indicator lights are off.
Your seat may be stopped at any time the motor is running without damaging the motor.
POUR ÉTEINDRE LE MOUVEMENT DE
text_image
x1= x2= x3= x4= x5= x6=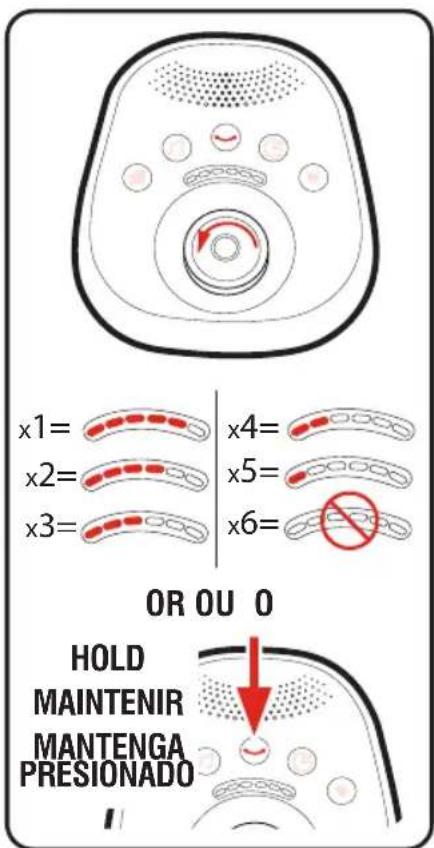
text_image
x1= x2= x3= x4= x5= x6= OR OU O HOLD MAINTENIR MANTENGA PRESIONADONature Sound Controls
natural_image
Diagram of a device with a red arrow pointing to a circular component (no text or symbols)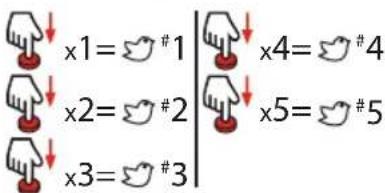
text_image
x1=#1 x4=#4 x2=#2 x5=#5 x3=#3TO TURN NATURE SOUNDS ON: Press Nature Sounds button as shown. Select next sound by pressing button again.
POUR ACTIVER LES BRUITS DE LA
natural_image
Diagram of a circular device with red and white arrows indicating rotation or direction (no text or symbols)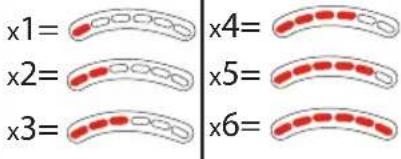
text_image
x1= x2= x3= x4= x5= x6=Rotate the dial clockwise to choose one of six volume levels identified by indicator lights. Change setting if needed by moving the dial clockwise for louder volume or counter-clockwise for lower.
TO TURN NATURE SOUNDS OFF: Turn dial counter-clockwise until all indicator lights are off OR press and hold Nature Sound button until icon turns off.
POUR DÉSACTIVER LES BRUITS DE LA
text_image
x1= x4= x2= x5= x3= x6= OR OU O HOLD MAINTENIR MANTENGA PRESIONADOMusic Controls
TO TURN MUSIC ON: Press Music button as shown. Select next song by pressing button again.
text_image
x1= ♪ #1 x2= ♪ #2 x3= ♪ #3 x4= ♪ #4 x5= ♪ #5 x6= ♪ #6 x7= ♪ #7 x8= ♪ #8 x9= ♪ #9 x10= ♪ #10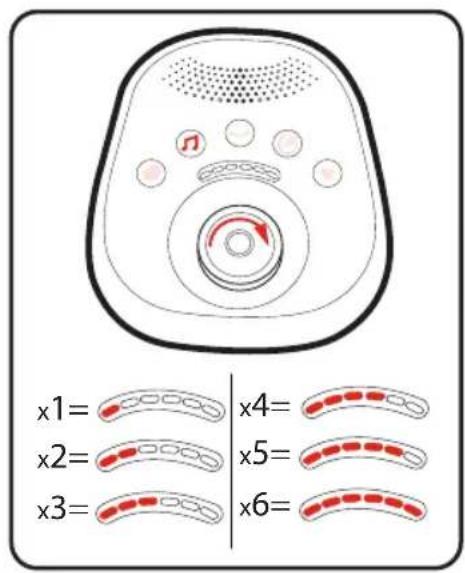
text_image
x1= x2= x3= x4= x5= x6=Rotate the dial clockwise to choose one of six volume levels identified by indicator lights. Change setting if needed by moving the dial clockwise for louder volume or counter-clockwise for lower.
text_image
x1= x2= x3= x4= x5= x6= OR OU O HOLD MAINTENIR MANTENGA PRESIONADOTO TURN MUSIC OFF: Turn dial counterclockwise until all indicator lights are off OR press and hold Music button until icon turns off.
TO USE TIMER: Press Timer button as shown.
POUR UTILISER LA MINUTERIE :
natural_image
Diagram of a device with a circular head and control knob, featuring a red arrow pointing to a circular component (no text or symbols present)Turn dial to choose desired amount of time as shown by indicator lights.
text_image
10m= 20m= 30m= 40m= 50m= 60m=FAVORITE: Press and hold Favorite button, once sequence is saved favorite button will turn off.
POUR ENREGISTRER LA SÉQUENCE
natural_image
Diagram of a biological cell with labeled organelles and a red oval highlight (no text or symbols present)You will know favorite is saved once indicator lights stops blinking and goes to current swing speed setting.
natural_image
Simple line drawing of a stylized eye face with no text or symbols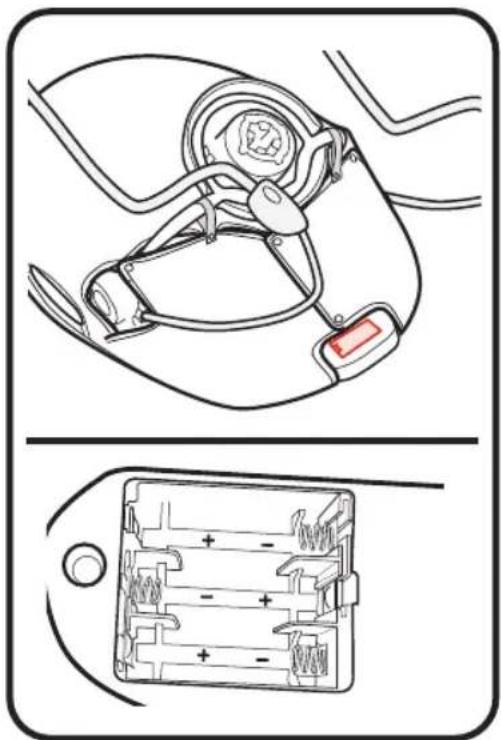
natural_image
Technical line drawing of a car interior showing steering wheel and battery pack (no text or symbols)
natural_image
Line drawing of a car seat assembly with no text or symbols4-HProblemSolving
- Speed setting too low.
- Baby grabbing swing legs. (Discontinue use.)
- Push swing to start.
SEAT DOESN'T SWING VERY HIGH:
- Control setting too low.
- Blanket hanging down, causing increased wind resistance.
- Baby too heavy or too active. (Discontinue use.)
- Soft carpet (swings higher on hard floors).
LA BALANÇOIRE NE FONCTONNE PAS :
5-A Care and Maintenance
- FROM TIME TO TIME CHECK YOUR SWING for loose screws, worn parts, torn material or stitching. Replace or repair the parts as needed. Use only Graco replacement parts.
- TO CLEAN SEAT PAD, refer to your care tag on your seat pad for washing instructions. NO BLEACH.
- TO CLEAN BODY SUPPORT, refer to your care tag on your seat pad for washing instructions. NO BLEACH.
- TO CLEAN FRAME, use only household soap and warm water. NO BLEACH OR DETERGENT.
- EXCESSIVE EXPOSURE TO SUN OR HEAT could cause fading or warping of parts.
text_image
Diagram illustrating a lock mechanism with red arrows indicating clockwise motion and directional arrows for movement or positioning.- To open, press button on buckle to release the waist straps.
- Pour ouvrir, appuyer sur le bouton de la boucle pour libérer les courroies abdominales.
- Para abrirlo, oprima el botón de la hebilla para liberar las correas de la cintura.
natural_image
Anatomical illustration of pelvic anatomy with red arrows indicating specific structures (no text or labels present)natural_image
Medical illustration showing a surgical procedure with red arrows indicating force or movement (no text or labels)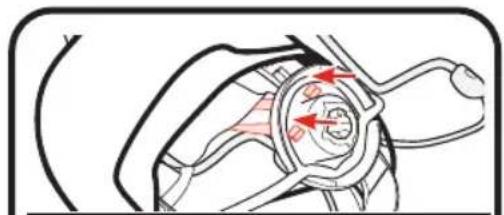
natural_image
Diagram of a mechanical component with red arrows indicating motion or force direction (no text or symbols)
natural_image
Technical diagram of a mechanical assembly with red arrows indicating motion or force directions (no text or symbols present)- Unthread the webbing straps from the seat frame.
- Détacher les sangles du cadre du siège.
-
Desabroche las correas de tejida del armazón del asiento.
-
Pull seat pad off of frame leaving shoulder harness attached to frame. REVERSE steps to reassemble.
- Retirer le coussin de siège du cadre en laissant le harnais attaché au cadre. INVERSER les étapes pour réinstaller.
- Saque la almohadilla del asiento del armazón, dejando las correas del arnés para los hombros conectadas al armazón. INVIERTA los pasos para volver a montarlo.
natural_image
Illustration of a hand holding a circular object with internal components, showing a red outline and arrow (no text or symbols)• Guidado
5 Care · Entretien
5-B Replacement Parts/Warranty Information (USA)
To purchase parts or accessories or for warranty information in the United States, please contact us at the following:
To purchase parts or accessories or for warranty information in Canada, please contact us at the following:
5-C Product Registration (USA)
To register your Graco product from within the U.S.A. visit us online at www.gracobaby.com/productregistration or return registration card provided with your product. We currently do not accept product registrations from those living outside the United States of America.