
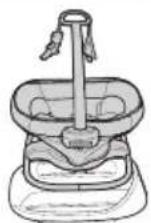
Sense2Soothe - Baby swing GRACO - Free user manual and instructions
Find the device manual for free Sense2Soothe GRACO in PDF.
| Product Type | Baby swing with removable cradle |
| Brand | Graco |
| Model | Sense2Soothe |
| Maximum child weight | 11.3 kg (25 lbs) in swing mode; 8.2 kg (18 lbs) in cradle mode |
| Maximum child height | 76.2 cm (30 in) in swing mode; 68.2 cm (27 in) in cradle mode |
| Power supply | AC adapter (wall outlet) |
| Swing speeds | 3 speeds |
| Swing directions | 4 directions (forward, backward, left, right) |
| Cry detection technology | Cry Detection™ with blue/green LED indicator |
| Operating modes | Graco Mode (8 automatic sequences) and Parent Mode (customizable) |
| Vibration | 3 settings: high, low, off |
| Sounds | 10 melodies, 4 nature sounds, white noise; 6 volume levels |
| Restraint system | 3-point harness with adjustable shoulder straps |
| Toy bar | Removable, with toys (models vary) |
| Care and cleaning | Washable seat pad (follow label); frame: mild soap and warm water; do not use bleach |
| Replacement parts | Available from Graco customer service |
| Warranty | Information in manual (USA/Canada) |
| Assembly | By adult, no tools needed |
| Safety | Always use harness; never leave unattended; stop at 9 months or 11.3 kg |
Frequently Asked Questions - Sense2Soothe GRACO
User questions about Sense2Soothe GRACO
0 question about this device. Answer the ones you know or ask your own.
Ask a new question about this device
Download the instructions for your Baby swing in PDF format for free! Find your manual Sense2Soothe - GRACO and take your electronic device back in hand. On this page are published all the documents necessary for the use of your device. Sense2Soothe by GRACO.
USER MANUAL Sense2Soothe GRACO
Prevent serious injury or death: Failure to follow these warnings and the assembly instructions could result in serious injury or death.
- READ ALL INSTRUCTIONS BEFORE USE OF THE PRODUCT.
- PLEASE SAVE OWNER'S MANUAL FOR FUTURE USE.
-
THIS PRODUCT REQUIRES ADULT ASSEMBLY. Follow assembly instructions carefully. If you experience any difficulties, please contact the Customer Service Department.
• TO PREVENT SERIOUS INJURY OR DEATH FROM INFANTS FALLING OR BEING STRANGLED IN STRAPS: -
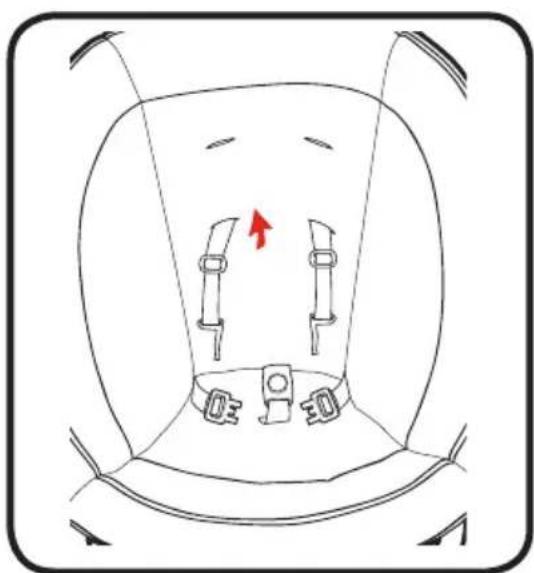
Always secure infant in the restraint system provided. After fastening buckles, adjust belts to get a snug fit around your infant.
• Never leave infant unattended in swing. - Never carry swing with infant in it.
- Discontinue use of swing when infant attempts to climb out (approximately 9 months) or reaches 25 lb (11.3 kg).
• Maximum recommended height is 30 inches (76.2 cm).
- Keep swing seat fully reclined until child is at least 4 months old AND can hold up head without help. Young infants have limited head and neck control. If seat is too upright, infant's head can drop forward, compress the airway, and result in DEATH.
STRANGULATION HAZARD:
- DO NOT suspend strings over the product or attach strings to toys.
- DO NOT place product in any location where there are cords, such as window blind cords, drapes, phone cords, etc.
- Strings can cause strangulation. DO NOT place items with a string around your child's neck, such as hood strings or pacifier cords.
• DO NOT USE THIS PRODUCT if it is damaged or broken.
- NEVER USE as a car seat.
WARNING
- ROCKER/ CARRIER MODE:
• Never leave child unattended.
• This product is not intended for unsupervised or prolonged periods of sleep.
- Never use for a child able to sit up unassisted.
- NEVER use this product as a means to transport an infant in a motor vehicle.
FALL HAZARD:
READ ALL INSTRUCTIONS BEFORE USE OF THIS ROCKER.
• Always use restraint system. Adjust belt as needed to get a snug fit around your child.
- Child's movement can slide product. Use only on floor. Never place product near edges of counter tops, tables or other elevated surfaces.
• Maximum recommended height is 27 inches (68.2 cm) and weight is 18 lb (8.2 kg).
STRANGULATION HAZARD:
• Children have STRANGLED in loose or partially buckled harness straps. Fully restrain the child at all times.
SUFFOCATION HAZARD:
- Product can roll over on soft surfaces and suffocate child. NEVER place product on beds, sofas, cushions or other soft surfaces.
• DO NOT place product near water and moisture. Do not use the product near possible wet areas, such as a bathtub, shower, wash basin, sink, laundry tub, swimming pool, wet basement, etc.
• DO NOT use the AC adapter if it has been exposed to liquids, has been dropped, or is damaged. - Protect the power cord. Place it so it is not walked on or pinched by furniture or other items.
• DO NOT use with an extension cord. - Use only power cord provided.
- The toy bar is not a carry handle. Never use toy bar to lift or carry rocker.
- Body support and harness covers are for use only with this product.
WARNING
Changes or modifications to this unit not expressly approved by the party responsible for compliance could void the user authority to operate the equipment.
This device complies with part 15 of the FCC Rules. Operation is subject to the following two conditions: (1) This device may not cause harmful interference, and (2) this device must accept any interference received, including interference that may cause undesired operation.
NOTE: This equipment has been tested and found to comply with the limits for a Class B digital device, pursuant to Part 15 of the FCC Rules. These limits are designed to provide reasonable protection against harmful interference in a residential installation. This equipment generates, uses and can radiate radio frequency energy and, if not installed and used in accordance with the instructions, may cause harmful interference to radio communications.
However, there is no guarantee that interference will not occur in a particular installation. If this equipment does cause harmful interference to radio or television reception, which can be determined by turning the equipment off and on, the user is encouraged to try to correct the interference by one or more of the following measures:
- Reorient or relocate the receiving antenna.
- Increase the separation between the equipment and receiver.
- Connect the equipment into an outlet on a circuit different from that to which the receiver is needed.
- Consult the dealer or an experienced radio/TV technician for help.
⚠ MISE EN GARDE
Check that you have all the parts for this model BEFORE assembling your product. If any parts are missing, call Customer Service.
No tools required.
DO NOT use any other accessories with this product.
Only use this body support on this swing. Never use this body support on any other product.
Only use harness covers on this swing. Never use harness covers on any other product.
natural_image
Line drawing of a car seat with two seats and a side panel (no text or symbols)2-C Modes of Use • Modes d'emploi • Modos de uso
Swing Mode: (4 Positions)
25 lb (11.3 kg) 30 inches (76.2 cm)
Do not store swing in either side facing mode
• Mode balançoire : (4 positions)
11,3 kg (25 lb), 76,2 cm (30 po)
- Modo columpio: (4 posiciones)
25 libras (11.3 kg), 30 pulgadas (76.2 cm)
Front facing Rear facing Left side facing Right side facing
Rocker Mode: 18 lb (8.2 kg) 27 inches (68.2 cm)
• Mode berceuse : 8,2 kg (18 lb), 68,2 cm (27 po)
- Modo mecedora: 18 libras (8.2 kg), 27 pulgadas (68.2 cm)

natural_image
Line drawing of a baby car seat with adjustable arm and head (no text or symbols)natural_image
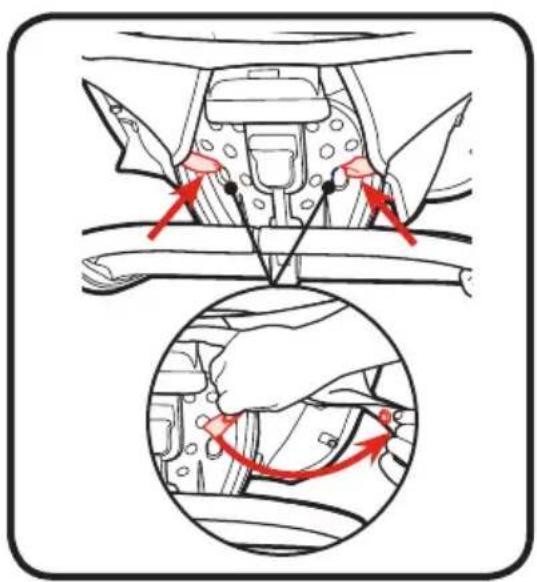
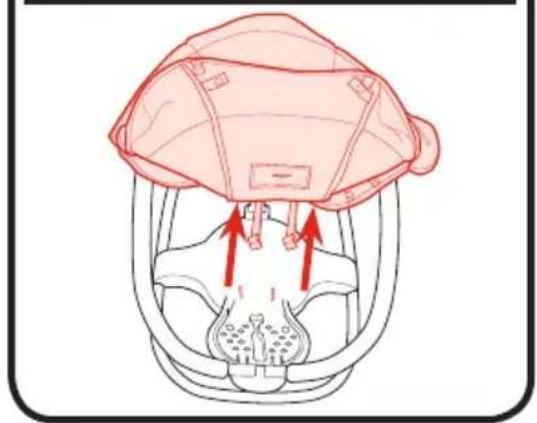
Line drawing of a mechanical component or housing with concentric layers and a central shaft (no text or symbols)- Insert tube on rear of frame into opening in base.
CHECK that button is visible as shown.
- Insert toy bar into opening in seat.
CHECK that toy bar is securely attached by pulling up on it.
natural_image
Illustration of a hand holding a funnel with a red arrow pointing to a pink toy figure (no text or symbols)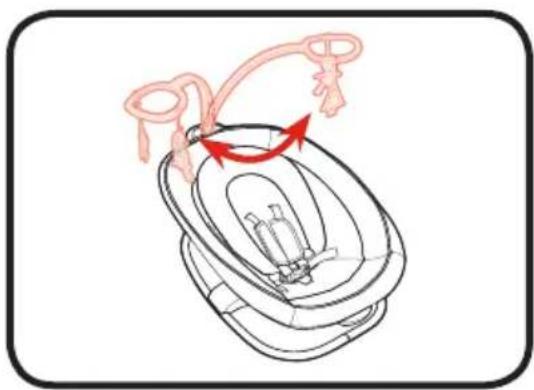
natural_image
Diagram of a baby car seat with a red arrow indicating rotation or movement (no text or symbols)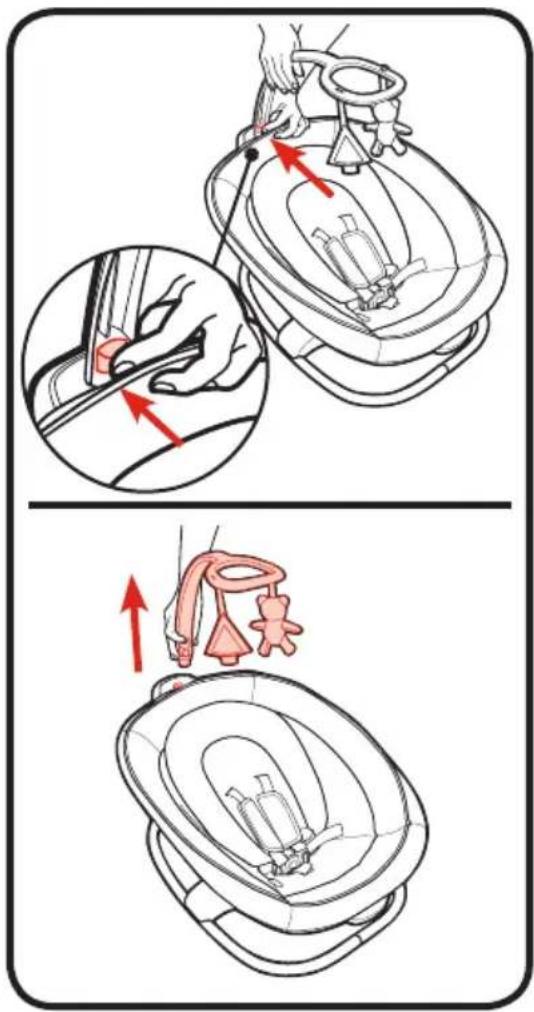
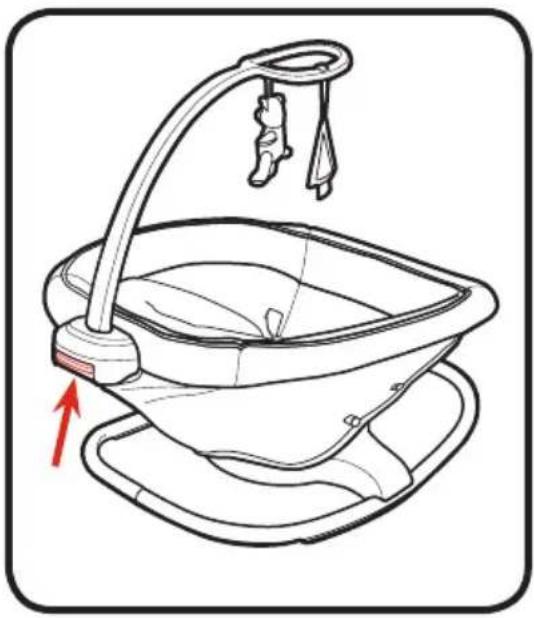
- Hold rocker by handles on seat ends and attach rocker to mount on swing base.
CHECK rocker is secure by pulling up on it.
natural_image
Line drawing of a funnel-shaped device with a handle and base, no text or symbols presentnatural_image
Line drawing of a laboratory filtration setup with a funnel and inverted funnel (no text or symbols)
4-B To Remove Rocker • Retrait de la berceuse • Cómo sacar la mecedora
- To use as rocker,
(a) pull up on rocker release lever,
(b) tilt front of seat up,
(c) then slide seat backwards slightly.
(d) Lift seat off of base.
natural_image
Line drawing of hands holding a basin with a faucet, no text or symbols presentFalling Hazard: Always use the restraint system.
MISE EN GARDE
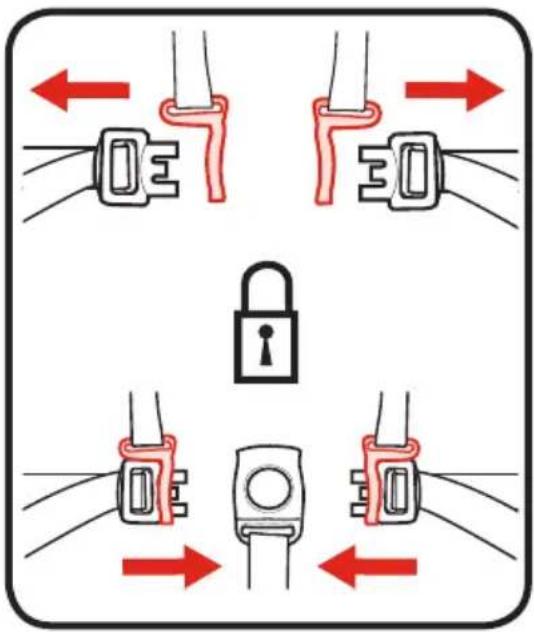
- To open, press button on buckle to release the waist straps.
- Pour ouvrir, appuyer sur le bouton de la boucle pour libérer les courroies abdominales.
- Para abrirlo, oprima el botón de la hebilla para liberar las correas de la cintura.
natural_image
Diagram of a car seatbelt with two side brackets and a red arrow indicating a specific seatbelt (no text or symbols present)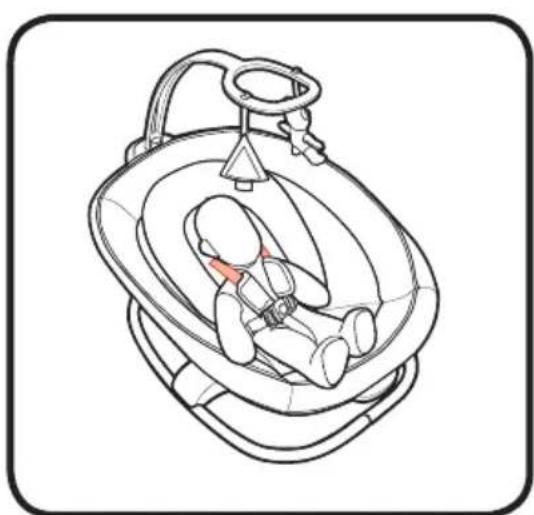
natural_image
Line drawing of a baby car seat with a red belt, no text or symbols present4-D
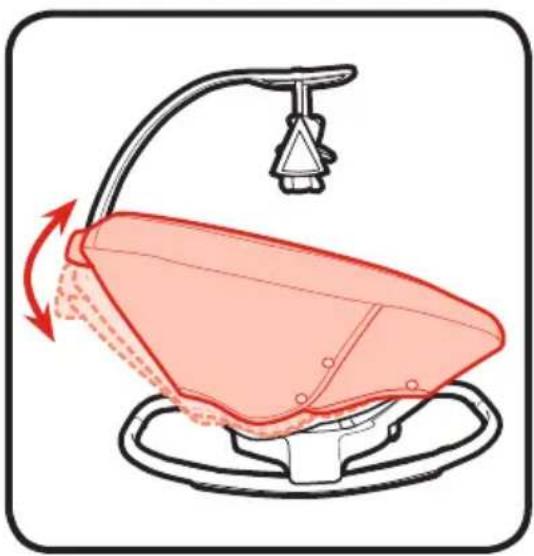
To Recline Rocker • Pour incliner la berceuse • Cómo reclinar la mecedora
natural_image
Line drawing of a fishbowl with a handle and attached structure, showing no text or symbols-
Squeeze button on rocker handle to adjust recline position.
-
Comprimer le bouton sur la poignée de la berceuse afin d'ajuster la position d'inclinaison.
-
Apriete el botón en la manija de la mecedora para ajustar la posición de reclinación.
natural_image
Illustration of a baby seat with a faucet and arrow indicating rotation (no text or symbols)-
There are 3 recline positions.
-
Il y a 3 positions d'inclinaison.
-
Hay 3 posiciones de reclinación.
4-E To Use Wall Plug • Utilisation de la prise murale • Cómo usar un tomacorriente de la pared
WARNING
DO NOT place product near water and moisture. Do not use the product near possible wet areas, such as a bathtub, shower, wash basin, sink, laundry tub, swimming pool, wet basement, etc.
DO NOT use the AC adapter if it has been exposed to liquids, has been dropped, or is damaged.
Protect the power cord. Place it so it is not walked on or pinched by furniture or other items.
WARNING Strangulation Hazard: Keep this cord out of the reach of children. DO NOT use with an extension cord. Use only power cord provided.
MISE EN GARDE
4-F Swing Controls
• Commandes de la balançoire
- Controles del columpio
WARNING
avoid serious injury from falling or sliding out. Always use restraint system. After fastening buckles, adjust belts to get a snug fit around your infant.
TO TURN SWING ON:
Press power button (don, and select desired motion to start the swing. Change speed if needed by pressing speed up ( for faster speeds or speed down ( for slower.
TO TURN SWING OFF: Press power button (again to turn off. It will take a few seconds for the swing to return to neutral position.
MISE EN GARDE
(Power Button) Press power button to turn swing controls on. To turn swing controls off press button. It will take a few seconds for the swing to return to neutral position.
Swing • Balancer • Columpiar
flowchart
graph TD
    A["User Profile"] --> B["Interaction Icon"]
    B --> C["Feedback Loop"]
    C --> D["Social Media Icon"]
    D --> E["Music Icon"]
    E --> F["Audio Icon"]
    F --> G["Social Media Feedback Icon"]
    G --> H["Feedback to Social Media"]
    H --> I["Social Media Feedback Icon"]
Cradle
• Balancer doucement • Acunar
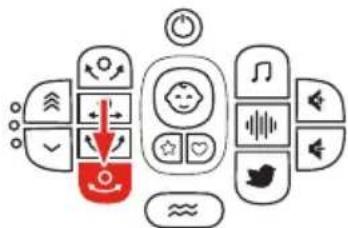
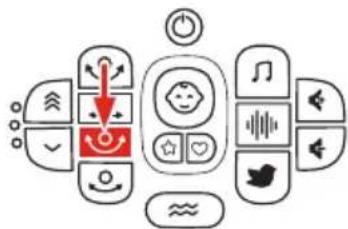
(Swing Motion Buttons)
Press one of 4 swing motion options. Button icon will flash during mode change and illuminate solid in full motion. If button icon flashes rapidly during transition an object could be blocking the swing. Please check product for any obstructions. If speed is off, nothing will happen.
Press Speed Up button (✗ to increase speed. Press Speed Down button (✗ to decrease speed. There are 3 speeds. Press Speed Down button (✗3 times to turn speed off. Speed is indicated by LED lights next to buttons.
(Boutons de bouton)
Press Vibration button ( ) to choose vibration setting. Vibration settings are High/Low/Off.
(Bouton de vibration)
(Music Button)
Press Music button ( ) to turn music on.
All ten songs will play in turn and then start again with the first song. Skip a song by pressing the music button.
(Bouton de musique)
Press White Noise button ( ) to turn white noise on.
Press Nature button ( ) to turn nature sounds on.
There are four nature sounds. The selected nature sound will play continuously until a different sound is selected. Skip to the next sound by pressing the nature button.
(Bouton de nature)
Sound Volume Up
Sound Volume Down
(Sound Volume Buttons)
Press Volume Up button (◀) to increase volume. Press Volume Down button (◀) to decrease volume. There are 6 volume options. Press Volume Down button (◀) 6 times to turn volume off.
When product is on and Graco Mode ( or Parent's Mode ( ) is active the sensor indicator ( will illuminate and product reacts as follows.
BLUE (→ Indicator will illuminate BLUE indicating Cry Detection™ Technology is enabled.
GREEN (💡) - Indicator will illuminate GREEN indicating Cry Detection™ Technology detects a cry.
If Cry Detection™ Technology detects crying has stopped, the indicator will illuminate BLUE again, and the current settings will continue until next cry is detected.
Press power button (①) and then choose Graco Mode button (★).
When sensor indicator (€) turns GREEN identifying the cry is confirmed, Graco selected settings begin. The settings will cycle through 8 sequences which automatically adjust motion, speed, vibration, sound and volume level.
If Cry Detection™ Technology detects crying has stopped, the current settings will continue until next cry is detected.
Press Graco Mode button (✗) to turn mode off.
(To set Parent's Mode)
Press power button (☐ and then choose desired swing settings (see Section 4-F).
When swing is at desired settings, press and hold Parent's Mode button ( ) until sensor indicator ( ) flashes BLUE three times (around 5 seconds). Parent's Mode is now set.
Press Parent's Mode button (❤️) to turn mode off.
(Configuration du mode Parent)
(To Use Parent's Mode)
Press power button (✗) and then choose Parent's Mode button (✗). When sensor indicator (✗) turns GREEN identifying a cry is confirmed, Parent selected settings will begin. The settings will continue to run.
If Cry Detection™ Technology detects crying has stopped, the current settings will continue until next cry is detected.
If crying hasn't stopped the swing will cycle between Parent's Mode settings and a factory programmed sequence.
- Speed setting too low.
- Baby too heavy or too active. (Discontinue use.)
- If any LED lights are blinking rapidly or swing is not moving, check for obstacle blocking swing or that load is over 25 lb (11.3 kg).
- If you suspect debris inside the swing base, stop using and contact customer service.
SEAT DOESN'T SWING VERY FAST:
- Speed setting too low.
- Objects such as blanket blocking swings travel.
- Baby too heavy or too active. (Discontinue use.)
LA BALANÇOIRE NE DÉMARRE PAS :
natural_image
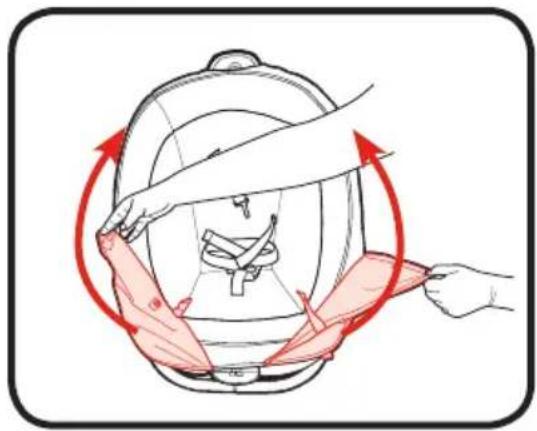
Illustration of a hand using scissors to adjust or install a mechanical component (no text or symbols visible)-
Disconnect 2 snaps on side of seat pad. REPEAT on other side of seat pad.
-
Détacher 2 boutons-pression sur le côté du coussin du siège. RÉPÉTER de l'autre côté du siège.
-
Desconecte los 2 broches del costado de la almohadilla del asiento. REPITA el procedimiento en el otro lado de la almohadilla del asiento.
-
Disconnect straps from around underside of seat.
-
Enlever les sangles qui se trouvent sous le siège.
-
Desconecte las correas de alrededor de alrededor de la parte de abajo del asiento.
-
Lift flaps up to expose frame of seat.
-
Soulever les rabats pour exposer le cadre du siège.
3 Levente las solapas para exponer el armazón del asiento. -
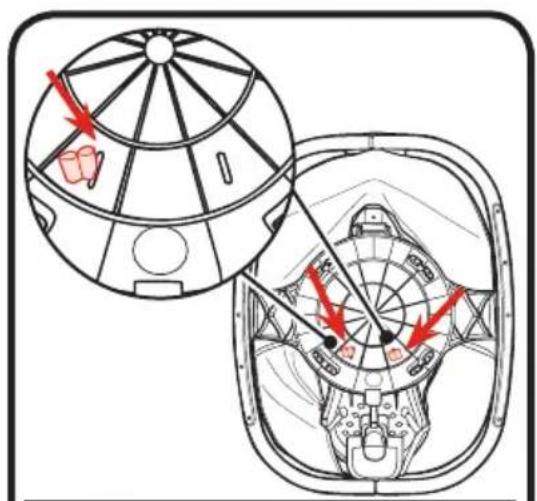
Disconnect 2 straps from around seat frame.
- Détacher 2 sangles du cadre du siège.
-
Desconecte las 2 correas de alrededor del armazón del asiento.
-
Flip seat over, insert ends of webbing through bottom of seat.
- Retourner le siège, insérer les extrémités des sangles à travers le fond du siège.
- Dé vuelta el asiento, pase los extremos de las cintas por la parte de abajo del asiento.
natural_image
Illustration of a person adjusting a helmet with red arrows indicating motion (no text or symbols)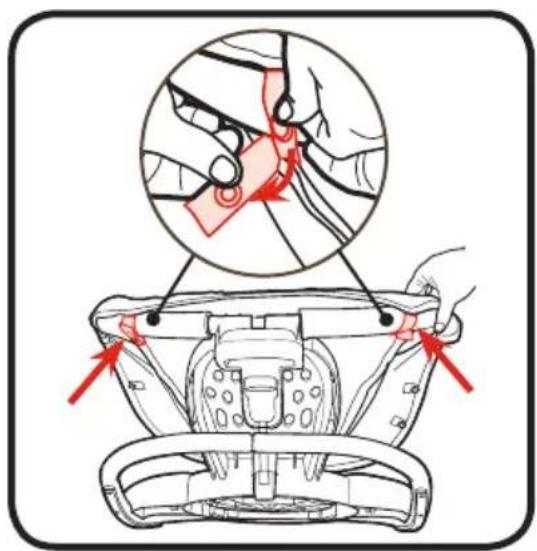
natural_image
Anatomical illustration of a human head with surgical hardware and red arrows indicating force or movement (no text or labels)natural_image
Illustration of a hand performing a medical procedure on a patient's abdomen, showing two steps with arrows indicating motion (no text or symbols present)Reverse steps to re-attach.
- FROM TIME TO TIME CHECK YOUR SWING for loose screws, worn parts, torn material or stitching. Replace or repair the parts as needed. Use only Graco replacement parts.
- TO CLEAN SEAT COVER, Refer to your care tag on your seat pad for washing instructions. NO BLEACH.
- TO CLEAN FRAME, use only household soap and warm water. NO BLEACH OR DETERGENT.
- EXCESSIVE EXPOSURE TO SUN OR HEAT could cause fading or warping of parts.
5-B Replacement Parts
To purchase parts or accessories or for warranty information in the United States, please contact us at the following:
To register your Graco product from within the U.S.A. visit us online at www.gracobaby.com/productregistration or return registration card provided with your product. We currently do not accept product registrations from those living outside the United States of America.
- STRANGULATION HAZARD:
- WARNING
- - ROCKER/ CARRIER MODE:
- FALL HAZARD:
- READ ALL INSTRUCTIONS BEFORE USE OF THIS ROCKER.
- SUFFOCATION HAZARD:
- ⚠ MISE EN GARDE
- 2-C Modes of Use • Modes d'emploi • Modos de uso
- Swing Mode: (4 Positions)
- Do not store swing in either side facing mode
- Rocker Mode: 18 lb (8.2 kg) 27 inches (68.2 cm)
- 4-B To Remove Rocker • Retrait de la berceuse • Cómo sacar la mecedora
- MISE EN GARDE
- 4-D
- To Recline Rocker • Pour incliner la berceuse • Cómo reclinar la mecedora
- 4-E To Use Wall Plug • Utilisation de la prise murale • Cómo usar un tomacorriente de la pared
- 4-F Swing Controls
- TO TURN SWING ON:
- (Swing Motion Buttons)
- (Boutons de bouton)
- (Bouton de vibration)
- (Music Button)
- (Bouton de musique)
- (Bouton de nature)
- Sound Volume Up
- Sound Volume Down
- (Sound Volume Buttons)
- (To set Parent's Mode)
- (Configuration du mode Parent)
- (To Use Parent's Mode)
- SEAT DOESN'T SWING VERY FAST:
- LA BALANÇOIRE NE DÉMARRE PAS :
- 5-B Replacement Parts
Brand : GRACO
Model : Sense2Soothe
Category : Baby swing