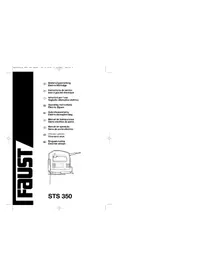
STS 350 E - Electric saw EINHELL - Free user manual and instructions
Find the device manual for free STS 350 E EINHELL in PDF.


| Product type | Electric jigsaw |
| Brand | Einhell |
| Model | STS 350 E |
| Power consumption | 350 W |
| Cycles per minute | max. 3000 |
| Stroke | 18 mm |
| Cutting depth (wood) | 55 mm |
| Cutting depth (plastic) | 10 mm |
| Cutting depth (iron) | 6 mm |
| Bevel cut | max. 45° (left and right) |
| Sound pressure level | 89 dB(A) |
| Sound power level | 99.6 dB(A) |
| Vibration (handle) | 3.5 m/s² |
| Weight | 1.7 kg |
| Power supply | Mains (cable) |
| Double insulation | Yes |
| Chip extraction | Vacuum connection |
| Adjustable saw base | Yes, up to 45° |
| Switch | ON/OFF with continuous lock |
| Eye protection | Protective device included |
| Spare parts | Saw blades, hex key |
| Repairs | By certified electrician |
Frequently Asked Questions - STS 350 E EINHELL
User questions about STS 350 E EINHELL
0 question about this device. Answer the ones you know or ask your own.
Ask a new question about this device
Download the instructions for your Electric saw in PDF format for free! Find your manual STS 350 E - EINHELL and take your electronic device back in hand. On this page are published all the documents necessary for the use of your device. STS 350 E by EINHELL.
USER MANUAL STS 350 E EINHELL
natural_image
Technical line drawing of a mechanical device with no visible text or symbolsSTS 350

©Bitte vor Montage und Inbetriebnahme die Betriebsanleitung aufmerksam lesen
Please read the operating instructions carefully before assembling and using
©Veuillez lire attentivement ce mode d'emploi avant de procéder au montage et à la mise en service
⑨Gelieve vóór montage en ingebruikneming de gebruiks-aanwijzing aandachtig te lezen
©Sírvase a leer atentamente estas instrucciones antes del montaje y de la puesta en servicio
⑤Queira ler atentamente as instruções de serviço antes da montagem e colocação em funcionamento
©Priv thn suvarμολόγηση kai va thn θέσετε σε λειτουργία διαβάστε παρακαλώ thn οδηγία χρήσεως.
①Si prega, prima di assemblare ed avviare il trapano, di leggere attentamente le istruzioni sul funzionamento
©Læs driftsvejledningen grundigt inden montage og idrifttagning

©Bitte Seite 2 ausklappen
©Please pull out page 2
⑤Veuillez ouvrir les page 2
©Gelieve bladzijden 2 te ontvouven
©Desdoble las página 2
©Desdobre as página 2
©Παρακαλούμε ξεδιπλώσετε τις σελίδες 2.
①Aprire le pagine dalle 2
©Fold siderne 2 ud
©Seite 4 - 6
GBPage 7 - 9
©Page 10 - 12
NLBlz. 13 - 15
©Página 16 - 18
©Página 19 - 21
GR Σελίδα 22 - 24
①Pagina 25 - 27
Side 30 - 32
natural_image
Technical line drawing of a mechanical device with no visible text or symbols9 Dust extractor socket
General safety and accident prevention regulations
To work safely with this machine and to prevent accidents it is imperative to read the following safety regulations and operating instructions in full and to put all the information into practice.
●Always check the machine, the power cable and the plug before use. Only ever use the machine if it is in perfect, undamaged condition. Damaged parts are to be repaired or replaced immediately by a qualified electrician.
●Always pull the plug out of the power socket before carrying out any work on the machine, before changing the tool and in periods of non-use.
●Always run the power cable away from the back of the machine to guard it from damage.
- For outdoors work use only suitably approved extension cables with a minimum conductor cross section of 1.5 mm ^2 . The plug connectors must have earthing contacts and be rain-water-proof.
- Keep the machine in a safe place and out of the reach of children.
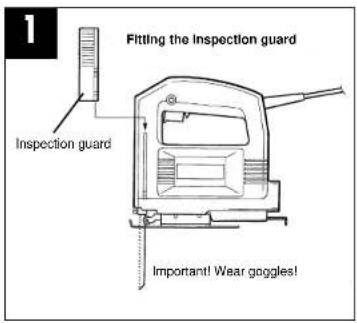
●Always wear goggles, safety gloves and ear muffs when grinding, brushing and cutting. Wear a breathing mask on dusty jobs.
●Never leave any tool keys or adjustment spanners in position on the machine. Before switching on, check that all keys and adjustment spanners have been removed.
- Secure the workpiece (with a clamp) so that it cannot slip.
●It is imperative to use a dust extractor when working on stone (cutting or grinding). Make sure the dust extractor is approved for stone dust.
●It is prohibited to use the machine on asbestos materials. Please note the accident prevention regulations in force in your country.
●Use only original spare parts.
●Repairs are to be carried out by qualified electricians only.
●The level of noise at the workplace may exceed 85 dB(A). In this case you will need to introduce noise protection measures for the user. The noise produced by this electric tool is measured in accordance with IEC 59 CO 11, IEC 704, DIN 45635 Part 21, NFS 31-031 (84/537/EEC).
●Make sure of your footing. Avoid abnormal working positions.
- Keep your electric tool out of the rain. Never use electric tools in wet or damp conditions, and never use them near inflammable liquids.
●Never carry the machine by its power cable. Keep the power cable safe from damage. Oil, solvent and sharp edges can damage cables.
- Keep your workplace tidy.
●Make sure the power switch is off before inserting the plug in the socket.
●Wear suitable clothing. Never wear loose-fitting clothes or jewelry. Use a hair-net on long hair.
- For your own safety, use only the manufacturer's accessories and attachments.
- Use only sharp saw blades that are in perfect condition. Replace bent and cracked saw blades immediately.
●After switching off the jigsaw, do not press against the side of the blade to bring it to a halt.
●Always cut at a steady rate of progress. This will prevent accidents and prolong the life of your jigsaw and the blade.
GB
Operating instructions for the STS 350 electric jigsaw
STARTING UP
Instant response operation (Figure 3)
Switching on: Press the On/Off switch
Switching off: Release the On/Off switch
Continuous operation
Switching on: Press the On/Off switch, keep pres sed and lock with the locking button
Switching off: Press the On/Off switch and release
Changing the saw blade (Figure 2)
Switch off the jigsaw and remove the plug from the power socket before changing the blade or carrying out any other work on the jigsaw.
Use the supplied hexagon-socket spanner to undo the two screws on the ram (Figure 2). Slide the saw blade into the guide slot and up to the stop between the piston rod and the retention clip. Use the supplied hexagon-socket spanner to tighten the two screws. The teeth of the saw blade must face in cutting direction. Make sure that the saw blade sits properly in the guide slot of the ram and roller.
Adjusting the base
(for mitering and sawling near edges, Figure 4) For mitre and bevel cuts you can swivel the base by up to 45^ in either direction after undoing the two screws on the bottom. The angles 15^ , 30^ and 45^ are marked but you can adjust the saw to any angle between these markings as required.
To adjust the cutting angle, undo the two screws (Figure 4) until you can just about move the blade. Adjust to the required angle and re-tighten the two screws.
To enable you to saw right up to the edge, the base can be pushed backward. To do so, undo the two screws underneath (Figure 4) and push the base to the back. Re-tighten the two screws.
Dust extraction
The jigsaw is equipped with a dust extractor socket. Any vacuum cleaner can be connected to the socket at the rear of the Jigsaw. If you require a special adapter, please contact the manufacturer of your vacuum cleaner.
TECHNICAL DATA
Nominal voltage: 230 V \~ 50 Hz
Power consumption: 350 W
Cutting rate: max. 3000 strokes/min.
Stroke height: 18 mm
Cutting depth in wood: 55 mm
Cutting depth in plastic: 10 mm
Cutting depth in iron: 6 mm
Mitre cuts: up to 45° (left and right)
Sound pressure level LPA: 89 dB(A)
Sound power level LWA: 99.6 dB(A)
Vibration a_W 3,5 m/s ^2
Weight 1,7 kg
Totally insulated
Vibration measured according ISO 5349.
GB


natural_image
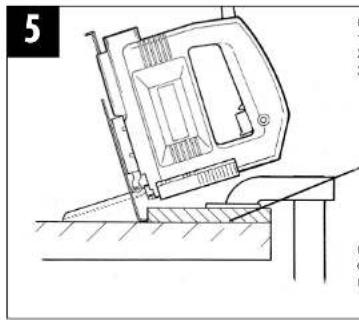
Technical line drawing of a mechanical device with a lever and base, no visible text or symbolsCutting veneered chipboard:
1. Use a fine saw blade
2. Position the base on the uncovered area
3. Advance the saw with little force
F
Description
natural_image
Technical line drawing of a mechanical device with a tool, showing no text or symbolsm = 311
Conectar: Pulse el conector/desconector
Funcionamiento
natural_image
Technical line drawing of a mechanical device with no visible text or symbolsnatural_image
Technical line drawing of a mechanical component or device (no visible text or symbols)natural_image
Technical line drawing of a mechanical device with a tool interacting with a surface (no text or symbols)natural_image
Technical line drawing of a mechanical assembly or tool, possibly a cutting or fastening tool, with no visible text or symbols.
Brand : EINHELL
Model : STS 350 E
Category : Electric saw