
X8 - Vacuum Cleaner MIDEA - Free user manual and instructions
Find the device manual for free X8 MIDEA in PDF.

| Product type | Cordless floor washer vacuum |
| Brand | Midea |
| Model | X8 |
| Power supply | Rechargeable battery, power adapter |
| Charging time | Approximately 4 to 6 hours |
| Cleaning modes | Automatic mode (washing), quick mode (dry suction) |
| Clean water tank capacity | Approximately 500 ml |
| Dirty water tank capacity | Approximately 400 ml |
| Main functions | Hard floor cleaning, vacuuming, washing, self-cleaning function |
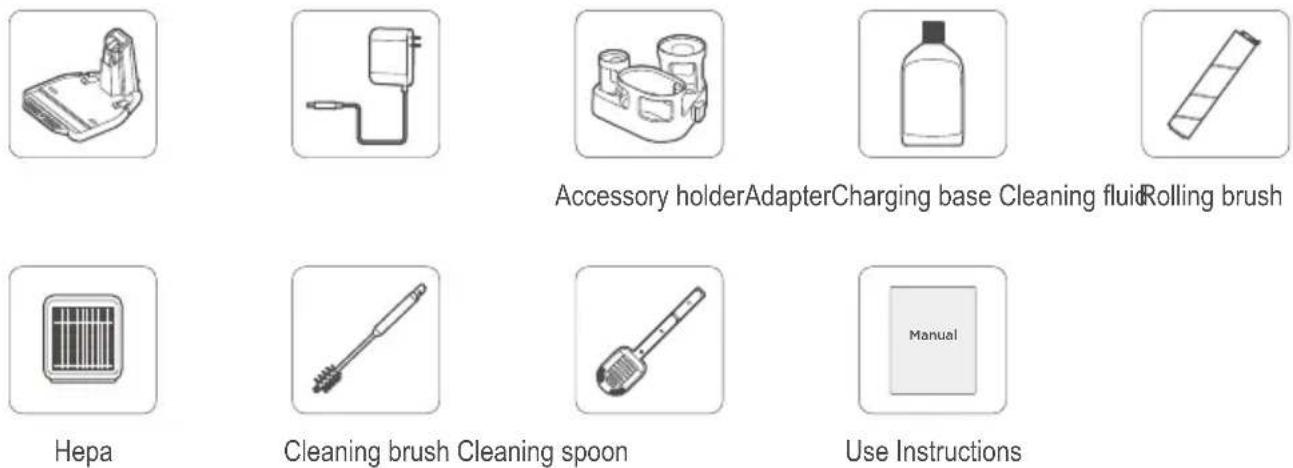
| Included parts | Cleaning brush, cleaning spoon, accessory holder, cleaning liquid, charging base |
| Maintenance | Regularly clean the dirty water tank, roller brush, floor brush cover, and HEPA filter |
| Safety | Use only on hard floors, do not vacuum hazardous or high-temperature substances, unplug before maintenance |
| Dimensions (approx.) | Height 110 cm, width 30 cm, depth 25 cm |
| Weight (approx.) | 5 kg |
Frequently Asked Questions - X8 MIDEA
User questions about X8 MIDEA
0 question about this device. Answer the ones you know or ask your own.
Ask a new question about this device
Download the instructions for your Vacuum Cleaner in PDF format for free! Find your manual X8 - MIDEA and take your electronic device back in hand. On this page are published all the documents necessary for the use of your device. X8 by MIDEA.
USER MANUAL X8 MIDEA
natural_image
Line drawing of a vacuum cleaner with handle and base (no text or symbols)X8
MWD2221WW
DE, EN, FR, IT, ES, PT
DEUTSCH.... 3-17
ENGLISH.... 18-30
FRANÇAIS.... 31-43
ITALIANO.... 44-56
ESPAÑOL 57-69
PORTUGAL.... 70-82
Sicherheitshinweise
natural_image
Two types of hairbrushes with different tip positions, one showing a blue arrow indicating rotation (no text or symbols)2 RHLQLJXQJV0| IIHO
natural_image
Illustration of two types of cleaning tools with a blue arrow indicating rotation (no text or symbols)3 Zubehörständer
natural_image
Technical line drawing of a mechanical device with two views showing internal components (no text or symbols)natural_image
Illustration of a blue droplet being poured into a cylindrical container (no text or symbols)Gebrauch
Installation des Griffs
natural_image
Diagram of a mechanical component with a dashed line indicating a cable or wire connection (no text or symbols present)
natural_image
Line drawing of a vacuum cleaner with attached circuit board (no text or symbols)Gebrauch
natural_image
Illustration of a blue pipette dispensing liquid into a cylindrical container (no text or symbols)natural_image
Line drawing of a vacuum cleaner (no text or symbols)natural_image
Line drawing of a vacuum cleaner with handle and base (no text or symbols)natural_image
Line drawing of a vacuum cleaner with blue arrow indicating rotation (no text or symbols)natural_image
Line drawing of a vacuum cleaner with a magnified inset showing internal components (no text or symbols)Gebrauch
natural_image
Technical line drawing showing a mechanical assembly process: before, after, and after being cut (no text or symbols present)Gebrauch
natural_image
Technical line drawing of a cylindrical mechanical component with internal spring and shaft (no text or symbols)natural_image
Diagram of a faucet spraying water into a basin with plastic containers and a gridded sink (no text or symbols)natural_image
Illustration of a hand using a vacuum cleaner to clean or adjust the air gap (no text or symbols present)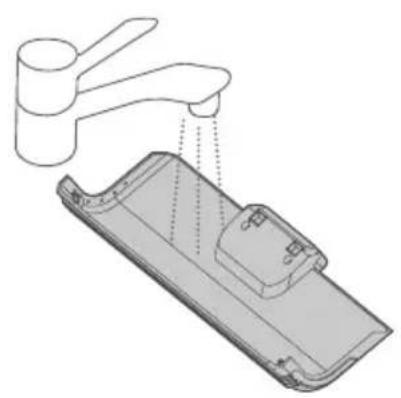
natural_image
Diagram of a hand washing a small appliance with a faucet, showing internal components and liquid level (no text or symbols)natural_image
Diagram showing a hand using a tool to adjust or install a device, with no visible text or symbols.
natural_image
Diagram of a hand using a vacuum cleaner to clean or adjust the air gap (no text or symbols present)Gebrauch
Rollbürste reinigen

Hinweis
natural_image
Diagram showing a faucet releasing liquid into a cylindrical battery (no text or symbols)natural_image
Diagram of a mechanical tool interacting with a cylindrical component (no text or symbols visible)Homepage: www.midea.com/de
Im Servicefall:
Tel.: 06196-90 20 - 0
Fax.: 06196-90 20 -120
Email: kundenservice@midea.com
- This product is suitable for hard floors in the indoor home environment, including waxed, stone, rubber, marble, granite, terrazzo, solid wood, laminate, bamboo floors and various mirror tiles, porcelain tiles and other flat surfaces. The product may not reach the best performance on uneven surfaces.
- Do not use this product near or on surfaces that are flammable or explosive, which may lead to a risk of fire and explosion.
- Do not use this product near a working fireplace or heater to prevent deformation of the casing.
- Do not suck in hot substances (unextinguished cigarettes, matches or hot ashes, etc.), ultra-fine substances (such as lime, cement, wood chips, gypsum powder, ashes, charcoal powder, etc.), hazardous substances (such as solvents, descaling agents, etc.), chemical substances (such as acids, cleaning agents, etc.), and other substances with uncertain physical properties.
- Do not use this floor washer to suck up detergent, kerosene, gasoline, alcohol, paint, perfume, etc. These liquids may cause a short circuit, fire or explosion in the machine.
- Do not use this floor washer to suck toners used in laser printers and copiers, which may cause fire or explosion.
- Do not use this floor washer to suck up sharp or large objects such as glass fragments, small toys, pins, paper clips, stones, plaster, large pieces of paper, which may jam and damage the machine.
- Do not use the floor washer to suck up any burning or smoking objects, such as ashes from unextinguished heat sources, burning cigarette ends or matches, etc. Stains such as shoe polish, paint and pigments that are strongly greasy, sticky or stained shall not be cleaned using this device.
- Do not touch the plug or any live part of the product with wet hands to avoid electric shock.
- If the plug is damaged, do not use it any longer. Please call our professional maintenance personnel to replace the damaged plug to prevent hazards.
- Keep the airflow channels and moving parts of this product away from long hair, loose clothing, fingers and other body parts. Do not point the vacuum hose, attachment wand or tool at your eyes, ears, or put them in your mouth.
- Please use the cleaners made by our company and our approved manufacturers, and do not add other solutions to avoid toxic and harmful gases.
- When using the device, in case of current leakage or over temperature or noise of the motor, as well as other abnormal conditions such as body overheating, noise, odor or weak suction, you should immediately stop using the device and call our professional maintenance personnel.
Safety Instructions
- After using the device, please clean up the sewage bucket in time to avoid odor and keep the ventilation path open to avoid blockage causing a decrease in suction power and motor heating, thus affecting the service life of the floor washer.
- After using the machine, please keep it in a dry place. Humidity will affect the insulation and service life of the machine. The floor washer body and floor brush have energized settings and cannot be soaked or rinsed in water.
- Please check the condition of the nozzle regularly. If there is any blockage, please clear it in time to avoid the decrease of suction power caused by the blockage, affecting the performance of the machine.
- Make sure to turn off the machine before replacing the rolling brush.
-
In case of any of the following conditions, please don't use the machine and send it to the service store assigned by our company:
-
The cleaner has fallen from a high place, leading to obvious damage or operation failure.
-
The power cord is damaged.
- Do not disassemble the closed machine by yourself. There are no parts in this machine that can be repaired by customers themselves. Do not try to modify the performance of the machine, otherwise it will lead to danger.
- The use of voltage that does not meet the specifications of the product will damage the product and may cause injury to the user.
- When sweeping stairs, extra care should be taken to prevent falling.
- Do not shake the machine up and down or bump it violently to prevent sewage from flowing into the motor.
- When the motor is working, do not lift or carry the machine up and down, and do not put the machine to one side or flat to prevent sewage from flowing back to the motor.
- To prevent tripping and falling, the machine should be placed against the wall after using it.
- Do not use the machine if the fresh water tank and sewage tank are not properly installed.
- Do not place any small objects on the air outlet, do not block the air outlet, and remove any small objects that may hinder the smooth airflow of the air outlet to prevent the machine from overheating.
- Do not get the machine body wet, otherwise there is a risk of fire due to short circuit of the machine.
- All technical and other data contained in the Use Instructions is obtained by our company or a designated third party testing company. The final interpretation right belongs to our company
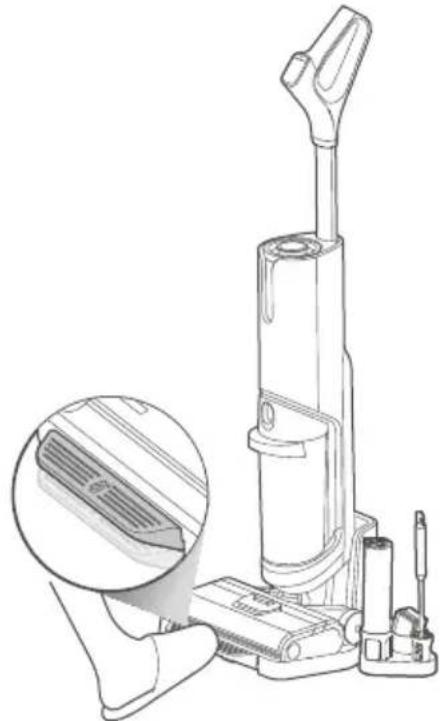
Product Introduction
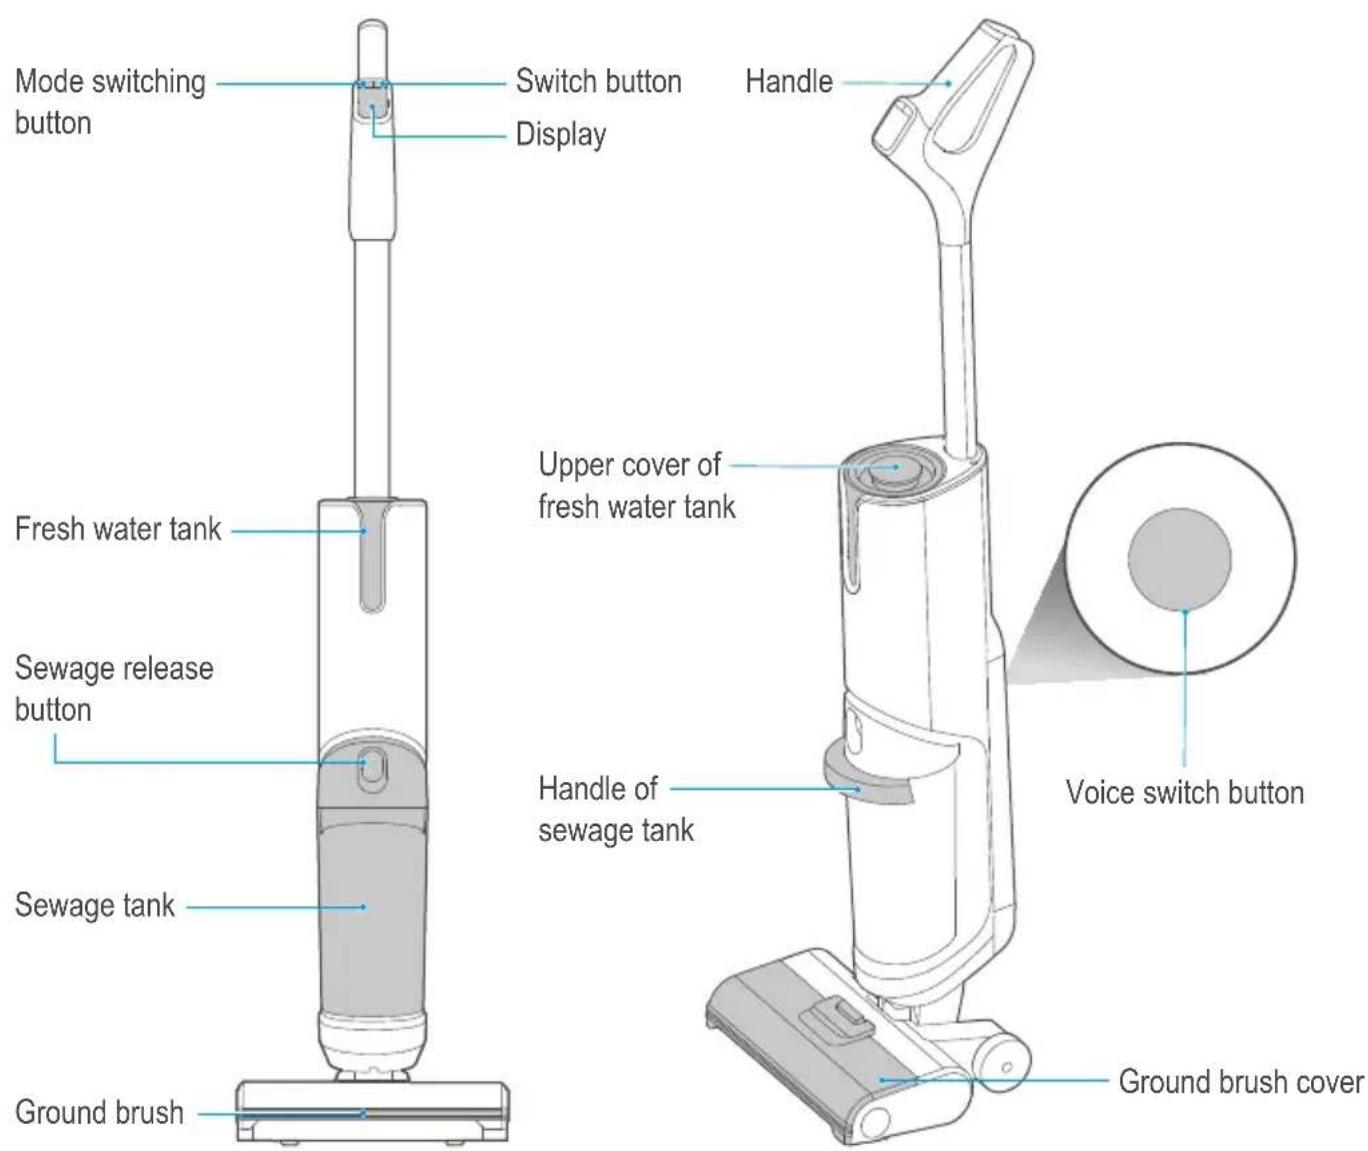
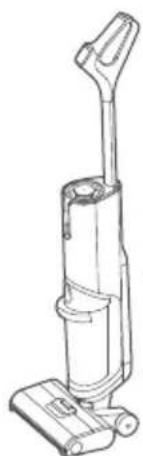
Introduction to Parts
text_image
Mode switching button Switch button Display Handle Fresh water tank Upper cover of fresh water tank Sewage release button Handle of sewage tank Voice switch button Sewage tank Ground brush cover Ground brushList of accessories
Product Introduction
Accessories Introduction
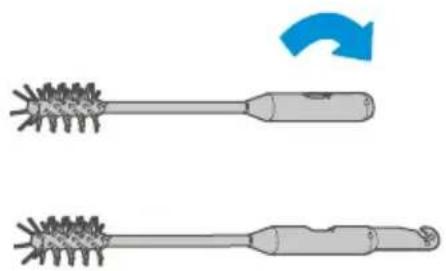
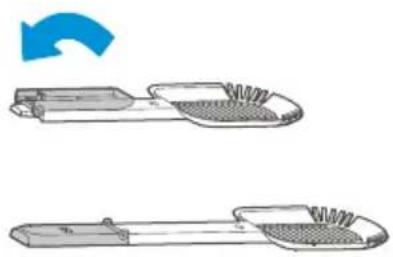
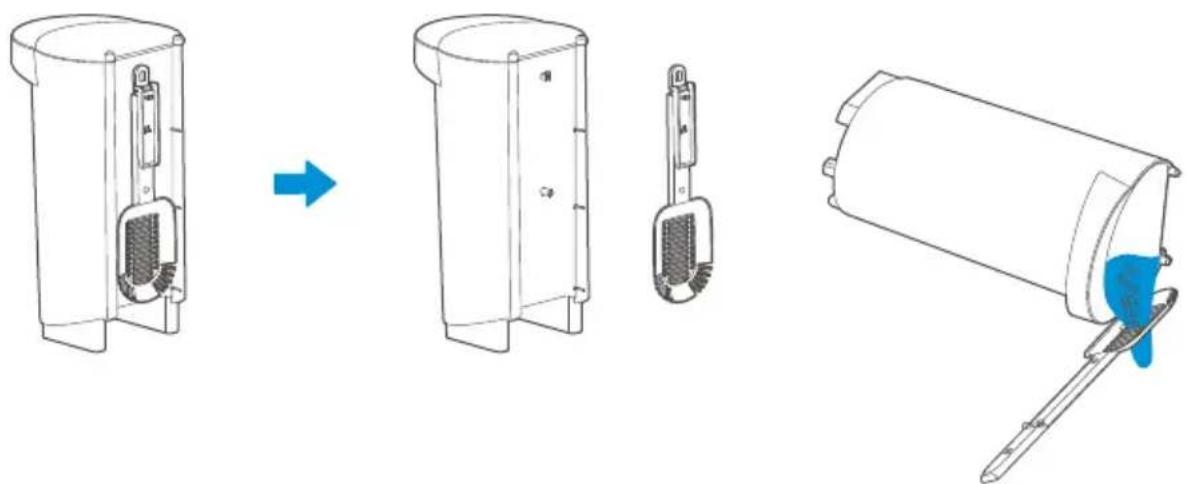
1 Cleaning brush
- A brush at one end, which can be used to clean the stubborn dirt attached to the inner wall of the sewage tank.
- The other end is a rotating blade that can be used to clean the tangled hairs on the rolling brush.
natural_image
Two types of hairpin tools with textured handles, one with a blue arrow indicating rotation (no text or symbols)2 Cleaning spoon
- The cleaning spoon has a folding extension handle, which can be unfolded for use when needed according to the illustration;
- It can be used to filter solid waste such as particulate matters and hair.
natural_image
Illustration of a pair of mechanical tools with textured surfaces, one showing a blue arrow indicating rotation (no text or symbols)3 Accessory holder
- It can be used to store rolling brush, cleaning brush and Hepa;
- Insert the projection part of the accessory holder into the slot of the charging base to fix it (there are slots on both sides of the charging base for fixing accessory holder)
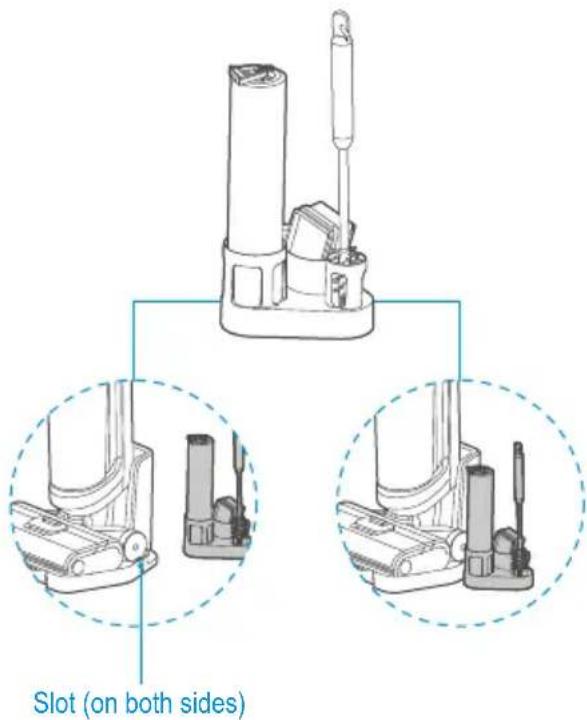
text_image
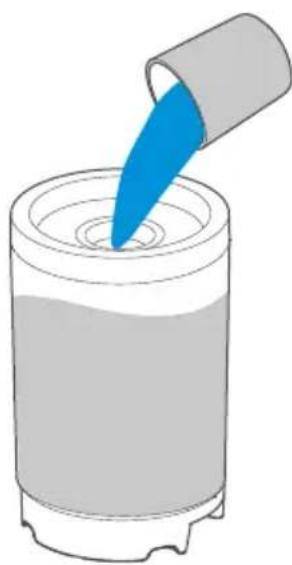
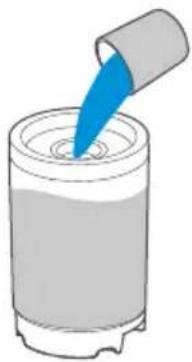
Slot (on both sides)4 Cleaning liquid
- To carry out depth cleaning, just put cleaning liquid into the water tank after it is filled with water according to the specified proportion.
natural_image
Illustration of a blue droplet being poured into a cylindrical container (no text or symbols)Use of Product
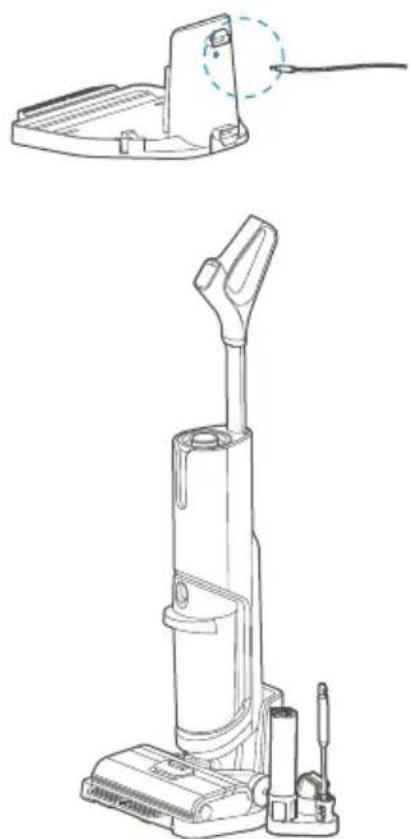
Installation of the handle
Insert the end of the handle into the port of the host vertically to the bottom position until a click could be heard. Pull it again to ensure that it could not be removed and that the handle is firmly connected to the machine body. Then the installation is successful.

text_image
InsertCharging the machine

Notes
- Charge the product before using it for the first time.
1 Insert the charging end of the adapter into the rear port of the charging base and connect the plug to the power supply.
2 Put the whole machine upright on the charging base to start charging, then there will be a voice prompting "start charging", while the screen shows the charging power.
3 It will take about 4-6 hours to fully charge the machine, and the screen turns off after the battery is full, while the machine is automatically powered off.
natural_image
Technical line drawing of a vacuum cleaner with a cable inserted, shown from two different angles (top: top view; bottom: front view), no text or symbols present.Use of Product
Fresh water tank filling
1 Hold the body of the machine with one hand, and grab the upper cover of the fresh water tank to take it out of the machine vertically.
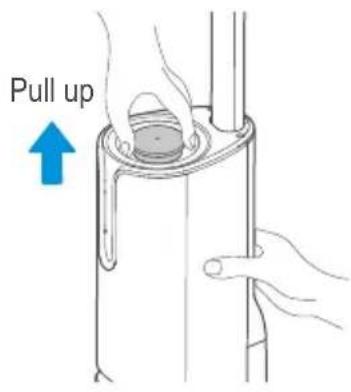
text_image
Pull up3 To carry out depth cleaning, just put cleaning liquid into the tank after it is filled with water according to the specified proportion.
natural_image
Illustration of a blue pipette dispensing liquid into a cylindrical container (no text or symbols)5 Install the fresh water tank back into the machine in the direction indicated by the printed words "this side facing forward" until the sound of click is heard.
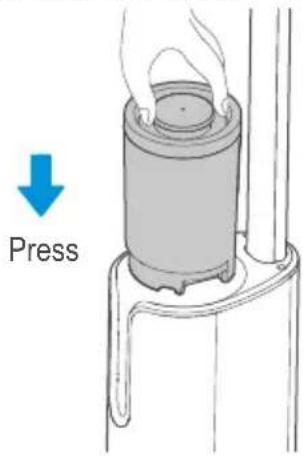
text_image
Press2 Remove the upper cover of the fresh water tank and fill the tank with tap water.
text_image
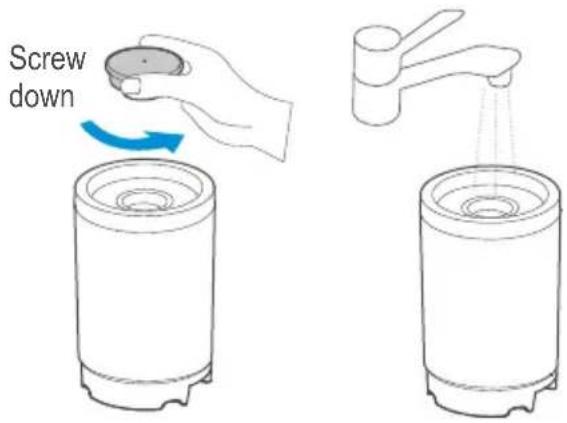
Screw down4 Screw the top cover of the water tank to ensure that it is closed tightly.
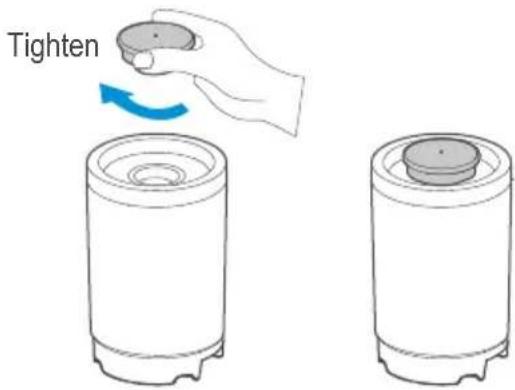
text_image
Tighten6 In case of water shortage of the fresh water tank, there will be a sound prompt.
natural_image
Line drawing of a vacuum cleaner (no text or symbols)Water shortage in fresh water tank, please add water
Use of Product
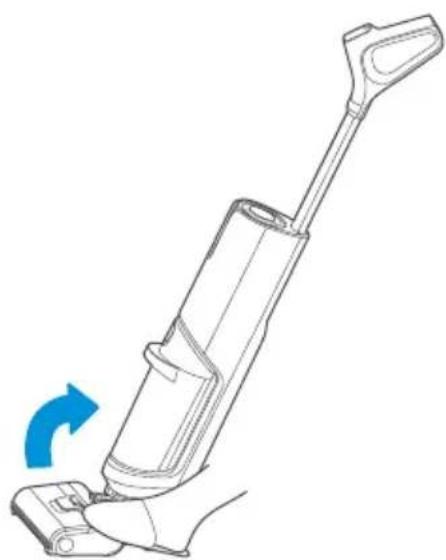
Turning on and cleaning
1 After the machine is fully charged, remove it from the charging seat, step on the ground brush and pull the handle diagonally and rotate the machine until the click sound is heard, at which time the machine enters the standby working state;

natural_image
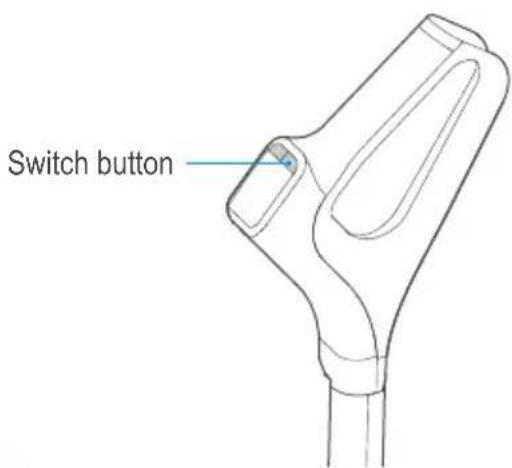
Line drawing of a vacuum cleaner with handle and base (no text or symbols)2 Start working: press the switch button to turn on the machine, and press this button again, the machine stops working.
natural_image
Line drawing of a vacuum cleaner with blue arrow indicating rotation (no text or symbols)3 Mode switching: the whole machine starts in the automatic mode by default. Press the mode switch button, the machine will be switched to rapid suction mode, press this button again, the machine will be switched to automatic mode.
text_image
Switch button
text_image
Mode switching button
Note
• Automatic mode: the machine pump will work to wet the rolling brush lint for floor washing;
- Rapid suction mode: the machine pump will not work, and the machine can suck the residual water on the floor in a dry or rapid way;
• After using the machine, it is recommended to put the machine vertically on the charging base provided for your machine.
Use of Product
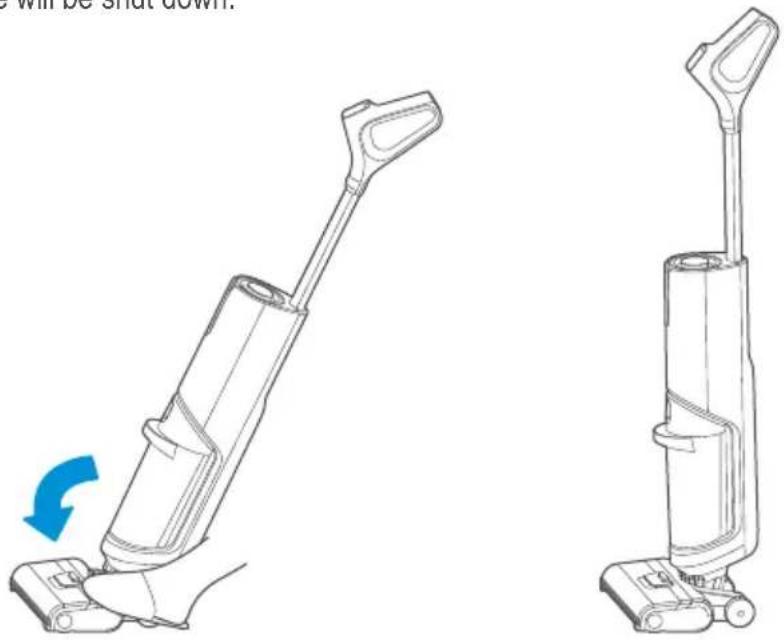
Vertical switch
The machine is equipped with a vertical switch and it can rotate upright until the click sound is heard. Then the machine stops running and is in standby mode. After standing by for one minute without operation, the machine will be shut down.
natural_image
Line drawing of a vacuum cleaner with a blue arrow indicating rotation (no text or symbols)Self-cleaning function
After putting the machine onto the charging base, make sure that the machine is in charging state. After stepping on the charging base pedal with your foot for 2 seconds, the self-cleaning function will be started. After the self-cleaning is finished, please clean the sewage tank in time. If there is residual stain on the base, please clean it in time.
natural_image
Line drawing of a vacuum cleaner with a magnified inset showing internal components (no text or symbols)Use of Product
Cleaning of sewage tank

Notes
• After cleaning, it is recommended to put the machine upright on the charging base at a place without direct sunlight or moisture;
- In order not to affect the performance of the machine, the components of the machine shall be maintained regularly;
- Before cleaning the machine, please cut off the power supply to stop its operation;
- Clean the machine with water or neutral detergent, dry the cloth before washing the machine, and do not let the water get into the electrical components of the machine.
1 Hold the machine with one hand, and pull the sewage tank button outward with the other hand to remove the sewage tank;
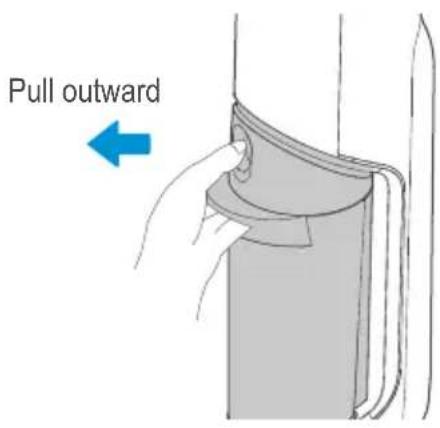
text_image
Pull outward2 Hold the machine with one hand and pull the upper cover of the sewage tank upward;
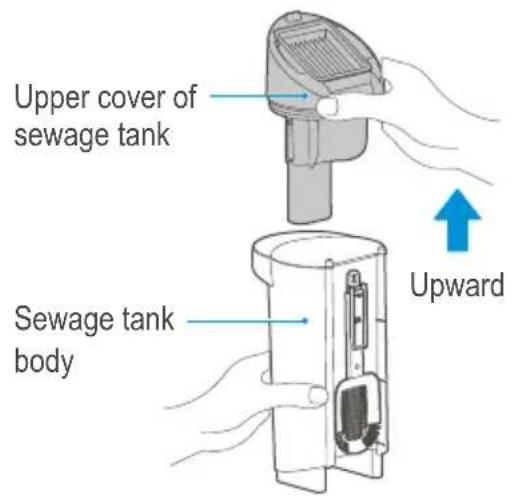
text_image
Upper cover of sewage tank Sewage tank body Upward3 As shown in the figure, pour out the sewage from the side of the tank, and if there is solid-liquid mixed waste in the tank, it is recommended to remove the cleaning spoon at the back of the sewage tank to filter the particles and hair. If there is still solid waste left in the sewage tank after cleaning, rinse and filter the tank repeatedly, or unfold the extended handle of the cleaning spoon and stick the cleaning spoon into the sewage tank for cleaning;
natural_image
Diagram showing a device being processed from a cylindrical container, with a blue tool inserted (no text or symbols present)Use of Product
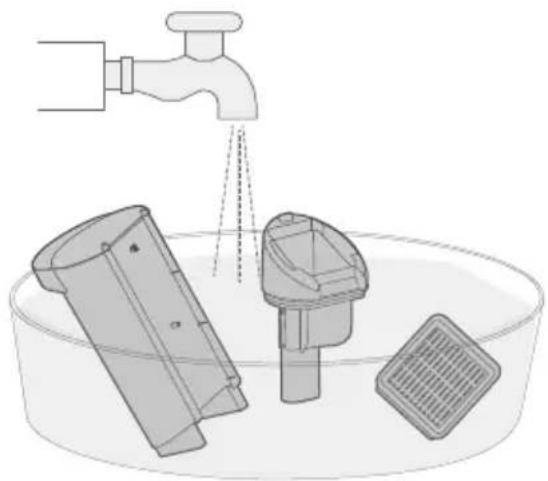
4 Pour out the sewage from the side of the tank as shown in the figure, and if you find any stubborn dirt on the inner wall of the tank, please clean it directly with a cleaning brush;
natural_image
Technical line drawing of a mechanical component with a cylindrical body and a rod inserted (no text or symbols)6 After taking the Hepa out of the tank, clean it with fresh water, dry it completely and then install it back to the sewage tank.
natural_image
Diagram of a faucet spraying water into a container with three plastic containers (no text or symbols)5 Remove the Hepa from top of the sewage tank.

text_image
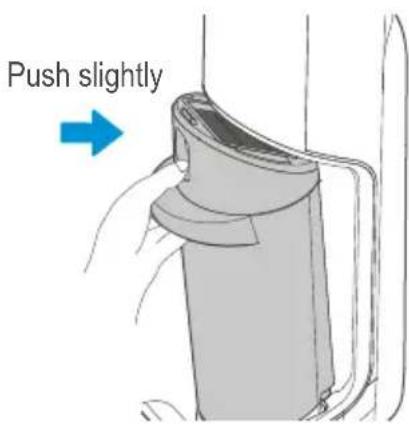
HEPA7 After removing the sewage, install the sewage tank back to the machine until the click sound could be heard.
text_image
Push slightlyUse of Product
Cleaning of the ground brush cover

Notes
- After using the machine, wash the ground brush cover regularly to keep the machine tidy and clean.
1 Put your fingers on the positions shown in the figure, press the front end of the release button with your thumb and pull it out with your middle finger and index finger to remove the ground brush cover;
2 After taking it out, wash it with fresh water until it is clean;
natural_image
Illustration of a hand operating a vacuum cleaner with a blue arrow indicating rotation (no text or symbols present)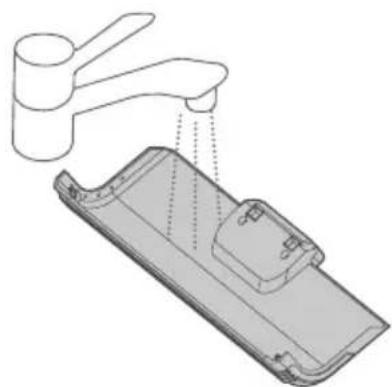
natural_image
Diagram of a kitchen sink with faucet and drawer, showing water level indicator (no text or symbols)3 After cleaning, align the snaps at both ends of the floor brush cover with the slots at both ends of the floor brush, rotate and press the lift handle of the floor brush cover until a click sound is heard, and the installation is successful.
natural_image
Diagram showing a hand using a tool to adjust or install a device, with no visible text or symbols.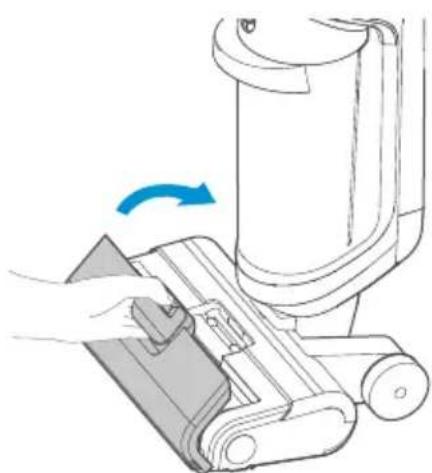
natural_image
Illustration of a hand using a vacuum cleaner to lift a device, showing mechanical components and a blue rotation arrow (no text or symbols)Use of Product
Cleaning of rolling brush

Notes
- If residual stains are found on the mouth of the suction nozzle, wipe with a damp rag, and do not rinse it with water;
• After using the machine each time, clean and dry the rolling brush timely to keep it clean and tidy.
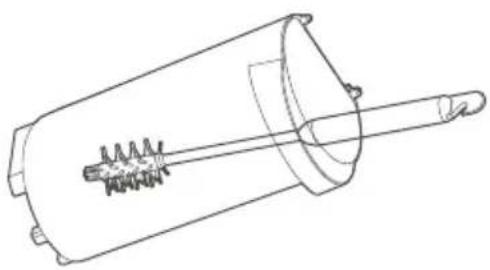
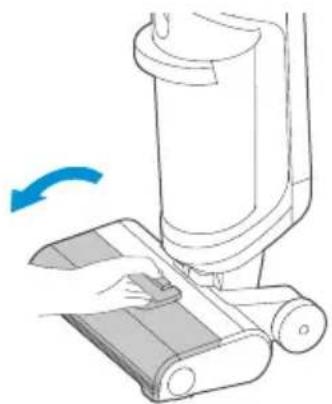
1 Pull the handle on the left end of the rolling brush to remove the rolling brush.
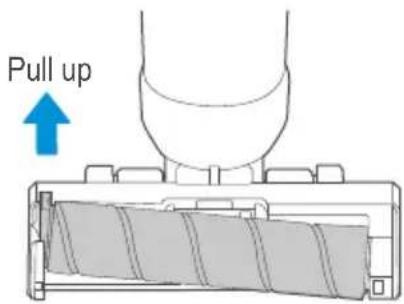
text_image
Pull up2 Remove the rolling brush, open the rotation blade of the cleaning brush to remove the things tangled on the brush such as hair.
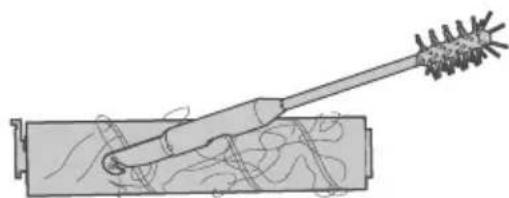
natural_image
Diagram of a mechanical tool interacting with a cylindrical component (no text or symbols visible)3 Wash the rolling brush with fresh water.
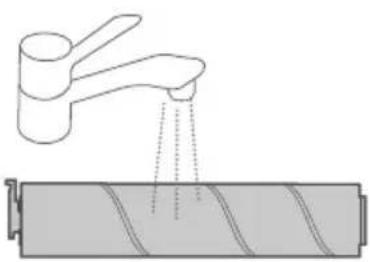
natural_image
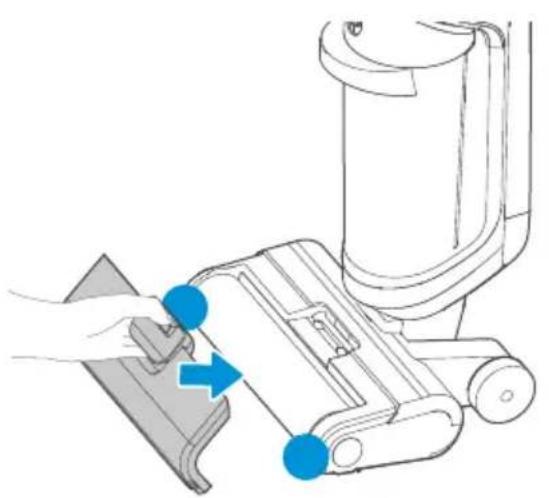
Diagram showing a faucet releasing liquid into a cylindrical battery (no text or symbols)4 After cleaning, pinch the brush handle with your hand, align the right side of the brush shown in Figure a with the right end cover first, then put the left end of the brush handle shown in Figure b into the slot, and the brush will be successfully installed.
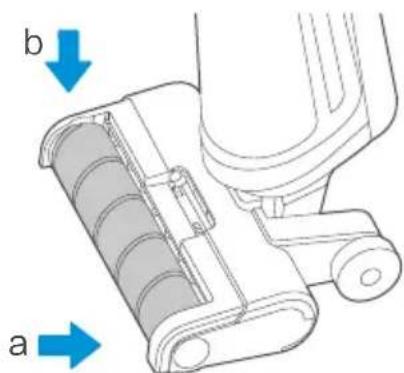
text_image
b aTroubleshooting
Please check the following table in case of any abnormal conditions when using the product.
| SolutionAbnormal Condition Possible Re | ||
| The floor washer does not work | - The rolling brush has been tangled by hair- The sewage tank is full- Water shortage in fresh water tank- Low battery | - Clean the rolling brush- Empty the sewage tank- Refill the fresh water tank- Charge the machine |
| Suction force is weakened | - Rolling brush, rolling brush cover or the sewage tank is not installed properly- The rolling brush has been tangled by hair- Suction nozzle or pipe is blocked- The filter screen on the floater is dirty- The sewage tank filter is dirty or missing | - Reinstall them- Clean the rolling brush- Remove the obstacles inside the suction nozzle or pipe- Clean the filter screen before using the machine- Clean or install the filter before using the machine |
| Fan operation noise | - Suction nozzle is blocked- Sewage reaches certain level in the tank | - Remove the obstacles inside the suction nozzle- Take out the sewage tank to remove the sewage before using the machine |
| No water could be sprayed from the ground brush | - No water in the fresh water tank- The fresh water tank is not installed properly | - Refill the fresh water tank- Reinstall the fresh water tank |
| Water leakage at air outlet | - The floater of the sewage tank is blocked- The sewage tank filter is not dried after washing and using | - Remove the foreign matter at the floater of the sewage tank- Dry the filter after washing and using it before using it again |
| Water leakage at the bottom of the ground brush | - Sewage tank or sewage tank filter is not installed | - Install the sewage tank and its filter |
Warranty policy / service
We congratulate you to your new device and are convinced that you will be satisfied and have your joy with this modern appliance.
However, if you recognize a reason for a complaint, please contact us:
| Midea Europe GmbH | Phone: +49 6196-90 20 - 0 | In case of service: |
| Ludwig-Erhard-Str. 14 | Fax: +49 6196-90 20 -120 | Phone: +49 6196-90 20 - 0 |
| 65760 Eschborn | Email: kundenservice@midea.com | Fax.: +49 6196-90 20 -120 |
| Homepage: www.midea.com/de | Email: kundenservice@midea.com |
In case of a technical fault, enter your exact address, telephone number, sales contract number and Device type (from the type plate of the device).
A precise fault description saves you time and money. For special questions, please contact the customer service center.
Before calling for service:
Please check whether there is an operating error or a cause that has nothing to do with the function of your device.
Please observe the note in the user manual and check whether:
- The power plug is connected
- The power plug may be damaged
- Electricity is available
Warranty erms
This device has been manufactured and tested according to the most modern methods. The seller warrants for faultless material and proper manufacture for a period of 24 months from the date of sale to the end user. The unit is not suitable for commercial use.
The claim under guarantee lapses in the event of intervention by the Buyer or by a third party. Damage caused as a result of improper handling or operation, incorrect installation or storage, improper connection or installation as well as an act [...] of God or other external factors shall not be covered by this warranty.
When claims are submitted, the manufacturer reserves the right to make improvements to defective parts or to replace or exchange the device.
Only if it is not possible to achieve the intended use of the device by repairing or replacing the device, the buyer can demand a reduction of the purchase price or the cancellation of the purchase contract within 6 months from the date of purchase.
Claims for damages, including consequential damages, are excluded unless they are based on intent or gross negligence.
The guarantee claim exists only with submission of the product and the purchase receipt. This warranty is valid within Germany.
Imported by: Midea Europe GmbH Ludwig-Erhard-Str. 14 65760 Eschborn, Germany
natural_image
Two identical mechanical tools with spiky surfaces, one with a blue arrow indicating rotation (no text or symbols)natural_image
Illustration of a mechanical tool with two views showing different blade configurations (no text or symbols)natural_image
Illustration of a blue droplet being poured into a cylindrical container (no text or symbols)Utilisation
natural_image
Technical line drawing of a mechanical component with a dashed circular arrow pointing to a cable (no text or symbols)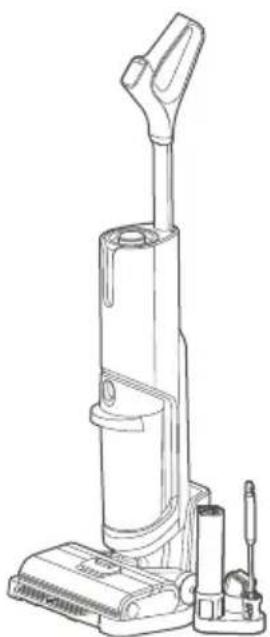
natural_image
Line drawing of a vacuum cleaner with attached circuit board (no text or symbols)Utilisation
natural_image
Illustration of a blue pipette dispensing liquid into a cylindrical container (no text or symbols)natural_image
Line drawing of a vacuum cleaner (no text or symbols)natural_image
Line drawing of a vacuum cleaner with handle and base (no text or symbols)natural_image
Line drawing of a vacuum cleaner with blue arrow indicating rotation (no text or symbols)natural_image
Technical line drawing of a vacuum cleaner with a magnified inset showing internal components (no text or symbols)Utilisation
natural_image
Technical line drawing showing a mechanical assembly process: before, after, and after being cut (no text or symbols present)Utilisation
natural_image
Technical line drawing of a mechanical component with a cylindrical body and a rod inserted (no text or symbols)natural_image
Diagram of a faucet spraying water into a basin with plastic containers and a gridded sink (no text or symbols)natural_image
Illustration of a hand using a vacuum cleaner to lift a device, showing motion and rotation (no text or symbols)natural_image
Technical line drawing of a cleaning or cleaning device with faucet and handle (no text or symbols)natural_image
Diagram showing a hand using a tool to adjust or install a device, with no visible text or symbols.
natural_image
Illustration of a hand using a vacuum cleaner to lift a device, showing mechanical components and a blue rotation arrow (no text or symbols)Utilisation
natural_image
Diagram of a mechanical tool interacting with a cylindrical component (no text or symbols visible)natural_image
Diagram showing a faucet pouring liquid into a battery (no text or symbols)natural_image
Two types of hairbrushes with different tip positions and a blue arrow indicating rotation (no text or symbols)natural_image
Illustration of a pair of mechanical tools with textured surfaces, one showing a blue arrow indicating rotation (no text or symbols)3 Porta accessori
natural_image
Illustration of a blue droplet being poured into a cylindrical container (no text or symbols)Utilizzo
natural_image
Technical line drawing of a mechanical component with a dashed circular annotation (no text or symbols)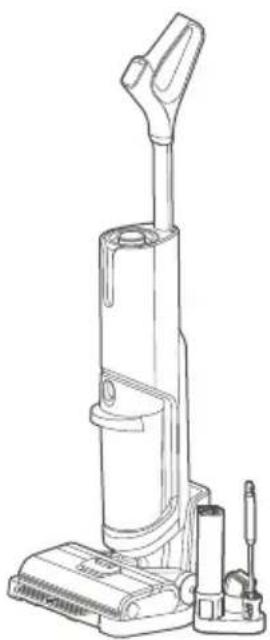
natural_image
Line drawing of a vacuum cleaner with attached circuit board (no text or symbols)Utilizzo
natural_image
Illustration of a blue pipette dispensing liquid into a cylindrical container (no text or symbols)natural_image
Line drawing of a vacuum cleaner (no text or symbols)natural_image
Line drawing of a vacuum cleaner with handle and base mount (no text or symbols)natural_image
Line drawing of a vacuum cleaner with blue arrow indicating rotation (no text or symbols)natural_image
Line drawing of a medical or laboratory device component (no text or symbols)natural_image
Line drawing of a medical or laboratory device component (no text or symbols)
Prompt
natural_image
Line drawings of a vacuum cleaner with a blue arrow indicating rotation (no text or symbols)natural_image
Line drawing of a vacuum cleaner with a magnified inset showing internal components (no text or symbols)natural_image
Technical line drawing showing a mechanical assembly process: before, after, and after being cut (no text or symbols present)Utilizzo
natural_image
Technical line drawing of a mechanical component with a cylindrical body and a rod inserted (no text or symbols)natural_image
Diagram of a faucet spraying water into a container with plastic containers and a gridded outlet (no text or symbols)natural_image
Line drawing of a hand using a vacuum cleaner to press or install a device, with no visible text or symbols.natural_image
Diagram of a hand washing a baby phone with a faucet, showing internal components and liquid level (no text or symbols)natural_image
Diagram showing a hand using a tool to adjust or install a device, with no visible text or symbols.
natural_image
Diagram of a hand using a tool to press or adjust a mechanical component, showing a blue arrow indicating rotation (no text or symbols present)Utilizzo
natural_image
Diagram showing a faucet releasing liquid into a cylindrical battery (no text or symbols)natural_image
Diagram of a mechanical device with a lever and internal components (no text or symbols)natural_image
Two identical mechanical tools with spiky ends, one with a blue arrow indicating rotation (no text or symbols)natural_image
Illustration of a pair of mechanical tools with textured surfaces, one showing a blue arrow indicating rotation (no text or symbols)natural_image
Illustration of a blue droplet being poured into a cylindrical container (no text or symbols)Uso
natural_image
Technical line drawing of a mechanical component with a dashed circular arrow pointing to a detail (no text or symbols)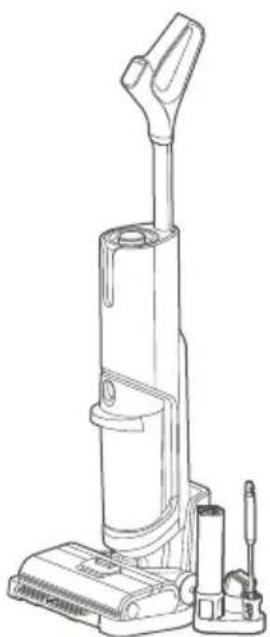
natural_image
Line drawing of a vacuum cleaner with attached circuit board (no text or symbols)Uso
natural_image
Illustration of a blue dropper dispensing liquid into a cylindrical container (no text or symbols)natural_image
Line drawing of a vacuum cleaner (no text or symbols)natural_image
Line drawing of a vacuum cleaner with handle and base mount (no text or symbols)natural_image
Line drawing of a vacuum cleaner with blue arrow indicating rotation (no text or symbols)Interruptor vertical
natural_image
Line drawing of a vacuum cleaner with a blue arrow indicating rotation (no text or symbols)natural_image
Line drawing of a vacuum cleaner with a magnified inset showing internal components (no text or symbols)Uso
natural_image
Technical line drawing showing a mechanical assembly process: before, after, and after being cut (no text or symbols present)Uso
natural_image
Technical line drawing of a mechanical component with a cylindrical shaft and flange (no text or symbols)natural_image
Diagram of a faucet spraying water into a basin with plastic containers and a gridded outlet (no text or symbols)natural_image
Illustration of a hand using a vacuum cleaner to lift a device, with a blue arrow indicating rotation (no text or symbols present)
natural_image
Technical line drawing of a faucet and plastic door assembly (no text or symbols)natural_image
Diagram showing a hand using a tool to adjust or install a device, with no visible text or symbols.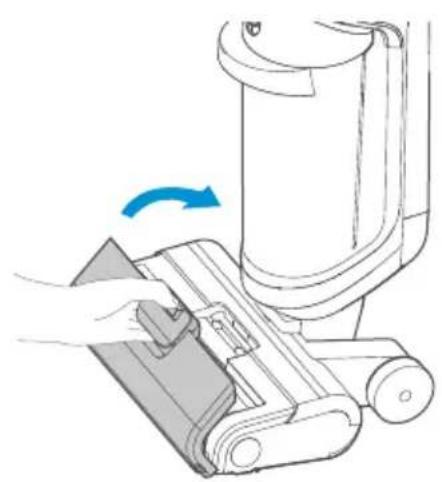
natural_image
Diagram of a hand using a vacuum cleaner to clean or adjust the air gap (no text or symbols present)Uso
natural_image
Diagram of a mechanical device with a lever and internal components (no text or symbols)natural_image
Diagram showing a faucet pouring liquid into a battery (no text or symbols present)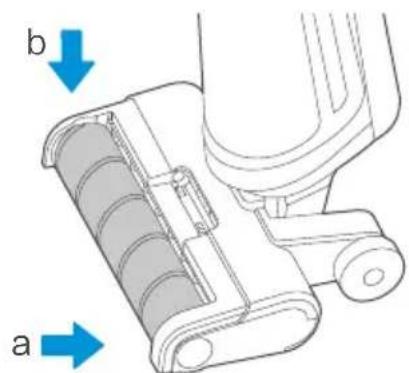
text_image
b anatural_image
Two identical mechanical tools with spiky blades and a blue arrow indicating rotation (no text or symbols)2 Colher de limpeza
natural_image
Illustration of a mechanical tool with two views showing internal structure and a blue arrow indicating rotation (no text or symbols)natural_image
Illustration of a blue pipette dispensing liquid into a cylindrical container (no text or symbols)Utilização
Instalação do punho
natural_image
Technical line drawing of a mechanical component with a dashed circular arrow pointing to a cable (no text or symbols)
natural_image
Line drawing of a vacuum cleaner with attached circuit board (no text or symbols)Utilização
natural_image
Illustration of a blue pipette dispensing liquid into a cylindrical container (no text or symbols)text_image
Pressionarnatural_image
Line drawing of a vacuum cleaner (no text or symbols)natural_image
Line drawing of a vacuum cleaner with handle and control panel (no text or symbols)natural_image
Line drawing of a vacuum cleaner with blue arrow indicating rotation (no text or symbols)Interruptor vertical
natural_image
Line drawings of a vacuum cleaner with a blue arrow indicating rotation, shown from left and right views (no text or symbols)natural_image
Line drawing of a vacuum cleaner with a magnified inset showing internal components (no text or symbols)Utilização
natural_image
Technical line drawing showing a mechanical assembly process: before, after, and after being cut (no text or symbols present)Utilização
natural_image
Technical line drawing of a mechanical component with a cylindrical body and a rod inserted (no text or symbols)natural_image
Diagram of a faucet spraying water into a basin with plastic containers and a gridded sink (no text or symbols)natural_image
Line drawing of a hand using a vacuum cleaner to press or install a device, with no visible text or symbols.
natural_image
Diagram of a kitchen sink with faucet and plastic tray (no text or symbols)natural_image
Diagram showing a hand using a tool to adjust or install a component, with no visible text or symbols.
natural_image
Illustration of a hand using a vacuum cleaner to lift a mechanical component, showing a blue arrow indicating rotation (no text or symbols present)Utilização
Limpeza da escova rotativa

Nota
natural_image
Diagram of a mechanical device with a lever and internal components (no text or symbols)natural_image
Diagram showing a faucet pouring liquid into a battery (no text or symbols present)
text_image
b aJiangsu Midea Cleaning Appliances Co., Ltd
No.39, Caohu Avenue, Xiangcheng Zone, Suzhou, China
Made in China