Delice 5L - Drink dispenser Ugolini - Free user manual and instructions
Find the device manual for free Delice 5L Ugolini in PDF.

| Product Type | Hot beverage dispenser |
| Brand | Ugolini |
| Model | Delice 5L |
| Tank Capacity | 5 liters |
| Number of Tanks | 1 |
| Dimensions (W x D x H) | 24 x 32 x 49 cm |
| Net Weight | 6 kg |
| Gross Weight | 7 kg |
| Power Supply | Single-phase (see rating plate) |
| Operating Ambient Temperature | +5°C to +35°C |
| Noise Level | < 70 dB(A) |
| Adjustable Thermostat | Yes (1 thermostat) |
| Functions | Heating, stirring, automatic cooking (electronic version) |
| Tank Material | Transparent plastic |
| Control Type | Main switch, thermostat, electronic panel (depending on version) |
| Safety | Grounding, thermal protection, automatic shut-off |
| Recommended Maintenance | Daily cleaning and disinfection |
| Spare Parts Available | Faucets, gaskets, mixer, heating element, etc. |
| Certifications | Compliant with EN standards |
Frequently Asked Questions - Delice 5L Ugolini
User questions about Delice 5L Ugolini
0 question about this device. Answer the ones you know or ask your own.
Ask a new question about this device
Download the instructions for your Drink dispenser in PDF format for free! Find your manual Delice 5L - Ugolini and take your electronic device back in hand. On this page are published all the documents necessary for the use of your device. Delice 5L by Ugolini.
USER MANUAL Delice 5L Ugolini
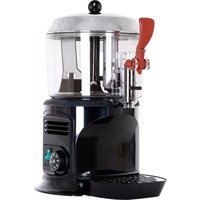
natural_image
Modern black and white industrial blender with glass control panel and side-mounted fan (no visible text or symbols)

ugolini®
EC DECLARATION OF CONFORMITY
We Ugolini S.p.A. - Via dei Pioppi 33 - 20090 Opera Milano - Italy declare, under our responsibility, that the apparatus HOT DRINK DISPENSER - Trademark: UGOLINI S.p.A. - Manufacturer: UGOLINI S.p.A. - Model: DELICE - DELICE SILVER - DELICE GOLD 230V 50Hz are in conformity with the following Standards:
- EN ISO 12100-1 (2010)
- EN ISO 12100-2 (2010)
- EN60335-1 (2012)
- EN60335-2-24 (2010)
- EN60335-2-75 (2004)+A1(2005)+A11(2006)+A2(2008)+A12(2010)
Following the provisions of the Directives 2006/42/CE, 2006/95/CE, 2004/108/CE.
DECLARATION DE CONFORMITE CE
Conformément aux Directives 2006/42/CE, 2006/95/CE, 2004/108/CE.
see data plate on the machine
Transparent removable bowls n 1
Capacity of each bowl, approx. 15
Dimensions:
width cm 24
depth cm 32
height cm 49
Net weight, approx. kg 6
Gross weight, approx. kg 7
Adjustable thermostats n 1
Noise level lower than 70 dB (A)

IMPORTANT
Electric specifications: read the information on the data plate of each single dispenser, situated on the underside. The serial number of the units is preceded by #
The manufacturer reserves the right to make changes without any prior notification.
2 INTRODUCTION
It is necessary to Read this instruction manual carefully to know the specifications of the dispenser. As all mechanical products, this unit requires cleaning and maintenance. Its working order can be compromised by possible errors made by the operator during disassembly and cleaning. For this reason it is important that the staff in charge of the dispenser is qualified to carry out the day to day operations, which are dismantling, cleaning, sterilisation and reassembly.
3 INSTALLATION
1 Remove the dispenser from the packaging. (This should be kept for any future requirement)
2 Check the dispenser has not been damaged during transport. The forwarding agent must be notified immediately of any claim.
3 Install the dispenser on a counter top that will support its weight, even with a full load.
4 Before connecting the dispenser electrically check that the voltage (in the network) is as shown on the data plate. Plug the unit into a grounded, protected single phase electrical supply according to the applicable electrical codes and the specifications of your machine. The electrical disconnect switch shall have a contact
separation in all poles, providing full disconnection under over voltage category III conditions. not use extension cords to connect the unit electrically.

ATTENTION
Ensure that the unit is grounded correctly; if not it may cause electric shock to persons or damage the dispenser.
5 The dispenser does not leave the factory presanitized and sanitized. Prior to use it must be disassembled, cleaned and sanitized according to the instructions in chapter 7 CLEANING AND SANITIZING PROCEDURES.
4 TO OPERATE PROPERLY AND SAFELY
1 Read the instruction booklet before using the dispenser.
2 Use the dispenser only if it is grounded correctly.
3 Do not use extension cords to connect the dispenser electrically.
4 Do not operate the dispenser if it is not closed and blocked with screws.
5 Do not place fingers or objects in the cooling fissures and faucet outlet panels louvers.
6 Do not remove the container when the unit is in operation.
7 This unit is not meant to be used outside.
8 This unit is not to be installed in areas subject to water-spouts.
9 Do not use water-jets to clean the unit.
10 This unit can work in a room temperature range between +5° and +35°C.

ATTENTION
Do not remove the container until the hot plate is cold.

ATTENTION
Do not remove the container from the dispenser when it contains hot products.

IMPORTANT
Place the unit on an horizontal surface.

ATTENTION
In case of damages, the power cord must be replaced by qualified personnel only in order to prevent any shock hazard.
5 OPERATING PROCEDURES
1 Clean and sanitized the dispenser prior to use following the instructions in chapter 7 CLEANING AND SANITIZING PROCEDURES.
2 Fill the bowl with the product, prepared according to the instructions of the manufacturer.
3 Install the cover above the container making sure that it is placed correctly.
4 Set the control switch (see charter 5.1. COMMAND DESCRIPTIONS)
5 The dispenser should always operate with the cover installed in order to prevent possible contamination of the product.
6 The dispenser must run uninterruptedly; heating will stop automatically when the product is ready for dispensing. The mixing device will continue to operate.
7 The dispenser is supplied with a container with a closed removable bottom to facilitate cleaning and sterilisation.

IMPORTANT
This appliance is not intended for use by person (including children) with reduced physical sensory or mental capabilities, or lack of experience and knowledge unless they have been given supervision or instruction concerning use of the appliance by a person responsible for their safety. Children should be supervised to ensure that they do not play with the appliance.
5.1 DESCRIPTION OF CONTROLS
The dispenser is equipped with a general switch whose functions are:
Position 0 : power is turned off
Position I : mixer and heating device in working order
The dispenser is equipped with a thermostat, on the right side, to adjust the temperature of the product.
(ELECTRONIC VERSION)
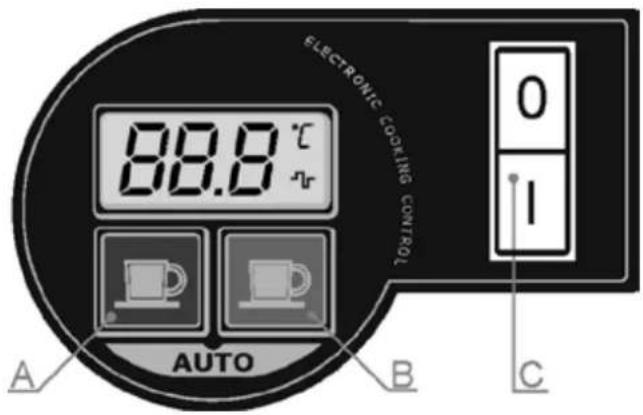
text_image
ELECTRONIC COOKING CONTROL 89.8 °C AUTO A B C 0 IThe dispenser is equipped with a general switch whose functions are:
Position 0 : power is turned off.
Position I : mixing and hating on.
The dispenser is also equipped with an electronic device, located on the right side, to control the temperature of the product. This device has one display, to show the set temperature and two keys whose functions are the following:
Key A: to decrease the desired temperature one degree by one; by keeping it pressed for more than two seconds it is possible to quickly decrease the temperature.
Key B : to increase the desired temperature one degree by one; by keeping it pressed for more than two seconds it is possible to quickly increase the temperature.
On the display, the symbols °C or °F indicates the current temperature unit and the symbol indicates the turning on of the heating element.
When the dispenser is turned on, both the mixing and the heating are turned on and on the display the set temperature is shown. The set temperature value blinks until when the product has reached the desired temperature.
When the dispenser is turned OFF all the current settings are saved into memory to be effective at the following power on.
Preparation hot chocolate: preparation following the traditional artisan method, mix the cocoa with milk or water well in a pan before pouring it into the bowl. Follow the instructions of the manufacturer if using packaged instantaneous products. It is possible to mix these directly in the container.
Activate the dispenser turning the switch to position 1. In the normal version turn the thermostat knob to 90°C to obtain the cooking temperature of the product. When the hot chocolate is ready lower the temperature to the value required for dispensing turning the thermostat knob.

IMPORTANT
Before switching off the dispenser completely (switch at position 0), bring the thermostat to the lowest temperature and wait for the product to cool down. This stops the product (if not agitated) from sticking to the hot plate.
AUTOMATING COOKING CYCLE electronic version
By pressing together key A and B the dispenser performs an Automatic Cooking Cycle. This means that the product is heated up to 95 °C and maintained at this temperature for 15 minutes. After the expiration of the Automatic Cooking Cycle the product is maintained at the desired temperature set before the cycle.
The temperature and the length of the Automatic Cooking Cycle are factory preset. To reset them turn the dispenser off and then turn it on keeping key A pressed. On the display the Cooking Temperature is shown and it is possible to decease or increase it using keys A or B and to confirm it pressing both keys together. Then the length of the Cooking Cycle is shown and it is possible to decease or increase it using keys A or B and to confirm it pressing both keys together.
7 CLEANING AND SANITIZING PROCEDURES
Cleaning and sanitizing are essential to maintain perfect taste and maximum efficiency from your dispenser. The procedures described below are general and can vary due to the sanitary regulations of the local health authorized.
The product must be taken out of the dispenser before it is disassembled for cleaning.
7.1 DISASSEMBLY

ATTENTION
Before proceeding to disassemble any component always disconnect the unit from the electricity removing the plug.
1 Empty the bowl and remove the lid
2 Remove the mixer from the central shaft
3 Dismantle the faucet following the sequence shown (see fig. 1).
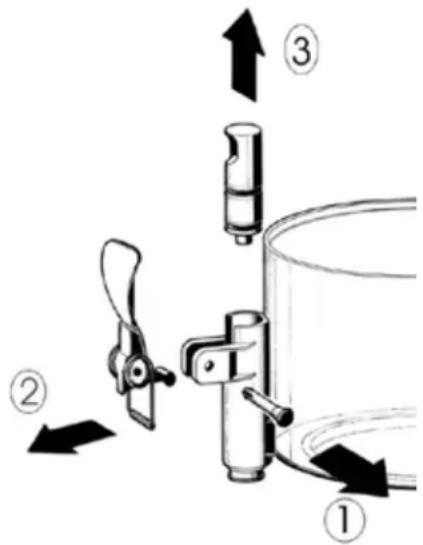
text_image
Diagram showing mechanical assembly steps with numbered arrows indicating direction of motion or forcefigure 1
4 Remove the container, lifting it upwards.
5 Remove the drip-tray and empty it. lavaggio.
7.2 CLEANING

ATTENTION
Before cleaning disconnect the dispenser from the electricity taking out the plug or turning off the outside switch on the wall.
1 Prepare approx. four litres (2 gallons) of hot water (45-60°C) and specific detergent in a bowl according to the instructions of the manufacturer; a solution, which is too concentrated, may cause damage to the parts to be washed, one that is
too diluted will not clean adequately. Do not use abrasive detergents.

IMPORTANT
Do not wash any component of the machine in the dishwasher.

IMPORTANT
Use detergents compatible with the plastic parts to avoid damaging the dispenser.
2 Use a suitable brush and carefully clean all the parts in contact with the drink.

ATTENTION
Do not use excessive amounts of water near the electric components of the dispenser when washing it as this can cause electric shock or damage the dispenser.
3 Rinse all the washed parts in running water.
7.3 SANITIZING
The dispenser must be sanitized prior to starting the machine, every day. Do not allow the unit to sit for extended periods of the time after sanitization.
1 Before starting the procedure described below wash hands with an anti-bacterial soap.
2 Prepare at least. four litres of hot water (45-60°C) and sterilising product legally approved in your Country, following the instructions of the manufacturer. If there is no specific sterilising product prepare a solution of water and bleach in the following ratio: 1 tbsp: 2 litres of water.
3 Immerse all the parts to be sterilised in the solution for time indicated by the manufacturer.
4 Allow the sterilised parts to air dry on a clean surface.
5 Use non-abrasive cloths to dry the external parts.
7.4 ASSEMBLY
1 Put the drip-tray and grill in place.
2 Lubricate the faucet piston (in the area A shown in fig. 2) using food grade approved lubricant.
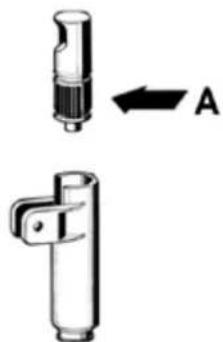
natural_image
Two mechanical components with a directional arrow labeled A, no text or symbols presentfigure 2
3 Reassemble the faucet assembly on the container in the opposite way to which it was dismantled (see fig. 1).
4 Install the container putting the central shaft in place.
5 Insert the mixer in the central shaft.
6 Position the cover on the container.
8 MAINTENANCE
1 Daily: check the dispenser for any loss of product from the gaskets. If there is, first check the dispenser is assembled correctly making sure that the gaskets need no lubricating and they are not faulty or worn. In this case they must be replaced with original parts.
2 To avoid damage to the dispenser the plastic parts must be lubricated only with the grease supplied by the manufacturer or other grease compatible with polycarbonate.
TROUBLESHOOTING
| PROBLEM CAUSE SOLUTION | ||
| Mixer doesn't turn Drive shaft coupling not cor-rect | Check that it's in the cor-rect operating position | |
| Drive shaft coupling broken Replace mixer and/or drive shaft | ||
| Gear motor not working See “Gear motor doesn't turn” | ||
| Electrical wires disconnected or interrupted | Connect or replace electrical wires | |
| Product too dense Dilute the product | ||
| Gear motor doesn't turn Motor overheated: “Thermal Protection” tripped | Check the voltage of the outlet. Check the ventilation (fins on the side panels obstructed or lower part of the distributor obstructed). Check the viscosity of the product | |
| Stator winding burned out or interrupted | Replace the motor | |
| Rotor shifted Check the alignment of the rotor bearings | ||
| Gears in the reducer box damaged or worn | Replace the motor | |
| Beverage leaks from the container | Container gasket seal broken or worn | Replace gasket seal |
| Tap piston o-ring broken or worn | Replace the piston o-ring | |
| Tap piston not in closed posi-tion | Check the tap lever or spring and replace the worn part | |
| Heating element not hot | Heating element burned out | Replace the heating element |
| Thermal fuse burned out | Adjust it to a suitable temperature | |
| Thermal fuse burned out | Thermal fuse defective | Replace with a good one |
| I'm not getting a sufficiently dense product | The temperature of the service thermostat (located on the side of the distributor) is set too low | Adjust it to a suitable temperature |
| Product excessively diluted Increase the concentration of the product | ||
| I'm not getting a sufficiently hot product | The temperature of the service thermostat (located on the side of the distributor) is set too low | Adjust it to a suitable temperature |
| The bottom of the tub is not touching the heating element | Position the tub on the heating element correctly | |
1 CARACTERISTIQUES TECHNIQUES
Delice
text_image
Diagram showing mechanical assembly steps with numbered arrows indicating direction of motion or forcefigure 1
natural_image
Two mechanical components with a directional arrow labeled A, no text or symbols presentfigure 2
text_image
Diagram showing a mechanical device with numbered parts and directional arrows indicating motion or assembly.Bild 1
natural_image
Two mechanical components with a labeled arrow indicating direction (no text or symbols present)Bild 2