
Jet Bot VR30T85513B - Robot vacuum SAMSUNG - Free user manual and instructions
Find the device manual for free Jet Bot VR30T85513B SAMSUNG in PDF.
| Product Type | Robot vacuum with automatic emptying station |
| Brand and model | Samsung Jet Bot VR30T85513B (VR30T85**** series) |
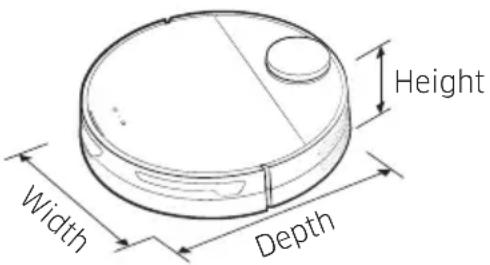
| Dimensions (robot) | W 350 mm x D 350 mm x H 99.8 mm |
| Weight (robot) | 3.4 kg |
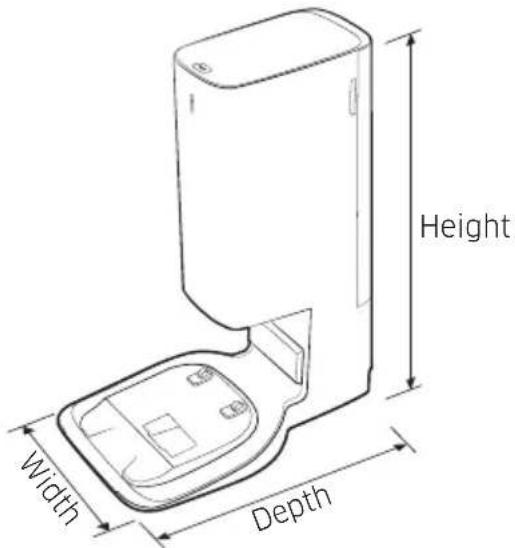
| Dimensions (Clean Station) | W 272 mm x D 416 mm x H 544 mm |
| Weight (Clean Station) | 5.0 kg |
| Battery type | Lithium-ion 21.9 V / 52.56 Wh |
| Charging time | Approximately 240 minutes |
| Runtime (wood floor) | Maximum: approx. 60 min; Intelligent: 60-90 min; Normal: approx. 90 min |
| Power consumption (robot) | 60 W (spot cleaning) |
| Power consumption (Clean Station) | Charging: 40 W; Operation: 1,300 W |
| Connectivity | Wi-Fi 2.4 GHz (IEEE 802.11b/g/n), SmartThings app |
| Navigation | LiDAR sensor |
| Cleaning modes | Automatic, room, spot |
| Additional functions | Energy saving, rest period, scheduled cleaning, no-go zones |
| Dust bin capacity (robot) | Automatic emptying via Clean Station |
| Included accessories | 2 side brushes, 2 dust bags (VCA-RDB95), 2 pre-motor filters, charging contacts, Clean Station, power cable |
| Routine maintenance | Cleaning of dust bin, brush, sensor window, wheel, side brush, fine dust filter, bottom cover |
| Safety | Cliff sensor, anti-start on slope, child lock, stop on obstacle |
| Floor compatibility | Hard floors and short pile carpets (< 2 cm) |
| Warranty | Consult the retailer or Samsung service center |
Frequently Asked Questions - Jet Bot VR30T85513B SAMSUNG
User questions about Jet Bot VR30T85513B SAMSUNG
0 question about this device. Answer the ones you know or ask your own.
Ask a new question about this device
Download the instructions for your Robot vacuum in PDF format for free! Find your manual Jet Bot VR30T85513B - SAMSUNG and take your electronic device back in hand. On this page are published all the documents necessary for the use of your device. Jet Bot VR30T85513B by SAMSUNG.
USER MANUAL Jet Bot VR30T85513B SAMSUNG
- Before operating this unit, please read the instructions carefully.
- For indoor use only

PREPARATION
Safety information 3
INSTALLATION
Installing a Clean Station 13
OPERATION
Charging the Jet Bot 14
Using the Jet Bot 17
Basic use 17
Operation status on the LED Status Indicator 18
Cleaning Functions 19
Additional functions 20
Attaching Boundary Markers 21
Parts diagram 22
Jet Bot 22
Clean Station 22
MAINTENANCE
Cleaning the Jet Bot 23
Emptying and cleaning the Dustbin 23
Cleaning the brush 24
Cleaning the Sensor Window 25
Cleaning the Driving Wheel 25
Cleaning the Side Brush 26
Cleaning the Clean Station 27
Replacing the Dust Bag 27
Cleaning the Fine dust Filter 27
Cleaning the bottom cover 28
APPENDIX
SmartThings App 29
Setting up the wireless router 29
Downloading the SmartThings App 30
Setting up a SAMSUNG account 30
Registering a device to the SmartThings App 30
Software Update 31
Functions of the SmartThings App 32
Notes and cautions 34
Installation 34
Charging 34
Using 35
Cleaning and maintenance 36
Battery usage 37
Corrective measures before reporting a problem 38
Troubleshooting 40
Open Source Announcement 45
How to reset to the factory default 45
Product Specification 46
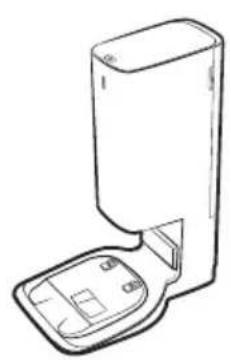
Accessories
Accessories may differ depending on the models.
natural_image
Line drawing of a mobile phone device with a base and top panel (no text or symbols)
Side Brush: 2 units (Inside the product: 1 unit, Spare: 1 unit)
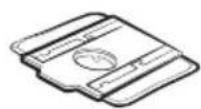
Dust Bag: 2 units (Inside the product: 1 unit, Spare: 1 unit)

Pre-motor Filter: 2 units (Inside the product: 1 unit, Spare: 1 unit)
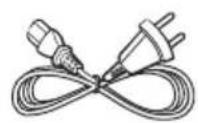
Clean Station Power cord Boundary Markers User Manual
* If you want to purchase an additional Dust Bag, check the model name (VCA-RDB95) and Samsung logo (SAMSUNG) first, then contact your nearest Samsung Electronics retailer or Samsung service center.
Safety information
- Before operating the appliance, please read this manual thoroughly and retain it for your reference.
- Because the following operating instructions cover various models, the characteristics of your vacuum cleaner may differ slightly from those described in this manual.
Caution/Warning symbols used
WARNING
Indicates that a danger of death or serious injury exists.
CAUTION
Indicates that a risk of personal injury or material damage exists.
Other symbols used
NOTE
Indicates that the following text contains additional important information.
Failure to meet these requirements could cause damage to the internal parts of the vacuum and void your warranty.
General
- Do not allow to be used as a toy. Close attention is necessary when used by or near children.
- Use only as described in this manual.
- Do not operate the Jet Bot or the Clean Station if it has been damaged in any way.
- If the vacuum cleaner is not working as it should, has been dropped, damaged, left outdoors, or dropped in water, return it to a customer care center.
- Do not handle the Clean Station or the Jet Bot if your hands are wet.
- Use only on dry, indoor surfaces.
- This appliance can be used by children aged from 8 years and above and persons with reduced physical, sensory or mental capabilities or lack of experience and knowledge if they have been given supervision or instruction concerning use of the appliance in a safe way and understand the hazards involved. Children should not play with the appliance. Children should not clean or perform maintenance on the vacuum without adult supervision.
- Move the cords of other appliances so they are not in the area that is to be cleaned.
- Do not operate the vacuum in a room where an infant or child is sleeping.
- Do not operate the vacuum in an area where there are lit candles or fragile objects on the floor.
- Do not operate the vacuum in a room that has lit candles on furniture that the vacuum may accidentally hit or bump into.
- Do not allow children to sit on the vacuum.
- Do not use the vacuum on a wet surface.
- If the supply cord is damaged, it must be replaced by the manufacturer or its service agent or a similarly qualified person in order to avoid a hazard.
- For information on Samsung's environmental commitments and product specific regulatory obligations e.g. REACH (WEEE, Batteries) visit: samsung.com/uk/aboutsamsung/samsungelectronics/corporatecitizenship/data_corner.html
Clean Station
- Do not modify the polarized plug to fit a non-polarized outlet or extension cord.
- Do not use outdoors or on wet surfaces.
- Unplug the Clean Station from the outlet when not in use and before servicing.
- Use only the Clean Station supplied by the manufacturer to recharge.
- Do not use with a damaged cord or a plug or a loose power outlet.
- Do not pull or carry by the cord, use the cord as a handle, close the door on the cord, or pull the cord around sharp edges or corners. Keep the cord away from heated surfaces.
- Do not use extension cords or outlets with inadequate current carrying capacity.
- Do not unplug by pulling on the cord. To unplug, grasp the plug, not the cord.
- Do not mutilate or incinerate batteries as they will explode at high temperatures.
- Do not attempt to open the Clean Station. Repairs should only be carried out by a qualified customer care center.
- Do not expose the Clean Station to high temperatures or allow moisture or humidity of any kind to come into contact with the Clean Station.
- Do not charge the non-rechargeable batteries with the Clean Station.
Jet Bot
- Do not pick up hard or sharp objects such as glass, nails, screws, coins, and etc.
- Do not use without a filter in place. When servicing the unit, never put fingers or other objects into the fan chamber in case the unit accidentally turns on.
- Do not put any objects into openings. Do not use with any openings blocked; keep openings free of dust, lint, hair, and anything that may reduce air flow.
- Do not pick up toxic materials (chlorine bleach, ammonia, drain cleaner, etc.).
- Do not pick up anything that is burning or smoking, such as cigarettes, matches, or hot ashes.
- Do not use to pick up flammable or combustible liquids such as gasoline or use in areas where they may be present.
-
Also do not use in:
-
Locations with candles or desk lamps on the floor.
- Locations with unattended fires (fire or embers).
- Locations with distilled alcohol, thinner, ashtrays with burning cigarettes, etc.
- Do not use the Jet Bot in an enclosed space filled with vapors given off by oil based paint, paint thinner, moth proofing substances, flammable dust, or other explosive or toxic vapors.
- Leaks from battery cells can occur under extreme usage or temperature conditions. If the liquid gets on the skin, wash quickly with water. If the liquid gets into the eyes, flush them immediately with clean water for a minimum of 10 minutes. Seek medical attention.
Power related
WARNING
- Please prevent any risk of electric shock or fire.
- Do not damage the power cord.
- Do not pull the power cord too hard or touch the power plug with wet hands.
- Do not use a power source other than rated volatge of the charger and also do not use a multi-outlet to supply power to a number of devices at the same time. (Do not leave the cord carelessly on the floor.)
- Do not use a damaged power plug, a power cord or a loose power outlet.
- Clean dust or any foreign matter on the pin and the contact part of the power plug.
- There is a risk of electric shock or malfunction.
Before use
WARNING
- Do not use the Jet Bot near a heater or combustible materials.
- Do not use the Jet Bot near fire or flame such as a movable heater, a candlelight, a desk lamp, a fireplace, etc. or in a place where combustible materials such as gasoline, alcohol, thinner, etc. exist.
- Make sure there are no dangerous objects around the Jet Bot's cleaning area to prevent collision and unplug any electric heaters or fans.
- The Jet Bot can be damaged or malfunction.
- The Jet Bot is intended for household use therefore do not use it in an attic, basement, storage, an industrial building, out of indoor space, places with moisture (such as a bathroom, a laundry room), on the table or shelves.
- The Jet Bot can be damaged or malfunction.
- Attach the Boundary Markers to a place where the Jet Bot may fall such as a stair or a banister to prevent product damage and injury.
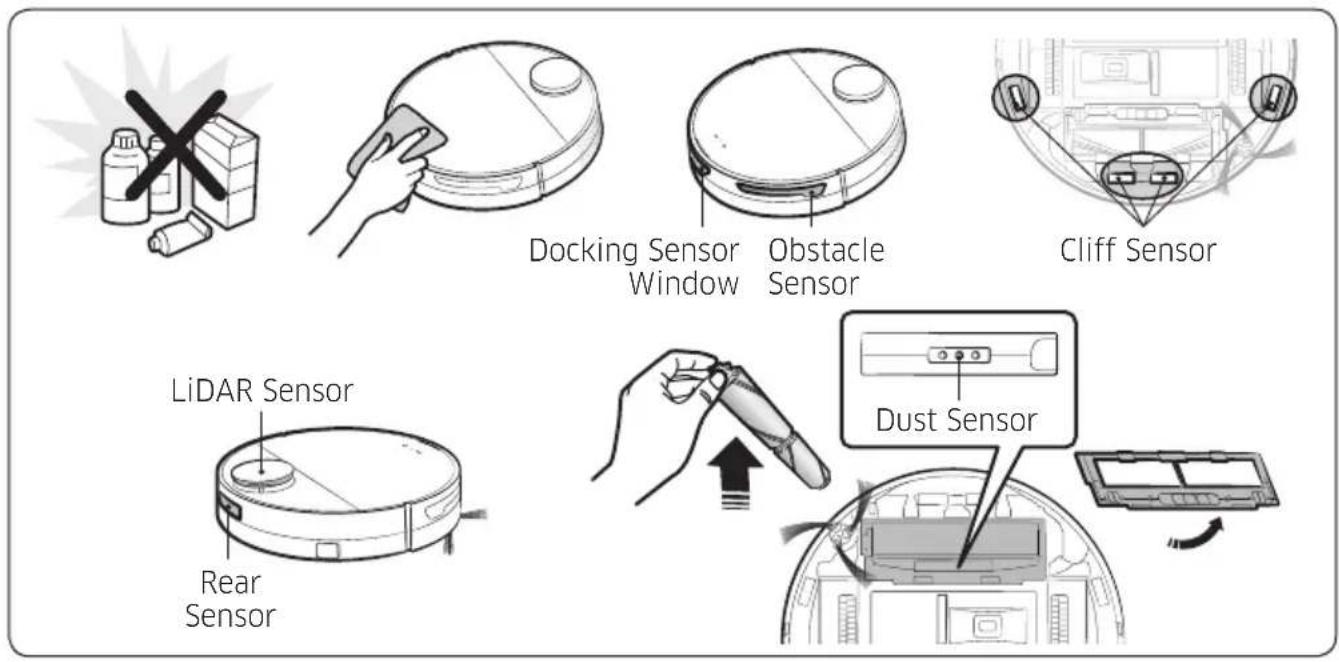
- Please keep the Cliff Sensor clean all the time for safety.
- Be sure the Jet Bot does not suck in or touch any kind of liquids (water, beverage, filth, etc.).
- The Jet Bot can be severely damaged and it may contaminate other areas if the wheels pass through liquid.
- Do not spill any liquids on the Clean Station.
- There is a risk of fire or electric shock.
- Do not use the Clean Station for anything other than its intended purposes.
- There is a risk of fire or severe damage to the Clean Station.
• Always keep the Cliff Sensor clean for your safety. - As this wireless installation may cause radio interference, it cannot provide a service related with human safety.
CAUTION
- Insert the Dustbin before using the Jet Bot.
- When installing the Clean Station, do not leave the cord carelessly on the floor since the Jet Bot may get tangled by it.
- To clean all areas of your house, open all rooms and set the No-go Zones with the SmartThings App or attach the Boundary Markers to the places where the Jet Bot may get damaged such as a front door, a veranda, a bathroom, and stairs for safety.
- Follow these recommendations for proper automatic recharging.
- Always turn on the power of the Clean Station.
- Install the Clean Station where the Jet Bot can easily find.
- Do not leave any objects in front of the Clean Station.
- Do not use the Jet Bot on black colored floors.
- The Jet Bot may not be able to operate normally.
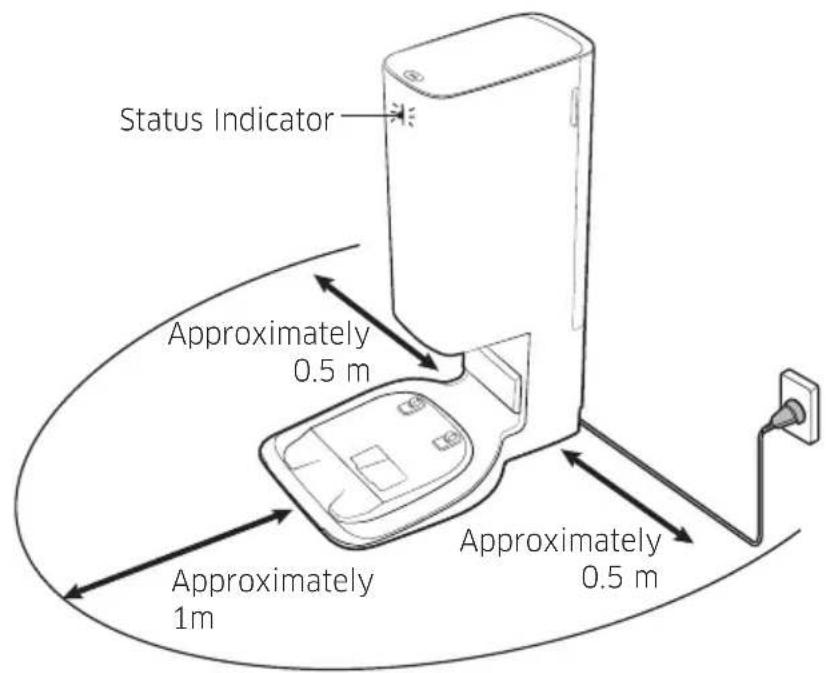
- Do not place any objects within 0.5 m of either side of the Clean Station or within 1 m of the front of the Clean Station.
- Make sure the Clean Station's charging contact is not damaged or have any foreign matter on it.
- For the very low areas where the Jet Bot may get stuck, set the No-go Zones with the SmartThings App or attach the Boundary Markers to prevent the Jet Bot from getting in.
- Do not install the Clean Station in an area with a dark floor.
- If the floor around the Clean Station is dark, recharging is hindered.
- Move any obstacles that may disturb the Jet Bot's movement (such as children's indoor swing or slides) before cleaning.
- Do not use the Jet Bot in a place which is narrower than its turning radius 0.5 m or less.
- Before operating the Jet Bot, remove the objects which could break such as glass, a frame, a mirror, and porcelain items so that the Jet Bot works without interruption.
- If a brush or a brush cover is not assembled correctly, scratches may occur on the floor, or product malfunction may occur.
- Use both hands to carry the product.
- Do not place the Clean Station in a place where people pass by frequently, in entrance way or narrow passage.
- People may trip over it and be injured, or product damage may occur.
- Do not push the Clean Station.
In use

WARNING
- If any abnormal sounds, smells or smoke come from the Jet Bot, immediately shut off the power switch of the Jet Bot and contact a service center.

CAUTION
- Using the Jet Bot on a thick carpet may damage both the Jet Bot and the carpet.
- The Jet Bot cannot pass over a carpet with fiber longer than 2 cm.
- Do not use the Jet Bot on tables or other high surfaces.
- There is a risk of damage if it falls.
- The Jet Bot may bump into chairs or desk legs, therefore move them away for faster and efficient cleaning.
- When the Jet Bot is operating, do not lift it up or carry it to another area.
- Do not hold by Driving Wheels of the Jet Bot when carrying it to another area.
- Do not put any objects on top of the Jet Bot since it may cause malfunction of the LiDAR sensor or the Jet Bot.
- Remove any large papers or plastic bags immediately when using the Jet Bot since they may block the intake.
- Do not lie down around the Jet Bot that is running.
- Your hair may be caught in the brush, resulting in physical injury.
- Do not allow children to play with the Jet Bot.
- Make sure hair, fingers, clothes do not get caught in a Side Brush or Driving Wheels.
- Do not allow children to sit on the Jet Bot and do not place an object on the Jet Bot.
- Leave over 3 cm space from the inner doorstep placed in the entrance. Otherwise, the Jet Bot can ride on it and go outside.
Cleaning and maintenance
WARNING
- When the power cord is damaged, contact a service center to get it replaced by a certified repairman.
- There is a risk of fire or electric shock.
- Please check with a SAMSUNG Electronics service center when replacing batteries.
- Using batteries from other products can cause malfunction.
- Be careful not to put your finger into the revolving LiDAR sensor.
Otherwise, your finger may get injured.
CAUTION
- Prevent any damage to the Jet Bot by complying with the following.
- Do not clean the Jet Bot by spraying water directly onto it or use a volatile substance such as benzene, thinner, or alcohol to clean it.
- Do not disassemble or repair the Jet Bot. This should only be done by a certified repairman.
- Always keep the Obstacle Sensor Window and the Cliff Sensor Window clear.
-
If foreign matter accumulates, sensors may malfunction.
-
Do not store the Jet Bot in a car.
- Be careful that the LiDAR sensor is not exposed to a direct light such as sun light, infrared light, etc.
- The direct light can affect the performance of the LiDAR sensor.
- When carrying the Jet Bot, be careful not to let it drop.
- The impact from the drop can affect the operation or performance of the LiDAR sensor.
- Do not look at the transmitting part (a laser) of the revolving LiDAR sensor horizontally.
- Be careful not to insert a tool such as a chopstick into the revolving LiDAR sensor. Otherwise, the LiDAR sensor may work abnormally or malfunction.
- Before cleaning, remove objects which are less than 9 cm height and are lightly on the floor as the Jet Bot can push along them, or the objects can be caught in the Jet Bot's Side Brush or Driving Wheels. (Fixed objects can be detected by the Jet Bot when its bumper is pressed and will avoid them.)
- If oil such as cooking oil is on the floor, the Jet Bot may become stationary because the floor is slippery. Remove the oil first before cleaning with the Jet Bot.
natural_image
Illustration showing a hand holding a pen and a tool interacting with a device panel (no text or symbols visible)1 Connect the provided power cord to the bottom of the Clean Station.
natural_image
Line drawing of a plug inserted into a socket, showing wiring and mounting bracket (no text or symbols)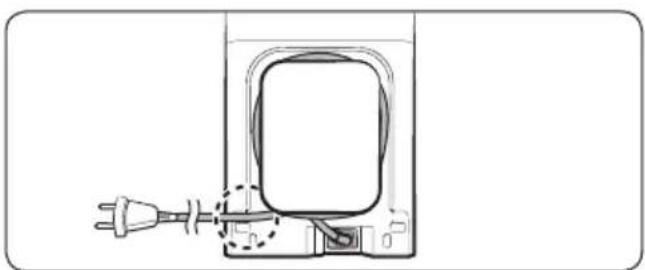
natural_image
Line drawing of a plug inserted into a device housing (no text or symbols)2 Position the power cord into the fixing groove at the rear of the Clean Station.
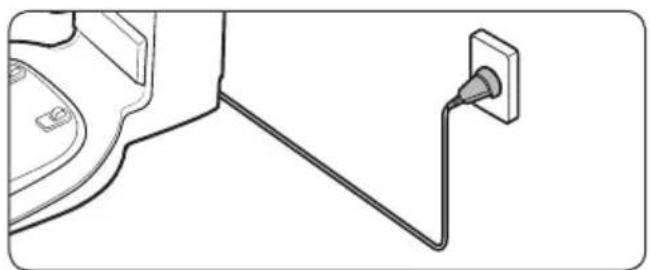
3 Place the Clean Station on an even floor and near an electrical outlet and plug it in.
* When the Clean Station is plugged in, the Status Indicator at the top of the Clean Station turns white for a short time.

NOTE
• Install the Clean Station in a place where the floor and wall are level.
- If the power cord is too long for the installation environment, coil the power cord around the cable management post, then put it in the fixing groove at the rear of the Clean Station.
- If you reinstall the Clean Station to a position 1 m or more from the previous installed place, recreate the map using the SmartThings App. (If you use the existing map, some places may not be cleaned.)
Charging the Jet Bot
Before using the Jet Bot for the first time, charge it completely. (For the charging time and cleaning time, refer to the 'Product specification'.)
natural_image
Diagram of a circular device with arrows indicating rotation or movement, no text or symbols present
natural_image
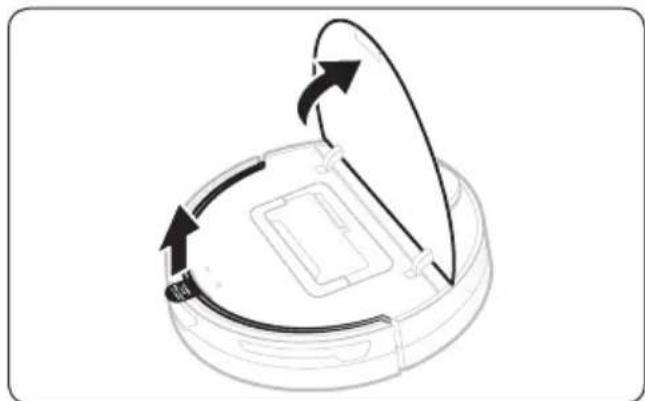
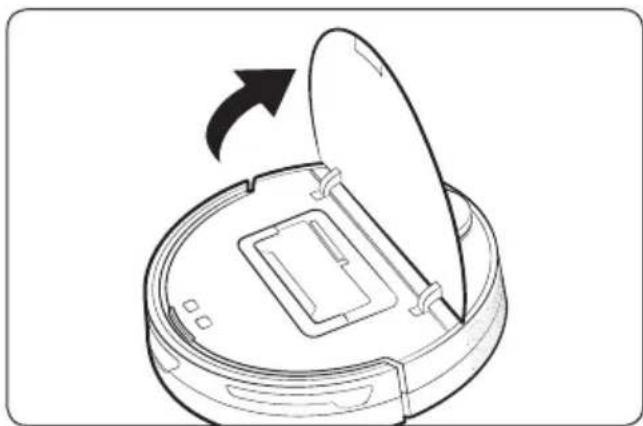
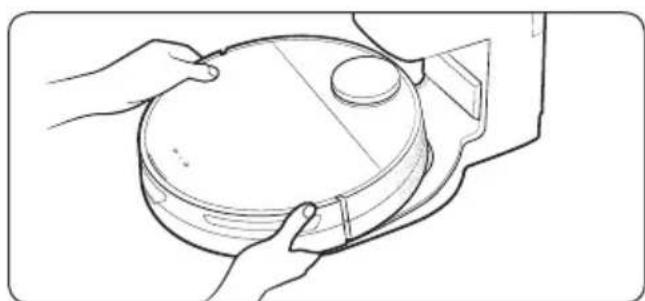
Line drawing of hands holding a circular object with a lid, no text or symbols present1 Open the upper cover of the Jet Bot and remove the white gasket.
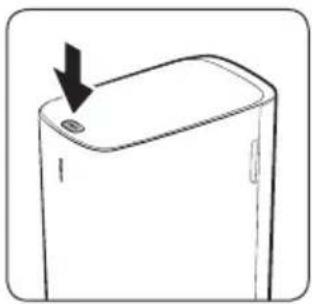
2 Remove the yellow gasket attached to the power switch at the side of the Jet Bot and press the power switch to turn the Jet Bot on.
- During booting, the Jet Bot's Status Indicator turns on with a melody which stops when the booting is complete.
- When you turn the Jet Bot on for the first time after purchase, check the SmartThings App connection (refer to p.29-33) and installation of the Clean Station following the voice guide of the Jet Bot.
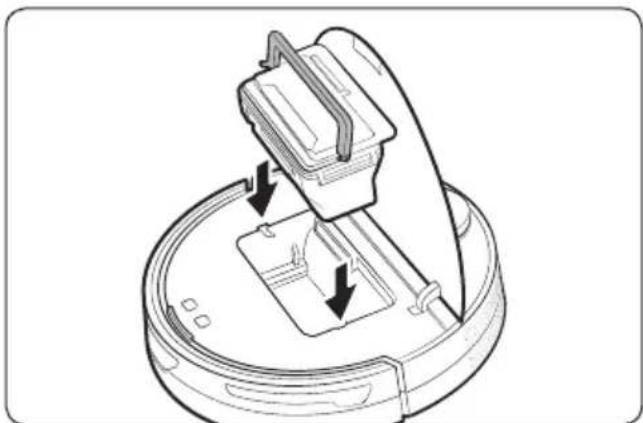
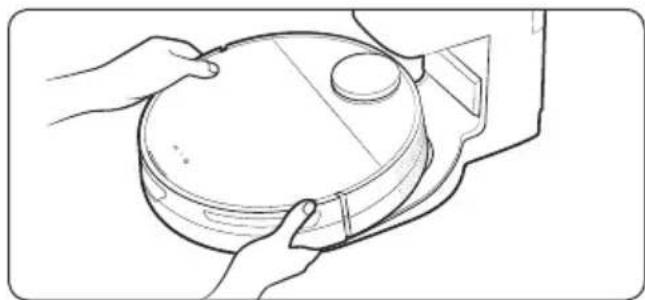
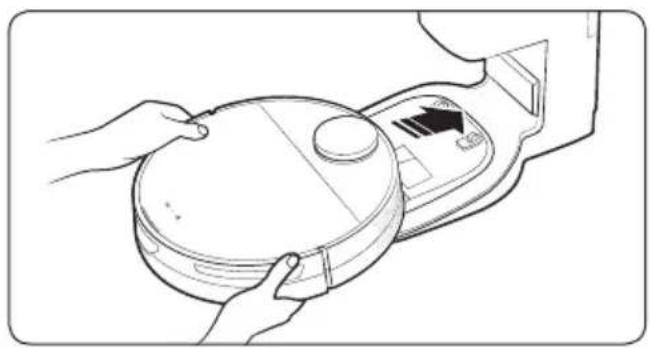
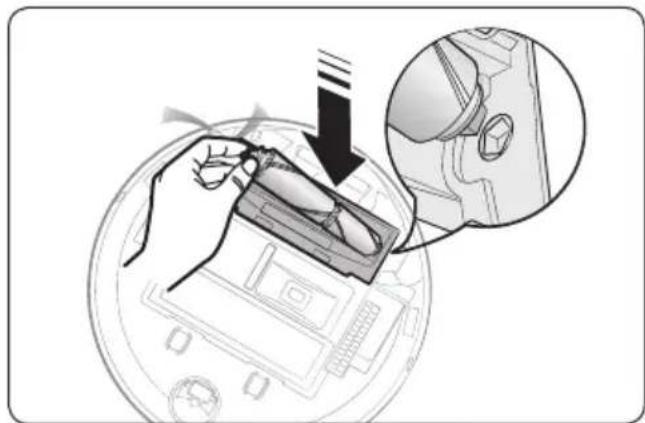
3 Place the Jet Bot on the Clean Station manually to start charging.
- Make sure the charging terminals on the Jet Bot and the Clean Station are aligned.
- When the Jet Bot starts charging, the Status Indicator of the Clean Station turns white and after 1 minute, the Status Indicator turns off automatically. (Charging continues though the Status Indicator has turned off.)
4 Check the charging status.
- When charging starts, the Status Indicator of the Jet Bot turns on (red, orange, or yellow depending on charging progress), it rises gradually, and changes to green when the charging is complete.
natural_image
Line drawing of a robotic vacuum cleaner with control panel and indicator lights (no text or symbols)Auto charging
The Jet Bot automatically returns to the Clean Station when it completes cleaning or when the battery is low to recharge.
Docking (Recharging)
You can return the Jet Bot to the Clean Station while cleaning to recharge.
- Press the [ ] on the Jet Bot or use the SmartThings App to select the recharging function. * If the Jet Bot fails to return to the Clean Station for charging, it turns to the Sleep Mode. To cancel the Sleep Mode, press the [DⅡ].
natural_image
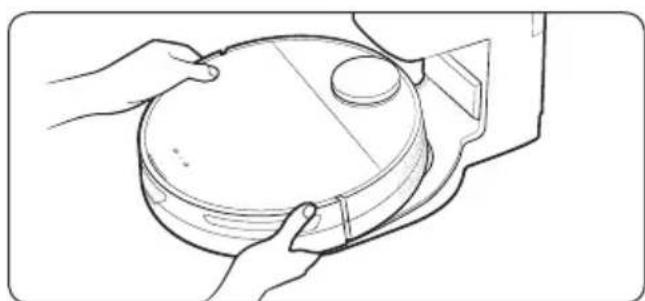
Line drawing of hands installing or adjusting a circular device component (no text or symbols)Discharged Jet Bot
Move the Jet Bot manually onto the Clean Station to recharge.
Checking if the docking (recharging) does not work
Check the Clean Station's installation status
- Check whether the Clean Station has been installed in a place where the Clean Station cannot guide the Jet Bot to return. - Check whether the distance between the Clean Station and the Jet Bot is over 5 m.
- It may take a longer time for the Jet Bot to return to the Clean Station.
Charge the Jet Bot manually for the following conditions.
- When the Clean Station is installed in a corner
- When the battery is completely discharged
- When the Jet Bot is stuck in an obstacle (e.g., furniture)
- When the Jet Bot cannot climb a threshold near the Clean Station. (It should be less than 1.5 cm.)
- When the Jet Bot's Status Indicator turns red and stays red with the Jet Bot not working

NOTE
- If the power switch of the Jet Bot is off, the Jet Bot will not charge even if it is docked on the Clean Station.
- Keep the Clean Station on at all times.
- If power is not supplied to the Clean Station, the Jet Bot cannot find the Clean Station and cannot automatically recharge.
- If the Jet Bot is left detached from the Clean Station, the battery drains naturally.
- When the Dustbin is full, the Jet Bot automatically returns to the Clean Station for recharging.
Using the Jet Bot
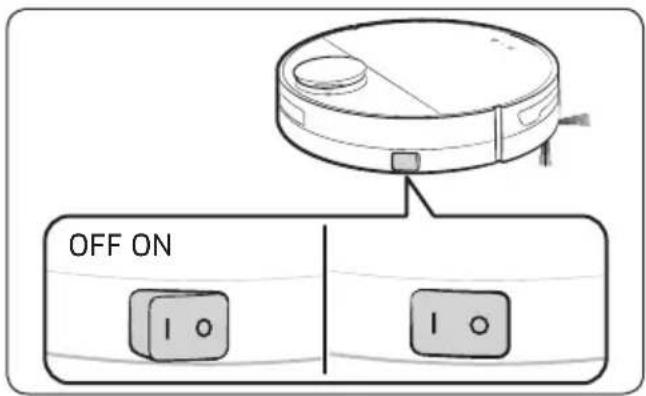
Before using the Jet Bot, press the power switch at the side of the Jet Bot to turn the Jet Bot on.
* For the normal use of the Jet Bot's functions, the SmartThings connection is required. - For downloading and installing the SmartThings App, refer to the 'SmartThings App (P.29-33)'.
Basic use

Power on / off
Press the power switch at the side of the Jet Bot to turn the Jet Bot on.
- During booting, the Jet Bot's Status Indicator turns on with a melody which stops when the booting is complete.
Starting cleaning
Press the [▶] on the Jet Bot to start cleaning in Auto Clean.
Stopping cleaning
- Press the [ ▷]on the Jet Bot to stop operation while cleaning. - When pressing the [icon], the Jet Bot returns to the Clean Station and starts charging. * If the Jet Bot does not operate for 20 minutes after it stops operation, it automatically returns to the Clean Station to recharge.
Sleep Mode
- When the Jet Bot is not in operation, press and hold the [▶] to set the Sleep Mode.
- In the Sleep Mode, press the [▷∥] to cancel the Sleep Mode.
Operation status on the LED Status Indicator
| Classification Color | Meaning | |||
| Jet Bot | While operating | Red | Blinking without moving | An error occurs. |
| Blinking while moving | Auto returning to the Clean Station due to low battery | |||
| On Operating stops due to low battery | ||||
| While charging | Red, orange, or yellow (depending on charging progress) | While charging | ||
| Green Charging is complete. | ||||
| Violet Software is being updated. | ||||
| Clean Station | White | On (5 seconds) Clean Stations' power is on. | ||
| On | Jet Bot's Empty Dust function is working, Jet Bot is docked (1 minute after the docking, it is off). | |||
| Red | Blinking | Clean Station's cover is open. The suction motor has a problem. | ||
| On Clean Station's Dust Bag is full. | ||||
* If the Jet Bot starts charging from the depleted status, the Status Indicator turns red and slowly blinks for about 20 minutes.
Cleaning Functions
| Cleaning Functions Operation | |
| Cleaning Methods | ·Auto Clean: Cleans automatically until the Jet Bot completes cleaning all rooms one time.·Room Clean: You can select a room you want to clean.·Spot Clean: You can set a specific area you want to clean. |
| Cleaning Mode | ·You can select one out of three modes.※You can set the Cleaning Mode only when the Jet Bot is in Room Clean. |
| Suction Power | ·You can select the suction power from Max, Smart or Normal.※When the Jet Bot is in ‘Smart’ suction power, the Intelligent Power Control Clean work. |
| Repeat Clean | ·The Jet Bot cleans repeatedly until its battery is discharged.※After the Jet Bot completes cleaning one time and returns to the Clean Station due to battery shortage, it does not clean again after charging is complete. |
| Empty Dust | ·You can select the Empty Dust conditions at the SmartThings App.·When the Jet Bot returns to the Clean Station, it automatically empties its Dustbin. (However, after the Spot Clean, the Jet Bot does not empty its Dustbin automatically.)※If the Empty Dust function does not work, check whether the top cover of the Clean Station is open or the Dust Bag is full.※While the Jet Bot is docked onto the Clean Station, press the [ ] to start emptying its Dustbin. |
| Intelligent Power Control Clean | ※When the Jet Bot detects a carpet during cleaning, it increases its suction power. (Suction Power: ‘Smart’ only) |
* You can set the Cleaning Functions, the Repeat Clean or the Cleaning Mode at the SmartThings App.
* When the Jet Bot does not have a saved map, it studies cleaning space through Auto Clean function which starts from the Clean Station. After studying the cleaning space, a map is saved. (The map creation is enabled through the SmartThings App only.)
* You can edit or delete the map at the SmartThings App.
* Room Clean or Spot Clean works regardless of choice sequences of the areas.
* If the Jet Bot is surrounded by low height obstacles, it may take more than 2 minutes to find its way out of them.
Additional functions
| Additional functions Operation | |
| Energy-Saving Mode | When charging is complete, the Jet Bot automatically enters the Sleep Mode. While the Jet Bot is docked on the Clean Station, press and hold the [▷∥] for 7 seconds to set it to the Sleep Mode. To cancel the Sleep Mode, start cleaning or press the [▷∥] for 7 seconds.When the Jet Bot is in the Energy-Saving Mode, the power is turned off after charging is complete which means the Wi-Fi reception waiting is not enabled, therefore the Jet Bot cannot be controlled with the mobile app. |
| Downtime Mode | You can set the Jet Bot not to clean within the Downtime at the Settings.When Downtime comes, the Jet Bot returns to the Clean Station. |
| Scheduled Cleaning | You can set the Jet Bot to clean at the Schedule.If the Jet Bot is detached from the Clean Station at the scheduled time, the scheduled cleaning does not work. |
| Setting the No-go Zones | When the Jet Bot has saved a map, you can set the Jet Bot not to enter a designated area.If the Jet Bot does not start cleaning from the Clean Station or the installation place of the Clean Station has been changed, the Jet Bot may clean the set No-go Zones.When setting the No-go Zones, you cannot include the Clean Station. |
* You can set the Downtime mode, Scheduled Cleaning or No-go Zones at the SmartThings App.
NOTE
- When a Check Notice occurs or when you carry the Jet Bot to another place and start cleaning, the Jet Bot spins left and right at a 30 degree angle to recognize its location before it starts cleaning.
- If the Jet Bot cannot recognize its current location, it starts Auto Clean.
- The Jet Bot automatically performs a system check and restarts once a week.
Attaching Boundary Markers
If Boundary Markers are attached before using the Jet Bot, the Jet Bot can operate safely. You can purchase additional Boundary Markers at a service center.

natural_image
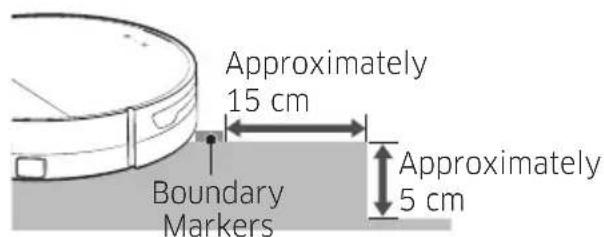
Line drawing of a hand holding a small object with a curved line extending from it (no text or symbols)To prevent the Jet Bot from entering the following areas, attach the Boundary Markers to the floor in a □ shape with 15 cm space distance.
Where the raised spot is below 5 cm When
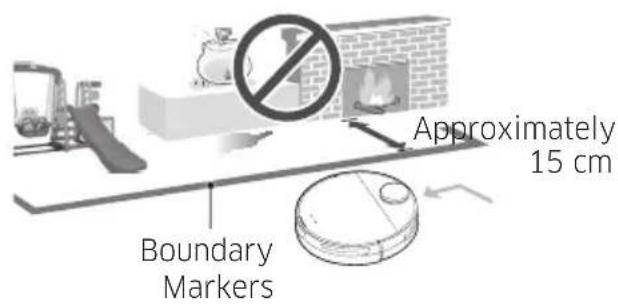
there is a slide, a swing, a flowerpot, a fireplace, any flammable substance or moisture.
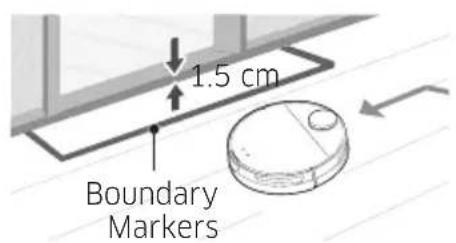
Where a threshold is above 1.5 cm Where
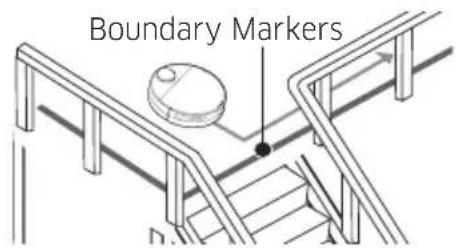
there is a risk of falling such as stairs, porches or guardrails.
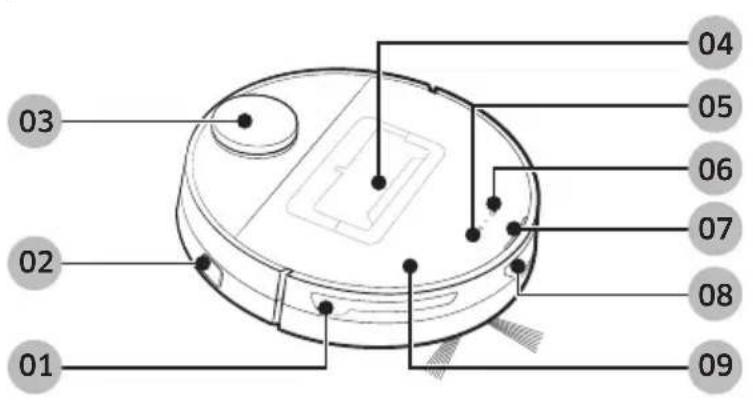
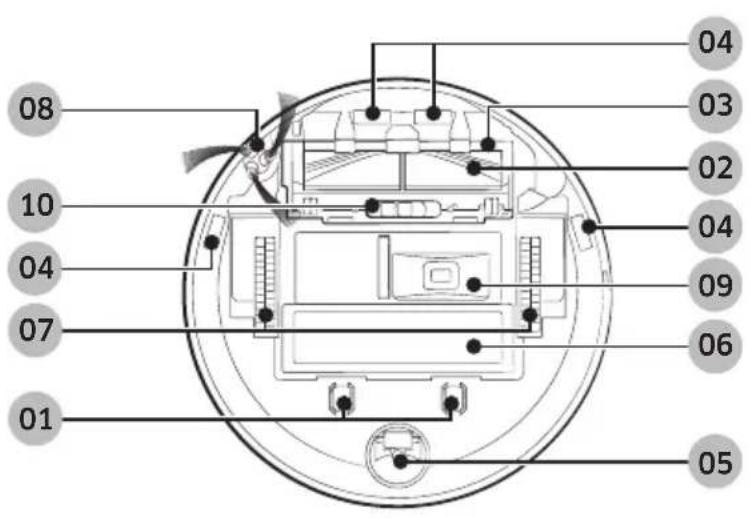
Jet Bot
Clean Station

Top
01 Obstacle Sensor
02 Power switch
03 LiDAR Sensor
04 Dustbin
05 Start/stop button
06 Docking (Recharging) button
07 Status Indicator
08 Docking Sensor Window
09 Upper Cover
Bottom
01 Charging Pin
02 Brush
03 Brush Cover
04 Cliff Sensor
05 Roller
06 Battery Cover
07 Driving Wheel
08 Side Brush
09 Empty Dust Outlet
10 Brush Cover Lock
01 Dust Suction Port
02 Charging Terminal
03 Status Indicator
04 Cover
05 Fine dust Filter Cover
06 Fine dust Filter
07 Power cord groove
08 Charging Signal Transmitter
Before maintenance work, you should turn off the power switch at the side of the Jet Bot.
Emptying and cleaning the Dustbin
natural_image
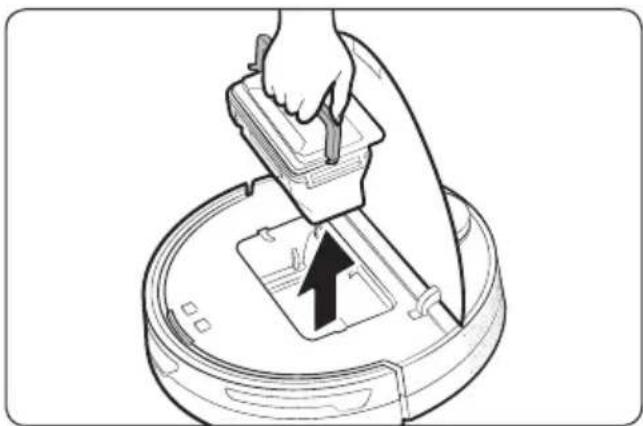
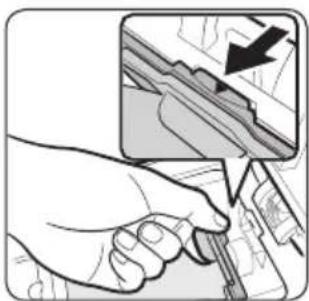
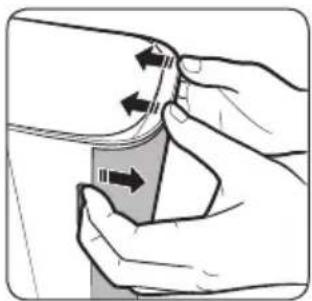
Diagram of a robotic vacuum cleaner with an open lid and internal components, showing a rotation arrow (no text or symbols)1 Grasp the Jet Bot's cover at the groove and lift it up.
natural_image
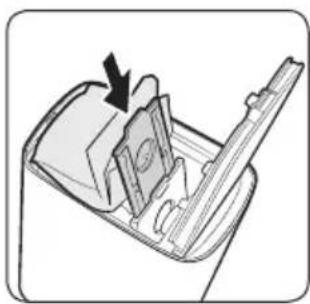
Illustration of a hand using a tool to clean or install a device on a circular base, with an arrow indicating the process (no text or symbols present)2 Hold the Dustbin handle and lift the Dustbin up.
natural_image
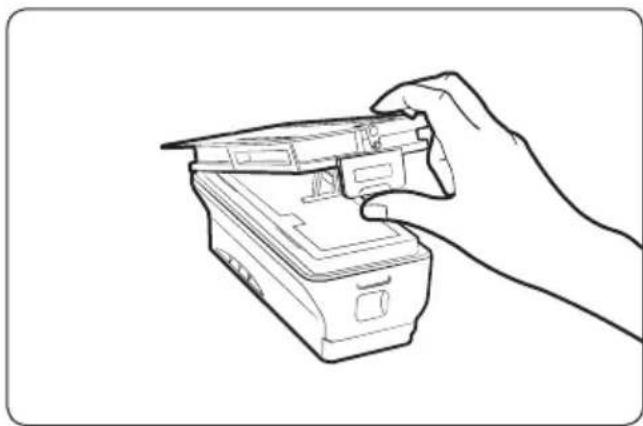
Line drawing of a hand holding a camera module (no text or symbols)3 Unlock the transparent clip at the side of the Dustbin.
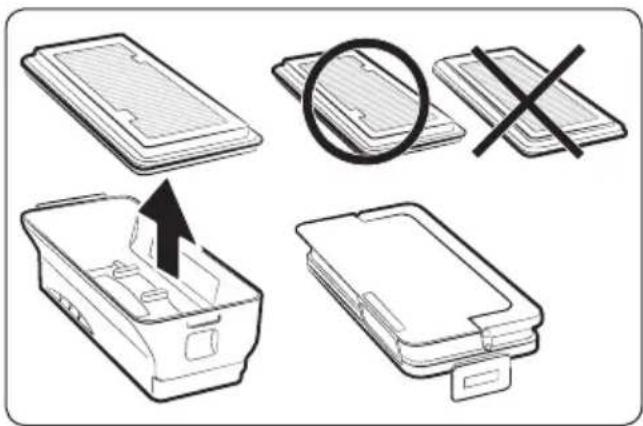
4 Detach the filter from the Dustbin.
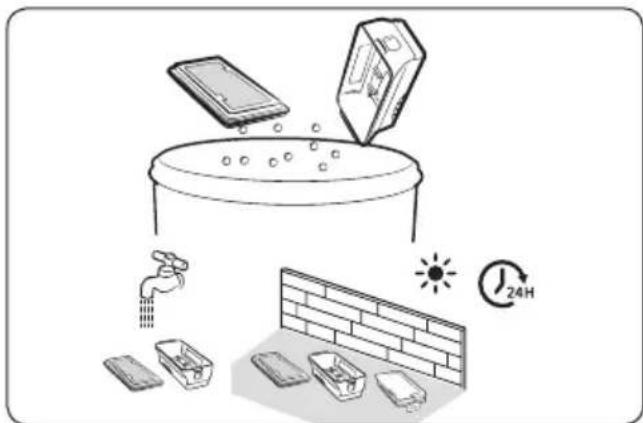
5 Remove the dust on the filter and the Dustbin, clean them with water, and dry completely in the shade.
natural_image
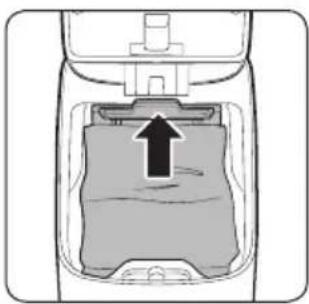
Technical line drawing of a robotic vacuum cleaner with directional arrows indicating movement (no text or symbols)6 Attach the filter to the Dustbin and insert the Dustbin into the Jet Bot. When inserting the Dustbin, grasp the handle and put the Dustbin into both grooves.
Cleaning the brush
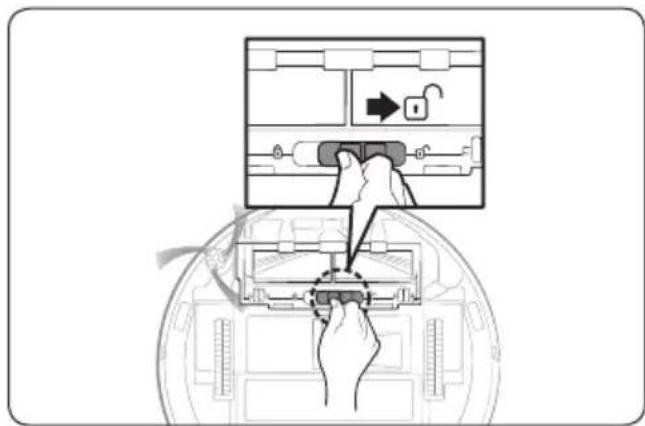
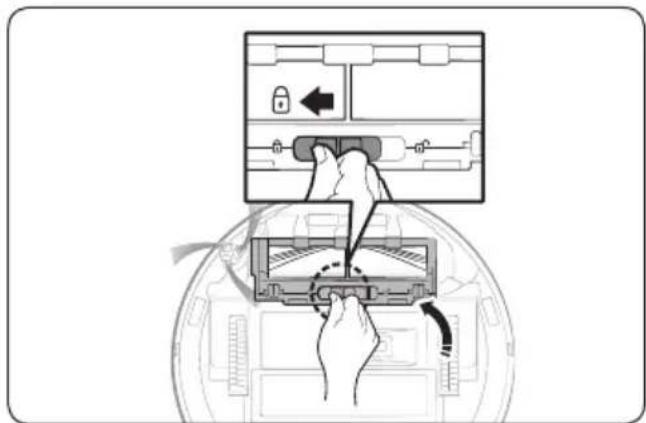
1 Push the Brush Cover Lock to the right to unlock.

natural_image
Top-down diagram of a car interior showing dashboard, seats, and steering wheel (no text or symbols)2 Detach the brush cover.

natural_image
Diagram of a hand pressing down on a device component, showing a black arrow indicating motion (no text or symbols present)3 Lift up the left side of the brush first and then pull the brush from the groove on the right.
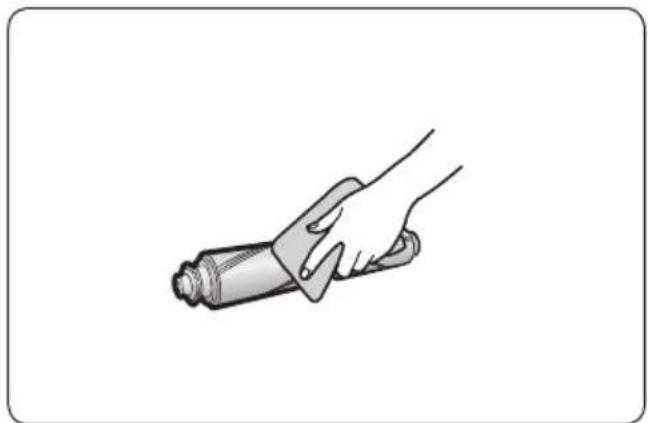
natural_image
Illustration of a hand holding a cylindrical object (no text or symbols)4 Clean the brush.

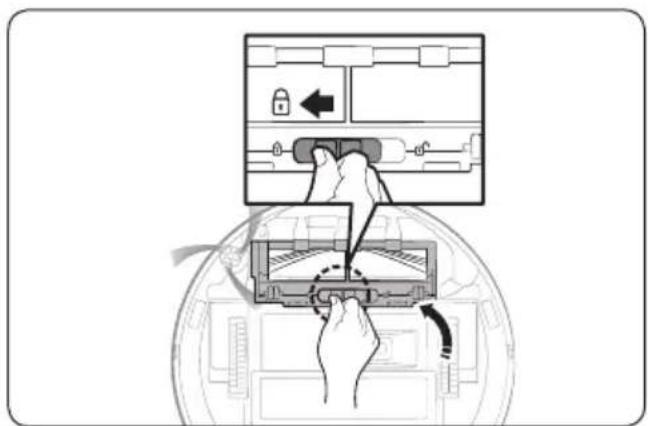
natural_image
Diagram showing a hand inserting a component into a device, with an inset close-up of the component (no text or symbols present)5 Attach the brush. 6 Attach the brush cover.
Cleaning the Sensor Window
Wipe the Sensor Window with a soft cloth.
Cleaning the Driving Wheel
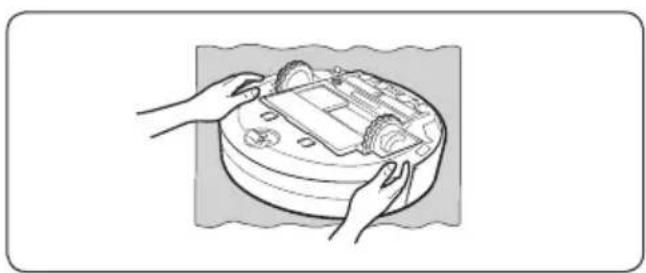
natural_image
Illustration of hands installing or adjusting a circular device on a base, with no visible text or symbols.1 Place a soft cloth down first, turn the Jet Bot over, and place it gently on the cloth.
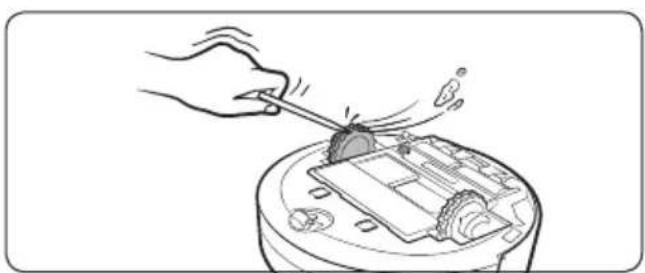
natural_image
Illustration of a hand using a tool to press or install a device on a circular base (no text or symbols visible)2 Remove foreign matter with a blunt rod or tweezers.
Cleaning the Side Brush
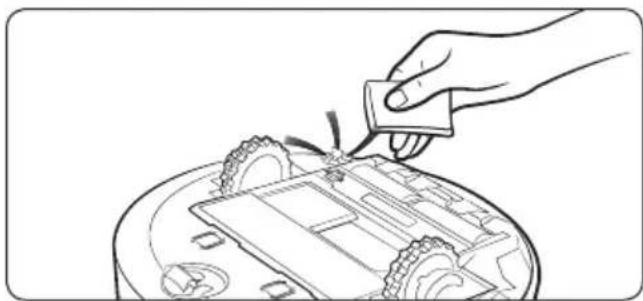
natural_image
Line drawing of a hand using a tool to clean or repair a small robot component (no text or symbols)Cover the Side Brush with a hot steamed cloth for 10 seconds, then wipe the Side Brush.

natural_image
Illustration of a hand using a tool to adjust or install a mechanical component, with an inset showing a close-up of the component (no text or symbols present)When the Side Brush is very tangled with hair, threads, etc., detach the Side Brush with a screwdriver while gripping the Side Brush, and remove the foreign matter. If the Side Brush is badly damaged, replace it with a new one.

For detailed methods of use and cleaning, refer to the QR code.
Before cleaning the Clean Station, unplug the power cord from the electrical outlet.
Replacing the Dust Bag
natural_image
Simple line drawing of a device with a downward arrow pointing to the top surface (no text or symbols)1 Press the [PUSH] button on the top of the Clean Station to open its cover.
natural_image
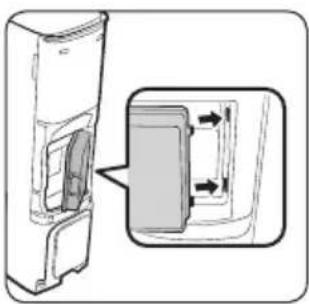
Illustration of a hand holding a tool with an inset showing a mechanical component (no text or symbols)2 Pull the top of the Dust Bag holder gently. - If you do not pull the Dust Bag holder, you cannot replace the Dust Bag due to the safety device.
natural_image
Diagram of a mechanical component with an arrow indicating direction (no text or symbols present)3 Remove the old Dust Bag and put a new Dust Bag into the Dust Bag holder by fitting into the grooves on the holder.
- Push the Dust Bag to the end.
natural_image
Diagram of a car interior showing a highlighted rectangular area with an upward arrow, no text or symbols present.4 Push the top of the Dust Bag holder gently until you hear it click.
5 Close the Clean Station's cover.
Cleaning the Fine dust Filter
natural_image
Illustration of hands holding a device with arrows indicating motion or movement (no text or symbols)1 Grasp the grooves at the rear of the Clean Station and detach the Fine dust Filter cover.
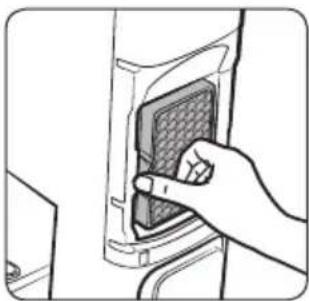
natural_image
Hand inserting a grid into a device panel (no text or symbols visible)2 Detach the Fine dust Filter.
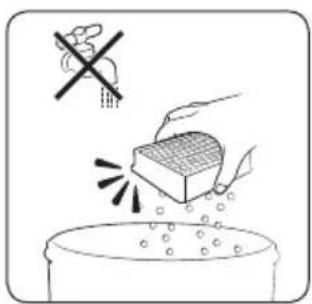
3 Clean the Fine dust Filter. - Do not clean the Fine dust Filter with water.
natural_image
Diagram of a device rear panel with an inset showing internal components (no text or symbols)4 Attach the Fine dust Filter and the Fine dust Filter cover.
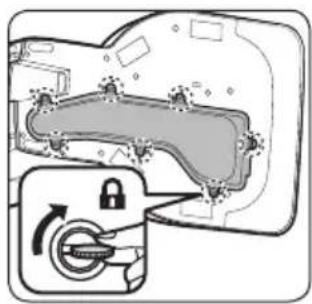
Cleaning the bottom cover
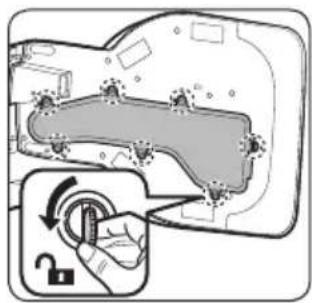
1 Lay the Clean Station on its side and turn the 7 fixed screws on the bottom cover in the unlock direction(2)
natural_image
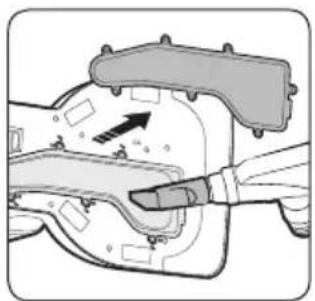
Diagram of a mechanical device with an arrow indicating direction (no text or symbols present)2 Detach the cover and remove dirt.
natural_image
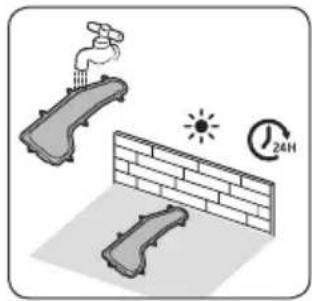
Illustration of a faucet emitting steam above a brick wall with a 24-hour cycle indicator (no text or symbols)3 Clean the cover with water and dry it completely in the shade.
natural_image
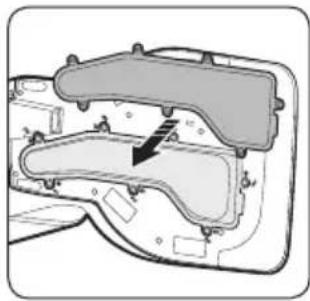
Cross-sectional diagram of a mechanical or electronic component with internal channels and mounting points (no text or symbols)4 Attach the cover to the Clean Station.
natural_image
Diagram of a door lock mechanism with a lock icon and directional arrow (no text or symbols)5 Turn the 7 fixed screws in the lock direction(
The SmartThings App is only compatible with models that have a Wi-Fi function. If you do not have a Wi-Fi router, you cannot use the SmartThings App.
Setting up the wireless router
- Please refer to the user manual of your wireless router for the settings of the wireless router.
• SAMSUNG Jet Bot supports only Wi-Fi 2.4 Ghz.
• SAMSUNG Jet Bot supports IEEE 802.11b/g/n and Soft-AP. - IEEE 802.11n is recommended.
- SAMSUNG Jet Bot supports only DHCP (Dynamic Host Configuration Protocol). Please make sure that the DHCP server option is activated on your wireless router.
- The Jet Bot supports the WEP-OPEN, WPA-PSK/TKIP, and WPA2-PSK/AES for the authentication and encryption protocols.
- WPA2-PSK/AES is recommended.
- Confirm that your router has a unique SSID and password.
- The quality of your wireless network connection may be influenced by the surrounding wireless environment.
- If your Internet service provider has permanently registered the MAC address (a unique identification number) of your PC or modem, your Jet Bot may not be able to connect to the Internet. Ask your Internet service provider about the procedure to connect an apparatus other than a PC to the Internet.
- If your internet service provider requires your ID or password to connect to the internet, your Jet Bot may not be able to connect. If this is the case, you must enter your ID or password when connecting to the Internet.
- The Jet Bot may not be able to connect to the Internet because of firewall issues. Contact your Internet service provider to resolve these issues.
- Some wireless routers may transmit an abnormal Domain Name Server (DNS) address even if the Internet is not connected. If this occurs, contact the manufacturer of your wireless router and your Internet service provider.
- If you still cannot connect to the Internet even after trying the procedure provided by your Internet service provider, please contact an authorized SAMSUNG service center.
- If your router is not a Wi-Fi certified product, The Jet Bot may not be able to connect to the Internet.

NOTE
- When pressing and holding the [▶] button for 3 seconds, the network status is guided by voice.
- Setting Wi-Fi On/Off: Hold the [icon] button down for 7 seconds to switch the Wi-Fi off or on to use again while the vacuum cleaner is on standby or charging.
Downloading the SmartThings App
- Download and install the SmartThings App from the markets (Google Play Store, Apple App Store, or SAMSUNG Galaxy Store). To find the app, use the keyword "SmartThings".

NOTE
- SmartThings is incompatible with some tablets and some mobile devices.
- Some iPads and some mobile devices may not be supported.
- Visit Play Store or App Store to see if your mobile device is compatible with SmartThings.
- The supporting software version of the SmartThings app is subject to change according to the OS supporting policy the manufacturer provides. In addition, as for the SmartThings app or the functions that the app supports, the new application update policy on the existing OS version can be suspended due to usability or security reasons.
- The SmartThings app is subject to change without notice to improve usability or performance. As the mobile phone OS version is updated every year, the SmartThings is also updated continually according to the latest OS.
- If you have enquiries regarding the items mentioned above, please contact us on st.service@samsung.com.
Setting up a SAMSUNG account
- You must sign in to a SAMSUNG account before using the SmartThings App.
- To set up a SAMSUNG account, you can follow the directions provided by the SmartThings App.
- Or, if you have a SAMSUNG smartphone, you can add your SAMSUNG account in the setting app of your smartphone. Then, it will automatically sign in to your SAMSUNG account and you can use the SmartThings App.
Registering a device to the SmartThings App
1 Connect your smartphone to your wireless router.
- If the smartphone is not connected, turn on the Wi-Fi in the Settings App and select a wireless router you want to connect to.
- Set your smartphone to use Wi-Fi only and connect a device.
2 Launch the SmartThings App on your smartphone.
3 If a pop-up saying that a new device has been found appears, tap ADD NOW.
- If the pop-up does not appear, add a device by selecting the 'Home appliances' category → 'Robot cleaner' and the Jet Bot to connect.
- If you scan the SmartThings QR code attached on the Jet Bot, you can connect to the Jet Bot more easily.
4 [Android] The connection to your device will be progressed automatically. - [iOS] Open the setting app, and select [vacuum]_E30AJT** in the Wi-Fi list.
5 Provide the authentication when you are directed to do so.
6 [Android] The connection to your wireless router will be progressed automatically. - [iOS] Open the setting app, and select the wireless router in the Wi-Fi list.
7 When the product registration is complete, the Jet Bot device card is added.

NOTE
- When the Jet Bot cannot be registered to the SmartThings App
- Refer to the SmartThings App guide or pop-up messages.
- Confirm that the UPnP option of your wireless router is active, and then try the registration procedure again.
- Confirm that your wireless router is operating in a wireless mode. If not, change it to the wireless mode and try again.
- If you have two or more Jet Bots, turn off the other Jet Bots, and then try to register your Jet Bot again.
- Change the name of the wireless router which has the same SSID to be distinguished from each other.
- If the Jet Bot and smartphone are not connected to the same wireless router, a response can be delayed depending on the network environment.
- When the wireless router is changed, the connection between the Jet Bot and the SmartThings App is disconnected.
- After changing the wireless router, register your Jet Bot again at the SmartThings App.
Software Update
- When the Jet Bot is charging on the Clean Station, the Jet Bot connects to the server and checks for software updates. If a new software is found, the Jet Bot will automatically download and update it.
- If the Status Indicator of the Jet Bot turns violet and stays violet while charging, it means that the Jet Bot is being updated. Please wait until rebooting is complete.
Functions of the SmartThings App
| Classification Functions Explanation | ||
| Monitoring Cleaning Report | You can check the result of the last cleaning.You can check the histories of last 50 cleanings. | |
| Dock | You can stop cleaning and have the Jet Bot return to the Clean Station. | |
| Pause • You can stop cleaning or restart cleaning. | ||
| Cleaning Mode • You can set the cleaning mode you want. | ||
| Cleaning Functions | You can set various cleaning functions.- For some functions, you need to create a map first.- For Room Clean and Spot Clean, you can choose only one of them, and the default setting is ‘All’ (All Rooms).* When the Jet Bot is in the Room Clean or the Spot Clean, it may pass an unselected area to go to the cleaning place or to recharge. | |
| Schedule | You can start designated cleaning at the scheduled time. | |
| Classification Functions Explanation | ||
| Setting | Sound Mode | You can set the voice guide to [Voice], [Sound Effect], or [Mute]. |
| Language • The Jet Bot supports 14 languages. | ||
| Volume | You can control the volume of the voice guide. | |
| Downtime | At the designated time, the Jet Bot stops cleaning and returns to the Clean Station.- You may start cleaning during Downtime. | |
| Find Robot Vacuum | The Jet Bot makes a sound so that a user can find it. | |
| Child Lock | The Jet Bot locks its buttons so that they do not function. To unlock the buttons, turn the Jet Bot off and then on again. | |
| Empty Dust | You can select when to empty the dustbin of the Jet Bot. | |
| Notice | Cleaning completed | When cleaning is complete, you can receive cleaning completion notice. |
| Check Notice | If the Jet Bot needs to be checked, you can receive a notice. | |
| Manage maps | No-go Zones | You can set a zone where you do not want the Jet Bot to clean.- You can create maximum 15 zones. |
| Edit Map | You can divide or combine rooms on the created map.You can change the name of a room. | |
| Reset Map • Reset | the saved map. | |
Installation

NOTE
• Install the Clean Station in a place where the floor and wall are level.
- If the cleaning area is wooden floors, it is best to install the Clean Station along the grain of wooden floors.
- If the power switch is off, the Jet Bot will not charge even if it is docked on the Clean Station.
• Always keep the Clean Station on.
- If power is not supplied to the Clean Station, the Jet Bot cannot find it and cannot automatically recharge.
- If the Jet Bot is left detached from the Clean Station, the battery will drain naturally.
- Do not attach the Boundary Markers as (----) shape.
- The Jet Bot may not detect it and cross the boundary.
Charging

NOTE
- If the battery overheats during charging, it may take longer to charge.
-
When auto charging is not working, do the following:
-
Turn the power switch (at the side the Jet Bot) off and on again.
- Unplug the Clean Station's power plug and then plug it back on.
- Unplug the Clean Station, and then check whether there is any foreign matter on the charging pins and clean charging pins of the Jet Bot and the Clean Station with a dry cloth or rag.
- Check for any obstacles such as reflective objects, chairs, etc. near the Clean Station.
- If the Jet Bot is left detached from the Clean Station, the battery will drain naturally.
- Try to keep the Jet Bot being charged on the Clean Station. (However, turn off the power switch and leave the Clean Station unplugged when planning to leave the house for long periods of time by going on a business trip or vacation, etc.)
Using
NOTE
- The Jet Bot may get caught on thresholds of entrance door or veranda, etc. during cleaning.
- To restart operation, shut off the power switch, move the Jet Bot to an area where it can move easily, and then turn on the power again.
- In a dark area, the Jet Bot may not recognize an object.
- Before cleaning, remove obstacles on the floor.
- The Jet Bot cannot completely clean areas which it cannot enter, such as small space between the corner, between the sofas or walls, etc.
- Please use another cleaning tool to clean them regularly.
- The Jet Bot cannot vacuum clumps of dirt, so some may remain on the floor after cleaning.
- Please use another cleaning tool to clean them regularly.
- After turning the Jet Bot off, wait for a while and then turn it on for a normal rebooting.
- When the Clean Station smells, replace a Dust Bag or clean filters.
- If there is a larva in the suctioned dust, it can multiply in the Dust Bag. Clean the Clean Station with a wet tissue and replace the Dust Bag.
Cleaning and maintenance

NOTE
- If you washed the Dustbin and filter with water
- Dustbin: Completely wipe out the water.
- Filter: Completely dry it in the shade before use.
- Do not use water to clean the Fine dust Filter, just shake it to clean.
- If suction power decreases continuously, or the Jet Bot overheats, clean the Fine dust Filter.

CAUTION
- Watch your fingers when attaching or detaching the filter, since they may get stuck in the Dustbin's intake.
- To avoid blockages by foreign matter, do not let the Jet Bot vacuum up toothpicks, cotton swabs, etc.
- If it is difficult to remove foreign matter from the brush, contact an authorized SAMSUNG service center.
- Since the brush sweeps dirt up from the floor during cleaning, foreign matter such as a thin and long thread, long hair, etc. may get caught in it. For the best cleaning results, check and clean it regularly.
- Turn off the Jet Bot before cleaning or maintenance work.
- If a brush or a brush cover is not assembled correctly after the maintenance work, scratches may occur on the floor, or product malfunction may occur. Therefore, assemble them correctly by checking the maintenance method.
Battery usage

NOTE
- When you purchase a battery, check the SAMSUNG logo (SAMSUNG) attached on the battery and the model name, then contact a service center.
- This battery is exclusively for the SAMSUNG Electronics Jet Bot. Do not use it for any other products or purposes.
- Do not disassemble or modify the battery.
- Do not throw the battery out in fire or heat it.
- Do not connect any metallic object to the charging contacts (+, -).
- Store the battery indoors (at 0 °C\~40 °C).
- If the battery malfunctions, do not disassemble it yourself. Contact your nearest SAMSUNG service center.
- As the battery is used over a length of time, the battery charging time and usage time decreases. In this case, contact a service center and replace it with a new battery.
- Do not disassemble the battery yourself and make sure short circuit of +, - poles does not occur.
- When battery leak occurs, make sure it does not touch your skin or eyes.
Corrective measures before reporting a problem
1 The Status Indicator turns red and blinks with a voice guide.
2 Turn off the power switch and check the instructions below and take appropriate actions.
3 When turning the Jet Bot on by pressing the power switch, the Status Indicator turns white.
* You can find details of the check at the SmartThings App.
* When the Jet Bot is turned off and on again, it starts newly in the Auto Clean mode.
| Voice Guide Checklist | |
| It's difficult to move. Please move me somewhere else. | The Jet Bot is caught, stuck or trapped while moving around.- Turn off the power switch and move the Jet Bot to another area. |
| Please remove the brush and take out whatever's stuck in there. | Foreign matter caught in the brush-Turn off the power switch and remove the foreign matter from the brush. |
| Something's stuck in the side brush. Please remove it. | Foreign matter caught in the brush-Turn off the power switch and remove the foreign matter from the Side Brush at the bottom. |
| Please check the left wheel to see if there's something stuck in it. | Foreign matter caught in the left Driving Wheel-Turn off the power switch and remove the foreign matter from the left Driving Wheel. |
| Please check the right wheel to see if there's something stuck in it. | Foreign matter caught in the right Driving Wheel-Turn off the power switch and remove the foreign matter from the right Driving Wheel. |
| Something's wrong with the front bump sensors. Please open the cover and check. The bumper might be jammed, or there might be something stuck in there. | Bumper Sensor needs to be checked.- Turn off the power switch and turn it back on.- When the Status Indicator remains in red color and blinks, check if there's any small foreign matter between the bumper and the main body. If there is, remove the foreign matter. |
| Can't see anything. Please clean the front with a soft cloth. | Foreign matter accumulated on the Obstacle Sensor Window.- Turn off the power switch and clean the Obstacle Sensor Window at the front with a soft cloth. |
| Something's wrong with the cliff sensor. Please clean the 4 small black windows underneath with a soft cloth. | Foreign matter accumulated on the Cliff Sensor-Turn off the power switch and clean 4 Cliff Sensor Windows at the bottom with a soft cloth. |
| Please insert the bin so cleaning can start. | Dustbin is not inserted.- Detach the Dustbin and insert it again. |
| The LiDAR sensor needs to be reset. Turn the power off, then on again. If that doesn't fix it, contact Customer Service. | ·There is a problem with the LiDAR sensor.- Turn the power off, then on again. If the notice remains, contact Customer Service. |
| Something's wrong with the main system. Turn the power off, then on again. If that doesn't fix it, contact Customer Service. | ·There is a problem with the main system.- Turn the power off, then on again. If the notice remains, contact Customer Service. |
| Something's wrong with the LiDAR bump sensor. The LiDAR cap might be jammed, or there might be something stuck in there. | ·Bumper Sensor needs to be checked.- Turn off the power switch and turn it back on.- When the Status Indicator remains in red color, check if there's any foreign matter between the LiDAR sensor and the main body. If there is, remove the foreign matter. |
| Can't move in this no-go zone. Please move me somewhere else. | ·The result of the location recognition indicates that the Jet Bot is placed within the No-go Zones.- Check the No-go Zones of the mobile App. |
* Hereby, Samsung Electronics, declares that the radio equipment type appliance is in compliance with Directive 2014/53/EU. The full text of the EU declaration of conformity is available at the following internet address: The official Declaration of conformity may be found at http://www.samsung.com, go to Support > Search Product Support and enter the model name.
| Symptom Checklist | |
| The Jet Bot is not working at all. | Check if the power switch is on.Check if the Status Indicator is on.Check if the Jet Bot's battery is depleted.- When the Jet Bot's Status Indicator turns red and stays red, place the Jet Bot manually on the Clean Station to charge it.When you manually charge the Jet Bot due to complete discharge of its battery, the buttons on the Jet Bot do not work. When charging is partially complete (about 10-20 minutes later), the Status Indicator is on and the buttons work again. |
| The Jet Bot has stopped during cleaning. | When the Jet Bot's Status Indicator turns red and stays red, place the Jet Bot manually on the Clean Station to charge it.When the Jet Bot is immobilized by an obstacle such as a cord, obstacles, threshold, a raised spot, etc., pick it up and move it away from the obstacle.- If any fabric or string is caught in a Driving Wheel, turn off the power switch and remove the fabric or string before using it again.Check whether the No-go Zones are set. |
| Suction power is weak. | When there's too much dust in the Dustbin, suction power may get weakened. Turn off the power switch and empty the Dustbin.If the brush at the bottom of the Jet Bot is blocked by foreign matter, turn off the power switch and remove foreign matter from the brush.When noise suddenly increases, turn off the power switch and empty the Dustbin. |
| The Jet Bot cannot find the Clean Station. | Check if there's a power failure or whether the power plug is unplugged.Remove any obstacles around the Clean Station that may prevent the Jet Bot from returning to the Clean Station.When there's foreign matter on the charging terminals, charging can be affected. Clean the foreign matter off the terminals. |
| The Jet Bot does not detect the Boundary Marker and crosses the boundary. | Make sure the Boundary Markers are attached as (☐) shape at 15 cm before the locations where the Jet Bot should not cross. |
| The Jet Bot suddenly cleans diagonally. | Check if the Clean Station is installed along the grain of wooden floors or tiles.The Jet Bot may clean in a diagonal direction if it is moving to another area using the shortest route. It may also move at a diagonal if it did not make contact with an obstacle at a right angle, if it was charged in a skewed direction at the Clean Station, or If the floor material is wooden or tile. |
| Jet Bot does not clean some places. | Check whether the Clean Station is installed in a narrow passage or near a room door and move it to another place.- If the Clean Station is installed in a narrow passage or near a room door, the Jet Bot cannot pass through the passage or the door.Check whether the places the Jet Bot does not clean are set as No-go Zones. |
| The Jet Bot cannot find a room. | If the Jet Bot does not start cleaning from the Clean Station, or if the Clean Station is reinstalled to a new position of 45 degree or 1 m or more from the previous installed place, the Jet Bot cleans all areas, which is not based on the created map.- Start cleaning from the Clean Station.- When the Jet Bot creates a map and the Jet Bot starts cleaning, make sure the Jet Bot starts operating parallel to the wall.- Remove obstacles within 0.5 m of the left and right side and 1 m of the front side of the Clean Station. |
| The map which the Jet Bot has created is different from the saved map and the map is also drawn askew. | |
| Empty Dust function does not work. | If the battery is too low, the Empty Dust function does not work. Charge the Jet Bot sufficiently, and run the function again.Check whether the Clean Station's cover is open or the Dust Bag is full.Check the time to empty Dustbin at the SmartThings App. If it is set as “When the robot vacuum’s dustbin is full”, the Empty Dust function does not work until the Dustbin is full.If the Empty Dust function does not work properly, press the [button] button on the body of the Jet Bot while it is charging, you can empty the Dustbin of the Jet Bot manually. If you press the [button] button during dust emptying, the dust emptying stops. |
| The Jet Bot does not detect and crosses No-go Zones. | ·If the Jet Bot does not start cleaning from the Clean Station, the set No-go Zones function does not work. Therefore, start cleaning from the Clean Station to use the function. |
| The Intelligent Power Control function works on a normal floor. | ·Check whether the floor is not even and then the Jet Bot works with its body a bit lifted up. ·Check whether there are any foreign matter on the Cliff Sensor which is at the bottom of the Jet Bot. ·Check whether the floor color is dark. |
| The Intelligent Power Control function does not work. | ·When the Jet Bot cleans a carpet with short fiber and bright color, it may recognize the carpet as a floor and then the Intelligent Power Control function may not work. |
| SmartThings App cannot be installed. | ·To check the compatibility of the SmartThings App with your smartphone, visit 'Play Store' or 'App Store'. ·The supporting OS version for the SmartThings App may change later. ·For rooted smart devices, standard installation and use will not be guaranteed. |
| I have installed the SmartThings App, but the Jet Bot fails to be connected. | ·Connect the Jet Bot to a wireless router by referring to the 'SmartThings App' of the user manual. |
| I fail to log into the SAMSUNG account. | ·Check your ID and password on the screen of the SAMSUNG account. |
| During product registration, the wireless router I want to connect cannot be searched. | ·Cancel the product registration, run the SmartThings App again, and try the product registration again. |
| During product registration, the password of the connecting wireless router is not input correctly. | ·Cancel the product registration, run the SmartThings App again, and try the product registration again. ·Press and hold the wireless router you want to connect on the network list, and delete the network to initialize the password. |
| During product registration, [icon] button is pressed and held as instructed but the next step does not appear. | Press the [icon] button until you hear it beep.If the next step does not appear within several seconds, press the [icon] button one more time.In the case of iOS, hold down the [icon] button on the Jet Bot for at least 3 seconds and then select the 'Next' button on the screen. |
| A message of the product registration failure appears. | Try the product registration procedure again by referring to the pop-up messages.Please refer to the "Setting up the wireless router" in the user manual.Please refer to the steps for completing the product registration in the user manual section "Adding a device to the SmartThings App".When the product registration fails repeatedly, restart the SmartThings App and try the product registration.All users should use the SAMSUNG account issued by the country which launches the product. |
| (Applicable to iOS only) During product registration, the AP password 1111122222 is not input correctly. | Press and hold the "[vacuum]_E30AJT**" on the network list and delete the network to initialize the password. |
| The Jet Bot is not connected to Wi-Fi. | Check the setting status of the wireless router. |
| Even though the Jet Bot is connected to a smartphone without a problem, the Jet Bot does not work with the smartphone. | Turn off the SmartThings App and then run it again, or disconnect the smartphone from the wireless router and then connect it again, or turn off the power supply of the Jet Bot, turn it on, wait for a minute or longer, and then run the SmartThings App again. |
| The Jet Bot on the SmartThings App fails to start. | Check if the Jet Bot is offline status on the SmartThings App.Connect the wireless router to Jet Bot again by referring to the 'SmartThings App' on the manual. |
| The 'Offline' message of the Jet Bot appears on the SmartThings App though the Jet Bot's registration has completed without a problem. | Close the SmartThings App and then run it again.Check whether there is an internet connection problem of the wireless router. Especially, a firewall may interrupt standard operation. |
| The ‘Offline’ message of the Jet Bot appears on the SmartThings App during normal operation of the App. | · If the Jet Bot is distant from a wireless router, connection cut may occur.· Close the SmartThings App and restart the App.· If the connection cut occurs repeatedly, try the product registration again.· When the SSID/password of a wireless router is changed, try the product registration again.· Check whether the Jet Bot is in the Sleep Mode. Press the [▷||] to cancel the Sleep Mode. |
| A map cannot be saved. | · To create a map, you need to register the device first and then start creating a map with the Smarthings App.· When the Jet Bot starts cleaning from the Clean Station and completes cleaning one time in Auto Clean, a map is saved. |
| When controlling with a smartphone, a response is delayed. | · If the Jet Bot and the smartphone are not connected to the same wireless router, a response can be delayed depending on the network environment. |
The software included in this product contains open source software.
To obtain the source code covered under licenses which have the obligation of publishing source code (e.g. GPL, LGPL... etc), please visit http://opensource.samsung.com/ and search by model name.
It is also possible to obtain the complete corresponding source code in a physical medium such as a CD-ROM; a minimal charge will be required.
The following URL http://opensource.samsung.com/opensource/VR9500_0/seq/0 leads to open source license information as related to this product. This offer is valid to anyone in receipt of this information.

How to reset to the factory default
- Turn the Jet Bot on and press and hold the [▶]+ [ ]for 7 seconds. Then the status indicator turns white and blinks, and the Jet Bot starts factory default setting.
- When the factory default setting is complete, the Jet Bot automatically restarts.
- After the factory default setting, the device status on the SmartThings App changes to offline status.
- Press and hold the 'Delete device' on the SmartThings App and delete the product.
- After that, register the product with a mobile device.
| Classification Items VR30T85**** series | |||
| Mechanical specifications | Weight 3.4 kg | ||
| Size W 350 mm x D 350 mm x H 99.8 mm | |||
| Cleaning method LiDAR location recognition | |||
| Button method of the Jet Bot | Touch type | ||
| Electrical specifications | Power consumption of the Jet Bot | 60 W (Spot Clean) | |
| Battery specification Lithium-ion 21.9 V / 52.56 Wh | |||
| Cleaning part | Charging type Auto charging / Manual charging | ||
| Cleaning Methods Auto Clean, Room Clean, Spot Clean | |||
| Additional functions | Energy-Saving Mode, Downtime Mode,Scheduled Cleaning, No-go Zones setting | ||
| Charging time About 240 minutes | |||
| Cleaning time (Based on a wooden floor) | Max About 60 minutes | ||
| Smart About 60-90 minutes | |||
| Normal About 90 minutes | |||
| Wi-Fi | Frequency range 2412-2472 MHz | ||
| Transmitter power(Max) 20 dBm | |||
* Charging and cleaning time may differ depending on the conditions of use.
* You can set the Downtime, the Scheduled Cleaning, the No-go Zones at the SmartThings App.
| Name Clean Station | ||
| Rated voltage 220-240 V | ~ 50-60 Hz | |
| Rated output current 25.85 V, 1.0 A | ||
| Power consumption | Charging 40 W | |
| Operation 1300 | W (When using suction power) | |
| Weight 5.0 kg | ||
| Size W 272 mm x D 416 | mm x H 544 mm | |
| Operating time About 18 seconds | ||
SAMSUNG
Jet Bot
Manuale dell'utente
Serie VR30T85****
natural_image
Line drawing of a mobile phone device with a rectangular base and a separate screen (no text or symbols)
natural_image
Illustration showing a hand holding a pen and a tool interacting with a device panel (no text or symbols visible)natural_image
Line drawing of a plug inserted into a car body (no text or symbols)
natural_image
Line drawing of a plug inserted into a device housing (no text or symbols)natural_image
Diagram of a circular device with arrows indicating rotation or movement, no text or symbols present
natural_image
Line drawing of hands holding a circular object with a lid, no text or symbols present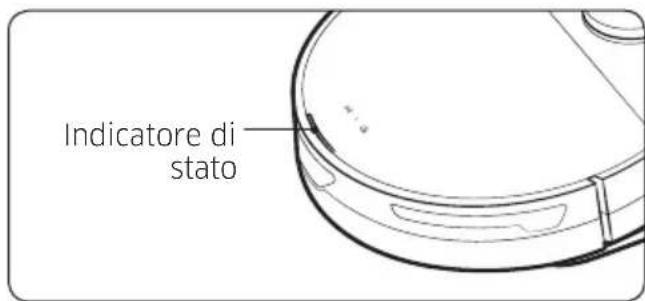
natural_image
Line drawing of a robotic vacuum cleaner with control panel and sensor icon (no text or symbols)
natural_image
Line drawing of hands installing a circular device with a lid and a tray, no text or symbols presentRicarica Auto
natural_image
Line drawing of two hands holding a small object, possibly a tool or device (no text or symbols present)natural_image
Diagram of a robotic vacuum cleaner with an open lid and internal components, showing a rotation arrow (no text or symbols)natural_image
Line drawing of a robotic vacuum cleaner with a hand using a tool to press or install a package, showing no text or symbols.natural_image
Line drawing of a hand holding a device with a lid (no text or symbols)natural_image
Technical line drawing of a robotic vacuum cleaner with internal components and directional arrows indicating motion (no text or symbols)natural_image
Top-down diagram of a car interior showing dashboard, seatbelt, and steering wheel (no text or symbols)natural_image
Illustration of a hand using a tool to press down an electronic device component (no text or symbols visible)natural_image
Illustration of a hand holding a cylindrical object (no text or symbols)natural_image
Diagram showing a hand inserting a device into a device's fan, with an inset close-up of the component (no text or symbols)natural_image
Illustration of hands installing or adjusting a circular device on a surface (no text or symbols)natural_image
Illustration of a hand using a tool to press or install a device on a circular base (no text or symbols visible)natural_image
Line drawing of a hand using a tool to clean or repair a small object on a wheeled robot (no text or symbols)natural_image
Illustration of a hand using a screwdriver to adjust or install a mechanical component, with an inset showing a close-up of the component (no text or symbols present)natural_image
Simple line drawing of a rectangular device with a downward arrow pointing to the top surface (no text or symbols)natural_image
Illustration of a hand holding a tool with an inset showing a mechanical component (no text or symbols)natural_image
Diagram of a mechanical component with an arrow indicating direction (no text or symbols present)natural_image
Diagram of a device interior with an arrow indicating upward motion (no text or symbols)natural_image
Illustration of hands holding a piece of paper with arrows indicating movement or change (no text or symbols present)natural_image
Hand inserting a grid into a device panel (no text or symbols visible)natural_image
Diagram of a refrigerator interior showing door and side view with directional arrows indicating movement (no text or symbols)natural_image
Diagram of a mechanical device with an arrow indicating direction (no text or symbols present)natural_image
Illustration of a faucet emitting smoke above a brick wall with a 24-hour clock, no text or symbols present.natural_image
Cross-sectional diagram of a mechanical or electronic component with internal channels and mounting holes (no text or symbols)natural_image
Diagram of a door lock mechanism with a key and lock symbol (no text or labels)www.samsung.com/it/support
Jet Bot
Manual del usuario
Serie VR30T85****
natural_image
Line drawing of a mobile phone device with a rectangular base and a separate screen (no text or symbols)
natural_image
Illustration showing a hand holding a pen and a tool interacting with a device panel (no text or symbols visible)natural_image
Line drawing of a plug inserted into a car body (no text or symbols)
natural_image
Line drawing of a plug inserted into a device housing (no text or symbols)natural_image
Diagram of a circular device with a curved arrow indicating rotation or movement, no text or symbols present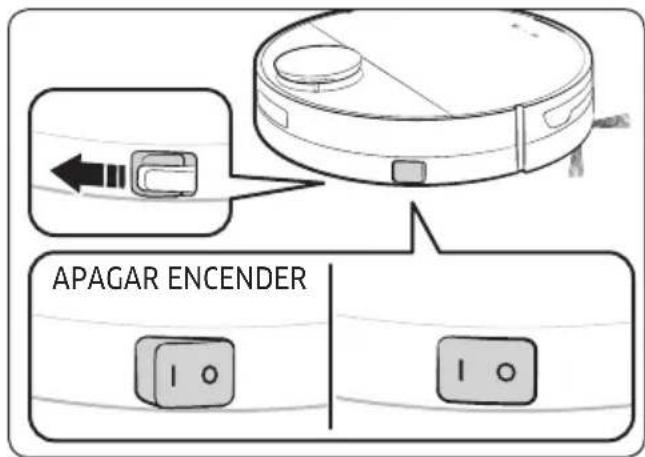
natural_image
Line drawing of hands holding a circular object with a lid, no text or symbols present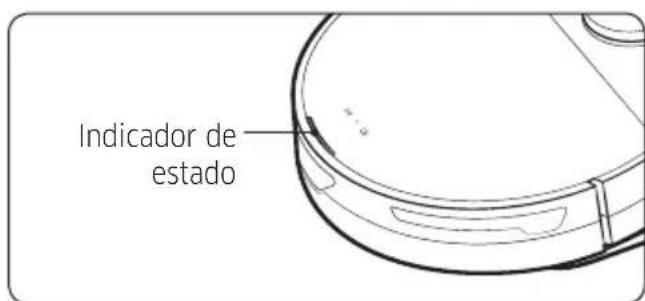
natural_image
Line drawing of a robotic vacuum cleaner with control panel and sensor icon (no text or symbols)

natural_image
Line drawing of hands holding a circular device with a lid and a control panel, no text or symbols presentRecarga automática
Encendido/apagado
natural_image
Line drawing of a hand holding a small object with a curved line above (no text or symbols)natural_image
Diagram of a robotic vacuum cleaner with an open lid and internal components, showing a rotation arrow (no text or symbols)natural_image
Illustration of a hand using a tool to clean or install a device on a circular base, with an arrow indicating the process (no text or symbols present)natural_image
Line drawing of a hand holding a device with a lid (no text or symbols)natural_image
Diagram showing various plastic packaging designs including a box, a cross mark, and a magnified inset with an arrow (no text or symbols)natural_image
Technical line drawing of a robotic vacuum cleaner with internal components and directional arrows indicating motion (no text or symbols)natural_image
Top-down schematic of a vehicle dashboard with internal components and a scroll arrow indicating motion (no text or symbols)natural_image
Diagram of a hand pressing down on a device component, showing a black arrow indicating motion (no text or symbols present)natural_image
Illustration of a hand holding a cylindrical object (no text or symbols)natural_image
Diagram showing a hand inserting a component into a device, with an inset close-up of the component (no text or symbols present)natural_image
Illustration of hands installing or adjusting a mechanical component on a circular base (no text or symbols)natural_image
Illustration of a hand using a tool to press or install a device on a circular base (no text or symbols visible)natural_image
Line drawing of a hand using a tool to clean or repair a small mechanical component (no text or symbols present)natural_image
Illustration of a hand using a tool to adjust or install a mechanical component, with an inset showing a close-up of the component (no text or symbols present)natural_image
Simple line drawing of a rectangular device with a downward arrow pointing to the top surface (no text or symbols)natural_image
Illustration of a hand using a tool to adjust or install a mechanical component, with an arrow indicating the process (no text or symbols present)natural_image
Diagram of a mechanical component with an arrow indicating direction (no text or symbols present)natural_image
Diagram of a device interior with an arrow indicating upward movement (no text or symbols)natural_image
Illustration of hands holding a folded paper or scroll with directional arrows indicating movement (no text or symbols)natural_image
Hand inserting a grid into a device panel (no text or symbols visible)natural_image
Illustration of a hand using a tool to remove debris from a container, with no text or symbols present.natural_image
Diagram of a refrigerator interior showing a door and side panel with directional arrows indicating movement (no text or symbols)natural_image
Diagram of a mechanical device with a tool interacting with a component, showing no text or symbols.natural_image
Illustration of a faucet emitting smoke above a brick wall with a 24-hour clock, no text or symbols present.natural_image
Diagram of a vehicle interior showing internal compartments and structural elements (no text or labels)natural_image
Diagram of a door lock mechanism with a lock icon and directional arrow (no text or symbols)natural_image
Line drawing of a mobile phone unit with a front panel and keypad (no text or symbols)
natural_image
Illustration showing a hand holding a pen and a tool interacting with a device (no text or symbols visible)natural_image
Line drawing of a plug inserted into a socket, showing wiring connection (no text or symbols)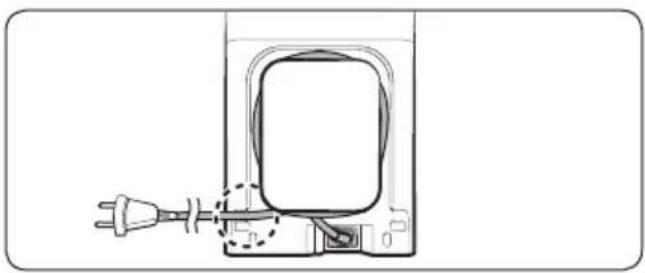
natural_image
Diagram of a plug inserted into a device housing, showing internal components and wiring (no text or symbols)natural_image
Diagram of a circular device with arrows indicating rotation or movement, no text or symbols present

natural_image
Line drawing of hands holding a circular object with a lid, no text or symbols present1 Abra a tampa superior do Jet Bot e retire a borracha branca.
natural_image
Line drawing of a robotic vacuum cleaner with control panel and indicator lights (no text or symbols)natural_image
Line drawing of hands installing or adjusting a circular device component (no text or symbols)Jet Bot descarregado
Ligar/Desligar
natural_image
Line drawing of a hand holding a small object with a curved line extending from it (no text or symbols)natural_image
Diagram of a robotic vacuum cleaner with an open lid and internal components, showing no text or symbolsnatural_image
Illustration of a hand using a tool to clean or install a device on a circular base (no text or symbols)natural_image
Line drawing of a hand holding a camera module (no text or symbols)natural_image
Technical line drawing of a robotic vacuum cleaner with directional arrows indicating movement (no text or symbols)natural_image
Top-down diagram of a car interior showing dashboard, seatbelt, and steering wheel (no text or symbols)natural_image
Illustration of a hand holding a tool over a device component, with no visible text or symbols.natural_image
Illustration of a hand gripping a cylindrical object (no text or symbols)4 Limpe a escova.
natural_image
Diagram showing a hand holding a device with an inset close-up of the component (no text or symbols)5 Encaixe a escova.
6 Encaixe a tampa da escova.
natural_image
Illustration of hands installing or adjusting a circular device on a base (no text or symbols visible)natural_image
Line drawing of a hand using a tool to press or install a device on a circular base (no text or symbols)natural_image
Line drawing of a hand using a tool to clean or repair a small mechanical component (no text or symbols present)natural_image
Illustration of a hand using a tool to adjust or install a mechanical component, with an inset showing a close-up of the component (no text or symbols present)natural_image
Simple line drawing of a rectangular device with a downward arrow pointing to its top surface (no text or symbols)natural_image
Illustration of a hand using a tool to adjust or install a mechanical component, with an arrow indicating the process (no text or symbols present)natural_image
Diagram of a mechanical component with an arrow indicating direction (no text or symbols present)natural_image
Diagram of a device interior with an arrow indicating upward motion (no text or symbols)natural_image
Illustration of hands holding a piece of paper with arrows indicating movement (no text or symbols)natural_image
Hand inserting a grid into a device panel (no text or symbols visible)natural_image
Illustration of a hand pouring liquid into a container with a plate, no text or symbols present3 Limpe o filtro do pó fino.
natural_image
Diagram of a device interior showing a door panel and a close-up view of the door handle (no text or symbols)natural_image
Diagram of a mechanical device with a tool interacting with a component, showing no text or symbols.natural_image
Illustration of a faucet spraying water above a brick wall with a clock showing 24h (no text or symbols)natural_image
Diagram of a vehicle interior showing internal compartments and a directional arrow (no text or labels)natural_image
Diagram of a door lock mechanism with a lock icon and directional arrow (no text or symbols)- Recomenda-se WPA2-PSK/AES.
www.samsung.com/pt/support
Jet Bot
Benutzerhandbuch
natural_image
Line drawing of a mobile phone device with a rectangular base and a side panel (no text or symbols)
natural_image
Illustration showing a hand inserting a device into a device panel, with no visible text or symbols.natural_image
Line drawing of a plug inserted into a car compartment, showing wiring and socket (no text or symbols)
natural_image
Diagram of a device with an electrical outlet connected to a plug, showing internal components and wiring (no text or symbols)natural_image
Diagram of a circular device with arrows indicating rotation or movement, no text or symbols present

natural_image
Line drawing of hands holding a circular object with a lid, no text or symbols presentnatural_image
Line drawing of a robotic vacuum cleaner with control panel and indicator lights (no text or symbols)Automatisches Laden
natural_image
Line drawing of a robotic vacuum cleaner inside a device, with hands holding the casing and a black arrow indicating motion (no text or symbols)Ein/Aus
natural_image
Line drawing of a hand holding a small object, possibly a tool or device, with no visible text or symbols.natural_image
Diagram of a robotic vacuum cleaner with an open lid and internal components, showing a rotation arrow (no text or symbols)natural_image
Illustration of a hand using a tool to clean or install a device on a circular base, with an arrow indicating the process (no text or symbols present)natural_image
Line drawing of a hand holding a device with a lid, no text or symbols presentnatural_image
Technical line drawing of a robotic vacuum cleaner with two arrows indicating motion (no text or symbols)natural_image
Top-down schematic of a vehicle dashboard with internal components and a scroll arrow indicating motion (no text or symbols)natural_image
Illustration of a hand using a tool to press down an electronic device component (no text or symbols visible)natural_image
Illustration of a hand holding a cylindrical object with a bandage (no text or symbols)natural_image
Diagram showing a hand inserting a component into a device, with an inset close-up of the component (no text or symbols present)natural_image
Illustration of hands installing or adjusting a mechanical component on a circular base (no text or symbols)natural_image
Line drawing of a hand using a tool to press or install a device on a circular base (no text or symbols)natural_image
Line drawing of a hand using a tool to clean or repair a small mechanical component (no text or symbols present)natural_image
Illustration of a hand using a tool to adjust or install a mechanical component, with an inset showing a close-up of the component (no text or symbols present)natural_image
Simple line drawing of a rectangular device with a downward arrow pointing to its top surface (no text or symbols)natural_image
Illustration of a hand using a tool to adjust or install a mechanical component, with an inset showing a close-up of the component (no text or symbols visible)natural_image
Diagram of a mechanical component with an arrow indicating direction (no text or symbols present)natural_image
Diagram of a device interior with an arrow indicating upward motion (no text or symbols)natural_image
Illustration of hands holding a device with arrows indicating motion (no text or symbols)natural_image
Hand inserting a grid into a device panel (no text or symbols visible)natural_image
Diagram of a device interior with a magnified view showing internal components and directional arrows (no text or symbols)natural_image
Diagram of a mechanical device with a tool interacting with a component, showing no text or symbols.natural_image
Illustration of a faucet spraying water above a brick wall with a 24-hour clock, no text or symbols present.natural_image
Diagram of a mechanical or electrical component with internal channels and a directional arrow (no text or symbols)natural_image
Line drawing of a mobile phone device with a front panel and keypad (no text or symbols)
natural_image
Illustration showing a hand inserting a device into a device panel, with no visible text or symbols.natural_image
Line drawing of a plug inserted into a socket, showing wiring connection (no text or symbols)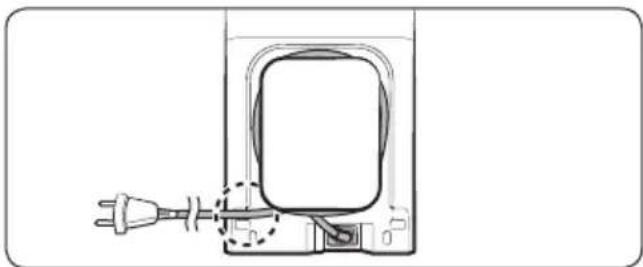
natural_image
Diagram of a device with an electrical outlet connected to a plug, showing internal components and wiring (no text or symbols)natural_image
Diagram of a circular device with arrows indicating rotation or movement, no text or symbols present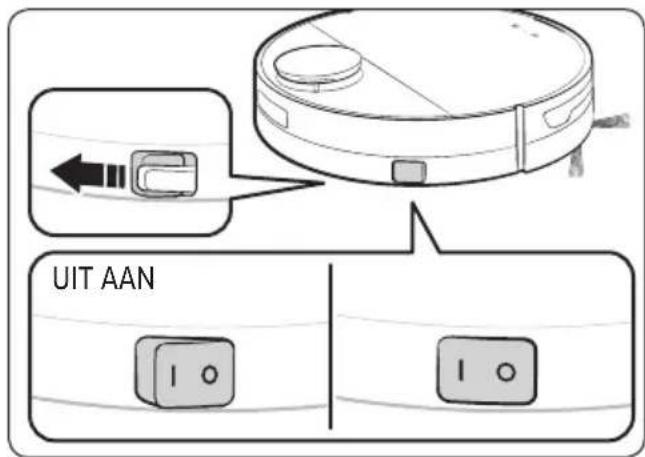

natural_image
Line drawing of hands holding a circular object with a lid, no text or symbols presentnatural_image
Line drawing of a robotic vacuum cleaner with control panel and indicator lights (no text or symbols)Automatisch opladen
natural_image
Line drawing of hands installing or adjusting a circular device component (no text or symbols)Aan/uit
natural_image
Line drawing of a hand holding a small object with a curved line extending from it (no text or symbols)natural_image
Diagram of a robotic vacuum cleaner with an open lid and internal components, showing a rotation arrow (no text or symbols)natural_image
Illustration of a hand using a tool to clean or install a device on a circular base (no text or symbols)natural_image
Line drawing of a hand holding a camera module (no text or symbols)natural_image
Technical line drawing of a robotic vacuum cleaner with directional arrows indicating movement (no text or symbols)natural_image
Top-down schematic of a vehicle dashboard with internal components and a scroll arrow indicating motion (no text or symbols)natural_image
Diagram of a hand pressing down on a device component, showing a black arrow indicating motion (no text or symbols present)natural_image
Illustration of a hand holding a cylindrical object (no text or symbols)4 Reinig de borstel.
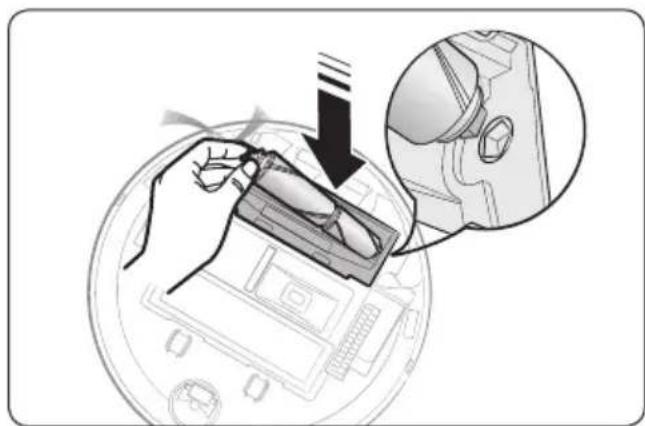
natural_image
Diagram showing a hand inserting a component into a device, with an inset close-up of the component (no text or symbols present)5 Bevestig de borstel. 6 Bevestig de borstelklep.

natural_image
Illustration of hands installing or adjusting a mechanical component on a circular base (no text or symbols)natural_image
Line drawing of a hand using a tool to press or install a device on a circular base (no text or symbols)natural_image
Line drawing of a hand using a tool to clean or repair a small robot component (no text or symbols)natural_image
Illustration of a hand using a tool to adjust or install a mechanical component, with an inset showing a close-up of the component (no text or symbols present)natural_image
Simple line drawing of a rectangular device with a downward arrow pointing to the top surface (no text or symbols)natural_image
Illustration of a hand using a tool to adjust or install a mechanical component, with an inset showing a close-up of the component (no text or symbols visible)natural_image
Diagram of a mechanical component with an arrow indicating direction (no text or symbols present)natural_image
Diagram of a device interior with an arrow indicating upward movement (no text or symbols)natural_image
Illustration of hands holding a device with directional arrows indicating movement (no text or symbols)natural_image
Hand inserting a grid into a device panel (no text or symbols visible)natural_image
Diagram of a device interior showing a door and a close-up view of the door panel (no text or symbols)natural_image
Diagram of a mechanical component with an arrow indicating direction, no visible text or symbolsnatural_image
Illustration of a faucet emitting steam above a brick wall with a 24-hour cycle indicator (no text or symbols)natural_image
Cross-sectional diagram of a mechanical or electrical component with internal channels and mounting points (no text or symbols)natural_image
Diagram of a door lock mechanism with a lock icon and directional arrow (no text or symbols)De fabrieksinstellingen herstellen
natural_image
Line drawing of a mobile phone device with a rectangular base and a separate screen (no text or symbols)
natural_image
Illustration showing a hand inserting a device into a device panel, with no visible text or symbols.natural_image
Diagram of a device with an electrical outlet connected to a panel, showing internal components and wiring (no text or symbols)natural_image
Line drawing of a plug inserted into a socket, showing wiring connection (no text or symbols)natural_image
Diagram of a robotic vacuum cleaner with directional arrows indicating rotation (no text or symbols)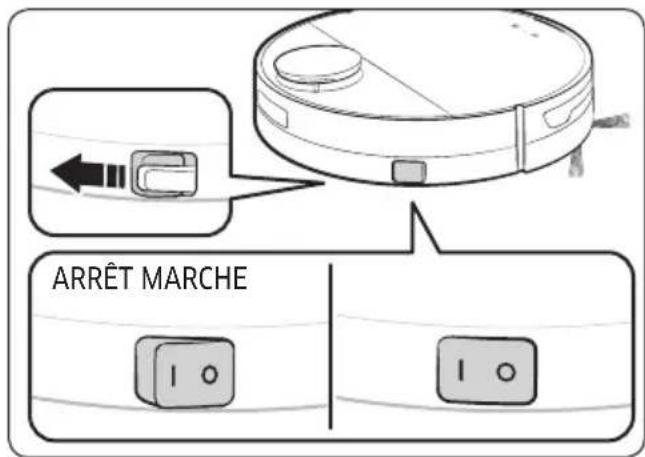

natural_image
Line drawing of hands holding a circular object with a lid, no text or symbols presentnatural_image
Line drawing of a robotic vacuum cleaner with control panel and indicator lights (no text or symbols)natural_image
Line drawing of a robotic vacuum cleaner inside a device, with hands holding the casing (no text or symbols)Jet Bot déchargé
natural_image
Line drawing of a hand holding a small object with a curved line extending from it (no text or symbols)natural_image
Diagram of a robotic vacuum cleaner with an open lid and internal components, showing a rotation arrow (no text or symbols)natural_image
Illustration of a hand using a tool to press or install a device on a circular base, with an arrow indicating the process (no text or symbols present)natural_image
Line drawing of a hand holding a device with a handle (no text or symbols)natural_image
Technical line drawing of a robotic vacuum cleaner with mechanical components and directional arrows indicating motion (no text or symbols)natural_image
Top-down diagram of a car interior showing dashboard, seats, and steering wheel (no text or symbols)natural_image
Diagram of a hand using a tool to press down an electronic device component (no text or symbols visible)natural_image
Illustration of a hand holding a cylindrical object with a bandage (no text or symbols)natural_image
Diagram showing a hand inserting a component into a device, with an inset close-up of the component (no text or symbols present)natural_image
Illustration of hands installing or adjusting a circular device with wheels and components (no text or symbols)natural_image
Illustration of a hand using a tool to press or install a device on a circular base (no text or symbols visible)natural_image
Line drawing of a hand using a tool to clean or repair a small mechanical component (no text or symbols present)natural_image
Illustration of a hand using a tool to adjust or install a mechanical component, with an inset showing a close-up of the component (no text or symbols present)natural_image
Simple line drawing of a device with a downward arrow pointing to the top surface (no text or symbols)natural_image
Illustration of a hand using a tool to adjust or install a mechanical component, with an inset showing a close-up of the component (no text or symbols visible)natural_image
Mechanical component diagram showing a lever mechanism with an arrow indicating direction (no text or symbols present)natural_image
Diagram of a device interior with an arrow pointing to a component (no text or symbols)natural_image
Illustration of hands holding a piece of paper or paper with arrows indicating movement (no text or symbols present)natural_image
Hand inserting a grid into a device panel (no text or symbols visible)natural_image
Diagram of a device interior showing a door and a close-up view of the door handle (no text or symbols present)natural_image
Diagram of a mechanical device with a tool interacting with a component, showing no text or symbols.natural_image
Illustration of a faucet spraying water above a brick wall with a 24-hour cycle indicator (no text or symbols)natural_image
Diagram of a vehicle interior showing internal compartments and a directional arrow (no text or labels)natural_image
Line drawing of a mobile phone device with a rectangular base and open lid (no text or symbols)
Sidoborste: 2 st (inuti produkten: 1 st, reserv: 1 st)

Dammpåse: 2 st (inuti produkten: 1 st, reserv: 1 st)
natural_image
Illustration showing a hand holding a pen and a tool interacting with a device panel (no text or symbols visible)natural_image
Line drawing of a plug inserted into a socket, showing wiring connection (no text or symbols)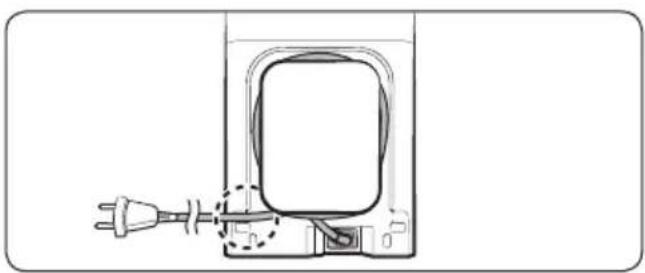
natural_image
Diagram of a plug inserted into a device housing, showing internal components and wiring (no text or symbols)natural_image
Diagram of a circular device with a curved arrow indicating rotation or movement, no text or symbols present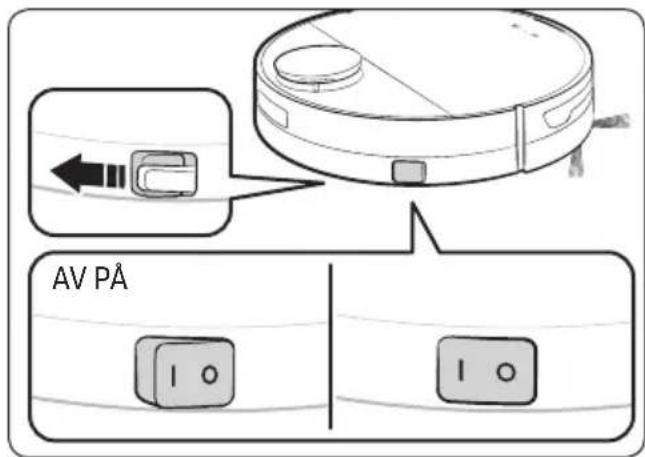

natural_image
Line drawing of hands holding a circular object with a lid, no text or symbols present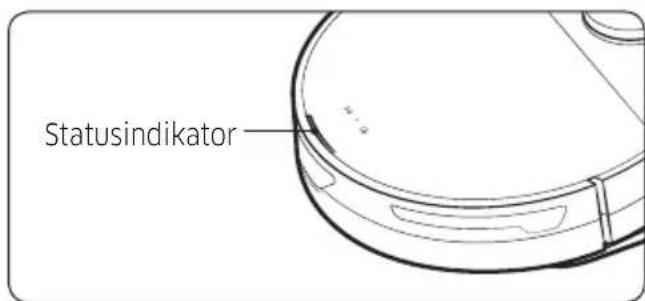
natural_image
Line drawing of a robotic vacuum cleaner with a close-up inset showing the internal components (no text or symbols)
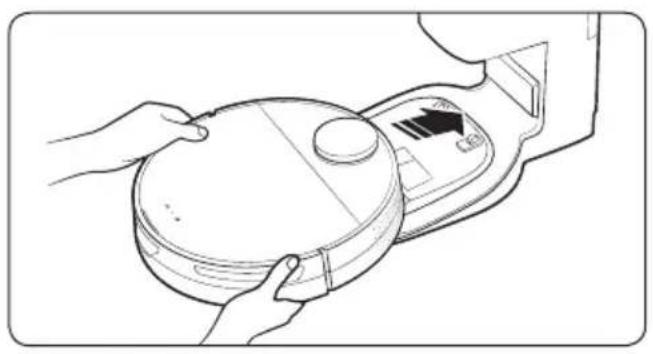
natural_image
Line drawing of hands installing a circular device with a lid and arrow indicator (no text or symbols)Autoladdning
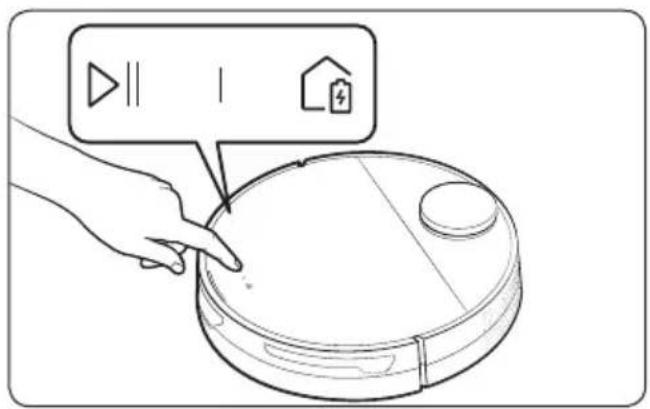
Ström på/av
natural_image
Line drawing of a hand holding a small object with a curved line extending from it (no text or symbols)natural_image
Diagram of a robotic vacuum cleaner with an open lid and internal components, showing a rotation arrow (no text or symbols)natural_image
Illustration of a hand using a tool to clean or install a device on a circular base, with an arrow indicating the process (no text or symbols present)natural_image
Line drawing of a hand holding a camera module (no text or symbols)natural_image
Technical line drawing of a robotic vacuum cleaner with mechanical components and directional arrows indicating motion (no text or symbols)natural_image
Top-down schematic of a vehicle dashboard with internal components and airflow direction (no text or symbols)2 Ta loss borstskyddet.
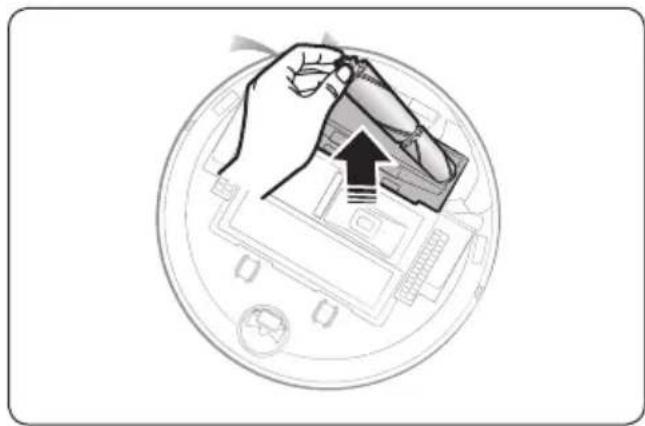
natural_image
Illustration of a hand using a tool to press down a device component (no text or symbols visible)natural_image
Illustration of a hand holding a cylindrical object with a bandage (no text or symbols)4 Rengör borsten.

natural_image
Diagram showing a hand inserting a component into a device, with an inset close-up of the component (no text or symbols present)5 Montera borsten.

natural_image
Illustration of hands installing or adjusting a mechanical component on a circular base (no text or symbols)natural_image
Line drawing of a hand using a tool to press or install a device on a circular base (no text or symbols)natural_image
Line drawing of a hand using a tool to clean or repair a small robot component (no text or symbols)natural_image
Illustration of a hand using a tool to adjust or install a mechanical component, with an inset showing a close-up of the component (no text or symbols present)natural_image
Simple line drawing of a device with a downward arrow pointing to the top surface (no text or symbols)natural_image
Illustration of a hand using a tool to adjust or install a mechanical component, with an inset showing a close-up of the component (no text or symbols visible)natural_image
Diagram of a mechanical component with an arrow indicating direction (no text or symbols present)natural_image
Diagram of a device interior with an arrow indicating upward motion (no text or symbols)natural_image
Illustration of hands holding a curved object with directional arrows indicating movement (no text or symbols)natural_image
Hand inserting a grid into a device panel (no text or symbols visible)natural_image
Illustration of a hand pouring liquid into a container with a plate, no text or symbols presentnatural_image
Diagram of a device interior showing a door and a close-up view of the door handle (no text or symbols present)natural_image
Diagram of a mechanical device with a tool interacting with a component, showing no text or symbols.natural_image
Illustration of a faucet emitting smoke above a brick wall with a 24-hour clock, no text or symbols present.natural_image
Diagram of a mechanical or electrical component with internal channels and mounting holes (no text or symbols)natural_image
Diagram of a door lock mechanism with a lock icon and directional arrow (no text or symbols)Diagram over dele 22
Jet Bot 22
natural_image
Line drawing of a mobile phone device with a rectangular base and a separate screen (no text or symbols)
natural_image
Illustration showing a hand holding a pen and a tool interacting with a device panel (no text or symbols visible)natural_image
Line drawing of a plug inserted into a socket (no text or symbols)
natural_image
Line drawing of a plug inserted into a device housing (no text or symbols)natural_image
Diagram of a circular device with a curved arrow indicating rotation or movement, no text or symbols present
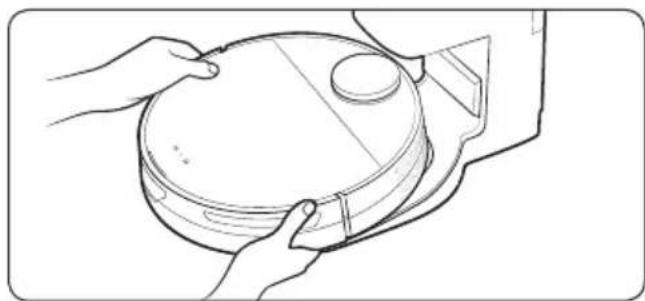
natural_image
Line drawing of hands holding a circular object with a lid, no text or symbols present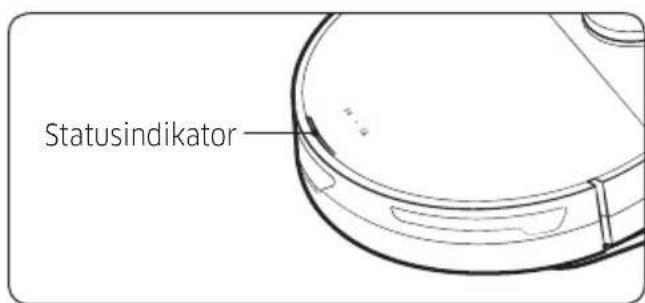
natural_image
Line drawing of a robotic vacuum cleaner with control panel and sensor icon (no text or symbols)
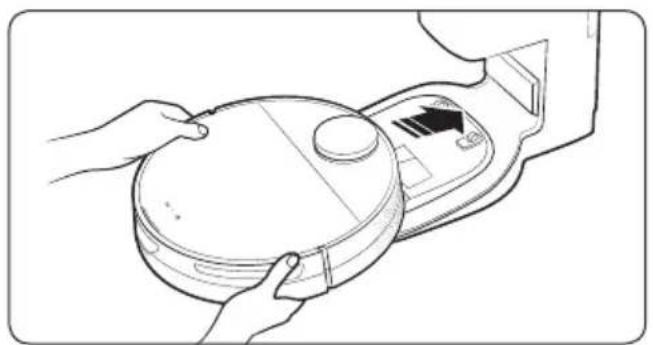
natural_image
Line drawing of a robotic vacuum cleaner with hand and blade, showing mechanical components (no text or symbols)Strøm, tænd/sluk
natural_image
Line drawing of a hand holding a small object, possibly a tool or device, with no visible text or symbols.natural_image
Diagram of a robotic vacuum cleaner with an open lid and internal components, showing a rotation arrow (no text or symbols)natural_image
Illustration of a hand using a tool to clean or install a device on a circular base (no text or symbols)natural_image
Line drawing of a hand holding a device with a clip (no text or symbols)natural_image
Diagram showing four steps of packaging or storage: open, closed, open with a circle indicating a magnified section, and open with a cross symbol (no text or symbols present)natural_image
Technical line drawing of a robotic vacuum cleaner with directional arrows indicating movement (no text or symbols)natural_image
Top-down schematic of a vehicle dashboard with internal components and airflow direction (no text or symbols)natural_image
Illustration of a hand using a tool to press down an electronic device on a circular base (no text or symbols)natural_image
Illustration of a hand holding a cylindrical object with a bandage (no text or symbols)4 Rengør børsten.

natural_image
Diagram showing a hand inserting a component into a device, with an inset close-up highlighting the component (no text or symbols present)5 Fastgør børsten.
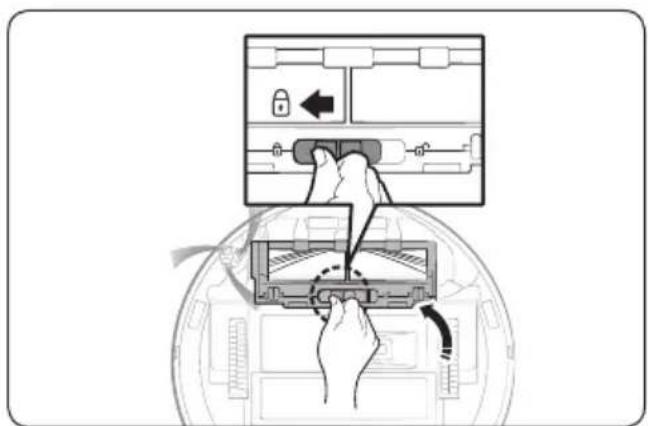
natural_image
Illustration of hands installing or adjusting a mechanical component on a circular base (no text or symbols)natural_image
Line drawing of a hand using a tool to press or install a device on a circular base (no text or symbols)2 Fjern fremmedlegemer med en tynd pind eller en pincet.
natural_image
Line drawing of a hand using a tool to clean or repair a small robot component (no text or symbols)Dæk sidebørsten med en varm, dampet klud i 10 sekunder, og tør derefter sidebørsten af.

natural_image
Illustration of a hand using a tool to adjust or install a mechanical component, with an inset showing a close-up of the component (no text or symbols present)natural_image
Simple line drawing of a rectangular device with a downward arrow pointing to its top surface (no text or symbols)natural_image
Illustration of a hand holding a tool with an inset showing a mechanical component (no text or symbols)natural_image
Diagram of a mechanical component with an arrow indicating direction (no text or symbols present)natural_image
Diagram of a device interior with an arrow indicating upward movement (no text or symbols)natural_image
Illustration of hands holding a device with arrows indicating rotation or movement (no text or symbols)natural_image
Hand inserting a grid into a device panel (no text or symbols visible)natural_image
Diagram of a door panel with an inset showing a close-up of the interior (no text or symbols present)natural_image
Diagram of a mechanical device with a tool interacting with a component, showing no text or symbols.natural_image
Illustration of a faucet emitting smoke above a brick wall with a 24-hour clock, no text or symbols present.natural_image
Diagram of a vehicle interior showing internal compartments and a directional arrow (no text or labels)natural_image
Diagram of a door lock mechanism with a lock icon and directional arrow (no text or symbols)Sådan nulstilles til fabriksstandarden
natural_image
Line drawing of a mobile phone device with a base and front panel (no text or symbols)
natural_image
Line drawing of a plug inserted into a socket, showing wiring connection (no text or symbols)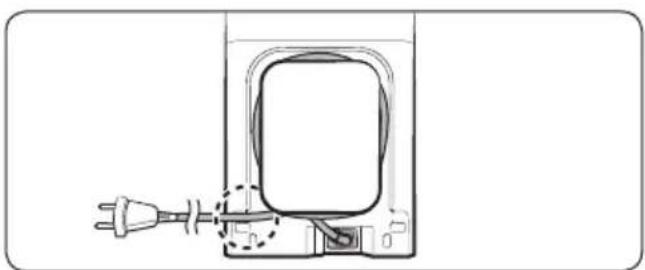
natural_image
Line drawing of a plug inserted into a device housing (no text or symbols)natural_image
Diagram of a circular device with arrows indicating rotation or movement, no text or symbols present

natural_image
Line drawing of hands holding a circular object with a lid, no text or symbols present
natural_image
Line drawing of a robotic vacuum cleaner with a control panel and a magnified inset showing light emission (no text or symbols)
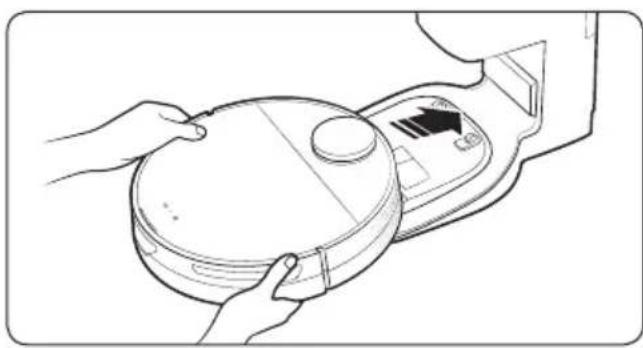
natural_image
Line drawing of a robotic vacuum cleaner inside a device, with hands adjusting the component (no text or symbols)Automatisk lading
På/av-knapp
natural_image
Line drawing of a hand holding a small object, possibly a tool or device, with no visible text or symbols.natural_image
Diagram of a robotic vacuum cleaner with an open lid and internal components, showing a rotation arrow (no text or symbols)natural_image
Illustration of a hand using a tool to clean or install a device on a circular base (no text or symbols)natural_image
Line drawing of a hand holding a camera module (no text or symbols)natural_image
Diagram showing four steps of packaging or storage: open, closed, open with a magnified circle, and open with a cross (no text or symbols present)natural_image
Technical line drawing of a robotic vacuum cleaner with directional arrows indicating movement (no text or symbols)natural_image
Top-down schematic of a circular device interior with internal components and a scroll arrow indicating rotation (no text or symbols)natural_image
Illustration of a hand pressing down on a device component (no text or symbols visible)natural_image
Illustration of a hand holding a cylindrical object (no text or symbols)4 Rengjør børsten.

natural_image
Illustration of a hand inserting a device into a circular device with an inset close-up showing the internal components (no text or symbols)5 Fest børsten.

natural_image
Illustration of hands installing or adjusting a circular device on a surface (no text or symbols)natural_image
Illustration of a hand using a tool to press or install a device on a circular base (no text or symbols visible)2 Fjern fremmedelementer med en stump stang eller pinsett.
natural_image
Line drawing of a hand using a tool to press or install a mechanical component on a wheeled platform (no text or symbols)Dekk sidebørsten med en varm, dampende klut i 10 sekunder, og tørk deretter sidebørsten.
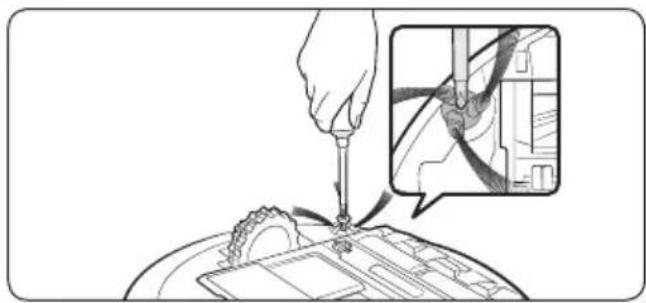
natural_image
Illustration of a hand using a screwdriver to adjust or install a mechanical component, with an inset showing a close-up of the component (no text or symbols present)natural_image
Simple line drawing of a device with a downward arrow pointing to the top surface (no text or symbols)natural_image
Illustration of a hand holding a tool with an inset showing a mechanical component (no text or symbols)natural_image
Diagram of a mechanical component with an arrow indicating direction (no text or symbols present)natural_image
Diagram of a device interior with an arrow indicating upward movement (no text or symbols)natural_image
Illustration of hands adjusting a component with arrows indicating motion (no text or symbols)natural_image
Hand inserting a grid into a device panel (no text or symbols visible)natural_image
Illustration of a hand using a tool to clean food in a bowl, with a no-smoking symbol above (no text or labels)natural_image
Diagram of a refrigerator interior showing door and side view with directional arrows indicating movement (no text or symbols)natural_image
Diagram of a mechanical device with a tool interacting with a component, showing no text or symbols.natural_image
Illustration of a faucet emitting smoke above a brick wall with a 24-hour clock, no text or symbols present.natural_image
Diagram of a mechanical component with internal channels and a directional arrow (no text or symbols)natural_image
Diagram of a door lock mechanism with a lock icon and directional arrow (no text or symbols)5 Drei de 7 faste skruene i låst stilling(
SmartThings-appen er bare kompatibel med modeller som har en Wi-Fi-funksjon.
Slik tilbakestiller du til fabrikkstandard
natural_image
Black-and-white photo of a modern lounge chair with leather backrest and accessories, no visible text or symbolsSAMSUNG
ESIVALMISTELUT
natural_image
Line drawing of a mobile phone device with a rectangular base and a separate screen (no text or symbols)
natural_image
Line drawing of a plug inserted into a socket, showing wiring and mounting bracket (no text or symbols)
natural_image
Line drawing of a plug inserted into a device housing (no text or symbols)natural_image
Diagram of a circular device with arrows indicating rotation or movement, no text or symbols present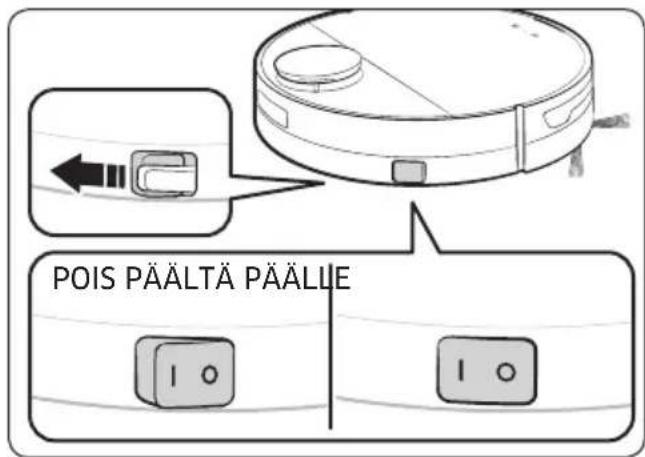

natural_image
Line drawing of hands holding a circular object with a lid, no text or symbols presentnatural_image
Line drawing of a robotic vacuum cleaner with control panel and indicator lights (no text or symbols)natural_image
Line drawing of hands installing a circular device with a lid and arrow indicator (no text or symbols)natural_image
Line drawing of a hand holding a small object, possibly a tool or device, with no visible text or symbols.natural_image
Diagram of a robotic vacuum cleaner with an open lid and internal components, showing no text or symbols.natural_image
Illustration of a hand using a tool to press or install a device on a circular base, with no visible text or symbols.natural_image
Line drawing of a hand holding a device with a lid (no text or symbols)natural_image
Technical line drawing of a robotic vacuum cleaner with internal components and directional arrows indicating motion (no text or symbols)natural_image
Top-down schematic of a circular device interior with internal components and a scroll arrow indicating rotation (no text or symbols)2 Irrota harjan kansi.

natural_image
Illustration of a hand pressing down on a device component (no text or symbols visible)natural_image
Illustration of a hand holding a cylindrical object (no text or symbols)4 Puhdista harja.
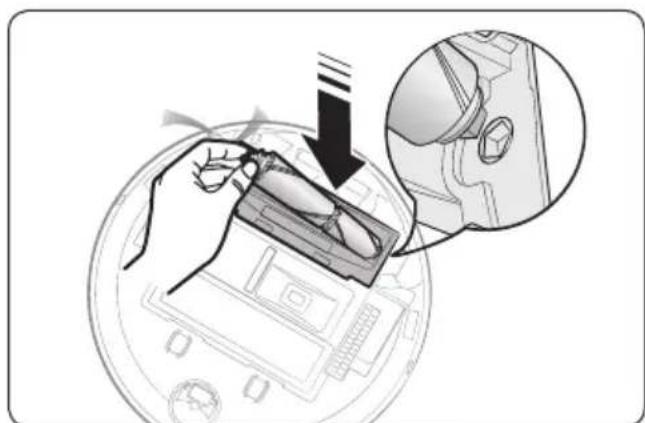
natural_image
Illustration of a hand inserting a device into a circular device with an inset close-up showing the internal components (no text or symbols)natural_image
Illustration of hands installing or adjusting a circular device on a surface (no text or symbols)natural_image
Illustration of a hand using a tool to press or install a mechanical component, no text or symbols presentnatural_image
Line drawing of a hand using a tool to clean or repair a small mechanical component (no text or symbols present)natural_image
Illustration of a hand using a tool to adjust or install a mechanical component, with an inset showing a close-up of the component (no text or symbols present)natural_image
Line drawing of a device with a downward arrow pointing to the top portion of a rounded rectangular area (no text or symbols)natural_image
Illustration of a hand holding a tool with an inset showing a mechanical component (no text or symbols)natural_image
Diagram of a mechanical component with an arrow indicating direction (no text or symbols present)natural_image
Diagram of a device interior with an arrow indicating upward motion (no text or symbols)natural_image
Illustration of hands holding a device with directional arrows indicating movement (no text or symbols)natural_image
Hand inserting a grid into a device panel (no text or symbols visible)2 Irrota pölyn hienosuodatin.
