
TS115W - Speaker ALTO - Free user manual and instructions
Find the device manual for free TS115W ALTO in PDF.
| Brand | Alto |
| Model | TS115W |
| Product type | Active amplified speaker |
| Category | Speaker |
| Power supply | Mains (power cable included) |
| Dimensions (estimated) | 400 x 300 x 300 mm |
| Weight (estimated) | 20 kg |
| Mounting | On floor stand or suspension via M10 anchor points |
| Wireless connectivity | Long-range Bluetooth (18-24 m) |
| Pairing function | Pairing with Bluetooth device via PAIR button |
| Parallel function | Wireless stereo linking of two speakers via STEREO LINK button |
| Audio inputs | 1x combo TRS/XLR 6.35 mm input |
| Audio output | 1x XLR MIX OUT output (pre/post volume) |
| Equalizer | CONTOUR button for musical equalization |
| Anti-feedback filter | GROUND button to reduce hum |
| Settings | Bluetooth volume, input volume, pairing/parallel tone volume |
| Indicators | Power LED, signal/limit LED (red) |
| Maintenance | Clean with a dry, soft cloth; do not use liquids |
| Safety | Use on a stable stand or suspend by anchor points only |
| Included parts | Power cable, simplified user guide |
Frequently Asked Questions - TS115W ALTO
User questions about TS115W ALTO
0 question about this device. Answer the ones you know or ask your own.
Ask a new question about this device
Download the instructions for your Speaker in PDF format for free! Find your manual TS115W - ALTO and take your electronic device back in hand. On this page are published all the documents necessary for the use of your device. TS115W by ALTO.
USER MANUAL TS115W ALTO
text_image
ALTO PROFESSIONALTSIIS W TRUESONIC
QUICKSTART GUIDE
ENGLISH
- Truesonic Wireless speaker
- Power cable
- Quickstart Guide
• Safety Instructions & Warranty Information Booklet
INSTALLATION
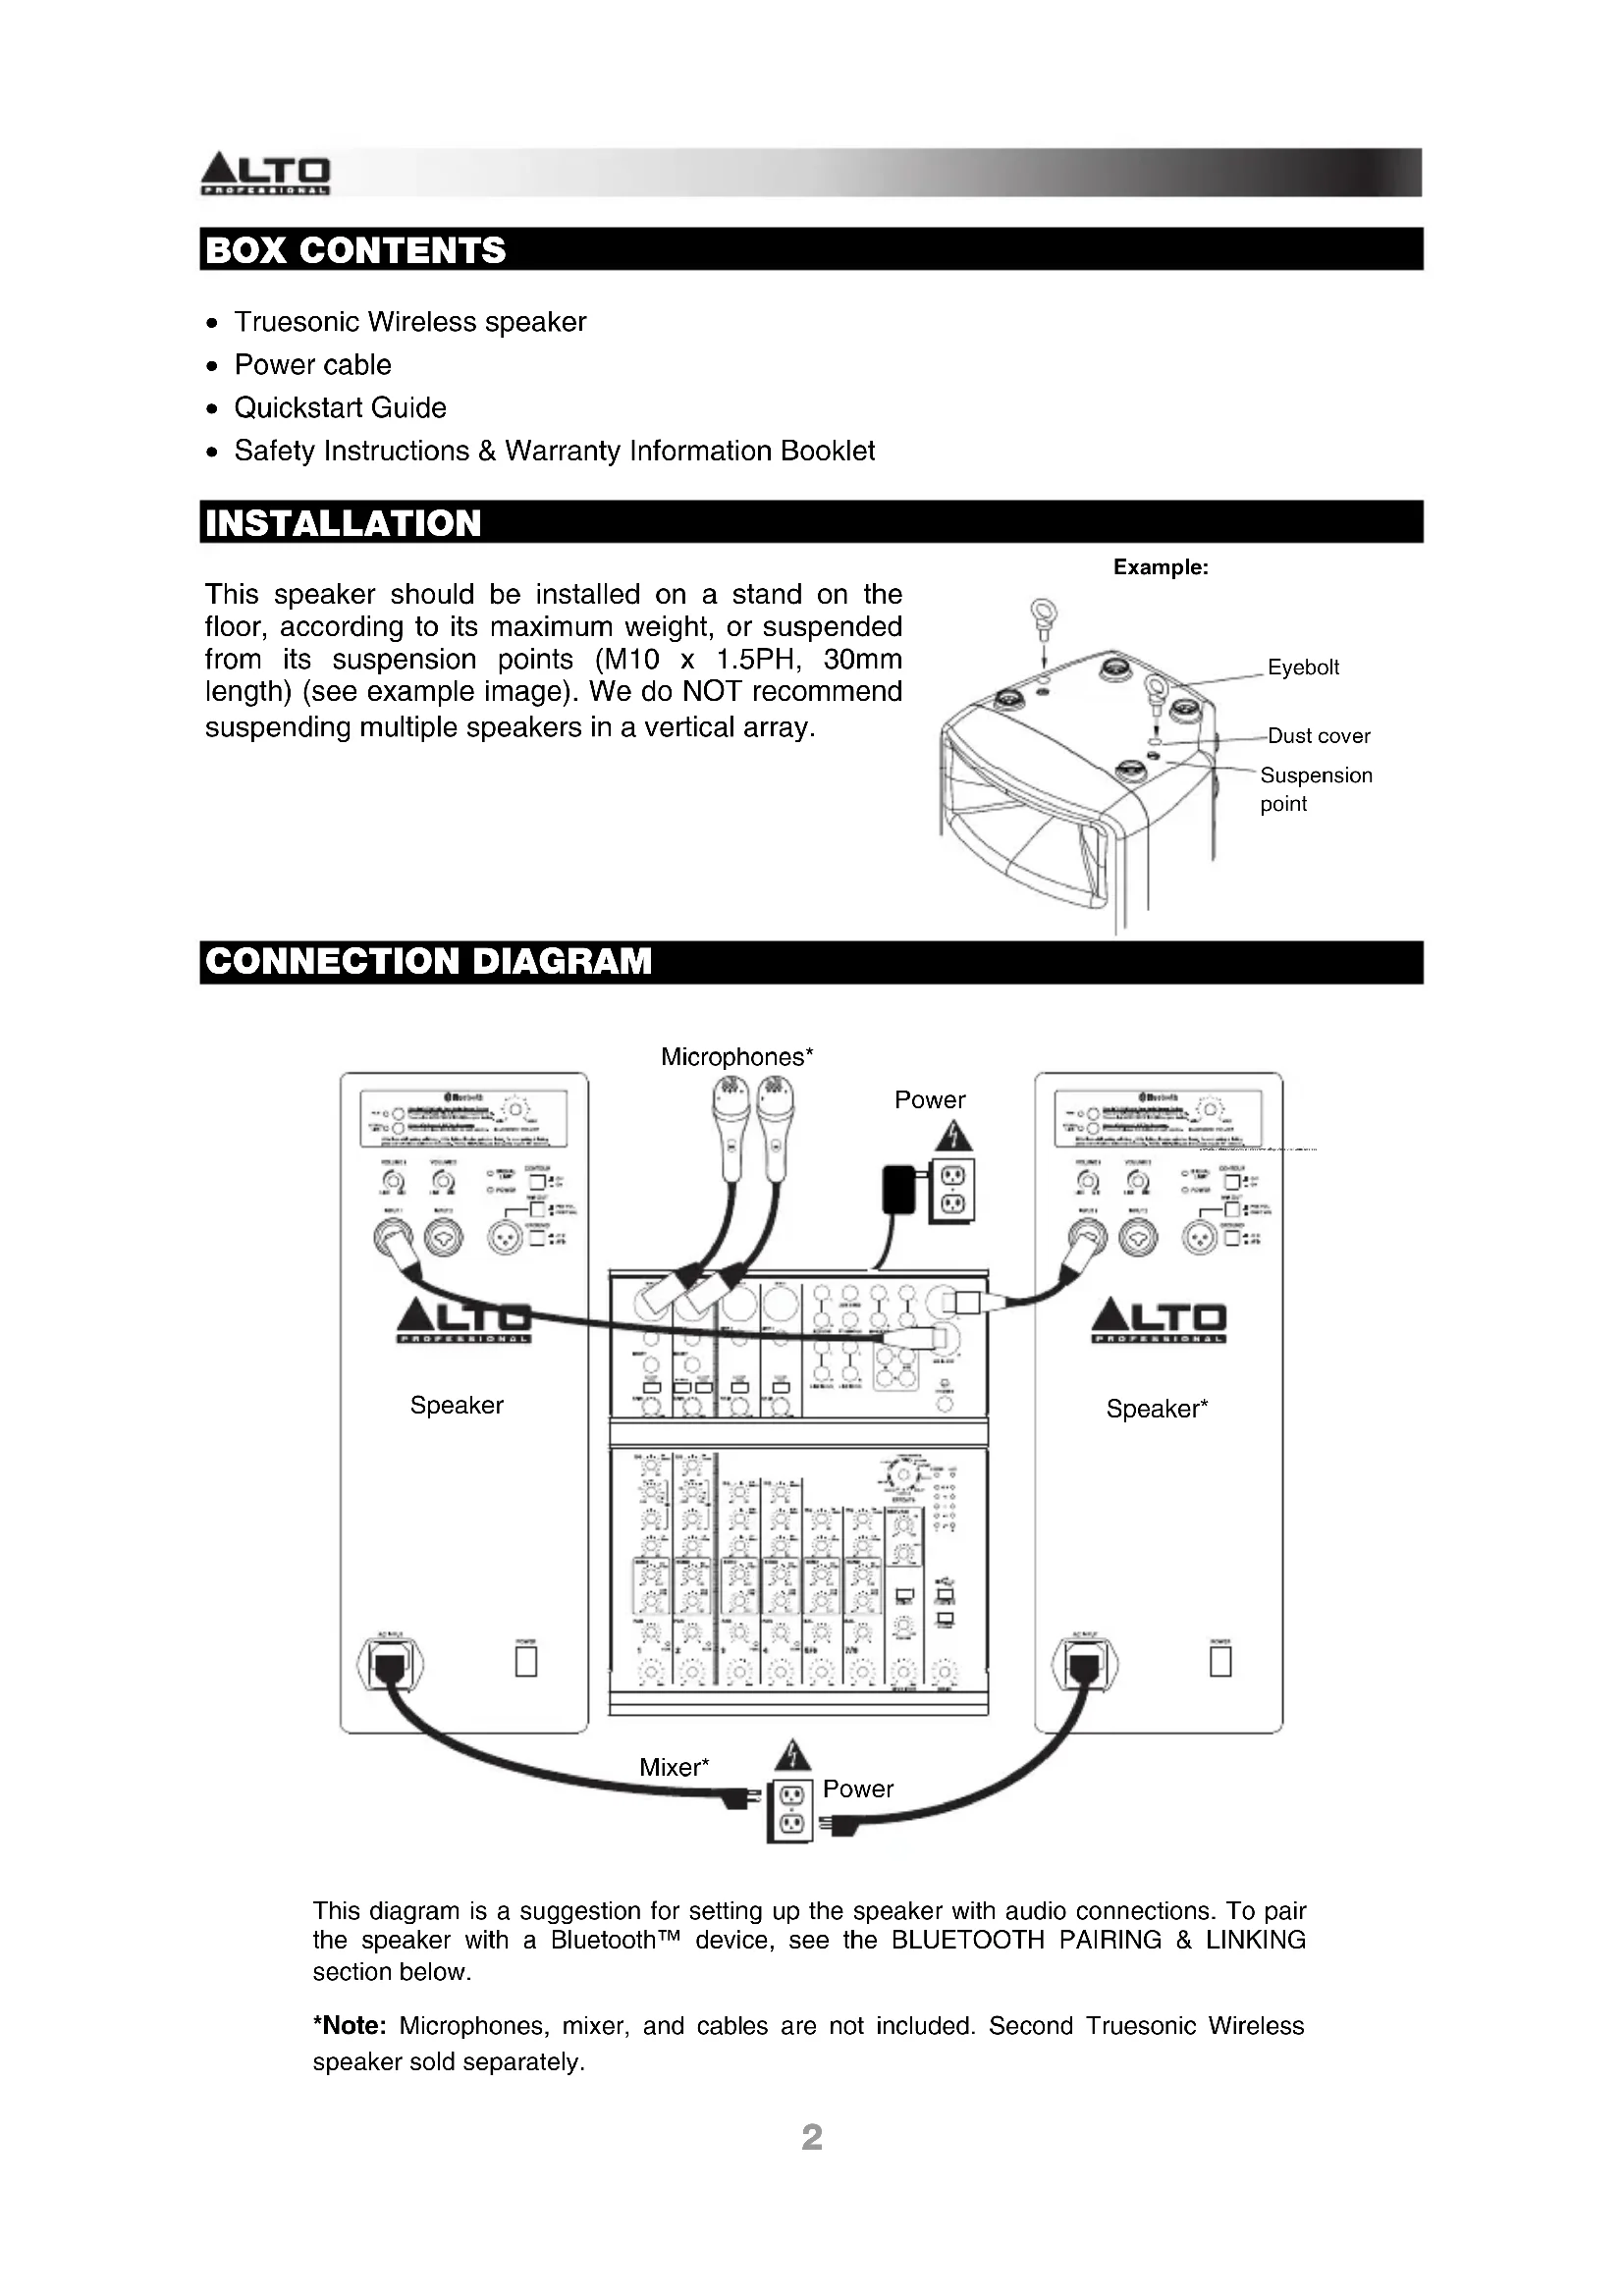
This speaker should be installed on a stand on the floor, according to its maximum weight, or suspended from its suspension points (M10 x 1.5PH, 30mm length) (see example image). We do NOT recommend suspending multiple speakers in a vertical array.
text_image
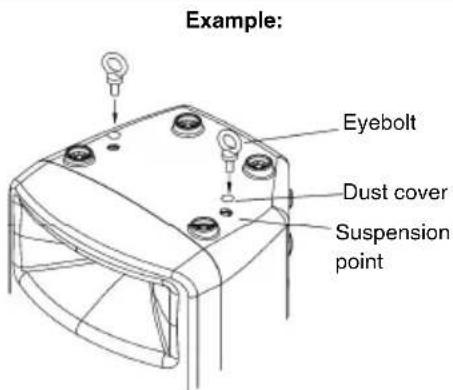
Example: Eyebolt Dust cover Suspension pointCONNECTION DIAGRAM

flowchart
graph TD
    A["Speaker"] --> B["Microphones*"]
    A --> C["Power"]
    A --> D["Mixer*"]
    A --> E["Power"]
    B --> F["Speaker*"]
    C --> G["Speaker*"]
    D --> H["Speaker*"]
    E --> I["Speaker*"]
This diagram is a suggestion for setting up the speaker with audio connections. To pair the speaker with a Bluetooth™ device, see the BLUETOOTH PAIRING & LINKING section below.
*Note: Microphones, mixer, and cables are not included. Second Truesonic Wireless speaker sold separately.
BLUETOOTH PAIRING & LINKING
IMPORTANT:
• These steps are for wireless audio streaming only.
- When pairing or linking, do only one process at a time. Starting one process before the other is finished will cancel the first.
- The tone sequences for pairing and linking are different, so you can easily distinguish between the two.
ABOUT RANGE
Truesonic wireless loudspeakers use an advanced, extended-range Bluetooth antenna design, allowing for ranges far greater than traditional Bluetooth devices. The typical range is 60-80 feet (18-24 meters) with a clear line of sight. However, the range may vary depending on your source device and the environment.
To maximize the range:
- Set your source device on a flat surface and make sure there are no obstacles between the loudspeaker and your device (e.g., walls, furniture, etc.).
- Turn off your source device's Wi-Fi.
- Turn off any unneeded 2.4 GHz devices in the nearby vicinity (e.g., other Bluetooth devices, baby monitors, Wi-Fi access points, microwave ovens, etc.).
- Try using a different Bluetooth source device. Bluetooth signal strength varies between different devices.
PAIRING
To pair the speaker to your Bluetooth device:
-
Do this on one loudspeaker only: With the loudspeaker powered on, press and release its PAIR BUTTON. Its LED will flash, and you will hear a tone sequence from the loudspeaker. (If you are using two Truesonic wireless loudspeakers, this one will be the "master." Also see the LINKING section below.)
-
From your Bluetooth device's settings page, enable Bluetooth and select ALTO PRO WIRELESS TS115W as the device. When paired successfully, you will hear a final "confirmation tone" from the loudspeaker and the PAIR BUTTON LED will light continuously. (This process may take up to 60 seconds.)
Note: If your device prompts you to enter a PIN code to pair it to the speaker, enter 0000 (four zeros).
Note: If your device prompts you to select the connection type, select "stereo speakers," "advanced audio," or a similar option.
- Turn the loudspeaker's BLUETOOTH VOLUME knob to its lowest setting.
- On your Bluetooth device, play music. We recommend setting the playback volume at its maximum setting. Then, adjust the loudpeaker's BLUETOOTH VOLUME knob to the desired level.
- Once your device is paired to the speaker, the speaker will remember the device even after power-cycling it. To reconnect it, go to your device's Bluetooth settings page and select "Connect" to re-establish the connection.
LINKING
If you are using two Truesonic wireless speakers:
-
Make sure no audio is playing from your Bluetooth device. If it is, pause/stop playback and wait 5 seconds.
-
Press and release the STEREO LINK BUTTON on each speaker.
-
Both loudspeakers' LEDs will flash while "searching" for each other, and you will hear a tone sequence from both loudspeakers. (This process may take up to 60 seconds. However, the very first time you link the loudspeakers, the process may take up to 3 minutes.)
-
When they are successfully linked, you will hear a final "confirmation tone" from both loudspeakers and the STEREO LINK BUTTON LEDs on both loudspeakers will light continuously.
Note: The loudspeaker that is connected to your source device is the “master”; the linked loudspeaker is the “slave.” The source device sends its signal to the master, and the master relays the signal to the slave.
Note: The stereo signal will be split between the two loudspeakers: the master loudspeaker will play the left channel; the slave loudspeaker will play the right channel.
Tip: When using two loudspeakers, we recommend labeling the master loudspeaker so you can distinguish between the two in future setups.
ADDITIONAL INFORMATION
Truesonic wireless loudspeakers will remember their pairing and linking settings even after they are powered off. When you turn the loudspeakers back on, they will automatically reconnect to each other. When the connections are re-established between the loudspeakers, the LEDs next to the STEREO LINK BUTTONS will light continuously.
Tip: Once your device is loudspeaker, the loudspeaker will remember the device even after power-cycling it. To reconnect, go to your device's Bluetooth settings page and select "Connect" to re-establish the connection.
p a i
If the connection is lost between the loudspeakers, or between the loudspeaker and the source device, and if they do not reconnect automatically, then power-cycle both loudspeakers and allow them to reconnect.
When the two loudspeakers are linked, you can only pair your source device to the master loudspeaker. The slave loudspeaker's PAIR BUTTON will be disabled; if you press it, you will hear 3 rapid "beeps" to indicate that the button is "locked out."
To erase all previous pairing and linking settings, press and hold either the PAIR BUTTON or the STEREO LINK BUTTON for 3 seconds. You will hear a long tone to confirm its pairing and linking settings have been erased. The LEDs will also turn off. Do this on both the master and the slave loudspeakers. Now, you can pair to a new source device or link the loudspeakers again.
Note: The volume of the pairing and linking tones are pre-set to an optimal level. To adjust their volume, see the REAR PANEL OVERVIEW section for information.
REAR PANEL OVERVIEW
-
POWER INPUT – Connect the included power cable to this input and connect the other end of the cable to a power source. Make sure the loudspeaker's POWER SWITCH is set to "off" when plugging and unplugging the cable.
-
POWER SWITCH – Turns the loudspeaker on/off. Make sure the VOLUME knob is set to "zero" before turning it on.
-
POWER LED – Illuminates when the loudspeaker is on.
-
PAIR BUTTON – Press and release this button to pair the loudspeaker to your Bluetooth device. See the BLUETOOTH PAIRING & LINKING section for pairing instructions.
-
BLUETOOTH VOLUME – Turn this knob to adjust the input volume of your paired Bluetooth device.
-
STEREO LINK BUTTON – When using a pair of Truesonic Wireless loudspeakers, press and release this button on each speaker to "link" them for wireless stereo audio. See the BLUETOOTH PAIRING & LINKING section for more information.
-
INPUT - Use a standard 1/4" TRS or XLR cable (not included) to connect your sound source to this input.
-
INPUT VOLUME - Turn this knob to adjust the input volume for each INPUT.
-
SIGNAL LIMIT LED - Illuminates RED when the internal protection circuit is activated by a high signal level. The protection circuit dynamically reduces the signal level to avoid audible distortion and to protect the woofer and high-

text_image
Bluetooth 4 Step 1+/- No. 95% with Your Audio Reverse Drive Power and Release the button on one speaker ring, Power and ALO PRO MSCI/LED on your button. 6 Step 2+/- No. 95% with Your Audio Reverse Drive Power and Release the button on each speaker. 14 VOLUME 1 VOLUME 2 9 SIGNAL LINE 8 LINE 8 10 POWER INPUT 1 INPUT 2 11 MIX OUT PRE VOL POST VOL GROUND 13 www.abc.com.cn
text_image
AD INPUT 1 POWER 2frequency driver from over excursion or mechanical damage. If the LED is lit constantly, or the sound is distorted, reduce the signal level of your sound source, or lower the volume control on the rear panel.
-
MIX OUT – Use a standard XLR cable (not included) to connect this jack to the input of another loudspeaker.
-
MIX OUT SELECTOR – When disengaged (PRE VOL), the MIX OUT level will be unaffected by the INPUT VOLUME controls. When engaged (POST VOL), the MIX OUT level can be adjusted by the INPUT VOLUME controls.
Note: The BLUETOOTH VOLUME control always affects the MIX OUT.
-
CONTOUR – Engage (depress) this switch to equalize the mix for optimal music playback. Disengage (raise) the switch during live performance for a flatter response.
-
GROUND SWITCH – Press this switch to reduce hum or noise.
-
PAIRING/LINKING TONE VOLUME – Below and to the left of the STEREO LINK BUTTON, there is a small opening that exposes a recessed level control. This potentiometer controls the volume of the pairing/linking tones. This is pre-set to an optimal volume by default, but you may use a small, flathead jeweler's screwdriver to adjust it from - dB to +10 dB. (Turning it clockwise increases the volume; counter-clockwise decreases it.) To return it to the factory setting, turn it until it you feel the center detent at the 12 o'clock position.
CONTENIDO DE LA CAJA
text_image
Bluetooth 4 FNT 6 STUDIO LINE 7 Blue 1-30 MHz with Your Audio System Pens and released the button on one speaker only. Then asked AUTO PRO WHERE it or your clock. Blue 1-30 MHz with Your Two Speakers Pens and released the button on each speaker. LA 14. As parking or falling, LISA Right and left were picked up to them. To send parking & holding power, I can allow for 2 seconds. NOTs Initial parking or falling may require 50 seconds. VOLUME 1 8 LINE - MAC VOLUME 2 8 LINE - MAC 9 SIGNAL LIMIT POWER 12 CONTOUR OUT ON MIX OUT PRE VOL POST VOL INPUT 1 INPUT 2 11 GROUND 7 7 10 13 www.albptech.com/online

text_image
Bluetooth 4 Blue 1-2 to OFF with Your Audio System Please and release the button on an audio jack. Then asked ATC PRO WIRE LED or your keyboard. Step 3 to Power LINK Two Software Please and release the button on each speaker. 6 BLUECO VOLUME VOLUME 1 8 VOLUME 2 8 9 SIGNAL LIMIT 3 POWER CONTOUR 12 OFF ON MIX OUT PRE VOL. POST VOL. INPUT 1 7 INPUT 2 10 GROUND 13 www.albcoptical.com/whl.edu

text_image
Bluetooth 4 Blue: "Hi-Fi" with You, Phone & Smart Home 6 Blue: "Hi-Fi" with You, Phone & Smart Home VOLUME 1 8 VOLUME 2 9 SIGNAL LIMIT 10 POWER CONTOUR 12 OFF ON WE OUT 11 PRE VOLT POST VOLT 13 GROUND INPUT 1 INPUT 2 14 VOLUME 5 6 INTL WORLD LEAVI LED LED LED LED BLUETHOY VOLUME 7 GROUND
text_image
AC INPUT 1 POWER 2INHOUD VAN DE DOOS
• Draadloze Truesonic luidspreker
- Stroomkabel
- Snelstartgids
text_image
Bluetooth 4 Use 1-Cr PSF with True Audio System Buttons: These will release 80% button on one square or 25. Then select AUTO PRO WIRELO on your keyboard. 6 Use 2-Cr Screen 1 PSF buttons: Press and release 100% button on each square. 14 VOLUME 1 8 VOLUME 2 8 9 SIGNAL LIMIT 3 POWER 12 CONTOUR OFF ON MIX OUT PRE VOL POST VOL 7 INPUT 1 INPUT 2 10 GROUND 13 MAX MIN MAX BLUTTOOTH VOLUME One Deutschland's choice
text_image
AC INPUT POWER 1 2Output Power: 800 W Peak (670 W LF + 130 W HF)
400 W Continuous RMS (335 W LF + 65 W HF)
Crossover: 2.5 kHz
Max SPL @ 1m: 125 dB Peak, 122 dB Continuous
Frequency Response: 65 Hz - 19 kHz (+3 dB)
Frequency Range: 54 Hz – 20 kHz (@ -10 dB)
Low Frequency: 15" (381 mm) woofer, 2" (51 mm) voice coil
High Frequency: Neodymium compression driver, 1" (25 mm) exit, 1" (25 mm) voice coil
Horn Coverage: 80/100° H x 60° V, nominal (@ -6 dB)
Input Control: Line/Mic - to +50 dB
Max input level: +23 dBu
Impedance: 15 kΩ
External Control: Volume, power on/off with LED, clip limiter with LED, ground lift
Connectors: Input: Two 1/4" TRS or XLR
Link: One XLR
Wireless connectivity: Bluetooth (A2DP)
Wireless range: 60-80 feet (18-24 meters), typical
Protection features: Over-excursion, thermal, driver
Power supply: 100 VAC, 110-120 VAC, or 220-240 VAC; 50/60 Hz
Cabinet: Trapezoidal with floor monitor capability. Injection-molded polypropylene with perforated steel grille
Mounting information: Integrated pole socket (36 mm diameter); 2 handles; 6 M10 threaded sockets (2 top, 2 bottom, 2 pullbacks)
Dimensions (H x W x D): 26.75" x 16.9" x 14.3" (679 mm x 430.3 mm x 365 mm)
Weight (speaker only): 39.6 lbs. (18 kg)
FCC ID: Y40-TS115W
THIS DEVICE COMPLIES WITH PART 15 OF THE FCC RULES. OPERATION IS SUBJECT TO THE FOLLOWING TWO CONDITIONS: (1) THIS DEVICE MAY NOT CAUSE HARMFUL INTERFERENCE, AND (2) THIS DEVICE MUST ACCEPT ANY INTERFERENCE RECEIVED, INCLUDING INTERFERENCE THAT MAY CAUSE UNDESIRED OPERATION.
SHIELDED CABLES MUST BE USED WITH THIS UNIT TO ENSURE COMPLIANCE WITH THE CLASS B FCC LIMITS.
Inrush current at initial switch-on: 6.01 A
Inrush current after power supply interruption: 4.44 A
Bluetooth PIN #: 0000
www.altoprofessional.com/wireless