USER MANUAL QA 405H MOULINEX
Thank you for choosing an appliance from the MOULINEX range, which is intended exclusively for the preparation of food and is only for indoor, domestic use.
EN
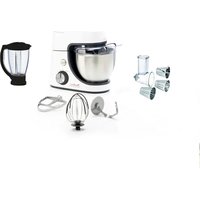
DESCRIPTION
a - Motor unit
a1 Electronic speed selector
a2 Multi-function head (a3) release button
a3 Multi-function head
a4 High speed outlet
(blender jug / juice / extractor / grinder)
a5 Safety cover
a6 Mixer accessories outlet
(kneader, balloon whisk, mixer)
a7 Power cord storage
b-Bowl assembly
b1 Stainless steel bowl
b2 Lid
c-Mixer accessories
c1 Kneader
c2 Mixer
c3 Balloon whisk
d - Blender jug (depending on model)
e - Attachment holder (depending on model)
f - Mincer head (depending on model)
f1 Metal body
f2 Feed screw
f3 Blade
f4 Large-hole screen
f5 Small-hole screen
f6 Nut
f7Pusher
f8 Tray
g - Vegetable slicer (depending on model)
g1 Drum body
g2Pusher
g3 Slicer drum A
g4 Coarse grater drum C
g5 Fine grater drum D
g6 Reibekuchen drum E
h - Juice extractor (depending on model)
h1Pusher
h2Lid
h3 Rotary filter
h4 Juice collector
h5 Pouring spout
h6 Locking lever
SAFETY INSTRUCTIONS
- Read the instructions for use carefully before using your appliance for the first time: the manufacture shall accept no liability in the event of any use that does not comply with the instructions.
- This appliance is not designed to be used by persons (including children) with reduced physical, sensorial or mental capacities, or by people with no prior knowledge or experience, except where they have benefited from supervision or previous instructions relating to the use of the appliance, from a person responsible for their safety. Children must be supervised to ensure that they do not play with the appliance.
- Check that the power rating of your appliance corresponds to your electrical supply. Any connection fault invalidates the warranty.
- Your appliance is intended only for domestic culinary use, in an indoor setting and under supervision.
- Always unplug the appliance as soon as you have finished using it and when you are cleaning it.

EN
- Do not use the appliance if it is not working properly or if it has been damaged. Contact an authorised service centre (see list in the service booklet).
- Any maintenance other than routine cleaning and upkeep by customers must be carried out by an approved service centre (see list in the service booklet).
- Do not place the appliance, the supply cable or the plug in water or any other liquid.
- The power cord must be kept out of the reach of children and must not be placed near or come into contact with the hot parts of the appliance, sources of heat or sharp corners.
- If the power cable or the plug are damaged, do not use the appliance. To maintain safety, these parts must be replaced by an approved service centre (see list in the service booklet).
- Do not place the accessories in a microwave oven.
- For your own safety, use only accessories and spare parts designed for your appliance and sold in an approved service centre.
- Always remove the blender (d) or the juice extractor (h) before pressing the multi-function head (a3) release button (a2).
- Always use the pusher (f7) with the mincer head accessory (f), to guide food in the feed tube. Never use your fingers, a fork, a spoon, a knife or any other object.
- Never touch any moving parts. Wait for the appliance to come to a complete stop before removing accessories.
- Handle the sharp blades (d, f, g) carefully when emptying the bowls and when cleaning: they are extremely sharp.
- Do not touch the whisks or the kneader when the appliance is running.
- Do not allow long hair, scarves, ties etc. to dangle over the appliance during operation.
- Never insert utensils (spoon, spatula, etc.) through the feed tube in the lids (b2), (d2) or (h2) in the drum body (g1).
- Do not run the blender jug (d1) without its lid (d2).
- Use only one accessory at a time.
- Do not use the bowls (b1, d1) as containers for freezing, cooking or sterilisation.
- Do not use the juice extractor if the rotary filter (h3) is damaged.
- Switch off the appliance and unplug from the mains supply before changing accessories or handling any parts that move during use.
BEFORE FIRST USE
- Before using for the first time, wash all accessory parts in soapy water (except for the attachment (e): see § Cleaning) Rinse and dry.
- Place the appliance on a flat, clean and dry surface. Make sure that the selector button (a1) is in "0" position and plug in your appliance.
-
You have several options for starting your appliance:
-
Intermittent operation (pulse): Turn the selector button (a1) to the "pulse" position. Using a succession of pulses can give you better control when preparing certain foods.
- Continuous operation: Turn the selector button (a1) to the desired position from "1" to "max" depending on the food you are preparing.
You can change it as required during preparation.
- To stop the appliance, turn the button (a1) to "0".
Important: The appliance will start only if the cover (a5) and the head (a3) are locked. The appliance will stop immediately if you unlock the cover (a5) and/or the head (a3) during operation. Lock the cover and/or the head, turn the control button (a1) to the "0" position, and then start the appliance normally by selecting the desired speed.
Your appliance comes with a microprocessor that controls and analyses the operating power. If the load becomes too high, your appliance will stop automatically. To restart your appliance, turn the rotary button (a1) to the "0" position and remove some of your ingredients. Allow your appliance to cool down for a few minutes. You can then select the desired speed to complete your preparation.
1 - MIXING / KNEADING / BEATING / EMULSIFYING / WHISKING
You can prepare up to 1,8kg of dough using the stainless steel bowl (b1) and its lid (b2) depending on the food.
ACCESSIONS USED:
- Stainless steel bowl (b1).
-Lid (b2)
- Kneader (c1) or mixer (c2) or balloon whisk (c3)
The paragraph numbering corresponds to the numbers in the diagrams.
1.1 - ASSEMBLING THE ACCESSORIES
- Press the button (a2) to release the multi-function head (a3) and raise it until it locks in place.
- Lock the stainless steel bowl (b1) (clockwise) on the appliance and put in the ingredients.
- Insert the desired accessory (c1, c2 or c3) on the outlet (a6), push and rotate it anti-clockwise a quarter turn to lock the accessory in its housing.
- Place the multi-function head (a3) to the horizontal position: press the button (a2) and manually lower the multifunction head (a3) until it locks (the button (a2) returns to its initial position).
- Slide the lid (b2) over the stainless steel bowl (b1).
Note: It is not essential to use the lid but it prevents splashing.
- Make sure that the cover (a5) is locked correctly (clockwise) on the high-speed outlet (a4).
1.2 - USAGE
Start by turning the selector button (a1) to the desired position according to the recipe.
- The appliance starts running immediately.
You can add food through the hole in the lid (b2) during preparation.
- To stop the appliance, turn the button (a1) to "0".
Tips:
- Kneading
- Use the kneader accessory (c1) at speed "1".
You can knead up to 500g of flour (e.g. white bread, grain bread, short crust pastry, etc.).
- Mixing
- Use the mixer (c2) at speed "1" to "max".
You can mix up to 1,8kg of light dough (light cake mixture, sponge cake, biscuit or cookie dough).
- Never use the mixer (c2) to knead heavy dough.
- Beating / emulsifying / whisking
- Use the balloon whisk (c3) at speed "1" to "max".
-
You can prepare: mayonnaise, aioli, sauces, whisked egg whites (up to 8 egg whites), whipped cream (up to 500~ml ), meringues etc.
-
Never use the balloon whisk (c3) to knead heavy dough or mix light dough.
1.3 - DISMANTLING THE ACCESSORIES
- Wait for the appliance to come to a complete stop.
- Remove the lid (b2).
- Using the button (a2), release the multi-function head (a3) and raise it to the upper position.
- Release the accessory (c1), (c2) or (c3) from the multi-function head by pushing the accessory into the head and rotating it clockwise a quarter turn.
- Remove the stainless steel bowl.
2-BLENDING/MIXING (DEPENDING ON MODEL)
Depending on the nature of the food, you can use the blender (d) to prepare up to 1.5L of thick mixtures and 1.25L of liquid mixtures.
ACCESSIONS USED :
2.1 - ASSEMBLING THE ACCESSORIES
- Place the multi-function head (a3) in the horizontal position: press the button (a2) and manually lower the multifunction head (a3) until it locks (the button (a2) returns to its initial position).
- Unlock the safety cover (a5) from the high-speed outlet (a4) by rotating it anti-clockwise and then remove it.
- Make sure that the appliance is switched off before locking the blender (d).
- Lock the blender jug (d) on the outlet (a4) by rotating it clockwise.
- Place the food in the blender jug, and lock the lid (d2) fitted with the measuring cap (d3), by rotating it anticlockwise.
2.2 - USAGE
- Start by turning the selector button (a1) to the desired position according to the recipe. Use the "Pulse" position for better mixing control and for a better blending of your preparation. You can add food through the hole in the measuring cap (d3) during preparation.

- To stop the appliance, turn the button (a1) to "0".
Tips :
You can prepare:
- finely blended soups, cream soups, stewed fruit, milkshakes and cocktails.
- liquid batter (pancake, fritters, Yorkshire pudding, waffles, clafoutis and custard flans).
If ingredients stick to the sides of the bowl when mixing, stop the appliance. Remove the blender, and push the food down onto the blades and put your blender back to continue your preparation.
- Never fill the blender jug with boiling liquid. Only use liquids or foods at simmering temperatures or below.
- Never run the blender jug empty.
Always use the blender jug with its lid.
- Never remove the lid before the blades have stopped completely.
- Always pour liquid ingredients into the blender jug first before adding solid ingredients.
2.3 - DISMANTLING THE ACCESSORY
- Wait for the appliance to come to a complete stop before removing the blender by unlocking it in the anti-clockwise direction and put back the cover (a5) by locking it on the outlet (a4) (clockwise).
3 - MINCING (DEPENDING ON MODEL)
ACCESSIONS USED :
- Attachment holder (e)
- Assembled mincer head (f)
3.1 - FITTING THE MINCER ATTACHMENT
- Press the button (a2) to release the multi-function head (a3) and raise it until it locks in place.
- Place the attachment (e) and lock it in the anti-clockwise direction such that the outlet is in alignment with the appliance.
- Place the multi-function head (a3) in the horizontal position by pressing the button (a2) once again.
3.2 - ASSEMBLING THE MINCER HEAD
- Hold the body (f1) by the feed tube, with the wider opening uppermost.
- Insert the feed screw (f2) (long shaft first) into the body (f1).
- Fit the blade (f3) onto the short shaft protruding from the feed screw (f2) with the cutting edges facing outwards.
- Fit the chosen screen (f4 or f5) on the blade (f3), aligning the two lugs with the two notches in the body (f1).
- Screw the nut (f6) home on the body (f1) in the clockwise direction, without locking it.
- Check the assembly. The shaft should have no play, neither should it be able to turn on its own. Otherwise, repeat the assembly procedure.
3.3 - FITTING THE MINCER HEAD ON THE APPLIANCE
- Facing the attachment outlet (e), insert the assembled mincer head (f) inclined to the right, aligning the two bayonets in the mincer head with the two notches in the attachment. Push the mincer head home into the attachment and turn the mincer head anti-clockwise until it latches with the feed tube in the vertical position.
- Place the removable tray (f8) on the feed tube.
3.4 - USAGE, TIPS AND DISMANTLING
- Make sure that the safety cover (a5) is locked correctly (clockwise) on the high-speed outlet (a4).
- Place a container to collect the preparation in front of the appliance.
- Run the appliance by turning the selector (a1) to speed "3" or "4".
- Push the meat, piece by piece, down the feed tube, using the pusher (f7). Never push the ingredients down the feed tube with your fingers or any other utensil.
- To stop the appliance, turn the selector to "0" speed and wait for the appliance to come to a complete stop.
- Unlock the mincer head in the reverse order of the assembly.
Tips :
- Prepare all of the foodstuffs to be minced (for meat, remove the bones, gristle and tendons and cut it into pieces of approximately 2 × 2 cm).
- Make sure that frozen meat is thoroughly thawed.
- At the end of the operation, you can feed a few small pieces of bread into the feed tube to clear any meat remaining in the machine.
4 - GRATING / SLICING (DEPENDING ON MODEL)
ACCESSIONS USED :
- Attachment holder (e)
- Assessed vegetable slicer (g)
- Drums (depending on model)
4.1 - ASSEMBLING THE ACCESSORIES
- Press the button (a2) to release the multi-function head (a3) and raise it until it locks in place.
- Place the attachment (e) and lock it in the anti-clockwise direction such that the outlet is in alignment with the appliance.
- Place the multi-function head (a3) in the horizontal position by pressing the button (a2) once again.
- Make sure that the safety cover (a5) is locked correctly (clockwise) on the high-speed outlet (a4).
- Facing the attachment (e) outlet, insert the drum body (g1) inclined to the right, aligning the two bayonets in the drum body with the two notches in the attachment. Push the drum body home and turn the drum body anticlockwise until it latches with the feed tube in the vertical position.
- Insert the chosen drum into the body, and make sure that it is fully engaged in the body.
4.2 - USAGE AND TIPS
- Place a container to collect the preparation in front of the appliance.
- Run the appliance by turning the selector (a1) to speed "3" to slice and to speed "4" to grate.
- Place the food in the feed tube on the body and press down with the pusher (g2). Never push the ingredients with your fingers or any other utensil.
- To stop the appliance, turn the selector to "0" speed and wait for the appliance to come to a complete stop.
- Unlock the drum body in the reverse order of the assembly.
-
Use the drums to :
-
Grate coarsely C (g4) / grate finely D (g5): carrots, celery, potatoes, cheese, etc.
- Slice thickly A (g3): potatoes, carrots, cucumbers, apples, beetroot, etc.
- Reibekuchen E (g6): potatoes, parmesan, etc.
5 - EXTRACTING JUICE FROM FRUITS AND VEGETABLES (DEPENDING ON MODEL)
ACCESSIONS USED :
- Assembled juice extractor (h).
- Place the filter (h3) in the middle of the juice collector (h4).
- Lock the lid: turn it anti-clockwise and lock the lid (h2) on the juice collector (h4) (closed padlock position).
- General locking: push the locking lever (h6) to closed padlock position.
- Place the multi-function head (a3) in the horizontal position: press the button (a2) and manually lower the multifunction head (a3) until it locks (the button (a2) returns to its initial position).
- Unlock and remove the cover (a5) from the outlet (a4) by turning it anti-clockwise.
- Make sure that the appliance is switched off before locking the juice extractor (h).
- Lock the assembled juice extractor on the outlet (a4) by turning it clockwise, so as to have the outlet for the pouring spout aligned with the appliance.
- Fit the pouring spout (h5) on the collector (h4).
5.3 - USAGE AND TIPS
- Place a large glass under the pouring spout (h5).
- Run the appliance by turning the selector (a1) to speed "3".
- Cut the fruits and/or vegetables into pieces.
- Insert them down the feed tube in the lid (h2) push them slowly using the pusher (h1). Never push the ingredients with your fingers or any other utensil.
- Do not process 500g of food more than 5 times continuously, without allowing your appliance to cool down completely.
- For best results, clean the filter after every 300g of ingredients.
- Important: When the pulp collector is full, stop the appliance and empty the collector.
- To stop the appliance, turn the selector to "0" speed and wait for the appliance to come to a complete stop.
- Wait until the rotary filter comes to a complete stop before removing the assembly from the appliance.


- To remove the juice extractor, unlock it by turning it anti-clockwise.
- Place the locking lever (h6) in the open padlock position. Open the lid (open padlock position). You can then remove the filter (h3) to clean it and empty the collector (h4).
Tips :
- You can make juice from: carrots, tomatoes, apples, grapes, raspberries, etc.
- Peel fruits with thick skins; remove stones and the core of pineapples.
- It is not possible to extract juice from certain fruits and vegetables: bananas, avocado pears, blackberries, etc.
- You can prepare juices with different fruits and vegetables without having to clean the juice extractor every time, the flavours will not be mixed. Just run the extractor with a little water to rinse it between two different juices.
- Drink the juices immediately after preparation, and add lemon juice to keep them in the fridge for a few hours.
6 - ADJUSTING THE CORD LENGTH
For more comfortable use or for storage, you can reduce the cord length by pushing it inside the motor unit (a) via the opening on the rear (a7).
7 - FINELY CHOPPING SMALL QUANTITIES (DEPENDING MODEL)
ACCESSION USED :
You can use the grinder to :
- Chop in a few seconds by pulsing: dried figs, dried apricots, etc.
Quantity / max time: 100g / 5s
This grinder is not designed for hard products like coffee beans or hard spices.
CLEANING
- Unplug the appliance.
- Do not immerse the motor unit (a) or the attachment (e) in water or under running water. Wipe them with a dry or slightly damp cloth.
- For easier cleaning, rinse the accessories quickly after use. Dismantle the mincer head assembly fully. Handle the blades with care to prevent injury.
- Wash, rinse and dry the accessories: they are dishwasher-safe, except for all the metal components in the mincer head: body (f1), feed screw (f2), blade (f3), screens (f4 and f5), nut (f6).
- The screens (f4) and (f5) as well as the blade (f3) must remain greased. Coat them with cooking oil.
Tips :
- In the event any of your accessories are coloured by food (carrots, oranges, etc.), rub with a cloth soaked in cooking oil and then clean them as usual.
- Blender jug (d): pour some hot water containing a few drops of washing up liquid into the blender. Close the lid. Place it on the appliance and pulse a few times. After removing it, rinse the bowl in running water and allow to dry (bowl upside down).
STORAGE
Do not store your appliance in a humid environment.
WHAT TO DO IF YOUR APPLIANCE DOES NOT WORK
If your appliance does not work, check:
- that it is plugged in correctly.
- that the accessories are correctly locked.
- that the safety cover (a5) is present and locked when the high-speed outlet (a4) is not used.
- that the multi-function head (a3) is locked horizontally.
Your appliance comes with a microprocessor that controls and analyses the operating power. If the load becomes too high, your appliance will stop automatically. To restart your appliance, turn the rotary button (a1) to the "0" position
and remove some of your ingredients. Allow your appliance to cool down for a few minutes. You can then select the desired speed to complete your preparation.
Your appliance still does not work? Contact an authorised service centre (see the list in the service booklet).
HELPLINE:
If you have any product problems or queries, please contact our Customer Relations Team first for expert help and advice: 0845 602 1454 - UK
(01) 677 4003 - Ireland
DISPOSAL OF PACKAGING AND THE APPLIANCE

The packaging is comprised exclusively of materials that present no danger for the environment and which may therefore be disposed of in accordance with the recycling measures in force in your area. For disposing of the appliance itself, please contact the appropriate service of your local authority.
END-OF-LIFE ELECTRICAL OR ELECTRONIC PRODUCTS

Think of the environment!
① Your appliance contains valuable materials which can be recovered or recycled.
Leave it at a local civic waste collection point.
ACCESSORIES
You can customise your appliance and obtain the following accessories from your usual retailer or an authorised service centre:
| Stainless steel bowl | Mincer head |
| Stainless steel bowl lid | Vegetable slicer: |
| Kneader | - A: Slicer |
| Mixer | - C: Coarse grating |
| Balloon whisk | - D: fine grating |
| Blender jug | - E: reibekuchen |
| Juice extractor | Kit pasta |
| Grinder | Couls attachment |
| Attachment holder | Pasta rolling mill |
Caution: you can purchase an accessory only when you present your instruction leaflet or your appliance.
5-ENTSAFTEN VON OBST UND GEMUSE (JE NACH MODELL)
VERWENDETES ZUBEHÖR:
3.4-ACCENSIONE, CONSIGLI E SMONTAGGIO
4.2 - ACCENSIONE CONSIGLI
5.3 - ACCENSIONE CONSIGLI
Retailer name & address
Nom et adresse du vendeur / Nombre y direction del minorista / Nome e endereço de revendedor / Nome e indirizzo del ngozio / Name und Anschrif des Händlers / Naam en adrves ad ne dealer / Forhandier navn & adressé / Aterforsaljarens namn och adress / Forhandier navn og adressé / Jalleenmyyjan nimi ja osoite / nazwa i adrres preradawcy / Numezi es adres vanzatorului / Parduotuves pavadinimas ir adresses / Muaja kauplus ja adress / Naziv in naslov trogvine / Tipusszam / Nazov a adressa predajcu / Veikala nosaukums un adrese / Naziv i adresa maloprodaje / Naziv i adresa producva / Naziv i adresa prodajnoj mesta / Nume si adresa vanzator / Nazev a adressa prodejce / Nama dan alamat peruncit / Nama Toko Penjual dan alamat / Tén va dia chu cia häng bán / Satici firmanin adi ve adressi / Haabaene i aedec nopadauba / Ha3aa i aedeca nopadauba / Tbrpobknk o6ekr / Ha3nb i aedeca h na pdoabmuaeta / CatuybubnH tby jxhe Mekenkai/ Etnvujia kai dEtuoyun kataatntmuatoC uHaumnuei mauiuuiuieh l haugli / Duaa aauanurwra / 1nurra / 零售商的店名和地址/ 贩売店の名前、住所/ Soeemelçir éncs andus/ UuucuucuucuucuucuucuucuucuucuucuucuucuucuucuucuucuucuucuucuucuucuucuucuucuucuucuucuucuucuucuucuucuucuucuucuucuucuucuucuucuucuucuucuucuucuucuucuucuucuucuUC
Distributor stamp
Cachet distributeur / Sello del distribuctor / Carimbo do revendedor / Timbro del negozio / Handlerstempel / Stempel van de dealer / Forhandler stempel / Aterforsaljarens stempel / Forhandler stempel / Jalleenmyyjan leima / pieczech sprzedawy / Stampila vanzatorului / Antspaudas / Tempel / Zig trgovine / Elado neve, cime / Razitko predajcu / Zimogs / Pečat maloprodaje / Pečat prodavca / Pečat prodajnog mestre / Stampila vanzatoruliu/ Razitko produje/ Cap peruncit / Cap dari Toko Penjual / Cura hang bong dαu / Satici Firmanin Kasei / Μηουτηνρούδαι / Μηουτηλ προύδαι / Μηουτη λυτρόσκυν συκόνι / Μηουτηλ προύδαι / Μηουτηλ προύδαι / Μηουτηλ προύδαι / Μηουτηλ προύδαι / Μηουτηλ προύδαι / Μηουτηλ προύδαι / Μηουτηλ προύδαι / Μηουτηλ προύδαι /
CaTyuBbHmepi/∑ppayiδaKaataoTμatoC/ufunnnnhyf/h/75vWvWvWvWvWvWvWvWvWvWvWvWvWvWvWvWvWvWvWvWvWvWvWvWvWvWvWvWvWvWvWvWvWvWvWvWvWvWvWvWvWvWvWvWvWvWvWvWvWvWv
()

www.moulinex.com


| ALGERIA | CIJA9 rue Puvis de ChavannesSaint Euquene Oran | 1 YEAR | (0)41 28 18 53 |
| ARGENTINA | GROUPE SEB ARGENTINA S.A., Billinghurst 1833 3°, C1425DTK Capital Federal, Buenos Aires | 2 YEARS (años) | 0800-122-2732 |
| ARMENIA (ДИLGИSSIL'LI) | ФГС, "Челочьш" Ubyf", 125171, Имитрих, Ддббббббббббббббббббб, 16A, сб.3 | 2 YEARS (amphib) | (010) 55-76-07 |
| AUSTRALIA | GROUPE SEB AUSTRALIA, PO Box 7535, Silverwater, NSW 2128 | 1 YEAR | 02 97487944 |
| AUSTRIA (ÖSTERREICH) | SEB ÖSTERREICH HmbHCampus 21 - Businesspark Wien Süd, Liebernannstr. A02 7022345 Brunn am Gebirge | 2 YEARS (Jahre) | 01 866 70 299 00 |
| BELGIUM (BELGIQUE / BELGIE) | GROUPE SEB BELGIUM SA NV25 avenue de l'Espérance - ZI6220 Fleurus | 2 YEARS (ans) | 070 23 31 59 |
| BELARUS (БELAPUCb) | ЗАО «Туши СЕВ-Bocstok», 125171, Мскьа, Ленистрадские щосяс, д. 16A,ст. 3 | 2 YEARS (roda) | 017 2239290 |
| BOSNA I HERCEGOVINA | SEB D Entwicklung, Predstavništro u BiH, Vrazova 8/II, 71000 Sarajevo | 2 YEARS (godine) | Info-linja za potrošće 033 551 220 |
| BRAZIL (BRASIL) | SEB COMERCIAL DE PRODUTOS DOMÉSTICOS LTDA, Rua Vençâncio Aires, 433/437/447, Pompeía, São Paulo/SP | 1 YEAR (ano) | 0800-119933 |
| BULGARIA (Бълария) | ГУП П СEB Бълария EOOD, Ул. Борово 52 Г, ect. 1, офис 1, 1680 София | 2 YEARS (rodihi) | 0700 10 330 |
| CANADA | GROUPE SEB CANADA, 345 Passmore Avenue, Toronto, ON M1V 3N8 | 1 YEAR (an) | 800-418-3325 |
| CHILE | GROUPE SEB CHILE Comercial Ltda, Av. Providencia, 2331, piso 5, oficina 501, Santiago | 2 YEARS (años) | 12300 209207 |
| COLOMBIA | GROUPE SEB COLOMBIA, Apartado Aero 172, Kilometro 1Via ZapaquiraCajica, Cundinamarca | 2 YEARS (años) | 18000919288 |
| CROATIA (HRVATSKA) | SEB Developpement S.A.S.Vodnjanska 26, 10000 Zagreb | 2 YEARS (godine) | 01 30 15 294 |
| CZECH REPUBLIC (ČESKA REPUBLIC) | GROUPE SEB ČR spel. s, r . o.Jankovcova, 1569/2c170 00, Praha 7 | 2 YEARS (roky) | 731 010 111 |
| DENMARK (DANMARK) | GROUPE SEB NORDIC, ASTempovej 27, 2750 Ballerup | 2 YEARS (àr) | 44 663 155 |
| GERMANY (DEUTSCHLAND) | GROUPE SEB DEUTSCHLAND GmbH / KRUPS, GmbHHerrmairweg 5, 63067 Offenbach | 2 YEARS (Jahre) | 0212 387 400 |
| ESTONIA (EESTI) | GROUPE SEB POLSKA Sp. z, o.o.ul. Bukowitska 22b02-703, Warszawa | 2 YEARS (aasta) | 5 800 3777 |
| FINLAND (SUOMI) | GROUPE SEB FinlandKutojantie 7, 02630 Espoo | 2 YEARS (Vuotta) | 09 622 94 20 |
| Guadeloupe, Martinique, Réunion, Saint Martin (France continentale) | GROUPE SEB FRANCE Service, Consommateur MoulinexBP, 1569131 ECULLY CEDEX | 1 YEAR (an) | 09 74 50 10 14 |
| GREECE (ΕΜΑΔΑ) | SEB GROUPE ΕΙΜΑΔΟΣ A.E.OδςΚαβαλεράτου 7T.K., 145 64 N.Κηροία | 2 YEARS (χρόνια) | 2106371251 |
| HONG KONG (香港) | SEB ASIA Ltd., Room 903, 9/F, South Block, Skyway House3 Sham Mong Road, Tai Kok Tsui, Kowloon, Hong Kong | 1 YEAR | 852 8130 8998 |


| HUNGARY (MAGYARORSZÁG) | GROUPE SEB CENTRAL-EUROPE, Kft. Távíró kőz 4, 2040 Budaörs | 2 YEAR (év) | 06 1 801 8434 |
| INDONESIA | GROUPE SEB INDONESIA, (Representative office) Sudirman Plaza, Plaza Marein 8th FloorJL Jendral Sudirman Kav 76-78,Jakarta 12910, Indonesia | 1 YEAR | +62 21 5793 6881 |
| ITALY (ITALIA) | GROUPE SEB ITALIA, S.p.A., Via Montefeltrò, 420156 Milano | 2 YEARS (anni) | 1 99 207 892 |
| JAPAN | GROUPE SEB JAPAN Co. Ltd.,1F Takanawa Muse Building, 3-14-13, Higashi Gotanda,Shinagawa-Ku,Tokyo 141-0022 | 1 YEAR | 0570-077772 |
| KAZAKHSTAN (KA3AKCTAH) | ЖАК «Гтуна СЕВ-БOSTOK»125171, Мэсkey, Ленистордбостешовпocьс, 16A, 3 уи | 2 YEARS (жын) | 727 378 39 39 |
| KOREA (한국어) | (류)그름 썸버 키리어서울지 칬로구 죽류동 88 죽류일명 3身高, 110-790 | 1 YEAR | 1588-1588 |
| LATVIA (LATVJA) | GROUPE SEB POLSKA, Sp. z o.o.ul., Bukowitska 22b02-703, Warszawa | 2 YEARS (gadi) | 6 716 2007 |
| LITHUANIA (LIETUVA) | GROUPE SEB POLSKA, Sp. z o.o.ul., Bukowitska 22b02-703, Warszawa | 2 YEARS (metali) | 6 470 8888 |
| LUXEMBOURG | GROUPE SEB BELGIUM, SAN V25 avenue de l'Espérance - ZI6220, Fleurus | 2 YEARS (ans) | 0032 70 23 31 59 |
| MACEDONIA | Groupe SEB Bulgaria, EOODOOffice 1, floor 1, 52G Borovo St., 1680 Sofia - Bulgaria Гул СЕВ Бълария ДIDOЕЛун. Боробо 52 Г, сп. 1, офис 1, 1680 Соб,在а, Бълария | 2 YEARS (rogenи) | (0)2 2050 022 |
| MALAYSIA | GROUPE SEB MALAYSIA SDN., BHDUnit No. 402-403, Level 4, Uptown 2, No. 2, Jalan SS21/37, Damansara Uptown, 47400, Petaling Jaya, Selangor D.E. Malaysia | 1 YEAR (año) | 65 6550 8900 |
| MEXICO | Groupe.S.E.B. México, S.A. DE C.V. Goldsmith 38 Desp. 401, Col. PolancoDelegacion, Miguel Hildalgo11, 560 México D.F | 2 YEARS (años) | (01800) 112 8325 |
| MOLDOVA | TOB «Гун CBУкай»02121, Харковскиешице, 201-203, 3 поевх, КИВ, Урайna | 2 YEARS (ani) | (22) 929249 |
| THE NETHERLANDS (NEDERLAND) | GROUPE SEB NEDERLAND, BVGeneratorstraat, 63903 LJ Veenendaal | 2 YEARS (jaar) | 0318 58 24 24 |
| NEW ZEALAND | GROUPE SEB NEW ZEALAND, Unit E, Building 3, 195 Main Highway, Ellerslie, Auckland | 1 YEAR | 0800 700 711 |
| NORWAY (NORGE) | GROUPE SEB NORDIC, ASTempovej, 272750 Ballerup | 2 YEARS (àr) | 815 09 567 |
| PERU | Groupe SEB Perú, Av. Camino Real N° 111 of. 805 B, San Isidro - Lima | 1 YEAR (año) | 441 4455 |
| POLAND (POLSKA) | GROUPE SEB POLSKA, Sp. z o.o.ul. Bukowitska 22b02-703, Warszawa | 2 YEARS (lata) | koszt jak za polaczenia lokalne 0801 300 423 |
| PORTUGAL | GROUPE SEB IBÉRICA, SAUrb. da MatinhaRua Projectada à Rua 3Bloco1 - 3° B/D 1950 - 327 Lisboa | 2 YEARS (años) | 808 284 73 |
| REPUBLIC OF IRELAND | GROUPE SEB IRELAND, Unit B3 Aerodrome Business Park, College Road, Rathcoole, Co. Dublin | 1 YEAR | 01 677 4003 |
| ROMANIA (ROMÁNIA) | GROUPE SEB ROMÁNIA, Str. Daniel Constantin nr., 8010632 Bucuresti | 2 YEARS (ani) | 021 316 87 84 |
| RUSSIA (ROCCY) | 3AO «Гунna СЕВ-ВOSTOK», 125171, Moskva, Ленистордбостешице, д. 16A,ст. 3 | 2 YEARS (rogenи) | 495 213 32 29 |


| SERBIA (SRBIJA) | SEB Developpement, Dorda Stanojeviča, 11b11070 Novi Beograd | 2 YEARS (godine) | 060 0 732 000 |
| SINGAPORE | GROUPE SEB SINGAPORE Pty Ltd., 59 Jalan Pemipin, #04-01/02 L&Y Building, Singapore 577218 | 1 YEAR | 65 6550 8900 |
| SLOVENSKO (SLOVENSKO) | GROUPE SEB Slovensko, spol. s r.o.Rybničná 40, 831 06 Bratislava | 2 YEARS (roky) | 233 595 224 |
| SLOVENIA (SLOVENIJA) | SEB d.o.o Gregorčićeva ulica, 62000 MARIBOR | 2 YEARS (leti) | 02 234 94 90 |
| SPAIN (ESPÁÑA) | GROUPE SEB IBÉRICA S.A.C/Almogâvers, 119-123, Complejo Ecourban, 08018 Barcelona | 2 YEARS (años) | 902 31 22 00 |
| SWEDEN (SVERIGE) | TEFAL SVERIGE SUBSIDIARY OF GROUP SEB NORDIC, Truckvågen 14 A, 194 52 Upplands Våsby | 2 YEARS (àr) | 08 594 213 30 |
| SWITZERLAND (SUISSE CHWEIZ) | GROUPE SEB SCHWEIZ GmbH, Thurgauerstrasse, 1058152 Glattbrugg | 2 YEARS (ans / Jarhre) | 044 837 18 40 |
| TAIWAN (台灣) | SEB ASIA Ltd., Taiwan Branch, 4F., No. 37 Dexing W. Rd., Shilin Dist., Taipei City 11158, Taiwan (R.O.C.) | 1 YEAR | 886-2-2833 3716 |
| THAILAND | GROUPE SEB THAILAND, 2034/66 Italthai Tower, 14th Floor, n° 14-02, New Phetchburi Road, Bangkapi, Huaykwang, Bangkok 10320 | 2 YEARS | 662 351 8911 |
| TURKEY (TÜRÜKIYE) | GROUPE SEB ISTANBUL, ASBeybi Giz Plaza Dereboyu, Cad.Meydan Sok.No: 28 K.12 Maslak | 2 YEARS (YIL) | 216 444 40 50 |
| U.S.A. | GROUPE SEB USA, 2121 Eden Road, Millville, NJ 08332 | 1 YEAR (an) | 800-395-8325 |
| UKRAINE (Украïна) | TOB «Грун СБ Украïна»02121, Харковские пос, 201-203, 3 поевх, Кíв, Украïна | 2 YEARS (poikn) | 044 492 06 59 |
| UNITED KINGDOM | GROUPE SEB UK LTD, Riverside House, Riverside WalkWindsor, Berkshire, SL4 1NA | 1 YEAR | 0845 602 1454 |
| VENEZUELA | GROUPE SEB VENEZUELA, Av Eugenio Mendoza, Centro Letonia, Torre ING Bank, Piso 15, Ofc 155Urb. La Castellana, Caraca | 2 YEARS (años) | 0800-7268724 |
| VIETNAM | Vietnam Fan Joint Stock Company, 25 Nguyen Thi Nho Str, Ward 9, Tan Binh Dist, HCM city | 1 YEAR | +84-8 38644037 +84-8 38645830 |
Moulinex®
FR P.8-14
NL P.14-21
EN P.21-27
DE P.27-34
ES P.34-40
PT P.41-47
EL P.47-53
IT P.54-60
Ref. 8080012362-01