
DuetPro - Stroller Qtus - Free user manual and instructions
Find the device manual for free DuetPro Qtus in PDF.
| Product type | Double stroller |
| Brand | Qtus |
| Model | DuetPro |
| Maximum child weight (per seat) | 15 kg |
| Maximum basket weight | 5 kg |
| Recommended age | 6 months to 4 years |
| Number of children | 1 or 2 (extra seat sold separately) |
| Restraint system | Adjustable 5-point harness |
| Brake | Brake pedal on rear wheels |
| Front wheels | Swiveling with lock |
| Rear wheels | Fixed with brake |
| Seat recline | Adjustable (buttons on both sides) |
| Footrest | Adjustable recline |
| Canopy | Removable, integrated sunshade |
| Handlebar | Height adjustable |
| Arm bar | Removable, lockable |
| Folding | Compact, with release button |
| Fabric care | Machine washable at 30°C, do not tumble dry |
| Frame care | Clean with damp cloth and mild detergent |
| Warranty | 2 years (subject to conditions) |
| Compatible accessories | DuetPro bassinet, DuetPro second seat (sold separately) |
| Safety standards | Complies with current standards |
Frequently Asked Questions - DuetPro Qtus
User questions about DuetPro Qtus
0 question about this device. Answer the ones you know or ask your own.
Ask a new question about this device
Download the instructions for your Stroller in PDF format for free! Find your manual DuetPro - Qtus and take your electronic device back in hand. On this page are published all the documents necessary for the use of your device. DuetPro by Qtus.
USER MANUAL DuetPro Qtus
natural_image
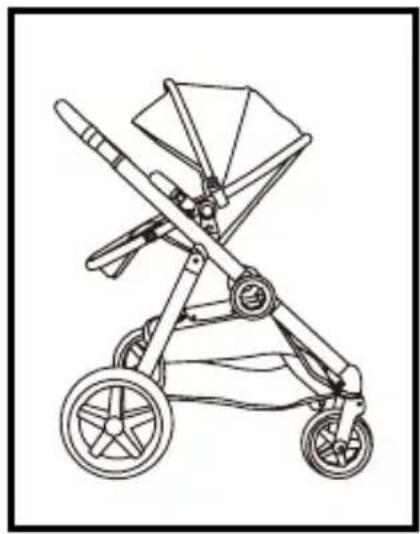
Line drawing of a stroller with wheels and canopy (no text or symbols)DuetPro
Index
Index:
EN ...... pag. 04
DE ...... pag. 24
FR pag. 44
NL pag. 64
Welcome
Congratulations on the purchase of your Qtus product.
We wish you and your child a lot of fun discovering the world. If you would like to share something with us or if you have any questions, please contact us at: info@qtus.eu
KEEP THE MANUAL FOR FUTURE REFERENCE.
Read the instructions carefully before use and keep them for future reference. Your child's safety may be affected if you do not follow these instructions.
- A CHILD'S SAFETY IS YOUR RESPONSIBILITY. Children should be harnessed in at all times and should never be left unattended. The child should be clear of moving parts while making adjustments. This vehicle requires regular maintenance by the user. Overloading, incorrect folding and the use of non-approved accessories may damage or break this vehicle. Read the instructions.
- This product is only suitable for children from 6 months up to 4 years up to a maximum weight of 15 kg / 33 lbs
- Never leave your child unattended.
- Ensure that all the locking devices are engaged before use.
- The parking device shall be engaged during the loading and unloading of your child.
- The maximum load that can be stored in the storage basket is: 5 kg / 11 lbs.
- This product is only suitable for one child.
- Accessories or replacement parts which are not approved by the manufacturer shall not be used.
- Any load attached to the handle bar may affect the stability of the product.
• Always use the restraint system. - Always use the crotch strap in combination with the waist belt when carrying your child in the seat.
- Check that the carrycot or seat unit attachment devices are correctly engaged before use.
WARNING
- This product is not suitable for running or skating.
- Carelessness causes fire.
- Incorrect folding/overloading and the use of non approved accessories may break or damage this product.
- Keep this plastic cover away from children to avoid suffocation.
- Do not let your child play with the Qtus DuetPro.
- To avoid injury ensure that your child is kept away when unfolding and folding this product.
- Never place more than 13kg in any car seat when attached to the stroller.
- The car seat does not replace a cot or bed. Should your child need to sleep, then it should be placed in a suitable bassinet/carrycot, cot or bed.
- TIP: If the instructions say left or right, this is always meant when looking from behind the Qtus DuetPro handles.
- When assembling the DuetPro there should not be a child in the seat or carrycot.
- Avoid dangerous situations. Take your child out of the Qtus DuetPro if you go up or down stairs, escalators or steep hills.
- The Qtus DuetPro should only be used with the accompanying seat and accessories. Only use the parts and accessories approved for use by Qtus.
- Do not use the Qtus DuetPro if any part is broken, torn, incomplete or does not seem to be functioning correctly.
- Never carry more than one child per place in this stroller.
- Never allow a child to step on the footrest to get in or out of the stroller.
WARNING
- Always make sure the bumper bar is correctly installed before using the seat unit.
- Always adjust the handle bar to the highest position when using in double-seat mode.
- Avoid serious injury from falling or sliding out.
- Always install carrycot facing the stroller handle bar.
Parts list

natural_image
Technical line drawing of a mechanical assembly with no visible text or symbolsFrame

natural_image
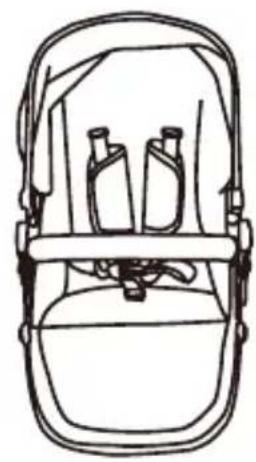
Line drawing of a backpack seat with two bottles on top (no text or symbols)Seat

natural_image
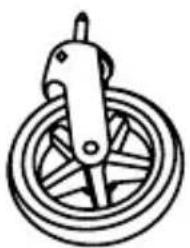
Simple line drawing of a bicycle wheel with a handle (no text or symbols)Front Wheel x2

natural_image
Simple line drawing of a pulley system with rope and lever (no text or symbols)
natural_image
Simple line drawing of a curved mechanical handle or lever (no text or symbols)Front Bar
natural_image
Simple line drawing of a wheel with spokes and a central hub (no text or symbols)Rear Wheel x2 Front Seat

natural_image
Simple line drawing of a wheel with six blades and a central hub (no text or symbols)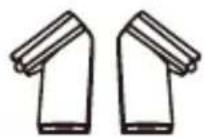
Adapter

natural_image
Pure mechanical bracket diagram without any text, numbers, or symbolsRear Seat Adapter
Introducing your new stroller
To ensure safe operation of your stroller, please follow these instruction carefully.

Introducing your new stroller
- Handle height adjuster
- Handle
- Canopy latch
- Seat adjustment button
- Seat release button
- Brake
- Rear wheel (2)
- Rear wheel release button
- Canopy
- Sun shield
- Front bar release button
- Front bar
- Shoulder pad
- 5-point safety harness
- Folding button
- Basket
- Front swivel wheel lock
- Front wheel release button
- Front wheel (2)
- Footrest adjustment button
Frame with two seats

-
Rear seat adapter
-
Seats (2)
-
Front seat adapter
ATTENTION: DuetPro 2nd Seat is not included. If you would like to use this product in double seat mode, please purchase it separately.

Assembling and using your stroller
- Unfolding the frame

natural_image
Diagram of a robotic arm with a hand adjusting the handle, showing mechanical components and motion direction (no text or symbols)1- Hold the handle and lift the frame.

natural_image
Illustration of a hand operating a mechanical device with a red upward arrow indicating motion (no text or symbols)2- Lift the handle until the frame is fully opened.
• Install / remove the front wheels
natural_image
Illustration of a hand operating a bicycle steering wheel with a red arrow indicating the direction (no text or symbols present)1- Insert the front wheel into the tube of the frame.

natural_image
Illustration of hands using a tool to adjust or install a component, with a red arrow indicating the direction (no text or symbols present)2- Press the release button and pull the front wheel out.
• Install / remove the rear wheels

natural_image
Technical diagram of a mechanical assembly with a red arrow indicating a specific component (no text or symbols present)3- Insert the rear wheel into the tube of the frame until it is fully engaged.

natural_image
Mechanical assembly diagram showing a wheel and gear mechanism with red directional arrows indicating motion (no text or labels)4- Press the release button and pull the rear wheels out.
• Install / remove the seat

natural_image
Line drawing of hands operating a mechanical device with red arrows indicating motion (no text or symbols)1- Slide both seat moldings down until they click into position.
2- Pull the seat to make sure it is fully engaged.

natural_image
Line drawing of a mechanical component with a red arrow pointing to a specific part (no text or symbols present)3- Press the release buttons on both sides at the same time, lift the seat to remove it from the frame.
• Install the canopy

natural_image
Line drawing of a mechanical tool or tool with multiple blades and joints (no text or symbols)1- Clip each side of the canopy.

natural_image
Illustration of a person using a pulley system to adjust or install a cable, with no visible text or symbols.2- Zip up the canopy.
• Install / remove the bumper bar
natural_image
Mechanical assembly diagram showing hands operating a component with a red arrow indicating direction (no text or symbols present)1- To attach the bumper bar, insert the bumper bar into the openings on the seat until you hear "click"

natural_image
Line drawing of hands operating a mechanical component with a red arrow indicating a specific part (no text or symbols present)2- To remove the bumper bar, press the release button on both sides and remove the bumper bar.
- Folding the stroller

natural_image
Mechanical component diagram showing a lever mechanism with a red arrow indicating a specific point (no text or symbols present)1- Apply the brake before folding the stroller.
natural_image
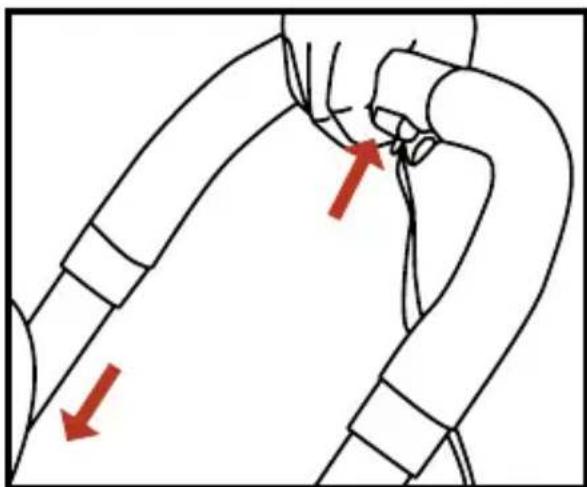
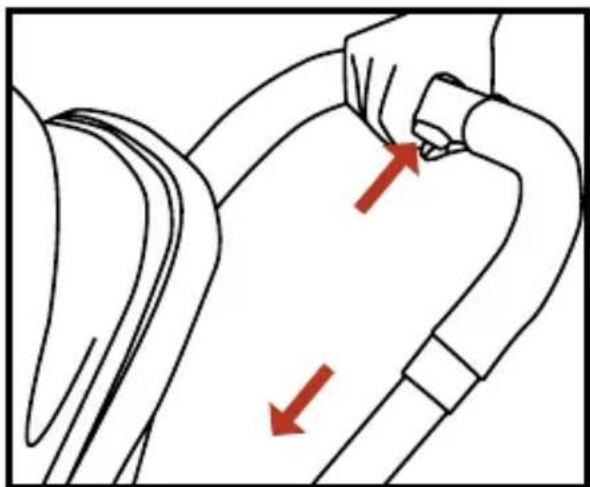
Diagram of a human arm with two red arrows indicating movement or force direction (no text or symbols present)2- Squeeze the handle adjustment button and slide the handle to the lowest height.
natural_image
Line drawing of a hand using a tool to adjust or install a mechanical component, with no visible text or symbols.3- Press the release button on both sides, pull the seat to remove it.

natural_image
Technical line drawing of mechanical components with a red arrow indicating a specific part (no text or symbols present)4- Slide at the front of the stroller. Slide the button in the direction of the arrows and lift it to fold the stroller.

natural_image
Mechanical assembly diagram showing a hand operating a rotating wheel with a red arrow indicating motion direction (no text or symbols)5- Push the stroller down in the direction of the arrow.
natural_image
Technical line drawing of a two-wheeled vehicle chassis with wheels and suspension components (no text or symbols)6- Push down as far as possible.
WARNING: Always remove your child from the stroller prior to folding of stroller.
TIP: You do not need to remove the seat for folding the stroller when it is in one seat mode.
Using your stroller

natural_image
Line drawing of a hand using a tool to adjust or install a car wheel (no text or symbols present)1- To lock the front wheel, push the swivel wheel lock downwards.
2- To Unlock the front wheel, push the swivel wheel lock upwards.
natural_image
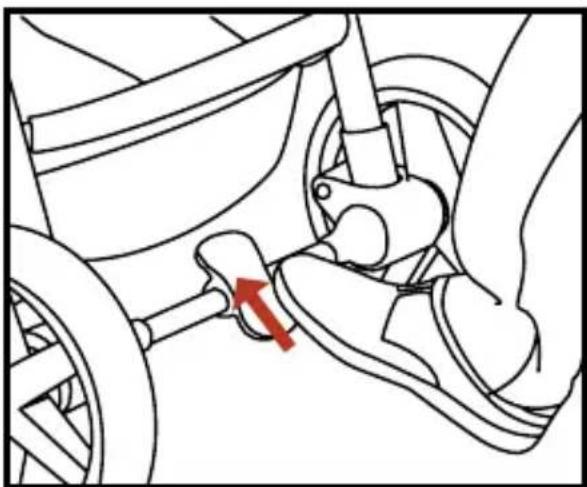
Mechanical diagram showing a car wheel and suspension mechanism with a red arrow indicating motion (no text or symbols)4- To unlock the rear wheel, push the brake pedal up.

natural_image
Diagram of a car's seatbelt mechanism showing a red arrow indicating the direction (no text or symbols present)3- To Lock the rear wheel, push the brake pedal down, push the stroller until the real wheel is locked.
natural_image
Illustration of a hand holding a curved object with two red arrows indicating direction (no text or symbols)5- Squeeze the adjustment button and slide the handle bar to the desired height.
6- The handle bar will click into place.
TIP: Lock the swivel wheel when using the stroller in a straight direction for a long period.
natural_image
Line drawing of hands using a tool to adjust or install a mechanical component, with a red arrow indicating the step (no text or symbols present)7- To adjust seat recline, Press the buttons on both sides and tilt the seat to the desired position.

natural_image
Mechanical assembly diagram showing hands operating a belt switch (no text or symbols visible)8- To adjust the footrest, press the buttons on both sides and tilt the footrest to the desired position.

natural_image
Four-panel line drawing showing hands using a tool, with no visible text or symbols9- Place your child in the stroller, with the crotch strap (Figure 3) between the child's leg. Tighten the waist strap (Figure 1) and shoulder strap (Figure 2).

natural_image
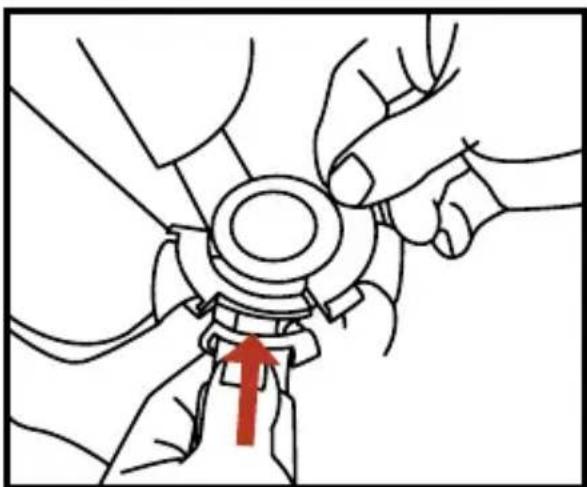
Mechanical gear assembly diagram showing rotational components and motion arrows (no text or labels)10- Fit clips together. Slide the right clip into right buckle until you hear "click".
natural_image
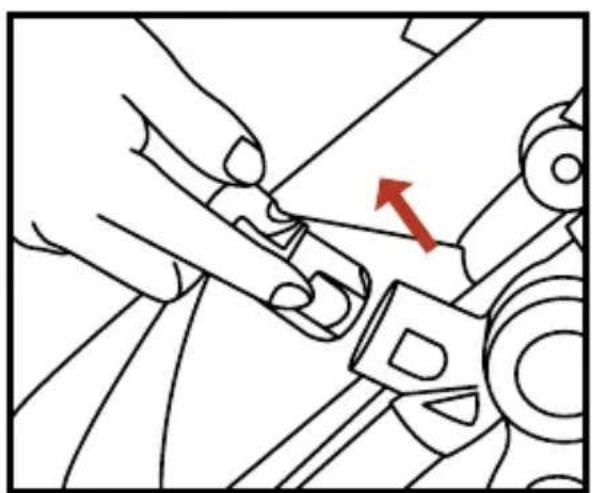
Illustration of hands adjusting a mechanical component with a red arrow indicating the motion (no text or symbols present)11- Fit clips together. Slide the left clip into left buckle until you hear "click". Pull the harness to make sure it is secured.
natural_image
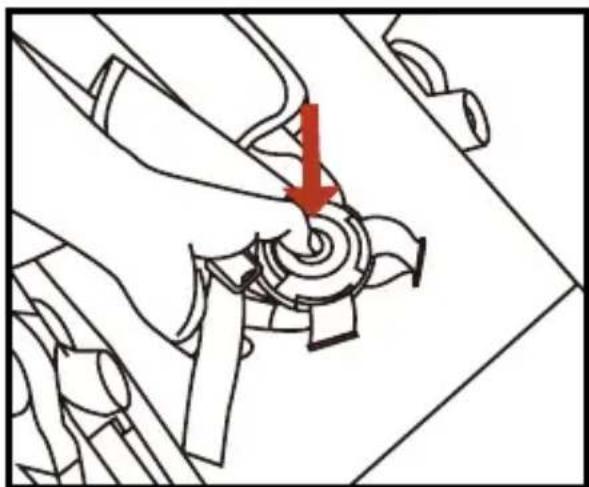
Mechanical assembly diagram showing a hand turning a gear with a red arrow indicating the direction (no text or symbols present)12- To release the 5-point harness, press the 5-point harness release button.

natural_image
Diagram of a mechanical component with red directional arrows indicating motion or force (no text or symbols)13- To open the canopy, pull the front forwards until it is fully opened.
To close the canopy, push it backward until it is fully closed.

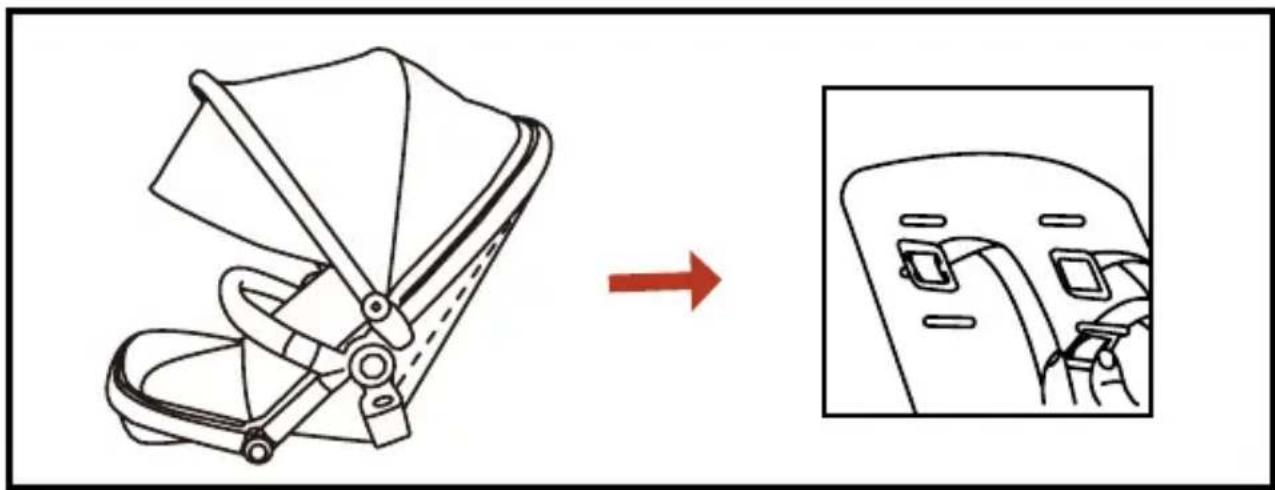
14- According to the needs of your child, adjust the shoulder strap. Insert the shoulder strap into the correct position (in cloth layer)(1/2/3)
natural_image
Diagram showing a car seatbelt switch being adjusted to the side panel, with no text or symbols present.15- For safety, the shoulder strap should also go through the plastic backrest.
Single seat mode

natural_image
Line drawing of a baby stroller with wheels and canopy (no text or symbols)Sitting position

natural_image
Line drawing of a two-wheeled baby stroller with wheels and canopy (no text or symbols)Semi-reclining position

natural_image
Line drawing of a baby stroller with wheels and canopy (no text or symbols)Reclining position
Double seat mode
natural_image
Line drawing of a two-wheeled baby stroller with twin canopyers and wheels (no text or symbols)Two seats world facing

natural_image
Line drawing of a two-wheeled baby stroller with two canopy blades and wheels (no text or symbols)Two seats facing different directions

natural_image
Line drawing of a two-wheeled baby stroller with twin canopy and wheels (no text or symbols)Two seats parent-facing
Install/remove the front/rear seat adapter
The front / rear seat adapter allows you to secure your carriers onto your DuetPro.
• Fit with DuetPro Carrycot.
• Fit with DuetPro 2nd seat.

natural_image
Mechanical assembly diagram showing a lever mechanism with red directional arrows indicating motion (no text or symbols present)1- To install the front seat adapter, insert the adapters on both sides into the hinge points until you hear "click".

natural_image
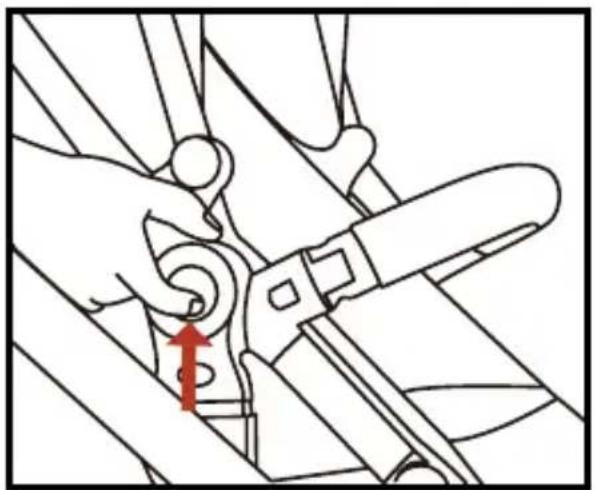
Diagram of a person climbing a ladder with red directional arrows indicating motion (no text or symbols)2- To remove the front seat adapter, seperate the adapter clip point by using your finger. 3- Pull the adapter to remove it.
natural_image
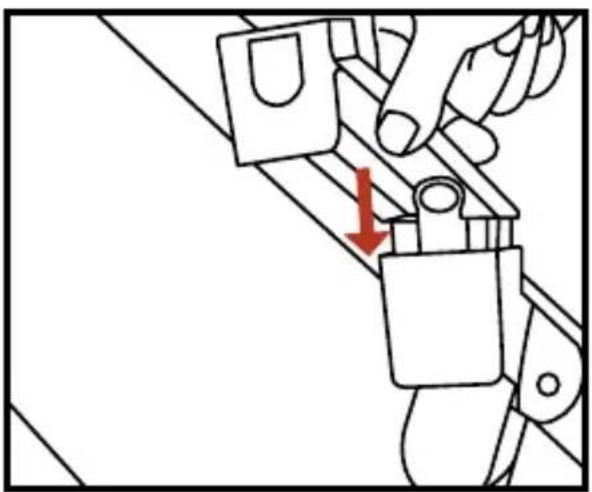
Diagram of a hand using a tool to adjust or install a mechanical component, with a red arrow indicating the downward motion (no text or symbols present)4- To install the rear seat adapter, insert the adapter on both sides into the hinge points until you hear “click”.

natural_image
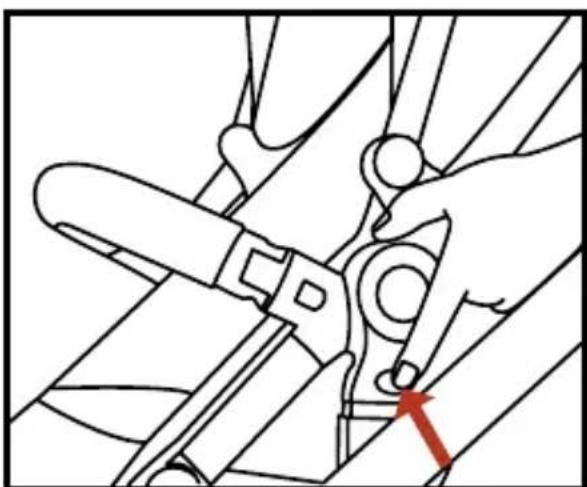
Line drawing of a hand holding a small object on a wooden structure, with a red arrow indicating direction (no text or symbols)5- To remove the rear seat adapter, press the release button on both sides, pull the adapter to remove it.
Care And Maintenance
Check your Qtus DuetPro regularly.
Regularly clean the Qtus DuetPro. Use a damp cloth and a mild cleaning solution if necessary.
The swivel wheel holders and the front wheel axles get dirty. Take the wheels off on a regular basis and clean them with lukewarm water. Ensure that all parts are dried thoroughly and oil the axles lightly with oil or silicone spray before replacing the wheels.
Avoid exposing the Qtus DuetPro to extreme temperatures. The Qtus DuetPro is not resistant to salt water. Never bleach, dry-clean.
Fabrics used on the Qtus DuetPro are removable and washable. Before washing always remove the fastenings, foam, plastic or metal parts. Always refer to the washing label on each part.
During wet weather always use the rain cover. If the Qtus DuetPro is wet due to cleaning or rain do not fold but leave to dry, opened out, in a well ventilated room.
Parts of the Qtus DuetPro can slightly discolour or become worn as a result of weather conditions and usage. This can also occur with normal usage.
The utmost care was exercised in designing and compiling these instructions. The content however, is subject to change without notice. Qtus shall not be liable for technical errors or omissions contained in this manual.
The purchased product may differ from the product as described in this manual. Check for the most recent manuals on the Qtus website.
www.Qtus.eu
Warranty
In its capacity as brand owner, Qtus provides a warranty for the Qtus products, under the following conditions:
The warranty commences on the date stated on the proof of purchase and is valid for two years. This is in accordance with the manufacturer's (importer's) specification concerning correct use of the product or what may be expected as normal when using it.
The guarantee for rims, outer tires, inner tubes, foam, spokes, covers and accessories only relates to construction and/or material faults. If you have any doubts about the state of one or more of the components, contact the shop where you purchased the product. The retailer will assess the product and carry out simple repairs. The retailer will always contact Qtus should there be serious problems. You cannot demand an exchange or refund.
Repairs do not allow the warranty period to be extended. Qtus is never liable for damage other than to the product marketed by Qtus.
IMPORTANT!: Keep your proof of purchase and the instructions safely.
IMPORTANT!: The serial number of the Qtus stroller can be found on the frame sticker.
Read more on www.Qtus.eu
Do not forget to complete the warranty form on the website www.Qtus.eu
WARNING
WICHTIG!
natural_image
Technical line drawing of a mechanical assembly with no visible text or symbolsRahmen
natural_image
Line drawing of a backpack seat with two bottles on top (no text or symbols)Sitz

natural_image
Simple line drawing of a bicycle wheel with a handle and spokes (no text or symbols)Vorderrad x2

natural_image
Simple line drawing of a pulley system with rope and lever (no text or symbols)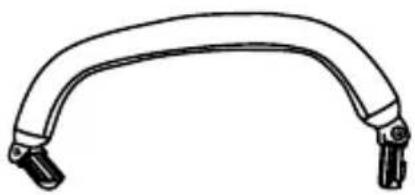
natural_image
Simple line drawing of a curved mechanical handle or lever (no text or symbols)Stoßstange

natural_image
Simple line drawing of a wheel with spokes and a central hub (no text or symbols)natural_image
Simple line drawing of a wheel with spokes and a central hub (no text or symbols)
adapter

natural_image
Pure mechanical bracket diagram without any text, numbers, or symbolsRücksitz adapter
natural_image
Diagram of a robotic arm with a hand adjusting the handle and belt, showing no text or symbols.natural_image
Illustration of a hand operating a mechanical device with a red upward arrow indicating motion (no text or symbols)natural_image
Illustration of a hand using a steering wheel to adjust a component, with a red arrow indicating the motion direction (no text or symbols present)natural_image
Illustration of hands using a tool to adjust or install a component, with a red arrow indicating the direction (no text or symbols present)natural_image
Technical diagram showing a mechanical assembly with a red arrow indicating a specific component (no text or symbols present)natural_image
Mechanical assembly diagram showing a wheel and gear mechanism with red directional arrows indicating motion (no text or labels)natural_image
Line drawing of a mechanical device with red arrows indicating adjustment or movement (no text or symbols)natural_image
Line drawing of hands operating a mechanical device with a red arrow pointing to a component (no text or symbols present)natural_image
Line drawing of a mechanical tool or tool with multiple blades and joints (no text or symbols)natural_image
Illustration of a person using a pulley system to adjust or install a cable, with no visible text or symbols.natural_image
Mechanical assembly diagram showing hands operating a belt switch with a red arrow indicating direction (no text or symbols)natural_image
Illustration of hands operating a mechanical component with a red arrow indicating a specific part (no text or symbols present)natural_image
Mechanical component diagram showing a lever mechanism with a red arrow indicating a specific point (no text or symbols present)natural_image
Diagram of a human arm with two red arrows indicating specific anatomical or structural features (no text or symbols present)natural_image
Line drawing of a hand using a tool to adjust or install a mechanical component, with no visible text or symbols.natural_image
Technical line drawing of mechanical components with no visible text or symbolsnatural_image
Mechanical assembly diagram showing a hand operating a pulley system with a red arrow indicating motion direction (no text or symbols)natural_image
Technical line drawing of a two-wheeled vehicle chassis with wheels and suspension components (no text or symbols)natural_image
Line drawing of a hand using a tool to adjust or install a car wheel (no text or symbols present)natural_image
Mechanical diagram showing a hand operating a stroller with a red arrow indicating the motion direction (no text or symbols present)natural_image
Mechanical diagram showing a car wheel and suspension mechanism with a red arrow indicating motion (no text or symbols)natural_image
Illustration of a hand holding a curved object with two red arrows indicating direction (no text or symbols)natural_image
Line drawing of hands using a tool to adjust or install a mechanical component, with a red arrow indicating the step (no text or symbols present)natural_image
Four-panel line drawing showing hands using a tool, with no visible text or symbolsnatural_image
Mechanical assembly diagram showing hands operating a belt switch (no text or symbols)natural_image
Mechanical gear assembly diagram showing internal components and motion arrows (no text or labels)natural_image
Illustration of hands adjusting a mechanical component with a red arrow indicating the motion (no text or symbols present)natural_image
Mechanical assembly diagram showing a hand turning a gear with a red arrow indicating the turning point (no text or symbols present)natural_image
Diagram of a mechanical component with red directional arrows indicating motion or force (no text or symbols)natural_image
Diagram showing a car seatbelt switch being adjusted to the side panel, with no text or symbols present.natural_image
Line drawing of a baby stroller with two wheels and a canopy (no text or symbols)Sitzposition
natural_image
Line drawing of a two-wheeled baby stroller with wheels and canopy (no text or symbols)natural_image
Line drawing of a baby stroller with wheels and canopy (no text or symbols)Liegende Position
Doppelsitz-Modus

natural_image
Line drawing of a two-wheeled baby stroller with twin canopyers and wheels (no text or symbols)natural_image
Line drawing of a two-wheeled baby stroller with two canopy blades and wheels (no text or symbols)natural_image
Line drawing of a two-wheeled baby stroller with twin canopy and wheels (no text or symbols)natural_image
Mechanical assembly diagram showing a lever mechanism with red directional arrows indicating motion (no text or symbols present)natural_image
Diagram of a person climbing a ladder with red directional arrows indicating motion (no text or symbols)natural_image
Diagram of a hand using a tool to adjust or install a component, with a red arrow indicating the direction (no text or symbols present)natural_image
Line drawing of a hand using a tool to cut a mechanical component, with a red arrow indicating the step (no text or symbols present)natural_image
Technical line drawing of a mechanical assembly with no visible text or symbolsCadre

natural_image
Line drawing of a backpack seat with two bottles on top (no text or symbols)Siège

natural_image
Simple line drawing of a bicycle wheel with a handle and spokes (no text or symbols)Roue avant x2
natural_image
Simple line drawing of a pulley system with rope and lever (no text or symbols)
natural_image
Simple line drawing of a curved mechanical handle or lever (no text or symbols)Barre avant

natural_image
Simple line drawing of a wheel with spokes and a central hub (no text or symbols)natural_image
Simple line drawing of a wheel with spokes and a central hub (no text or symbols)
de siège
avant

natural_image
Pure mechanical bracket diagram without any text, numbers, or symbolsnatural_image
Diagram of a robotic arm with a hand adjusting the handle and belt (no text or symbols present)natural_image
Illustration of a hand operating a mechanical lever system with a red upward arrow indicating motion (no text or symbols present)natural_image
Illustration of a hand operating a bicycle steering wheel with a red upward arrow indicating motion (no text or symbols)natural_image
Illustration of hands using a tool to adjust or install a car wheel, with a red arrow indicating the direction (no text or symbols present)natural_image
Technical diagram showing a mechanical assembly with a red arrow indicating a specific component (no text or symbols present)natural_image
Mechanical assembly diagram showing a wheel and gear mechanism with red directional arrows indicating motion (no text or labels)natural_image
Line drawing of a mechanical device with red arrows indicating adjustment or movement (no text or symbols)natural_image
Line drawing of hands operating a mechanical component with a red arrow indicating a specific point (no text or symbols present)natural_image
Line drawing of a mechanical tool or tool with multiple blades and joints (no text or symbols)natural_image
Illustration of a person using a pulley system to adjust or install a cable, with no visible text or symbols.2- Zippez la capote.
• Installer / retirer la barre de bras

natural_image
Mechanical assembly diagram showing hands operating a component with a red arrow indicating direction (no text or symbols present)natural_image
Line drawing of hands operating a mechanical component with a red arrow indicating a specific part (no text or symbols present)natural_image
Mechanical component diagram showing a turning tool interacting with a car wheel (no text or symbols)natural_image
Line drawing of a garment sleeve with red arrows indicating points of interest (no text or symbols)natural_image
Line drawing of a mechanical tool with a red arrow pointing to a specific part (no text or symbols present)natural_image
Technical line drawing of mechanical components with no visible text or symbolsnatural_image
Mechanical assembly diagram showing a hand operating a rotating wheel with a red arrow indicating motion direction (no text or symbols)natural_image
Technical line drawing of a two-wheeled vehicle chassis with wheels and suspension components (no text or symbols)natural_image
Line drawing of a hand using a tool to adjust or install a car wheel (no text or symbols present)natural_image
Mechanical diagram showing a lever mechanism with a red arrow indicating motion direction (no text or symbols present)natural_image
Diagram of a car's seatbelt mechanism showing a red arrow indicating the direction (no text or symbols present)natural_image
Illustration of a hand holding a curved object with two red arrows indicating direction (no text or symbols)natural_image
Line drawing of hands using a tool to adjust or install a mechanical component, with a red arrow indicating the step (no text or symbols present)natural_image
Mechanical assembly diagram showing hands operating a belt switch (no text or symbols present)natural_image
Four-panel line drawing showing hands using a tool, with no visible text or symbolsnatural_image
Mechanical gear assembly diagram showing internal components and motion arrows (no text or labels)natural_image
Illustration of hands adjusting a mechanical component with a red arrow indicating the motion (no text or symbols present)natural_image
Mechanical assembly diagram showing a hand turning a gear with a red arrow indicating the direction (no text or symbols present)natural_image
Diagram of a mechanical component with red directional arrows indicating motion or force (no text or symbols)natural_image
Diagram showing a car seatbelt switch being adjusted to the side panel, with no text or symbols present.natural_image
Line drawing of a baby stroller with two wheels and a canopy (no text or symbols)Position assise

natural_image
Line drawing of a two-wheeled baby stroller with wheels and canopy (no text or symbols)Position semi-inclinable

natural_image
Line drawing of a baby stroller with wheels and canopy (no text or symbols)Position inclinée
Mode double siège

natural_image
Line drawing of a two-wheeled baby stroller with twin canopyers and wheels (no text or symbols)natural_image
Line drawing of a two-wheeled baby stroller with two canopy filters (no text or symbols)natural_image
Line drawing of a two-wheeled baby stroller with twin canopy and wheels (no text or symbols)natural_image
Mechanical assembly diagram showing a lever mechanism with red directional arrows indicating motion (no text or symbols present)natural_image
Diagram of a hand using a tool to adjust or install a component, with a red arrow indicating the direction (no text or symbols present)natural_image
Diagram of a person climbing a ladder with red directional arrows indicating motion (no text or symbols)natural_image
Line drawing of a hand holding a small object on a wooden structure, with a red arrow indicating direction (no text or symbols)natural_image
Technical line drawing of a mechanical assembly with no visible text or symbolsFrame

natural_image
Line drawing of a backpack seat with two bottles on top (no text or symbols)Zitje

natural_image
Simple line drawing of a bicycle wheel with a handle (no text or symbols)
natural_image
Simple line drawing of a pulley system with rope and lever (no text or symbols)Voorwiel x2

natural_image
Simple line drawing of a curved mechanical handle or bracket (no text or symbols)Bumper bar

natural_image
Simple line drawing of a wheel with spokes and a central hub (no text or symbols)
natural_image
Simple line drawing of a wheel with spokes and a central hub (no text or symbols)natural_image
Two identical mechanical bracket components with mounting holes (no text or symbols)Achterste stoel adapter
Introductie
Introductie
natural_image
Diagram of a robotic arm with a hand adjusting the handle, showing mechanical components and motion direction (no text or symbols)natural_image
Illustration of a hand operating a mechanical device with a red upward arrow indicating motion (no text or symbols)natural_image
Illustration of a hand operating a bicycle steering wheel with a red arrow indicating the direction (no text or symbols present)natural_image
Illustration of hands adjusting a car wheel, showing a red arrow indicating motion (no text or symbols present)natural_image
Technical diagram of a mechanical assembly with a red arrow indicating a specific component (no text or symbols present)natural_image
Mechanical assembly diagram showing a wheel and gear mechanism with red directional arrows indicating motion (no text or labels)natural_image
Line drawing of hands operating a mechanical device with red arrows indicating motion (no text or symbols)natural_image
Line drawing of a mechanical assembly with hands operating a tool (no text or symbols)natural_image
Line drawing of a mechanical tool or tool with multiple blades and joints (no text or symbols)1- Klik elke kant van de zonnekap vast.

natural_image
Illustration of a person using a pulley system to adjust or install a cable, with no visible text or symbols.2- Rits de zonnekap vast.
natural_image
Mechanical assembly diagram showing hands operating a component with a red arrow indicating direction (no text or symbols present)natural_image
Line drawing of hands operating a mechanical component with a red arrow indicating a specific part (no text or symbols present)natural_image
Mechanical component diagram showing a lever mechanism with a red arrow indicating a specific point (no text or symbols present)natural_image
Line drawing of a human arm with two red arrows indicating movement or force direction (no text or symbols)natural_image
Line drawing of a hand using a tool to adjust or install a mechanical component, with no visible text or symbols.natural_image
Technical line drawing of mechanical components with a red arrow indicating a specific part (no text or symbols present)natural_image
Mechanical assembly diagram showing a hand operating a rotating wheel with a red arrow indicating motion direction (no text or symbols)natural_image
Technical line drawing of a two-wheeled vehicle chassis with wheels and suspension components (no text or symbols)natural_image
Line drawing of a hand using a tool to adjust or install a car wheel (no text or symbols present)natural_image
Mechanical diagram showing a car wheel and suspension mechanism with a red arrow indicating motion (no text or symbols)natural_image
Diagram of a car wheel assembly with a red arrow indicating a specific component (no text or symbols present)natural_image
Illustration of a hand holding a curved object with two red arrows indicating direction (no text or symbols)natural_image
Line drawing of hands using a tool to adjust or install a mechanical component, with a red arrow indicating the step (no text or symbols present)natural_image
Mechanical assembly diagram showing hands operating a belt switch (no text or symbols visible)natural_image
Four-panel line drawing showing hands using a tool, with no visible text or symbolsnatural_image
Mechanical gear assembly diagram showing internal components and red directional arrows (no text or labels)natural_image
Illustration of hands adjusting a mechanical component with a red arrow indicating the motion (no text or symbols present)natural_image
Mechanical assembly diagram showing a hand turning a gear with a red arrow indicating the direction (no text or symbols present)natural_image
Diagram of a mechanical component with red directional arrows indicating motion or force (no text or symbols)natural_image
Diagram showing a car seatbelt switch being adjusted to the side panel, with no text or symbols present.natural_image
Line drawing of a baby stroller with two wheels and a canopy (no text or symbols)Zitpositie

natural_image
Line drawing of a two-wheeled baby stroller with wheels and canopy (no text or symbols)Semi-liggende positie

natural_image
Line drawing of a baby stroller with wheels and canopy (no text or symbols)Liggende positie
Dubbele stoelmodus

natural_image
Line drawing of a two-wheeled baby stroller with twin canopyers and wheels (no text or symbols)natural_image
Line drawing of a two-wheeled baby stroller with two canopy filters (no text or symbols)natural_image
Line drawing of a two-wheeled baby stroller with two canopyers and wheels (no text or symbols)natural_image
Mechanical assembly diagram showing a lever mechanism with red directional arrows indicating motion (no text or symbols present)natural_image
Diagram of a person climbing a ladder with red directional arrows indicating motion (no text or symbols)natural_image
Diagram of a hand using a switch to adjust or install a component, with a red arrow indicating the downward motion (no text or symbols present)natural_image
Line drawing of a hand holding a small object on a wooden structure, with a red arrow indicating direction (no text or symbols)Qtus Belgium & Luxembourg
Babimex NV
Dennenlaan 9
2340 Beerse
België
info@babimex.be
www.babimex.be

natural_image
Solid gray rectangular shape with no text, symbols, or discernible features.
natural_image
Solid gray rectangular shape with no text, symbols, or discernible features.
Qtus
Qtus
Overijsselhaven 135, 3433 PH
Nieuwegein The Netherlands.
www.Qtus.eu


- Index
- Index:
- Welcome
- WARNING
- Parts list
- Introducing your new stroller
- To ensure safe operation of your stroller, please follow these instruction carefully.
- Frame with two seats
- Assembling and using your stroller
- - Unfolding the frame
- • Install / remove the front wheels
- - Folding the stroller
- Using your stroller
- Single seat mode
- Double seat mode
- Install/remove the front/rear seat adapter
- The front / rear seat adapter allows you to secure your carriers onto your DuetPro.
- Care And Maintenance
- Warranty
- WICHTIG!
- Doppelsitz-Modus
- Mode double siège
- Introductie
- Dubbele stoelmodus
- Qtus Belgium & Luxembourg
- Qtus
Brand : Qtus
Model : DuetPro
Category : Stroller