Easy Duo 1561121 - Irrigation timer Toolcraft - Free user manual and instructions
Find the device manual for free Easy Duo 1561121 Toolcraft in PDF.
| Product type | Watering timer |
| Brand | Toolcraft |
| Model | Easy Duo 1561121 |
| Power supply | 2 AA batteries (non-rechargeable) |
| Maximum hydraulic pressure | 6.89 bars (100 psi) |
| Operating/storage temperature range | 0 to +60 °C |
| Dimensions (L x H x P) | 135 x 165 x 63 mm |
| Protection rating | IP67 |
| Number of zones | 2 (Easy Duo model) |
| Display type | LCD screen with menu indicators |
| Start time programming | Yes, 12-hour format (AM/PM) |
| Watering duration range | 1 to 360 minutes |
| Watering interval range | Every hour (1-24h) or every day (1-7 days) |
| Rain delay function | Yes (12h or 1-7 days) |
| Manual watering | Yes (1-360 minutes) |
| Factory reset | Yes, by pressing and holding OK (7 seconds) |
| Winter storage | Disconnect, drain, remove batteries, store in dry place |
| Maintenance | Clean with a dry or damp cloth (mild dish soap) |
| Package contents | Timer, instruction manual |
| Compliance | European and national directives |
Frequently Asked Questions - Easy Duo 1561121 Toolcraft
User questions about Easy Duo 1561121 Toolcraft
0 question about this device. Answer the ones you know or ask your own.
Ask a new question about this device
Download the instructions for your Irrigation timer in PDF format for free! Find your manual Easy Duo 1561121 - Toolcraft and take your electronic device back in hand. On this page are published all the documents necessary for the use of your device. Easy Duo 1561121 by Toolcraft.
USER MANUAL Easy Duo 1561121 Toolcraft
5 Taste ON/OFF MANUAL
6 Taste OK
7 Taste ZONE 1 2
text_image
START WATER HOW LONG WATER DAY SU MO TU WE TH FR SA ZONE ① 2 FOR MANN DELAY PRESS + OUT OFF
text_image
SET TIME START WATER HOW LONG OFF Auta OUTA EVERY DAY SU MO TU WE TH FR SA ZONE ① 2 FOR RAIN DELAY PRESS + HOW OVERTI
text_image
SET TIME START WATER HOW LONG AUTO OFF A N O F W O H T E H P E H T E H T E H T E H T E H T E H T E H T E H T E H T E H T E H T E H T E H T E H T E H T E H T E H T E I J K L M N O P R S D L YOperating Instructions
Water timer
Item no. 1561120 - Easy
Item no. 1561121 - Easy duo
Intended use
The product is intended for connection to a suitable water tap. The point of time and duration of watering can be programmed. Power is supplied via batteries (not included).
The product is waterproof according to IP67.
For safety and approval purposes, you must not rebuild and/or modify this product. Using the product for purposes other than those described above may damage the product. In addition, improper use can cause hazards such as short circuits. Read the instructions carefully and store them in a safe place. Only make this product available to third parties together with its operating instructions.
This product complies with statutory national and European regulations. All company and product names are trademarks of their respective owners. All rights reserved.
Delivery contents
- Water timer
- Operating instructions
Up-to-date operating instructions
To download the latest operating instructions, visit www.conrad.com/downloads or scan the QR code on this page. Follow the instructions on the website.
Explanation of symbols
The symbol with an exclamation mark in a triangle is used to highlight important information in these operating instructions. Always read this information carefully.
The arrow symbol indicates special information and advice on how to use the product.
Safety information
Read the operating instructions and safety information carefully. If you do not follow the safety instructions and information on proper handling in this manual, we will assume no liability for any resulting personal injury or damage to property. Such cases will invalidate the warranty/guarantee.
a) General information
- The device is not a toy. Keep it out of the reach of children and pets.
- Do not leave packaging material lying around carelessly. It may become a dangerous toy for children.
- Protect the product from extreme temperatures, direct sunlight, strong jolts, flammable gases, vapours and solvents.
- Do not place the product under any mechanical stress.
- If it is no longer possible to operate the product safely, stop using it and prevent unauthorized use. Safe operation can no longer be guaranteed if the product:
- is visibly damaged,
- is no longer working properly,
- has been stored for extended periods in poor ambient conditions or
- has been subjected to any serious transport-related stress.
- Always handle the product carefully. Jolts, impacts or a fall even from a low height may damage the product.
- Always observe the safety and operating instructions of any other devices which are connected to the product.
- At freezing temperatures, disconnect the product from the water tap and hose. Store the product in a frost-free location.
- Avoid water pressure above 6.89 bar, otherwise you may damage the product.
- Consult a technician if you are not sure how to use or connect the product.
- Maintenance, modifications and repairs must be done by a technician or a specialist repair centre.
- If you have questions which remain unanswered by these operating instructions, contact our technical support service or other technical personnel.
b) Batteries
- Check that the batteries are inserted with the correct polarity.
- The batteries should be removed from the device if it is not used for a long period of time to avoid damage through leaking. Leaking or damaged batteries may cause acid burns when they come into contact with skin. Always use protective gloves when handling damaged batteries.
- Keep batteries out of the reach of children. Do not leave batteries lying around, as they constitute a choking hazard for children and pets.
- Replace all of the batteries at the same time. Mixing old and new batteries may lead to battery leakage and thus to damage to the device.
- Batteries must not be dismantled, short-circuited or thrown into fire. Never recharge non-rechargeable batteries. There is a risk of explosion!
Product overview
123
| 1 Water tap connection, inlet2 - button3 Select button4 + button5 ON/OFF MANUAL button6 OK button7 ZONE 1 2 button8 Hose connection (Zone 2)9 Hose connection (Zone 1)10 Display | |||
| 10 | ZONE | MIN | 4 |
| 5 | |||
| 6 | |||
| 7 | |||
| 8 | |||
| 9 | |||
| 10 Display | |||
| 9 | 8 | ||
The figure shows item no. 1561121.
Item no. 1561120 does not have the operating elements no. 7 and no. 8.
Inserting/changing the batteries
Only use conventional, non-rechargeable batteries. Do not use rechargeable batteries.
When replacing the batteries, proceed quickly. Otherwise you have to make all the settings again.
- Remove the battery compartment on the back of the housing.
- Insert two AA batteries with the correct polarity. Follow the polarity as indicated inside the battery compartment.
- Make sure that the rubber sealing ring on the battery compartment is installed correctly.
- Push the battery compartment all the way into the housing.
Replace the batteries when the battery level indicator in the bottom area of the display shows 0%.
Connection
You can program the product before or after connection.
- Connect the water tap connector with a suitable water tap.
- Connect the hose connection with a suitable water hose.
- Open the water tap and then leave it open. At the programmed times, water will exit the hose connection.
Operation
Selecting a menu item
Press the select button (upper middle button) to select the next menu item. The menu items are printed on the edge of the display. The selected menu item is indicated by the triangular arrow.
Zone selection (only item no. 1561121)
For the menu items START WATER, HOW LONG and HOW OFTEN, press the ZONE 1 2 button to select one of the two hose connections for the program. The selected zone is marked by a circle.
You can program both hose connections independently of each other.
Settings
a) Time and day
- Select the menu item SET TIME.
- Select the current day of the week with the + or - button. The day of the week is marked by a frame.
SU Sunday
MO Monday
TU Tuesday
WE Wednesday
TH Thursday
FR Friday
SA Saturday
- Press the OK button to confirm. The time flashes.
- Set the current time with the + or - button. Press and hold the button for fast setting.
→ The time is in the 12-hour format.
AM = midnight to noon
PM = afternoon until midnight
- Press the OK button to confirm.

text_image
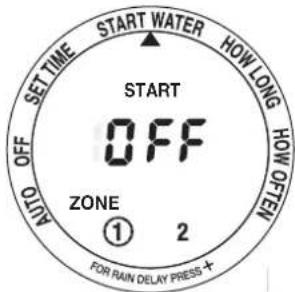
SET TIME START WATER HOW LONG OFF AUTO TIME AM 7:00 TODAY SU FR SATHWETUMO FOR RAIN DELAY PRESS + 100%b) Start time
- Select the menu item START WATER.
- Set the start time with the + or - button. Press and hold the button for fast setting.
text_image
SETTIME AUTO OFF OFF SET START WATER OFF ZONE ① 2 FOR RAIN DELAY PRESS + HOW LONG HOW OPEN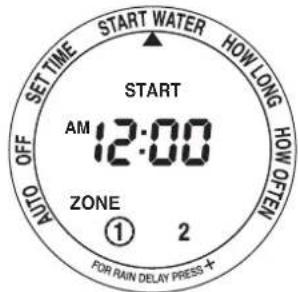
text_image
START WATER HOW LONG WHY ONION SET TIME AM 12:00 ZONE ① 2 FOR RAIN DELAY PRESS +c) Watering duration
- Select the menu item HOW LONG.
- Set the duration between 1 and 360 minutes with the + or - button.
text_image
SET TIME START WATER HOW LONG WATER 0 MIN HOM OFFEN ZONE ① ② FOR RAIN DELAY PRESS +d) Watering interval / cycle
On specified days
- Select the menu item HOW OFTEN.
- Select a day with the + or - button. Press the OK button.
The days when the watering program is active are marked with a frame.
- Set the repeat interval in hours for the selected days. To do this, repeatedly press the + button until EVERY HRS appears on the display. Set the hours with the + or - button.

text_image
SET TIME START WATER HOW LONG HOW OFF AUTO WATER DAY SU FR SATHVETUMO ZONE ① 2 FOR RAIN DELAY PRESS +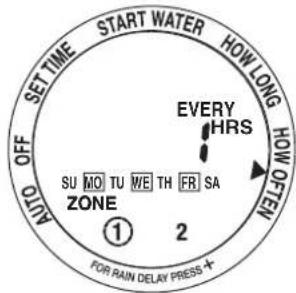
text_image
SET TIME START WATER HOW LONG OFF OHIO SU MO TU WE TH FR SA ZONE ① 2 EVERY HRS FOR RAIN DELAY PRESS +Interval
- Select the menu item HOW OFTEN.
• Repeatedly press the + button until EVERY DAY appears on the display. - Set the days with the + or - button. Select the option EVERY 1 DAY to water every day.

text_image
START WATER HOW LONG WATER DAY SU MO TU VIE TH FR SA ZONE ① 2 POST GAIN DELAY PRESS +
text_image
SET TIME START WATER HOW LONG HORN ON OFF SET TIME EVERY DAY SU NO TU WE TH FR S4 ▶ ZONE ① 2 FOS RAIN DELAY PRESS ★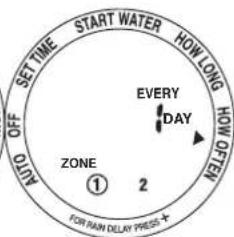
text_image
SET TIME START WATER HOW LONG A NO OFF EVERY DAY ZONE ① 2 FOR PAIN DELAY PRESSActivating automatic watering
-
Select the menu item AUTO. The device will now water according to the settings.
• The display shows the following information consecutively: -
Current time and current day
- Next start time for zone 1
- Next start time for zone 2 (optional)

text_image
SET TIME START WATER HOW LONG AM 8:10 TODAY FR AUTO OFF TIME FON RAN DELAY PRESS ★
text_image
SET TIME NO OFF MINT SET WATER HOW LONG HOW LONG NEXT START TIME AM 10:30 TU ZONE ① 2 400% FOR MAIN DELAY PRESS
text_image
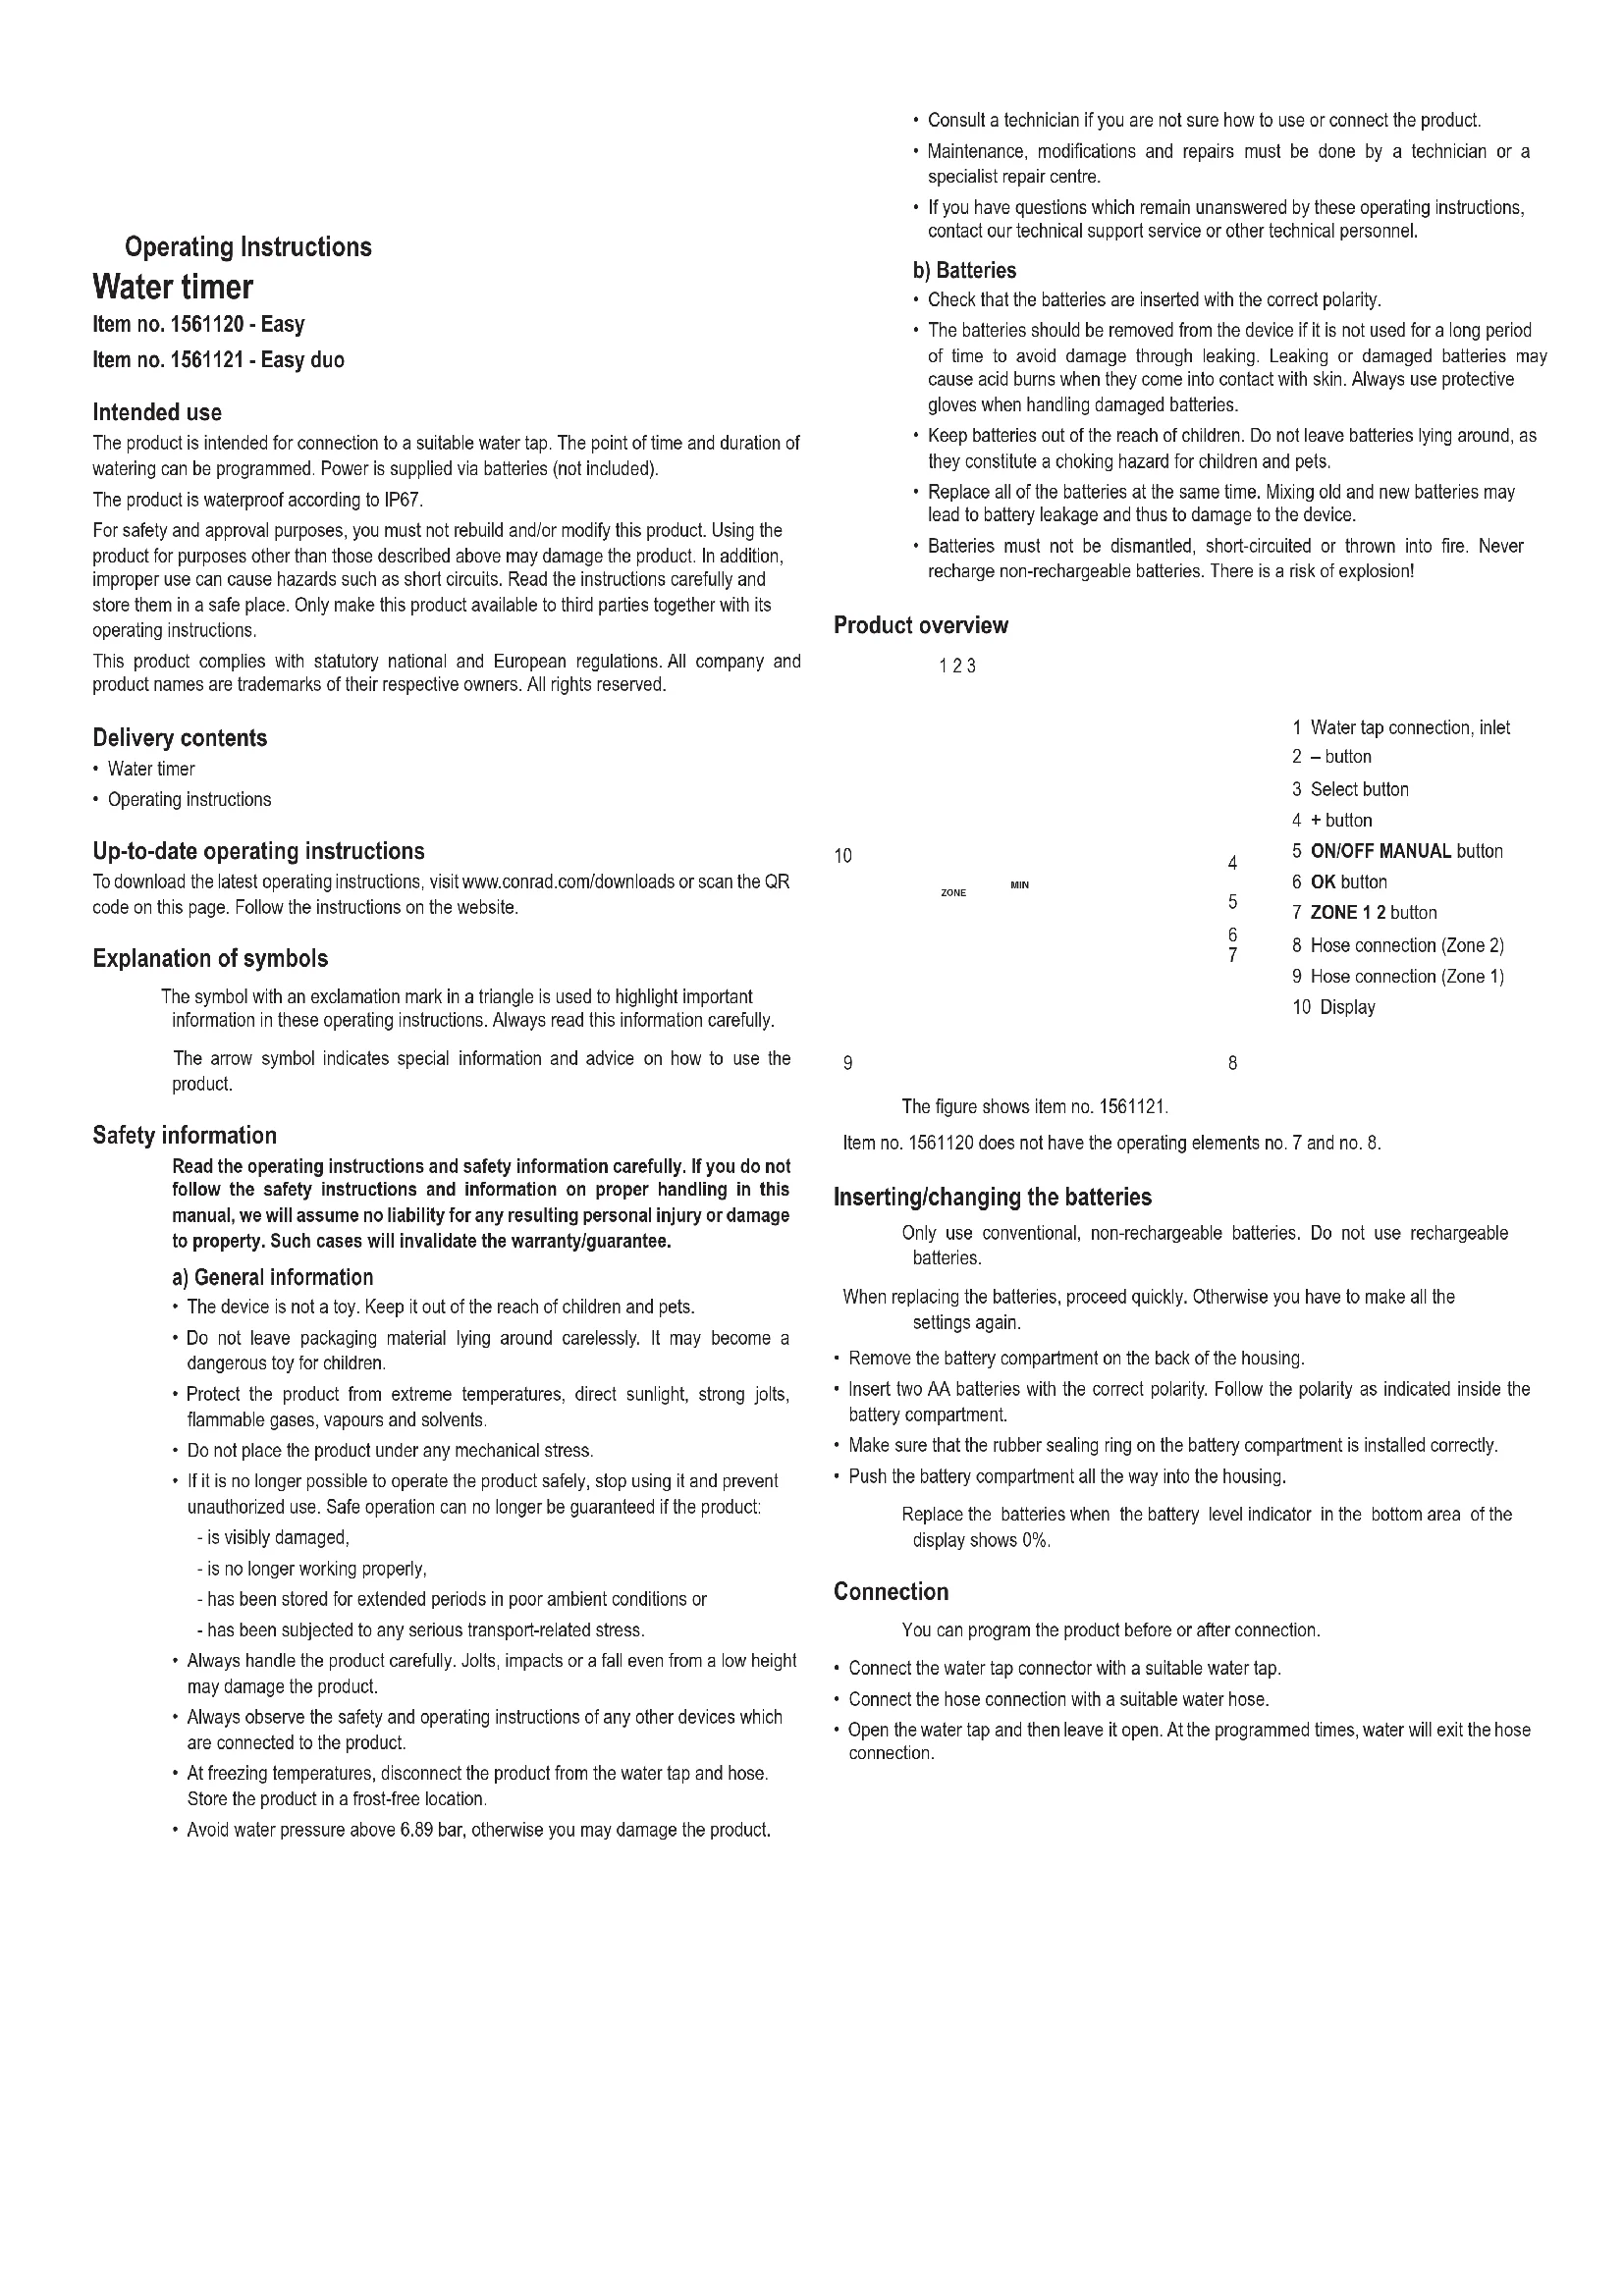
SET TIME START WATER HOW LONG OFF NOW OFF NEXT START TIME PM 6:00 FR ZONE 1 2 FOR RAIN DELAY PRESSDisabling automatic watering
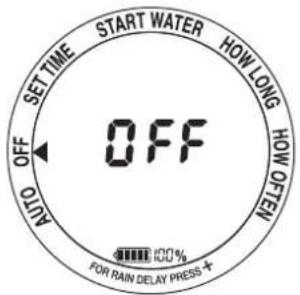
Select the menu item OFF.
text_image
SET TIME START WATER HOW LONG HOW GREEN OFF AUTO OFF FOR RAIN DELAY PRESS ★Delaying automatic watering
If it is supposed to rain, you can delay automatic watering for a fixed period. After this delay, the program continues automatically.
- Select the menu item AUTO.
- Press the + button. The display shows DELAY.
- Press the + or – button to set the duration. You can set 12 hours or 1 to 7 full days.
- To undo this delay, repeatedly press the – button when selecting the duration until the current time is displayed.

text_image
SET TIME START WATER HOW LONG OFF TIME AM 8:10 TODAY FR AUTO FOR RAIN DELAY PRESS + 100%
text_image
SET TIME START WATER HOW LONG OFF AUTO DELAY DAY FR ZONE 1 2 FOR RAIN DELAY PRESS + H00%Manual watering
→ Manual watering will not work while automatic watering is delayed (see previous chapter).
- Press the ON/OFF MANUAL button.
- Set the duration between 1 and 360 minutes with the + or - button.
- Press the OK button to confirm.

text_image
SET TIME START WATER HOW LONG OFF WATER 0 MIN AUTO ZONE MANUAL ① 2 FOR RAIN DELAY PRESS ★Resetting
Press and hold the OK button for 7 seconds to reset the product to the factory settings. All settings will be lost.

text_image
SET TIME AUTO OFF AUTO RESET FOR RAIN DELAY PRESS START WATER HOW LONG HOW OFFEN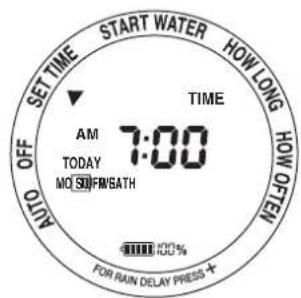
text_image
SET TIME START WATER HOW LONG OFF AUTO TIME AM 7:00 TODAY MO SIFRNGATH FOR RAIN DELAY PRESS + 100%Storage in winter
- Turn off the tap. Disconnect the product from the water tap.
- To open the valve and allow any remaining water to drain, press the ON/OFF MANUAL button. Set a duration of 1 minute. Press the OK button to confirm.
- Let the product dry completely.
- Remove the batteries.
- Store the product in a dry place.
Care and cleaning
- Never use aggressive detergents, rubbing alcohol or other chemical solutions, as these may damage the housing or cause the product to malfunction.
- Use a dry, lint-free cloth to clean the product. Use a damp cloth and a mild detergent to remove tougher stains.
- If necessary, remove filth from the water tap connection.
Disposal
a) Product

Electronic devices are recyclable waste and must not be placed in household waste. At the end of its service life, dispose of the product according to the relevant statutory regulations.
Remove any inserted batteries and dispose of them separately from the product.
b) Batteries

You are required by law to return all used batteries (Battery Directive). They must not be placed in household waste.
Batteries that contain hazardous substances are labelled with this symbol to indicate that disposal in domestic waste is forbidden. The abbreviations for heavy metals in batteries are: Cd = Cadmium, Hg = Mercury, Pb = Lead (indicated on the battery, e.g. below the waste icon on the left).
Used batteries can be returned to local collection points, our stores or battery retailers. You thus fulfil your statutory obligations and contribute to the protection of the environment.
Technical data
Power supply 2x AA battery
Water pressure....max. 6.89 bar (100 psi)
Operating/storage conditions.....0 to +60 °C, 10 – 100 % RH
Dimensions (W x H x D).... 135 x 165 x 63 mm
TOOLCRAFT
CE
F Mode d'emploi
text_image
1 2 3 SET FLOW START WATER HOW LONG HOW OFF ZONE 30 MIN ZONE ① 2 OK 4 5 6 7 9 8Copyright 2017 by Conrad Electronic SE. *1561120_1_v1_0118_02_IPL_m_fr
TOOLCRAFT
CE