Glastonbury Go - Radio Auna - Free user manual and instructions
Find the device manual for free Glastonbury Go Auna in PDF.
User questions about Glastonbury Go Auna
0 question about this device. Answer the ones you know or ask your own.
Ask a new question about this device
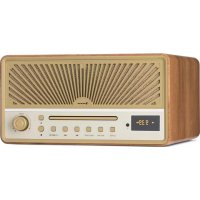
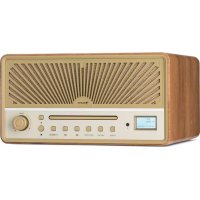
Download the instructions for your Radio in PDF format for free! Find your manual Glastonbury Go - Auna and take your electronic device back in hand. On this page are published all the documents necessary for the use of your device. Glastonbury Go by Auna.
USER MANUAL Glastonbury Go Auna
CONTENTS Technical Data 20 Safety Instructions 21 Product Overview 23 BT Mode 24 AUX IN Mode 24 FM Mode 24 DAB Mode 25 Disposal Considerations 30 Declaration of Conformity 30 Dear Customer, Congratulations on purchasing this equipment. Please read this manual carefully and take care of the following hints to avoid damages. Any failure caused by ignoring the items and cautions men- tioned in the instruction manual are not covered by our warranty and any liability. Scan the QR code to get access to the latest user manual and other information about the product.20
SAFETY INSTRUCTIONS General safety instructions CAUTION Risk of injury. Do not listen to music at excessive volume as this may result in a loss of hearing.
- This device may be only used by children 8 years old or older and persons with limited physical, sensory and mental capabilities and/ or lack of experience and knowledge, provided that they have been instructed in use of the device by a responsible person who understands the associated risks.
- Never open the device cover. Do not attempt to repair the device by yourself.
- Consult qualied personnel for repairs. The device does not contain user-serviceable device components.
- Improper handling may damage the device and therefore void the warranty. Power Connection
- To charge the internal battery, plug the USB charging cable into the DC Power Input on the speaker and a powered on computer or USB power adapter (not included) and standard power outlet.
- Unplug the device from the main power supply during thunderstorms.
- Be sure to turn o the power before unplugging the power cord.
- If you are using a multiple socket power strip or the plug as a splitting device, ensure that the plugs are always accessible and ready for use.
- Never throw batteries into an open re and do not attempt to open their outer shells.
- Batteries are harmful if swallowed and should therefore be stored out of the reach of small children. If you think batteries have been swallowed or may have entered any part of your body, seek medical attention immediately.22
- Do not block or cover the ventilation holes, vents, or openings of the unit with anything, such as carpet, cloth, or similar, as otherwise the openings may not be able to ensure functionality and / or ventilation for safe use.
- The bottom of the unit may become warm if the unit is used for an extended period of time. This is normal. Location
- Make sure the unit is standing on a at and stable surface.
- Do not place the device more than 4.5 feet (1.4 meters) away from the nearest outlet. Make sure that the power cord and speaker cords do not create a tripping hazard.
- Place the device at least 3.25 feet (1 meter) away from other electrical devices in order to avoid noise interference.
- Make sure the device has enough room for the antenna to be properly aligned.
- Never place the unit directly on antique or polished surfaces.23
1. Press and Hold the POWER button to turn on the unit. The unit will
enter standby mode. The display will show "00:00" and ash. The date and time is automatically set once it receives local broadcast signals(and when such info is available).
2. Press to POWER button again to enter menu.
(Note: By pressing the POWER button you switch between "ON" mode and "Standby" mode (showing clock and date). BT MODE The rst time you use your BT device with this speaker, you will need to or pair it with the speaker rst.
1. Press the MODE button to select BT mode. The display will show
"Pairing" indicating that the system has entered pairing mode and will be searchable by your BT enabled device.
2. Activate your BT enabled device and select the search mode.
"Glastonbury Go" will appear on your BT device list. Select "Glastonbury Go" in the pairing list.
3. There will be a prompt sound after the successful pairing. The display
will show "Connected". If the pairing device is disconnected, the unit will also issue a prompt sound.
Press the MODE button to select AUX mode. use 3.5mm audio cable(not provided) to connect player with other audio output devices(such as:mobile phone, etc): FM MODE
1. This radio antenna is on the back of the machine. When you need to
3. Search for station
- Hold and press the button to automatically search for station. The unit will store radio stations automatically after the search is complete. Press the ⏮ or ⏭ button to select the station.
- Press the to manually search for station.25
- Rotate the tuning knob to tune up or down the frequency band. Audio Setup This unit can select audio type between Mono and Stereo in FM mode.
1. In FM mode, Hold and press MENU|INFO to enter menu. Rotate the
TUNING knob to "Audio setting" showing on the display. And then press to enter.
2. Rotate the tuning knob to select the available options: Stereo allowed,
Forced mono. And the press the to conrm. DAB MODE
1. This radio antenna is on the back of the machine. When you need to
3. Press the button to automatically search for station. The
unit will store radio stations automatically after the search is complete.
4. Press or ⏮ or ⏭ to select the station in the station list and then press
to conrm. Prune This feature removes any stations that in the DAB station list but have no service in your area.
1. In DAB mode, hold and press the MENU|INFO to enter menu. Rotate
the tuning knob until "System" and press the to enter.
2. Rotate the tuning knob to "Prune" and press to enter.
3. Rotate the tuning knob to choosing "Yes" to remove invalid stations
from the station list and press to conrm. DRC(Dynamic Range Control) This DRC adds or removes a degree of compensation for the dierence in the dynamic range between radio stations.
2. Rotate the tuning knob to "DRC" and press to enter.
3. Rotate the tuning knob to select the available options: o, high, low.
- high: mximum compensation applied
- Low: medium compensation applied Station Order
2. Rotate the tuning knob to "Station order" and press to
Active, Multiplex. And the press the to conrm. Storing preset station The unit can store up to 20 stations as preset stations.
1. In DAB/FM mode, tune to a station.
2. Hold and press MENU|INFO to enter menu. Rotate the TUNING knob
until "Preset" showing on the display. And the press to enter.
3. Rotate the tuning knob to select a preset number.
4. Hold and press the to store the station.
5. To listen to a preset station, hold and press MODE|PRESET to enter
preset station list. Rotate the tuning knob to select a desired preset station. And the press to conrm to listen the station. Time Setup
1. Hold and press MENU|INFO to enter menu. Rotate the TUNING knob
to "System" showing on the display. And then press to enter.
2. Rotate the tuning knob to "Time setup" position and press
3. Rotate the tuning knob to cycle through the below options.
- Set clock: Press to enter "Set clock". Rotate the TUNING knob to cycle through the number to desired position and press to conrm.
- Set date: Press to enter "Set date". Rotate the TUNING knob to cycle through the number to desired position and press to conrm. The date is displayed in DD-MM-YYYY.
to "System" showing on the display. And then press MENU|INFO to enter.
2. Rotate the TUNING knob to "Sleep" position and press
to "System" showing on the display. And then press to enter.
the to conrm. Backlight Setup
1. Hold and press MENU|INFO to enter menu. Rotate the TUNING knob
to "System" showing on the display. And then press to enter.
2. Rotate the TUNING knob to "Backlight" position and press
3. Rotate the tuning knob to cycle through the below options.
- Timeout (To dene the duration of the backlight before it it dimmed.): Press to enter "Timeout". Rotate the TUNING knob to select the timeout options: On(the backlight does not dim), 10 Sec, 20 Sec, 30 Sec, 45 Sec, 60 Sec, 90 Sec, 120 Sec, 180 Sec, and press to conrm.
- On Level(To dene the brightness level when the backlight is switched on) : Press to enter "On level". Rotate the TUNING knob to select the brightness levels: High/Low/Medium and press to conrm.28
to "System" showing on the display. And then press to enter.
to "System" showing on the display. And then press to enter.
2. Rotate the TUNING knob to "SW version" position and press
3. The system software version will be displayed.
1. Press or and then press to enter alarm setting.
2. Rotate the tuning knob to cycle through the below options.
- On/O: Press to turn the alarm on/o.
- Time: Rotate the TUNING knob to "Time" position and press to enter. And rotate the TUNING knob to set time and press the to conrm.
- Days: Rotate the TUNING knob to "Days" position and press to enter. And rotate the TUNING knob to select the available options:Daily, Once, Weekdays, Weekends and press to conrm.
- Mode: Rotate the TUNING knob to "Mode" position and press to enter. And rotate the TUNING knob to select the sound source of the alarm. Source options: DAB, FM, Buzzer. And then press to conrm
- Volume: Rotate the TUNING knob to "Volume"position and press to enter. And rotate the TUNING knob to select the alarm volume level and press to conrm.
- Last listened: Rotate the TUNING knob to "Last listened" position and press to enter. And rotate the TUNING knob to select the desired preset station as alarm source. And press the to conrm.(Note: The function is available when the preset station is set.)
- Save: When the above setting is nished, rotate the knob the "Save" position and press the to save the alarm setting. When the alarm setting is active, the corresponding alarm 1 or alarm 2 icon29
will show on the display. Notes
- At the set time, the alarm will sound. The volume will increase gradually until it reaches the set volume level. The corresponding alarm icon will also ash on the display.
- When the alarm goes o, press any button(except TUNING knob and VOLUME knob) on the panel to turn o the alarm.
- SNOOZE Function: When the alarm goes o, rotate the TUNING knob or VOLUME knob to activate SNOOZE function and snooze for 10 minutes. The unit will go into standby mode. press any button(except TUNING knob and VOLUME knob) on the panel to turn o the alarm. Charging the device The speaker has a built-in, rechargeable lithium ion battery. To avoid damage, do not attempt to remove the battery.Please charge the speaker before rst use. While the unit is charging, the charging indicator will be red. When the battery is fully charged, the charging indicator will be green. Important: To avoid a complete discharge of battery, charge the speaker at least once every month.30
DISPOSAL CONSIDERATIONS If there is a legal regulation for the disposal of electrical and electronic devices in your country, this symbol on the product or on the packaging indicates that this product must not be disposed of with household waste. Instead, it must be taken to a collection point for the recycling of electrical and electronic equipment. By disposing of it in accordance with the rules, you are protecting the environment and the health of your fellow human beings from negative consequences. For information about the recycling and disposal of this product, please contact your local authority or your household waste disposal service. This product contains batteries. If there is a legal regulation for the disposal of batteries in your country, the batteries must not be disposed of with household waste. Find out about local regulations for disposing of batteries. By disposing of them in accordance with the rules, you are protecting the environment and the health of your fellow human beings from negative consequences.
DECLARATION OF CONFORMITY
Manufacturer: Chal-Tec GmbH, Wallstrasse 16, 10179 Berlin, Germany. Importer for Great Britain: Berlin Brands Group UK Limited PO Box 42 272 Kensington High Street London, W8 6ND United Kingdom Hereby, Chal-Tec GmbH declares that the radio equipment type Glastonbury Go is in compliance with Directive 2014/53/EU. The full text of the EU declaration of conformity is available at the following internet address: use.berlin/10041150 For Great Britain: Hereby, Chal-Tec GmbH declares that the radio equipment type Glastonbury Go is in compliance with the relevant statutory requirements. The full text of the declaration of conformity is available at the following internet address: use.berlin/1004115031