
RTS001X - Video Intercom HAGER - Free user manual and instructions
Find the device manual for free RTS001X HAGER in PDF.
| Product type | IP video intercom software |
| Brand | Hager |
| Model | RTS001X |
| Supported operating systems | Windows XP, Vista, 7, 8 (32 & 64 bit) |
| Minimum PC configuration | 1.6 GHz, 1 GB RAM, 100 Mbits, 1024x768 screen, microphone and speaker |
| Video call function | Yes |
| Door opening (electric strike) | Yes, via DTMF sequence |
| Lighting opening | Yes, via DTMF sequence |
| Camera management | Up to 4 inputs/cameras (buttons 9-12) |
| Hands-free audio | Yes |
| Customizable ringtones | Yes, WAV files |
| Automatic recording on startup | Yes |
| Window overlay during call | Yes, always on top |
| Diagnosis and debugging | Yes, log files |
| License activation | Yes, with key |
| Demo version available | Yes |
| Installation type | Folder copy (no standard installation) |
| Factory settings | Deleting Config.xml file |
| Maintenance | Updates and configuration backup |
| Security | License activation and SIP registration |
Frequently Asked Questions - RTS001X HAGER
User questions about RTS001X HAGER
0 question about this device. Answer the ones you know or ask your own.
Ask a new question about this device
Download the instructions for your Video Intercom in PDF format for free! Find your manual RTS001X - HAGER and take your electronic device back in hand. On this page are published all the documents necessary for the use of your device. RTS001X by HAGER.
USER MANUAL RTS001X HAGER
Installation and configuration 16 - 19
User interface and other adaptations 20 - 23
Error diagnostics and factory settings 24
Instructions and FAQ 25
Safety instructions
The installation and assembly of electrical equipment may only be carried out by an electrician in compliance with applicable installation standards, directives, regulations, safety and accident ordinances for the local country. When working on systems with a 230V power connection, the safety requirements of DIN VDE 0100 must be met. Failure to comply with the instructions can cause damage to the device, fire or other dangers. These instructions are a component of the product and must remain with the end customer.
System information and intended use
This software is a product of the IP door intercom system and can only be used within the defined installation scenarios. Detailed technical knowledge from IP training is assumed in order to understand them. The function of the device depends on its configuration. You can find more information about the specific functional scope in the corresponding application descriptions in the product database.
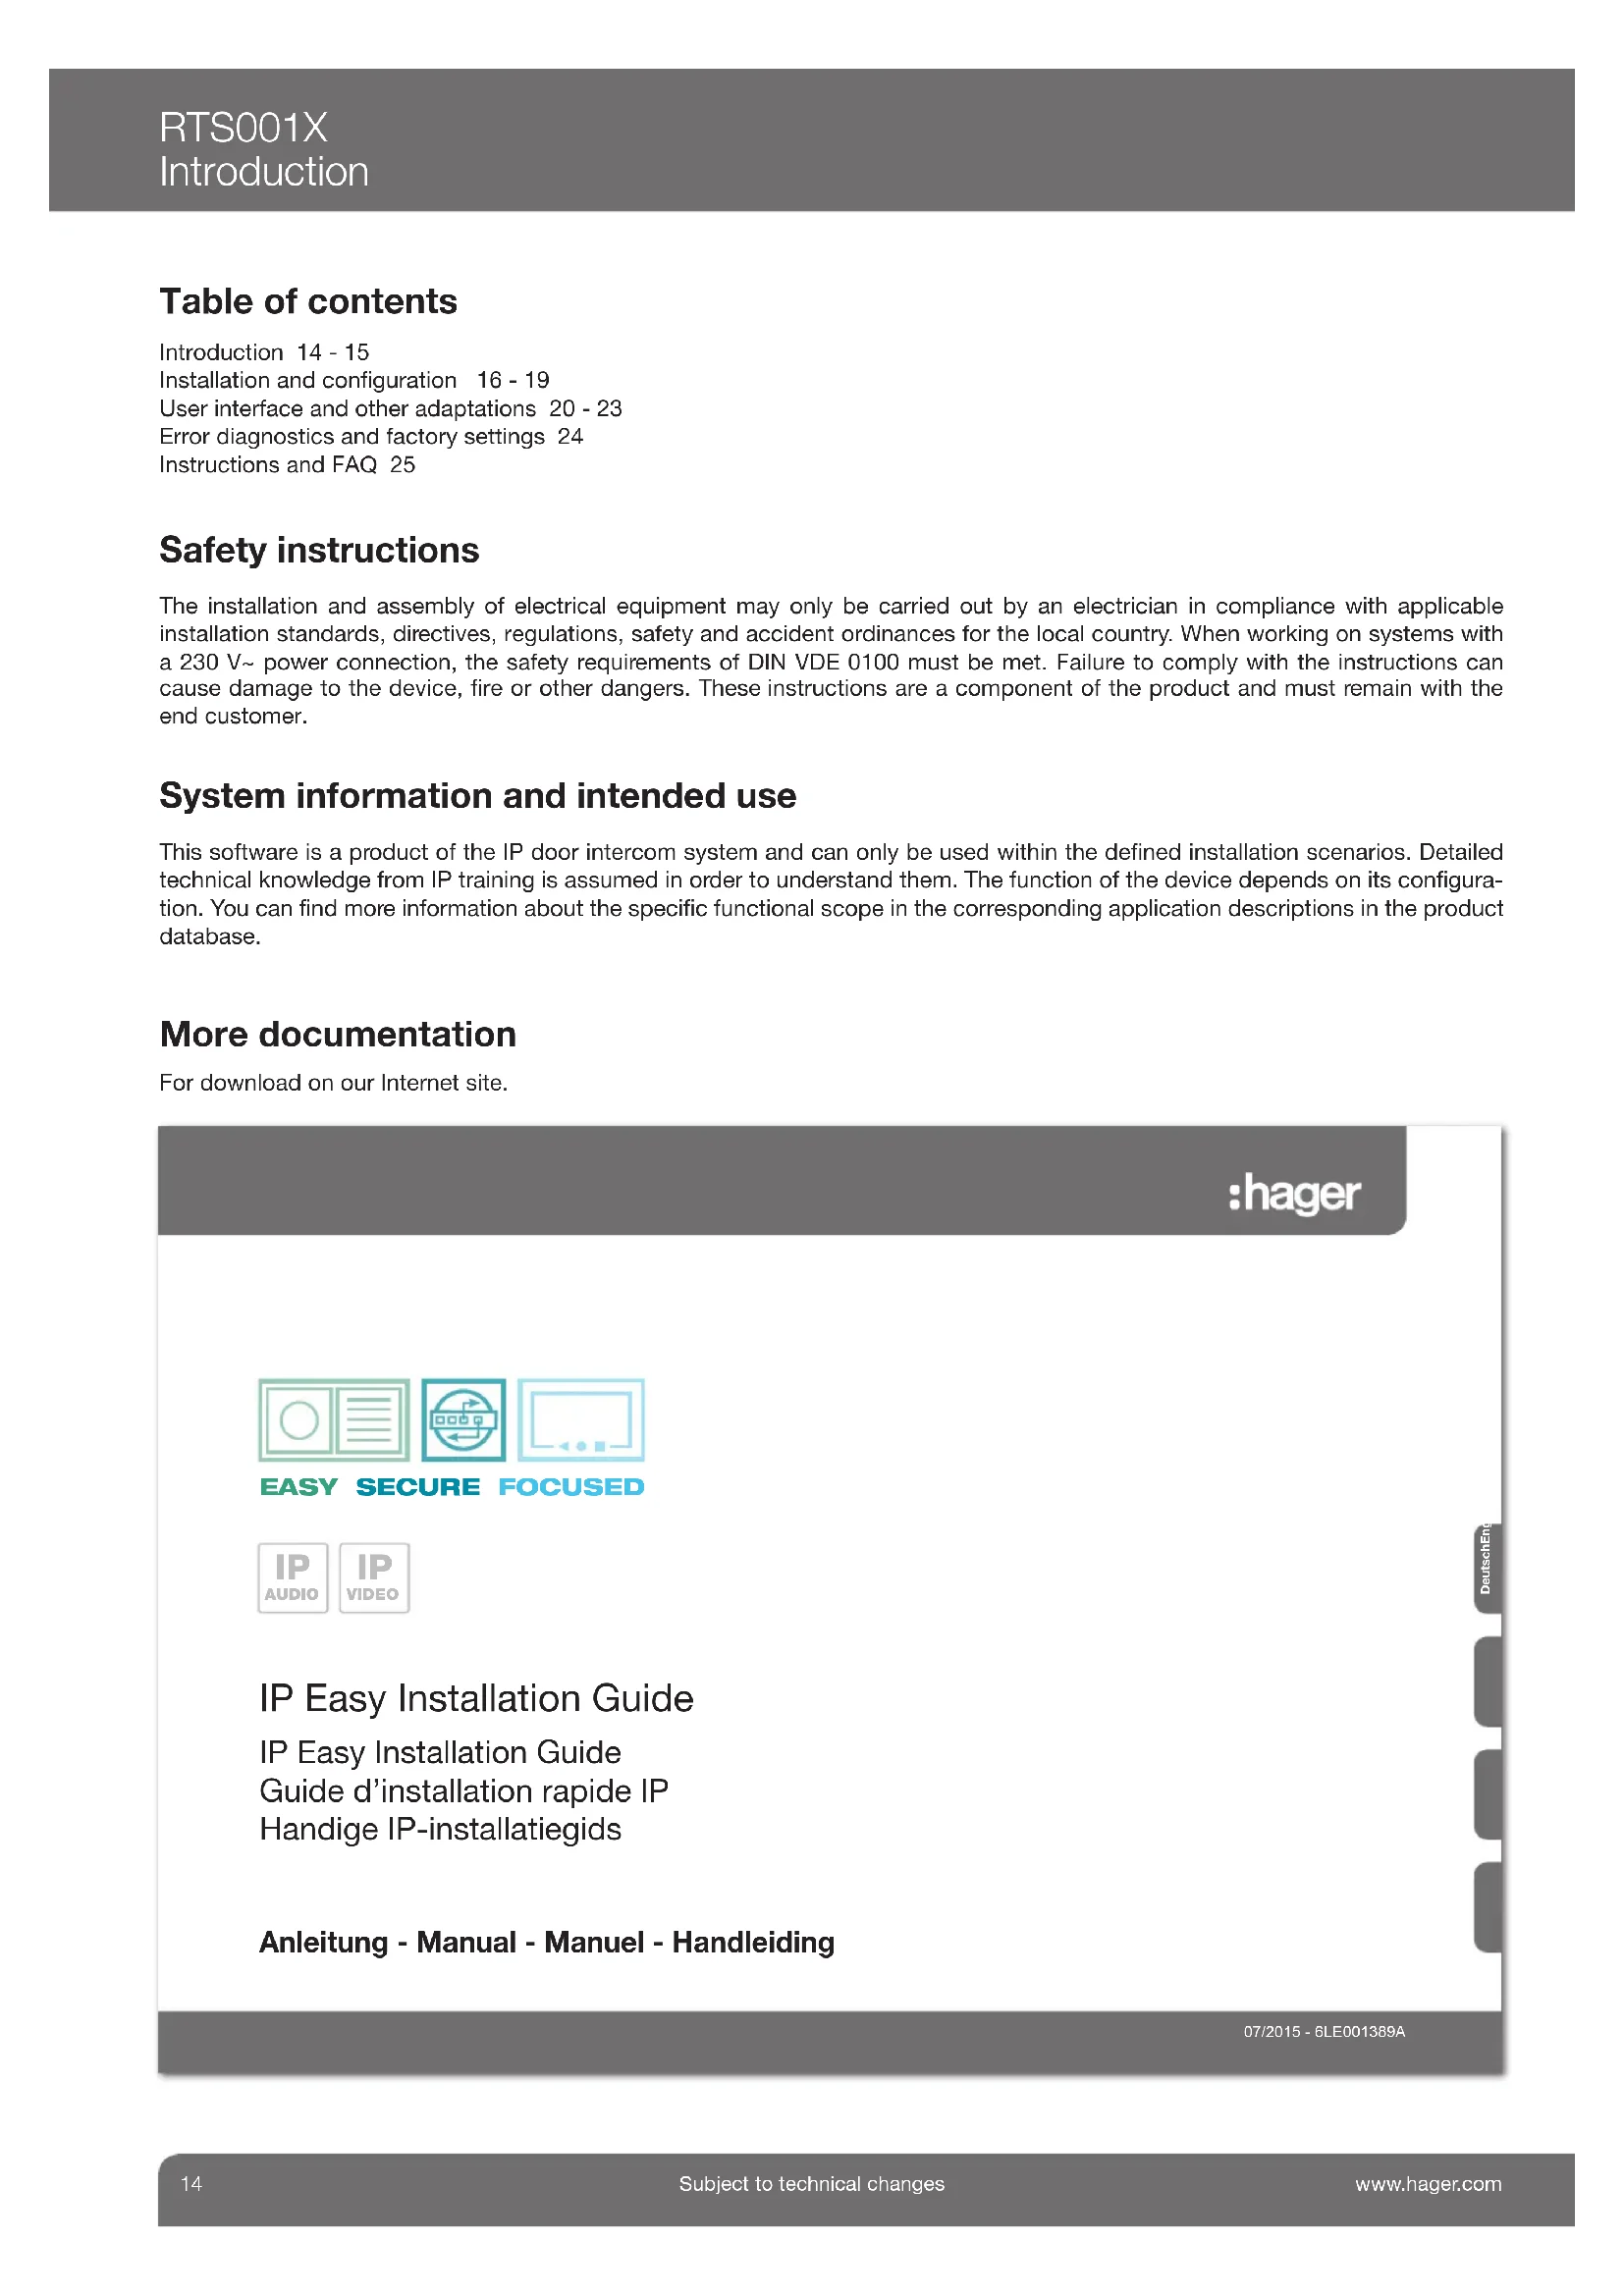
More documentation
For download on our Internet site.

System description
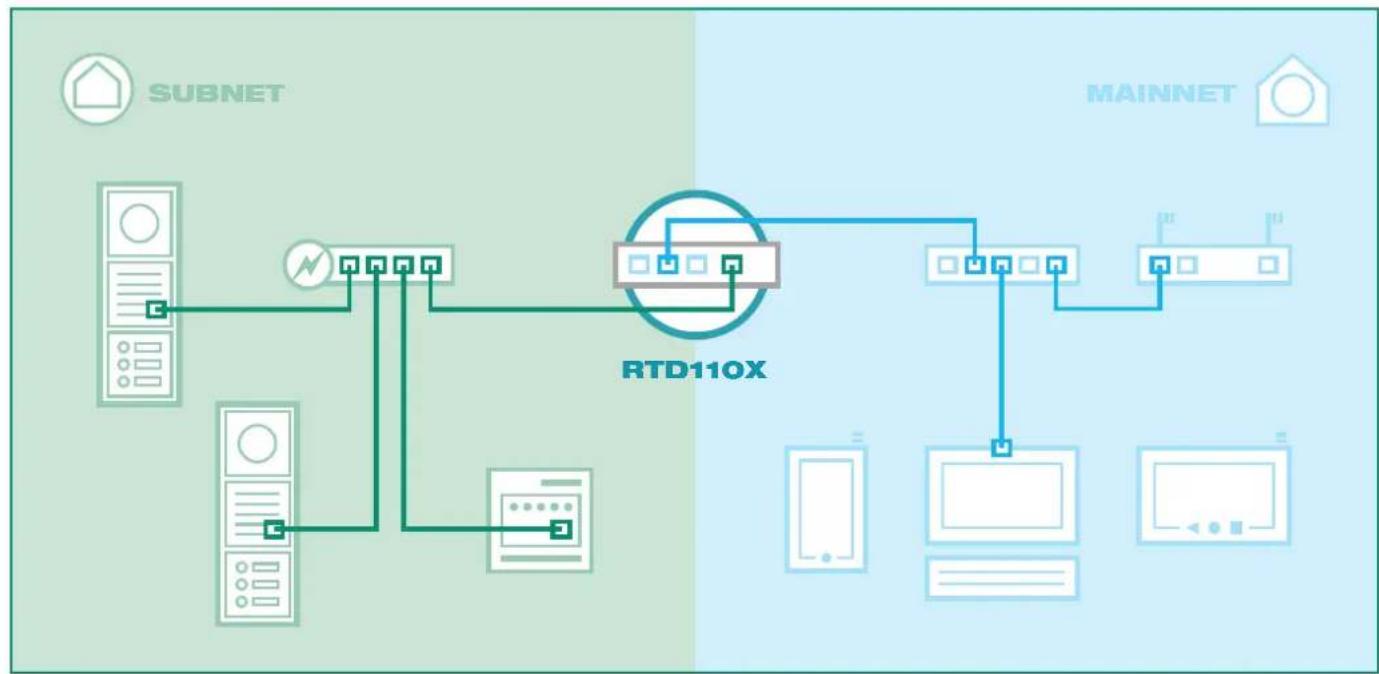
The Videofon videophone clients for Windows operating systems are software applications for convenient in-house communication through the IP network. The functionality includes all the important features of classical house communication. The user therefore gets a true video intercom, based on software. With the IP system components RTN300X/301X, RTN500X and RTD110X, a smart IP-based in-house communications system is easy to implement. Comprehensive configuration options permit seamless, adaptable integration in any desired application scenario.
Possible device types and operating system versions

Operating systems: MS Windows XP, Vista, 7, 8 (32 & 64bit)
PC hardware (Min): Touch panel PCs, laptop/Desktop with x86 architecture, 1.6GHz (DC), 1GB RAM, 100Mbit, 1024 x 768px screen, microphone and speaker (headset or hands-free-compatible)
Note: Only for use in the local network
WARNING! Please be sure to check Windows tablets for suitability for door communication. Frequent problems: No network on standby, not hands-free-suitable, ringtone too quiet
The software licence purchased is provided for installation of equipment in a household. To test the software for suitability, particularly on a touch panel PC with hands-free use, we would be happy to provide you with a demo version. Please make use of it in advance. Our support team would be happy to assist you with any questions.
Basic connection and system scenario
The Videofon application is designed for operation with IP System components. These include RTN300X/301X IP door speakers, RTN500X IP camera and the RTD110X IP intercom server. You can find more detailed information about system construction and installation in our IP Easy Installation Guide. All the configuration steps described in these instructions are based on a correctly configured and working hardware installation.
Preparing the Videofon app for the first use


Videofon does not need to be installed. Simply copy the program folder onto your hard drive and start the application.

The message shown may appear before the program starts. Permit access to private networks.

The Videofon application is now started and can be configured using the settings menu.
Enter the license key and activate Videofon
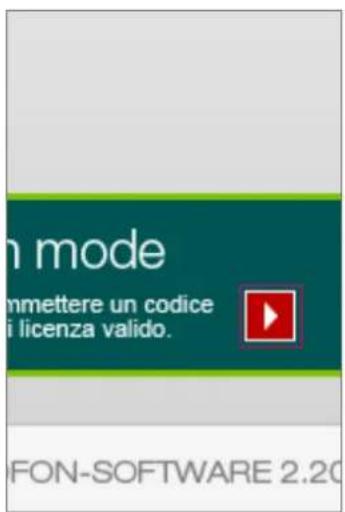
Click the "To activation" button.
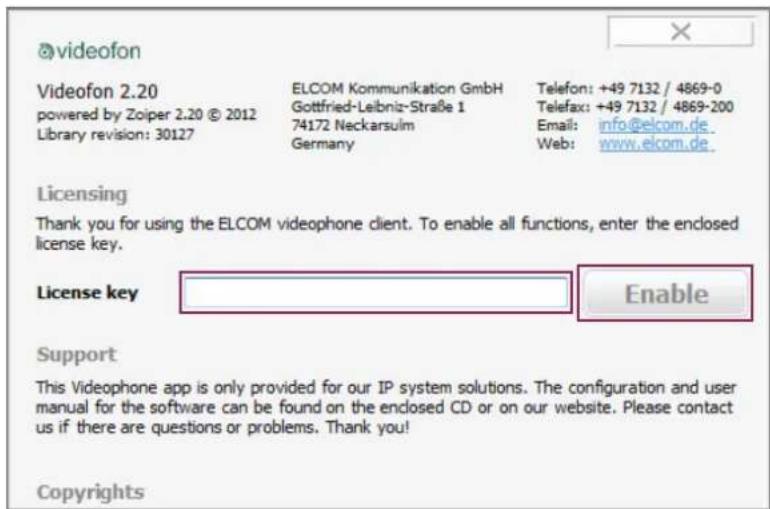
Under "License key" enter the code you received from us (with the dashes) and click "Activate". The Videofon client is now activated and the demo banner will no longer appear.
The Videofon client for Windows is also fully functional in its "inactivated" state. This is so that you can have the option of testing the software in advance on different hardware with no obligation. If necessary, the demo version can be downloaded from our website.
Call settings menu

The settings are opened using the "Menu" button on the Videofon user interface.

Alternatively, you can also right-click the Videofon icon on the Tasktray menu
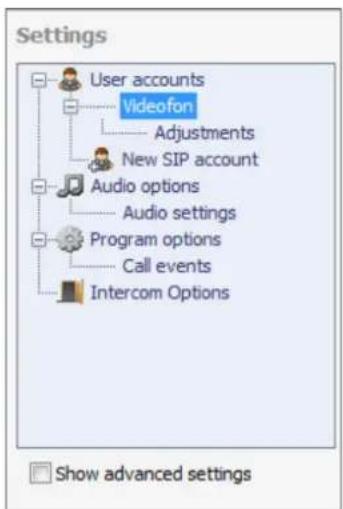
Settings menu view with standard options
Determine indoor client settings in RTD110X

Devices
Network
System

Logout
Overview
Configuration
Outdoor
Call Zones
Indoor

For the Windows videophone client, an account must first be set up and configured on the RTD110X. An overview of the available accounts can be displayed in the "Intercom / overview" menu. Click on the idoor client name to see an overview of the settings for that client definition. Transmit the values displayed to the configuration of the videophone client.
Settings Videofon Windows App
To configure your Videoon Windows App, go to "Settings" and fill in the following configuration data to the corresponding sections. Please register only one client to this account.
Account
| Display Name: | Touchpanel PC | |
| SIP Server: | 192.168.255.38 | 1 |
| SIP User ID: | 301 | 2 |
| SIP Auth PIN: | 301abc | 3 |
Control Settings
| Door Release: | 96 |
| Toggle Light: | 98 |
Door & Camera 1
| Display Name: | Driveway | |
| Entrance Active: | On | 4 |
| Unit Type: | Video Doorstation | 5 |
| Video Stream: | 192.168.255.38 8021/mjpg/video.mpg | |
| Username: | camuser | 7 |
| Password: | view | 8 |
| SIP-ID Entrance: | 201 | 9 |
Door & Camera 2
| Display Name: | Entrance |
Accept user account settings and register account
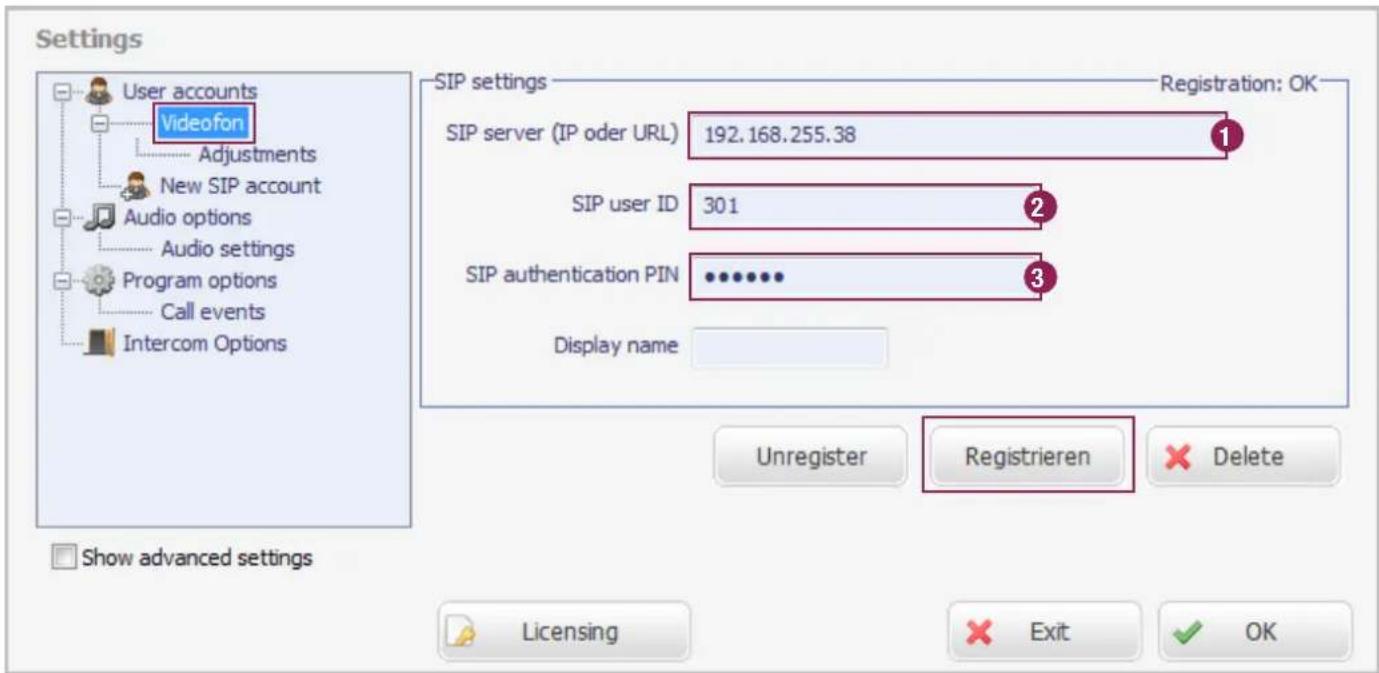
The user account information displayed on the RTD110X is entered in the Windows client under "User accounts / Videofon". Click the "Register" button to log the client into the system. Successful registration is indicated by the message "Registration OK".
Input/Accept camera information

Accept the information from the RTD110X "Entrance and camera" area into the corresponding input fields in the Windows client in the "Entrance and camera / Entry/camera #". If no special customisation has been done in the RTD110X configuration, then all that needs to be done is to set the entrance to "Active" and replace the URL text area "ipaddresse-server" with the actual main network IP address of the RTD110X.
The camera stream can then be displayed and the door speaker module called. You can find more information about this in the next section "User interface and functions".
User interface and button assignments
1. Accept calls
2. End call or reject incoming call
3. Actuate door opener relay
This button stores the DTMF sequence to control the door opening relay (intercom options). This only works if a call has been established
4. Actuate light relay
This button stores the DTMF sequence to control the light relay (intercom options). This only works if a call has been established.
5. Establish connection to door
The video stream assigned to the door to call must have previously been defined (camera button 9-12).
6. Mute ringtone
Mutes the call signal. All other functions continue to run normally.
7. Call settings menu
This button takes you to the Videofon settings.
8. Camera/door switching (i2BUS only)
On this button the DTMF sequence for camera/door switching in the i2BUS system is set up (intercom options). This button only works in the i2BUS interface mode and in an established call.
9. - 12. Other entrances and cameras
These buttons are assigned to entrances/door stations or IP cameras/server (Intercom options - Entrance/camera). Pressing the button shows the video stream. A call to the corresponding door can be made with the "Establish call to door" button (5). With an entrance configured as an i2BUS interface, the video image is displayed only after the call is established, since the i2-BUS cameras are disabled in the idle state and only activated after a door connection is active.
13. Ending Videofon
Button can be converted to "minimize" in the settings to protect against ending.
14. Minimize Videofon
Videofon is minimised. The application can be called again from the Tasktray menu.
15. Display of registration status
This display shows you the registration status on the RTD110X. Green = Videofon is registered. Yellow = registration procedure is in progress.
Red = videophone is not registered.

Functional status of the buttons

Function is not available. Function is available and can be selected.

Function is active and will be executed.
Functional combinations (no call established)

Call the door assigned to the camera.
Open the door assigned to the camera without establishing a call.


Turn on the lighting assigned to the camera without establishing a call.
Functions (on incoming call)

Call is rejected. Door is opened without accepting a
call (and the system hangs up again if "Hang up after opening door" is checked)

Call acceptance and turn on the lights at the door calling. Call is not ended.
Door call not accepted quickly enough
If a door call has not been answered within the time defined in the door module, a connection to the door can be established simply by pressing the corresponding camera and speaker button.

Call the door assigned to the camera.
Camera switching during a call (mode: video outside station)
If you would like to call up other IP cameras/servers defined in Videofon while the visitor is still in the entryway, then use the camera buttons to switch to the desired video stream. This also works during the call.


Switch video stream.
Mute ring tone
The ringtone of the Videofon client is muted by pressing the "Mute" button in standby mode. The application minimized in the Tasktray is displayed, however.


Ringtone muted
Set custom ringtone
Settings

User accounts
Videofon
Adjustments
New SIP account

Audio options
Audio settings

Program options
Call events
Intercom Options
-User-defined adjustments

Account registration on program start

User-defined audio codec settings
Use user-defined ring tone
C:\Users\support\Desktop\ELCOM_Videofon_210_final\Klingeltoene\Ethereal.wav

Show advanced settings

Licensing

Exit

OK
The Windows Videofon client in version 2.20 or better permits the selection of custom ringtones. Call up the menu "User accounts / Videofon / Customizing". Here, check the setting "Use user-defined ringtone" and use the file selector under that to select an audio file in uncompressed WAV format. This audio file will now be used to signal calls.

There is already a selection of suitable audio files included in the scope of delivery of the Videofon client in the "Ringtones" folder.
Set behaviour options for the application
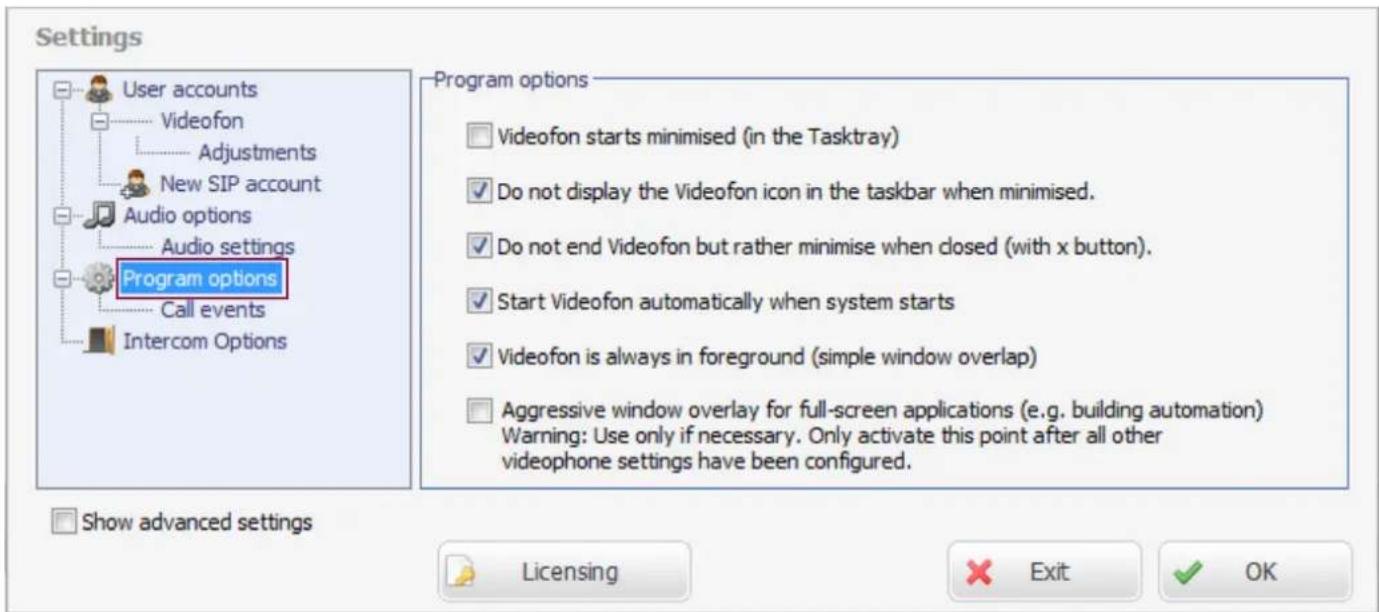
Videofon starts minimised (in the Taskray)
Check this checkbox if the Videofon should not visibly be started on the Desktop when the computer is restarted. The application is then active in the Tasktray and will be displayed only when a call comes in.
Do not display the Videofon icon in the taskbar when minimised
If the application is minimised, it will not be displayed on the Windows task bar.
Do not end Videofon but rather minimise when closed (with x button).
Protects from accidental ending of the application (if the application is ended, no calls from the entrance will be signalled).
The Videofon application can then only be ended from the Tasktray menu.
Start Videofon automatically when system starts
Videofon will automatically be started when the computer restarts. No link in the Windows Autostart folder is needed.
Videofon is always in foreground (simple window overlap)
Windows of standard applications (Office, Internet Explorer, etc.) will be overlapped by the Videofon application. This means that the program is always in the foreground if a call comes in.
Aggressive window overlap for full-screen applications
"Workaround" mode for operation with full-screen applications that also have requested foreground priority. If this function is active, Videofon "triggers" in the foreground again every 500ms when the user interface is maximised. Since this setting can cause problems, use it only when absolutely necessary. Only activate this function once all settings have been configured in Videofon and disable it before changing settings. If the function is activated, the Videofon settings menu will not accept input.

Automatically display or maximise Videofon on incoming call
This function should be checked. Then Videofon will automatically be brought out of the minimised state when a call comes in, and displayed maximised.
Diagnostic options / factory settings
Settings


Show advanced settings
Diagnostic options

Activate debug log

Details about audio problems

Details on program crashes
If problems occur with the Videofon application, different log files can be recorded for diagnostic purposes. Check these options only if there is specifically a problem and then send us the files generated.
Activate debug log
Logs all registration and communication transactions.
Details on audio problems
Logs audio-specific malfunctions.
Details on program crashes
Logs information about program crashes.
Debug log and details on program crashes: Details on audio problems:

These log files are in the application data folder (User/Username/AppData/Roaming/Videofon). It is quickest if you call up this folder content by entering %appdata%/videofon into the Windows Explorer.
CrashDumpFree....dmp is a dump for a program crash, and
logfile_xxxxxxxxx....xx.txt is the debug log file
(The crash dump file shown in the figure was generated with an earlier beta version of Videofon.)
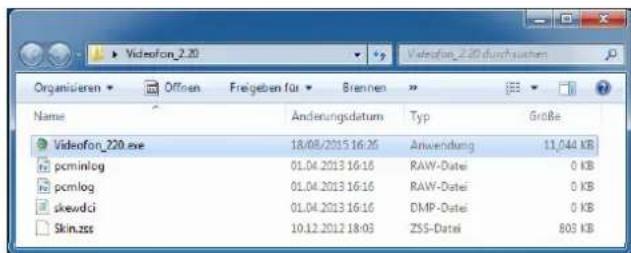
The log files for audio problems are located in the same folder as the Videofon application and are:
pcminlog raw pcmlog/raw
skewdci.dmp
If there are problems, send us the logs generated.
We can run an error analysis on them.
Factory settings
If the Videofon application should be reset to factory settings, the Videofon application must be ended and then the file Config.xml deleted from the AppData folder (%appdata%/videofon). All settings in Videofon will then be reset when it starts again.
Side note - Audio settings in the RTN300X/301X IP door speaker

At the factory, the RTN300X/ 301X IP door speaker is set to audio values that have been tested as suitable in combination with different devices (smart phones, touch panels and IP telephones). Depending on local conditions and the device used, it may be necessary to make changes here.
You can get to the audio configuration of the RTN300X/301X via "Quick start / Communication" or "Expert configuration / Communication"
Audio settings for Android tablets in RTN300X IP door speaker
Side note - video settings for IP cameras/server

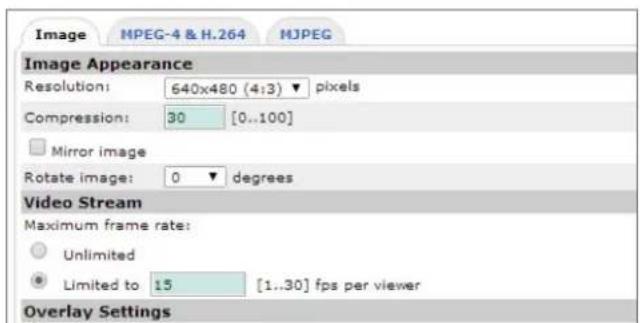
Video settings in RTN500X and AXIS IP camera/server
If many devices are used in parallel for IP video door communication, a call can lead to increased camera or network load, since all devices involved will request the video stream simultaneously.
It is therefore recommended that the video frame rate be reduced and JPG compression increased in order to compensate for bandwidth problems. (This is particularly true of HD resolutions greater than 640x480 pixels.)
On the RTN500X, the compression is defined on the value X. For the AXIS, it is around the value X.
You can get to the video settings of the RTN500X via "Quick start / Image settings" or "Expert / Image settings".
Sommaire
Introduction 26-27
Installation et configuration 28 - 31
To configure your Videoon Windows App, go to "Settings" and fill in the following configuration data to the corresponding sections. Please register only one client to this account.
Account
Display Name: Touchpanel PC
| SIP Server: | 192.168.255.38 |
| SIP User ID: | 301 |
| SIP Auth PIN: | 301abc |
Control Settings
Door Release: 96
Toggle Light: 98
Door & Camera 1
Display Name:
Entrance Active: On
Unit Type: Video Doorstation
Video Stream: 192.168.255.38:8021/mjpg/video.mjpg
Username: camuser
Password: view
SIP-ID Entrance 201
Door & Camera 2
Display Name: Entrance
Technical additions, and printing errors do not constitute grounds for any claims to damages.