919752 - Lamp Wetelux - Free user manual and instructions
Find the device manual for free 919752 Wetelux in PDF.

| Product type | LED solar light with motion detector |
| Brand | Wetelux |
| Model | 919752 |
| Light source | 20 x 0.5 W LED |
| Luminous flux | 1000 lumens |
| Color temperature | 5000 K (cool white) |
| Power supply | Solar panel 3 W, 5 V / 600 mA |
| Battery | Li-Ion 3.7 V, 4400 mAh (16.28 Wh) |
| Runtime (full battery) | Up to 2 hours |
| Motion detector | Range: 12 m, angle: 180° |
| Detector settings | Time (10s-1min), sensitivity, day/night threshold |
| Minimum distance to objects | 0.1 m |
| Temperature range | -5 °C to +40 °C |
| Protection rating | IP44 |
| Electrical protection class | III (very low voltage) |
| Mounting | Vertical or horizontal (on solid surface) |
| Maintenance and cleaning | Clean the solar panel and housing with a damp cloth, without abrasive cleaners |
| Safety | Do not look directly at LEDs, keep distance >10 cm, do not cover when on, do not immerse |
| Spare parts / repairability | Battery replaceable by a specialist |
| Included accessories | Mounting screws |
Frequently Asked Questions - 919752 Wetelux
User questions about 919752 Wetelux
0 question about this device. Answer the ones you know or ask your own.
Ask a new question about this device
Download the instructions for your Lamp in PDF format for free! Find your manual 919752 - Wetelux and take your electronic device back in hand. On this page are published all the documents necessary for the use of your device. 919752 by Wetelux.
USER MANUAL 919752 Wetelux
Solar Floodlight with Motion Sensor
Art. 91 97 52
GB Original Instructions
natural_image
Exterior view of a black-and-white photo of a streetlight with a solar panel and cable, no visible text or symbols.Instruction manuals provide valuable hints for using your new device. They enable you to use all functions, and they help you avoid misunderstandings and prevent damage. Please take the time to read this manual carefully and keep it for future reference.
If you pass the device on to third parties, enclose these instructions.
Chers clients,
Please note the following safety notes to avoid malfunctions, damage or physical injury:

- Please read this manual carefully and use the device only according to this manual.
- Dispose of used packaging material carefully or store it out of the reach of children. There is a danger of suffocation!
- Persons with limited physical, sensorial or mental abilities are not allowed to use the device, unless they are supervised and briefed for their safety by a qualified person.
- The LED lamp with solar panel is not a toy. Do not allow children play with it.
- Attention! LED spotlights also emit heat during operation and heat themselves up during operation. Do not cover the switched-on headlight and do not lay it down with the illuminated surface facing down when it is switched on!
- Please leave a distance of at least 10 cm between the front lens and any other object.
- The unit may be mounted on normally inflammable surfaces.
- Do not modify the power cord of the solar module and do not use the unit if the power cord has been damaged.
- Do not immerse any components of the LED lamp with solar panel in liquids of any kind.
- Position the power cord securely so it cannot become a tripping hazard. Do not bend the power cord extensively and do not jam the cord or pull it around edges.
- Do not use the LED lamp with solar panel close to flammable gas, hot objects, dust vapours and solvents.
- Do not expose the LED lamp with solar panel to excessive temperatures or to strong vibrations.
- Do not expose the device to strong mechanical stresses.
- Do not directly stare into the LEDs and do not direct the light beam towards people or animals.
- Do not disassemble, burn, or short-circuit batteries.
- Do not operate the LED lamp without the cover.
- Should the unit become damaged do not use it any further and have it repaired by a professional or contact our customer service. Do not disassemble the unit or try repairing it yourself.

Batteries do not belong in the household garbage.
For battery disposal please check with your local council.
OPERATION
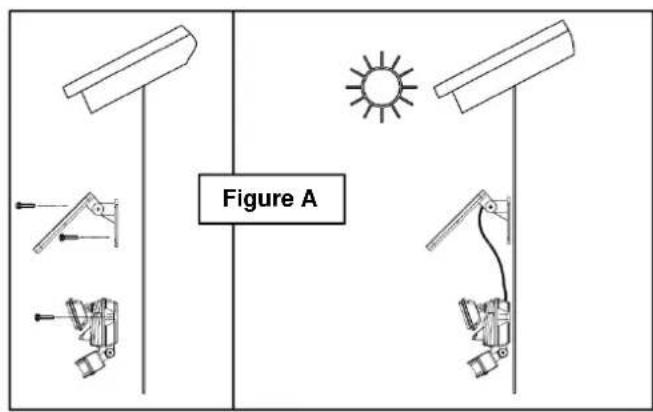
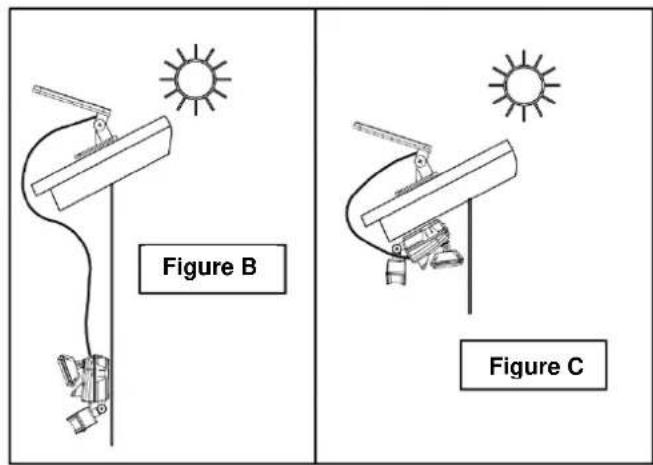
The most important thing when mounting the LED lamp with solar panel and motion sensor is to be aware that it requires DIRECT SUNLIGHT. The more direct sunlight the solar module receives, the longer the light will operate.
Important: if the main unit is mounted horizontally, it should be mounted in a sufficiently covered area so rain water cannot enter the housing.
Main Unit
The main unit consists of the LED spotlight (6), the motion sensor (8) and the rechargeable battery. When you are planning the installation location of the main unit, keep in mind that the motion sensor that actives the light, has a “field of vision” of approx. 12 meters in front of the light (for movements sidewise to the motion sensor) and about 180^ horizontally.
To mount the unit vertically for use as a security type of light, attach the main unit to a solid surface as shown in figures A and B. To mount the main unit horizontally for use as a convenience type of light, attach the unit as shown in
figure C. Use the included screws or other suitable screws depending on the consistency of the ground.
Solar Module
The solar module (4) is the power source for the LED lamp with motion sensor. Make sure that the solar module is exposed to DIRECT SUNLIGHT for as long as possible.
Mounting and Start-up
- For installing the main unit, use the included screws or other suitable screws and wall plugs depending on the consistency of the ground.
- You can adjust the motion sensor horizontally and vertically. For vertical adjustment, unscrew the wing screw at the joint of the motion sensor and hand tight the wing screw after adjusting the motion sensor. To adjust the motion sensor horizontally, grasp the whole sensor and turn it very carefully to the left or to the right to the desired position.
- Connect the feed cable (2) of the solar module with the main unit. Make sure to mount the main unit in a covered area so water cannot enter the unit.
Set the AUTO/OFF switch (9) to the position OFF.
AUTO Position for normal operation of unit;
OFF Position for storing, shipping and non-use for extended period of time, position for initial 3-day charge. In this position the battery is charged but the light does not turn on.

- Leave the switch in the OFF position for at least 3 sunny days.
- After the initial charge, set the switch to the AUTO position.
Note: If the LED lamp flashes in regular intervals, the batteries are empty. Expose the solar module to direct sunlight in order to recharge the batteries.
Adjusting the Motion Sensor
There are three adjusting knobs on the motion sensor: TIME, SENS and LUX.
TIME – Illumination Time:
Setup how long the unit stays lit after motion stops in the field of vision of the motion sensor. The time can be set from 10 seconds to 1 minute. Please note, once the light has been triggered by the sensor any subsequent detection will start the timed period again from the beginning.
SENS – Sensitivity Adjustment:
The sensitivity of the motion sensor will be affected by the ambient temperature. The higher the temperature (e.g. in the summer), the higher the sensitivity
setting of the motion sensor must be set in order to “detect” motion within the field of vision. So you can adjust the SENS knob to compensate the change of sensitivity affected by the ambient temperature.
LUX – Lux Control Level/Ambient Light Adjustment:
The lux control module has a built-in sensing device (photocell)
that detects daylight and darkness. Turn the knob towards (☐) to have the motion sensor turning on the light during day and night, turn it to (C) to have the light activated only at night.
Note: If the light turns on in bright light conditions, turn the control towards (C). However if the light does not turn on at night time, turn this control towards the (○) icon. This may when there are bright street lights or house lights.
Final Adjustment, Alignment and Test
- Point the motion sensor towards the area in which you want to detect motion.
- Turn the TIME knob (10) to the minus (-) position. When you are walking slowly within the detection area, the sensor can detect thermal radiation emitted by you and then turn on the light.
- Test the coverage of the area by walking slowly around the area and readjust the sensor if necessary. Please keep in mind that the motion sensor does not detect directly oncoming movement very well.
Point the LED floodlight towards the area you want to illuminate.
Adjusting the Solar Module
- Always align the front side of the solar module horizontally pointing to the sun at noon – this means to the south on the northern hemisphere and to the north on the southern hemisphere. If necessary, use a compass.
- The vertical angle of the module should correspond to the degree of latitude of your position. This ensures the best energy efficiency during the whole year.
Alternatively to the method described above you can use the following formula to calculate the angle for winter or summer:
$$ \text { Summer } = \text { Latitude } - 2 2. 4 ^ {\circ} / \text { Winter } = \text { Latitude } + 2 2. 4 ^ {\circ}. $$
For Lizard Point in Cornwall UK, the following calculation is made:
$$ \text { Summer } = 5 0 ^ {\circ} - 2 2. 4 ^ {\circ} = 2 7. 6 ^ {\circ} / \text { Winter } = 5 0 ^ {\circ} + 2 2. 4 ^ {\circ} = 7 2. 4 ^ {\circ} $$
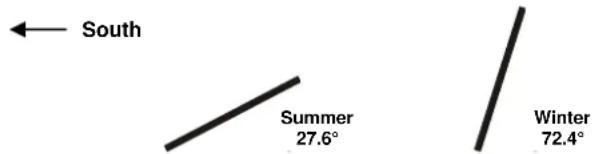
- Keep the module out of the shade and mount it in an area exposed to the sun all day to achieve the maximum energy efficiency.
Note:
If the unit is positioned close to strong radio transmitters, malfunctions of the motion sensor are possible. Strong radio transmitters may be amateur radio operators in the neighbourhood or transmitters for mobile communications or broadcast stations. In this case it is possible that the lamp will turn on although no one is in the field of vision of the sensor.
Replacing the Battery
If the battery cannot be charged after several sunny days, have the rechargeable battery replaced.
Have the battery unit only replaced by an expert.
Cleaning
- It is important that the solar module is kept free from dirt and debris. A dirty solar module cannot bring the battery to a full charge and this will shorten the service life of the battery and the light cannot function properly.
Wipe the housing with a lightly moistened cloth. Do not use aggressive chemicals or abrasives for cleaning.
Technical Data
LED Floodlight
Illuminant:
20 x LEDs 0,5 W each
Distance to other Objects: 0,1 m
Temperature Range: -5 to +40 °C
Protection Class: III
Degree of Protection: IP44
Lightstream: 1000 lm
Colour Temperature: 5000 K
Illumination Time with fully charged Battery: Up to 2 h
Input LED Spotlight: 5 V, max. 600 mA
三
Battery Li-Ion: 3,7 V, 4400 mAh, 16,28 Wh
三
Solar Module
P mpp: 3 W
U mpp: 5 V
三
I_mpp : 600 mA
U _oc : 5,8 V
三
| sc:
660 mA
Motion Sensor
Field of View:
180°
Range:
12 m
CONSIGNES DE SÉCURITÉ

declare by our own responsibility that the product
Solar Floodlight with Motion Sensor
Article No. 91 97 52
is according to the basic requirements, which are defined in the European Directives and their amendments.
2011/65/EU Restriction of the Use of certain hazardous Substances in electrical and electronic Equipment (RoHS)
Hagen, 31 ^st of January 2023
Thomas Klingbeil,
natural_image
Symbol of a trash bin crossed with no visible text or numbers, enclosed in a rounded square frame (no text or numbers present)Werter Kunde,
Please help avoid waste materials.
If you at some point intend to dispose of this article, then please keep in mind that many of its components consist of valuable materials, which can be recycled. Please do not discharge it in the rubbish bin, but check with your local council for recycling facilities in your area.