
DEOS 21s - Dehumidifier Ariston Thermo - Free user manual and instructions
Find the device manual for free DEOS 21s Ariston Thermo in PDF.

| Product type | Dehumidifier |
| Brand | Ariston Thermo |
| Model | DEOS 21s |
| Dimensions (W x D x H) | 350 x 510 x 245 mm |
| Net / Gross weight | 12.2 kg / 14.7 kg |
| Power supply | 230 V ~ 50 Hz |
| Power consumption | 395 W |
| Dehumidification capacity | 21 L/day (at 30 °C, 80 % RH) |
| Condensate tank | 3.3 L |
| Refrigerant | R134A (GWP 1430, charge 0.14 kg) |
| Operating temperature | 5 °C to 35 °C |
| Max. air flow | 225 m³/h |
| Noise level | 41 dB(A) |
| Compressor type | Rotary |
| Filter | Washable dust filter + HEPA filter (replacement every 12 months) |
| Operating modes | Standard, Super Laundry, Continuous, Auto |
| Special functions | Auto Restart, Anti-freeze, Anti-mold, Self Clean, Air Purifier |
| Continuous drainage | Possible via hose (inner diam. 10 mm, not supplied) |
| Routine maintenance | Clean dust filter every 30 days; clean tank every 2-3 weeks |
| Safety | Automatic shut-off when tank full; anti-freeze protection; do not open the appliance |
| Protection rating | IPX4 (estimated) |
Frequently Asked Questions - DEOS 21s Ariston Thermo
User questions about DEOS 21s Ariston Thermo
0 question about this device. Answer the ones you know or ask your own.
Ask a new question about this device
Download the instructions for your Dehumidifier in PDF format for free! Find your manual DEOS 21s - Ariston Thermo and take your electronic device back in hand. On this page are published all the documents necessary for the use of your device. DEOS 21s by Ariston Thermo.
USER MANUAL DEOS 21s Ariston Thermo
natural_image
Line drawing of a portable air purifier with control panel and wheels (no text or symbols)DEOS 21s
DEUMIDIFICATORE
DEHUMIDIFIER / DÉSHUMIDIFICATEUR / DESHUMIDIFICADOR
DESUMIDIFICADOR / ONTVOCHTIGER

ARISTON
MANUALE D'USO
USER MANUAL
UMIDITA &
TEMPERATURA
HUMIDITY&TEMPERATURE

ANTI MUFFA
ANTI MILDEW

PURIFICATORE
ARIA
AIR PURIFIER

TOUCH SUPER

LAVANDERIA
SUPER LAUNDRY

TIMER

TURBO

AUTO
ITALIANO 4
ENGLISH 13
FRANÇAIS 22
ESPAÑOLAS 31
PORTUGUÊS 40
NEDERLANDS 49
IT
Egregio Cliente,
natural_image
Symbol of a trash bin crossed out by a diagonal line, no text or numbers presentNORME DI SICUREZZA
CONSERVARE E CONSULTARE ATTENTAMENTE IL PRESENTE LIBRETTO IN QUANTO TUTTE LE AVVERTENZE FORNISCONO INDICAZIONI IMPORTANTI PER LA SICUREZZA NELLE FASI DI INSTALLAZIONE, USO E MANUTENZIONE.
6. TASTO TURBO/SELF CLEAN
TURBO
natural_image
Technical line drawing of a mechanical component with circular holes and a labeled section (Fig.A), no readable text or symbols beyond label.SCARICO CONDENSA
natural_image
Line drawing of a portable air purifier with a door and side panel, showing internal components and a directional arrow (no text or symbols)fig.B
natural_image
Line drawing of a portable air purifier device with control panel and side-mounted buttons (no text or symbols)fig.C
natural_image
Line drawing of a portable air purifier with a cable inserted, showing no text or symbolsPICCOLA MANUTENZIONE
natural_image
Line drawing of a portable air conditioner unit with ventilation slots and cooling fins (no text or symbols)SE IL DEUMIDIFICATORE NON FUNZIONA
We would like to thank you for purchasing one of our dehumidifiers.
We are confident in having supplied you with a technically sound product.
This booklet contains some suggestions and precautions for operating the appliance correctly and performing maintenance, so that you can fully appreciate its features.
Store this booklet in a safe place for further reference.
Our nearest technical assistance centre remains at your disposal for any need you may have.
Yours faithfully.
Despite the utmost care taken in publishing this booklet, some errors may nonetheless have been overlooked by our proof-reading department.
We therefore kindly ask you to report to us any mistakes you may notice, in order to help us improve our service.
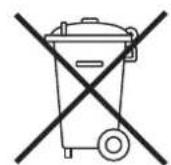
THIS PRODUCT CONFORMS TO EU DIRECTIVE 2012/19/EU
The barred dustbin symbol appearing on the appliance indicates that the product must be disposed of separately from household waste once it reaches the end of its lifespan, and transferred to a waste disposal site for electric and electronic equipment, or returned to the dealer when purchasing a new appliance of the same kind.
The user is responsible for delivering the decommissioned appliance to a suitable waste disposal site.
Proper separated collection of the decommissioned appliance and its subsequent eco-compatible recycling, treatment and disposal helps to prevent negative effects on the environment and human health, besides encouraging reuse of the materials comprising the product.
For further details on the available waste collection systems, contact your local waste disposal office, or the dealer from which the product was purchased.
SAFETY RULES
READ THIS MANUAL CAREFULLY AND STORE IT SAFELY, AS IT CONTAINS IMPORTANT INFORMATION FOR SAFE INSTALLATION, USE AND MAINTENANCE OF YOUR NEW APPLIANCE.
| RULE RISK | ||
| Do not perform any operations that involve opening the appliance. | Electrocution due to exposure to live components.Personal injury caused by burns due to overheated components, or wounds caused by sharp edges or protrusions. | ⚠️ |
| Make sure that the systems to which the appliance should be connected comply with the applicable regulations. | Electrocution due to exposure to live wires. | ⚠️ |
| Do not start or stop the appliance simply by plugging it into the mains electricity socket or unplugging it. | Electrocution through contact with a damaged cable or plug, or socket. | ⚠️ |
| Do not damage/modify/heat the power cable or place heavy objects on top of it. | Electrocution due to non-insulated live wires. | ⚠️ |
| Do not leave any objects on top of the appliance. Personal injury due to objects falling as a result of vibrations. | ⚠️ | |
| Do not climb onto the appliance. Personal injury due to the appliance falling. | ⚠️ | |
| Do not attempt to clean the appliance without first turning it off and unplugging it or switching the dedicated switch off. | Electrocution due to exposure to live components. | ⚠️ |
| Do not direct the air flow towards gas hobs or gas stoves. | Explosions, fires or intoxication due to the discharge of gas from supply nozzles. Flames extinguished by the air flow. | ⚠️ |
| Do not place your fingers in the air outlets or in the air inlet grilles. | Electrocution due to exposure to live components.Personal injury from cuts. | ⚠️ |
| Do not drink the condensate water. Personal injury from poisoning. | ⚠️ | |
| If you notice a burnt smell or see smoke coming out of the device, disconnect it from the power supply, open all windows and contact the technician. | Personal injury from burns or fume inhalation. | ⚠️ |
| Ensure that there is sufficient ventilation in the room in which the dehumidifier is installed if a combustion appliance is also located there. | Lack of oxygen. | ⚠️ |
| Do not operate the unit in the presence of hazardous substances and flammable or corrosive gases. | Risk of fire, injury, explosion. | ⚠️ |
| If the power cable is damaged, it must be replaced by the manufacturer or by the relevant technical assistance service, or – at all events – by a suitably qualified technician, in order to prevent potential risks. | Electrocution due to exposure to live wires. | ⚠️ |
| Avoid prolonged exposure to the air flow. Health issues. | ⚠️ | |
| Do not use any insecticides, solvents or aggressive detergents to clean the appliance. | Damage to plastic or painted parts. | ⚠️ |
| Do not use the appliance for any purpose other than normal domestic use. | Damage to the device caused by operation overload. Damage to objects caused by improper use. | ⚠️ |
| Do not allow children or inexperienced persons to operate the appliance. | Damage to the appliance caused by improper use. | ⚠️ |
| Do not direct the air flow towards valuable items, plants or animals. | Damage or deterioration due to excessive cold/heat, humidity, ventilation. | ⚠️ |
| Make sure that the appliance is connected to an efficient earthing system. | ⚠️ | |
Symbol legend:
Failure to comply with this warning implies the risk of injury to persons, which in some circumstances may be fatal.
Failure to comply with this warning implies the risk of damage – even serious damage in some circumstances – to property and plants or harm to animals.
PRECAUTIONS AND INFORMATION
Never attempt to personally perform maintenance interventions that imply opening the machine: the presence of charged components and the gas contained in the refrigeration circuit make these operations particularly dangerous. Always contact a specialised technical assistance centre.
CAUTION
Always unplug the appliance prior to effecting any operation.
Prevent water from entering through the upper grille. Do not obstruct the air flow.
Never use the dehumidifier outdoors.
Do not use the appliance in places where corrosive vapours or dangerous substances are present.
Do not place objects on top of the appliance.
Before removing the appliance, make sure that the condensate collector tank is empty.
Do not pull on the power cable to turn the appliance off.
Never open the dehumidifier body.
After turning the appliance off, wait a few minutes before turning it back on.
Do not use the appliance on inclined surfaces.
Do not use extensions for the power cable.
IMPORTANT
- Do not turn the appliance on and off continuously and avoid tilting it. If the appliance does not switch on, unplug it from the socket and contact the local dealer for assistance.
- Do not spray insecticides or other chemical substances onto the appliance as they may cause warping of the plastic structure.
- This dehumidifier is exclusively designed for domestic use: any other use must be regarded as improper use.
Warning: the dehumidifier does not operate at temperatures below 5°C or above 35°C.
AFTER-SALES ASSISTANCE
If necessary, contact your dealer or the manufacturer's technical assistance centre for further information.
MAINTENANCE
Dirt may sometimes build up in the dehumidifier after it has been used for several seasons, resulting in a loss of efficiency. It is important to regularly empty the condensate water deposited in the appliance and periodically perform maintenance operations; contact the local dealer for technical assistance.
HUMIDITY CONCEPTS
AIR HUMIDITY
A certain amount of water vapour is always present in the air: the air's capacity to withhold water vapour increases with its temperature.
For example, at a temperature of 26^ C, the maximum humidity content is 21.4 g of water vapour per kg of air, while at 30^ C, the maximum humidity content is 27.2 g of water vapour per kg of air. In actual fact, the maximum humidity contents constitute extreme cases which do not occur at our latitudes. In these conditions, air is said to be ‘saturated’ (i.e. it cannot contain any more humidity) and the water vapour begins to condense. ‘Relative humidity’ refers to the ratio between the air’s actual humidity and the maximum possible humidity content at that particular temperature.
For example, if said temperature were to be 26^ C, the actual humidity content would be 10.7 g of water vapour for each kg of air, and the relative humidity would be:
$$ = 50 \% \quad \frac{10.7 \times 100}{21.4} $$
Relative humidity is always expressed as a percentage value (%). Apart from natural causes, the air's humidity in enclosed spaces can increase due to the number of people present, the activities being performed, etc. Both too little and too much humidity are harmful to the human body, for opposite reasons, and should thus be avoided.
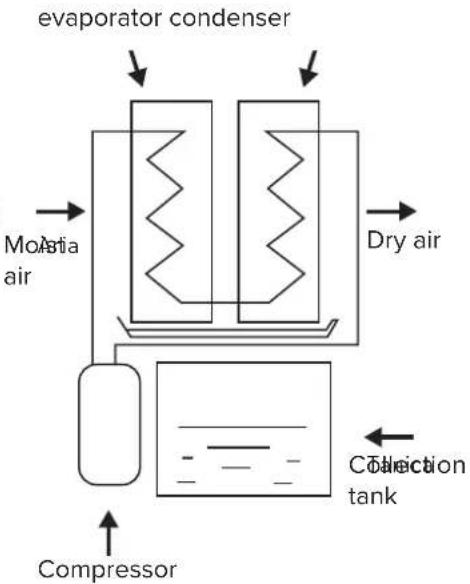
flowchart
graph TD
    A["Compressor"] --> B["MoAsia air"]
    B --> C["evaporator condenser"]
    C --> D["Dry air"]
    D --> E["Collection tank"]
    E --> F["Water tank"]
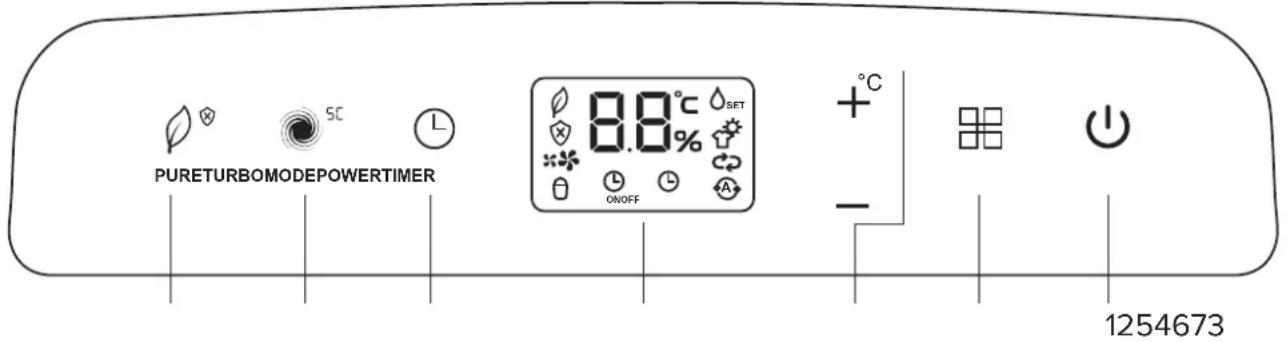
PRODUCT DESCRIPTION
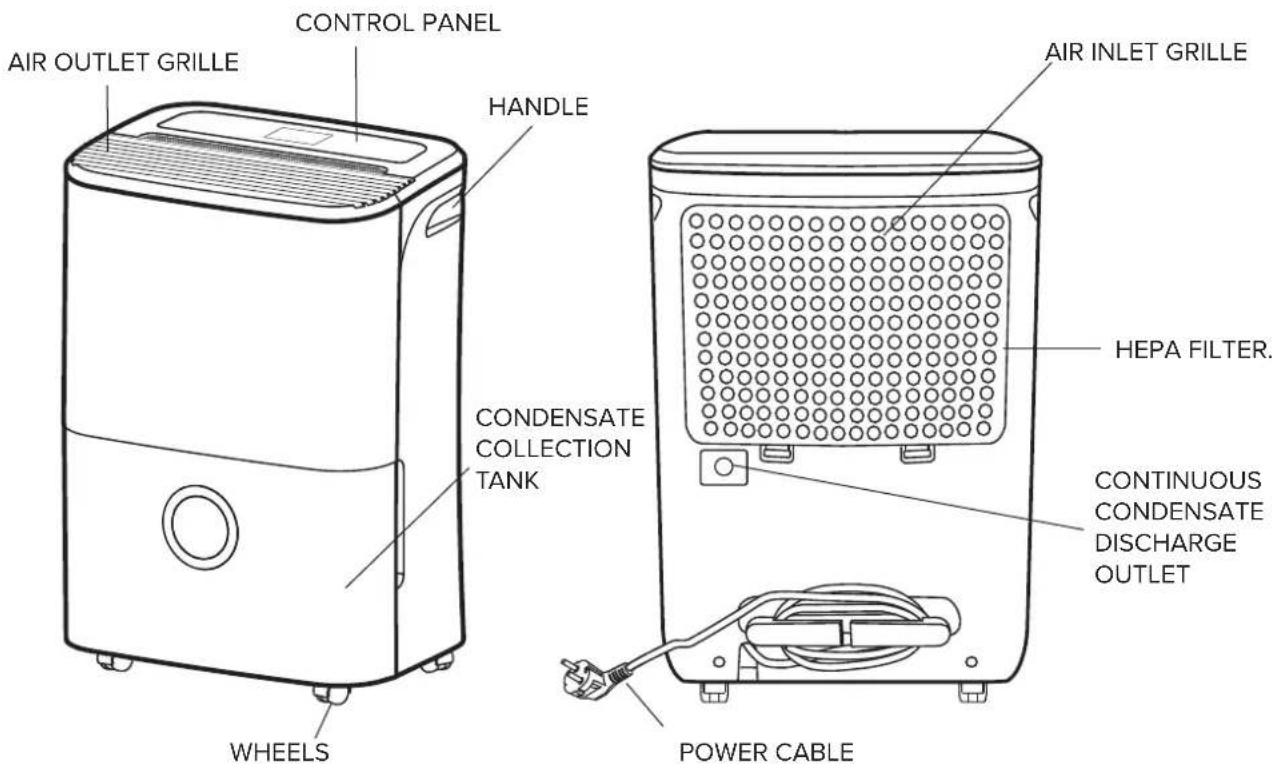
CONTROL PANEL
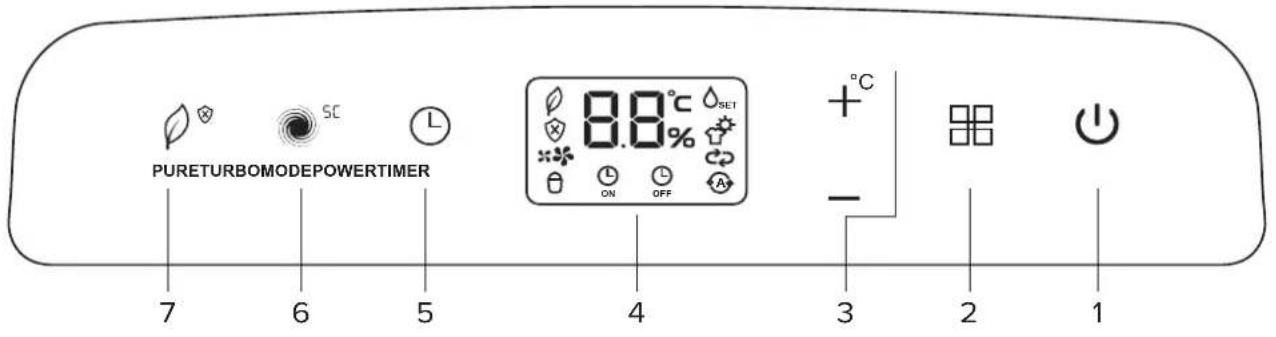
1. POWER BUTTON

Press to switch the dehumidifier on and off.
2. MODE BUTTON

Press to select the desired operating mode: STANDARD, SUPER LAUNDRY ROOM, CONTINUOUS or AUTO.
_SET , STANDARD mode - the dehumidifier runs until it reaches its humidity setting.
, SUPER LAUNDRY ROOM mode, the dehumidifier automatically sets the fan speed and relative humidity in relation to the ambient temperature. The mode remains active up to 10h.
NOTE: in this mode you cannot change the fan speed or relative humidity settings.
, CONTINUOUS mode, the dehumidifier runs at maximum power without time limit.
(A), AUTO mode, the dehumidifier sets the relative humidity in relation to the ambient temperature to maximise occupant comfort, according to the following rules:
| Detected room temperature Set relative humidity | |
| T ≤ 18 °C 55% | |
| 18 °C < T < 25 °C 50% | |
| T ≥ 25 °C 45% | |
NOTE: in this mode you cannot change the relative humidity setting.
3. HUMIDITY SETTING/TEMPERATURE DISPLAY
HUMIDITY SETTING
The relative humidity level can be set from 35% (minimum) and 80% (maximum), with 5% increments each time the '+' and '-' control buttons are pressed. When the set humidity level is reached, the compressor stops and the fan continues to run for 3 minutes.
NOTE: the humidity setting buttons are disabled in SUPER LAUNDRY ROOM, CONTINUOUS and AUTO modes.
TEMPERATURE DISPLAY
You can display the ambient temperature (°C) by holding down the "+" button for more than 3 seconds. You can do this whether the dehumidifier is running or not, so long as it is connected to its power supply. The ambient temperature displays for 10 seconds.
4. LCD DISPLAY
The display shows the operating mode, actual and set relative humidity, ambient temperature, fan speed, timer, special functions and shutdown alarms.
When the dehumidifier is connected to its power supply, the actual relative humidity displays; to display the ambient temperature, hold down the “+” button for more than 3 seconds.
5. TIMER BUTTON

Pressing this button programs a delay after which the dehumidifier will start or stop. When set, the TIMER ON / TIMER OFF icon displays. Press or hold the "+" and "-" control buttons to set the delay: in 0.5 h (30 min) increments for 0-10 hours, and 1h (60 min) increments for 10-24 hours.
Set the delay to 0.0h to cancel the TIMER ON / TIMER OFF function.
NOTE: You can set the TIMER whether the dehumidifier is running or not, so long as it is connected to its power supply.
6. TURBO/SELF CLEAN BUTTON
TURBO
Press to select the fan speed: normal (the " indicator light turns on) or turbo (the " indicator light turns on).
NOTE: the TURBO button is disabled in SUPER LAUNDRY ROOM mode and when the SELF CLEAN, AIR PURIFIER and ANTI-MOULD special functions are enabled.
SELF CLEAN SC
Pressing the TURBO button for more than 3 seconds enables the SELF CLEAN function.
7. PURE/ANTI-MOULD BUTTON
PURE
Press this button to select the AIR PURIFIER function which uses the included HEPA (High Efficiency Particulate Air) filter to reduce the dust, bacteria and allergen content in the room.
ANTI-MOULD
Pressing the PURE button for more than 3 seconds enables the ANTI-MOULD function.

CAUTION
Do not touch the selector with wet hands (risk of personal injury due to electrocution).
Do not start or stop the appliance by simply plugging it into the power socket or unplugging it (risk of personal injury due to electrocution).
Avoid prolonged direct exposure to the air flow (risk of personal injury due to sensitisation of the skin).
SPECIAL FUNCTIONS
AUTO-RESTART
This function enables the dehumidifier to restart, after a power failure, from the last stored settings.
ANTI-FROST FUNCTION
Prevents the evaporator from frosting, thereby extending the dehumidifier's life and enhancing energy saving. When this function is active, the fan continues to run while the compressor stops and 'P1' appears on the display.
TANK FULL STOPPAGE
The dehumidifier stops when the condensate collection tank is full or incorrectly positioned. 'P2' displays together with indicator light .
NOTE: when the compressor stops, it is necessary to wait 3 minutes before it restarts.
ANTI-MOULD FUNCTION
Hold the PURE button down for more than 3 seconds to enable this function. It sets the fan speed and hours of operation of the dehumidifier (up to 4h) in relation to the measured actual humidity. This maximises occupant comfort while reducing the risk of mould and bacterial growth.
To disable the function, hold the PURE button down for more than 3 seconds or select an operating mode with the MODE button.
SELF CLEAN SC
Hold the TURBO button down for more than 3 seconds to enable this function; the displays reads SC for 5 seconds and then clears.
The SELF CLEAN function initiates as soon as the dehumidifier is switched off, and runs for 15 minutes; the display reads SC while the function is active.
The function cleans and dries the heat exchangers with ventilation/dehumidification cycles, thus keeping them in perfect working order.
To deactivate SELF CLEAN, hold down the TURBO button for 3 seconds; SC flashes on the display for 5 seconds and then clears.
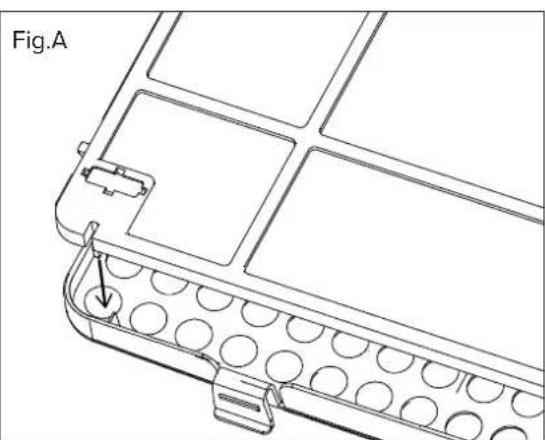
AIR PURIFIER FUNCTION
This function significantly reduces the dust, bacterial and allergen content of the room, using the HEPA (High Efficiency Particulate Air) filter supplied with the dehumidifier.
Press the PURE button to activate the AIR PURIFIER function; all other modes and special functions are inhibited while it is running. Make sure you have fitted the HEPA filter as indicated in fig.A.

CAUTION
Incorrectly installing the filter or forcing it into place can cause the dehumidifier to malfunction, overheat and even fail.
natural_image
Technical line drawing of a mechanical component with circular holes and a pin (no text or symbols)CONDENSATE DISCHARGE
The dehumidifier can discharge the condensate water in two different ways:
1. DISCHARGE INTO TANK
The condensate water falls directly in the tank located in the lower section of the dehumidifier. When the tank is full, the dehumidifier automatically shuts down and the displays shows "P2" and the logo.
PROCEDURE FOR EMPTYING THE TANK:
- Pull out the tank slightly using the appropriate handles on the sides (Fig. A).
- Pull the tank out fully while being careful not to spill the condensate water.
- Do not place the tank on the ground as its irregular underside may cause the water to spill out.
- Empty out the water.
- Put the tank back into its housing. The dehumidifier will automatically start functioning again.
Fig. A

natural_image
Line drawing of a portable air purifier with a door and arrow indicating airflow direction (no text or symbols)WARNING:
- Do not remove the float (located inside the tank) when emptying out the water.
- Make sure to put the tank properly back into its housing (after having emptied it).
- Incorrectly fitting the tank can stop the dehumidifier starting (make sure the "P2" has cleared from the display). Before removing the tank, it is advisable to tap the top part of the dehumidifier a few times to ensure that all the water has fallen into the tank. A few drops of water may nonetheless drip down once the tank has been pulled out.
- Before undertaking any operation on the appliance, make sure that the power supply has been disconnected.
Fig. B

natural_image
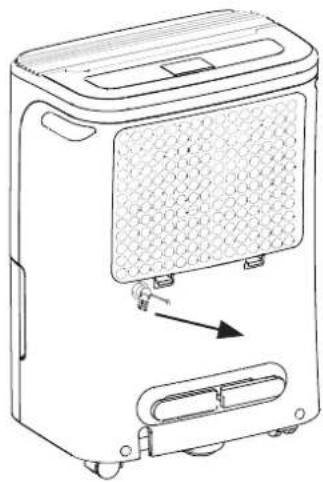
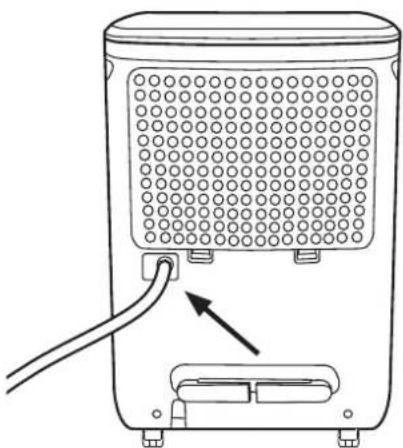
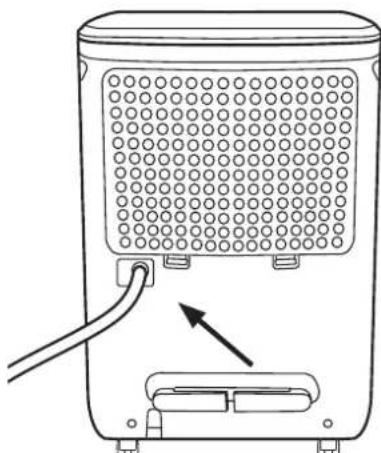
Line drawing of a portable water heater with ventilation grilles and control buttons (no text or symbols)2. CONTINUOUS DRAINAGE
Allows for discharging the condensate water without letting it fall into the collection tank. This function is particularly useful when the dehumidifier must be operated for long periods, making it difficult to empty the tank continuously.
Fig. C
INSTRUCTIONS
- Remove the rubber cap from the right-hand outlet located on the rear of the appliance (Fig. B).
- Connect the hose (not included) with 10 mm internal diameter to the outlet (Fig.C). Make sure that the other end of the hose terminates at a water collection point lying lower than the discharge outlet.
- Switch the appliance on.

CAUTION:
To restore standard draining into the tank, make sure to refit the rubber cap into the hole on the rest of the unit.
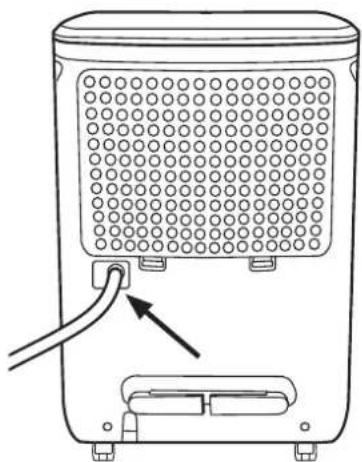
natural_image
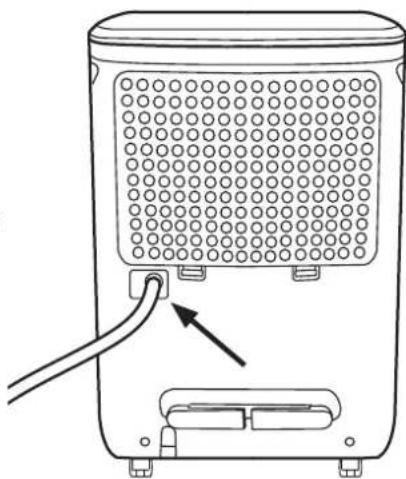
Line drawing of a portable air purifier with a cable inserted, showing internal grid pattern and outlet (no text or symbols)POSITIONING TIPS
For the correct operation of your dehumidifier, we advise you to observe the distances shown in Fig. D.
Position the dehumidifier on a stable, smooth and horizontal surface.
The appliance can be moved using the wheels. Before moving the appliance, disconnect the power supply and empty the condensate collection tank.
BASIC MAINTENANCE
Before cleaning the appliance, unplug it and disengage the automatic switch.
1. CLEANING THE DEHUMIDIFIER
- Clean the dehumidifier using a cloth dampened in lukewarm water (no more than 40°C) and neutral soap. Do not use solvents or aggressive detergents.
- Do not spray water directly onto the appliance.
2. CLEANING THE TANK
Clean the condensate collection tank regularly (every 2-3 weeks) in order to prevent mould and bacteria build-up. Use water and non-aggressive detergents.
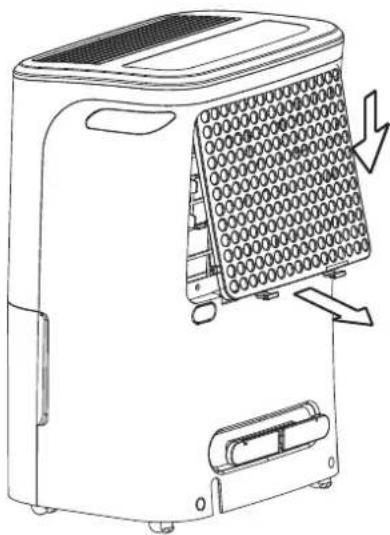
3. CLEANING THE FILTERS
Dust filter
Cleaning the filter regularly (to be performed at least every 30 days) is essential to ensure optimal dehumidifier performance.
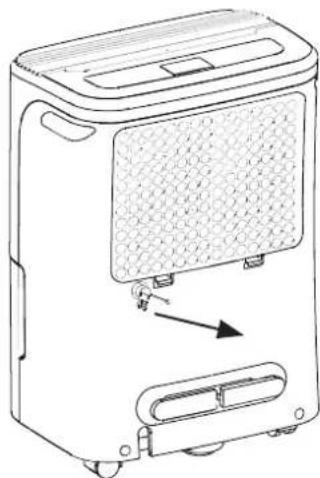
- Remove the rear grille by raising the lower part and sliding it out downwards (Fig. E).
- Remove the filter from the grille and clean it using a vacuum cleaner or wash it with lukewarm water and neutral detergent.
- Dry it thoroughly (do not leave it exposed to sunlight).
- Put the filter and grille back in place.
HEPA filter: High Efficiency Particulate Air
(Supplied with the dehumidifier, not pre-installed)
Purifies the air and reduces dust, bacteria and allergens.
- Replace the filter every 12 months of use.
4. END-OF-SEASON MAINTENANCE
- Remove any condensate water present in the tank.
- Clean the appliance, tank and dust filter.
- Cover the appliance to protect it against dust.
- Store the dehumidifier in a dry and well-ventilated place.
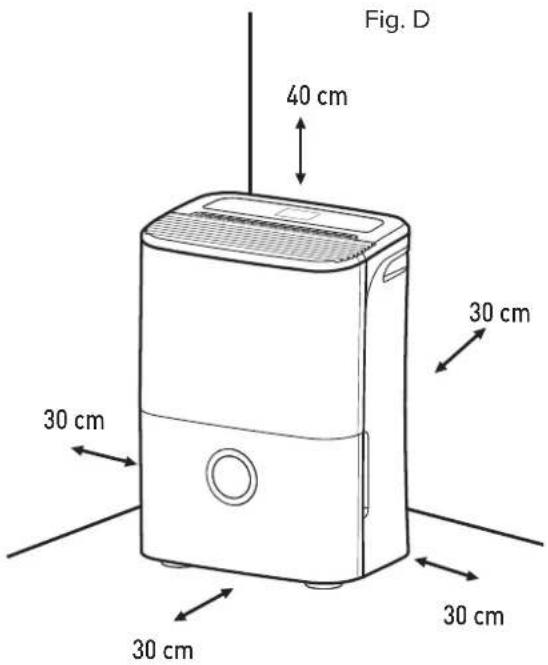
Fig. E
natural_image
Line drawing of a portable air conditioner unit with ventilation slots and a downward arrow indicating airflow direction (no text or symbols)IN CASE THE DEHUMIDIFIER MALFUNCTIONS
BEFORE CONTACTING THE TECHNICAL ASSISTANCE CENTRE, PERFORM THE FOLLOWING CHECKS:
| PROBLEM CAUSE SOLUTION | ||
| The appliance does not start by pressing the ON/OFF button. | 1) The plug is not properly inserted.2) The main switch is not properly inserted.3) The tank full signal is active4) The tank is either full or not properly inserted. | 1) Insert the plug correctly.2) Check the main switch.3) Empty the tank.4) Put the tank properly back into place. |
| The appliance is not able to dehumidify the room enough. | 1) The air inlet or outlet are obstructed (by curtains, objects, walls, etc.).2) The set humidity level is not low enough.3) The windows and doors of the room are not closed.4) The room temperature is either too low (lower than 5°C) or too high (above 35°C).5) The air filter is clogged. | 1) Free the air inlet and outlet.2) Appropriately adjust the humidity level.3) Close all windows and doors.5) Clean the air filter. |
| The appliance is very noisy. 1) The air filter is clogged.2) The appliance is inclined.3) The appliance is resting on a non-flat surface. | 1) Clean the air filter.2) 3) Reposition the appliance. | |
| ‘P1’ appears on the display. Anti-frost function active. Wait until the defrosting function ends. ‘P1’ will disappear automatically. | ||
| ‘P2’ appears on the display. | Tank full. | Empty the tank and put it correctly back in place. |
| ‘AS’ appears on the display. The humidity sensor is disconnected or has short-circuited. | sensor is disconnected or has short-circuited. | Contact the technical assistance service. |
| ‘ES’ appears on the display. The temperature sensor is disconnected or has short-circuited. | sensor is disconnected or has short-circuited. | Contact the technical assistance service. |
PRODUCT TECHNICAL SHEET
| Type of appliance | Dehumidifier |
| Supplier brand | ARISTON |
| DEOS 21s | ||
| Dehumidification(1) | litres/day | 21 |
| Power consumption(1) | W | 395 |
| Sound pressure(1) | dB(A) | 41 |
| Type of refrigerant | R134A | |
| GWP(2) | kgCO2 eq. | 1430 |
| Operating temperature | °C | 5/35 |
| Tank capacity | litres | 3,3 |
| Power supply and no. of phases | Hz - V - Ph | 50-230-1 |
| Type of compressor | Rotativo | |
| Maximum air flow rate | m3/h | 225 |
| Standard refrigerant charge | kg | 0,14 |
| Dimensions | mm | 350x510x245 |
| Weight (net/gross) | kg | 12,2/14,7 |
(1) Relative to operation at 30^ C and 80% relative humidity.
(2) Refrigerant loss contributes to climate change. In case of their release into the atmosphere, refrigerants with lower global warming potential (GWP) have less impact on global warming compared to refrigerants with a higher GWP. This appliance contains a refrigerant fluid with a GWP of 1,300. In other words, if 1kg of this refrigerant fluid were released into the atmosphere, the impact on global warming would be 1,300 times greater compared to 1kg of CO_2 , over a period of 100 years. In no case whatsoever must the user attempt to intervene on the refrigerant circuit or dismantle the product. In case of need, please contact a qualified professional.
FR
Cher Client,
natural_image
Technical line drawing of a mechanical component with circular holes and a labeled section (no text or symbols beyond label)
ARISTON
ÉVACUATION DES CONDENSATS
natural_image
Line drawing of a portable air purifier with a side panel and directional arrow indicating motion (no text or symbols)ATTENTION :
natural_image
Line drawing of a portable air purifier device with control panel and indicator lights (no text or symbols)2. DRAINAGE EN CONTINU
natural_image
Line drawing of a portable air purifier with ventilation grille and cable insertion point (no text or symbols)CONSEILS POUR SON POSITIONNEMENT
natural_image
Line drawing of a portable air conditioner unit with ventilation slots and a downward arrow indicating airflow (no text or symbols)SI LE DÉSHUMIDIFICATEUR NE FONCTIONNE PAS
AVANT DE FAIRE APPEL AU SERVICE APRÈS-VENTE, PROCÉDER AUX CONTRÔLES SUIVANTS :
natural_image
Symbol of a trash bin crossed with a diagonal line, no text or numbers presentNORMAS DE SEGURIDAD
6. TECLA TURBO/SELF CLEAN
TURBO
natural_image
Technical line drawing of a mechanical component with circular holes and a labeled section (no text or symbols beyond label)natural_image
Line drawing of a portable air purifier device with a side panel and directional arrow (no text or symbols)ATENCIÓN:
natural_image
Line drawing of a portable air purifier device with ventilation grille and control buttons (no text or symbols)2. DRENAJE CONTINUO
natural_image
Line drawing of a portable water heater with ventilation grille and cable (no text or symbols)natural_image
Line drawing of a portable air conditioner unit with ventilation slots and cooling mechanism (no text or symbols)6. TECLA TURBO/SELF CLEAN
TURBO

natural_image
Technical line drawing of a mechanical component with circular holes and a labeled section (no text or symbols beyond label)2. DRENAGEM CONTINUATIVA
natural_image
Line drawing of a portable air purifier with a side panel and directional arrow indicating motion (no text or symbols)fig. B
natural_image
Line drawing of a portable air purifier device with control panel and side-mounted buttons (no text or symbols)fig. C
natural_image
Line drawing of a portable water heater with ventilation grille and power cord (no text or symbols)natural_image
Line drawing of a portable air conditioner unit with ventilation slots and a downward arrow indicating airflow (no text or symbols)natural_image
Symbol of a trash bin crossed with a diagonal line, indicating no waste or discharge (no text or labels present)VEILIGHEIDSVOORSCHRIFTEN
BEWAAR EN RAADPLEEG DIT BOEKJE ZORGVULDIG, DAAR ALLE WAARSCHUWINGEN BELANGRIJKE INFORMATIE BEVATTEN VOOR DE VEILIGHEID TIJDENS INSTALLATIE, GEBRUIK EN ONDERHOUD.
WAARSCHUWINGEN EN INFORMATIE
BESCHRIJVING VAN HET PRODUCT

BEDIENINGSPANEEEL
1. POWER TOETS ⏻
6. TURBO/SELF CLEAN TOETS
TURBO
natural_image
Technical line drawing of a mechanical component with circular holes and a labeled section (no text or symbols beyond label)CONDENSAFVOER
natural_image
Line drawing of a portable air purifier device with control panel and buttons (no text or symbols)afb. C
natural_image
Line drawing of a portable air purifier with a cable inserted, showing internal grid pattern and mounting base (no text or symbols)SUGGESTIES VOOR DE PLAATSING
HEPA filter: High Efficiency Particulate Air
natural_image
Line drawing of a portable air conditioner unit with ventilation slots and a downward arrow indicating airflow direction (no text or symbols)ALS DE ONTVOCHTIGER HET NIET DOET
VOORDAT U ASSISTENTIE VRAAGT AAN HET SERVICECENTRUM, IS HET RAADZAAM OM EERST DE HIERONDER AANGEGEVEN CONTROLES UIT TE VOEREN:
- Model
- Brand
- Product code
- Power consumption (MAX) (W)
- Power supply (V) power supply frequency (Hz)
- Serial number
- Manufacturer
- Refrigerant gas
- Amount of refrigerant gas
- IP protection rating