
T4522001 - Thermostat PECO - Free user manual and instructions
Find the device manual for free T4522001 PECO in PDF.
User questions about T4522001 PECO
0 question about this device. Answer the ones you know or ask your own.
Ask a new question about this device
Download the instructions for your Thermostat in PDF format for free! Find your manual T4522001 - PECO and take your electronic device back in hand. On this page are published all the documents necessary for the use of your device. T4522001 by PECO.
USER MANUAL T4522001 PECO
THE PECO® PERFORMANCE PRO™ THERMOSTAT
Thank you for choosing a PECO® Performance PRO™ thermostat. The Performance PRO T4000 Series is intended for use in residential and commercial environments. It is designed for and can support up to 2-HEAT/ 2-COOL confi gurations in conventional systems and 3-HEAT/ 2-COOL confi gurations in heat pump applications. The Performance PRO also provides the capability to meet the requirements for ASHRAE 90.1-2004 and California Building Code Title 24 (2008 edition).
The Performance PRO T4000 Series is comprised of the T4000 non-programmable thermostat models and the T4500 programmable thermostat models. The T4000 Series feature a 4 square inch blue backlit display with dynamic menus, accessed using soft keys. All Performance PRO T4000 Series offer the following standard features: auto-changeover, optional remote sensors, occupancy sensor, keypad lockout, a PIN access code, a furnace filter change reminder, and a heat/cool Demand Indicator. In addition, the T4500 programmable models offer: programmability with up to four scheduled events per day, temporary override, a 365-day calendar, 20 holidays, and holiday override.
The T4000 Series can be powered off of 24 VAC or batteries or both (recommended). The T4000 Series can control a minimum of 5 outputs, can monitor at least two external sensors, and can mount onto any PECO Performance PRO Series backplate.
APPLICATIONS AND FEATURES
The PECO Performance PRO is intended for use in conventional and heat pump applications.
- System mode selections: Off-Heat-Cool-Auto
• Stages: 1 Heat/1 Cool, 2 Heat/1 Cool, 1 Heat/2 Cool; 2 Heat/2 Cool; 3 Heat/2 Cool
• Fan control: Cycling (Auto) or Continuous (On); 1 Speed - Permanent memory: All device settings are stored in permanent memory
- Connections for Remote Sensors (indoor and occupancy)

CAUTION!
- 24 VAC low-voltage thermostat. Do not install on voltages higher than 30 VAC.
- Use copper wire only; insulate or cap off (with wire nuts) all unused leads.
- Use care to avoid electrostatic discharge to the thermostat.
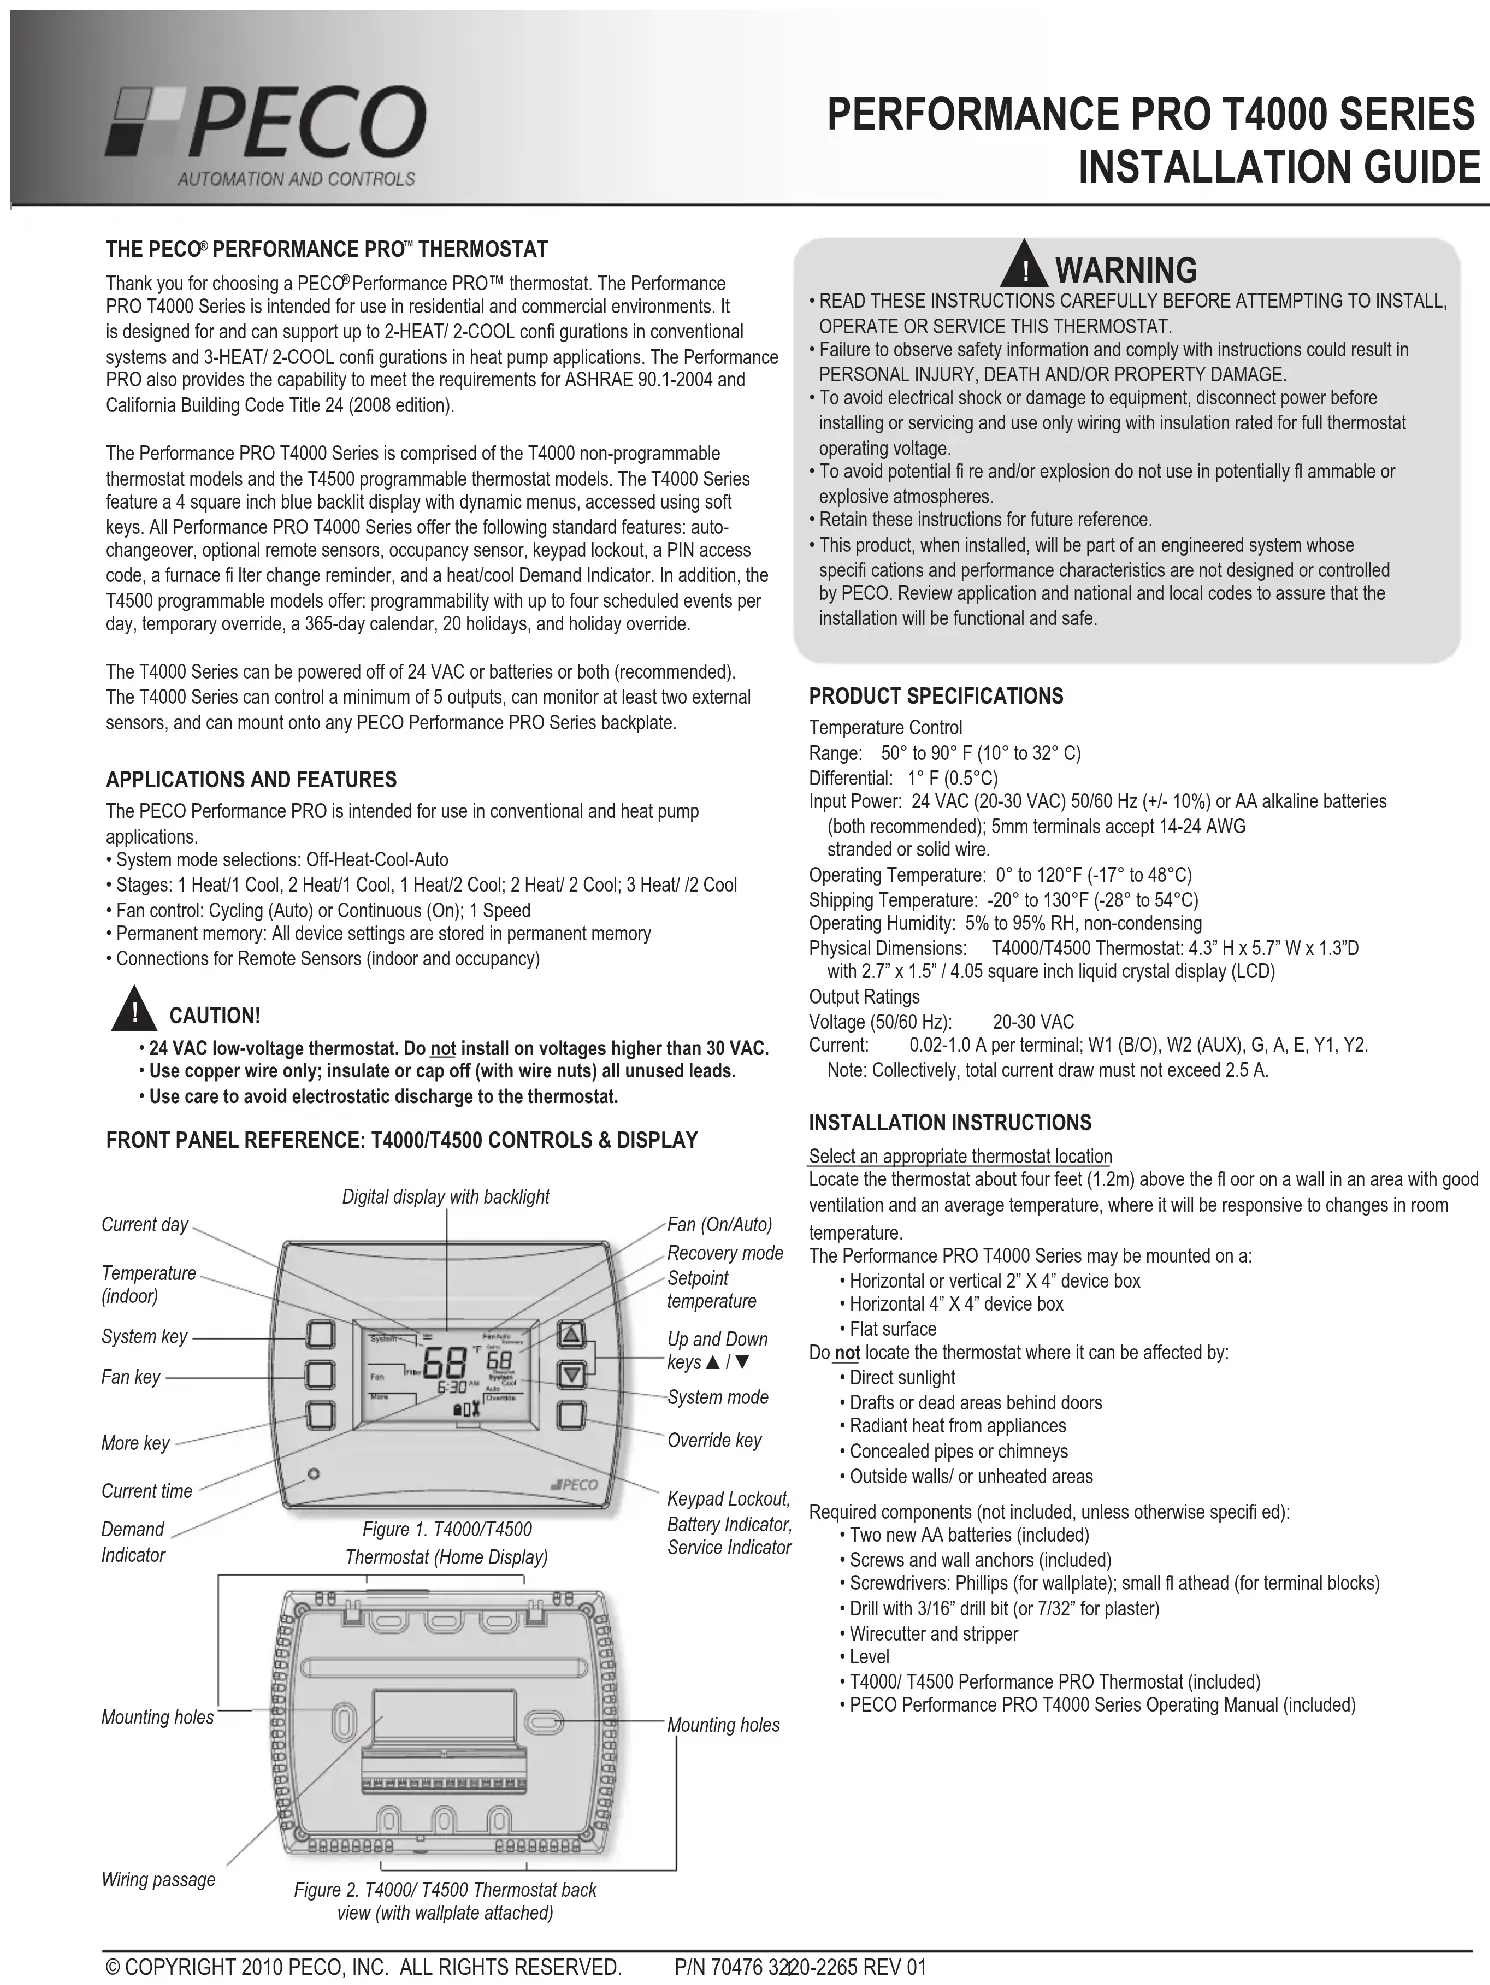
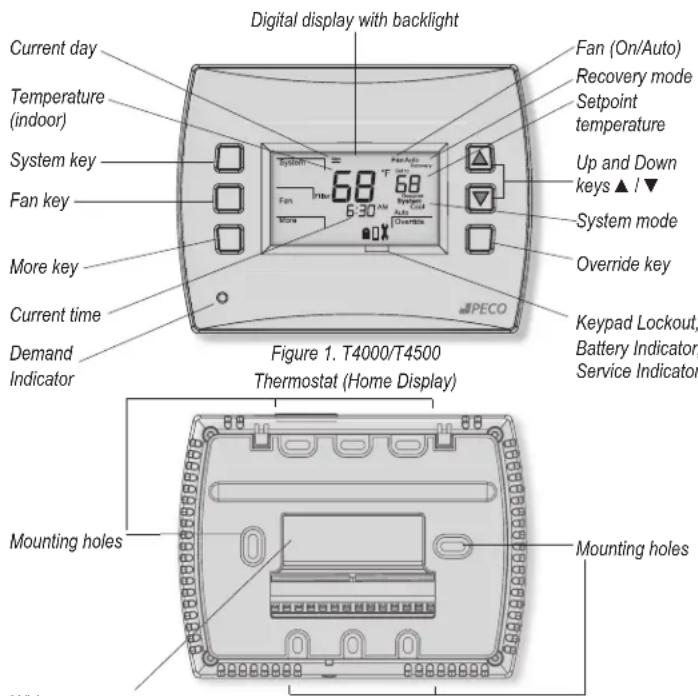
FRONT PANEL REFERENCE: T4000/T4500 CONTROLS & DISPLAY
text_image
Digital display with backlight Current day Temperature (indoor) System key Fan key More key Current time Demand Indicator Fan (On/Auto) Recovery mode Setpoint temperature Up and Down keys ▲ / ▼ System mode Override key Keypad Lockout, Battery Indicator, Service Indicator Figure 1. T4000/T4500 Thermostat (Home Display) Mounting holes Mounting holesFigure 2. T4000/T4500 Thermostat back view (with wallplate attached)

WARNING
- READ THESE INSTRUCTIONS CAREFULLY BEFORE ATTEMPTING TO INSTALL, OPERATE OR SERVICE THIS THERMOSTAT.
- Failure to observe safety information and comply with instructions could result in PERSONAL INJURY, DEATH AND/OR PROPERTY DAMAGE.
- To avoid electrical shock or damage to equipment, disconnect power before installing or servicing and use only wiring with insulation rated for full thermostat operating voltage.
- To avoid potential fire and/or explosion do not use in potentially fl ammable or explosive atmospheres.
- Retain these instructions for future reference.
- This product, when installed, will be part of an engineered system whose specifications and performance characteristics are not designed or controlled by PECO. Review application and national and local codes to assure that the installation will be functional and safe.
PRODUCT SPECIFICATIONS
Temperature Control
Range: 50° to 90° F (10° to 32° C)
Differential: 1°F (0.5°C)
Input Power: 24 VAC (20-30 VAC) 50/60 Hz (+/- 10%) or AA alkaline batteries
(both recommended); 5mm terminals accept 14-24 AWG stranded or solid wire.
Operating Temperature: 0° to 120°F (-17° to 48°C)
Shipping Temperature: -20° to 130°F (-28° to 54°C)
Operating Humidity: 5% to 95% RH, non-condensing
Physical Dimensions: T4000/T4500 Thermostat: 4.3" H x 5.7" W x 1.3"D with 2.7" x 1.5" / 4.05 square inch liquid crystal display (LCD)
Output Ratings
Voltage (50/60 Hz): 20-30 VAC
Current: 0.02-1.0 A per terminal; W1 (B/O), W2 (AUX), G, A, E, Y1, Y2.
Note: Collectively, total current draw must not exceed 2.5 A.
INSTALLATION INSTRUCTIONS
Select an appropriate thermostat location
Locate the thermostat about four feet (1.2m) above the floor on a wall in an area with good ventilation and an average temperature, where it will be responsive to changes in room
temperature
The Performance PRO T4000 Series may be mounted on a:
• Horizontal or vertical 2" X 4" device box
• Horizontal 4" X 4" device box
- Flat surface
Do not locate the thermostat where it can be affected by:
- Direct sunlight
• Drafts or dead areas behind doors - Radiant heat from appliances
- Concealed pipes or chimneys
- Outside walls/ or unheated areas
Required components (not included, unless otherwise specified):
- Two new AA batteries (included)
- Screws and wall anchors (included)
- Screwdrivers: Phillips (for wallplate); small flathead (for terminal blocks)
- Drill with 3/16" drill bit (or 7/32" for plaster)
- Wirecutter and stripper
- Level
• T4000/ T4500 Performance PRO Thermostat (included) - PECO Performance PRO T4000 Series Operating Manual (included)
PART I: INSTALL THE WALLPLATE
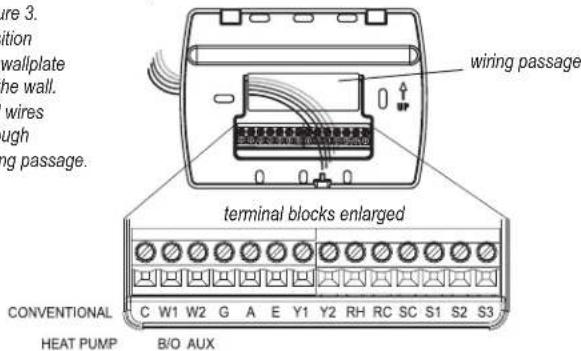
- Position the wallplate on the wall with the directional arrow pointing up (see Fig. 3) and terminal blocks facing outward.
Figure 3.
Position
the wallplate
on the wall.
Pull wires
through
wiring passage
text_image
Figure 3. tion wallplate the wall. wires ough ng passage. wiring passage terminal blocks enlarged CONVENTIONAL C W1 W2 G A E Y1 Y2 RH RC SC S1 S2 S3 HEAT PUMP B/O AUX- Pull equipment wires through the wallplate wiring passage (see Fig. 3).
- Use a level to determine the best horizontal wallplate mounting position.
- Mark positions of the screw holes (two at minimum) with a pencil and remove wallplate.
- Drill holes at pencil-marked locations (3/16" for drywall, 7/32" for plaster).
- Insert the wall anchors in the holes, tapping them into place.
- Mount the wallplate onto the wall and insert screws through mounting holes. Assure that all loose wires come through the center opening of the backplate (see Fig. 3).
- Cap off any unused wires and terminate properly according to local building codes.
PART II: ATTACH WIRES TO THERMOSTAT WALLPLATE
- Select the terminal designations that correspond to the system type (see Table 1).

- WARNING: Disconnect power before beginning installation.
- CAUTION: Use copper wire only. Insulate or wire-nut all unused leads.
- Use care to avoid electrostatic discharge to thermostat
TABLE 1. TERMINAL DESIGNATIONS AND SYSTEM TYPES
| Conventional Terminal Letters Heat Pump Terminal Letters | |||
| C | Unswitched side, 24 VAC | C | Unswitched side, 24 VAC |
| W1 | Stage 1 Heat | B/O | Reversing Valve |
| W2 | Stage 2 Heat | AUX | Auxiliary (Stage 3 Heat) |
| G | Fan | G | Fan |
| A | A | ||
| E | E | ||
| Y1 | Stage 1 Cool | Y1 | Compressor Stage 1, Heat /Cool 1 |
| Y2 | Stage 2 Cool (or Dehumidify) | Y2 | Compressor Stage 2, Heat /Cool 2 (or Dehumidify) |
| RH | Power for heating, switched side, 24 VAC | RH | Power for heating, switched side, 24 VAC |
| RC | Power for cooling, switched side, 24 VAC | RC | Power for cooling, switched side, 24 VAC |
| SC | Sensor Common | SC | Sensor Common |
| S1 | Indoor Remote Sensor | S1 | Indoor Remote Sensor |
| S2 | Occupancy Setback Input | S2 | Occupancy Setback Input |

ALL ELECTRICAL LOADS
MUST BE CONNECTED TO
in Operating Manual to learn about additional
sensor applications.
| System Type 1: 1H/1C Conventional System | |
| TERM Function TERM Function | |
| C Common C Common | |
| W1 Heat | B/ |
| W2 | |
| G | Fan |
| A | |
| E | |
| Y1 | Cool |
| Y2 | |
| RH | Power for Heating |
| RC | Power for Cooling |
| System Type 3: Heat only (without fan) | |
| TERM | Function |
| C Common C | Common |
| W1 | Heat |
| W2 | |
| G | |
| A | |
| E | |
| Y1 | |
| Y2 | |
| RH | Power for Heating |
| RC | |
| System Type 5: Cool only | |
| TERM | Function |
| C Common C Common | |
| W1 | |
| W2 | |
| G Fan | G Fa |
| A | |
| E | |
| Y1 | Cool |
| Y2 | |
| RH | Power for Heating |
| RC | Power for Cooling |
| System Type 7: 2H/2C Conventional System | |
| TERM | Function |
| C Common C Common | |
| W1 | Heat 1 |
| W2 | Heat 2 |
| G Fan | G Fa |
| A | |
| E | |
| Y1 | Cool 1 |
| Y2 | Cool 2 |
| RH | Power for Heating |
| RC | Power for Cooling |
| Type 2: 1H/1C Heat Pump | |
| Reversing Valve | |
| AUX | |
| G | Fan |
| A | |
| E | |
| Y1 | Compressor |
| Y2 | |
| RH Power for Heating | |
| RC Power for Cooling | |
| System Type 4: Heat only with fan | |
| TERM | Function |
| W1 | Heat |
| W2 | |
| G Fan | |
| A | |
| E | |
| Y1 | |
| Y2 | |
| RH | Power for Heating |
| RC | |
| System Type 6: 2H/1C Heat Pump (Aux. | |
| TERM | Function |
| B/O | Reversing Valve |
| AUX Auxiliary Heat | |
| A | |
| E | |
| Y1 | Compressor |
| Y2 | |
| RH | Power for Heating |
| RC | Power for Cooling |
| Type 8: 2H/1C Conventional | |
| TERM | Function |
| W1 | Heat 1 |
| W2 | Heat 2 |
| A | |
| E | |
| Y1 | Cool |
| Y2 | |
| RH | Power for Heating |
| RC | Power for Cooling |
| System Type 9: 1H/2C Conventional System | |
| TERM Function TERM Function | |
| C Common C Common | |
| W1 Heat B/O Reversing Valve | |
| W2 AUX | |
| G | Fan |
| A | |
| E | |
| Y1 | Cool 1 |
| Y2 | Cool 2 |
| RH | Power for Heating |
| RC | Power for Cooling |
| type 10: 2H/2C Heat Pump | |
| G | Fan |
| A | |
| E | |
| Y1 | Compressor 1 |
| Y2 | Compressor 2 |
| RH | Power for Heating |
| RC | Power for Cooling |
| System Type 11: 3H/2C Heat Pump | |
| TERM | Function |
| C | Common |
| B/O | Reversing Valve |
| AUX Auxiliary Heat | |
| G | Fan |
| A | |
| E | |
| Y1 | Compressor 1 |
| Y2 | Compressor 2 |
| RH | Power for Heating |
| RC | Power for Cooling |

• CAUTION: Do not connect unused wires together.
PART II: ATTACH WIRES TO THERMOSTAT WALLPLATE (CONT.)
- Using a small flathead screwdriver, loosen the screws on the terminal blocks that correspond to the system type (see Table 1).
- Strip the insulation of each wire at a proper length (about 1/4" or 64 cm).
- On the wallplate, insert wires into the terminal blocks that correspond to the system type, then re-tighten each screw for each terminal (see Fig. 4). Note: Do not over-tighten screws or use excessive force.
- Assure that no uninsulated wires are exposed: Cap off and place a wire-nut on any unused wires. Assure that the attached wires fit into the cavity on the back side of the thermostat.
Figure 4.
Insert wires into
appropriate terminal
blocks.

natural_image
Technical line drawing of a device housing with internal components and a magnified inset showing internal compartments (no text or symbols)Enlarged area shows wire insertion point above terminal block
PART III: CONNECT POWER TO THE THERMOSTAT
- Choose from the following options to power the thermostat.
Power Options
The Performance PRO T4000 Series will operate on 24VAC power and/or two AA batteries (both are recommended). Choose from three methods to connect power to the thermostat.
• Batteries only (AA alkaline)
• 24 VAC direct connection only
• 24 VAC with AA battery backup (highly recommended)
Wiring 24 VAC Common
- Single-Transformer System: Connect the common side of the transformer to the "C" screw terminal of the thermostat wallplate. Assure that the metal jumper connects "RC" and "RH." Connect power side to the RC/RH and assure that the jumper remains in place.
- Two-Transformer System: The T4000/T4500 is shipped with a jumper connecting terminals RH and RC. If the heating and cooling equipment do not use separate transformers, leave this jumper in place. If separate transformers are required, remove this jumper. With the jumper removed, connect RC to the power side of the cooling transformer. Connect RH to the power side of the heating transformer; then connect both the heating and cooling commons together to terminal C (Common).
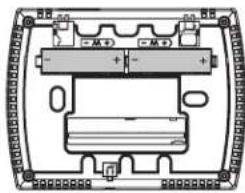
PART IV: INSTALL BATTERIES
Insert two AA batteries (included) into the back compartment of the thermostat, where indicated (see Fig. 5).
natural_image
Pure electrical circuit lines without any symbolsFigure 5. Insert two AA batteries in back of thermostat.
PART V: SET THE CLOCK, MONTH, AND DAY
When power is first applied to the thermostat, it will activate the clock display. It is recommended that the time and day are entered before performing advanced configuration. Follow the procedure below to set the clock, month, and day (see Fig. 6).
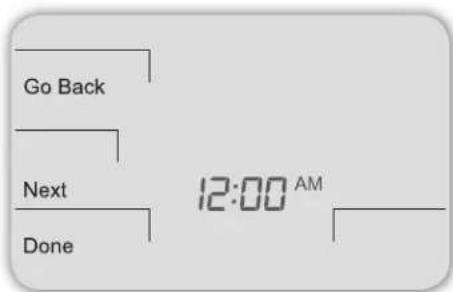
text_image
Go Back Next Done 12:00 AMFigure 6. Clock must be set before performing advanced configuration.
- Press ▲ / ▼ to select 12 or 24 HR mode, then press Next.
- Press ▲ / ▼ to select clock hour, then press Next.
- Press ▲ /▼ to select clock minutes, then press Next.
- Press ▲ / ▼ to select clock year, then press Next.
- Press ▲ / ▼ to select current month, then press Next. Note: Mo (month) appears.
- Press ▲ / ▼ to select current date. Note: Days appears.
- Press Done to finish clock mode.
PART VI: VERIFY SYSTEM SETTING IS TURNED OFF
- Press any key to enter the Home Display.
- Press System to enter system settings.
- Press ▲ / ▼ to select "Off," then press Done.
- Press Fan key to enter fan mode.
- Press ▲ / ▼ to select "Auto," then press Done. Note: The flashing option is the selection.
PART VII: PERFORM ADVANCED CONFIGURATION
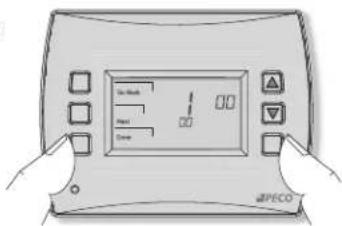
Perform advanced confi guration before attaching the thermostat to the wallplate. Advanced confi guration is done by simultaneously pressing the lower left and lower right keys for about fi ve seconds (see Fig. 7), which gives the user access to Service Menus. Use Table 2 of this Installation Guide to set each desired Service Menu item. Advanced confi guration allows the user to confi gure the thermostat to match the system type and to customize several thermostat settings.
Figure 7.
Access Service Menus by pressing the lower right and lower left keys simultaneously.
text_image
No Check Reset DownIt is also recommended to review the T4000 Series Operating Manual to learn how to program basic settings, such as setting the temperature display mode and other useful functions.
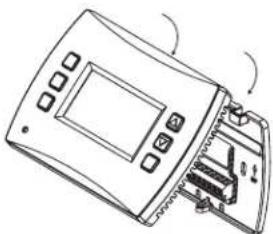
PART VIII: MOUNT THE T4500 ONTO THE WALLPLATE
- Position the thermostat slightly above the mounted wallplate (see Fig. 8), then secure the hooks on the back side of the thermostat to the hinge pockets on the wallplate. Note: The top back side of the thermostat should slip into the hinge pockets easily. Do not use excessive force.
Figure 8.
Secure the hooks on the back side of the thermostat to the wallplate.
natural_image
Line drawing of a device with an open panel and internal components (no text or symbols)- Align the pins on the back side of the thermostat with the terminal blocks on the wallplate.
- Gently bring down the thermostat onto the wallplate so the pins on the back of the thermostat fit into the terminal blocks on the wallplate.
- Attach the retaining screw to the underside of the thermostat as shown (see Fig. 9).
PART IX: VERIFY THERMOSTAT OPERATION WITH SYSTEM TESTS
System test verification is highly recommended to verify thermostat operation. Follow at least one procedure in the system tests below. Refer to the Service Menus (see Table 2) for more tests. For all tests, press Next to continue to the following system test, which is the next available Service Menu. Press Done only if finished performing all system tests. Pressing Done exits the Service Menus and turns off all active outputs.
SYSTEM TEST MAIN OUTPUT (HEAT)
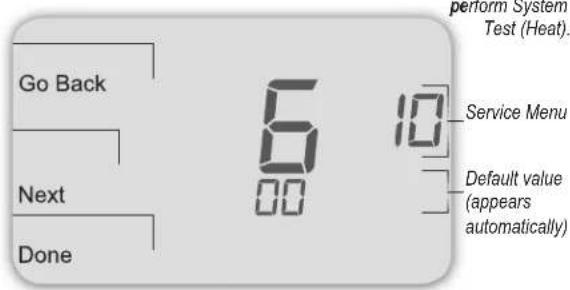
- On the thermostat, press the lower left and lower right keys simultaneously for about five seconds. Next, Go Back, and Done appear (see Fig. 10).
- Press Next until Service Menu 610 appears in the display. (Default value "00" appears below Service Menu.)
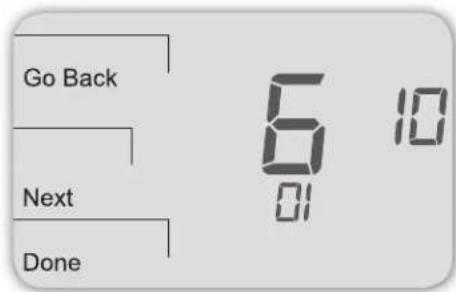
Figure 10.
Service Menu 610
allows the user to
perform System
Test (Heat).
text_image
Go Back Next Done 600 10 Service Menu Default value (apears automatically)-
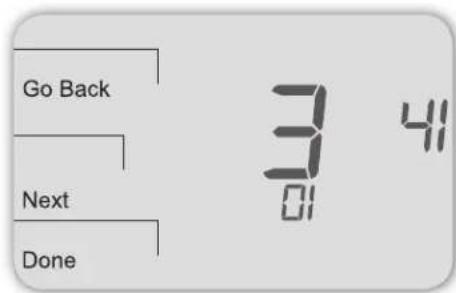
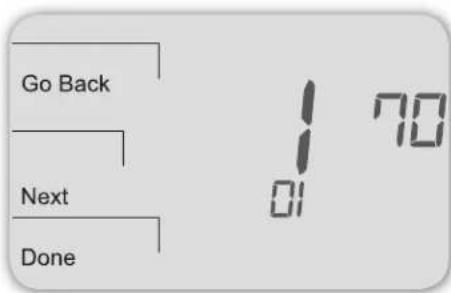
In Service Menu 610, press ▲ / ▼ to select option "01," Heat Stage 1 (see Fig.11). Note: If 01 is selected, the thermostat will activate the associated output for 10 minutes. The user should observe that the fan output (with heat) turns on. The user may also test more stages of heat according to what is available for the system type.
-
Press Done to complete the system test and exit the Service Menus. After verifying the system test, the outputs are disabled and the fan will stop.
text_image
Go Back Next DoneFigure 11. Press Done to complete testing and exit Service Menus, or Next to continue tests.
Figure 9.
Mount the thermostat
onto the wallplate.

natural_image
Line drawing of a device with control panel and buttons (no text or symbols)Retaining screw
SYSTEM TEST FAN: OPTIONAL
If continuing from the previous section on this page, skip to Step 2 below. The following instructions assume that the user enters the Service Menus from the home screen display; it does not assume that the user has followed in sequence from the previous section.
- On the thermostat, press the lower left and lower right keys simultaneously for about five seconds. Next, Go Back, and Done appear (see Fig. 12).
- Press Next until Service Menu 620 appears in the display. (The default value for Service Menu appears below Service Menu.)
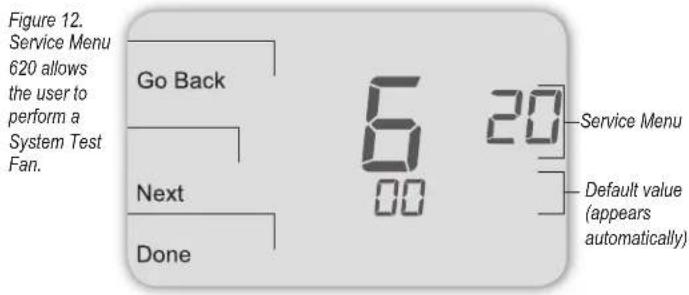
text_image
Figure 12. Service Menu 620 allows the user to perform a System Test Fan. Go Back Next Done 6 00 20 Service Menu Default value (appears automatically)- In Service Menu 620, press ▲ / ▼ to select option "01" to enable fan output (see Fig. 13). Note: If 1 is selected, the thermostat will activate the associated output for 10 minutes. The user should observe that the fan output will turn on.
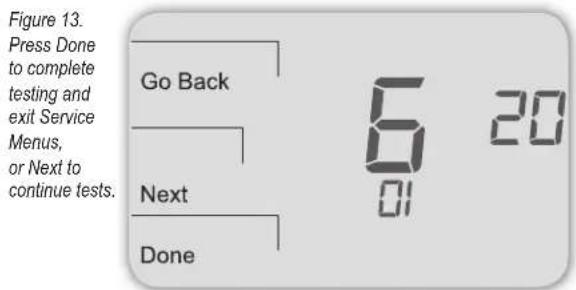
text_image
Figure 13. Press Done to complete testing and exit Service Menus, or Next to continue tests. Go Back Next Done 6 20 01- Press Done to complete the system test. After verifying the system test, the outputs are disabled.
Optional: The user may also perform System Test Main Output (Cool): See Table 2, Service Menu 600.
USER OPERATION
For detailed instructions on user operation of the T4000 Series, including how to operate all key functions, please refer to the Performance PRO T4000 Series Operating Manual, the companion to this installation guide.
PART X: SET PIN ACCESS FOR SERVICE MENUS (OPTIONAL)
Creating a PIN access code allows the installer to restrict access to Service Menus. First, PIN access must be enabled in Service Menu 341; second, a three-digit code must be created in Service Menu 342. After these two Service Menus are properly configured, the thermostat requires the user to enter a PIN access code to enter the Service Menus.
- On the thermostat, press the lower left and lower right keys simultaneously for about five seconds. Next, Go Back, and Done appear (see Fig. 14).
- Press Next until Service Menu 341 (Enable/Disable PIN Access) appears in the display. (Default value "00" appears below Service Menu.)
text_image
Go Back Next Done 3 41 01Figure 14. Service Menu 341 allows user to restrict access to Service Menus.
- In Service Menu 341, press ▲ / ▼ to change digit (fl ashing) value to "01" (see Fig. 14). Note: Selecting 01 enables PIN access for the thermostat Service Menus, and selecting it is necessary to show Service Menu 342.
- Press Next.
- In Service Menu 342, press ▲ / ▼ adjust values and create a three-digit PIN access code. The flashing three-digit code appears in the clock area (see Fig. 15). Note: Write down the PIN access code, and keep it in a safe place.
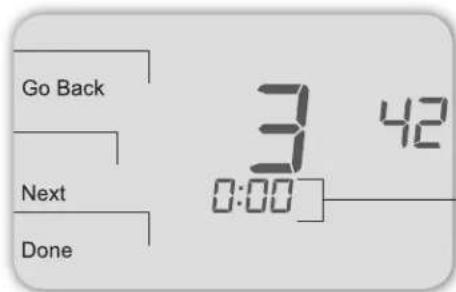
text_image
Go Back Next Done 3 42 0:00Figure 15.
Service Menu
342 allows
user to create
a PIN access
code.
Flashing three-digit code
- Press Done when fi nished.
VERIFY PIN ACCESS CODE
Enter the PIN access code upon entering the Service Menus. Note: Flashing digit is active; it is changed using the ▲ / ▼ keys. The active (editable) digit moves from right to left.
- On the thermostat, press the lower left and lower right keys simultaneously for about five seconds. Note Flashing three-digit code, Next, and Done appear (see Fig. 16).
- Press ▲ / ▼ to change value of digit furthest to the right, then press Next.
- Press ▲ / ▼ to change value of digit in middle, then press Next.
Press ▲ / ▼ to change value of digit furthest to left, then press Done.
Note: After step 4 is complete, user is allowed access to Service Menus. Next, Go Back, Done, and Service Menu 100 appear.
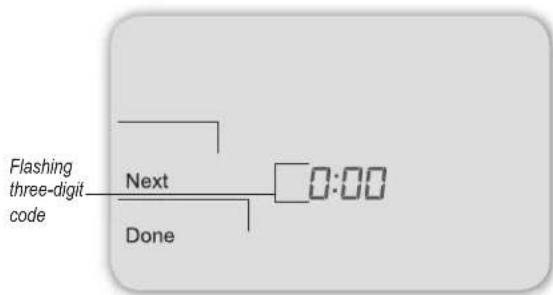
text_image
Flashing three-digit code Next Done 0:00Figure 16. PIN access code fl ashes when user enters Service Menus (after enabling PIN access).
TABLE 2. ADVANCED CONFIGURATION: SERVICE MENUS
To access Service Menus, simultaneously press lower left and lower right keys. Changed values are automatically retained. Service Menu availability is dependent upon system type and upon system configuration. Note: The Remote Indoor Zone Sensor must be enabled in the Service Menus (see Service Menu 170).
| MENU | FEATURE OPTIONS | STD.MODEL | DEFAULT | DESCRIPTION / COMMENTS |
| 100* | Schedule Format 0-3 | 1 Select the schedule format on the Performance PRO T4000 Series.0 = nonprogrammable1 = programmable2 = 5-1-1 schedule3 = 5-2 schedule | ||
| 101 | Daylight-Saving Time | 0,1 0 Select daylight-saving time as it follows standard format in U.S.: It begins second Sunday of March at 2:00 AM and ends on the first Sunday of November at 2:00 AM.0 = Disabled1 = Enabled (2007 US Format) | ||
| 110 | System Type 1-11 | 1 Select the appropriate system configuration (determines available Service Menus).1 = 1 Heat/1 Cool conventional2 = 1 Heat/1 Cool heat pump3 = Heat only without fan (2-wire systems)4 = Heat only with fan5 = Cool only6 = 2 Heat/1 Cool heat pump (with auxiliary heat) and Emergency (Em) heat7 = 2 Heat/2 Cool multistage conventional8 = 2 Heat/1 Cool multistage conventional9 = 1 Heat/2 Cool multistage conventional10 = 2 Heat/2 Cool heat pump (no aux. heat)11= 3 Heat/2 Cool heat pump (with auxiliary heat) and Emergency (Em) heat | ||
| 120 | Fan Control (heating) | 0,1 0 0 = Fossil Fuel: Gas/Oil/Propane heat (equipment controls heating fan)1 = Electric Furnace (thermostat controls heating fan) | ||
| 130 | Changeover valve (B/O terminal) | 0,1 0 0 = B/O terminal controls valve in cooling1 = B/O terminal controls valve in heating | ||
| 140 | Auxiliary Heat | 0,1 0 0 = Electric backup heat1 = Fossil fuel backup heat | ||
| 150 | Backlight | 0,1 0 0 = Backlight temporarily on1 = Backlight always on (low intensity, 24V only) | ||
| 170 | Remote Sensor | 0-1 | 0 | Select sensor if used (connected to the S1 Terminal). Contact PECO for more information on the Indoor Remote Zone Sensor.0 = No Sensor1 = Indoor Sensor |
| 230 | Furnace Filter Change Reminder | 0; 30; 60; 90; 120; 365 | 0 Set a filter reminder timer; appears on digital display when timer expires (if programmed).0 = Off10 days; 30 days; 60 days; 90 days; 120 days; 365 days | |
| 240 | Number of Program Periods | 2; 4 events | 4 2 = 2 events per day4 = 4 events per day | |
| 250 | Clock format | 12 or 24 Hours | 12 | 12 = 12-hour clock mode24 = 24-hour clock mode |
| 260 | Temperature Format (°F or °C) | 0,1 1 0 = Celsius1 = Fahrenheit | ||
| 270 | Fan Off Delay Heat | 0-99 Seconds | 0 | Select the amount of time (in seconds) that the fan will run after the thermostatheatoutputs are turned off. |
| 280 | Fan Off Delay Cool | 0-99 Seconds | 0 | Select the amount of time (in seconds) that the fan will run after the thermostatcooloutputs are turned off. |
| 290 | Range Low | 50-90 °F or 10-32°C | 50°F (10°C) | Choose thelowestselectable temperature setpoint value. |
| 300 | Range High | 50-90 °F or 10-32°C | 90°F (32°C) | Choose thehighestselectable temperature setpoint value. |
| 310 | Setback Low | Off; 50-82°F or 11-27°C | 55°F (13°C) | Select the heat setpoint for setback mode.0 = Off50-82°F (11-27°C) |
| 320 | Setback High | Off; 58-90°F or 11-32°C | 90°F (32°C) | Select the cool setpoint for setback mode.0 = Off58-90°F (11-32°C) |
| 330 | Zone Temp Offset | +/-9°F or +/-4.5°C | 0°F (18 °C) | Adjusts the displayed value; may differ from actual zone temperature. |
| 340 | Keypad Lockout 0-3 0 Restricts access to certain features of device; Service Menu still available if enabled. | |||
| 0 = No key pad lockout (Default) | ||||
| 1 = Disables Schedule and System keys | ||||
| 2 = Disables Schedule, System, and Fan keys | ||||
| 3 = Disables all keys | ||||
| 341 | Enable Pin Access 0,1 0 Applies a 3 digit access code to enter Service Menu 342 | |||
| 0 = Disable, | ||||
| 1 = Enable | ||||
| 342 | Set PIN Access Code | 000-999 000 Choose a 3-digit code. | ||
| 350 | Fan Mode Enable | 1-3 3 1 = ON: Fan is turned on regardless of demand. | ||
| 360 | System Mode Enable | 0-3 1 Allows ability to determine which system modes the occupant can select. | ||
| 380 | Minimum Deadband Adjustment | 3-10°F, 1.5-5°C | 3°F | Select a changeover deadband value to prevent short cycling between heating and cooling modes. The value is adjustable to meet various HVAC system requirements. |
| 390 | Pre-Occupancy Purge | 0-3 hours | 0 hours | Select to energize fan for selected number of hours (0-3) prior to all occupied events. |
| 395 | Maximum Override Time Limit | 0=Time until next event; or 1-4 hours | 3 Restricts the duration that a temporary hold can be set. The temporary hold is limited by the maximum amount of time as defined in this Service Menu. | |
| 400 | Cycles Per Hour (CPH) Cooling Stage 1 | 0-6 CPH | 3 CPH | Defines the number of cycles per hour for cooling (Stage 1). Select 0 to enable ON-OFF control for Stage 1 cooling. |
| 410 | Cycles Per Hour (CPH) Cooling Stage 2 | 0-6 CPH | 3 CPH | Defines the number of cycles per hour for cooling (Stage 2). Select 0 to enable ON-OFF control for Stage 2 cooling. |
| 420 | Cycles Per Hour (CPH) Heating Stage 1 | 0-12 CPH | 5 CPH | Defines the number of cycles per hour for heating (Stage 1). Select 0 to enable ON-OFF control for Stage 1 heating. |
| 430 | Cycles Per Hour (CPH) Heating Stage 2 | 0-12 CPH | 5 CPH | Defines the number of cycles per hour for heating (Stage 2). Select 0 to enable ON-OFF control for Stage 2 heating. |
| 450 | Cycles Per Hour (CPH) Heating Stage 3 | 0-12 CPH | 5 CPH | Defines the number of cycles per hour for heating. Select 0 to enable ON-OFF control for Heating Stage 3. |
| 460 | Heat Recovery Rate | 0-18°F/Hr 0-10°C/Hr | 5°F/Hr | Defines the rate at which the device achieves the heat comfort setpoint. Select 0 to disable ramp recovery. |
| 470 | Cool Recovery Rate | 0-18°F/Hr 0-10°C/Hr | 5°F/Hr | Defines the rate at which the device achieves the cool comfort setpoint. Select 0 to disable ramp recovery. |
| 480 | Minimum Off Time | 1-10 minutes | 4 minutes | Sets the minimum off time for both the heat and cool output. |
| 490 | Humidity Control Enable (Select models only) | Selects how humidity will be controlled. When dehumidify control is enabled, the Y2 terminal becomes dehumidify. | ||
| 0 = Disabled | ||||
| 1 = Dehumidify Control | ||||
| 500 | Programmable/ Intermittent Fan | 0-2 0 0 = Disable | 1 = Programmable Fan: Fan operates continuously in occupied periods or with demand in unoccupied periods. | |
| 2 = Intermittent Fan: Fan operates based on the on and off times set in menus 501 and 502. | ||||
| MENU FEATURE OPTIONS STD.MODEL | DEFAULT | DESCRIPTION / COMMENTS | ||
| 501 | Intermittent Fan On Time | 1-60 minutes | 5 minutes Defines | the on time for the Intermittent Fan. |
| 502 | Intermittent Fan Off Time | 0-60 minutes | 25 minutes Defines | the off time for the Intermittent Fan. Select 0 for continuous fan. |
| 520 | Default Display Icons 0 | 4 0 Select icons | that will be displayed in the Default Display screen.0 = Time, Temp, Setpoint (SP)1 = Time, Temp2 = Time3 = Temp4 = None | |
| 530 | Revision — — Displays firmware revision information (for technician); not adjustable. | |||
| 540 | Factory Default Reset 0,1 0 Select 1 (enable) to restore factory default settings for thermostat. Select 0 to disable.0 = Disable1 = EnableNote: Press "Done" key to complete process. | |||
| 600 | System Test Main Output (Cool) | 0-2 | 0 | Select an option to activate the fan output for 10 minutes; select 0, Done or a different Service Menu to disable.0 = Disable (Default)1 = Cool Stage 12 = Cool Stage 2 |
| 610 | System Test Main Output (Heat) | 0-3 0 Select an option to activate the fan output for 10 minutes; select 0, Done or a different Service Menu to disable. Note: Outputs will be activated based upon the system configuration.0 = Disable (Default)1 = Heat Stage 12 = Heat Stage 23 = Heat Stage 3 | ||
| 620 | System Test Fan Output | 0,1 0 Select 0 or 1 to activate the fan output for 10 minutes; select 0, Done or a different Service Menu to disable.0 = Disable Fan Output1 = Enable Fan Output Note: Outputs will be activated based upon the system configuration. | ||
Note: For Service Menus 610 and 620, outputs will be activated based upon the system configuration.
TABLE 3. TROUBLESHOOTING & FREQUENTLY ASKED QUESTIONS
In case of difficulty, try one of the following suggestions below.
| Symptom Potential Cause(s) Solution | ||
| If display screen is blank | ·Thermostat is not being powered | ·Check to assure connection between Common (C) and (RC) for 24 VAC.·Check to assure that the metal jumper connects "RC" and "RH" (on single transformer system only).·Check to assure AA batteries are installed properly and are charged. |
| ·Default Display is set to "4" (None) ·Check Service Menu 520 | ||
| If keys do not allow manual entry | ·Keypad Lockout may be enabled | ·Access Service Menu 340. Within this menu, select option "0" to assure there is no Keypad Lockout (so manual entry is enabled). |
| If Service Indicator (wrench) is on ·Remote temperature sensors may not be installed correctly or may be damaged. | ·Check to assure that remote temperature sensor is connected properly. Ensure that the system uses PECO-approved sensor(s). | |
| Setpoint limits do not change | ·Heat or cool setpoint limit has been reached | ·Check range limits and deadband (see Service Menus 290, 300, 380). |
| ·Keypad is locked ·See item above. | ||
| If no heating or cooling is running, but there is a call for heat or cool (Heat/Cool appears on display) in Auto mode | ·Heating or cooling equipment is not operating | ·Check Service Menu 110 to assure that the correct option is selected to match the system type.·Check wiring, using output tests to verify (see Service Menus 600, 610, 620). |
| If heating and cooling system doesn't respond | ·System type selection is incorrect | ·Check Service Menu 110 to assure that the correct option is selected to match the system type. |
| If heating and cooling equipment are running at the same time | ·System type selection is incorrect | ·Check Service Menu 110 to assure that the correct option is selected to match the system type. |
| ·Heating and cooling wires are shorted together | ·Separate the heating and cooling wires, using output tests to verify (see Service Menus 600, 610, 620). | |
| Heat does not turn on (Heat is on continuously on display) | ·Heating equipment failure·Loose or broken wire connection between heating equipment and thermostat | ·Check for 24 VAC at the equipment on the secondary side of the transformer between the Power for Heating (RH) and the Common (C)·Check to assure 24 VAC connection between heat terminal (W1) and transformer Common (C). If 24 VAC is present, thermostat is functional. Check heating equipment to find cause of failure. If voltage is not present, check wire connection between the heating equipment and the thermostat. |
| If Demand Indicator light is red | ·Heating is occurring | ·No action is required. |
| If Demand Indicator light is green | ·Cooling is occurring | ·No action is required. |
| If Demand Indicator light is flashing | ·An error has occurred,·Remote sensor may be malfunctioning | ·Check remote sensor wiring·Verify that the sensor(s) are PECO supported products. |
| If heat pump issues cool air in heat mode or warm air in cool mode | ·Changeover valve (B/O terminal) is not configured to match the heat pump | ·Check Service Menu 130 to assure that the changeover valve (B/O terminal) is set to properly match the heat pump. |
| Cooling does not turn on (Cool is on display) in Auto mode | ·Cooling equipment failure·Loose or broken wire between cooling equipment and thermostat | ·Check for 24 VAC at the equipment on the secondary side of the transformer between the Power for Cooling (RC) and the Common (C).·Check to assure 24 VAC connection between the cool terminal (Y1) and transformer Common (C). If 24 VAC is present, thermostat is functional. Check cooling equipment to find cause of failure. If voltage is not present, check the wire connection between the cooling equipment and the thermostat. |
| If fan does not turn on when there is a demand for heat | ·System type may be incorrect | ·See Service Menu 110 and assure that the correct option is selected. |
| ·Fan Control may be incorrect | ·See Service Menu 120 and assure that the correct option is selected. | |
| If heating system is running in the cool mode | ·System type selection is incorrect | ·Check Service Menu 110 to assure that the correct option is selected to match the system type. |
| If heating equipment does not turn off and heat temperature setting is set below room temperature | ·Heating equipment is not a heat pump but system type selected is heat pump | ·Check Service Menu 110 to assure that the correct option is selected to match the system type. |
| If the user cannot select the system setting for cool | ·System type is set to Heat only or Heat only with fan | ·Check Service Menu 110 to assure that the correct option is selected to match the system type. |
| If the user cannot select the system setting for heat | ·System type is set to Cool only. | ·Check Service Menu 110 to assure that the correct option is selected to match the system type. |
| If Heat does not appear on the display | ·System type setting is not set to Heat and/or temperature setting is not set above the room temperature | ·Set the system setting to "Heat" and adjust the temperature setting to be above the room temperature. Verify heating equipment activates. |
PERFORMANCE PRO T4000 SERIES ACCESSORIES: SENSORS
The following Performance PRO T4000 Series compatible sensors are available from PECO, providing optimal control of the environment. Following are sensor wiring diagrams for temperature averaging and installation instructions for the PECO Indoor Remote Zone Sensor.
| PECO SENSORS Model | Number | Part Number | Terminal T4000 T4500 | |
| Indoor Remote Sensor | SP155-017 69308 S1 | √ | √ | |
| Occupancy Sensor | SB200-001 68375 S2 | √ | √ |
Visit www.pecomanufacturing.com to learn more about the benefits of PECO sensors or to place an order. Contact a service representative today.
LOCATE AND MOUNT PECO OCCUPANCY SENSOR (SB200-001)
Please use the installation instructions for the SB200-001 to mount the PECO Occupancy Sensor SB200-001.
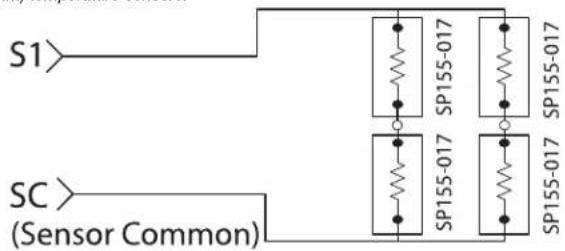
SENSOR WIRING FOR TEMPERATURE AVERAGING
Figure 17.
Wiring four SP155-017
(10K ohm) temperature sensors.
text_image
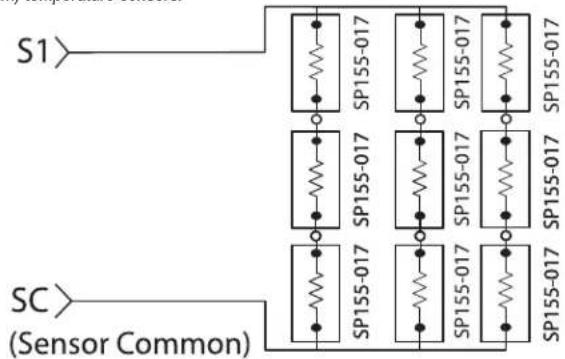
S1 SC (Sensor Common)Figure 18.
Wiring nine SP155-017
(10K ohm) temperature sensors.
flowchart
graph TD
    A["SC (Sensor Common)"] --> B["SP155-017"]
    B --> C["SP155-017"]
    C --> D["SP155-017"]
    D --> E["SP155-017"]
    E --> F["SP155-017"]
    F --> G["SP155-017"]
    G --> H["SP155-017"]
    H --> I["SP155-017"]
    I --> J["SP155-017"]
    J --> K["SP155-017"]
    K --> L["SP155-017"]
    L --> M["SP155-017"]
    M --> N["SP155-017"]
    N --> O["SP155-017"]
    O --> P["SP155-017"]
    P --> Q["SP155-017"]
    Q --> R["SP155-017"]
    R --> S["SP155-017"]
    S --> T["SP155-017"]
    T --> U["SP155-017"]
    U --> V["SP155-017"]
    V --> W["SP155-017"]
    W --> X["SP155-017"]
    X --> Y["SP155-017"]
    Y --> Z["SP155-017"]
    Z --> AA["SP155-017"]
    AA --> AB["SP155-017"]
    AB --> AC["SP155-017"]
    AC --> AD["SP155-017"]
    AD --> AE["SP155-017"]
    AE --> AF["SP155-017"]
    AF --> AG["SP155-017"]
LOCATE AND MOUNT PECO INDOOR REMOTE ZONE SENSOR (SP155-017)

WARNING
- READ THESE INSTRUCTIONS CAREFULLY BEFORE ATTEMPTING TO INSTALL, OPERATE, OR SERVICE THIS SENSOR.
- Failure to observe safety information and comply with instructions could result in PERSONAL INJURY, DEATH AND/OR PROPERTY DAMAGE.
- To avoid electrical shock or damage to equipment, disconnect power before installing and use only wiring with insulation rated for full sensor operating voltage.
- This product, when installed, will be part of an engineered system whose specifications and performance characteristics are not designed or controlled by PECO. Review applications and national and local codes to assure that the installation will be functional and safe.
- Do not run low-voltage control wiring in the same conduit with high-voltage wiring.
- Use in indoor applications only.
text_image
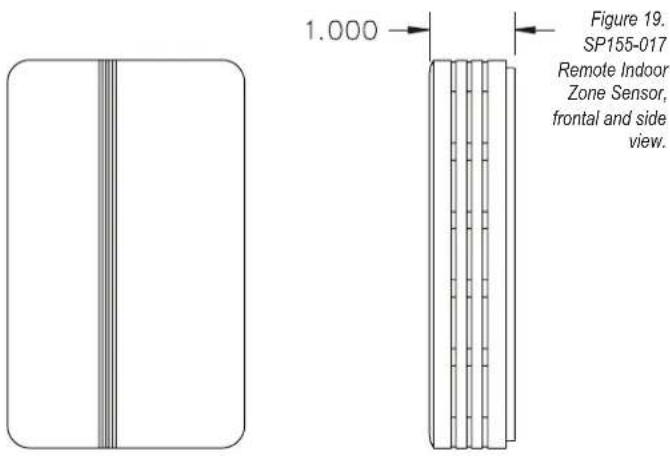
1.000 Figure 19. SP155-017 Remote Indoor Zone Sensor, frontal and side view.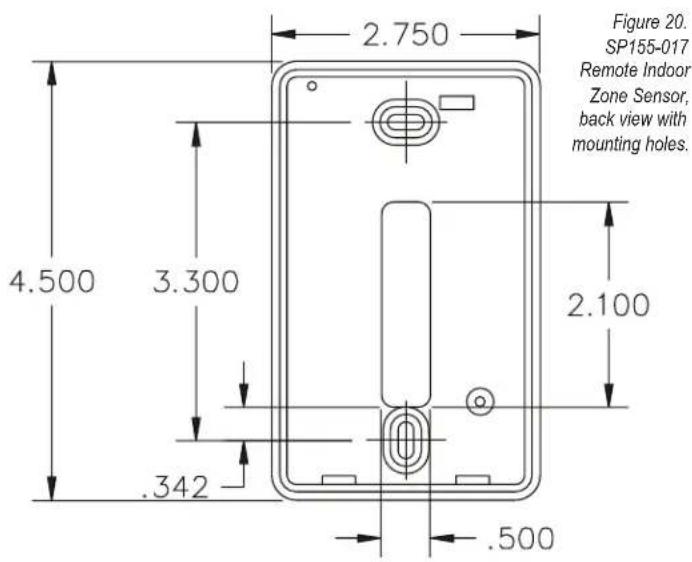
text_image
Figure 20. SP155-017 Remote Indoor Zone Sensor, back view with mounting holes. 2.750 4.500 3.300 2.100 .342 .500INSTALLATION
- Mounting location. Choose a location on an interior wall near the air return grille, about fi ve feet above fi oor level, where air circulation is good and temperature is average for the zone.
Avoid mounting the indoor zone sensor in areas such as:
- Behind doors
- On outside walls, or any walls with unheated or uncooled areas behind the zone sensor
-
In direct sunlight, or near any source of radiant heat that could affect the temperature measurements
• In line with the discharge air from the unit being controlled -
Mount subbase. Remove Zone Sensor cover from the subbase and mount subbase on the wall or in a 2' X 4" device box. Route the wires through the wire access hole in the subbase (see Fig. 21). Seal the hole in the wall behind the subbase.
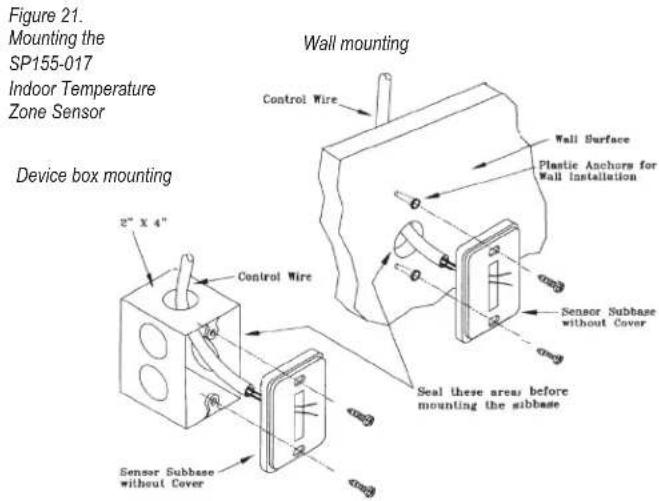
text_image
Figure 21. Mounting the SP155-017 Indoor Temperature Zone Sensor Device box mounting Wall mounting Control Wire Wall Surface Plastic Anchors for Wall Installation Control Wire Sensor Subbase without Cover Seal these areas before mounting the sibbase Sensor Subbase without CoverTABLE 4. ZONE SENSOR MAXIMUM LENGTH AND WIRE SIZE
| Distance from Unit to Control Recommended Wire Size | |
| 000 - 150 feet 22 gauge | |
| 151 - 240 feet 20 gauge | |
| 241- 385 feet 18 gauge | |
| 386 - 610 feet 16 gauge | |
| 611 -970 feet 14 gauge | |
WIRING
- Run wires. Run wires between the thermostat wallplate and the Zone Sensor subbase.

CAUTION: Keep wires separate and routed away from any source of noise such as motors, fluorescent lights, and other wiring.
- Connect wires. Connect the wiring to the terminals, S1 and SC, at the thermostat wallplate (see Fig. 22).
Note: See TABLE 1 for terminal designations for the Indoor Remote Zone Sensor.
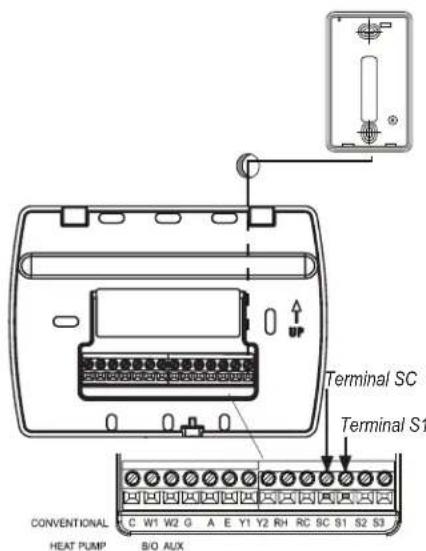
text_image
Terminal SC Terminal S1 CONVENTIONAL HEAT PUMP B/O AUXFigure 22. Wiring terminal designations for SP155-017 Indoor Remote Zone Sensor.
- Replace cover. Place Zone Sensor cover back on the subbase, and snap it securely into place.
- Go to Service Menu 170. Select option "01" to enable the Indoor Sensor (see Fig. 23).
text_image
Go Back Next DoneFigure 23. Service Menu 170 allows the user to enable the Indoor Remote Zone Sensor.
If the Indoor Remote Zone Sensor is working properly, the primary display (center) shows the correct temperature taken at the location where Indoor Remote Zone Sensor is currently installed (see Fig. 24).
Figure 24. Thermostat Display shows temperature from Zone Sensor if working properly.
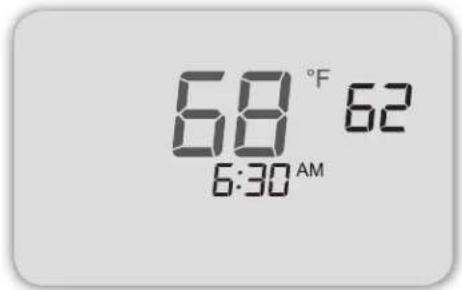
text_image
68 °F 62 6:30 AMTROUBLESHOOTING: INDOOR REMOTE ZONE SENSOR
If the thermostat Home Display appears as follows (see Fig. 25), then the Indoor Remote Zone Sensor is not connected properly. Two dashes and the Service Indicator (wrench) appear as the error message.
Figure 25
Thermostat
Display
shows Zone
Sensor error
message if
Sensor is
not working
properly.
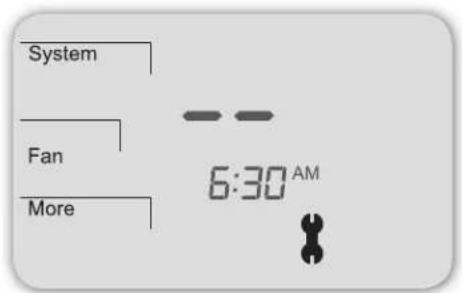
text_image
System Fan More 6:30 AMIf the Indoor Remote Zone Sensor is not connected properly, check the following:
- Make sure sensor is wired properly and connected to terminals S1 and SC on the thermostat wallplate (see Table 1, Terminal Designations and System Types).
- If using multiple sensors, make sure wiring follows diagrams in Sensor Wiring for Temperature Averaging.
• Make sure to select "01" in Service Menu 170.
EL TERMOSTATO PECO® PERFORMANCE PRO™
natural_image
Technical line drawing of a device housing panel with internal components and a magnified inset showing internal structure (no text or symbols)natural_image
Pure electrical circuit lines without any symbolstext_image
Go Back Next Done 12:00 AMtext_image
On/Down Close Closenatural_image
Line drawing of a device with ports and a central screen, showing internal components (no text or symbols)natural_image
Line drawing of a device with buttons and a door (no text or symbols)text_image
Go Back Next Donetext_image
Go Back Next Done 3 41 01text_image
Go Back Next Donetext_image
System Fan More 6:30 AMAPPLICATIONS ET FONCTIONS
natural_image
Technical diagram of an electronic device rear panel with labeled components (no text or symbols present)SPÉCIFICATIONS DU PRODUIT
natural_image
Technical line drawing of a device housing with internal components and a magnified inset showing internal grid layout (no text or symbols)natural_image
Pure electrical circuit lines without any symbolstext_image
Go Back Next Done 12:00 AMnatural_image
Line drawing of a device with a control panel and internal components (no text or symbols)natural_image
Line drawing of a device with buttons and a scroll, no text or symbols presentVis de retenue
PARTIE IX : VÉRIFIEZ LE FONCTIONNEMENT DU THERMOSTAT AVEC LES TESTS DU SYSTÈME
text_image
Go Back Next DoneFigure 11.
Appuyez
sur Done
(Terminé)
pour terminer
les tests et
quitter les more de
menus de configuration