HWQ800C - Soundbar SAMSUNG - Free user manual and instructions
Find the device manual for free HWQ800C SAMSUNG in PDF.

User questions about HWQ800C SAMSUNG
0 question about this device. Answer the ones you know or ask your own.
Ask a new question about this device
Download the instructions for your Soundbar in PDF format for free! Find your manual HWQ800C - SAMSUNG and take your electronic device back in hand. On this page are published all the documents necessary for the use of your device. HWQ800C by SAMSUNG.
USER MANUAL HWQ800C SAMSUNG
Thank you for purchasing this Samsung product.
To receive more complete service, please register your product at
www.samsung.com/register
Figures and illustrations in this User Manual are provided for
reference only and may differ from actual product appearance.
CONTENTS
01 Checking the Components 3
02 Product Overview 4
Top Panel of the Soundbar....4
Bottom Panel of the Soundbar....5
03 Using the Soundbar Remote Control 6
Inserting Batteries before using the Remote Control (AAA batteries X 2)....6
How to Use the Remote Control....6
Active Voice Amplifier (AVA) 8
Using the Hidden Buttons (Buttons with more than one function)....8
Output specifications for the different sound effect modes....8
Adjusting the Soundbar volume with a TV remote control ....10
04 Connecting the Soundbar 11
Connecting the power and units 11
- Recommended Speaker Layout.... 12
- Surround speaker mode (HW-Q9**C, HW-Q9**GC only) .. 12
- Manually connecting the Subwoofer or Surround Speakers.... 13
- LED Indicator Lights on the Rear of Subwoofer and Surround Speakers 14
05 Connecting to a TV 15
Connecting the TV that supports HDMI ARC (Audio Return Channel) 15
Connecting using an Optical Cable 16
Connecting via Bluetooth 17
Connecting via Wi-Fi 19
Using the Q-Symphony Function....20
Using the SpaceFit Sound 21
06 Connecting an External Device 22
Method 1. Connecting using an HDMI Cable (Capable of Dolby Atmos / DTS:X decoding and playback)....22
Method 2. Connecting using an Optical Cable ..... 23
07 Connecting a Mobile Device 24
Method 1. Connecting via Bluetooth .....24
Method 2. Connecting via Wi-Fi (Wireless Network)....26
Using the Tap Sound 27
08 Connecting via Apple Airplay 2 28
09 Installing the Wall Mount 29
Installation Precautions....29
Wallmount Components .....29
Installing the Surround Speakers on a Wall (applicable models only)....30
10 Installing the Soundbar in front of TV 30
Component 30
11 Software Update 31
Auto Update 31
USB Update....31
Initialisation 32
12 Troubleshooting 32
01 CHECKING THE COMPONENTS

natural_image
Three grayscale images of remote control devices: a rectangular remote, a remote with two buttons, and a black tower (no text or symbols)Soundbar Main Unit Soundbar Remote Control / Batteries Subwoofer

natural_image
Three product images showing different hardware or device configurations: a gray server unit, a black connector with 'x 4 or 2' label, and a black connector with two USB connectors (no text or symbols present)Surround Speaker (optional)
(Left / Right)
Power Cord (Subwoofer, Surround Speaker, Soundbar) (optional)


text_image
A B 2×2 x 2 (M4 x L10)Wall Mount Guide Holder-Screw Screw

natural_image
Two 3D mechanical parts: a bracket with cross-sectional view and a flat rectangular block, both scaled by 2x and 4x respectively (no text or symbols on the objects themselves)Bracket-Wall Mount Rubber-Foot
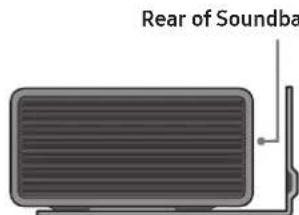
- For more information about the power supply and power consumption, refer to the label attached to the product. (Label: Rear of the Soundbar Main Unit)
• To purchase additional components or optional cables, contact a Samsung Service Centre or Samsung Customer Care. - For more information about the wallmount or rubber-foot, see pages 29\~31.
- Design, specifications, and App screen are subject to change without prior notice.
- The appearance of the accessories may differ slightly from the illustrations above.
- Samsung Electronics Co., Ltd reserves the right to change the specifications without notice.
• Weight and dimensions are approximate.
02 PRODUCT OVERVIEW
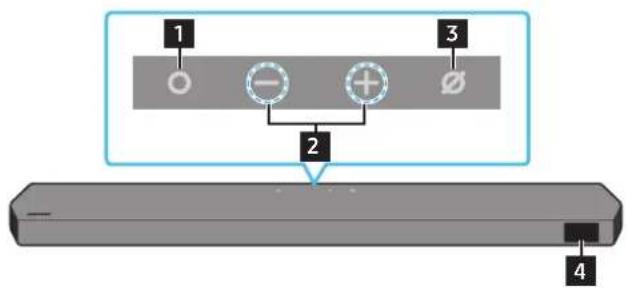
Top Panel of the Soundbar
text_image
1 2 3 4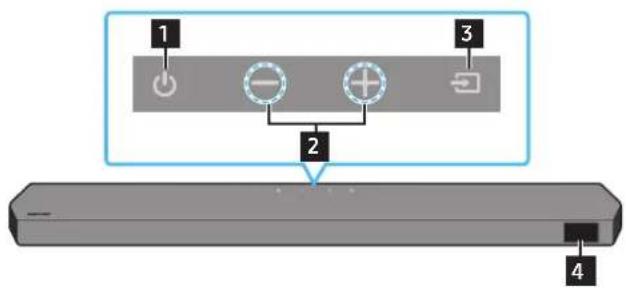
text_image
1 2 3 4HW-Q9**C, HW-Q9**GC / HW-Q8**C, HW-Q8**GC HW-Q7**C, HW-Q7**GC
| 1 | ○ (Multi Function) Button (HW-Q9**C, HW-Q9**GC / HW-Q8**C, HW-Q8**GC models)In standby mode, press the Ⓜ Multi Function) button to turn on the Soundbar.Press the Ⓜ Multi Function) button to change the input source. |
| 1 | ↓ (Power) Button (HW-Q7**C, HW-Q7**GC model)Turns the power on and off. |
| 2 | - + (Volume) ButtonAdjusts the volume. |
| 3 | ∅ (Mic On/Off) Button(HW-Q9**C, HW-Q9**GC / HW-Q8**C, HW-Q8**GC models)Press the button to turn the microphone on or off.When the microphone is off, the LED indicator will glow red. 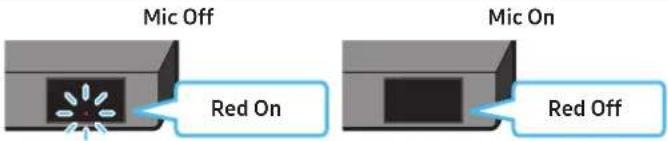 |
| 3 | → (Source) Button (HW-Q7**C, HW-Q7**GC model)Press the Source) button to change the input source. |
| 4 | DisplayDisplays the product's status and current mode.D.IN → HDMI → Wi-Fi → BT |
- When you plug in the AC cord, the power button will begin working in 4 to 6 seconds.
- When you turn on this unit, there will be a 4 to 5 second delay before it produces sound.
• If you hear sounds from both the TV and Soundbar, go to the Settings menu for the TV audio and change the TV speaker to External Speaker.
Bottom Panel of the Soundbar

text_image
1 2 SERVICE 3 4 HDMI HDMI TO TV (WABC/ARC) 51 POWER
Connect the Soundbar's AC power cable. (See page 11)
2 SERVICE
Connect a USB storage device to upgrade the product's software.
3 DIGITAL AUDIO IN (OPTICAL)
Connect to the digital (optical) output of an external device. (See page 23)
4HDMI
Inputs digital video and audio signals simultaneously using an HDMI cable. Connect to the HDMI output of an external device. (See page 22)
5 HDMI TO TV (eARC/ARC)
Connect to the HDMI jack on a TV. (See page 15)
- When disconnecting the power cord from a wall outlet, pull the plug. Do not pull the cable.
- Do not connect this unit or other components to an AC outlet until all connections between components are complete.
03 USING THE SOUNDBAR REMOTE CONTROL
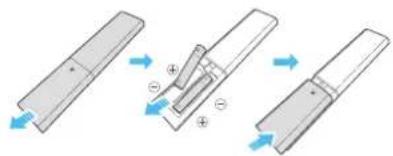
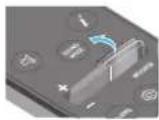
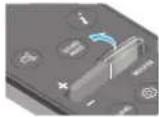
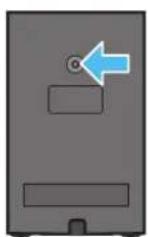
Inserting Batteries before using the Remote Control (AAA batteries X 2)
Slide the back cover in the direction of the arrow until it is completely removed. Insert 2 AAA batteries (1.5V) oriented so that their polarity is correct. Slide the battery cover back into position.
text_image
Diagram illustrating three-step assembly or manufacturing process with labeled components and directional arrowsHow to Use the Remote Control
text_image
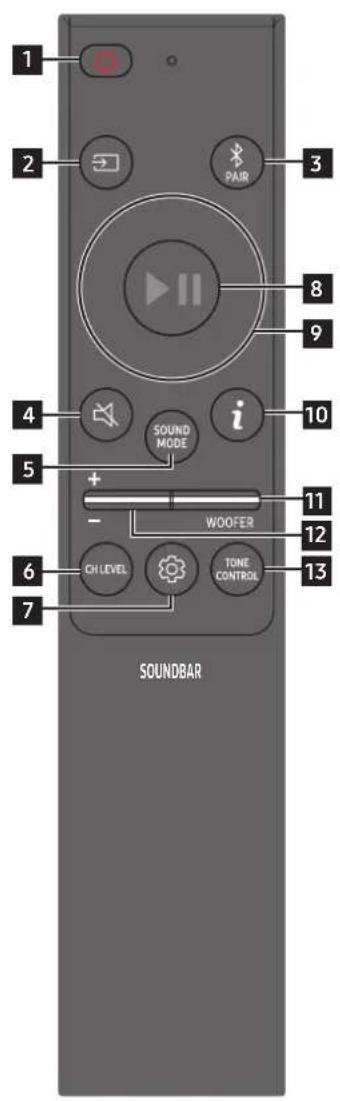
1 2 PAIR 3 8 9 4 i 10 5 + - WOOFER 11 12 6 CH LEVEL TONE CONTROL 13 7 SOUNDBAR| 1 |  Power Power | Turns the Soundbar on and off.Auto Power Down FunctionThe unit turns off automatically in the following situations:In D.IN / HDMI / Wi-Fi / BT mode if there is no audio signal for 18 minutes. |
| 2 |  Source Source | Press to select a source connected to the Soundbar.Voice Feedback On/OffYou can turn on or off the Voice Feedback.Press and hold the →(Source) button on the remote control for 5 seconds while the Soundbar is off (Standby mode).Each time you change the Voice Feedback setting, the OLED Display will show “AUI OFF” (Default) or “AUI ON”. |
| 3 |  Bluetooth PAIR Bluetooth PAIR | Switch the Soundbar to Bluetooth pairing mode. Press the button and wait for the “BTPAIRING” screen to connect to a new Bluetooth device. |
| 4 |  Mute Mute | Press the 🔒(Mute) button to mute the sound.Press it again to unmute the sound. |
| 5 |  SOUND MODE SOUND MODE | By pressing the button, you can select the desired audio mode such as Surround, Game Pro, Standard, Adaptive Sound.StandardOutputs the original sound.SurroundProvides a wider sound field than standard.Game ProProvides stereoscopic sound to immerse you in the action while gaming.Adaptive SoundAnalyzes the content in real time and automatically provides the optimal sound field based on the characteristics of the content. |
| 6 |  CH LEVEL CH LEVEL | By pressing the button, you can adjust the volume of the each speaker such as Centre level, Side level, Wide level, Front Top level, Rear level, and Rear top level.To control the volume of the each speaker select Centre level, Side level, Wide level, or Front Top level in Sound Settings, and then adjust the volume between -6~+6 by using the Up/Down buttons.If Surround Speakers are connected, select Rear level or Rear top level and then use the Up/Down buttons to adjust the volume within a -6 to +6 range.CH LEVEL specifications may differ with the respective model. |
| 7 |  Sound Control Sound Control | By pressing the button, you can set the audio function such as SpaceFit Sound, AVA, Voice enhance mode, Night mode, Sync, Surround speaker mode, Virtual. The desired item can be adjusted using the Up/Down buttons.The SpaceFit Sound and AVA functions are not supported by HW-Q7**C, HW-Q7**GC model.Voice enhance mode enhances spoken dialog in movies and TV to make it easier to hear.Night mode is optimized for night time viewing with the settings adjusted to bring the volume down but keep the dialog clear.Press and hold the (Sound Control) button for about 5 seconds to adjust the sound for each frequency band.150Hz, 300Hz, 600Hz, 1.2kHz, 2.5kHz, 5kHz, and 10kHz are selectable using the Left/Right buttons and each can be adjusted to a setting between -6 to +6 using the Up/Down buttons.(Make sure the Sound mode is set to "Standard".If the video on the TV and audio from the Soundbar are not synchronized, select Sync in Sound Control, and then set the audio delay between 0~300 milliseconds by using the Up/Down buttons.Sync is only supported for some functions.Available Surround speaker mode settings are supported only by HW-Q9**C, HW-Q9**GC model.The Virtual Speaker function can be turned ON/OFF by using the Up/Down buttons. |
| 8 |  Play / Pause Play / Pause | You can also play or pause music by pressing the button. |
| 9 |  Up/Down/Left/Right Up/Down/Left/Right | 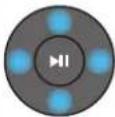 Press the indicated areas to select Up/Down/Left/Right.Press Up/Down/Left/Right on the button to select or set functions.Music SkipPress the Right button to select the next music file. Press the Left button to select the previous music file.ID SETUse this option when the Subwoofer or Surround Speakers are not connected or need reconnection.While powered off, press and hold the Up button for 5 seconds to perform ID SET. (See page 13.) Press the indicated areas to select Up/Down/Left/Right.Press Up/Down/Left/Right on the button to select or set functions.Music SkipPress the Right button to select the next music file. Press the Left button to select the previous music file.ID SETUse this option when the Subwoofer or Surround Speakers are not connected or need reconnection.While powered off, press and hold the Up button for 5 seconds to perform ID SET. (See page 13.) |
| 10 |  Info Info | Press to display information about the active function or the codec available.In BT mode, it displays the connected device (when pairing is complete) or "BT ready" (when pairing is required). |
| 11 | WOOFER LEVEL | 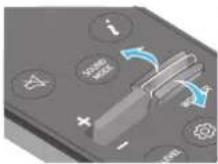 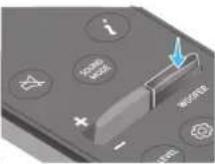 Push the button up or down to adjust the level of the woofer (bass). Push the button up or down to adjust the level of the woofer (bass). |
| 12 | VOLUME |  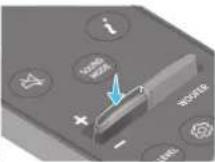 Push the button up or down to adjust the volume.MutePress the VOL button to mute the sound. Press it again to unmute the sound. Push the button up or down to adjust the volume.MutePress the VOL button to mute the sound. Press it again to unmute the sound. |
| 13 | TONE CONTROL | By pressing the button, you can adjust the volume of the treble or bass sound. The defired item can be adjusted using the Up/Down buttons. This function is enabled in Sound mode excluding in Standard mode.To control the volume of the treble or bass sound, select TREBLE or BASS in Sound Settings, and then adjust the volume between -6~+6 by using the Up/Down buttons.Once the bass level is changed, the woofer level will be also adjusted accordingly. |
Active Voice Amplifier (AVA)
- Analyzes external noise in real time while soundbar is playing, so that voice audio can always be heard clearly.
- No data is saved during the analysis.
- This function is not supported by HW-Q7**C, HW-Q7**GC model.
Using the Hidden Buttons (Buttons with more than one function)
| Hidden Button | Reference page | |
| Remote Control Button Function | ||
| WOOFER (Up) TV remote control | On/Off (Standby) page 10 | |
| Up ID SET page 13 | ||
| (Sound Control) | 7 Band EQ page 7 | |
| (Source) | Voice Feedback On/Off (Standby) page 6 | |
Output specifications for the different sound effect modes
| Effect Input | Output | |
| With Subwoofer & Surround Speaker | ||
| Standard | 2.0 ch 2.1 ch | |
| 5.1 ch 5.1 ch / 7.1 ch (DTS) | ||
| 7.1 ch 7.1 ch | ||
| Dolby Atmos®, DTS:X 7.1.4 ch | ||
| Surround | 2.0 ch | 9.1.4 ch |
| 5.1 ch | 9.1.4 ch | |
| 7.1 ch | 9.1.4 ch | |
| Dolby Atmos®, DTS:X | 9.1.4 ch | |
| Game Pro | 2.0 ch | 9.1.4 ch |
| 5.1 ch | 9.1.4 ch | |
| 7.1 ch | 9.1.4 ch | |
| Dolby Atmos®, DTS:X | 9.1.4 ch | |
| Adaptive Sound | 2.0 ch | 9.1.4 ch |
| 5.1 ch | 9.1.4 ch | |
| 7.1 ch | 9.1.4 ch | |
| Dolby Atmos®, DTS:X | 9.1.4 ch |
| Effect Input | Output | ||
| With Subwoofer Only | With Subwoofer & Surround Speaker | ||
| Standard | 2.0 ch 2.1 ch 2.1 ch | ||
| 5.1 ch 5.1 ch 5.1 ch / 7.1 ch (DTS) | |||
| 7.1 ch 5.1 ch 7.1 ch | |||
| Dolby Atmos®, DTS:X 5.1.2 ch 7.1.4 ch | |||
| Surround | 2.0 ch 5.1.2 ch 7.1.4 ch | ||
| 5.1 ch 5.1.2 ch 7.1.4 ch | |||
| 7.1 ch 5.1.2 ch 7.1.4 ch | |||
| Dolby Atmos®, DTS:X 5.1.2 ch 7.1.4 ch | |||
| Game Pro | 2.0 ch 5.1.2 ch 7.1.4 ch | ||
| 5.1 ch 5.1.2 ch 7.1.4 ch | |||
| 7.1 ch 5.1.2 ch 7.1.4 ch | |||
| Dolby Atmos®, DTS:X 5.1.2 ch 7.1.4 ch | |||
| 2.0 ch 5.1.2 ch 7.1.4 ch | |||
| Adaptive Sound | 5.1 ch 5.1.2 ch 7.1.4 ch | ||
| 7.1 ch 5.1.2 ch 7.1.4 ch | |||
| Dolby Atmos®, DTS:X 5.1.2 ch 7.1.4 ch | |||
| Effect Input | Output | ||
| With Subwoofer Only | With Subwoofer & Surround Speaker | ||
| Standard | 2.0 ch 2.1 ch 2.1 ch | ||
| 5.1 ch 3.1 ch 5.1 ch | |||
| Dolby Atmos®, DTS:X 3.1.2 | ch 5.1.4 ch | ||
| Surround | 2.0 ch 3.1.2 ch 5.1.4 | ch | |
| 5.1 ch 3.1.2 ch 5.1.4 | ch | ||
| Dolby Atmos®, DTS:X 3.1.2 | ch 5.1.4 ch | ||
| Game Pro | 2.0 ch 3.1.2 ch 5.1.4 | ch | |
| 5.1 ch 3.1.2 ch 5.1.4 | ch | ||
| Dolby Atmos®, DTS:X 3.1.2 | ch 5.1.4 ch | ||
| Adaptive Sound | 2.0 ch 3.1.2 ch 5.1.4 | ch | |
| 5.1 ch 3.1.2 ch 5.1.4 | ch | ||
| Dolby Atmos®, DTS:X 3.1.2 | ch 5.1.4 ch | ||
The Surround Speakers will not produce sounds for 2 channel output while Standard mode is in use. To enable sound for the Surround Speakers, change the effect mode to Surround.
Adjusting the Soundbar volume with a TV remote control
Adjust the Soundbar volume using the TV's remote control.
- This function can be used with IR remote controls only. Bluetooth remote controls (remote controls that require pairing) are not supported.
-
Set the TV speaker to External Speaker to use this function.
• Manufacturers supporting this function:
Samsung, VIZIO, LG, Sony, Sharp, PHILIPS, PANASONIC, TOSHIBA, Hisense, RCA -
Turn Off the Soundbar.
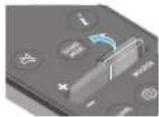
- Push up and hold the WOOFER button for 5 seconds.
Each time you push the WOOFER button up and hold it for 5 seconds, the mode switches in the following order: "OFF-TV REMOTE" (Default mode), "SAMSUNG-TV REMOTE", "ALL-TV REMOTE".
| Remote Control Button Display Status | |||
 |  | (Default mode)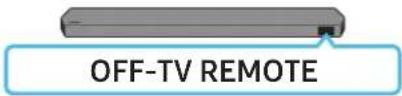 | Disable the TV remote control. |
 |  |  | Enable a Samsung TV's IR remote control. |
 |  |  | Enable a third-party TV's IR remote control. |
04 CONNECTING THE SOUNDBAR
Connecting the power and units
Use the Power cord to connect the Subwoofer, Surround Speakers, and Soundbar to an electrical outlet in the following order:
- For more information about the required electrical power and power consumption, refer to the label attached to the product. (Label: Rear of the Soundbar Main Unit)
- Connect the Power cord to the Subwoofer.
Power Cord
Rear of Subwoofer
- Connect the power cord to the Left and Right Surround Speakers. (optional)
Power Cord
Bottoms of the Left and
Right Surround Speakers
(optional)
- Connect the Power cord to the Soundbar.
Power Cord
Bottom of the Soundbar
Main Unit
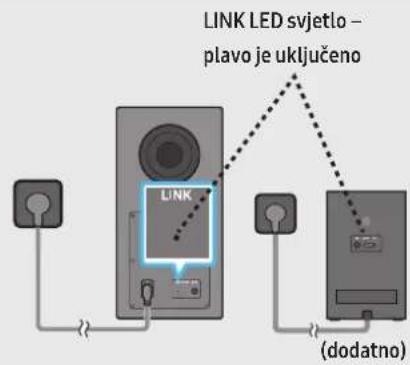
- Connect power to the Soundbar, Subwoofer and Surround Speakers. The Subwoofer and Surround Speakers are automatically connected when the Soundbar is turned on.
LINK LED - Blue is On
(optional)
NOTE
- Connect the Subwoofer and Surround Speakers power before connecting to the Soundbar. The Subwoofer and Surround Speakers will be automatically connected when turning on the Soundbar.
- If you unplug and reconnect the power cord when the product is turned on, the Soundbar turns on automatically.
- The surround speaker system is supported by applicable models only.
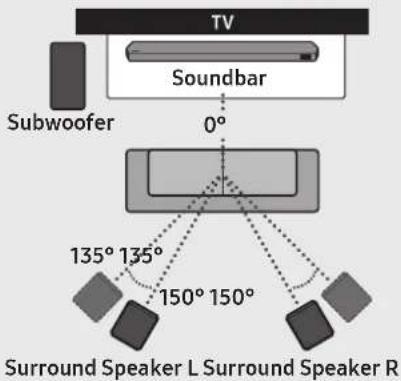
Recommended Speaker Layout
text_image
TV Soundbar 0° Subwoofer 135° 135° 150° 150° Surround Speaker L Surround Speaker RCAUTION
- Wireless receiving antennas are built into the subwoofer and surround speakers. Keep the units away from water and moisture.
- For optimal listening performance, make sure that the areas around the subwoofer and surround speakers locations are clear of any obstructions.
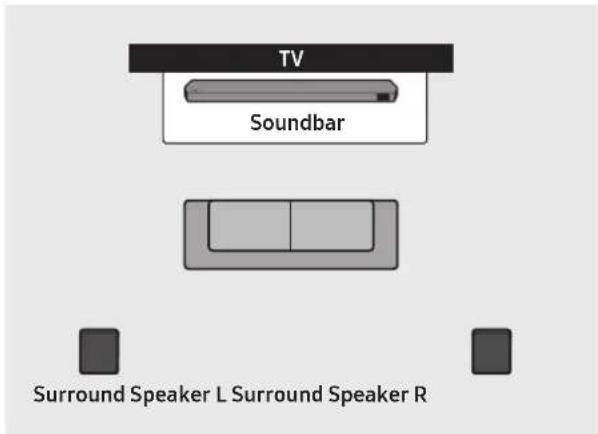
Surround speaker mode (HW-Q9\*\*C, HW-Q9\*\*GC only)
An optimal surround sound may be delivered depending on the position of the surround speaker. See the illustration below for speaker positioning.
To activate this mode, select the Surround Speaker mode using the remote control of the Soundbar.
(Sound Control) → Surround speaker → ▲(Up) / ▼(Down) → Front / Rear
text_image
TV Soundbar Surround Speaker L Surround Speaker R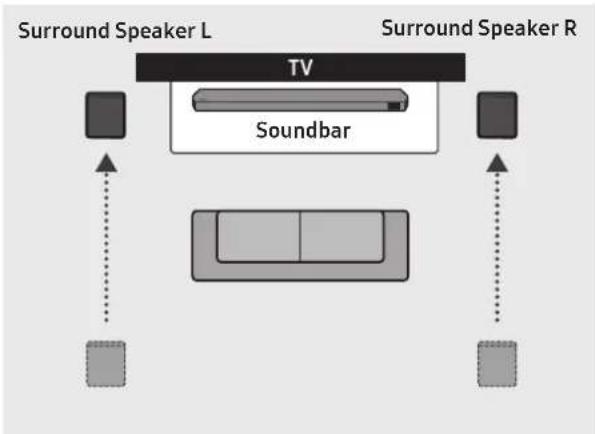
flowchart
graph TD
    A["TV"] --> B["Soundbar"]
    B --> C["Surround Speaker L"]
    B --> D["Surround Speaker R"]
    C --> E["Square Box"]
    D --> F["Square Box"]
    style A fill:#999
    style B fill:#ccc
    style C fill:#999
    style D fill:#999
    style E fill:#ccc
    style F fill:#ccc
Rear positioning Front positioning
NOTE
- This mode is available only with Soundbar models including a specific surround speaker.
- In Front speaker mode, position the front speakers toward you.
- The surround speaker mode is enabled by default.
Before performing the manual connection procedure below:
-
Check whether the power cables for the Soundbar and subwoofer or Surround Speakers are connected properly.
• Make sure that the Soundbar is turned off. -
Turn off the Soundbar main.
-
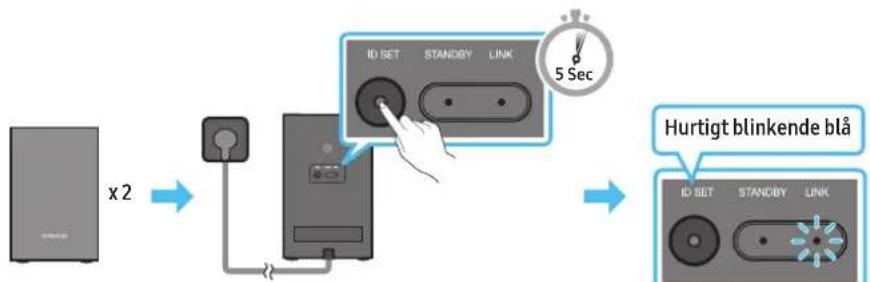
Press and hold ID SET on the rear of the subwoofer and surround speakers for at least 5 seconds.
- The red indicator at the rear of each speaker turns off and the blue indicator blinks.
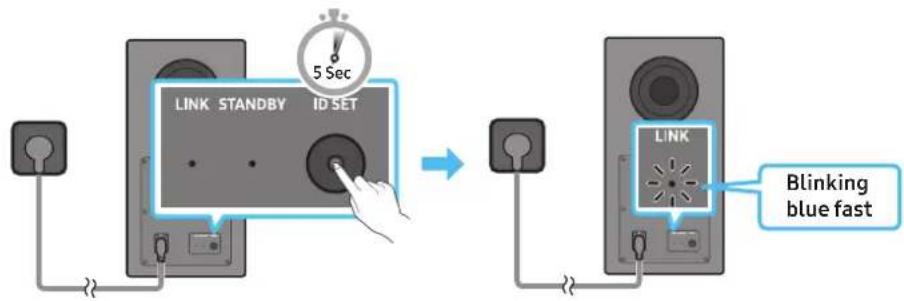
text_image
LINK STANDBY ID SET 5 Sec LINK Blinking blue fastRear of Subwoofer Rear of Subwoofer

flowchart
graph LR
    A["Device with x2"] --> B["Switch"]
    B --> C["ID SET"]
    C --> D["STANDBY"]
    D --> E["LINK"]
    E --> F["5 Sec"]
    F --> G["Blinking blue fast"]
Rear of the Left and Right Surround Speakers (optional)
-
Press the Up button on the remote control for 5 seconds.
-
The ID SET message appears on the display of the Soundbar for a moment, and then it disappears.
- The Soundbar will automatically power on when ID SET is complete.
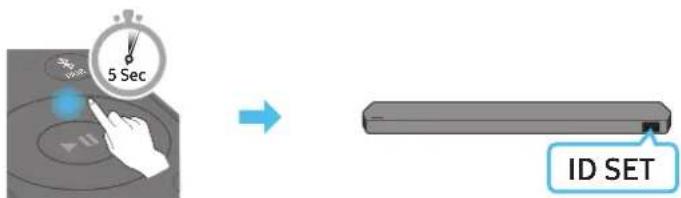
text_image
5 Sec ID SET- Check if the LINK LED is solid blue (connection complete).
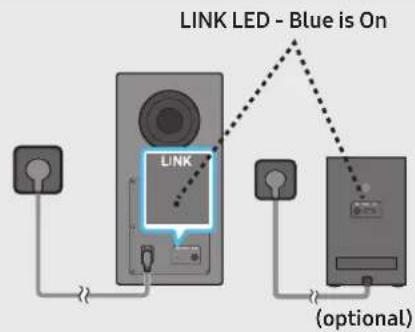
text_image
LINK LED - Blue is On LINK (optional)The LINK LED indicator stops blinking and glows a solid blue when a connection is established between the Soundbar and the Subwoofer, surround speakers.
LED Indicator Lights on the Rear of Subwoofer and Surround Speakers
| LED Status Description Resolution | |||
Subwoofer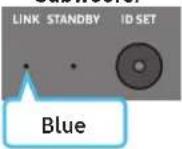 Surround Speakers(applicable models only) Surround Speakers(applicable models only)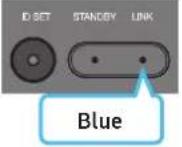 | On | Successfully connected(normal operation) | - |
| Blinking Recovering the connection | Check if the power cable attached to the main Soundbar unit is connected properly or wait about 5 minutes.If blinking persists, try manually connecting the subwoofer and Surround Speakers. See page 13. | ||
Subwoofer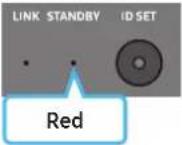 Surround Speakers(applicable models only) Surround Speakers(applicable models only)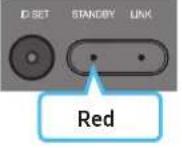 | On | Standby (with theSoundbar main unit turned off) | Check if the power cable attached to the main Soundbar unit is connected properly. |
| Connection failed | Connect again. See the instructions for manual connection on page 13. | ||
Subwoofer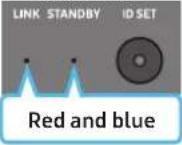 Surround Speakers(applicable models only) Surround Speakers(applicable models only)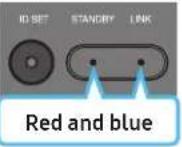 | Blinking Malfunction | See the contact information for the Samsung Service Centre in this manual. | |
NOTE
- If the main unit is powered off, the subwoofer will go into stand-by mode and the STANDBY LED on the rear of the sub-woofer will turn red after blinking in blue several times.
- If you use a device that uses the same frequency as the Soundbar near the Soundbar, interference may cause some sound interruption.
- The maximum transmission distance of the main unit's wireless signal is about 10 m, but may vary depending on your operating environment. If a steel-concrete or metallic wall is between the main unit and the subwoofer, the system may not operate at all because the wireless signal cannot penetrate metal.
- The surround speaker system is supported by applicable models only.
CAUTION
- Wireless receiving antennas are built into the subwoofer and Surround Speakers. Keep the unit away from water and moisture.
- For optimal listening performance, make sure that the area around the subwoofer and the Surround Speakers are clear of any obstructions.
05 CONNECTING TO A TV
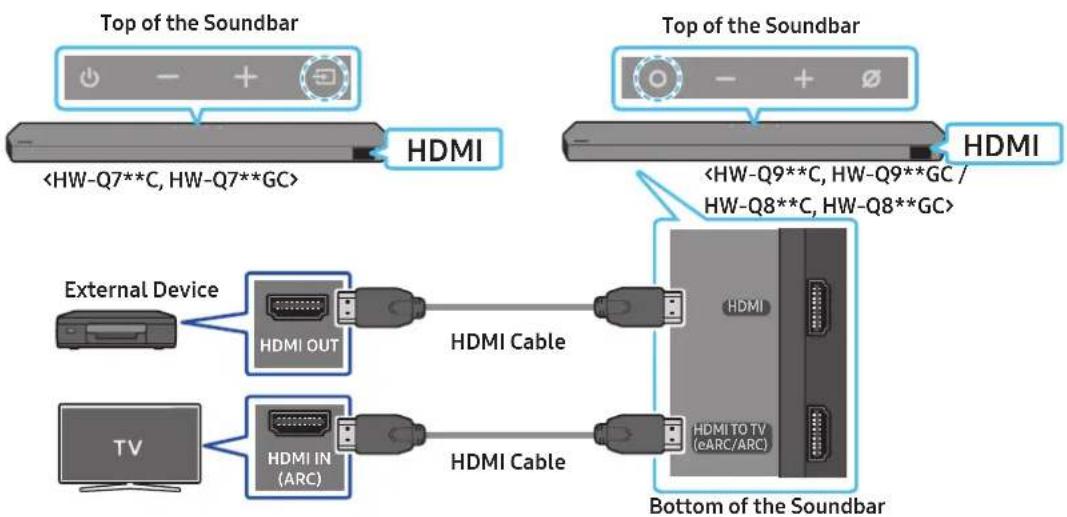
Connecting the TV that supports HDMI ARC (Audio Return Channel)

CAUTION
- When both the HDMI cable and optical cable are connected, the HDMI signal is received first.
- To connect the HDMI cable between the TV and Soundbar, be sure to connect the terminals marked ARC. Otherwise, the TV sound may not be output.
- The recommended cable is a Premium High Speed HDMI Cable with Ethernet certified by HDMI.org.
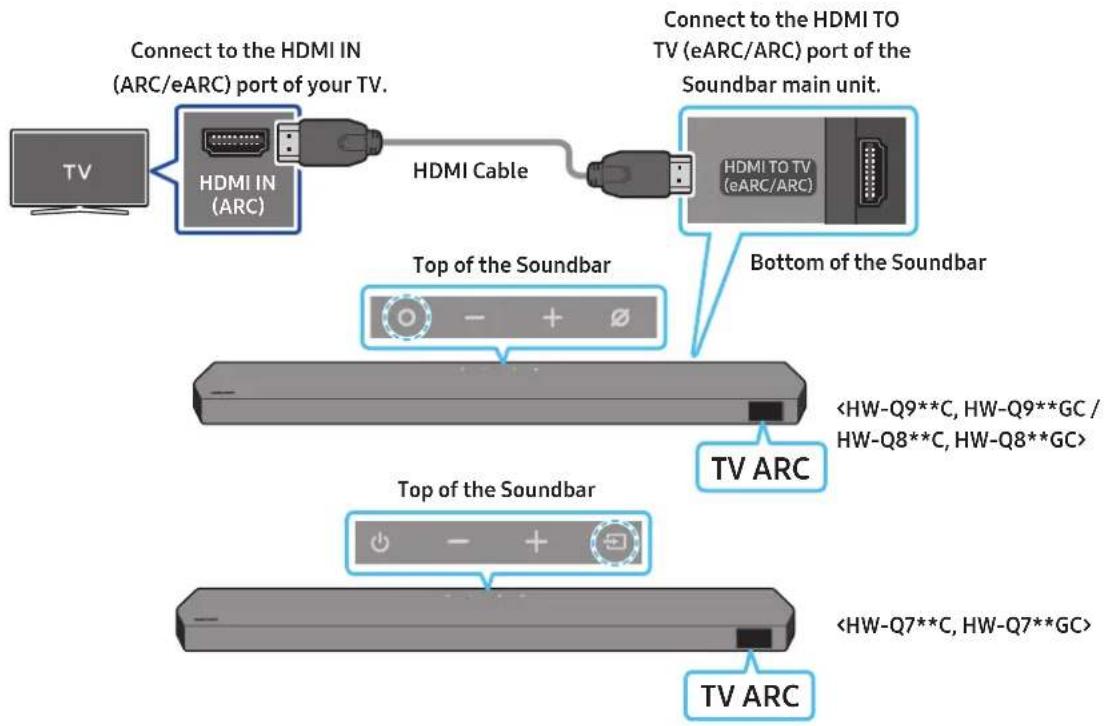
text_image
Connect to the HDMI IN (ARC/eARC) port of your TV. Connect to the HDMI TO TV (eARC/ARC) port of the Soundbar main unit. HDMI IN (ARC) HDMI Cable HDMI TO TV (eARC/ARC) Bottom of the Soundbar Top of the Soundbar- With the Soundbar and TV turned off, connect the HDMI cable as shown in the figure.
- Turn on the Soundbar and TV.
-
"TV ARC" appears in the display window of the Soundbar main unit and the Soundbar plays TV sound.
-
When the TV sound is not output, press the ⬆(Multi Function) / →(Source) button at the top of the Soundbar or the →(Source) button on the remote control to select the "D.IN" mode. The screen displays "D.IN" and "TV ARC" in sequence, and TV sound is played.
- When connecting a TV that supports the eARC function, "eARC" appears on the display and the sound is heard.
- To connect with eARC, the eARC function in the TV menu should be set to On. Refer to the TV user manual for details on setting. (e.g. Samsung TV: Home ( home ) → Menu → Settings ( ➕ → All Settings ( ➕ → Sound → Expert Settings → HDMI-eARC Mode (Auto))
- If "TV ARC" does not appear in the display window of the Soundbar main unit, confirm that the HDMI cable is connected to the correct port.
- Use the volume buttons on the TV's remote control to change the volume on the Soundbar.
NOTE
- When you connect the TV that supports the HDMI ARC (Audio Return Channel) to the Soundbar with an HDMI cable, you can transmit the digital video and audio data without connecting a separate optical cable.
• We recommend you use a coreless HDMI cable if possible. If you use a cored HDMI cable, use one whose diameter is less than 14 mm. - This function is not available if the HDMI cable does not support ARC.
- When the audio in a broadcast is encoded in Dolby Digital and the "Digital Output Audio Format" on your TV is set to PCM, we recommend that you change the setting to Dolby Digital. When the setting on the TV is changed, you will experience better sound quality. (The TV menu may use different words for Dolby Digital and PCM depending on the TV manufacturer.)
• The ARC/eARC protocols support Dolby Atmos. - Make sure that the content supports Dolby Atmos®.
Connecting using an Optical Cable
Pre-connection Checklist
- When both the HDMI cable and optical cable are connected, the HDMI signal is received first.
- When you use an optical cable and the terminals have covers, be sure to remove the covers.

natural_image
Three-step diagram showing a device moving from left to right, with no visible text or symbols.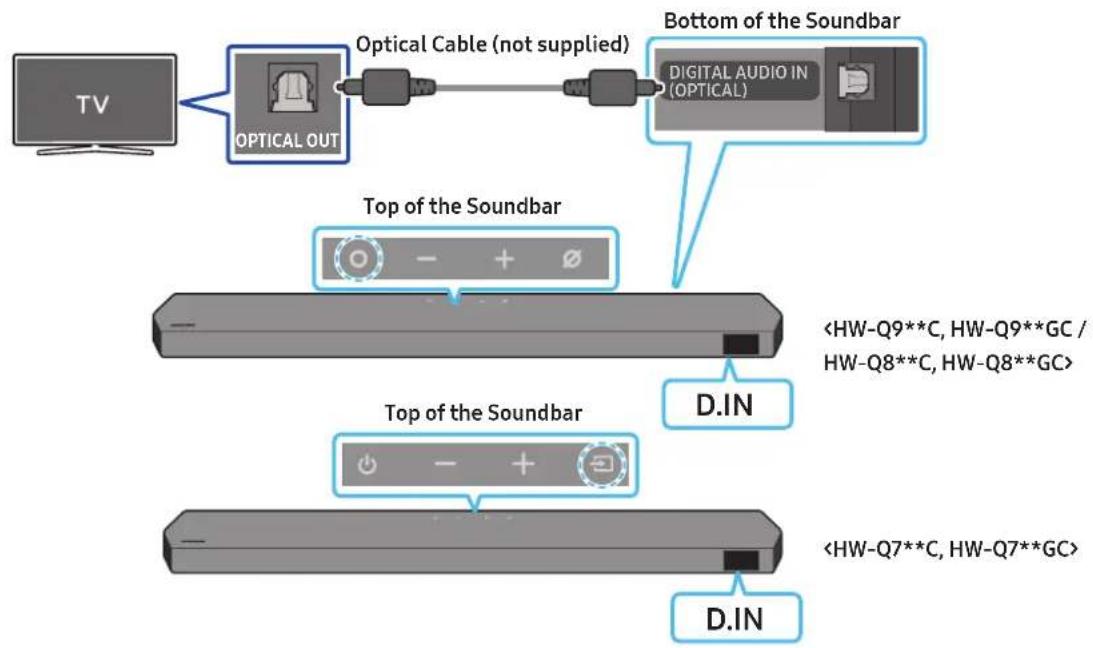
flowchart
graph TD
    A["TV"] --> B["OPTICAL OUT"]
    B --> C["Optical Cable (not supplied)"]
    C --> D["Bottom of the Soundbar"]
    D --> E["Digital Audio in (OPTICAL)"]
    F["Top of the Soundbar"] --> G["+ - +"]
    H["Top of the Soundbar"] --> I["- - +"]
    J["<HW-Q9**C, HW-Q9**GC / HW-Q8**C, HW-Q8**GC>"] --> K["D.IN"]
    L["<HW-Q7**C, HW-Q7**GC>"] --> M["D.IN"]
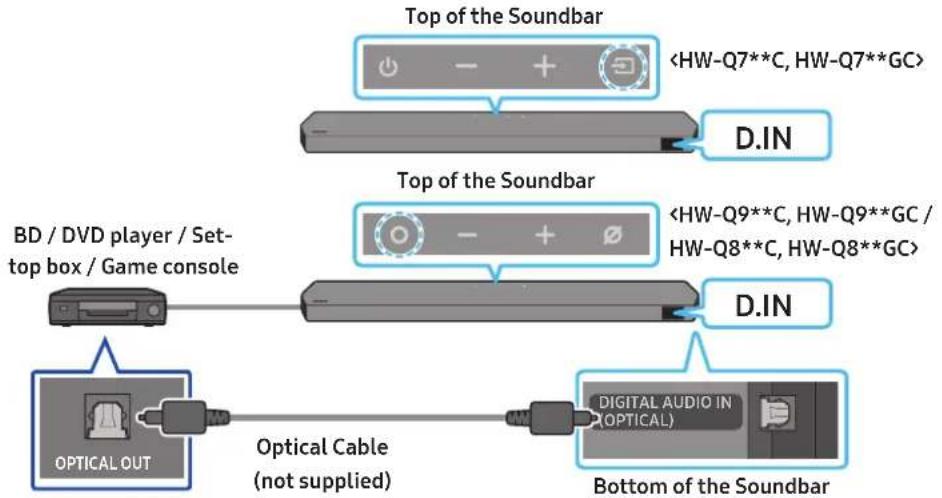
- With the TV and Soundbar turned off, connect the DIGITAL AUDIO IN (OPTICAL) port on the Soundbar and the OPTICAL output port on the TV with the optical cable (not supplied), as shown in the figure.
- Turn on the Soundbar and TV.
- Press the ⬆ (Multi Function) / → (Source) button at the top of the Soundbar or the → (Source) button on the remote control to select the "D.IN" mode.
- The TV sound is output from the Soundbar.
Connecting via Bluetooth
When a Samsung TV is connected using Bluetooth, you can hear stereo sound without the hassle of cabling.
- Only one Samsung TV can be connected at a time.
- Samsung TV that supports Bluetooth can be connected. Check the specifications of your TV.
The initial connection
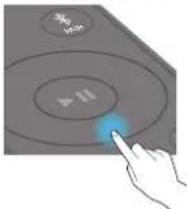
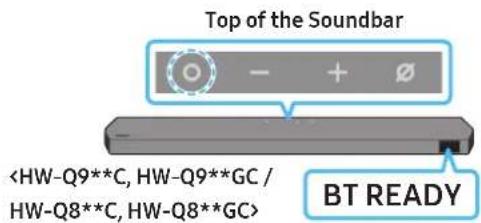
- Press the ✧PAIR button on the Soundbar remote control to enter the "BTPAIRING" mode.
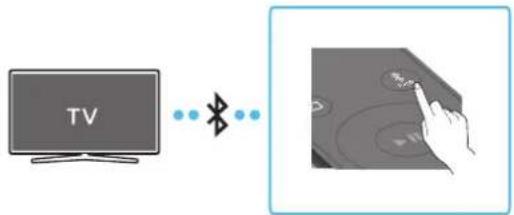
(OR) a. Press the ⬤ (Multi Function) / → (Source) button on the top panel and then select "BT". "BT" changes to "BT PAIRING" in a few seconds automatically or changes to "BT READY" if there is a connect record.
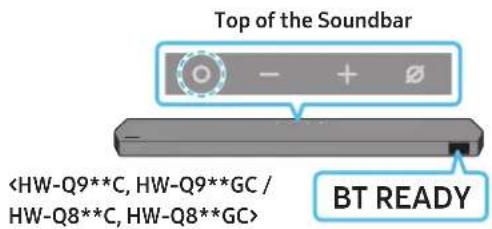
text_image
Top of the Soundbar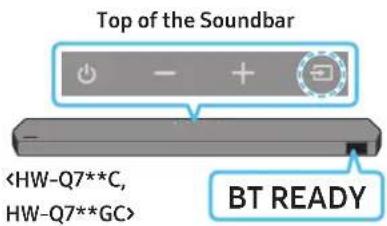
text_image
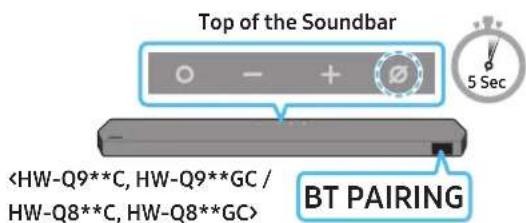
Top of the Soundbarb. When "BT READY" appears, press and hold the ☑ (Mic On/Off) / ➞ (Source) button on the top panel of the Soundbar for more than 5 seconds to display "BT PAIRING".

text_image
Top of the Soundbar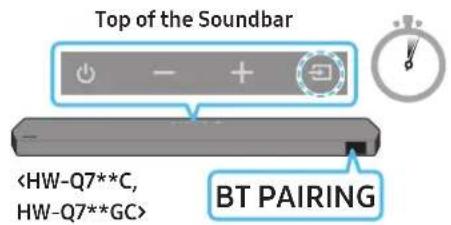
text_image
Top of the Soundbar- Select Bluetooth mode on the Samsung TV.
(e.g. Home (☑) → Menu → Settings (☑) → All Settings (☑) → Sound → Sound Output → Bluetooth Speaker List → Soundbar Q***C (Bluetooth))
- Select "Soundbar Q***C" from the list on TV's screen.
An available Soundbar is indicated with "Need Pairing" or "Paired" on the TV's Bluetooth device list. To connect the Samsung TV to the Soundbar, select the message, and then establish a connection.
- When the Samsung TV is connected, [TV Name] "BT" appears on the Soundbar's front display.
- You can now hear Samsung TV sound from the Soundbar.
- After you have connected the Soundbar to your Samsung TV the first time, use the "BT READY" mode to reconnect.
If the device fails to connect
- If you have an existing Soundbar (e.g., Soundbar Q***C) on the list of speakers on the Samsung TV, delete it.
- Then repeat steps 1 through 3.
Disconnecting the Soundbar from the Samsung TV
Press the ⬤ (Multi Function) / → (Source) button at the top of the Soundbar or the → (Source) button on the remote control to select the mode other than "BT".
- Disconnecting takes time because the Samsung TV must receive a response from the Soundbar.
(The time required may differ, depending on the Samsung TV model.)
- BT READY : In this mode, you can reconnect any Samsung TV or mobile device that was connected before.
- BT PAIRING : In this mode, you can connect a new device to the Soundbar.
(Press the ✦PAIR button on the Soundbar remote control or press and hold the ⭕(Mic On/Off) / →(Source) button on the top of the Soundbar for more than 5 seconds while the Soundbar is in "BT" mode.)
Notes on Bluetooth connection
- Locate a new device within 1 m to connect via Bluetooth communication.
- If asked for a PIN code when connecting a Bluetooth device, enter <0000>.
- The Soundbar automatically turns off after 18 minutes in the Ready state.
- The Soundbar may not perform Bluetooth search or connection correctly under the following circumstances:
- If there is a strong electrical field around the Soundbar.
- If several Bluetooth devices are simultaneously paired with the Soundbar.
- If the Bluetooth device is turned off, not in place, or malfunctions.
- Electronic devices may cause radio interference. Devices that generate electromagnetic waves must be kept away from the Soundbar main unit - e.g., microwaves, wireless LAN devices, etc.
Connecting via Wi-Fi
Pre-connection Checklist
• Wi-Fi connection is available only on Samsung TV.
- Check whether the wireless router (Wi-Fi) is turned on and the TV is connected to the router.
- The TV and Soundbar must be connected to the same wireless network (Wi-Fi).
- If your wireless router (Wi-Fi) uses a DFS channel, you will not be able to establish a Wi-Fi connection between the TV and Soundbar. Contact your Internet service provider for details.
- Because the menus may differ depending on the year of manufacture, refer to your TV manual.
- To connect the TV to the Soundbar via Wi-Fi, connect the Soundbar to the wireless router first. See page 26, for details on how to establish a Wi-Fi connection.
- For more information about Wi-Fi connection to the Soundbar, see page 26, "Method 2. Connecting via Wi-Fi (Wireless Network)".
- Change the input source of the TV by using the Audio menu to Soundbar.
• Samsung TVs released in 2017 or later
Home (☐) → Menu → Settings (☐) → All Settings (☐) → Sound → Sound Output → Soundbar Q***C (Wi-Fi)
NOTE
The Wi-Fi Dolby Atmos connection is available in some Samsung TVs and some Soundbar models.
Precaution : The Soundbar will restart automatically if you turn on/turn off Wi-Fi.
| Wi-FiPort deactivation method | Press the CH LEVEL button on the remote control of the Soundbar for 30 seconds to turn Wi-Fi On / Off. |
| BluetoothPort deactivation method | Press the TONE CONTROL button on the remote control of the Soundbar for 30 seconds to turn Bluetooth On / Off. |
Using the Q-Symphony Function
- When the Soundbar connects to a Samsung TV that supports the Q-Symphony function you can play the sound simultaneously through the Soundbar and the TV. If you use the Q-Symphony function, the surround sound played on the TV allows you to enjoy a richer, more three-dimensional surround sound effect.
- When the Soundbar is connected "TV+Soundbar" menu appears on the TV.
Settings ( Ⓞ → All Settings ( Ⓓ → Sound → Sound Output
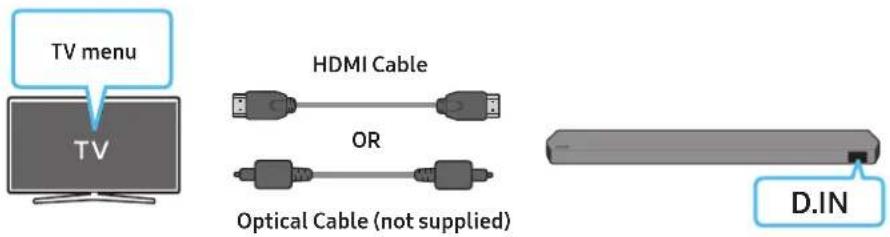
text_image
TV menu TV HDMI Cable OR Optical Cable (not supplied) D.IN• TV menu example: TV + [AV] Soundbar series name (HDMI) / TV + [AV] Soundbar series name (Optical)
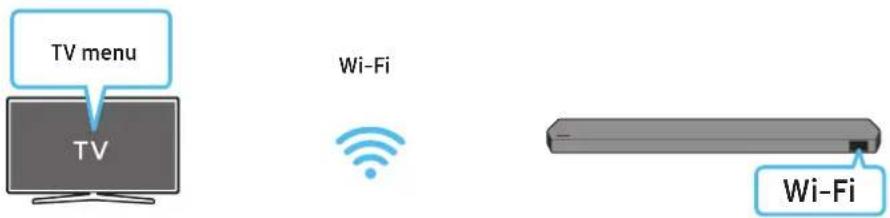
text_image
TV menu TV Wi-Fi Wi-Fi• TV menu example: TV + [AV] Soundbar series name (Wi-Fi)
NOTE
- It can operate according to the Codec supported by TV.
- This function is supported only when the HDMI Cable or Optical Cable (not supplied) or Wi-Fi is connected.
- The message displayed may differ with the TV model.
- Ensure that your TV and Soundbar are connected to the same wireless router/frequency.
- This function is available in some Samsung TVs and some Soundbar models.
Using the SpaceFit Sound
This function analyzes the user's listening space with the Soundbar's microphone and provide optimal sound for the space. Sound optimization proceeds automatically.
Method 1. Connecting via Soundbar
To enable this function, turn on the SpaceFit Sound mode with the remote control of the Soundbar.
- Press the ⚙ (Sound Control) button to turn on the SpaceFit Sound mode.
"SPACEFIT SOUND OFF" appears on the display.
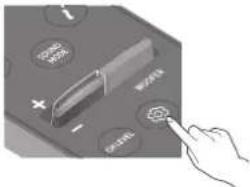
text_image
Diagram of a calculator interface with labeled buttons and a hand pointing to the function- Press the Up button on the remote control to turn on the SpaceFit Sound.
"ON" appears on the display.
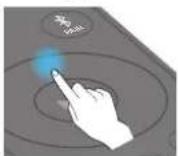
- Press the Down button on the remote control to turn off the SpaceFit Sound.
"OFF" appears on the display.
natural_image
Hand interacting with a device screen displaying a play button (no text or symbols visible)• This is available in all Sound modes.
Method 2. Connecting via TV
To enable this function, turn on the Adaptive Sound+ mode on your Samsung TV menu.
(Home ( home ) → Menu → Settings ( 🎨 ) → All Settings ( ⚙ ) → General → Intelligent Mode Settings → Adaptive Sound+)
- The sound mode on your Soundbar will automatically change to Adaptive Sound+ if you enable the Adaptive Sound+ mode on your TV.
NOTE
- This function works when the Soundbar connects to some of the Samsung TVs.
- HW-Q7**C, HW-Q7**GC models support only the method of "Connecting via TV".
06 CONNECTING AN EXTERNAL DEVICE
Method 1. Connecting using an HDMI Cable (Capable of Dolby Atmos / DTS:X decoding and playback)
Pre-connection Checklist
- If the Audio Output options include Secondary Audio, make sure Secondary Audio is set to Off.
- Make sure that the content supports Dolby Atmos® / DTS:X.
text_image
Top of the Soundbar- Use an HDMI cable to connect the HDMI OUT port on the external device and the HDMI port on the bottom of the Soundbar.
- Use an HDMI cable to connect the HDMI IN port of the TV and the HDMI TO TV (eARC/ARC) port on the bottom of the Soundbar.
- Turn on the Soundbar, TV, and the external device.
- Press the O(Multi Function) / →(Source) button on the top of the Soundbar or the →(Source) button on the remote control to select "HDMI" mode.
- The Soundbar display indicates that "HDMI" mode is currently selected and the Soundbar will start playing sounds.
NOTE
- When you use Dolby Atmos® / DTS:X: If the input source is Dolby Atmos® / DTS:X, refer to "Output specifications for the different sound effect modes" on page 8.
- When Dolby Atmos® is activated, "DOLBY ATMOS" appears in the front display.
- When DTS:X is activated, "DTS:X" appear in the front display.
- Configuring Dolby Atmos® / DTS:X on your BD player or other device
Open the audio output options on the settings menu of your BD player or other device and make sure that "No Encoding" is selected for Bitstream. For example, on a Samsung BD Player, go to Home Menu → Sound → Digital Output and then select Bitstream (unprocessed).
Supported UHD Signals Specification (3840 x 2160p)
| Frame rate (fps) Colour depth RGB 4:4:4 YCbCr 4:4:4 YCbCr 4:2:2 YCbCr 4:2:0 | |||||
| < 60 | 8 bit 0 0 0 0 | ||||
| 10 bit | - | - | 0 0 | ||
| 12 bit | - | - | 0 0 | ||
| 120 | 8 bit | - | - | - | - |
| 10 bit | - | - | - | - | |
• Supported specification may vary depending on the connected external device or usage conditions.
Method 2. Connecting using an Optical Cable
flowchart
graph TD
    A["Top of the Soundbar"] --> B["<HW-Q7**C, HW-Q7**GC>"]
    B --> C["D.IN"]
    C --> D["Top of the Soundbar"]
    D --> E["<HW-Q9**C, HW-Q9**GC / HW-Q8**C, HW-Q8**GC>"]
    E --> F["D.IN"]
    F --> G["Bottom of the Soundbar"]
    G --> H["DIGITAL AUDIO IN (OPTICAL)"]
    H --> I["Optical Cable (not supplied)"]
    I --> J["OPTICAL OUT"]
    J --> K["BD / DVD player / Set-top box / Game console"]
- Use an optical cable (not supplied) to connect the DIGITAL AUDIO IN (OPTICAL) on the Soundbar main and the OPTICAL OUT port on the external device.
- Turn on the Soundbar and external device.
- To select "D.IN" mode, press the Ⓐ(Multi Function) / ➞(Source) button on the top of the Soundbar or the ➞(Source) button on the remote control.
- Your Soundbar will play sounds from the external device.
07 CONNECTING A MOBILE DEVICE
Method 1. Connecting via Bluetooth
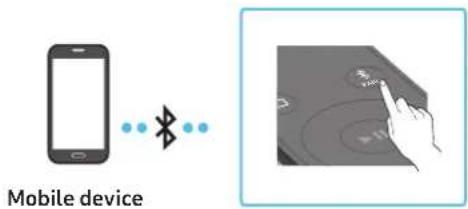
When a mobile device is connected using Bluetooth, you can hear stereo sound without the hassle of cabling.
- When you connect a paired Bluetooth device with the Soundbar off, the Soundbar automatically turns on.
The initial connection
- When connecting to a new Bluetooth device, make sure the device is within 1 m distance.
- Press the ✝PAIR button on the Soundbar remote control to enter the "BT PAIRING" mode.
text_image
Mobile device(OR) a. Press the ⬤ (Multi Function) / → (Source) button on the top panel and then select "BT".
"BT" changes to "BT PAIRING" in a few seconds automatically or changes to "BT READY" if there is a connect record.
text_image
Top of the Soundbar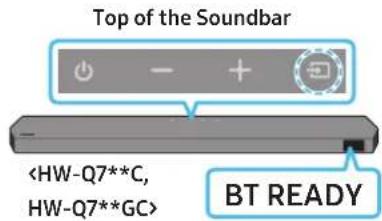
text_image
Top of the Soundbarb. When "BT READY" appears, press and hold the ☑ (Mic On/Off) / ➞ (Source) button on the top panel of the Soundbar for more than 5 seconds to display "BT PAIRING".
text_image
Top of the Soundbar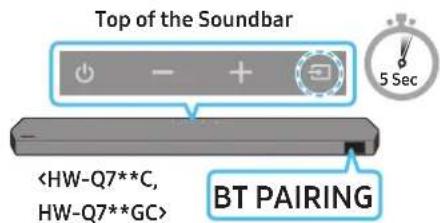
text_image
Top of the Soundbar- On your device, select "Soundbar Q***C" from the list that appears.
- When the Soundbar is connected to the Mobile device, [Mobile Device Name] "BT" appears in the front display.
- Play music files from the device connected via Bluetooth through the Soundbar.
• After you have connected the Soundbar to your mobile device the first time, use the "BT READY" mode to reconnect.
If the device fails to connect
- If you have an existing Soundbar (e.g., "Soundbar Q***C") in the list of speakers on the Mobile device, delete it.
- Repeat steps 1 and 2.
What is the difference between BT READY and BT PAIRING?
- BT READY : In this mode, you can reconnect any Samsung TV or mobile device that was connected before.
- BT PAIRING : In this mode, you can connect a new device to the Soundbar.
(Press the ✦PAIR button on the Soundbar remote control or press and hold the ⭕(Mic On/Off) / →(Source) button on the top of the Soundbar for more than 5 seconds while the Soundbar is in "BT" mode.)
Notes on Bluetooth connection
- Locate a new device within 1 m to connect via Bluetooth communication.
- If asked for a PIN code when connecting a Bluetooth device, enter <0000>.
- The Soundbar automatically turns off after 18 minutes in the Ready state.
-
The Soundbar may not perform Bluetooth search or connection correctly under the following circumstances:
-
If there is a strong electrical field around the Soundbar.
- If several Bluetooth devices are simultaneously paired with the Soundbar.
- If the Bluetooth device is turned off, not in place, or malfunctions.
- Electronic devices may cause radio interference. Devices that generate electromagnetic waves must be kept away from the Soundbar main unit - e.g., microwaves, wireless LAN devices, etc.
• The Soundbar supports SBC data (44.1kHz, 48kHz).
- Connect only to a Bluetooth device that supports the A2DP (AV) function.
- You cannot connect the Soundbar to a Bluetooth device that supports only the HF (Hands Free) function.
- When connecting the Soundbar to a Bluetooth device, place them as close to each other as possible.
- The farther the Soundbar and Bluetooth device are from each other, the lower the sound quality will become.
The Bluetooth connection may break when the devices are out of the effective range.
- The Bluetooth connection may not function as intended in areas with poor reception.
- A Bluetooth device may experience noise or malfunction under in the following conditions:
- When the body is in contact with the signal transceiver on the Bluetooth device or Soundbar
- In corners or when there is an obstacle in proximity, such as a wall or partition, where electrical changes may occur.
- When exposed to radio interferences by other products operating on the same frequency ranges, such as medical equipment, microwave ovens, and wireless LAN devices.
- Obstacles such as doors and walls may still impact the sound quality even when the devices are within the effective range.
• Note that your Soundbar cannot be paired with other Bluetooth devices while using the Bluetooth option.
- This wireless device may cause electrical interference during operation.
Disconnecting the Bluetooth device from a Soundbar
You can disconnect a Bluetooth device from the Soundbar. For instructions, see the Bluetooth device's user manual.
• The Soundbar will be disconnected.
- When the Soundbar is disconnected from the Bluetooth device, the Soundbar will display "BT DISCONNECTED" on the front display.
Disconnecting the Soundbar from the Bluetooth device
Press the ⬆(Multi Function) / →(Source) button on the top of the Soundbar or the →(Source) button on the remote control to switch the mode from "BT".
- Disconnecting takes time because the Bluetooth device must receive a response from the Soundbar. (Disconnection time may differ, depending on the Bluetooth device)
- When the Soundbar is disconnected from the Bluetooth device, the Soundbar will display "BT DISCONNECTED" on the front display.
Method 2. Connecting via Wi-Fi (Wireless Network)
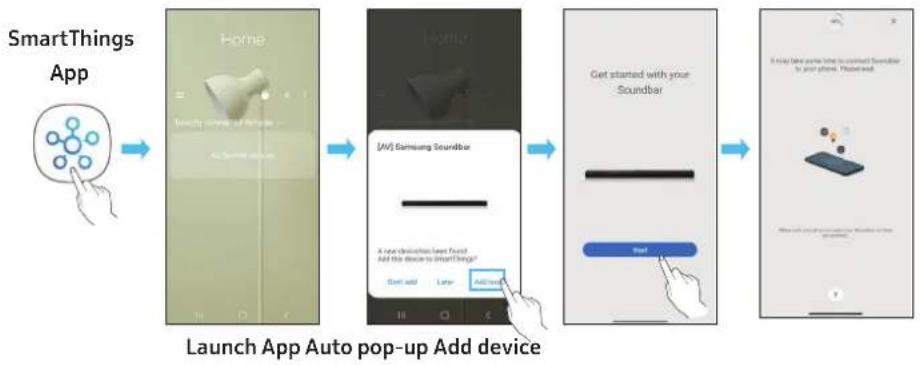
To connect a Soundbar to a mobile device via a wireless network (Wi-Fi), the SmartThings app is required.
The initial connection
- Install and launch the SmartThings app from your mobile device (smartphone or tablet).
-
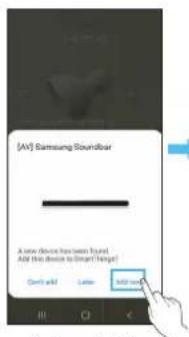
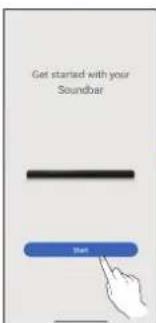
On the app, follow the screen instructions to add the Soundbar.
-
The automatic pop-up (the second screenshot below) may not show on some devices.
If the pop-up window does not appear, press “+” on the Home screen. The Soundbar is added to the app. - The illustration below may differ according to the app version.
flowchart
graph LR
    A["SmartThings App"] --> B["Home"]
    B --> C["(AV) Samsung Soundbar"]
    C --> D["Get started with your Soundbar"]
    D --> E["Add device"]
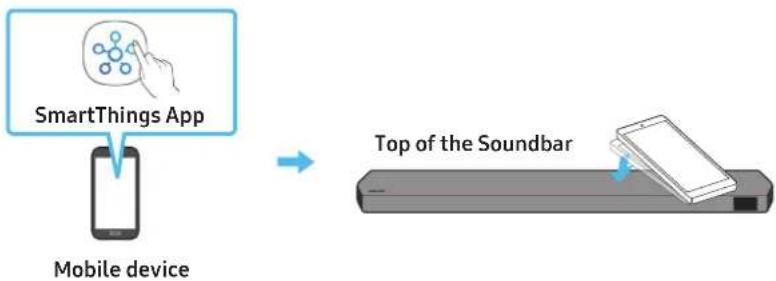
Using the Tap Sound
Tap the Soundbar with your mobile device to play the sound of content on the mobile device through the Soundbar.
- This function may not be supported, depending on the mobile device.
- This function is only compatible with Samsung mobile devices with Android 8.1 or later.
flowchart
graph LR
    A["SmartThings App"] --> B["Mobile device"]
    B --> C["Top of the Soundbar"]
- Turn on the Tap Sound function on your mobile device.
- For details on how to turn on the function, refer to "Setting the Tap Sound function" below.
-
Tap the Soundbar with the mobile device. Select "Start now" in the displayed message window. A connection is established between the mobile device and Soundbar via Bluetooth.
-
Play the sound of content on the mobile device through the Soundbar.
-
This function connects a mobile device to the Soundbar via Bluetooth by detecting vibration that occurs when the device touches the Soundbar.
- Make sure the mobile device does not tap a sharp corner of the Soundbar. The Soundbar or mobile device may become scratched or damaged.
- It is recommended that the mobile device be covered with a case. Lightly tap the wide area in the upper portion of the Soundbar, without using excessive force.
• To use this function, update the SmartThings app to the latest version.
The function may not be supported, depending on the app version.
Setting the Tap Sound function
Use the SmartThings app to turn on the Tap View, Tap Sound function.
- On the mobile device, run the SmartThings app.
- Select (≡→_) in the SmartThings app screen displayed on the mobile device.
- Set "Tap View, Tap Sound" to On to allow the function to work when a mobile device moves close to the Soundbar. The function is turned on.
NOTE
- When the mobile device is in power-saving mode, the Tap Sound function does not work.
- The Tap Sound function may not work if there are devices near the Soundbar that cause radio interference such as electric devices. Make sure devices that may cause radio interference are placed at a sufficient distance away from the Soundbar.
08 CONNECTING VIA APPLE AIRPLAY 2
• This feature may not be available in some countries.
- This Samsung Soundbar supports AirPlay 2 and requires iOS 13.4 or later.
With AirPlay 2, you can stream music, podcasts, and other audio from your Apple devices to the Samsung Soundbar.
- To enable AirPlay2 in your Soundbar, you must first register the device with the Samsung Smart Things app by agreeing with the app's terms and conditions.
- Make sure the Soundbar is powered on and connected to the same Wi-Fi network as your Apple device.
- Select from an AirPlay-supported app or Control Centre on your iPhone, iPad, or Mac.
- Select the Soundbar from the list of available devices to play the current audio to.
09 INSTALLING THE WALL MOUNT
Installation Precautions
• Install on a vertical wall only.
- Do not install in a place with high temperature or humidity.
- Verify whether the wall is strong enough to support the product's weight. If not, reinforce the wall or choose another installation point.
- Purchase and use the fixing screws or anchors appropriate for the kind of wall you have (plaster board, iron board, wood, etc.). If possible, fix the support screws into wall studs.
• Purchase wall mounting screws according to the type and thickness of the wall you want to mount the Soundbar on.
- Diameter: M5
- Length: 35 mm or longer recommended.
- Connect cables from the unit to external devices before you install the Soundbar on the wall.
- Make sure the unit is turned off and unplugged before you install it. Otherwise, it may cause an electric shock.
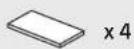
Wallmount Components

Wall Mount Guide

x2

x2
(M4 × L10)
Holder-Screw Screw

x2
Bracket-Wall Mount
- Place the Wall Mount Guide against the wall surface.
• The Wall Mount Guide must be level.
- If your TV is mounted on the wall, install the Soundbar at least 5 cm below the TV.

text_image
TV 5 cm or more- Align the Wall Mount Guide's Centre Line with the centre of your TV (if you are mounting the Soundbar below your TV), and then fix the Wall Mount Guide to the wall using tape.
- If you are not mounting below a TV, place the Centre Line in the centre of the installation area.
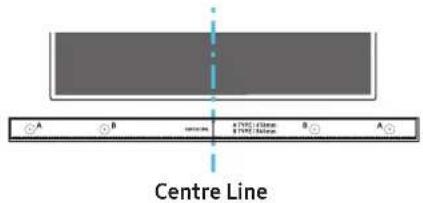
text_image
Centre Line- Push a pen tip or sharpened pencil tip through the centre of the A-TYPE images on each end of the Guide to mark the holes for the supporting screws, and then remove the Wall Mount Guide.

text_image
A B A (Fig. 1) B A A- Using an appropriately sized drill bit, drill a hole in the wall at each marking.
- If the markings do not correspond to the positions of studs, make sure you insert appropriate anchors or mollies into the holes before you insert the support screws. If you use anchors or mollies, make sure the holes you drill are large enough for the anchors or mollies you use.
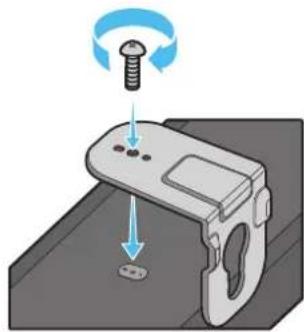
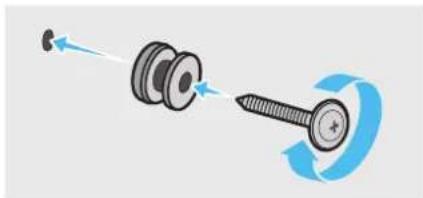
- Push a screw (not supplied) through each Holder-Screw, and then screw each screw firmly into a support screw hole.
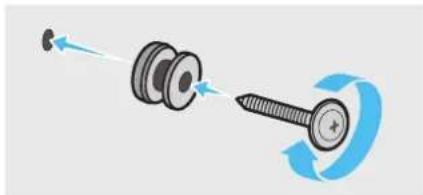
natural_image
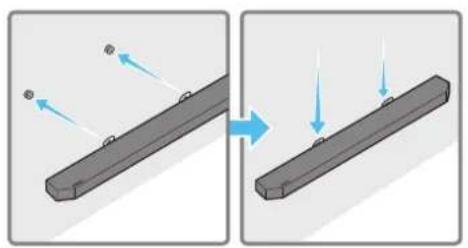
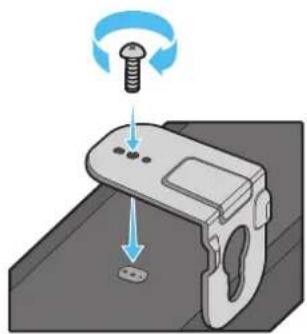
Diagram showing a screw being inserted into a housing with motion arrows indicating rotation (no text or symbols)- Install the 2 Bracket-Wall Mounts in the correct orientation on the bottom of the Soundbar using 2 Screws.
natural_image
Illustration of a mechanical component with a screw and a base, showing motion direction (no text or symbols)- When assembling, make sure the hanger part of the Bracket-Wall Mounts are located behind the rear of the Soundbar.
text_image
Rear of SoundbaRight end of Soundbar
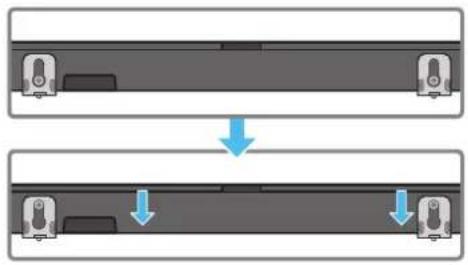
- Install the Soundbar with the attached Bracket-Wall Mounts by hanging the Bracket-Wall Mounts on the Holder-Screws on the wall.
natural_image
Diagram showing two states of a mechanical component before and after motion, with arrows indicating direction (no text or symbols)- Slide the Soundbar down as shown below so that the Bracket-Wall Mounts rest securely on the Holder-Screws.
- Insert the Holder-Screws into the wide (bottom) part of the Bracket-Wall Mounts, and then slide the Bracket-Wall Mounts down so that the Bracket-Wall Mounts rest securely on the Holder-Screws.
natural_image
Diagram showing two mechanical components with downward arrows indicating motion or assembly (no text or symbols)Installing the Surround Speakers on a Wall (applicable models only)
You can purchase wall mounts separately to install the surround speakers on a wall.
Wall mounts aren't sold by Samsung Electronics.
Notes for Wall Mounting the Surround Speakers
- Surround Speaker wall mounts must be able to support more than 8.0 kg.
• Hole size : 1/4 - 20 UNC threaded insert
- Standard Screw : 6.35 mm ø,
1.27mm Pitch
- Length : 18 mm long
- Quantity: Left 1 EA / Right 1 EA

L
R
- Check the strength of the wall before you install the Wall Mount Brackets. If the strength is insufficient, make sure to reinforce the wall before installing the Wall Mount Brackets and the speakers on the wall.
- Samsung Electronics is not liable for any damage to the product due to the product being installed inappropriately.
• Take care not to install the speakers sideways or upside down.
10 INSTALLING THE SOUNDBAR IN FRONT OF TV
Component
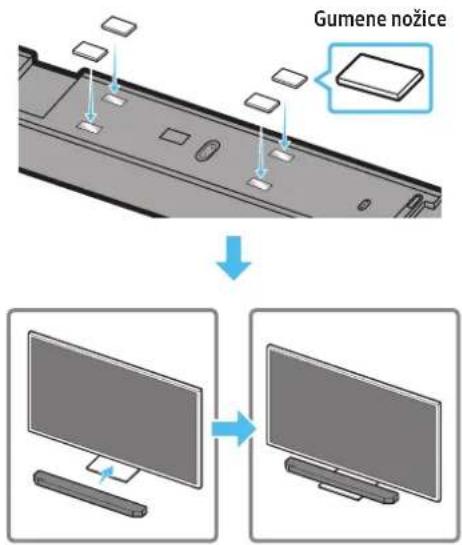
Rubber-Foot
To install, attach the Rubber-Feet to the bottom of the Soundbar before placing it in position above the TV stand. Make sure you attach the Rubber-Feet so they do not lie outside the edges of the TV stand. Refer to the figure below.

text_image
Rubber-FootPlace the Soundbar on a TV stand.
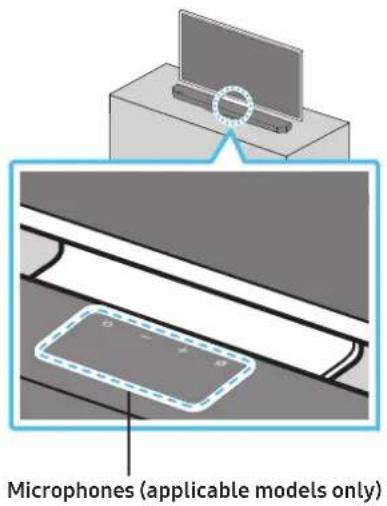
text_image
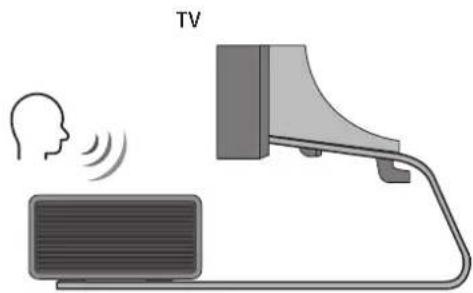
Microphones (applicable models only)As illustrated in the image, align the centre of the Soundbar with the centre of the TV, carefully place the Soundbar onto the TV stand. At this time, place the microphones (applicable models only) at the front of the stand not to interfere with voice recognition.
text_image
TVRight end of Soundbar
NOTE
- Make sure the Soundbar is placed on a flat and solid surface.
- Insufficient gap from the TV may cause voice recognition and acoustic problems.
• The illustration above differs with the respective model. - This function is not supported by HW-Q7**C, HW-Q7**GC model.
- For the best performance of the microphones, keep the Soundbar at least 2 cm away from the TV's panel.
11 SOFTWARE UPDATE
Auto Update
When the Soundbar is connected to the Internet, software updates automatically occur even when the Soundbar is turned off.
- To use the Auto Update function, the Soundbar must be connected to the Internet.
The Wi-Fi connection to the Soundbar will be terminated if the Soundbar's power cord is disconnected or the power is cut off. If the power is cut off, when the power comes back on or you reconnect the power cord, turn on the Soundbar, and then reconnect it to the Internet.
USB Update

text_image
Bottom of the SoundbarSamsung may offer updates for the Soundbar's system firmware in the future.
When an update is available, you can update the Soundbar by connecting the USB drive that contains the update firmware to the SERVICE port of the Soundbar.
- Go to the Samsung website (www.samsung.com) → search for the model name from the customer support menu option.
- For more information about update, refer to Upgrade Guide.
- Download the upgrade file (USB type).
- Unzip the file to create a folder with the file name.
- Store the created folder in a USB and then connect it to the Soundbar.
-
Turn on the Soundbar. Then the product is updated within 3 minutes with displaying the message, "UPDATE".
-
During update, do not turn it off or remove the USB.
- If "UPDATE" does not appear on the display window, remove the power cord from the Soundbar and then reconnect it.
- When the latest version is installed, no update is performed.
- Depending on the USB type, update may not be supported.
Initialisation
Top of the Soundbar
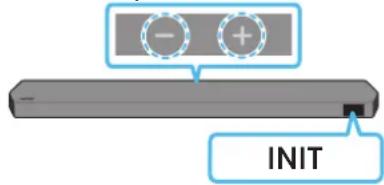
text_image
- + INITWith the Soundbar on, press the (Volume) buttons on the body at the same time for at least 5 seconds. "INIT" appears on the display and then the Soundbar is initialised.
CAUTION
- All the settings of the Soundbar are initialised. Be sure to perform this only when initialisation is required.
12 TROUBLESHOOTING
Before seeking assistance, check the following.
Soundbar does not turn on.
- Check whether the power cord of the Soundbar is correctly inserted into the outlet.
Soundbar works erratically.
• After removing the power cord, insert it again.
• Power cycle the external device and try again.
- If there is no signal, the Soundbar automatically turns off after a certain period of time. Turn on the power. (See page 6.)
Remote control does not work
- Point the remote directly at the soundbar.
- Replace the batteries with new ones.
The Soundbar indicator turns solid red.
- The microphone is turned off. Turn on the microphone. (See page 4.)
Sound is not output from the soundbar.
- The volume of the Soundbar is too low or muted. Adjust the volume.
- When any external device (STB, Bluetooth device, mobile device, etc.) is connected, adjust the volume of the external device.
- For sound output of the TV, select Soundbar. (Samsung TV: Home ( home ) → Menu → Settings ( 📋 → All Settings ( 🌐 → Sound → Sound Output → Select Soundbar)
- The cable connection to the Soundbar may not be loose. Remove the cable and connect again.
- Remove the power cord completely, reconnect, and turn the power on.
- Initialise the product and try again. (See page 32.)
Sound is not output from the subwoofer or the rear speakers.
- Check whether the LED indicator on the rear of the Subwoofer and Surround Speakers are on in blue. Reconnect the Soundbar and Subwoofer and Surround Speakers if the indicator is blinking in blue or turned red. (See page 13.)
- You may experience an issue if there is an obstacle between the Soundbar and Subwoofer. Move devices to an area away from obstacles.
- Other devices sending radio frequency signals in proximity may interrupt the connection. Keep your speaker away from such devices.
- Remove and reconnect the power plug.
In case there is sound jitter, delays, or noise from the Subwoofer and Surround Speaker
- If there are any objects between the Soundbar and Subwoofer speaker, this could cause a problem. Please reposition these to a place without such an object.
- There may be sound jitter or delays when the Subwoofer and Surround Speaker are far from the Soundbar. Please place them near the Soundbar.
- There may be sound jitter or delays when the Soundbar is near an instrument or electrical device that can cause radio interference. Place the Soundbar far from such devices that can cause radio interference. (E.g., wireless router)
- Change the TV network connection status from wireless to wired.
The Subwoofer volume is too low
- The original volume of the content you are playing may be low. Try adjusting the Subwoofer level. (See page 7.)
- Bring the Subwoofer speaker closer to you.
If the TV is not connected via HDMI TO TV (eARC/ARC)
- Check whether the HDMI cable is correctly connected to the ARC terminal. (See page 15.)
- Connection may not be possible due to the connected external device (set-top box, game machine, etc.). Directly connect the Soundbar.
- HDMI-CEC may not be activated on the TV. Turn on the CEC on the TV menu. (Samsung TV: Home (💡) → Menu → Settings (💡) → All Settings (💡 → Connection → External Device Manager → Anynet+ (HDMI-CEC) ON)
- To connect with eARC, the eARC function in the TV menu should be set to On. (Samsung TV: Home ( → Menu → Settings ( → All Settings ( → Sound → Expert Settings → HDMI-eARC Mode (Auto))
There is no sound in when connecting to the TV in HDMI TO TV (eARC/ARC) mode
- Your device is unable to play the input signal. Change the TV's audio output to PCM or Dolby Digital. (For a Samsung TV: Home ( home ) → Menu → Settings ( ➕ → All Settings ( ➕ → Sound → Expert Settings → Digital Output Audio Format)
Soundbar will not connect via Bluetooth.
- When connecting a new device, switch to "BT PAIRING" for connection. (Press the ➕ PAIR button on the remote control or press the ☑ (Mic On/Off) / → (Source) button on the body for at least 5 seconds.)
- If the Soundbar is connected to another device, disconnect that device first to switch the device.
- Reconnect it after removing the Bluetooth speaker list on the device to connect. (Samsung TV: Home ( → Menu → Settings ( → All Settings ( → Sound → Sound Output → Bluetooth Speaker List)
- The automatic TV connection may be disabled. While the Soundbar is in "BT READY", press and hold the Left button on the Soundbar remote control for 5 seconds to select ON-TV CONNECT. If you see OFF-TV CONNECT, press and hold Left button again for 5 seconds to switch the selection.
- Remove and reconnect the power plug, then try again.
- Initialise the product and try again. (See page 32.)
Sound drops out when connected via Bluetooth.
- Some devices can cause radio interference if they are located too close to the Soundbar. e. g. microwaves, wireless routers, etc.
- If your device that is connected via Bluetooth moves too far away from the soundbar, it may cause the sound to drop out. Move the device closer to the soundbar.
- If a part of your body is in contact with the Bluetooth transceiver or the product is installed on metal furniture, the sound may drop out. Check the installation environment and conditions for use.
Soundbar will not connect to Wi-Fi.
- Check whether your wireless router is on.
- Turn off the router, turn it back on, and then try again.
- The soundbar will not connect if the wireless signal is too weak. Try moving the router closer to the soundbar, or eliminating any obstacles that are between the soundbar and the router, if possible.
- If your wireless router is new, you will need to reconfigure the speaker's network settings.
The soundbar does not turn on automatically with the TV.
- When you turn off the Soundbar while watching TV, power synchronization with the TV is disabled. First turn off the TV.
The AVA function (applicable models only) is not available in the following cases.
- The AVA function (applicable models only) will not be available when the microphone is turned off.
After connecting the TV to the Soundbar, I switched the Soundbar mode. Then no sound is output from the TV.
- If you connect your Soundbar to a mobile device while the Soundbar is connected to the TV, the Soundbar outputs sound from the mobile device while keeping the TV connection. So the TV sound will not be delivered anywhere.
- Disconnect the mobile device, and the TV sound will be output from the Soundbar again.
The Soundbar does not appear in AirPlay2
- To enable AirPlay2 in your Soundbar, you must first register the device with the Samsung Smart Things app by agreeing with the app's terms and conditions. (See page 28.)
- AirPlay2 does not operate if you delete the Soundbar from the Samsung Smart Things app.
- Make sure that the Soundbar and the Apple device are connected to the same Wi-Fi network.
- The Soundbar is compatible with AirPlay2 installed on iOS 13.4 or later.
СЪДЪРЖАНИЕ
01 Проверка на компонентите 3
natural_image
Three grayscale images of remote control devices: a rectangular remote, a remote with two buttons, and a black tower (no text or symbols)natural_image
Three product images: a gray server unit labeled 'x2', a black U-shaped connector labeled 'x4 u1u 2', and a black USB cable with connectors (no text or symbols on the devices themselves)text_image
Diagram illustrating three-step mechanical assembly or disassembly process with labeled components and directional arrowstext_image
5 Sec ID SETnatural_image
Three-step diagram showing a mechanical component before and after processing, with no visible text or symbols.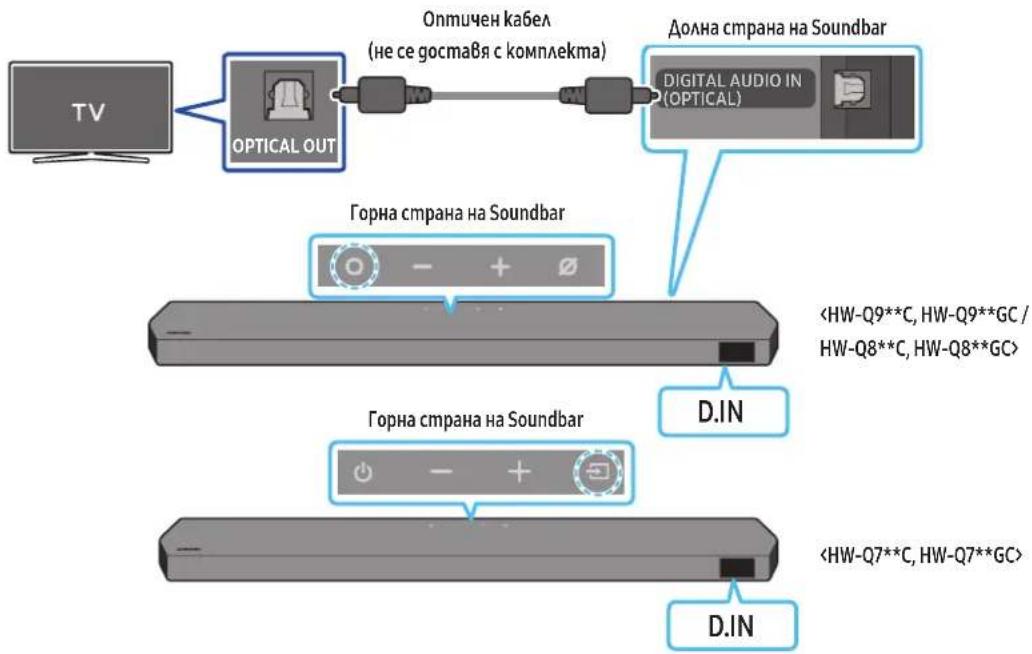
flowchart
graph TD
    A["TV"] --> B["OPTICAL OUT"]
    B --> C["On Michigan kabel (не се доставя с комплекта)"]
    C --> D["Долна страна на Soundbar"]
    D --> E["Digital Audio IN (OPTICAL)"]
    F["Горна страна на Soundbar"] --> G["<HW-Q9**C, HW-Q9**GC / HW-Q8**C, HW-Q8**GC>"]
    H["Горна страна на Soundbar"] --> I["<HW-Q7**C, HW-Q7**GC>"]
    J["D.IN"] --> K["D.IN"]
text_image
Diagram of a calculator interface with labeled buttons and a hand pointing to the functionnatural_image
Hand interacting with a touchscreen device displaying a play button (no text or symbols visible)text_image
A B A (100%) B (100%) A A Anatural_image
Diagram showing a screw being inserted into a housing with blue motion arrows indicating rotation (no text or symbols)natural_image
Illustration of a mechanical device with a screw and adjustment knob, showing no text or symbolsnatural_image
Diagram showing two mechanical components with arrows indicating motion, no text or symbols presentnatural_image
Diagram showing two mechanical components with downward arrows indicating motion or assembly (no text or symbols)natural_image
Diagram showing a monitor mounted on a base with an inset close-up of its screen (no text or symbols present)natural_image
Illustration of a person emitting sound waves near a device with a lamp (no text or symbols)natural_image
Three grayscale images of remote devices: a rectangular remote, a remote control with two buttons, and a cylindrical tower (no text or symbols)Glavna jedinica sustava Soundbar Daljinski upravljač / baterije sustava Soundbar Subwoofer

natural_image
Three electronic devices: a gray server unit labeled 'x2', a black I/O port labeled 'x4 ili 2', and a black USB connector (no text or symbols on the devices themselves)Zvučnik prostornog ozvučenja (dodatno)
(lijevi/desni)

3 DIGITAL AUDIO IN (OPTICAL)
Povežite sa digitalnim (optičkim) izlazom vanjskog uređaja. (Pogledajte stranicu 23)
4 HDMI
text_image
Diagram illustrating three-step assembly or cleaning process with labeled components and directional arrowstext_image
5 Sec ID SET- Provjerite svijetli li LINK LED postojano plavo (povezivanje je završeno).
natural_image
Diagram showing three stages of a mechanical or electronic component with blue arrows indicating direction (no text or symbols)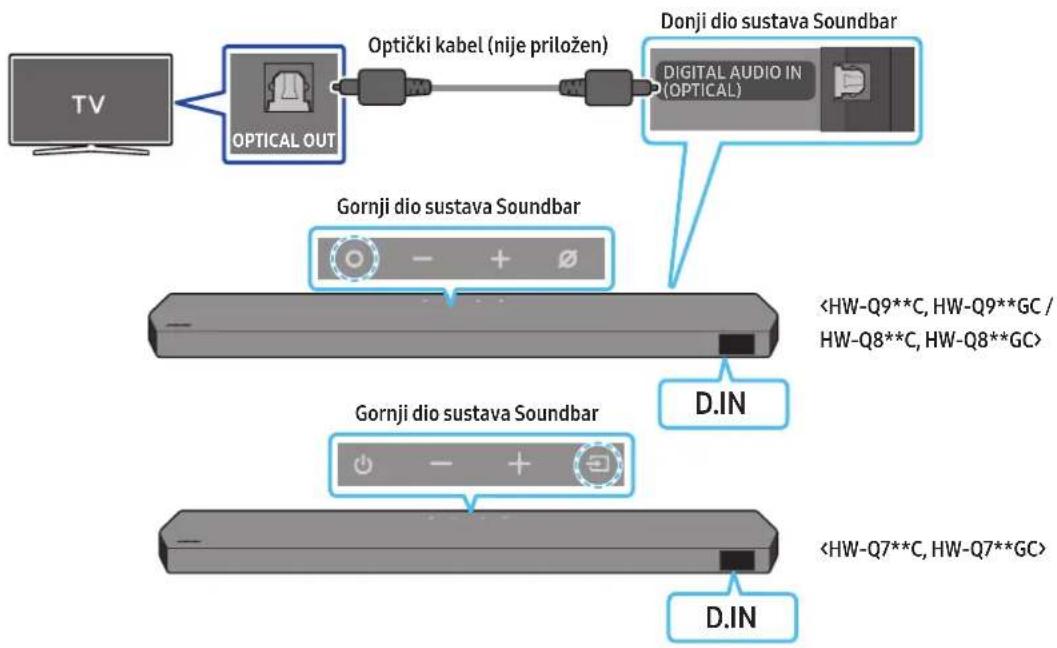
flowchart
graph LR
    TV["TV"] --> OpticalOut["Optical OUT"]
    OpticalOut --> OptičkiKabel["Optički kabel (nije priložen)"]
    OptičkiKabel --> DonjiDioSustavaSoundBar["Donji dio sustava Soundbar"]
    DonjiDioSustavaSoundBar --> DigitalAudioIn["Digital Audio In (OPTICAL)"]
    DigitalAudioIn --> GornjiDioSustavaSoundBar1["Gornji dio sustava Soundbar"]
    DigitalAudioIn --> DonjiDioSustavaSoundBar2["Gornji dio sustava Soundbar"]
    DonjiDioSustavaSoundBar2 --> D.IN["D.IN"]
    D.IN --> <HW-Q7**C, HW-Q7**GC>
    D.IN --> <HW-Q8**C, HW-Q8**GC>
- Kad su televizor i Soundbar isključeni, ulaz DIGITAL AUDIO IN (OPTICAL) na uređaju Soundbar i izlazni priključak OPTICAL na televizoru povežite optičkim kabelom (nije priložen), kao što je prikazano na slici.
- Uključite Soundbar i televizor.
- Pritisnite gumb ○ (Više funkcija) / ➞ (Izvor) na vrhu uređaja Soundbar ili gumb ➞ (Izvor) na daljinskom upravljaču kako biste odabrali način rada „D.IN”.
- Zvuk televizora se čuje iz Soundbar sustava.
Povezivanje putem Bluetooth veze
Kad je Samsung TV povezan putem Bluetooth veze, možete čuti stereo zvuk bez prethodnog mučenja s kabelima.
- Istodobno se može spojiti samo jedan Samsung TV.
- Može se povezati Samsung TV koji podržava Bluetooth. Provjerite specifikacije svojeg televizora.
Početno povezivanje
text_image
Diagram of a calculator interface with labeled buttons and a hand pointing to the functiontext_image
Homo Others supplied by Home 1 The second editionPokretanje aplikacije

text_image
[AV] Samsung Soundbar A new device has been found AND this device is Smart Things! Don't add Letter Add ItemAutomatski skočni prozor

text_image
Get started with your Soundbar StartDodavanje uređaja

text_image
8-day take closer, time for last week. You would to check again. Please call.Upotreba funkcije Tap Sound
natural_image
Simple 3D illustration of a bracket with a hole, labeled 'x2' (no text or symbols on the object itself)Zidni nosač
- Postavite vodič za zidni nosač na površinu zida.
• Vodič za zidni nosač mora biti ravan.
- Ako je televizor postavljen na zid, instalirajte Soundbar najmanje 5 cm ispod televizora.
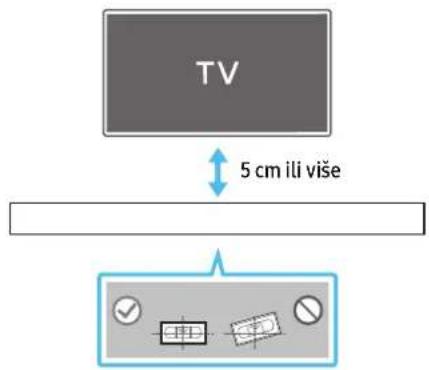
text_image
TV 5 cm ili više- Poravnajte središnju liniju vodiča za zidni nosač sa sredinom TV-a (ako postavljate Soundbar ispod TV-a), a zatim pričvrstite vodič za zidni nosač na zid pomoću ljepljive trake.
- Ako ga ne postavljate ispod TV-a, postavite središnju liniju u sredinu područja instalacije.
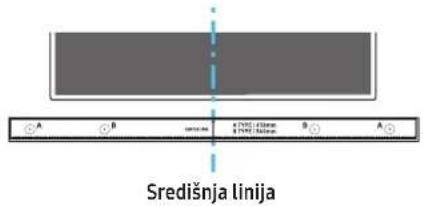
text_image
Središnja linija- Gurnite vrh olovke kroz sredinu slika A-TYPE na svakoj strani vodiča kako biste označili otvore za nosive vijke, a zatim uklonite vodič za zidni nosač.
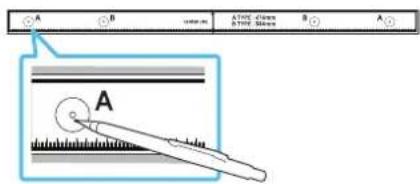
text_image
A B STOCK CHAM STOCK MEANS A A A- S pomoću svrdla odgovarajuće veličine izbušite otvor u zidu na svakoj oznaci.
- Ako oznake ne odgovaraju položajima usadnih vijaka, obavezno umetnite odgovarajuća sidra ili tiple u otvore prije umetanja nosivih vijaka. Ako upotrebljavate tiple, pobrinite se da su otvori koje ste izbušili dovoljno veliki za te tiple.
- Gurnite vijak (nije priložen) kroz svaki vijak držača, a zatim čvrsto zategnite svaki vijak u otvor za nosive vijke.
natural_image
Diagram showing a screw being inserted into a housing with blue motion arrows indicating rotation (no text or symbols)- Montirajte 2 zidna nosača u točan položaj na dnu uređaja Soundbar pomoću 2 vijka.
natural_image
Illustration of a mechanical component with a screw and a button, showing motion direction (no text or symbols)natural_image
Diagram showing two mechanical components with arrows indicating motion, no text or symbols presentnatural_image
Diagram showing two identical mechanical components with downward arrows indicating motion or assembly (no text or symbols)natural_image
Two identical gray rectangular devices with blue arrows pointing to the left panel (no text or symbols)LD
- Provjerite jačinu zida prije nego što postavite zidne nosače. Ako zid nije dovoljno jak, obavezno ga učvrstite prije postavljanja zidnih nosača i zvučnika na taj zid.
- Tvrtka Samsung nije odgovorna za oštećenja proizvoda zbog njegovog nepravilnog postavljanja.
- Pripazite da zvučnike ne postavite bočno ili naopako.
10 POSTAVLJANJE UREĐAJA SOUNDBAR ISPRED TV-A
Sastavni dio

x4
Gumene nožice
Prilikom postavljanja pričvrstite gumene nožice na donji dio sustava Soundbar prije postavljanja u položaj iznad postolja televizora. Obavezno pričvrstite gumene nožice tako da se ne nalaze izvan rubova postolja TV-a. Pogledajte donju sliku.
text_image
Gumene nožicenatural_image
Illustration of a TV setup with a speaker emitting sound waves, next to a monitor and cable (no text or symbols)natural_image
Three grayscale images of remote and control devices, no text or symbols visibletext_image
A B C=5mm x 7.75E-35mm B A 2 ks 2 ks (M4 × L10)3 DIGITAL AUDIO IN (OPTICAL)
text_image
Diagram illustrating three-step assembly or manufacturing process with labeled components and directional arrowstext_image
5 Sec ID SETnatural_image
Three-step diagram showing a mechanical component before and after processing, with no visible text or symbols.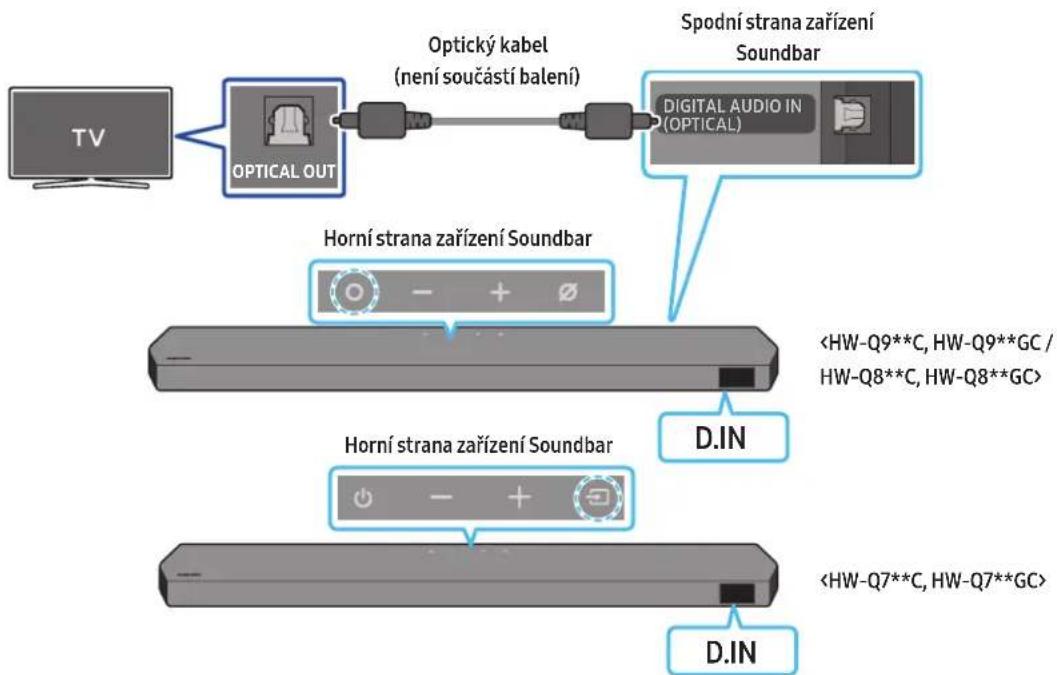
flowchart
graph LR
    TV["TV"] --> OpticalOut["Optical OUT"]
    OpticalOut --> OptickyKabel["Optický kabel (není součástí balení)"]
    OptickyKabel --> DigitalAudioSoundBar["Spodní strana zařízení Soundbar"]
    DigitalAudioSoundBar --> HorníStranaSoundBar1["Horní strana zařízení Soundbar"]
    DigitalAudioSoundBar --> HorníStranaSoundBar2["Horní strana zařízení Soundbar"]
    DigitalAudioSoundBar --> SpodníStranaSoundBar3["Spodní strana zařízení Soundbar"]
    SpodníStranaSoundBar3 --> <HW-Q9**C, HW-Q9**GC / HW-Q8**C, HW-Q8**GC> <HW-Q7**C, HW-Q7**GC> <HW-Q9**C, HW-Q9**GC> <HW-Q8**C, HW-Q8**GC> <HW-Q7**C, HW-Q7**GC> <HW-Q9**C, HW-Q9**GC> <HW-Q8**C, HW-Q8**GC> <HW-Q7**C, HW-Q7**GC> <HW-Q8**C, HW-Q8**GC> <HW-Q9**C, HW-Q9**GC/ HW-Q8**C, HW-Q8**GC> <HW-Q9**C, HW-Q9**GC/ HW-Q8**GC> <HW-Q8**C, HW-Q8**GC> <HW-Q7**C, HW-Q7**GC> <HW-Q7**C, HW-Q7**GC> <HW-Q8**C, HW-Q8**GC> <HW-Q8**C, HW-Q8**GC> <HW-Q9**C, HW-Q9**GC/ HW-Q8**C, HW-Q8**GC> <HW-Q9**C, HW-Q9**GC/ HW-Q8**GC> <HW-Q9**C, HW-Q9**GC/ HW-Q8**GC> <HW-Q9**C, HW-Q9**GC/ HW-Q8**GC> <HW-Q9**C, HW-Q9**GC/ HW-Q8**GC> <HW-Q9**C, HW-Q9**GC/ HW-Q8**GC> <HW-Q9**C, HW-Q9**GC/ HW-Q8**gc> <HW-Q9**C, HW-Q9**GC/ HW-Q8**GC/ HW-Q8**GC> <HW-Q9**C, HW-Q9**GC/ HW-Q8**GC/ HW-Q8**GC> <HW-Q9**C, HW-Q9**GC/ HW-Q8**GC/ HW-Q8**GC> <HW-Q9**C, HW-Q9**GC/ HW-Q8**GC/ HW-Q8**GC> <HW-Q9**C, HW-Q9**GC/ HW-Q8**GC/ HWQ8*GC> <HW-Q9**C, HW-Q9**GC/ HWQ8*GC/ HWQ8*GC> <HW-Q9**C, HWQ8*GC/ HWQ8*GC/ HWQ8*GC> <HW-Q9**C, HWQ8*GC/ HWQ8*GC/ HWQ8*GC> <HW-Q9**C, HWQ8*GC/ HWQ8*GC/ HWQ8*GC> <HW-Q9**C, HWQ8*GC/ HWQ8*GC/ HWQ8*GC> <HW-Q9**C, HWQ8^GNC/ HWQ8^GNC/ HWQ8^GNC/ >D.IN.
text_image
Diagram of a calculator interface with labeled buttons and a hand pointing to the functionnatural_image
Hand interacting with a device screen displaying a play button (no text or symbols visible)08 PŘIPOJENÍ PŘES APPLE AIRPLAY 2
natural_image
Diagram showing a screw being inserted into a housing with motion arrows indicating rotation (no text or symbols)natural_image
Illustration of a mechanical component with a screw and a base, showing motion direction (no text or symbols)natural_image
Illustration of a flat-screen monitor with a vertical cable and antenna (no text or symbols)natural_image
Diagram showing two mechanical components before and after force application, with arrows indicating motion direction (no text or symbols)natural_image
Diagram showing two mechanical components with downward arrows indicating motion or assembly (no text or symbols)natural_image
Two identical gray rectangular devices with blue arrows pointing to the left side of each device (no text or symbols)LP
natural_image
Diagram showing a device mounted on a screen and a rectangular panel with labeled points, no text or symbols present.text_image
Diagram showing a device with labeled component C and an inset highlighting a 12-pin connectornatural_image
Three grayscale images of remote control devices: a rectangular remote, a remote with two buttons, and a black tower (no text or symbols)natural_image
Three product images: a gray server unit labeled 'x2', a black U-shaped connector labeled 'x4 eller 2', and a black USB cable with two connectors (no text or symbols on the devices themselves)natural_image
Two 3D model diagrams showing a bracket and a rectangular block, both labeled 'x2' and 'x4' (no text or symbols on the objects themselves)text_image
Diagram illustrating three-step mechanical assembly or disassembly process with labeled components and directional arrowstext_image
Strømkabel Subwooferens bagsideSubwooferens bagside Subwooferens bagside
flowchart
graph LR
    A["Device 2 x 2"] --> B["Switch"]
    B --> C["Device 1"]
    C --> D["ID SET STANDBY LINK"]
    D --> E["5 Sec"]
    E --> F["Hurtigt blinkende blå"]
text_image
5 Sec ID SETnatural_image
Diagram showing three stages of a mechanical or industrial process: moving, passing through a tunnel, and finally settling into a final component (no text or symbols present)
flowchart
graph TD
    A["TV"] --> B["OPTICAL OUT"]
    B --> C["Optisk kabel (medfølger ikke)"]
    C --> D["Soundbars set ovenfra"]
    D --> E["<HW-Q9**C, HW-Q9**GC / HW-Q8**C, HW-Q8**GC>"]
    D --> F["<HW-Q7**C, HW-Q7**GC>"]
    D --> G["D.IN"]
    H["Soundbarens bund"] --> I["DIGITAL AUDIO IN (OPTICAL)"]
text_image
Diagram of a computer control panel with labeled buttons and a hand pointing to the buttonnatural_image
Simple 3D illustration of a bracket-like object with a hole, labeled 'x2' (no text or symbols on the object itself)Vægmonteringsbeslag
text_image
A B a time, phase b time, phase A Anatural_image
Diagram showing a screw being inserted into a housing component with blue motion arrows indicating rotation (no text or symbols)natural_image
Illustration of a mechanical component with a screw and a base, showing motion direction (no text or symbols)natural_image
Diagram showing two mechanical components with arrows indicating motion, no text or symbols presentnatural_image
Diagram showing two identical mechanical components with downward arrows indicating motion or assembly (no text or symbols)10 INSTALLATION AF SOUNDBAREN FORAN TV'ET
Komponent

x4
Gummifod
natural_image
Two 3D mechanical parts with dimension labels (x2 and x4), no visible text or symbols on the parts themselves.text_image
Diagram illustrating three-step mechanical assembly or disassembly process with labeled components and directional arrowstext_image
5 Sec ID SETnatural_image
Three-step diagram showing a mechanical component before and after processing, with no visible text or symbols.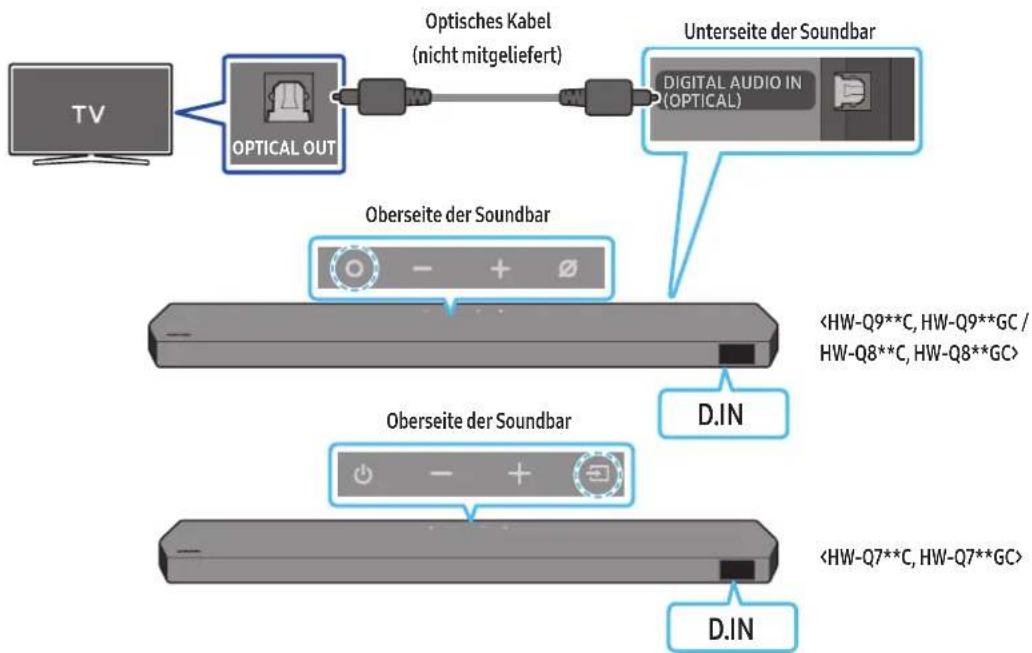
flowchart
graph TD
    A["TV"] --> B["OPTICAL OUT"]
    B --> C["Optisches Kabel (nicht mitgeliefert)"]
    C --> D["Unterseite der Soundbar"]
    D --> E["Digital Audio in (OPTICAL)"]
    F["Oberseite der Soundbar"] --> G["<HW-Q9**C, HW-Q9**GC / HW-Q8**C, HW-Q8**GC>"]
    H["Oberseite der Soundbar"] --> I["<HW-Q7**C, HW-Q7**GC>"]
    J["D.IN"] --> K["D.IN"]
text_image
Diagram of a computer control panel with labeled buttons and a hand pointing to the buttonnatural_image
Hand interacting with a circular interface displaying a play button and icons (no text or symbols visible)text_image
A B A (100%) B (100%) A A Anatural_image
Diagram showing a screw being inserted into a housing with blue arrows indicating motion (no text or symbols)natural_image
Illustration of a mechanical device with a screw and adjustment knob, showing no text or symbolsnatural_image
Diagram showing two mechanical components with arrows indicating motion, no text or symbols presentnatural_image
Diagram showing a monitor mounted on a base with an inset close-up of its screen (no text or symbols present)natural_image
Three grayscale images of remote devices: a rectangular remote, a black remote with two buttons, and a black tower (no text or symbols)natural_image
Three product images: a gray server unit labeled 'x2', a black U-shaped connector labeled 'x4 of 2', and a black USB cable with two connectors (no text or symbols on the devices themselves)Surround-luidspreker (optioneel) (links/rechts)
Stroomkabel (subwoofer, surround-luidspreker, Soundbar) (optioneel)


text_image
A B C=5mm x 7000 mm x 7000 mm B A x 2 x 2 (M4 x L10)natural_image
Two 3D model diagrams showing a bracket and a rectangular block, both labeled 'x2' and 'x4' (no text or symbols on the objects themselves)3 DIGITAL AUDIO IN (OPTICAL)
text_image
Diagram illustrating three-step mechanical assembly or disassembly process with labeled components and directional arrows'SAMSUNG-TV REMOTE', 'ALL-TV REMOTE'.
text_image
5 Sec ID SETnatural_image
Diagram showing three stages of a mechanical or electrical component with directional arrows indicating motion (no text or symbols)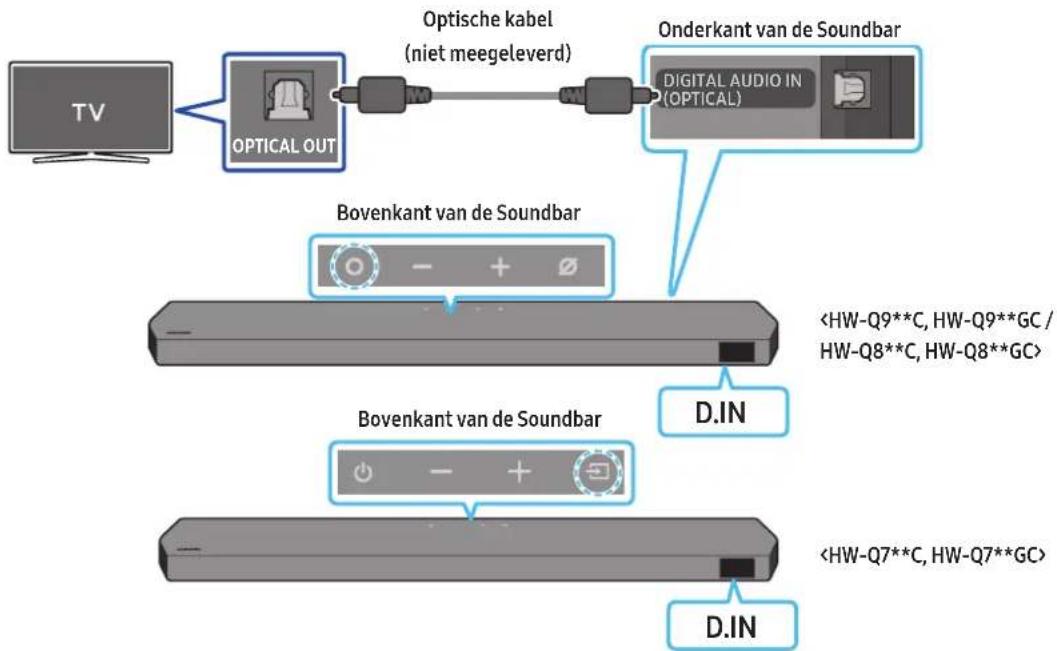
flowchart
graph TD
    A["TV"] --> B["OPTICAL OUT"]
    B --> C["Optische kabel (niet meegeleverd)"]
    C --> D["Onderkant van de Soundbar"]
    D --> E["Digital Audio IN (OPTICAL)"]
    F["Bovenkant van de Soundbar"] --> G["<HW-Q9**C, HW-Q9**GC / HW-Q8**C, HW-Q8**GC>"]
    H["Bovenkant van de Soundbar"] --> I["<HW-Q7**C, HW-Q7**GC>"]
    J["D.IN"] --> K["D.IN"]
text_image
Hand interacting with a calculator interface showing function buttons and a cursor pointing to the buttonnatural_image
Hand interacting with a device screen displaying a play button (no text or symbols visible)flowchart
graph LR
    A["SmartThing-app"] --> B["Home"]
    B --> C["App started Automatische pop-up"]
    C --> D["Get started with your Soundbar"]
    D --> E["Apparaat toevoegen"]
    E --> F["End"]
Tap Sound gebruiken
natural_image
Diagram showing a screw being inserted into a housing with blue arrows indicating rotation (no text or symbols)natural_image
3D illustration of a mechanical component with a screw and mounting base, showing rotational motion (no text or symbols)natural_image
Diagram showing two mechanical components with arrows indicating motion, no text or symbols presentnatural_image
Diagram showing two mechanical components with downward arrows indicating motion or assembly (no text or symbols)12 PROBLEEMOPLOSSING
natural_image
Three grayscale images of remote and TV devices: a rectangular remote, a remote control with two buttons, and a black tower (no text or symbols visible)natural_image
Three electronic devices: a server unit, a four-pin connector, and a USB cable (no text or symbols visible)Ruumhelikölar (valikuline)
(vasak/parem)

text_image
A B x2 x2 (M4 x L10)Seinakinnitusjuhik Hoidikkruvi Kruvi

natural_image
Two 3D model diagrams showing a bracket and a rectangular block, both with x2 and x4 labels (no text or symbols on the objects themselves)Seinakinnituskronstein Kummijalg
text_image
Diagram illustrating three-step mechanical assembly or disassembly process with labeled components and directional arrowstext_image
5 Sec ID SETnatural_image
Diagram showing three stages of a mechanical or electronic component with directional arrows indicating motion (no text or symbols)
flowchart
graph TD
    A["TV"] --> B["OPTICAL OUT"]
    B --> C["Optiline kaabel (pole kaasas)"]
    C --> D["Soundbari põhi"]
    D --> E["Digital Audio IN (OPTICAL)"]
    F["Soundbari ülaosa"] --> G["<HW-Q9**C, HW-Q9**GC / HW-Q8**C, HW-Q8**GC>"]
    H["Soundbari ülaosa"] --> I["<HW-Q7**C, HW-Q7**GC>"]
    J["D.IN"] --> K["D.IN"]
text_image
Diagram of a computer control panel with labeled buttons and an icon pointing to the buttontext_image
Homo White hair model of women? The white hair modeltext_image
[AV] Samsung Soundbar A new device has been joined by Add this device to SmartTangel! Don't add Letter Add texttext_image
Get started with your Soundbar StartSeadme lisamine

text_image
8-day Belize Inside Into New! Please check To check you. Please walk.Tap Soundi kasutamine
natural_image
Diagram showing a screw being inserted into a housing with motion arrows indicating rotation (no text or symbols)natural_image
Illustration of a mechanical component with a screw and a button, showing motion direction (no text or symbols)- Kokkupanekul veenduge, et seinakinnituskronsteinide riputusosad jääksid Soundbari taha.
text_image
Soundbari tagakülgHeliriba parempoolne ots
natural_image
Diagram showing two mechanical components before and after motion, with arrows indicating direction of movement (no text or symbols present)natural_image
Diagram showing two mechanical components with downward arrows indicating motion or assembly (no text or symbols)natural_image
Illustration of a TV setup with a speaker emitting sound waves, next to a monitor and cable (no text or symbols)Heliriba parempoolne ots
MÄRKUS
text_image
Soundbari pōhiActive Voice Amplifier (AVA)....8
natural_image
Three grayscale images of remote and control devices: a rectangular remote, a remote control with two buttons, and a black tower (no text or symbols visible)natural_image
Three electronic devices: a server unit, a four-tai connected cable, and a USB connector (no text or symbols visible)natural_image
Two black mechanical linkages with labeled sizes, one 'x4 tai 2' and the other a separate diagram (no text or symbols on the linkages themselves)natural_image
Two 3D model diagrams showing a bracket and a rectangular block, both with x2 and x4 labels (no text or symbols on the objects themselves)3 DIGITAL AUDIO IN (OPTICAL)
text_image
Diagram illustrating three-step assembly or manufacturing process with labeled components and directional arrowsActive Voice Amplifier (AVA)
text_image
5 Sec ID SETnatural_image
Three-step diagram showing a mechanical component before and after processing, with no visible text or symbols.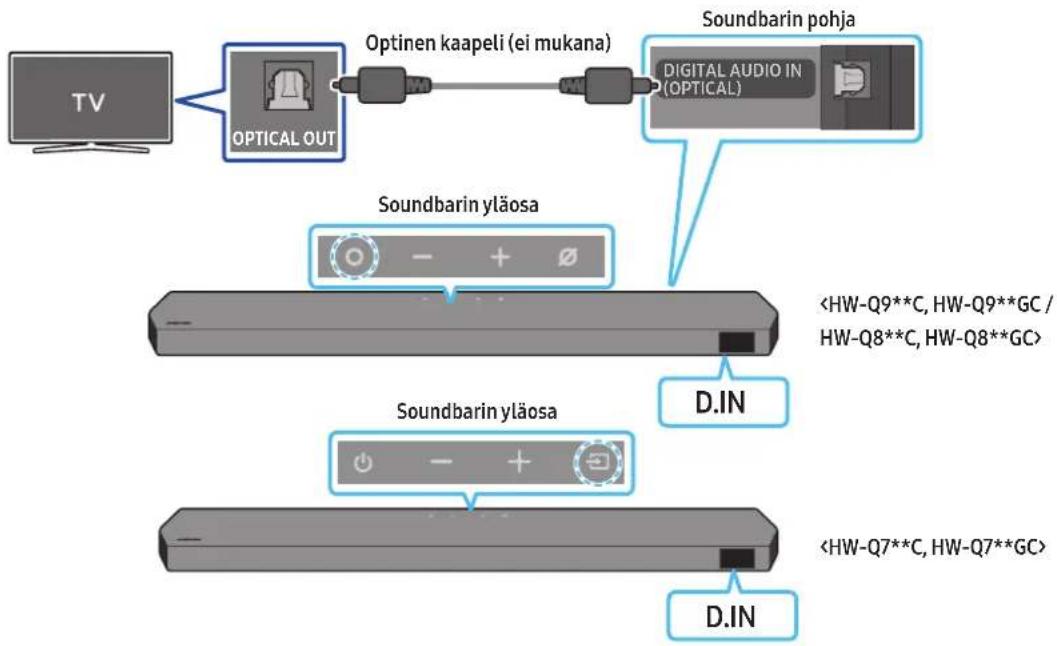
flowchart
graph TD
    A["TV"] --> B["OPTICAL OUT"]
    B --> C["Optinen kaapeli (ei mukana)"]
    C --> D["Soundbarin pohja"]
    D --> E["Digital Audio IN (OPTICAL)"]
    F["Soundbarin yläosa"] --> G["<HW-Q9**C, HW-Q9**GC / HW-Q8**C, HW-Q8**GC>"]
    H["Soundbarin yläosa"] --> I["<HW-Q7**C, HW-Q7**GC>"]
    J["D.IN"] --> K["D.IN"]
text_image
Diagram of a calculator with labeled buttons and a hand pointing to the function buttonnatural_image
Hand interacting with a circular electronic device displaying a play button (no text or symbols visible)natural_image
Diagram showing a screw being inserted into a housing with blue motion arrows indicating rotation (no text or symbols)natural_image
Illustration of a mechanical device with a screw and adjustment knob, showing no text or symbolsnatural_image
Diagram showing two mechanical components before and after force application, with arrows indicating motion direction (no text or symbols)natural_image
Diagram showing two mechanical components with downward arrows indicating motion or assembly (no text or symbols)text_image
Kumitassunatural_image
Diagram showing a monitor mounted on a base with a magnified view of its screen and panel (no text or symbols present)natural_image
Three grayscale images of remote and control devices, no text or symbols visiblenatural_image
Two 3D-rendered objects: a flat chair and a rectangular block, both with dimension labels 'x2' and 'x4' (no text or symbols on the objects themselves)02 VUE D'ENSEMBLE DU PRODUIT
3 DIGITAL AUDIO IN (OPTICAL)
text_image
Diagram illustrating three-step assembly or cleaning process with directional arrows and polarity indicatorstext_image
5 Sec ID SETnatural_image
Three-step diagram showing a device moving from left to right, with no visible text or symbols.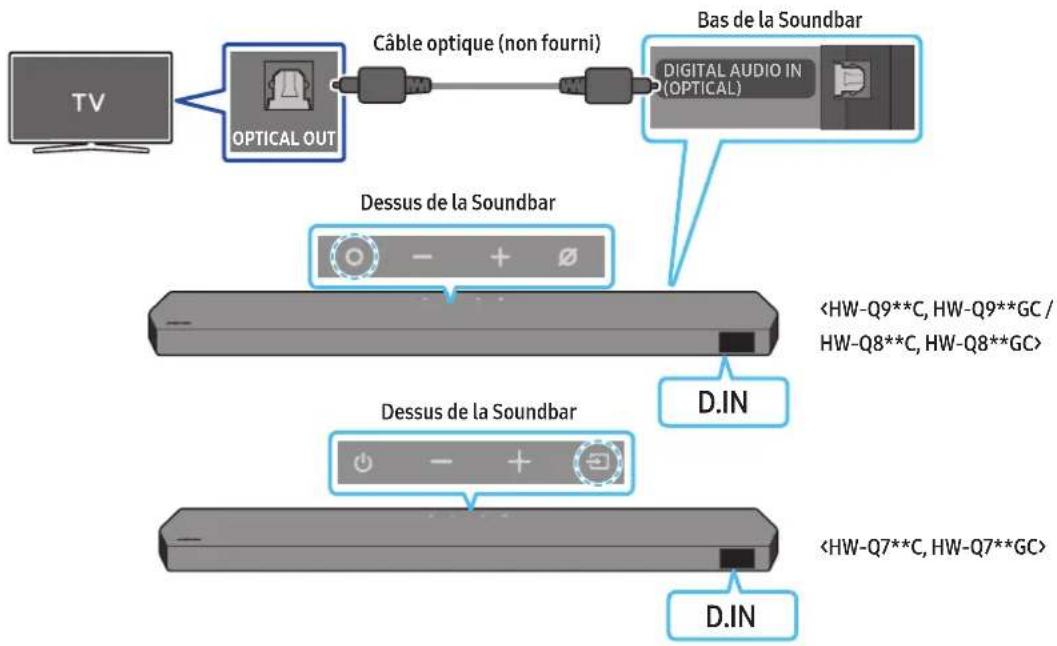
flowchart
graph TD
    A["TV"] --> B["OPTICAL OUT"]
    B --> C["Câble optique (non fourni)"]
    C --> D["Bas de la Soundbar"]
    D --> E["Digital Audio IN (OPTICAL)"]
    F["Dessus de la Soundbar"] --> G["<HW-Q9**C, HW-Q9**GC / HW-Q8**C, HW-Q8**GC>"]
    H["Dessus de la Soundbar"] --> I["<HW-Q7**C, HW-Q7**GC>"]
    J["D.IN"] --> K["D.IN"]
text_image
TV Bluetoothtext_image
Diagram of a hand interacting with a control panel showing buttons labeled 'OK', 'Cancel', and 'WIRE' with an plus/minus icon.natural_image
Hand interacting with a device screen displaying a play button (no text or symbols visible)08 CONNEXION VIA APPLE AIRPLAY 2
natural_image
Simple 3D illustration of a bracket with a hole and label 'x2' (no text or symbols on the object itself)Support de fixation murale
natural_image
Diagram showing a screw being inserted into a housing with blue motion arrows indicating rotation (no text or symbols)natural_image
Illustration of a mechanical device with a screw and adjustment knob, showing no text or symbols3 DIGITAL AUDIO IN (OPTICAL)
text_image
Diagram illustrating three-step assembly or process of a mechanical component with positive charges and directional arrows indicating movement.04 Σ'YNΔΕΣΗ TOY SOUNDBAR
text_image
5 Sec ID SETnatural_image
Diagram showing a mechanical component before and after assembly, with no visible text or symbols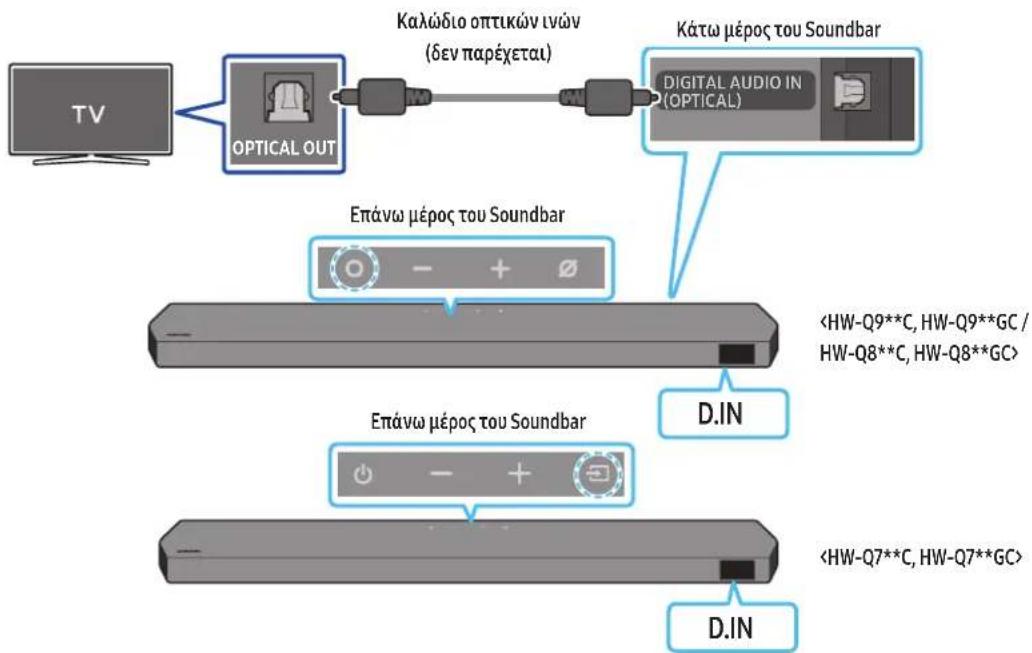
text_image
Diagram of a computer control panel with labeled buttons and a hand pointing to the buttonnatural_image
Hand interacting with a digital display screen showing play button and icons (no text or symbols)text_image
A B a1000. Close STOP: Close B A Anatural_image
Diagram showing a screw being inserted into a housing with motion arrows indicating rotation (no text or symbols)natural_image
3D illustration of a mechanical component with a screw and adjustment arrows indicating motion (no text or symbols)natural_image
Two-step diagram showing a mechanical component before and after cutting, with arrows indicating motion direction (no text or symbols)natural_image
Diagram showing two mechanical components with downward arrows indicating motion or assembly (no text or symbols)natural_image
Diagram showing a monitor mounted on a base with an inset view of a device inside a container (no text or symbols)text_image
Diagram illustrating three-step assembly or cleaning process with labeled components and directional arrowsflowchart
graph TD
    A["B térhatású hangszóró"] --> B["TV"]
    B --> C["Soundbar"]
    C --> D["Térhatású Hangszóró J"]
    D --> E["Square"]
    E --> F["Square"]
    F --> G["Square"]
    G --> H["Square"]
    H --> I["Square"]
    I --> J["Square"]
    J --> K["Square"]
    K --> L["Square"]
    L --> M["Square"]
    M --> N["Square"]
    N --> O["Square"]
    O --> P["Square"]
    P --> Q["Square"]
    Q --> R["Square"]
    R --> S["Square"]
    S --> T["Square"]
    T --> U["Square"]
    U --> V["Square"]
    V --> W["Square"]
    W --> X["Square"]
    X --> Y["Square"]
text_image
5 Sec ID SETnatural_image
Three-step diagram showing a mechanical component before and after processing, with no visible text or symbols.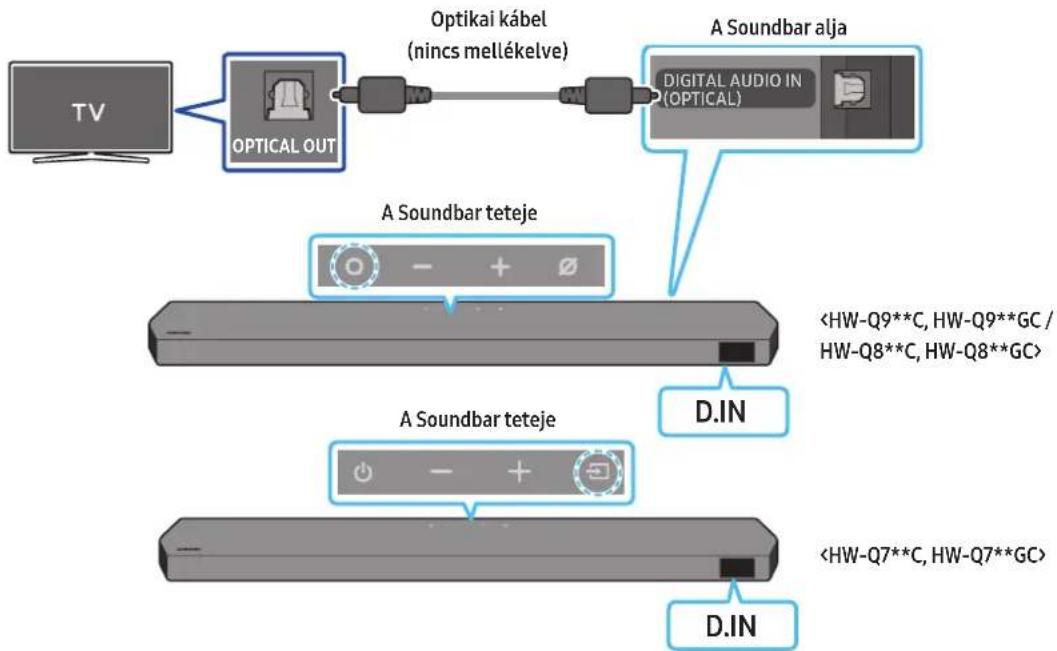
flowchart
graph LR
    TV["TV"] --> OpticalOut["Optical OUT"]
    OpticalOut --> OptikaiKabel["Optikai kabel (nincs mellékelve)"]
    OptikaiKabel --> DigitalAudioIn["Digital Audio In (OPTICAL)"]
    DigitalAudioIn --> SoundbarAlja["A Soundbar alja"]
    SoundbarAlja --> ASoundBarTeteje1["A Soundbar teteje"]
    ASoundBarTeteje1 --> <HW-Q9**C, HW-Q9**GC / HW-Q8**C, HW-Q8**GC> <HW-Q7**C, HW-Q7**GC> <HW-Q7**C, HW-Q7**GC> <HW-Q9**C, HW-Q9**GC> <HW-Q8**C, HW-Q8**GC> <HW-Q8**C, HW-Q8**GC> <HW-Q9**C, HW-Q9**GC> <HW-Q8**C, HW-Q8**GC> <HW-Q8**C, HW-Q8**GC> <HW-Q8**C, HW-Q8**GC> <HW-Q8**C, HW-Q8**GC> <HW-Q8**C, HW-Q8**GC> <HW-Q8**C, HW-Q8**GC> <HW-Q8**C, HW-Q8**GC> <HW-Q8**C, HW-Q8**GC> <HW-Q8**c, HW-Q8**GC> <HW-Q8**c, HW-Q8**GC> <HW-Q8**c, HW-Q8**GC> <HW-Q8**c, HW-Q8**GC> <HW-Q8**c, HW-Q8**GC> <HW-Q8**c, HW-Q8**GC> <HW-Q8**c, HW-Q8**GC> <HW-Q8**c, HW-Q8**GC> <DWQIN1["D.IN"]
text_image
Diagram of a calculator interface with Chinese labels and a hand pointing to the buttonnatural_image
Hand interacting with a digital play button (no text or symbols visible)natural_image
Simple 3D illustration of a bracket-like object with no text or symbolsTartó-Fali konzol
text_image
A B A C D E F G H I J K L M N O P Q R S T U V W X Y Z Anatural_image
Diagram showing a screw being inserted into a housing with blue motion arrows indicating rotation (no text or symbols)natural_image
Illustration of a mechanical device with a screw and adjustment knob, showing no text or symbolsnatural_image
Diagram showing two mechanical components with arrows indicating motion, no text or symbols presentnatural_image
Diagram showing two mechanical components with arrows indicating motion or assembly (no text or symbols)natural_image
Two identical gray rectangular devices with blue arrows pointing to circular buttons, no text or symbols present.BJ
natural_image
Three grayscale images of remote and control devices: a rectangular remote, a remote control with two buttons, and a black tower (no text or symbols visible)natural_image
Three product images: a gray server unit labeled 'x2', a black connector with 'x4o2' label, and a black USB cable with two connectors (no text or symbols on devices)natural_image
Simple black U-shaped connector with two connectors (no text or symbols)Cavo HDMI

text_image
A B x 7500 x 16mm B A x 7500 x 16mm x 2 x 2 (M4 x L10)natural_image
Two 3D model diagrams showing a bracket and a rectangular block, both labeled 'x2' and 'x4' (no text or symbols on the objects themselves)text_image
Diagram illustrating three-step mechanical assembly or disassembly process with labeled components and directional arrowstext_image
5 Sec ID SETnatural_image
Diagram showing a mechanical component before and after processing, with no visible text or symbols.
flowchart
graph TD
    A["TV"] --> B["OPTICAL OUT"]
    B --> C["Cavo ottico (non fornito in dotazione)"]
    C --> D["Parte inferiore della Soundbar"]
    D --> E["Digital Audio IN (OPTICAL)"]
    B --> F["Parte superiore della Soundbar"]
    F --> G["<HW-Q9**C, HW-Q9**GC / HW-Q8**C, HW-Q8**GC>"]
    F --> H["Parte superiore della Soundbar"]
    H --> I["<HW-Q7**C, HW-Q7**GC>"]
    H --> J["D.IN"]
text_image
Diagram of a calculator interface with Chinese labels and a hand pointing to the buttonnatural_image
Hand interacting with a screen displaying audio icons (no text or symbols visible)08 CONNESSIONE TRAMITE APPLE AIRPLAY 2
text_image
A B Linea centrale 4°150' 45mm 8°150' 50mm B Anatural_image
Diagram showing a screw being inserted into a housing with motion arrows indicating rotation (no text or symbols)natural_image
Illustration of a mechanical device with a screw and adjustment knob, showing no text or symbolsnatural_image
Diagram showing two mechanical components with arrows indicating motion, no text or symbols presentnatural_image
Diagram showing two mechanical components with downward arrows indicating motion or assembly (no text or symbols)natural_image
Two identical gray rectangular devices with blue arrows pointing to the left panel (no text or symbols)SD
natural_image
Diagram showing a monitor mounted on a base with a magnified view of a rectangular object inside, no text or symbols present.02 PRODUKTA PÄRSKATS
text_image
Diagram illustrating three-step assembly or manufacturing process with labeled components and directional arrowsnatural_image
Diagram showing a mechanical component before and after processing, with no visible text or symbols.
flowchart
graph TD
    A["TV"] --> B["OPTICAL OUT"]
    B --> C["Optiskais kabelis (nav iekļauts komplektācijā)"]
    C --> D["Sistēmas Soundbar apakspuse"]
    D --> E["Digital Audio IN (OPTICAL)"]
    F["Soundbar augšdaļa"] --> G["<HW-Q9**C, HW-Q9**GC / HW-Q8**C, HW-Q8**GC>"]
    H["Soundbar augšdaļa"] --> I["<HW-Q7**C, HW-Q7**GC>"]
    J["D.IN"] --> K["D.IN"]
text_image
Diagram of a computer control panel with labeled buttons and a hand pointing to the buttontext_image
Mobilä ierice(VAI)
text_image
A B STOCK CHAM STOCK MEANS A Anatural_image
Diagram showing a screw being inserted into a housing with motion arrows indicating rotation (no text or symbols)natural_image
Illustration of a mechanical device with a screw and a button, showing motion direction (no text or symbols)natural_image
Diagram showing two mechanical components before and after force application, with arrows indicating motion direction (no text or symbols)natural_image
Diagram showing two mechanical components with arrows indicating motion or assembly (no text or symbols)natural_image
Two identical gray rectangular devices with blue arrows pointing to circular features on their surfaces (no text or symbols)Kreisais Labais
12 PROBLÉMU NOVĚRŠANA
text_image
Diagram illustrating three-step mechanical assembly or disassembly process with labeled components and directional arrowstext_image
5 Sec ID SETnatural_image
Three-step diagram showing a mechanical component before and after processing, with no visible text or symbols.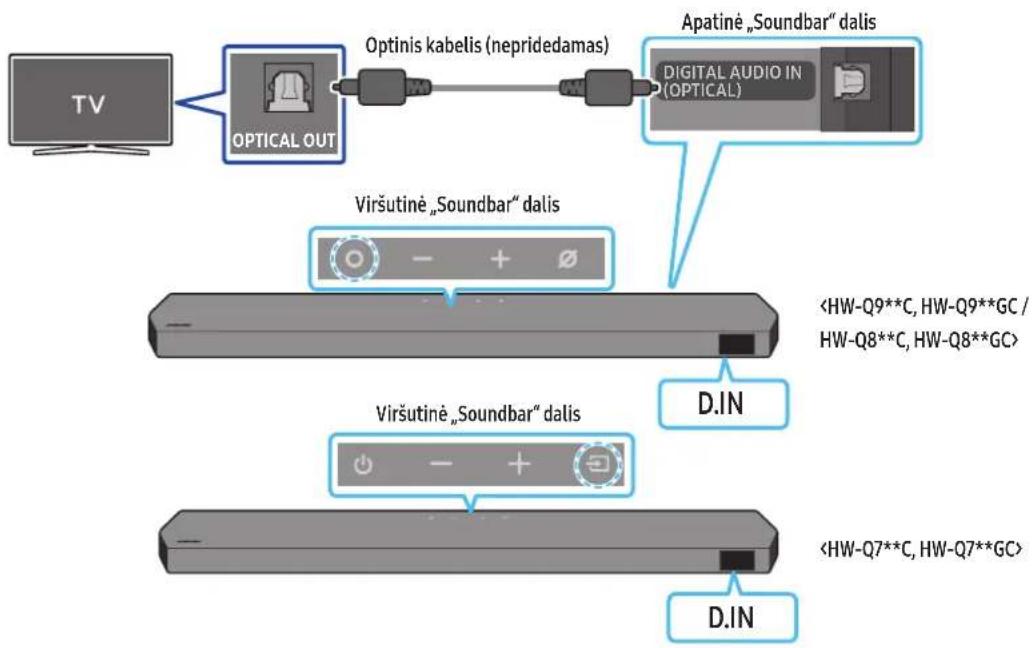
flowchart
graph LR
    TV["TV"] --> OpticalOut["Optical OUT"]
    OpticalOut --> Optiniskabel["Optinis kabel (nepridedamas)"]
    Optiniskabel --> DigitalAudioIn["Digital Audio In (Optical)"]
    DigitalAudioIn --> ApatinéSoundBar["Apatiné „Soundbar“ dalis"]
    ApatinéSoundBar --> ViršutineSoundBar1["Viršutine „Soundbar“ dalis"]
    ViršutineSoundBar1 --> DIN["D.IN"]
    DIN --> <HW-Q9**C, HW-Q9**GC / HW-Q8**C, HW-Q8**GC>
    ViršutineSoundBar1 --> <HW-Q7**C, HW-Q7**GC>
    DIN --> DIN2["D.IN"]
text_image
Hand interacting with a calculator interface showing buttons labeled 'OK', 'Cancel', and 'SIN' with a cursor pointing at the button.natural_image
Hand interacting with a device screen displaying a play button (no text or symbols visible)natural_image
Hand interacting with a touchscreen display (no text or symbols visible)natural_image
Simple 3D illustration of a bracket-like object with a cutout, labeled 'x2' (no text or symbols on the object itself)Sieninis laikiklis
natural_image
Diagram showing a screw being inserted into a housing with blue motion arrows indicating rotation (no text or symbols)natural_image
Mechanical component diagram showing a screw being inserted into a housing, with no visible text or symbolsnatural_image
Diagram showing two mechanical components with arrows indicating motion, no text or symbols presentnatural_image
Diagram showing two mechanical components with arrows indicating motion or assembly (no text or symbols)natural_image
Illustration of a person emitting sound waves from a computer monitor (no text or symbols)natural_image
Three grayscale images of remote and TV devices: a rectangular remote, a remote control with two buttons, and a black tower (no text or symbols visible)Soundbar-hovedenhet Soundbar-fjernkontroll/batterier Basshøyttaler

text_image
x 2 x 4 eller 23 DIGITAL AUDIO IN (OPTICAL)
Koble til den digitale (optiske) utgangen til en ekstern enhet. (Se side 23)
4 HDMI
text_image
Diagram illustrating three-step mechanical assembly or disassembly process with labeled components and directional arrowstext_image
Strømkabeltext_image
5 Sec ID SETnatural_image
Three-step diagram showing a mechanical component before and after processing, with no visible text or symbols.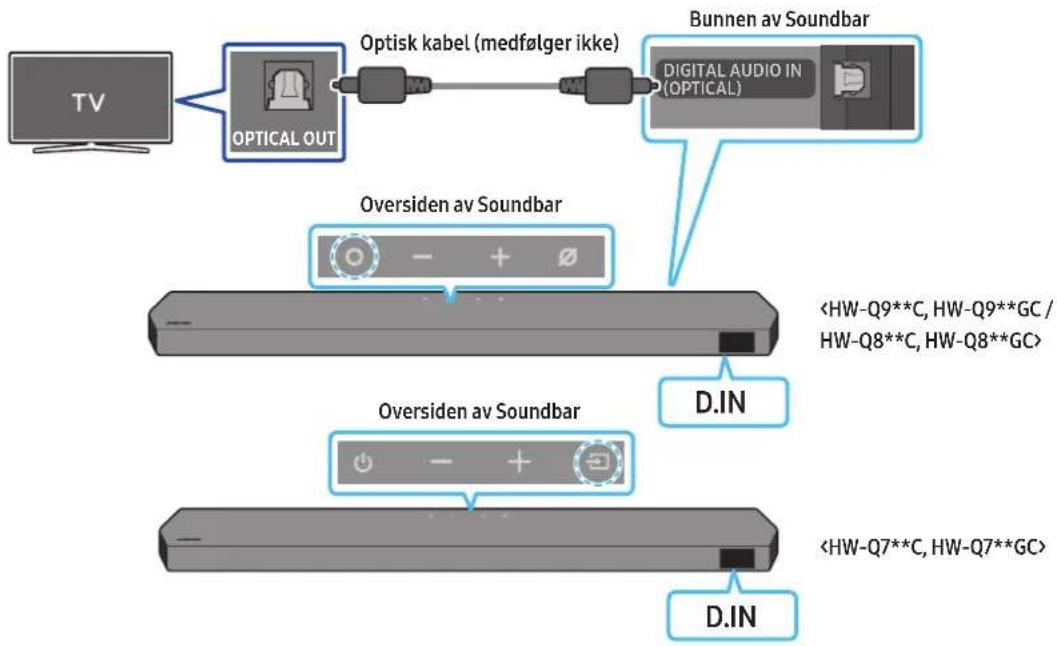
flowchart
graph TD
    A["TV"] --> B["OPTICAL OUT"]
    B --> C["Optisk kabel (medfølger ikke)"]
    C --> D["Bunnen av Soundbar"]
    D --> E["Digital Audio IN (OPTICAL)"]
    B --> F["Oversiden av Soundbar"]
    F --> G["<HW-Q9**C, HW-Q9**GC / HW-Q8**C, HW-Q8**GC>"]
    F --> H["Oversiden av Soundbar"]
    H --> I["<HW-Q7**C, HW-Q7**GC>"]
    H --> J["D.IN"]
text_image
Hand interacting with a device control panel showing buttons labeled 'ADD', 'ADD', 'SOLD', and 'ONLINE'08 KOBLE TIL VIA APPLE AIRPLAY 2
natural_image
Simple 3D illustration of a bracket-like object with a hole, labeled 'x2' (no text or symbols on the object itself)text_image
A B A (100%) B (100%) A A Anatural_image
Diagram showing a screw being inserted into a housing with blue motion arrows indicating rotation (no text or symbols)natural_image
Illustration of a mechanical device with a screw and adjustment knob, showing motion direction (no text or symbols)natural_image
Diagram showing two mechanical components with arrows indicating motion, no text or symbols presentnatural_image
Diagram showing two mechanical components with downward arrows indicating motion or assembly (no text or symbols)Active Voice Amplifier (AVA)....8
natural_image
Two 3D mechanical parts shown: a bracket with cross-sectional view and a flat rectangular block, both labeled 'x2' and 'x4' (no text or symbols on the objects themselves)text_image
Diagram illustrating three-step assembly or manufacturing process with labeled components and directional arrowsObstuga pilota
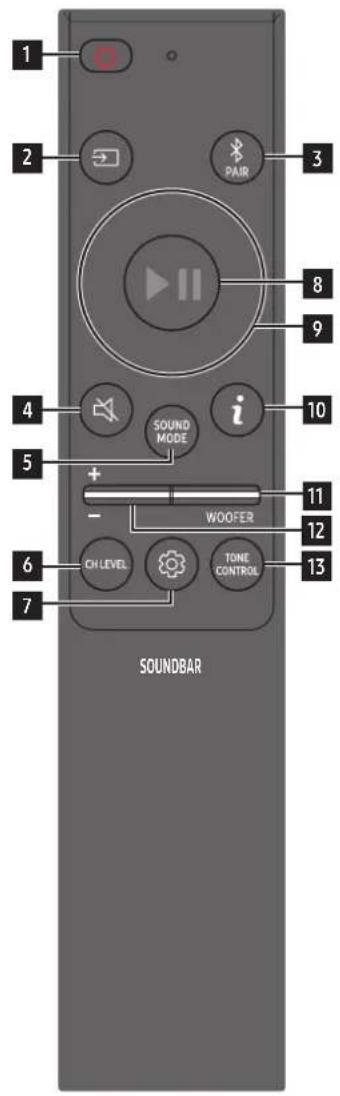
text_image
1 2 3 8 9 4 i 10 5 + - WOOFER 11 12 6 CH LEVEL TONE CONTROL 7 SOUNDBARActive Voice Amplifier (AVA)
text_image
5 Sec ID SETnatural_image
Diagram showing a mechanical component before and after processing, with no visible text or symbols.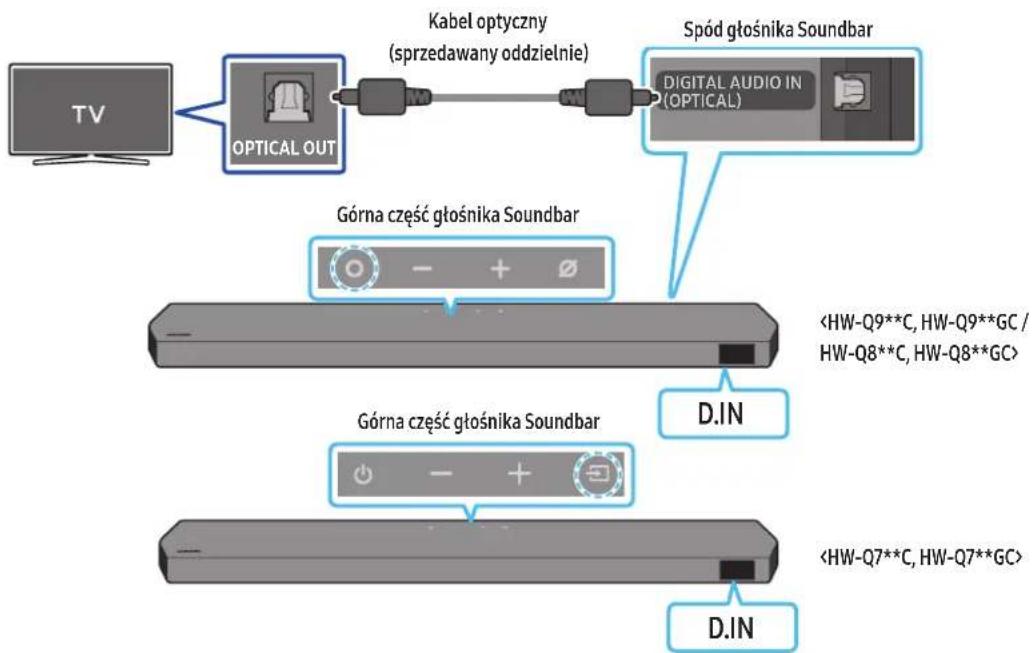
text_image
Diagram of a calculator interface with labeled buttons and a hand pointing to the functionnatural_image
Hand interacting with a circular electronic device displaying a play button (no text or symbols visible)text_image
A B A (100%) B (100%) A Anatural_image
Diagram showing a screw being inserted into a housing with motion arrows indicating rotation (no text or symbols)natural_image
Mechanical component diagram showing a screw being inserted into a housing (no text or symbols)natural_image
Diagram showing two mechanical components before and after force application, with arrows indicating motion direction (no text or symbols)natural_image
Two identical gray rectangular devices with blue arrows pointing to the left panel (no text or symbols)Lewy Prawy
natural_image
Diagram showing a monitor mounted on a base with an inset close-up of its screen (no text or symbols present)Active Voice Amplifier (AVA)....8
natural_image
Three grayscale images of remote and control devices: a rectangular remote, a remote control with two buttons, and a cylindrical device (no text or symbols visible)3 DIGITAL AUDIO IN (OPTICAL)
text_image
Diagram illustrating three-step mechanical assembly or disassembly process with labeled components and directional arrowsActive Voice Amplifier (AVA)
text_image
5 Sec ID SETnatural_image
Diagram showing three stages of a mechanical or electronic component with blue arrows indicating direction (no text or symbols)
flowchart
graph LR
    TV["TV"] --> OpticalOut["OPTICAL OUT"]
    OpticalOut --> CableOtico["Cabo ótico (não fornecido)"]
    CableOtico --> DigitalAudioDigital["DIGITAL AUDIO IN (OPTICAL)"]
    DigitalAudioDigital --> ParteInferiorSoundbar["Parte inferior do Soundbar"]
    ParteInferiorSoundBar --> ParteSuperiorSoundBar["Parte superior do Soundbar"]
    ParteSuperiorSoundBar --> DINA["D.IN"]
    DINA --> <HW-Q9**C, HW-Q9**GC / HW-Q8**C, HW-Q8**GC>
    DINA --> <HW-Q7**C, HW-Q7**GC>
    DINA --> D.IN
text_image
Diagram of a hand interacting with a control panel showing buttons labeled 'OK', 'Cancel', and 'OK/Cancel' with a cursor pointing to it.natural_image
Hand interacting with a circular device displaying a play button and monitor icon (no text or symbols visible)natural_image
Hand interacting with a touchscreen display (no visible text or symbols)text_image
Linha centralnatural_image
Diagram showing a screw being inserted into a housing with blue arrows indicating motion (no text or symbols)natural_image
Illustration of a mechanical device with a screw and adjustment knob, showing motion direction (no text or symbols)natural_image
Illustration of a flat-screen TV with antenna and cable (no text or symbols)natural_image
Diagram showing two mechanical components before and after force application, with arrows indicating motion direction (no text or symbols)natural_image
Diagram showing two mechanical components with downward arrows indicating motion or assembly (no text or symbols)Active Voice Amplifier (AVA)....8
text_image
Diagram illustrating three-step mechanical assembly or disassembly process with labeled components and directional arrowsActive Voice Amplifier (AVA)
(○ (Control sunet) → Difuzor surround → ▲Sus)/ (Jov) → Front / Rear)
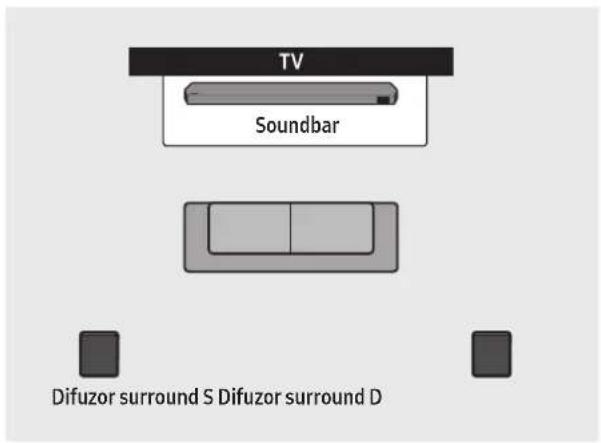
text_image
TV Soundbar Difuzor surround S Difuzor surround D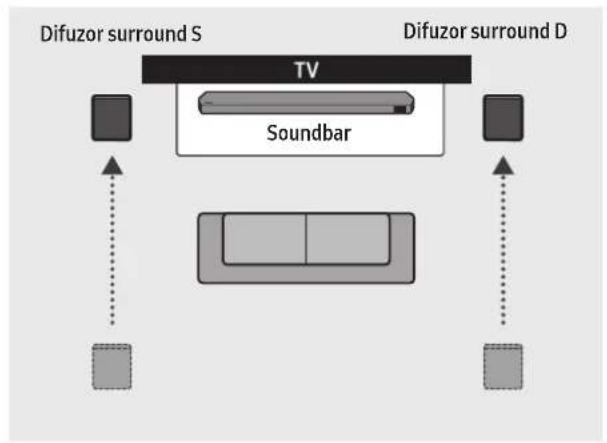
flowchart
graph TD
    A["TV"] --> B["Soundbar"]
    C["Difuzor surround S"] --> A
    D["Difuzor surround D"] --> C
    A --> E["Box 1"]
    A --> F["Box 2"]
    A --> G["Box 3"]
    A --> H["Box 4"]
    A --> I["Box 5"]
    style A fill:#f9f,stroke:#333
    style D fill:#f9f,stroke:#333
    style C fill:#ccf,stroke:#333
    style E fill:#cfc,stroke:#333
    style F fill:#cfc,stroke:#333
    style G fill:#cfc,stroke:#333
    style H fill:#cfc,stroke:#333
    style I fill:#cfc,stroke:#333
text_image
5 Sec ID SETnatural_image
Three-step diagram showing a mechanical component before and after processing, with no visible text or symbols.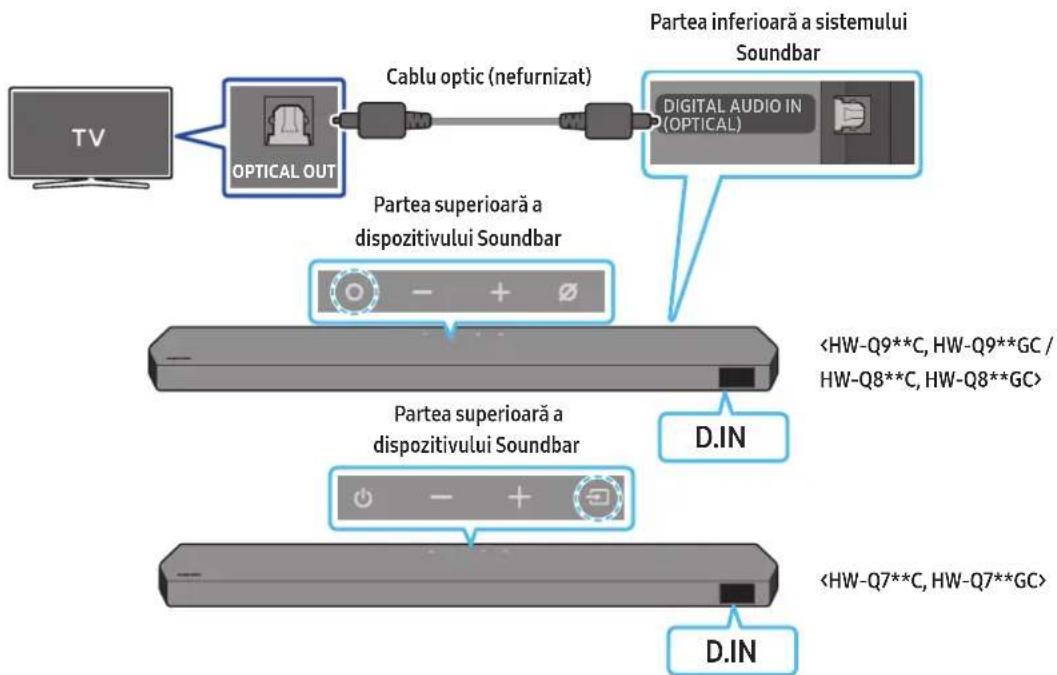
flowchart
graph TD
    A["TV"] --> B["OPTICAL OUT"]
    B --> C["Cablu optic (nefurnizat)"]
    C --> D["Partea inferioară a sistemului Soundbar"]
    D --> E["Digital Audio IN (OPTICAL)"]
    B --> F["Partea superioară a dispozitivului Soundbar"]
    F --> G["<HW-Q9**C, HW-Q9**GC / HW-Q8**C, HW-Q8**GC>"]
    F --> H["Partea superioară a dispozitivului Soundbar"]
    H --> I["<HW-Q7**C, HW-Q7**GC>"]
    H --> J["D.IN"]
text_image
Diagram of a calculator interface with Chinese labels and a hand pointing to the function buttonnatural_image
Hand interacting with a circular electronic device displaying a play button (no text or symbols visible)natural_image
Hand interacting with a touchscreen display (no text or symbols visible)08 CONECTAREA PRIN APPLE AIRPLAY 2
natural_image
Diagram showing a screw being inserted into a housing with blue motion arrows indicating rotation (no text or symbols)natural_image
Illustration of a mechanical device with a screw and adjustment knob, showing no text or symbolsnatural_image
Diagram showing two mechanical components with arrows indicating motion, no text or symbols presentnatural_image
Diagram showing two mechanical components with downward arrows indicating motion or assembly (no text or symbols)natural_image
Two identical gray rectangular objects with blue arrows pointing to circular features, no text or symbols present.SD
natural_image
Diagram showing a monitor mounted on a base with a magnified view of a device inside a container (no text or symbols)text_image
Diagram showing a device with a labeled component 'C' and an arrow pointing to it, likely indicating a process or assembly step.natural_image
Three grayscale images of remote devices: a rectangular remote, a remote control with two buttons, and a black tower (no text or symbols)Glavni zvučnik Soundbar Daljinski upravljač/baterije Soundbar-a Sabvufer

natural_image
Three electronic devices: a gray server unit labeled 'x2', a black I/O port labeled 'x4 ili 2', and a black USB connector (no text or symbols on the devices themselves)Zvučnik za prostorni zvuk (opcionalno)
(levi/desni)

text_image
A B x 7500 x 16mm B A x 7500 x 16mm x 2 x 2 (M4 x L10)Kabl za napajanje (sabvufer, zvučnik za prostorni zvuk, Soundbar) (opcionalno)

text_image
Vodica za montažu na zid Zavrtanj držača Zavrtanj x 2 x 4Nosač za montažu na zid Gumena nožica
- Više informacija o napajanju i potrošnji energije potražite na nalepnici na proizvodu. (oznaka: Zadnja strana glavne jedinice Soundbar zvučnika)
- Za kupovinu dodatnih komponenata ili opcionalnih kablova, obratite se Samsung servisnom centru ili Samsung korisničkoj podršci.
- Za više informacija o montiranju na zid ili na gumenoj nožici pogledajte strane od 29 do 31.
- Dizajn, specifikacije i ekran aplikacija su podložni promeni bez prethodnog obaveštenja.
- Izgled dodatne opreme se može u određenoj meri razlikovati od ilustracija prikazanih iznad.
• Samsung Electronics Co., Ltd zadržava pravo da promeni specifikacije bez prethodnog upozorenja. - Težina i dimenzije su približne.
02 PREGLED PROIZVODA
Gornji panel Soundbar uređaja
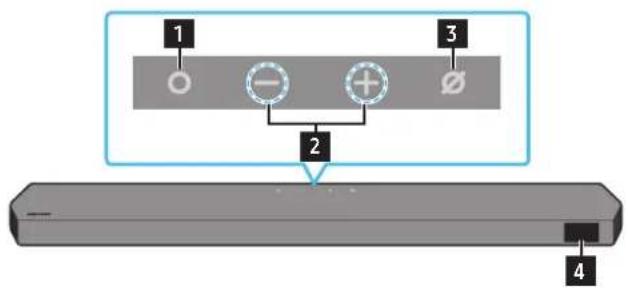
text_image
1 2 3 4HW-Q9**C, HW-Q9**GC / HW-Q8**C, HW-Q8**GC
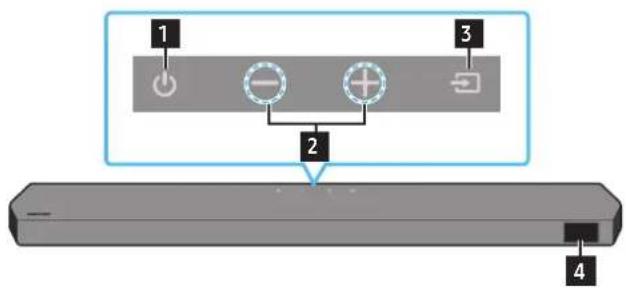
text_image
1 2 3 4HW-Q7**C, HW-Q7**GC
| 1 | Dugme (Više funkcija) (modeli HW-Q9**C, HW-Q9**GC / HW-Q8**C, HW-Q8**GC)U režimu pripravnosti pritisnite dugme (Više funkcija) da biste uključili zvučnik Soundbar.Pritisnite dugme (Više funkcija) da biste promenili ulazni kanal. | |
| 1 | Dugme (Uključivanje/Isključivanje) (model HW-Q7**C, HW-Q7**GC)Uključuje i isključuje napajanje. | |
| 2 | Dugme — + (Jačina zvuka)Podešava jačinu zvuka. | |
| 3 | Dugme (Mikrofon uključen/isključen)(modeli HW-Q9**C, HW-Q9**GC / HW-Q8**C, HW-Q8**GC)Pritisnite dugme da uključite ili isključite mikrofon.Kad se mikrofon isključi, LED indikator svetleće u crvenoj boji. | 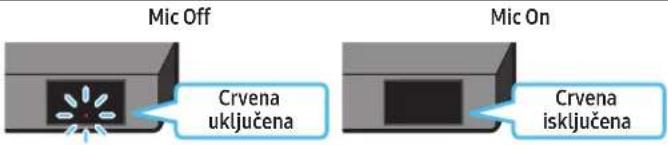 |
| 3 | Dugme → (Izvor) (model HW-Q7**C, HW-Q7**GC)Pritisnite dugme → Izvor) da biste promenili ulazni izvor. | |
| 4 | EkranPrikazuje status i trenutni režim proizvoda.D.IN → HDMI → Wi-Fi → BT | |
3 DIGITAL AUDIO IN (OPTICAL)
text_image
Diagram illustrating three-step assembly or cleaning process with labeled components and directional arrowsKako se koristi daljinski upravljač

text_image
1 2 3 8 9 4 i 10 5 + - WOOFER 11 12 6 CH LEVEL TONE CONTROL 13 7 SOUNDBAR| 1 |  Napajanje Napajanje | Uključuje i isključuje Soundbar.Funkcija automatskog smanjenja napajanjaJedinica se automatski isključuje u sledećim situacijama:U režimu D.IN / HDMI / Wi-Fi / BT ako 18 minuta nema signala zvuka. |
| 2 |  Izvor Izvor | Pritisnite za izbor izvora signala koji je povezan sa Soundbar-om.Uključi/isključi glasovne povratne informacijeGlasovnu povratnu informaciju možete da uključite ili isključite.Pritisnite i zadržite dugme → (Izvor) na daljinskom upravljaču 5 sekundī dok je Soundbar isključen (Režim pripravnosti).Svaki put kada promenite postavku Glasovne povratne informacije, na OLED ekranu prikazaće se „AUI OFF" (Podrazumevano) ili „AUI ON”. |
| 3 |  Bluetooth PAIR Bluetooth PAIR | Prebacuje Soundbar uređaj u režim za Bluetooth uparivanje. Pritisnite dugme i sačekajte da se prikaže ekran „BTPAIRING" da biste povezali novi Bluetooth uređaj. |
| 4 |  Utišaj Utišaj | Pritisnite dugme ≈ (Utišaj) da biste isključili zvuk.Ponovo ga pritisnite da biste uključili zvuk. |
| 5 |  SOUND MODE SOUND MODE | Pritiskom na dugme možete izabrati željeni audio režim kao što su Surround, Game Pro, Standard, Adaptive Sound.StandardNa izlazu se dobija originalni zvuk.SurroundObezbeđuje šire zvučno polje od standardnog.Game ProObezbeđuje stereoskopski zvuk koji vas uranja u akciju tokom igre.Adaptive SoundAnalizira sadržaj u realnom vremenu i automatski obezbeđuje optimalno zvučno polje na osnovu karakteristika sadržaja. |
| 6 | [BXDC]CH LEVEL | Pritiskom na dugme možete podesiti jačinu zvuka svakog zvučnika, kao što su Centre level, Side level, Wide level, Front Top level, Rear level, and Rear top level.Za kontrolu jačine zvuka svakog zvučnika izaberite Centre Level, Side level, Wide level ili Front Top Level u opciji Postavke zvuka, a zatim podesite jačinu između -6~+6 pomoću dugmeta Nagore/Nadole.Ako su zvučnici za prostorni zvuk povezani, izaberite Rear level ili Rear top level, a zatim upotrebite dugmad Nagore/Nadole za podešavanje jačine zvuka u rasponu od -6 do +6.Specifikacije režima CH LEVEL mogu se razlikovati u zavisnosti od modela. |
| 7 | Kontrola zvuka | Pritiskom na dugme možete postaviti audio funkcije kao što suSpaceFit Sound, AVA, Voice enhance mode, Night mode, Sync,Surround speaker mode, Virtual Željena stavka se može prilagoditi pomoću dugmeta Nagore/Nadole.Funkcije SpaceFit Sound i AVA podržavaju modeli HW-Q7**C, HW-Q7**GC.Voice enhance mode olakšava slušanje govornih dijaloga u filmovima i na TV-u da biste lakše slušali.Night modeje optimizovan za gledanje noću jer su postavke prilagođene tako da je jačina zvuka mala, a dijalog jasan.Pritisnite i zadržite dugme (Kontrola zvuka) oko 5 sekundi kako biste podesili zvuk na svakom frekventnom opsegu.Moguće je izabrati150 Hz, 300 Hz, 600 Hz, 1,2 kHz, 2,5 kHz, 5 kHz i10 kHz pomoću dugmetaNalevo/Nadesno, a svaka od tih stavki se može podesiti na postavku od -6 do +6 pomoću dugmetaNagore/Nadole.(Uverite se da je režim zvuka podešen na „Standard“)Ako video na TV-u i zvuk sa zvučnika Soundbar nisu sinhronizovani, izaberiteSyncu opciji Kontrola zvuka, a zatim postavite odlaganje zvuka između 0~300 milisekundi pomoću dugmetaNagore/Nadole.Syncje podržana samo za neke funkcije.Dostupne postavkeSurround speaker modepodržava samo model HW-Q9**C, HW-Q9**GC.Funkciju zvučnikaVirtualje moguće postaviti naON/OFPomoću dugmeta Nagore/Nadole. |
| 8 |  Reprodukcija/Pauza Reprodukcija/Pauza | Pritiskom na ovo dugme takođe možete pokrenuti reprodukciju muzike ili je pauzirati. |
| 9 |  Nagore/nadole/nalevo/nadesno Nagore/nadole/nalevo/nadesno |  Pritisnite označena područja za izbor Nagore/nadole/nalevo/nadesno.Pritisnite nagore/nadole/nalevo/nadesno na dugmetu da biste izabrali ili podesili funkcije.Preskakanje muzikePritisnite dugmeNadesnoza izborsledeće muzičke datoteke. Pritisnite dugmeNalevoza izbor prethodne muzičke datoteke.ID SETOvu opciju upotrebite kada sabvufer zvučnik ili zvučnici za prostorni zvuk nisu priključeni ili je potrebno da se ponovo priključe.Dok je napajanje isključeno, pritisnite i zadržite dugmeNagore5 sekundi kako biste izvršiliID SET. (Pogledajte stranicu 13.) Pritisnite označena područja za izbor Nagore/nadole/nalevo/nadesno.Pritisnite nagore/nadole/nalevo/nadesno na dugmetu da biste izabrali ili podesili funkcije.Preskakanje muzikePritisnite dugmeNadesnoza izborsledeće muzičke datoteke. Pritisnite dugmeNalevoza izbor prethodne muzičke datoteke.ID SETOvu opciju upotrebite kada sabvufer zvučnik ili zvučnici za prostorni zvuk nisu priključeni ili je potrebno da se ponovo priključe.Dok je napajanje isključeno, pritisnite i zadržite dugmeNagore5 sekundi kako biste izvršiliID SET. (Pogledajte stranicu 13.) |
| 10 |  Informacije Informacije | Pritisnite dugme za prikaz informacija o aktivnoj funkciji na dostupnom kodeku.U režimuBTprikazuje se povezani uređaj (kada se završi uparivanje) ili „BTready” (kada je potrebno uparivanje). |
| 11 | WOOFER LEVEL | 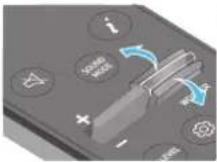 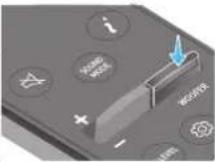 Pritisnite dugme nagore ili nadole da biste podesili nivo vufera (niski tonovi). Pritisnite dugme nagore ili nadole da biste podesili nivo vufera (niski tonovi). |
| 12 | JAČINA ZVUKA | 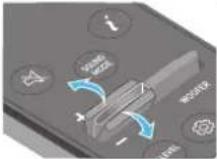 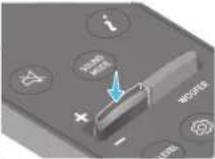 Pritisnite dugme nagore ili nadole da biste prilagodili jačinu zvuka.UtišajPritisnite dugmeJAČINAZVUKAda biste isključili zvuk. Ponovo ga pritisnite da biste uključili zvuk. Pritisnite dugme nagore ili nadole da biste prilagodili jačinu zvuka.UtišajPritisnite dugmeJAČINAZVUKAda biste isključili zvuk. Ponovo ga pritisnite da biste uključili zvuk. |
| 13 |  TONE CONTROL TONE CONTROL | Pritiskom na dugme možete podesiti jačinu zvuka visokih ili niskih tonova. Željena stavka se može prilagoditi pomoću dugmeta Nagore/Nadole. Ova funkcija je omogućena u režimu zvuk, osim u režimuStandard.Za kontrolu jačine visokih ili dubokih tonova izaberite TREBLEiliBASSu opciji Postavke zvuka, a zatim podesite jačinu između -6~+6 pomoću dugmetaNagore/Nadole.Kada se promeni nivo niskih tonova, nivo vufera će se takode prilagoditi u skladu sa tim. |
Aktivno pojačalo glasa (AVA)
text_image
5 Sec ID SETnatural_image
Diagram showing a mechanical component before and after assembly, with no visible text or symbols
flowchart
graph LR
    TV["TV"] --> OpticalOut["Optical OUT"]
    OpticalOut --> OptičkiKab["Optički kabl (nije u isporuci)"]
    OptičkiKab --> DigitalAudio["Digital Audio IN (OPTICAL)"]
    DigitalAudio --> DonjaStranaSoundBara["Donja strana Soundbar-a"]
    DonjaStranaSoundBara --> GornjiDeoZvučnikaSoundbar["Gornji deo zvučnika Soundbar"]
    DonjaStranaSoundBara --> <HW-Q9**C, HW-Q9**GC / HW-Q8**C, HW-Q8**GC>
    DonjaStranaSoundBara --> D.IN["D.IN"]
    D.IN --> <HW-Q7**C, HW-Q7**GC>
- Kada su TV i Soundbar isključeni, optičkim kablom (nije priložen) povežite DIGITAL AUDIO IN (OPTICAL) port Soundbar-a i OPTICAL izlazni port TV-a, na način prikazan na slici.
- Uključite Soundbar i TV.
- Pritisnite dugme ○ (Više funkcija) / → (Izvor) na vrhu zvučnika Soundbar ili dugme → (Izvor) na daljinskom upravljaču da biste izabrali režim „D.IN”.
- Soundbar uređaj emituje zvuk sa televizora.
Povezivanje putem Bluetooth veze
Kada se Samsung TV poveže putem Bluetooth veze, možete dobiti stereo zvuk bez petljanja sa kablovima.
- Istovremeno može biti povezan samo jedan Samsung TV.
- Može se povezati Samsung TV koji podržava Bluetooth povezivanje. Proverite specifikacije svog TV-a.
Početno povezivanje
- Pritisnite dugme ✝PAIR na daljinskom upravljaču Soundbar zvučnika da biste ušli u režim „BTPAIRING”.

text_image
Diagram of a calculator interface with buttons labeled 'OK', 'Cancel', and 'Change', and a hand pointing to the right button.- Pritisnite dugme Nagore na daljinskom upravljaču da biste uključili SpaceFit Sound. Na ekranu se prikazuje „ON”.
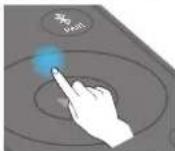
- Pritisnite dugme Nadole na daljinskom upravljaču da biste uključili SpaceFit Sound. Na ekranu se prikazuje „OFF“.
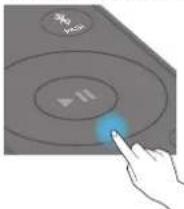
- Ova funkcija je dostupna u svim režimima zvuka.
text_image
Home Home is a home of home? The home is a home.Pokrenite aplikaciju


text_image
[AV] Samsung Soundbar A new device has been found AND this device is Smart T Angola! Can't add Enter Add TouchAutomatski iskačući prozor

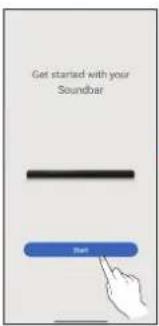
text_image
Get started with your Soundbar StartDodaj uređaj


text_image
I may take a new route to learn! Downloaded to check your. Please walk.natural_image
Simple 3D illustration of a bracket-like object with a hole, labeled 'x2' (no text or symbols on the object itself)Nosač za montažu na zid
-
Postavite vodicu za montiranje na zid na površinu zida.
-
Vodica za montiranje na zid mora da bude ravna.
- Ako je televizor postavljen na zid, instalirajte Soundbar najmanje 5 cm ispod televizora.
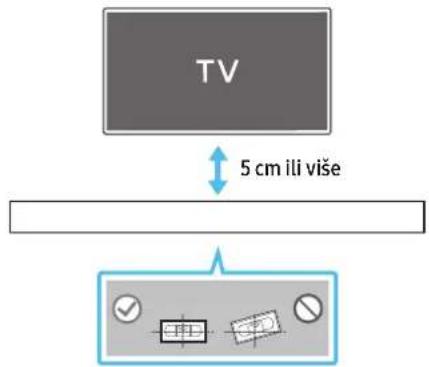
text_image
TV 5 cm ili više- Poravnajte središnju liniju vodice za montiranje na zid sa sredinom TV-a (ako postavljate Soundbar ispod TV-a), a zatim pričvrstite vodicu za montiranje na zid na zid pomoću lepljive trake.
- Ako ga ne postavljate ispod TV-a, postavite središnju liniju u sredinu područja instalacije.
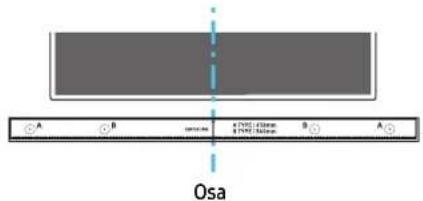
text_image
A B Osa a (VCS) 430mm b (VCS) 50mm D A- Gurnite vrh olovke kroz sredinu slika VRSTE A na svakoj strani vođice da biste označili otvore za noseće vijke, a zatim uklonite vodicu za montiranje na zid.
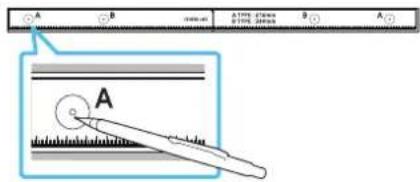
text_image
A B A B A Anatural_image
Diagram showing a screw being inserted into a housing with blue motion arrows indicating rotation (no text or symbols)- Montirajte 2 zidna nosača u tačan položaj na dnu Soundbar zvučnika pomoću 2 vijka.
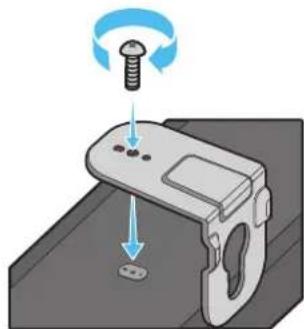
natural_image
Illustration of a mechanical device with a screw and adjustment knob, showing motion direction (no text or symbols)- Prilikom sastavljanja proverite da li se delovi za kačenje na zidnim nosačima nalaze na zadnjem delu Soundbar zvučnika.
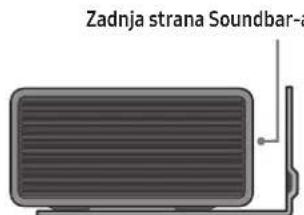
text_image
Zadnja strana Soundbar-aDesni kraj zvučnika Soundbar
natural_image
Diagram showing two mechanical components with arrows indicating motion, no text or symbols presentnatural_image
Diagram showing two mechanical components with downward arrows indicating motion or assembly (no text or symbols)Postavljanje zvučnika za prostorni zvuk na zid (samo primenljivi modeli)
Za postavljanje zvučnika za prostorni zvuk na zid možete odvojeno da kupite zidne držače.
Kompanija Samsung Electronics ne prodaje zidne držače.
Napomene vezane za montiranje zvučnika za prostorni zvuk na zid
natural_image
Two identical gray rectangular devices with blue arrows pointing to the left panel (no text or symbols)Levi Desni
- Proverite izdržljivost zida pre postavljanja zidnih nosača. Ako njegova čvrstina nije adekvatna, ojačajte zid pre montiranja konzole zidnih nosača i zvučnika na zid.
- Samsung ne snosi odgovornost ni za kakvo oštećenje proizvoda zbog njegovog nepravilnog postavljanja.
- Vodite računa da ne postavite zvučnike položeno ili da donja strana bude okrenuta nagore.
10 POSTAVLJANJE ZVUČNIKA SOUNDBAR ISPRED TV-A
Komponenta

x4
Gumena nožica
Za instalaciju, prikačite gumene nožice sa donje strane Soundbar uređaja pre nego što ga postavite iznad stalka za televizor. Vodite računa da gumene nožice prikačite tako da ne budu van spoljašnjih ivica stalka za televizor. Pogledajte sliku u nastavku.

text_image
Gumena nožicaPostavite Soundbar uređaj na postolje za televizor.

text_image
Mikrofoni (samo primenljivi modeli)Kao što je prikazano na slici, poravnajte sredinu Soundbar-a sa sredinom TV-a i pažljivo postavite Soundbar u stalak za televizor.
Sada postavite mikrofone (samo primenljivi modeli) ispred stalka da ne bi došlo do smetnji sa prepoznavanjem glasa.
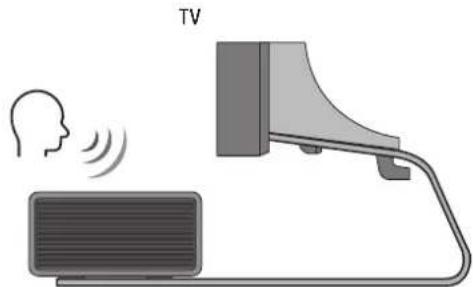
natural_image
Illustration of a TV setup with a speaker emitting sound waves, next to a monitor and cable (no text or symbols)Desni kraj zvučnika Soundbar
NAPOMENA
- Obavezno postavite Soundbar na čvrstu i ravnu površinu.
- Nedovoljna udaljenost od televizora može dovesti do problema sa prepoznavanjem glasa i akustikom.
- Gornja ilustracija se razlikuje u zavisnosti od odgovarajućeg modela.
- Ovu funkciju ne podržava model HW-Q7**C, HW-Q7**GC.
- Za najbolje performanse mikrofona, držite zvučnik Soundbar bar 2 cm od panela televizora.
11 AŽURIRANJE SOFTVERA
Automatsko ažuriranje
Kada se Soundbar poveže na Internet, softver sa ažurira automatski, čak i kada je Soundbar isključen.
- Za upotrebu funkcije automatskog ažuriranja Soundbar mora biti povezan na Internet.
Wi-Fi veza sa Soundbar-om će biti raskinuta ako se kabl za napajanje Soundbar-a isključi ili se napajanje prekine. Ako se napajanje prekine, kada se napajanje ponovo uspostavi ili se kabl za napajanje ponovo uključi, uključite Soundbar, pa zatim ga ponovo povežite na Internet.
Ažuriranje putem USB-a
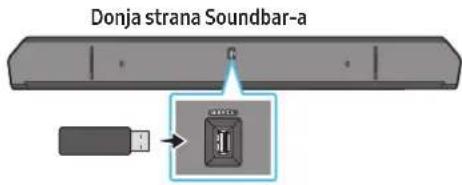
text_image
Donja strana Soundbar-a IKompanija Samsung u budućnosti može ponuditi ažurirane verzije firmvera sistema Soundbar-a.
Kad je ažurirana verzija dostupna, Soundbar se može ažurirati tako što ćete priključiti USB memoriju koja sadrži ažurirani firmver na port Soundbar-a označen sa SERVICE.
- Idite na veb lokaciju kompanije Samsung (www.samsung.com) → potražite naziv modela u opciji menija korisničke podrške.
-
Više informacija o ažuriranju potražite u Vodiču za nadogradnju.
-
Preuzmite datoteku za ažuriranje (USB tip).
-
Raspakujte zip datoteku da biste dobili fasciklu sa datotekom.
-
Snimite napravljenu fasciklu na USB memoriju, koju zatim priključite na Soundbar.
-
Uključite zvučnik Soundbar. Proizvod se zatim ažurira u roku od 3 minuta uz prikazivanje poruke „UPDATE“.
-
Tokom ažuriranja nemojte da ga isključujete ili da uklanjate USB.
- Ako se poruka „UPDATE” ne pojavi na prozoru ekrana, uklonite kabl za napajanje sa zvučnika Soundbar, a zatim ga ponovno povežite.
- Ako je instalirana najnovija verzija, ažuriranje se ne obavlja.
- U zavisnosti od vrste USB-a, ažuriranje možda nije podržano.
Inicijalizacija
Gornji deo zvučnika Soundbar
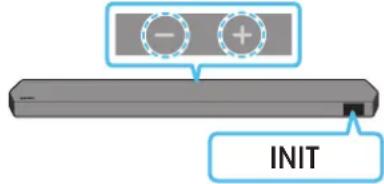
text_image
- + INITKad je Soundbar uključen, istovremeno pritisnite dugmad — + (Jačina zvuka) na kućištu i držite ih tako najmanje 5 sekundi. Na ekranu se pojavljuje poruka „INIT“, a zatim se Soundbar resetuje.
PAŽNJA
- Pokreću se sve postavke Soundbar zvučnika. Vodite računa da ovo obavljate samo kada je pokretanje obavezno.
12 REŠAVANJE PROBLEMA
3 DIGITAL AUDIO IN (OPTICAL)
text_image
Diagram illustrating three-step assembly or cleaning process with labeled components and directional arrowstext_image
5 Sec ID SETnatural_image
Diagram showing three stages of a mechanical or electronic component with blue arrows indicating direction (no text or symbols)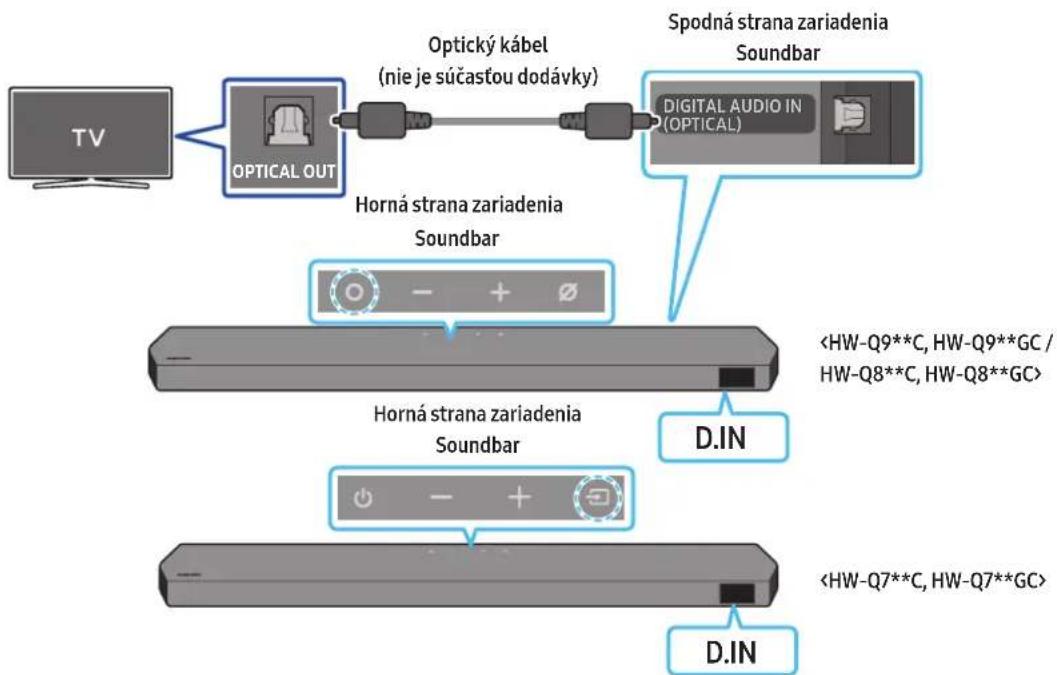
flowchart
graph TD
    A["TV"] --> B["OPTICAL OUT"]
    B --> C["Optický kábel (nie je súčastou dodávky)"]
    C --> D["Spodná strana zariadenia Soundbar"]
    D --> E["Digital Audio IN (OPTICAL)"]
    B --> F["Horná strana zariadenia Soundbar"]
    F --> G["<HW-Q9**C, HW-Q9**GC / HW-Q8**C, HW-Q8**GC>"]
    F --> H["<HW-Q7**C, HW-Q7**GC>"]
    H --> I["D.IN"]
text_image
Diagram of a calculator interface with buttons labeled 'OK', 'Cancel', and 'Target' and a hand pointing to the button.natural_image
Hand interacting with a circular electronic device displaying a play button (no text or symbols visible)natural_image
Diagram showing a screw being inserted into a housing with motion arrows indicating rotation (no text or symbols)natural_image
Illustration of a mechanical device with a screw and adjustment knob, showing no text or symbolsnatural_image
Illustration of a flat-screen electronic device with ventilation grille and antenna (no text or symbols)Pravý koniec zariadenia Soundbar
natural_image
Diagram showing two mechanical components with arrows indicating motion, no text or symbols presentnatural_image
Diagram showing two mechanical components with downward arrows indicating motion or assembly (no text or symbols)natural_image
Two identical gray rectangular devices with blue arrows pointing to the left side of each device (no text or symbols)L' P
text_image
Diagram showing a device with a battery and a magnified view of its internal component labeled '1'.3 DIGITAL AUDIO IN (OPTICAL)
text_image
Diagram illustrating three-step assembly or manufacturing process with labeled components and directional arrowstext_image
5 Sec ID SETnatural_image
Three-step diagram showing a mechanical component before and after processing, with no visible text or symbols.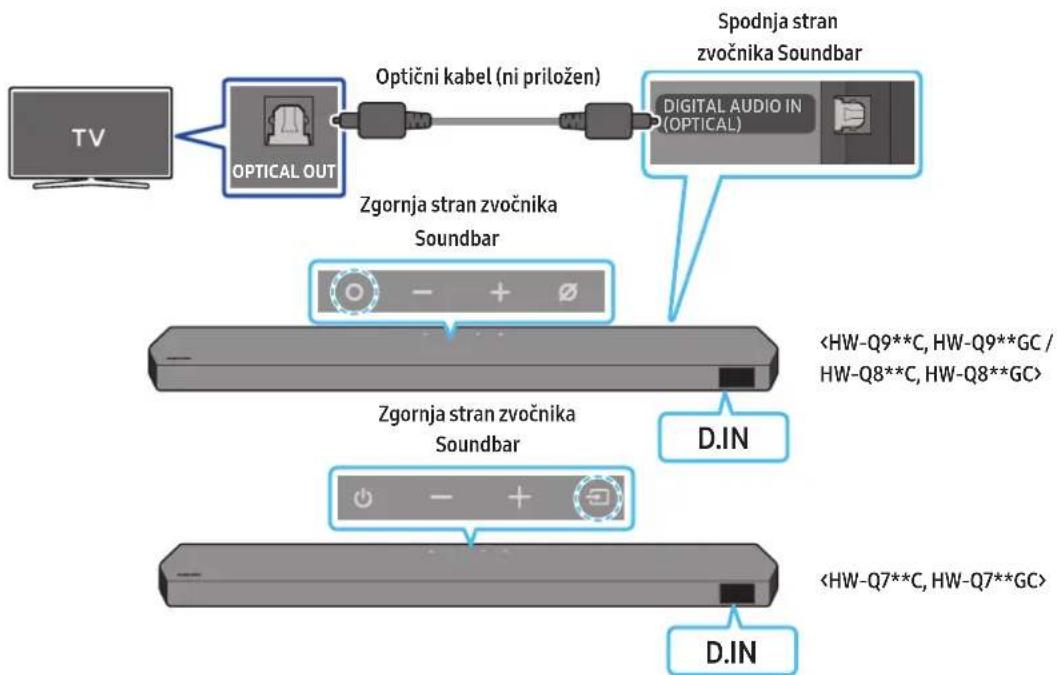
flowchart
graph TD
    A["TV"] --> B["OPTICAL OUT"]
    B --> C["Optični kabel (ni priložen)"]
    C --> D["Zgornja stran zvočnika Soundbar"]
    D --> E["Digital Audio IN (OPTICAL)"]
    E --> F["Spodnja stran zvočnika Soundbar"]
    F --> G["<HW-Q9**C, HW-Q9**GC / HW-Q8**C, HW-Q8**GC>"]
    D --> H["Zgornja stran zvočnika Soundbar"]
    H --> I["<HW-Q7**C, HW-Q7**GC>"]
    I --> J["D.IN"]
text_image
Diagram of a calculator interface with buttons labeled 'OK', 'Cancel', and 'Reset', plus a hand pointing to the button.natural_image
Hand interacting with a touchscreen display (no text or symbols visible)text_image
A B a time, phase b time, phase A Anatural_image
Diagram showing a screw being inserted into a housing component, with blue arrows indicating direction (no text or symbols)- 2 stenska nosilca pravilno usmerite in z 2 vijakoma namestite na spodnjo stran zvočnika Soundbar.
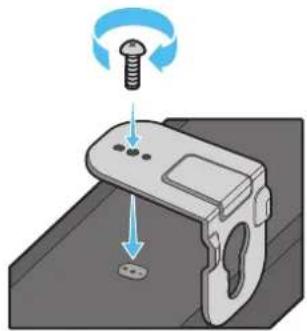
natural_image
Illustration of a mechanical device with a screw and a base, showing motion direction (no text or symbols)natural_image
Diagram showing two mechanical components with arrows indicating motion, no text or symbols present- Soundbar potisnite navzdol, kot je prikazano spodaj, da stenska nosilca varno namestite na vijake nosilca.
- Vijake nosilca vstavite v široki (spodnji) del stenskih nosilcev in nato potisnite stenska nosilca navzdol, da ju varno namestite na vijake nosilca.
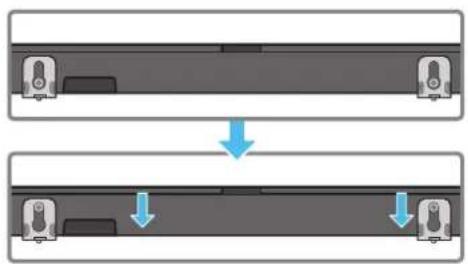
natural_image
Diagram showing two mechanical components with downward arrows indicating motion or assembly (no text or symbols)natural_image
Three grayscale images of remote control devices: a rectangular remote, a remote with two buttons, and a black tower (no text or symbols)natural_image
Three product images: a gray server unit labeled 'x2', a black U-shaped connector labeled 'x4o2', and a black USB cable with connectors (no text or symbols on the devices themselves)text_image
Diagram illustrating three-step mechanical assembly or disassembly process with labeled components and directional arrowstext_image
5 Sec ID SETnatural_image
Diagram showing a mechanical component before and after processing, with no visible text or symbols
flowchart
graph LR
    TV["TV"] --> OpticalOut["OPTICAL OUT"]
    OpticalOut --> CableOptico["Cable óptico (no incluido)"]
    CableOptico --> DigitalAudioIn["DIGITAL AUDIO IN (OPTICAL)"]
    DigitalAudioIn --> ParteInferior["Parte inferior de la Soundbar"]
    ParteInferior --> AudioIn["<HW-Q9**C, HW-Q9**GC / HW-Q8**C, HW-Q8**GC>"]
    OpticalOut --> ParteSuperior["Parte superior de la Soundbar"]
    ParteSuperior --> AudioIn
    AudioIn --> D.IN["D.IN"]
    D.IN --> AudioIn
text_image
TV Bluetoothtext_image
Menú del television TV Wi-Fi Wi-Fitext_image
Diagram of a calculator with labeled buttons and a hand pointing to the function buttonnatural_image
Hand pointing at a button labeled 'ACOS' with a play button and monitor icon (no text or symbols on the button itself)natural_image
Diagram showing a screw being inserted into a housing with blue motion arrows indicating rotation (no text or symbols)natural_image
Illustration of a mechanical device with a screw and adjustment knob, showing no text or symbolsnatural_image
Illustration of a flat-screen monitor with a vertical cable and antenna (no text or symbols)natural_image
Diagram showing two mechanical components with arrows indicating motion, no text or symbols presentnatural_image
Diagram showing two mechanical components with downward arrows indicating motion or assembly (no text or symbols)text_image
Diagram showing a device with a USB port connected to a labeled component, likely illustrating a system or hardware setup.(AAA-batterier x 2)....6
natural_image
Three grayscale images of remote and control devices, no text or symbols visiblenatural_image
Two 3D model diagrams showing a bracket and a rectangular block, both with x2 and x4 labels (no text or symbols on the objects themselves)Väggfäste Gummifot
3 DIGITAL AUDIO IN (OPTICAL)
text_image
Diagram illustrating three-step mechanical assembly or disassembly process with labeled components and directional arrowstext_image
5 Sec ID SETnatural_image
Three-step diagram showing a mechanical component before and after processing, with no visible text or symbols.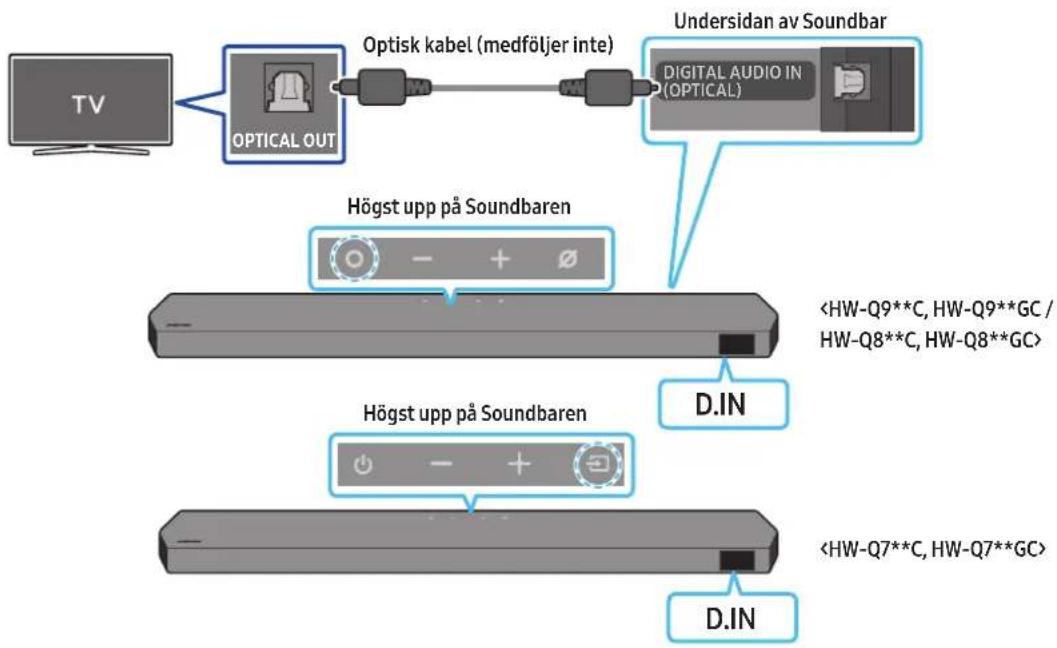
flowchart
graph LR
    TV["TV"] --> OpticalOut["Optical OUT"]
    OpticalOut --> OptiskLabel["Optisk kabel (medföljer inte)"]
    OptiskLabel --> DigitalAudio["Digital Audio IN (OPTICAL)"]
    DigitalAudio --> UndersidanavSoundbar["Undersidan av Soundbar"]
    OpticalOut --> HypostuppSoundbaren1["Högst upp på Soundbaren"]
    HypostuppSoundbaren1 --> <HW-Q9**C, HW-Q9**GC / HW-Q8**C, HW-Q8**GC> <HW-Q9**C, HW-Q9**GC/
    HypostuppSoundbaren1 --> HypostuppSoundbaren2["Högst upp på Soundbaren"]
    HypostuppSoundbaren2 --> <HW-Q7**C, HW-Q7**GC> <HW-Q7**C, HW-Q7**GC
    HypostuppSoundbaren2 --> D.IN["D.IN"]
text_image
Diagram of a handheld device with labeled buttons and a hand pointing to the button, showing Chinese text.natural_image
Hand interacting with a device screen displaying a play button (no text or symbols visible)text_image
Mobil enhet08 ANSLUTA VIA APPLE AIRPLAY 2
natural_image
Simple 3D illustration of a bracket with a hole and side groups, labeled 'x2' (no text or symbols on the object itself)Väggfäste
text_image
A B 100mm A (75%) C (75%, 20mm) B A Anatural_image
Diagram showing a screw being inserted into a housing with motion arrows indicating rotation (no text or symbols)natural_image
Illustration of a mechanical device with a screw and a button, showing rotational motion (no text or symbols)natural_image
Diagram showing two mechanical components with arrows indicating motion, no text or symbols presentnatural_image
Diagram showing two identical mechanical components with downward arrows indicating motion or assembly (no text or symbols)natural_image
Two identical gray rectangular objects with blue arrows pointing to circular and rectangular features, no text or symbols present.VÄHÖ
natural_image
Diagram showing a monitor mounted on a base with an inset close-up of its screen (no text or symbols present)Mikrofoner (bara tillämpliga modeller)