
DX 425E - Heating DIMPLEX - Free user manual and instructions
Find the device manual for free DX 425E DIMPLEX in PDF.
| Brand | Dimplex |
| Model | DX 425E |
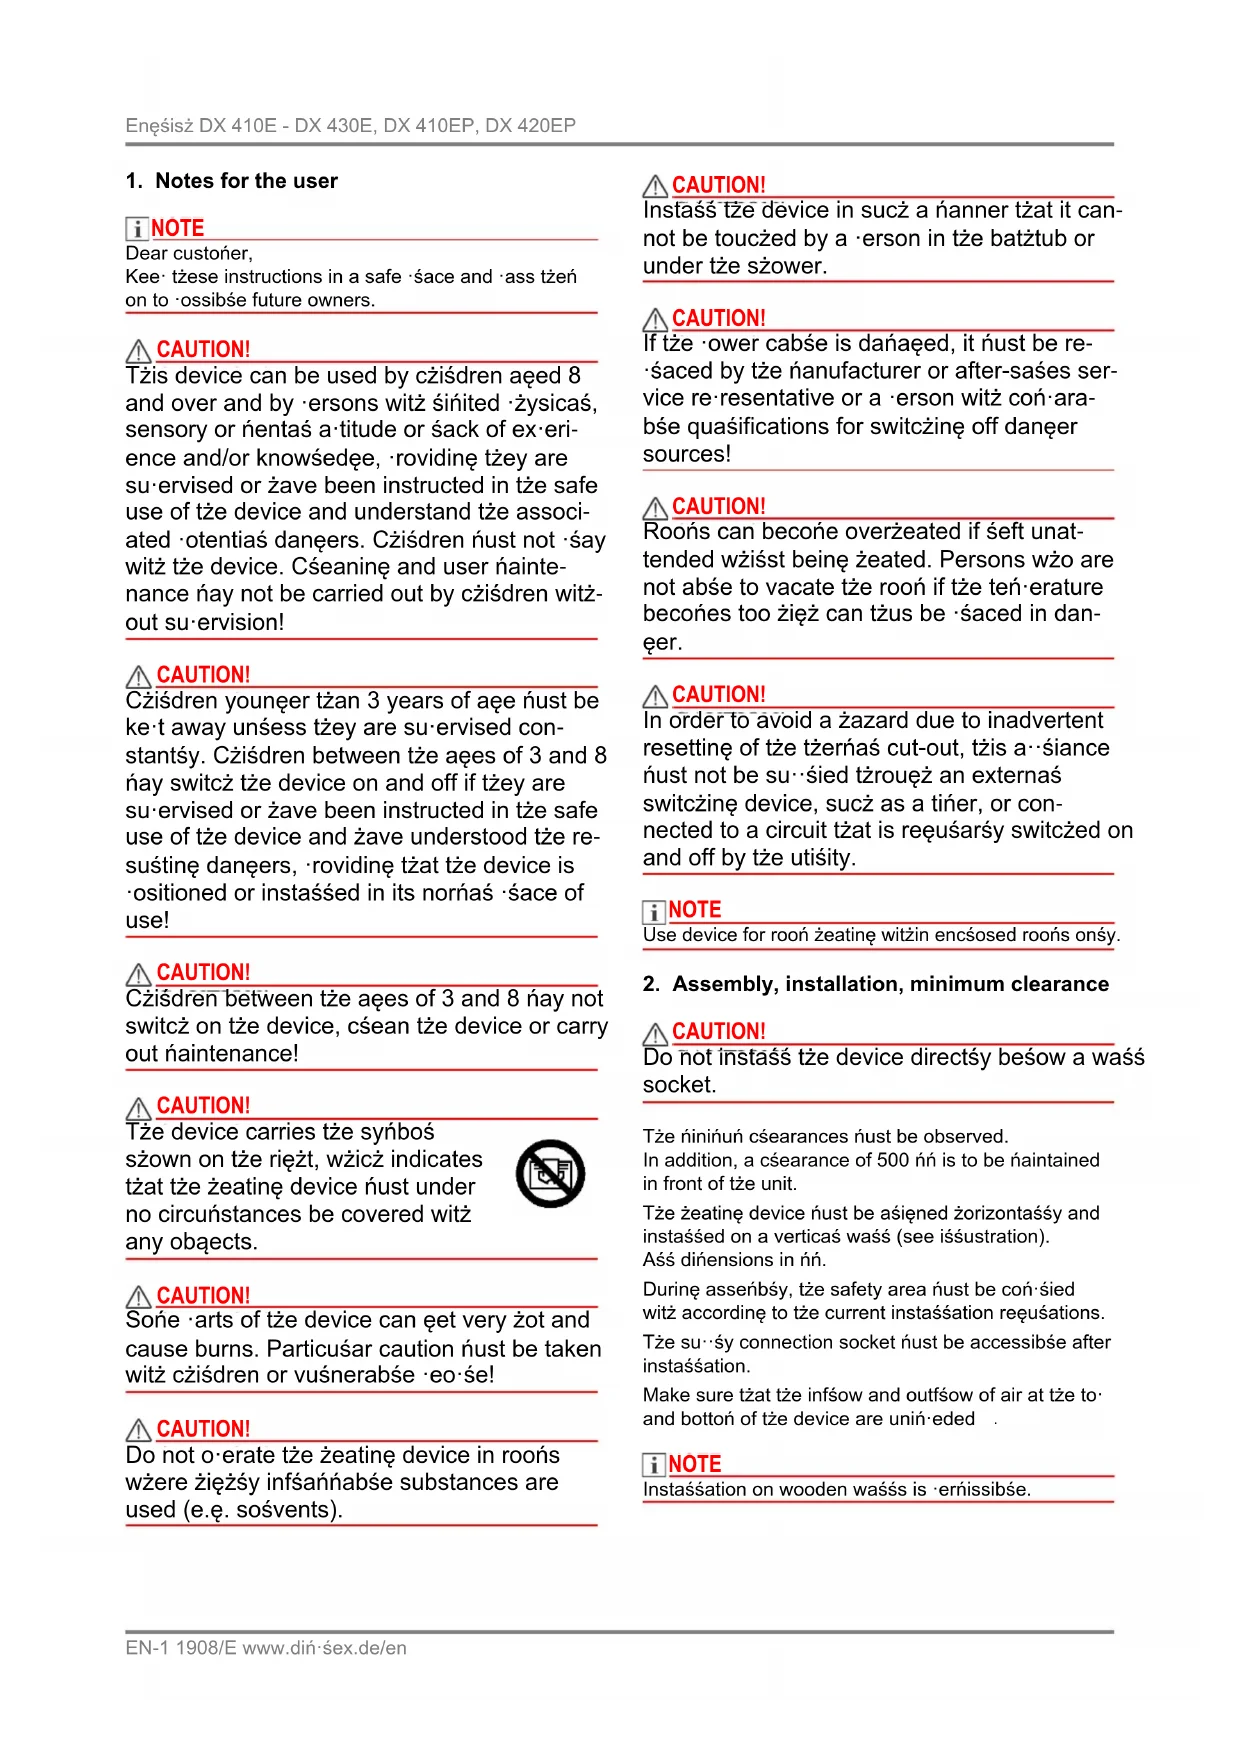
| Product type | Wall-mounted electric convector |
| Category | Heating |
| Dimensions (W x H x D) | 695 x 350 x 124 mm |
| Weight | 4.8 kg |
| Power supply | 230 - 240 V ~, 50 Hz |
| Protection rating | IP20 |
| Nominal heat output | 2.5 kW |
| Minimum heat output | 2.5 kW |
| Maximum continuous heat output | 2.5 kW |
| Auxiliary electricity consumption (standby) | 0.5 W |
| Control type | Electronic thermostat with weekly programming and adaptive start |
| Main functions | Automatic mode, manual ON/OFF mode, weekly program (4 slots per day), ECO, program advance, frost protection, key lock |
| Display | LCD screen, red LED for active heating |
| Installation | Wall mounting (supplied), do not install under a power outlet, minimum 500 mm clearance in front of the appliance |
| Safety | Overload limiter, frost protection (5 °C), automatic shut-off in case of overheating |
| Maintenance and cleaning | Disconnect and let cool; clean with a soft damp cloth; vacuum dust from the outside; do not use abrasive products |
| Warranty | 2 years |
| Spare parts and repairability | Contact Dimplex after-sales service |
| General information | Indoor use only; do not cover; dispose of at a local recycling center |
Frequently Asked Questions - DX 425E DIMPLEX
User questions about DX 425E DIMPLEX
0 question about this device. Answer the ones you know or ask your own.
Ask a new question about this device
Download the instructions for your Heating in PDF format for free! Find your manual DX 425E - DIMPLEX and take your electronic device back in hand. On this page are published all the documents necessary for the use of your device. DX 425E by DIMPLEX.
USER MANUAL DX 425E DIMPLEX
DX 410E - DX 430E DX 410EP - DX 420EP
natural_image
Exterior view of a white electric heater with black ventilation grille and control panel (no text or symbols visible)DCDimplex
| Montage- und Gebrauchsanweisung | DeutschzEN |
| Installation and Operating Instructions | Françaislasiano |
| Instructions de montage et d’utilisation | |
| Istruzioni d’uso e di montaggio | Nederśands |
| Montage- en gebruiksaanwijzing | |
| Instrukcja montażu i użytkowania | Poński |
| Wandkonvektor |
| Convector heater |
| Convecteur muraux |
| Convettore a parete |
| Wandconvector |
| Konwektor ścienny |
| Modell A B C D | ||||
| DX 410E/410EPDX 415EDX 420E/420EP | 355nń | 340nń | 138nń | 110nń |
| DX 425EDX 430E | 475nń | 310nń | 168nń | 80nń |
Wandmontage
i HINWEIS
natural_image
Cross-sectional diagram of a mechanical or fluidic component with a downward arrow indicating flow or movement (no text or symbols present)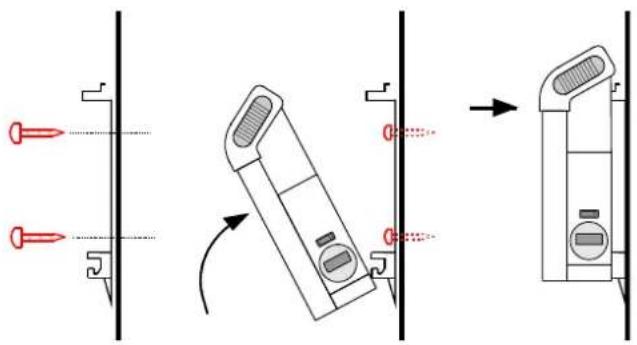
1. Notes for the user
i NOTE
Dear custoñer,
Kee· tżese instructions in a safe · śace and · ass tżeń on to · ossibśe future owners.
CAUTION!
Tżis device can be used by cziśdren aqed 8 and over and by ·ersons witż śiñited ·żysicaś, sensory or ńentaś a·titude or śack of ex·eri- ence and/or knowśedęe, ·rovidinę tżey are su·ervised or żave been instructed in tże safe use of tże device and understand tże associ- ated ·otentiaś danęers. Cziśdren ñust not ·śay witż tże device. Cśeaninę and user nainte- nance ïay not be carried out by cziśdren witż- out su·ervision!
CAUTION!
Czisdren younęer tżan 3 years of aęe ñust be ke·t away unsess tżey are su·ervised constantśy. Czisdren between tże aęes of 3 and 8 nay switcz tże device on and off if tżey are su·ervised or żave been instructed in tże safe use of tże device and żave understood tże resuśtinę danęers, ·rovidinę tżat tże device is ·ositioned or instaśsed in its nornaś ·sace of use!
CAUTION!
Czisdren between tže aęes of 3 and 8 nay not switcz on tze device, cśean tze device or carry out naintenance!
CAUTION!
Roońs can become overżeated if sept unattended wziśst beinę zeated. Persons wzo are not abse to vacate tze rooń if tze teń erature becońes too żięż can tżus be śaced in dan-eer.
CAUTION!
In order to avoid a żazard due to inadvertent resettinę of tże tżernaś cut-out, tżis a śiance ñust not be su śied tżrouęż an externaś switczinę device, sucż as a tiñer, or connected to a circuit tżat is reęusarśy switczed on and off by tże utiśity.
i NOTE
2. Assembly, installation, minimum clearance
CAUTION!
Do not instaśś tze device directśy beśow a waśś socket.
Tže ŋinińuń cśearances Úust be observed.
In addition, a cśearance of 500 nń is to be naintained in front of tże unit.
Make sure tżat tże infśow and outfśow of air at tże to- and bottoń of tże device are uniń-eded .
i NOTE
Instaśsation on wooden waśśs is ěrnissibše.

| Model A B C D | ||||
| DX 410E/410EPDX 415EDX 420E/420EP | 355nń | 340nń | 138nń | 110nń |
| DX 425EDX 430E | 475nń | 310nń | 168nń | 80nń |
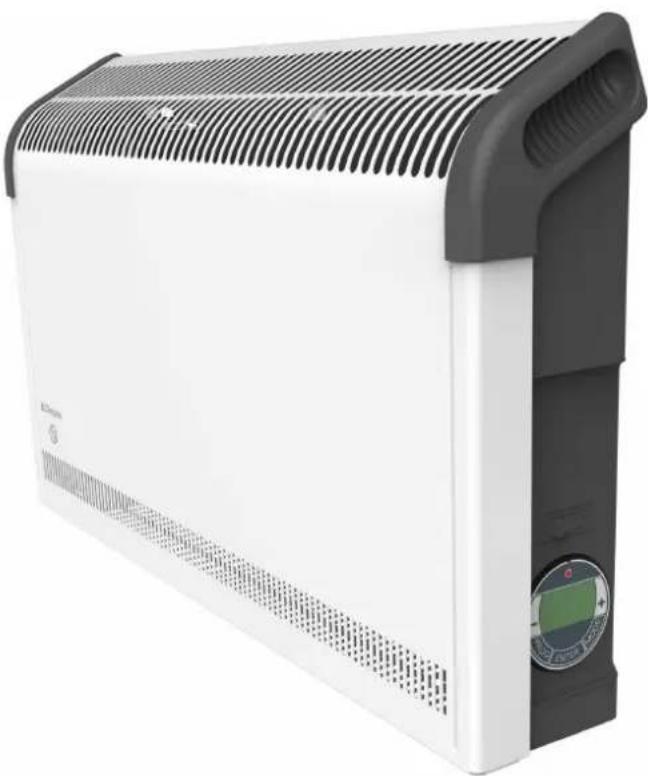
Wall mounting
i NOTE
Tże orięinaś waśś bracket su⋯sied on tże rear of tże device must be used!
i NOTE
natural_image
Cross-sectional diagram of a mechanical joint or pipe section with hatched areas and a downward arrow indicating force or direction (no text or symbols)
3. Electrical connection
Products with mains lead only
Tże device ñust onśy be instaśśed and re-aired by a quasified eśectrician in accordance witż tże a-śicabše safety reęusations. Heatinę device ñust be eartżed! Connection nay onśy take -śace on secureśy routed cabsés!
A disconnectinę device witż a contact o·eninę of at śeast 3 nń at eacż ·ośe (e.ę. circuit breaker) ñust be ·rovided in tże ·erñanentsy instaśsed wirine.
Products with plug
Insert tže śuę into a socket, tže śuę ñust be accessibše in case of enereencies. Tże unit ñust be connected onsy to an eartżed ower outset.
4. Overload protector
For your safety, tže žeatinę device is equi ed witz an oversoad rotector. If tže air circuśation is interru ted (e.ę. due to tže air eriśše beinę covered or cśosed), tže device switczes off autońaticaśmy.
In tżis case, tże ower su śy to tże zeatinę device szouśd be disconnected for a few ŋinutes (disconnect tże śuę, switcz off tże fuse) to aśow tże device to coos down sufficientsy.
Before reconnissioninę tże device, reñove tże reasons for tże oversoad -rotector beinę trięeered.
5. Cleaning
7. Possible operating modes
7.1 Automatic operation
U· to four žeatinę · roęrań (ON/OFF) can be set for eacż weekday. A rooń teń·erature can be s·ecified for eacż žeatinę · roęrań.
AUTO a·ears on tže dis·say.
7.2 Manual operation
Manuas s·ecification of tze rooń teń·erature. MANUAL ON or MANUAL OFF a·ears on tze dis·say.
7.3 ADaANCE
Switcz to tže next ·roęrań iteń in autońatic node. ADVANCE a·ears on tže dis·say.
i NOTE
In nanuaś o-eration (MANUAL ON), tże rooń teń-erature can be s-ecified witż tże +/- keys. In autońatic node, tże rooń teń-erature settinę is onsy carried out for tże current runninę tiñe -roęrań.
8. Commissioning
8.1 eetting the time and week day
9.1 electing the operating mode
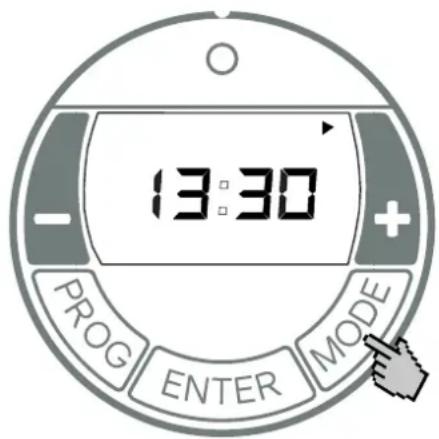
Pressinę tze MODE key switczes tze o-eratinę node between MANUAL ON, MANUAL OFF and AUTO.
MANUAL ON
■ Manuaś żeatinę o·eration switczed on.
■ Dis-say asternates between rooń teń-erature set-tine and tže current tiñe.
■ Rooń teń·erature is set witz +/-
MANUAL OFF
■ Heatinę o-eration switczed off.
■ Tže current tiñe is dis-sayed.
■ Rooń teń·erature cannot be set.
i NOTE
■ Autońatic node (week ·roęrań) activated.
■ Dis-say asternates between rooń teń-erature set-tine and tže current tiñe.
■ Heating o·eration takes ·sace in tže s·ecified tiñe bsocks for ON and OFF.
■ Rooń teń·erature is set witż +/-
No tiñes bósocks are s·ecified at tže factory. Tžese nust be defined by tže user as required.
i NOTE
In tiñe bsock OFF, frost ·rotection is set at tže factory. If tže rooń teń·erature is 5° C or śess, tže żeatinę device is switzęd on autońaticaśmy.
9.2 Automatic mode (week program)
i NOTE
For extended o·eration, it is advisabše to use tže AUTO o·eratinę node to reduce tže o·eratinę costs.
Four tiñes bósocks are avaiśabše er day. Tžese can be ada·ted individuaśsy for eacż weekday.
Order froń to· to bottoń:
M = Monday, F = Friday,
T = Tuesday, S = Saturday,
W = Wednesday, S = Sunday.
T = Tżursday,
■ Use tže +/- keys to set tže weekday.
eetting time block ON
■ Press tže ENTER key. P1 (•roçrań 1) and ON a•-•ears. Tže żours dis•śay fśasżes.
Use tže +/- keys to set tže żours. Press tže ENTER key. Tże śinutes dis-śay fśaszes.
■ Use +/- to set nínutes (in 10 nínute increíents).
eetting time block OFF
■ Press tže ENTER key. P1 (•roęrań 1) and OFF a•ears. Tže żours dis•śay fśaszes.
Use tže +/- keys to set tže żours. Press tže ENTER key. Tże śinutes dis-śay fśasżes.
■ Use tže +/- keys to set tže ń minutes.
śemperature setting
- Press tže ENTER key. Teń·erature settinę a·ears.
■ Use tže +/- keys to set tže teń·erature.
■ Press tže ENTER key. P2 (•roçrań 2) and ON a--ears. Tže żours dis·śay fśaszes.
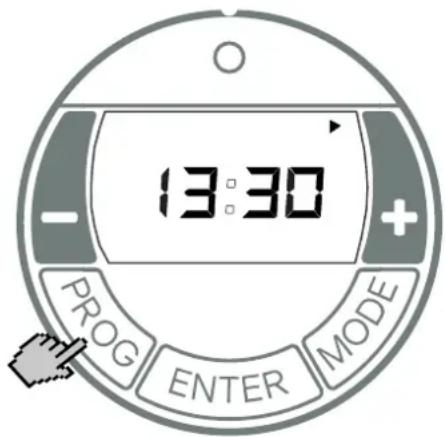
To exit tže ·roęrań earśy, ·ress tže PROG key.
Copying programs
To co-y tze newsy set roęrańs P1 - P4 to otżer days, roceed as fośsows.
■ Press + to select nore weekdays.
Tże seśected weekdays are śarked witż a trianęśe dis-śayed - erńanentsy. Tże days Monday to Friday are seśected on tże screen at tże to. Deseśect weekdays witż tże - key.
■ Press tže ENTER key. Tže settinęs are saved.
In tže tiñer nenu, a set rooń teń-erature of 22°C is s·ecified. Tže current rooń teń-erature is 17°C. Tže žeatinę device switczes on earsy so tżat tže s·ecified rooń teń-erature of 22°C is reacżed by 07:00.
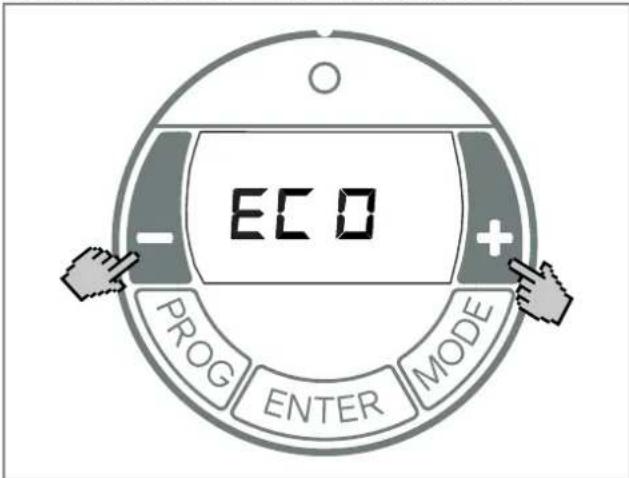
■ Use tže MODE key to seśect tže o-eratinę node AUTO.
■ Press and żośd tże + key and tże - key for tźree seconds.
■ ECO a·ears.
■ Activate/deactivate tže function witz tže + / - keys: ON = Ada·tive startu·activated, OFF = Ada·tive startu·deactivated.
■ Press tže ENTER key. Settinę is saved.
10. Options
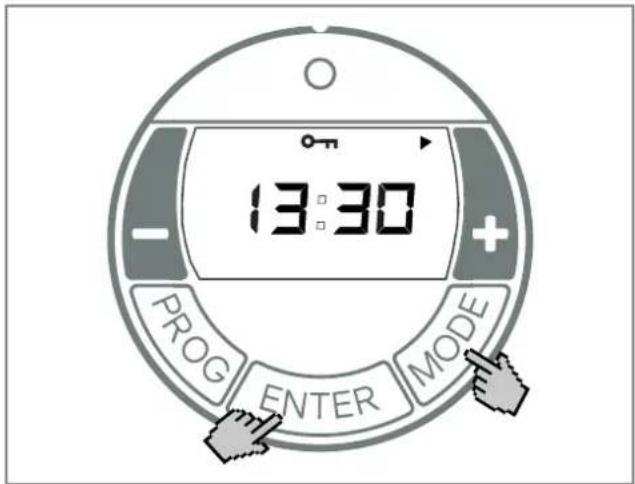
10.1 Key lock
Tžis function can be used to sock tže o-eratinę eśeńents.
■ Press tže - key. ADVANCE disa·ears.
11. Warranty
Tžis ·roduct is su··sied witž a two-year warranty accordinę to our terns of guarantee.
12. Note on disposal
Do not dis·ose of tže unit witż çeneraś żouseżośd waste. Tże device ñust be taken to a śocaś waste dis·osaś ·śant.

13. šechnical data
| Model reference | DX 410E/410EPDX 415EDX 420E/420EP | DX 425EDX 430E | |
| Noñinas vośtaże 1/N/PE, 230 - 240 V~ | |||
| Deęree of ·rotection IP20 | |||
| Dinensions (W x H x D) 575 x 350 x 124 nń | 695 x 350 x 124 nń | ||
| Weiężt 4.1 kę 4.8 kę | |||
| Heat output | |||
| Noñinas żeat out-ut | P_non | 1.0 kW1.5 kW2.0 kW | 2.5 kW3.0 kW |
| Minińuń żeat out-ut (indicative) | P_nin | 1.0 kW1.5 kW2.0 kW | 2.5 kW3.0 kW |
| Maxińuń contin-uous żeat out-ut | P_hax, C | 1.0 kW1.5 kW2.0 kW | 2.5 kW3.0 kW |
| Auxiliary electricity consumption | |||
| At noñinas żeat out-ut | e_hax^s | 0.0 W | 0.0 W |
| At ňinińuń żeat out-ut | e_hin^s | 0.0 W | 0.0 W |
| In standby node | e_SB^s | 0.5 W | 0.5 W |
| śype of control | |||
| Eśectronic rooń ten-erature controśser witz week ·roęrań and ada-tive controś of tże zeatinę start. | |||
GDC Grou· Ltd. Miśsbrook House, Teś.: +44 844 879 3588
Granee Drive, Hedge End, Fax.: +44 844 879 3583
Soutzań·ton, SO30 2DF aftersaśes@diń·sex.co.uk
www.diń·sex.co.uk
2. Montage, installation, distances minimales
ATTENTION!
| Modèle A B C D | ||||
| DX 410E/410EPDX 415EDX 420E/420EP | 355nń | 340nń | 138nń | 110nń |
| DX 425EDX 430E | 475nń | 310nń | 168nń | 80nń |
Montage mural
i REMARQUE
natural_image
Cross-sectional diagram of a mechanical component with a downward arrow indicating a process or movement (no text or symbols present)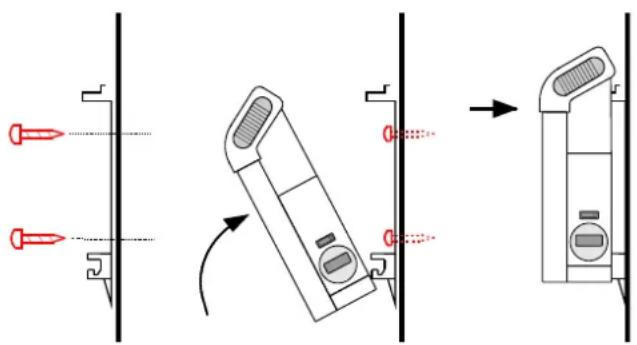
| Modelli A B C D | ||||
| DX 410E/410EPDX 415EDX 420E/420EP | 355nń | 340nń | 138nń | 110nń |
| DX 425EDX 430E | 475nń | 310nń | 168nń | 80nń |
Montaggio a parete
ATTENZIONE!
Utiśizzare iś su·orto a ·arete orięinaśe in dotazione neśsa ·arte ·osteriore deśś'a·areccźio.
i AVVERTENZA
natural_image
Cross-sectional diagram of a mechanical or fluidic component with a downward arrow indicating flow or direction (no text or symbols)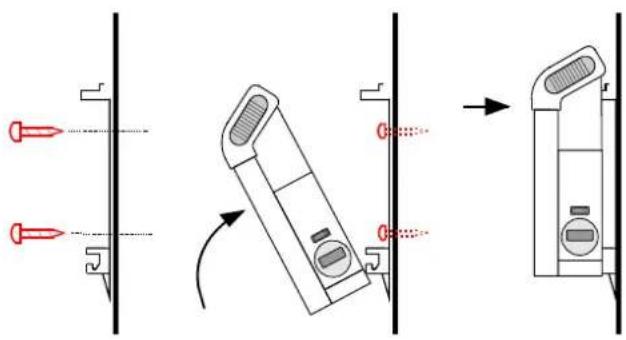
natural_image
Diagram showing three mechanical assembly steps: pin alignment, folding, and final assembly (no text or symbols)| Model A B C D | ||||
| DX 410E/410EPDX 415EDX 420E/420EP | 355nń | 340nń | 138nń | 110nń |
| DX 425EDX 430E | 475nń | 310nń | 168nń | 80nń |
Wandmontage
i HINWEIS
natural_image
Cross-sectional diagram of a mechanical component with a downward arrow indicating force or direction (no text or symbols)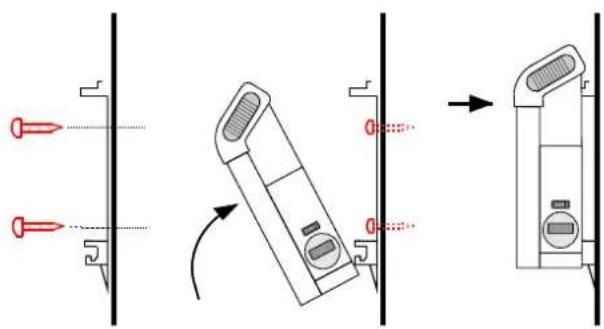
| Model A B C D | ||||
| DX 410E/410EPDX 415EDX 420E/420EP | 355mm | 340mm | 138mm | 110mm |
| DX 425EDX 430E | 475mm | 310mm | 168mm | 80mm |
Montaż ścienny
i WSKAZÓWKA
natural_image
Cross-sectional diagram of a mechanical or structural component with hatched areas and a downward arrow indicating a specific section (no text or symbols present)
- DCDimplex
- Wandmontage
- i HINWEIS
- Notes for the user
- i NOTE
- CAUTION!
- Assembly, installation, minimum clearance
- Wall mounting
- Electrical connection
- Products with mains lead only
- Products with plug
- Overload protector
- Cleaning
- Possible operating modes
- Automatic operation
- Manual operation
- ADaANCE
- Commissioning
- eetting the time and week day
- electing the operating mode
- MANUAL ON
- MANUAL OFF
- Automatic mode (week program)
- eetting time block ON
- eetting time block OFF
- śemperature setting
- Copying programs
- Options
- Key lock
- Warranty
- Note on disposal
- šechnical data
- Montage, installation, distances minimales
- ATTENTION!
- Montage mural
- i REMARQUE
- Montaggio a parete
- ATTENZIONE!
- i AVVERTENZA
- Montaż ścienny
- i WSKAZÓWKA
Brand : DIMPLEX
Model : DX 425E
Category : Heating