
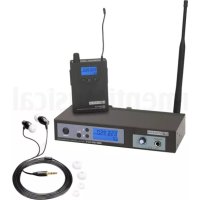
MEI 100 G2 B5 - Earplug LD Systems - Free user manual and instructions
Find the device manual for free MEI 100 G2 B5 LD Systems in PDF.

| Product type | UHF PLL stereo wireless in-ear monitoring system |
| Brand / Model | LD Systems MEI 100 G2 B5 |
| Frequency range | 584 – 607 MHz (B5) |
| Number of channels | 120 channels (10 groups of 12) |
| Frequency response | 80 Hz - 15 kHz (transmitter/receiver); 30 Hz - 20 kHz (earphones) |
| Signal-to-noise ratio | > 90 dB(A) |
| Distortion rate (THD) | < 0.5% |
| RF output power | 10 mW |
| Audio output power | 100 mW (on 3.5 mm mini-jack) |
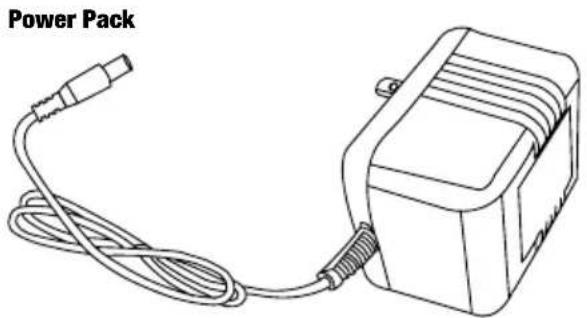
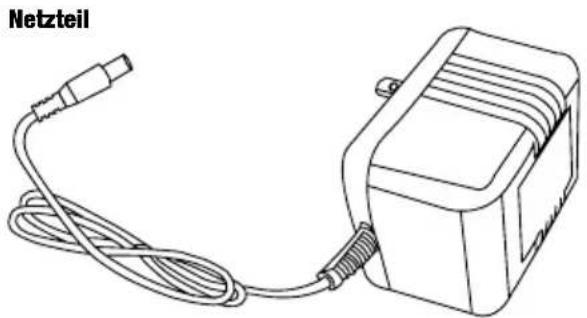
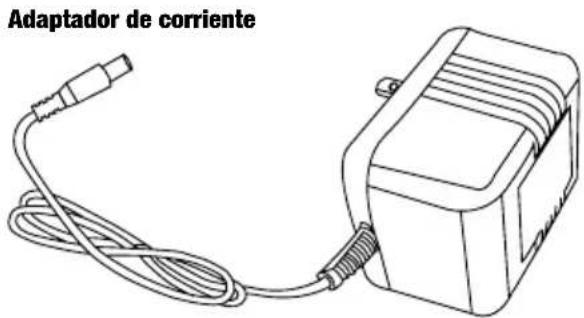
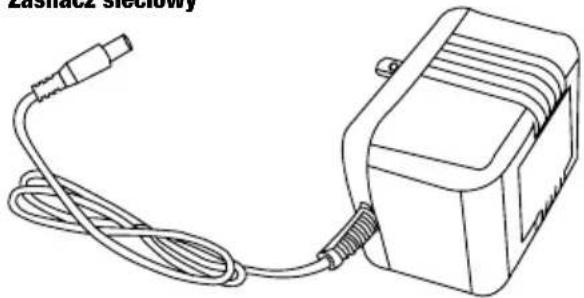
| Transmitter power supply | External power supply 9-18 V DC, 300 mA |
| Receiver power supply | 2 LR06 (AA) batteries; battery life > 10 hours |
| Transmitter dimensions (WxHxD) | 212 x 38 x 90 mm |
| Transmitter weight | 0.57 kg |
| Receiver dimensions (WxHxD) | 65 x 95 x 25 mm |
| Receiver weight | 0.07 kg (without batteries) |
| Earphone impedance | 16 Ohm |
| Earphone cable length | 1.5 m |
| Audio inputs | 2 x Combo (XLR/6.35 mm jack) balanced |
| Antenna connector | TNC (50 Ω) |
| Operating modes | Mono / Stereo |
| Main functions | Group/channel selection, volume adjustment, built-in limiter, multifunction LCD display |
| Safety | Do not open the device; risk of electric shock; high sound levels can damage hearing |
| Maintenance and cleaning | Use a dry cloth; do not expose to water; keep ventilation openings clear |
| Spare parts and repairability | Repair reserved for qualified personnel; contact: Adam Hall GmbH |
| Warranty | See adamhall.com for conditions |
Frequently Asked Questions - MEI 100 G2 B5 LD Systems
User questions about MEI 100 G2 B5 LD Systems
0 question about this device. Answer the ones you know or ask your own.
Ask a new question about this device
Download the instructions for your Earplug in PDF format for free! Find your manual MEI 100 G2 B5 - LD Systems and take your electronic device back in hand. On this page are published all the documents necessary for the use of your device. MEI 100 G2 B5 by LD Systems.
USER MANUAL MEI 100 G2 B5 LD Systems
natural_image
Exterior view of a MHz10A-025 digital audio recording device with external earphones and antenna (no readable text or symbols)LDMEI100G²
WIRELESS IN EAR MONITORING SYSTEM
LDMEI100G2
ENGLISH
PREVENTIVE MEASURES 3-4
INTRODUCTION 4
SYSTEM COMPONENTS 5
FRONT PANEL TRANSMITTER 6
REAR PANEL TRANSMITTER 6-7
BODY PACK RECEIVER 7-8
SYSTEM SETUP 9-10
SETUP AND TROUBLESHOOTING 11
SPECIFICATIONS 12
MANUFACTURER'S DECLARATIONS 13
DEUTSCH
We have designed this product to operate reliably over many years. LD Systems stands for this with its name and many years of experience as a manufacturer of high-quality audio products. Please read this User's Manual carefully, so that you can begin making optimum use of your LD Systems product quickly. You can find more information about LD-SYSTEMS at our Internet site WWW.LD-SYSTEMS.COM
PREVENTIVE MEASURES
- Please read these instructions carefully.
- Keep all information and instructions in a safe place.
- Follow the instructions.
- Observe all safety warnings. Never remove safety warnings or other information from the equipment.
- Use the equipment only in the intended manner and for the intended purpose.
- Use only sufficiently stable and compatible stands and/or mounts (for fixed installations). Make certain that wall mounts are properly installed and secured. Make certain that the equipment is installed securely and cannot fall down.
- During installation, observ e the applicable safety regulations for your country.
- Never install and operate the equipment near radiators, heat registers, ovens or other sources of heat. Make certain that the equipment is always installed so that is cooled sufficiently and cannot overheat.
- Never place sources of ignition, e.g., burning candles, on the equipment.
- Ventilation slits must not be blocked.
- This appliance is designed exclusively for indoor use, do not use this equipment in the immediate vicinity of water (does not apply to special outdoor equipment - in this case, observe the special instructions noted below). Do not expose this equipment to flammable materials, fluids or gases.
- Make certain that dripping or splashed water cannot enter the equipment. Do not place containers filled with liquids, such as vases or drinking vessels, on the equipment.
- Make certain that objects cannot fall into the device.
- Use this equipment only with the accessories recommended and intended by the manufacturer.
- Do not open or modify this equipment.
- After connecting the equipment, check all cables in order to prevent damage or accidents, e.g., due to tripping hazards.
- During transport, make certain that the equipment cannot fall down and possibly cause property damage and personal injuries.
- If your equipment is no longer functioning properly, if fluids or objects have gotten inside the equipment or if it has been damaged in anot her way, switch it off immediately and unplug it from the mains outlet (if it is a powered device). This equipment may only be repaired by authorized, qualified personnel.
- Clean the equipment using a dry cloth.
- Comply with all applicable disposal laws in your country. During disposal of packaging, please separate plastic and paper/cardboard.
- Plastic bags must be kept out of reach of children.
FOR EQUIPMENT THAT CONNECTS TO THE POWER MAINS:
- CAUTION: If the power cord of the device is equipped with an earthing contact, then it must be connected to an outlet with a protective ground. Never deactivate the protective ground of a power cord.
- If the equipment has been exposed to strong fluctuations in temperature (for example, after transport), do not switch it on immediately. Moisture and condensation could damage the equipment. Do not switch on the equipment until it has reached room temperature.
- Before connecting the equipment to the power outlet, first verify that the mains voltage and frequency match the values specified on the equipment. If the equipment has a voltage selection switch, connect the equipment to the power outlet only if the equipment values and the mains power values match. If the included power cord or power adapter does not fit in your wall outlet, contact your electrician.
- Do not step on the power cord. Make certain that the power cable does not become kinked, especially at the mains outlet and/or power adapter and the equipment connector.
- When connecting the equipment, make certain that the power cord or power adapter is always freely accessible. Always disconnect the equipment from the power supply if the equipment is not in use or if you want to clean the equipment. Always unplug the power cord and power adapter from the power outlet at the plug or adapter and not by pulling on the cord. Never touch the power cord and power adapter with wet hands.
- Whenever possible, avoid switching the equipment on and off in quick succession because otherwise this can shorten the useful life of the equipment.
- IMPORTANT INFORMATION: Replace fuses only with fuses of the same type and rating. If a fuse blows repeatedly, please contact an authorised service centre.
- To disconnect the equipment from the power mains completely, unplug the power cord or power adapter from the power outlet.
- If your device is equipped with a Volex power connector, the mating Volex equipment connector must be unlocked before it can be removed. However, this also means that the equipment can slide and fall down if the power cable is pulled, which can lead to personal injuries and/or other damage. For this reason, always be careful when laying cables.
- Unplug the power cord and power adapter from the power outlet if there is a risk of a lightning strike or before extended periods of disuse.
- The device must only be installed in a voltage-free condition (disconnect the mains plug from the mains).
- Dust and other debris inside the unit may cause damage. The unit should be regularly serviced or cleaned (no guarantee) depending on ambient conditions (dust etc., nicotine, fog) by qualified personnel to prevent overheating and malfunction.
-
Please keep a distance of at least 0.5 m to any combustible materials.
-
Power cables to power multiple devices must have a cross-section of at least 1.5 mm ^2 . Within the EU, the cables must correspond to H05VV-F, or similar. Suitable cables are offered by Adam Hall. With these cables, you can connect multiple devices via the power OUT connection to the power IN connection of an additional device. Make sure that the total current consumption of all connected devices does not exceed the specified value on all connected devices (label on the device). Make sure to keep power cable connections as short as possible.

CAUTION:
To reduce the risk of electric shock, do not remove cover (or back). There are no user serviceable parts inside. Maintenance and repairs should be exclusively carried out by qualified service personnel.
The warning triangle with lightning symbol indicates dangerous uninsulated voltage inside the unit, which may cause an electrical shock.

The warning triangle with exclamation mark indicates important operating and maintenance instructions.
CAUTION – HIGH VOLUME LEVELS WITH AUDIO PRODUCTS!
This equipment is intended for professional use. Therefore, commercial use of this equipment is subject to the respectively applicable national accident prevention rules and regulations. As a manufacturer, Adam Hall is obligated to notify you formally about the existence of potential health risks.
Hearing damage due to high volume and prolonged exposure: When in use, this product is capable of producing high sound-pressure levels (SPL) that can lead to irreversible hearing damage in performers, employees, and audience members.
For this reason, avoid prolonged exposure to volumes in excess of 90 dB.
To prevent possible hearing damage, avoid listening at high volume levels over long periods of time. Even exposure to short bursts of loud noise can result in hearing loss. Please keep the volume constantly at a comfortable level.
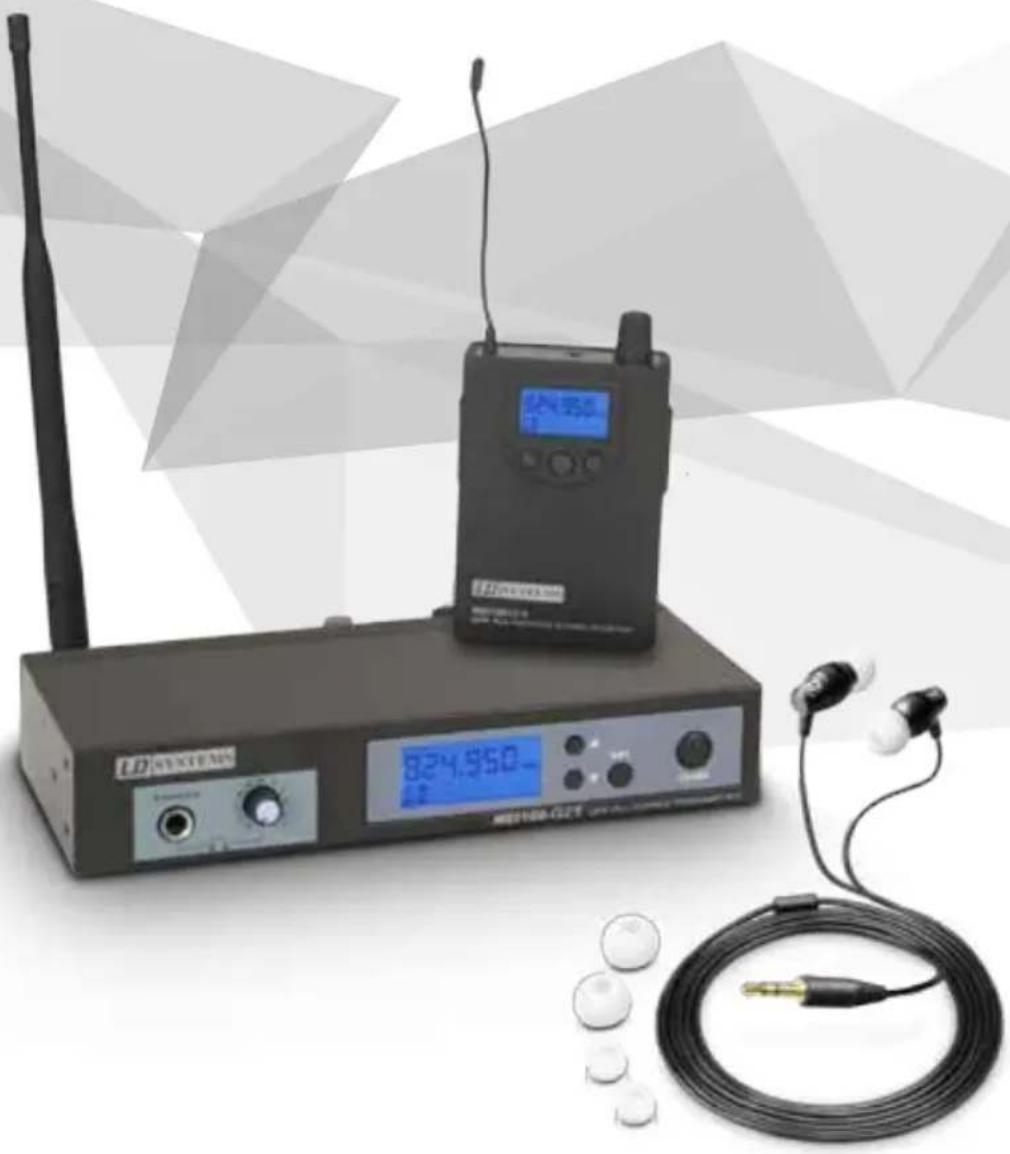
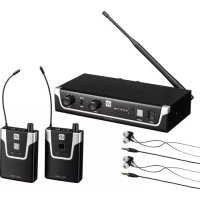
INTRODUCTION
The new LD Systems MEI 100 G2 In-Ear Monitoring-System with outstanding sound quality and a large dynamic range.
The system toggles between mono and stereo mode for perfect monitoring for live musicians, actors or speakers. A built-in limiter ensures even, distortion-free sound reproduction with a frequency range of 80Hz - 15 kHz and stands out because of its high signal-to-noise ratio and low total harmonic distortion.
The multifunctional displays of the transmitter and receiver indicates all important system statuses. With high quality batteries, it is possible to attain running times of 10 hours and more. The MEI 100 G2 package includes high-quality earphones, a 19" rackmount kit, and a rugged transport box made of ABS plastic.
The use of wireless microphone systems may require a license according to country-specific regulations. Please contact your local appropriate authority for more information.
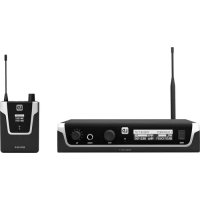
SYSTEM COMPONENTS
Transmitter
Receiver
natural_image
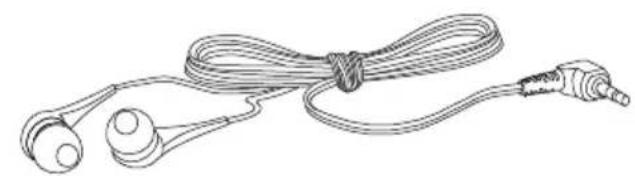
Line drawing of a cord with earbuds and connectors (no text or symbols)Headphones
natural_image
Line drawing of a power pack connected to a rectangular electronic device with coiled cable (no text or symbols)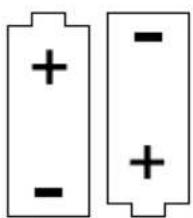
natural_image
Two battery cells with positive and negative charge markings (no text or symbols)Batteries (2 x AA)
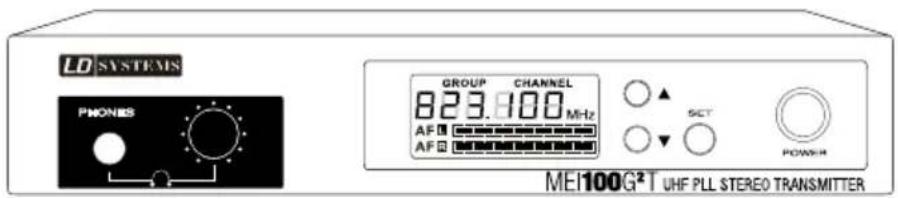
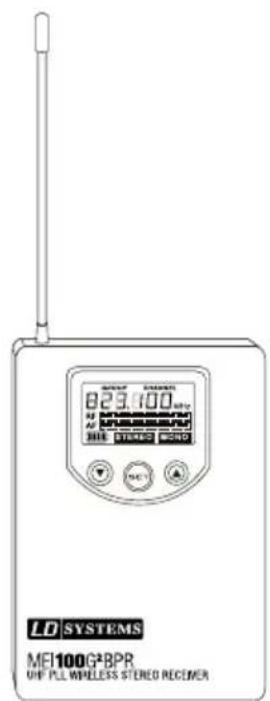
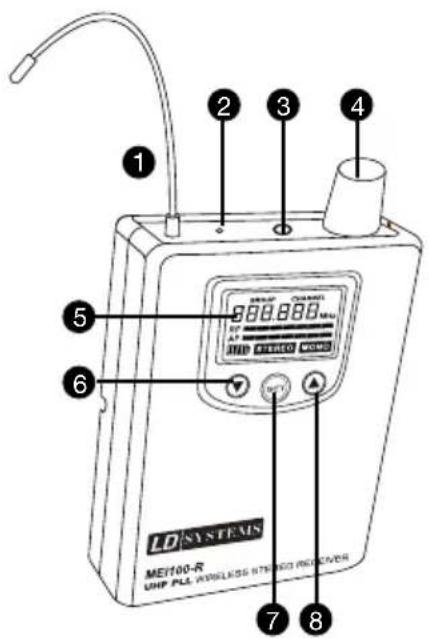
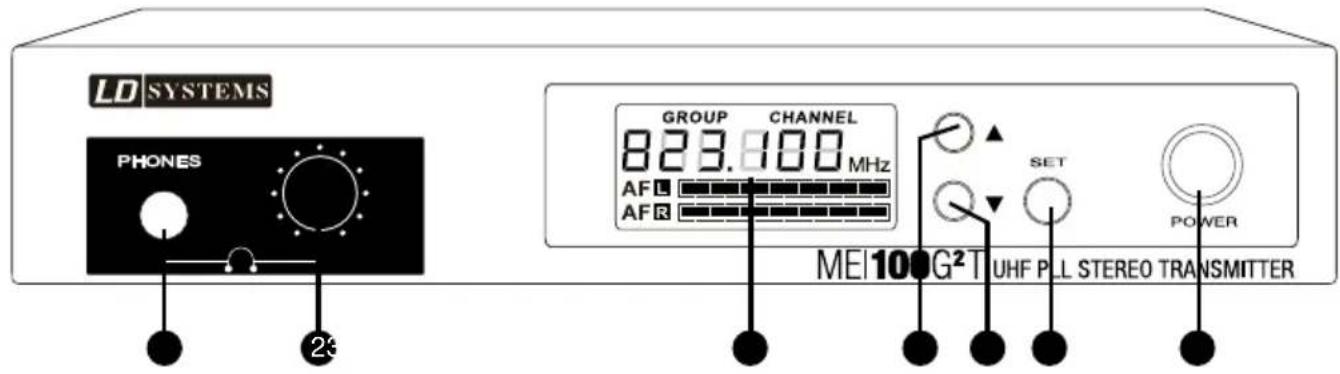
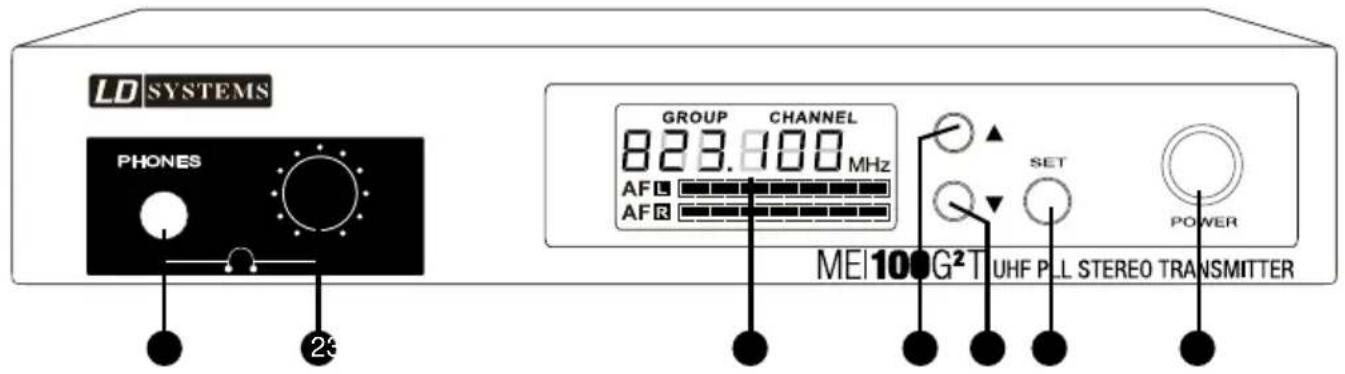
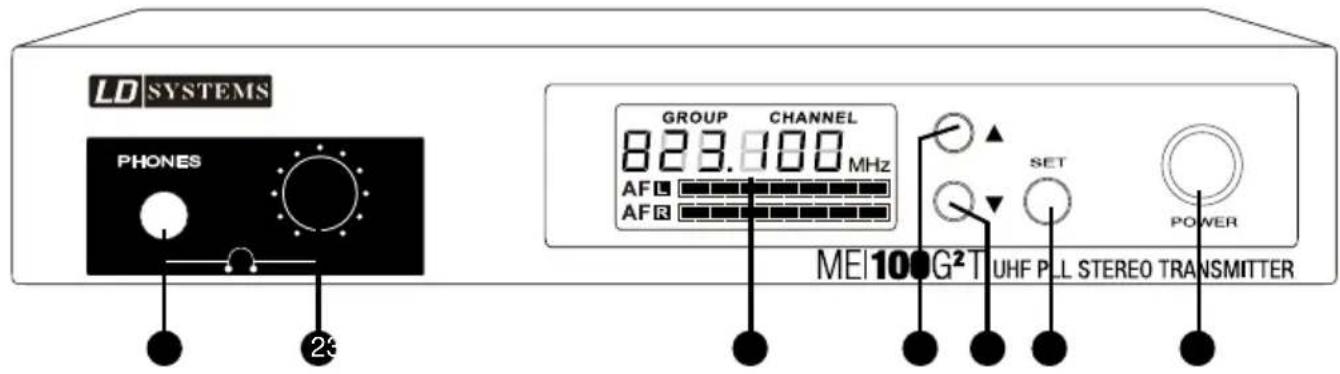
FRONT PANEL TRANSMITTER

1 HEADPHONE JACK
2 HEADPHONE VOLUME CONTROL
Turning the knob to the left decreases the volume; turning it to the right increases the volume. To avoid hearing damage, set the volume to minimum before using the earphones/headphones, then slowly increase the volume. Caution: high volume can cause permanent hearing damage.
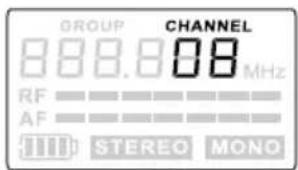
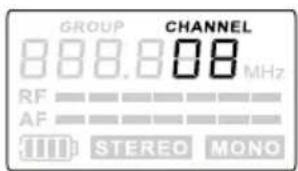
3 LC DISPLAY
See "System setup".
4 ARROW UP, INCREASE VALUE
See "System setup".
5 ARROW DOWN, DECREASE VALUE
See "System setup".
6 PROGRAMMING BUTTON (SET)
See "System setup".
7 POWER BUTTON
Switch on: Press and hold button for two seconds. Switch off: Press and hold button for two seconds.
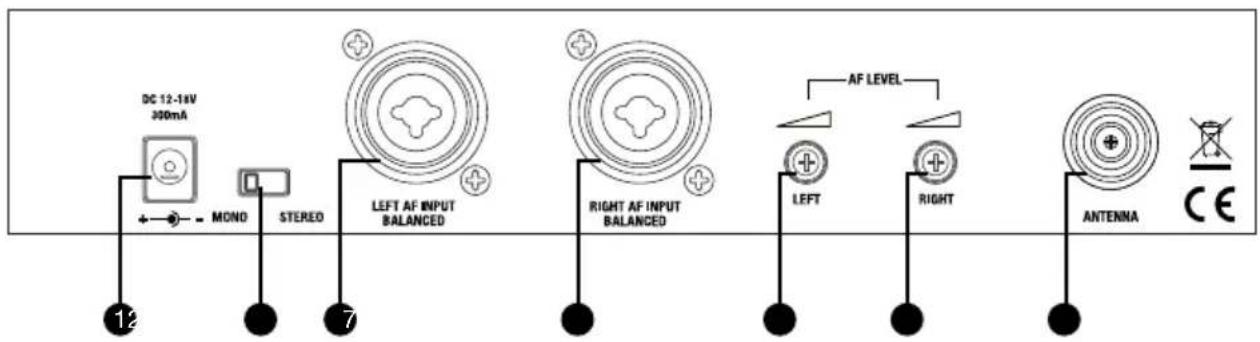
REAR PANEL TRANSMITTER
flowchart
graph TD
    A["DC 12-16V 300mA"] --> B["MONO"]
    B --> C["STERED"]
    C --> D["LEFT AF INPUT BALANCED"]
    D --> E["RIGHT AF INPUT BALANCED"]
    E --> F["LEFT"]
    E --> G["RIGHT"]
    F --> H["AF LEVEL"]
    G --> I["ANTENNA"]
    style A fill:#f9f,stroke:#333
    style B fill:#ccf,stroke:#333
    style C fill:#cfc,stroke:#333
    style D fill:#fcc,stroke:#333
    style E fill:#cff,stroke:#333
    style F fill:#ffc,stroke:#333
    style G fill:#fcc,stroke:#333
    style H fill:#fff,stroke:#333
    style I fill:#fff,stroke:#333
1 POWER PACK INPUT
2 STEREO/MONO SWITCH
Stereo mode: Both line inputs, left and right, must be used in order to hear a stereo signal on the receiver. It is advisable to set the left and right line inputs to the same level.
Mono mode: Only one line input must be used in order to hear a mono signal on both sides of the earphones.
If there are different signals on both line inputs, they are merged into sum mono signal. The loudness of the two signals is then adjusted using the left and right channel input level controls.
3 XLR/6.3 MM JACK SOCKET (COMBO) INPUT LEFT
4 XLR/6.3 MM JACK SOCKET (COMBO) INPUT RIGHT
5 INPUT LEVEL
Left channel
6 INPUT LEVEL
Right channel
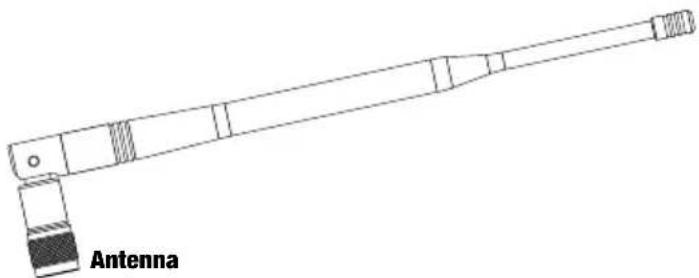
7 ANTENNA JACK
50 Ω
BODY PACK RECEIVER
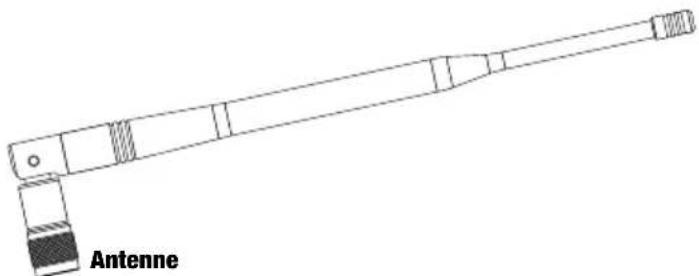
1 ANTENNA
2 RF SIGNAL LED
Lights up when an RF signal is present.
③ EARPHONE/HEADPHONE CONNECTOR 3.5 MM STEREO JACK
4 ON/OFF SWITCH AND VOLUME CONTROL FOR EARPHONE/HEADPHONE OUTPUT
To switch on, turn the knob to the right (clockwise) past the snap-in point. To switch off, turn the knob to the left (counter clockwise) past the snap-in point. Turning the knob to the left decreases the volume; turning it to the right increases the volume. To avoid hearing damage, set the volume to minimum before using the earphones/headphones, then slowly increase the volume. Caution: high volume can cause permanent hearing damage.
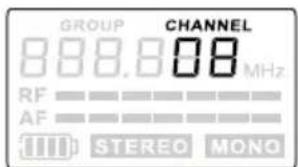
5 LC DISPLAY
6 ARROW DOWN, DECREASE VALUE
7 SET
Programming button
8 ARROW UP, INCREASE VALUE
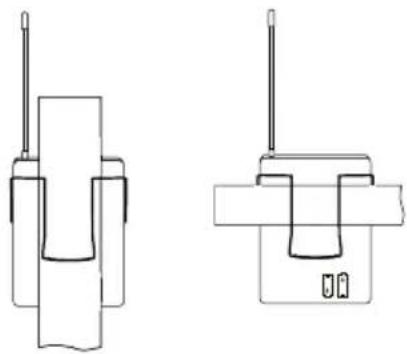
BELT CLIP
natural_image
Two technical line drawings of mechanical components with no visible text or symbolsWEARING THE BODY PACK RECEIVER
Clip the receiver to your belt or a suitable strap. For optimum fit, the clip should always be pushed all the way over the belt and/or strap (see illustration).
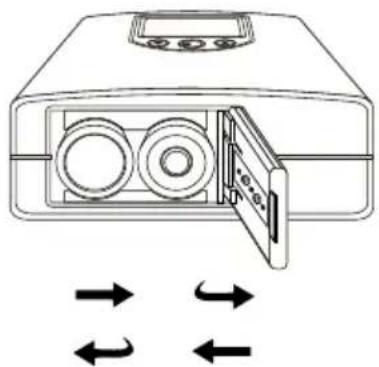
BATTERY REPLACEMENT
natural_image
Diagram of a device with two circular components and directional arrows indicating flow or movement (no text or symbols)Press the spot marked "OPEN" on the battery compartment lid and simultaneously push it toward the middle of the unit. The lid will spring open and the batteries can be removed. After inserting new batteries (battery orientation shown on rear of device), press down the battery compartment lid down on the sport marked "CLOSE" and push it toward the edge of the device until it engages.
With high quality batteries, it is possible to attain running times of 10 hours and more. When the LCD panel battery symbol flashes, the batteries (type AA) should be replaced immediately. Remove the batteries before extended periods of disuse.
SYSTEM SETUP
TRANSMITTER PROGRAMMING

1
2
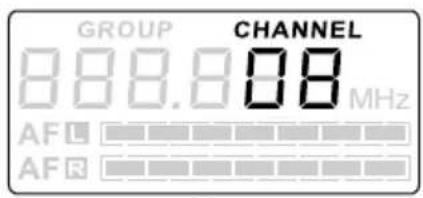
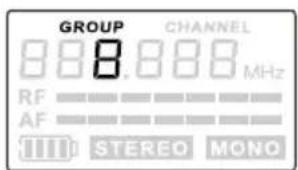
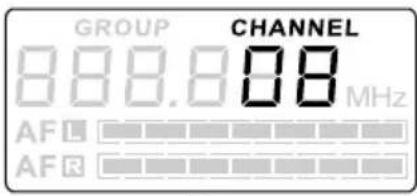
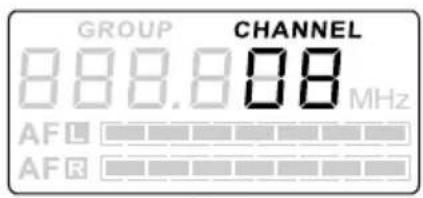
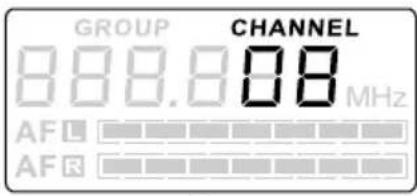
Select a GROUP and/or CHANNEL:
Press the SET button (GROUP flashes). The desired frequency group is selected using the arrow keys ▲ and ▼(see Figure 1). Press the SET button again (CHANNEL flashes). The desired frequency group is selected using the arrow keys ▲ and ▼(see Figure 2). Confirm the input with SET.
Note: Any number of receivers can be used with one transmitter, provided all receivers are supposed to receive the same signal and are set to the same radio frequency as the transmitter.
3
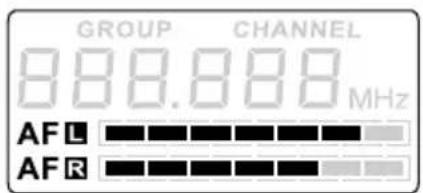
Audio input level display:
The audio input level is indicated by two bar indicators (channel left/right, see Fig. 3).
Note: Any number of receivers can be used with one transmitter, provided all receivers are supposed to receive the same signal and are set to the same radio frequency as the transmitter.
4
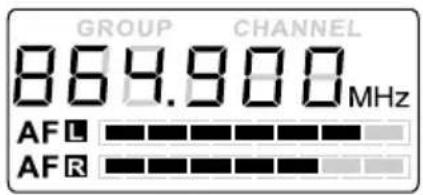
LC display options:
Audio input level, transmitter radio frequency (see Figure 4).
Adjust the audio input level using the level controls on the rear panel of the transmitter. Higher input levels result in improved signal to noise ratio. The input stage must not be overloaded.
RECEIVER PROGRAMMING
5

6
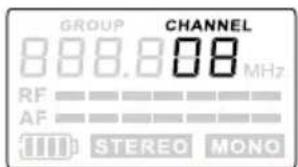
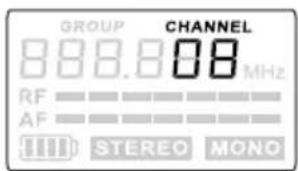
Select a GROUP and/or CHANNEL:
Press the SET button (GROUP flashes). The desired frequency group is selected using the arrow keys ▲ and ▼(see Figure 5). Press the SET button again (CHANNEL flashes). The desired frequency group is selected using the arrow keys ▲ and ▼(see Figure 6). Confirm with SET.
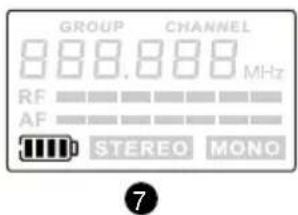
Battery indicator:
The battery status of the receiver is indicated in 5 levels (see Fig. 7).
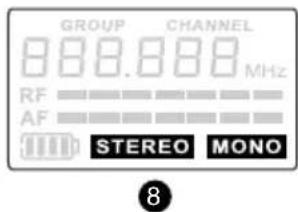
Stereo/mono mode indicator:
The receiver automatically detects whether a stereo or mono signal is present and indicates the respective status on the LC display (see Figure 8). Stereo/mono mode is configured on the transmitter.
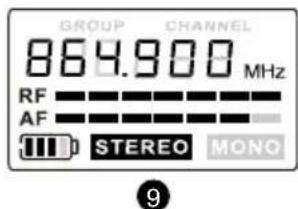
LC display options:
Battery status, RF/audio level, stereo/mono mode, radio frequency (see Figure 9).
SETUP AND TROUBLESHOOTING
SETUP
For optimal transmission, position the transmitter at a minimum height of 1 m and orient the antenna vertically upwards. When using multiple wireless systems in one installation, make certain that the antennas do not touch or cross. Do not position the transmitter in the immediate vicinity of metal objects and digitally controlled devices (CD players, computers, digital consoles, etc.): There should be a direct line of sight between transmitter and receiver.
TROUBLESHOOTING
| PROBLEM DISPLAY SOLUTION | ||
| Receiver: Display is switched off. | Make certain that the batteries are not dead and the receiver is on. | |
| Transmitter: Display is switched off. | Check the connection between power supply and transmitter. Turn on the transmitter. | |
| No sound or volume too low. | Receiver: is on, but the RF indicator is not lit. | Make certain that the transmitter and receiver are set to the same radio frequency. |
| Reduce the distance between transmitter and receiver and make certain that there is a direct line of sight between transmitter and receiver. | ||
| Make certain that the transmitter antenna is installed correctly. | ||
| Receiver: is on and the RF indicator is lit. | Increase the volume at the receiver and check the headphone connection. | |
| Check the input level on the transmitter and increase it if necessary. | ||
| Distortion or noise. Receiver: RF indicator is on. | Increase the distance to possible causes of interference (digitally controlled devices, e.g., CD players, computers, digital consoles...). | |
| Use a different radio frequency. | ||
| Distorted sound. | Receiver: Battery symbol is flashing. | Replace the batteries with new ones. |
| Transmitter: Level indicator is too high | Reduce the volume at the level controls of the transmitter or the volume of the source device. | |
Set designation: LDMEI100G2
Belt pack receiver model designation: LDMEI100G2BPR
| Frequency range: LDMEI100G2: 823 - 832 MHz and 863 - 865 MHzLDMEI100G2B5: 584 – 607 MHzLDMEI100G2B6: 655 – 679 MHz | |
| Channels: LDMEI100G2: 96 (8 groups of 12 channels)LDMEI100G2B5/B6: 120 (10 groups of 12 channels) | |
| Transmission method: FM stereo | |
| Frequency response: 80 - 15,000 Hz | |
| S/N ratio: >90 dB(A) | |
| THD: 0,50% | |
| Audio output: 3.5 mm stereo jack | |
| Max. audio output level: 100 mW | |
| Controls: Volume/ On / Off, Set, arrow keys (up/down) | |
| Indicators: Multifunctional LC display, RF signal | |
| Power supply: 2 "AA" size batteries | |
| Operating time: | >10 hours (depending on batteries) |
| Dimensions (W x H x D): | 65 x 95 x 25 mm |
| Weight: | 0.07 kg (without batteries) |
| Transmitter model designation: | LDMEI100G2T |
| Radio receiver frequency range: | LDMEI100G2: 823 - 832 MHz and 863 - 865 MHzLDMEI100G2B5: 584 – 607 MHzLDMEI100G2B6: 655 – 679 MHz |
| Channels: LDMEI100G2: 96 (8 groups of 12 channels) | LDMEI100G2B5/B6: 120 (10 groups of 12 channels) |
| Operating modes: | Mono / stereo |
| Transmission method: FM stereo | |
| RF output: | 10 mW |
| Frequency response: 80 - 15,000 Hz | |
| S/N ratio: >90 dB(A) | |
| THD: 0,50% | |
| Inputs: | 2 x XLR/ 6.3 mm jack (combo) |
| Input impedance: 100 kohms | |
| Antenna connector: | TNC |
| Controls: | Power (on/off), Set, arrow keys (up/down), headphone (AF level) left/right, mono/stereo switch |
| Indicators: Multifunctional LC display: | |
| Power supply: external power supply | |
| Operating voltage: 12 V - 18 V DC, 300 mA | |
| Dimensions (W x H x D): | 212 x 38 x 90 mm |
| Weight: | 0,57 kg |
| Headphone model designation : | LDIEHP1 |
| Type: | In-ear |
| Frequency response: 30 - 20,000 Hz | |
| Impedance: | 16 ohms |
| Connector type: | 3.5 mm stereo jack |
| Cable length: | 1.5 m |
MANUFACTURER'S DECLARATIONS
MANUFACTURER'S WARRANTY & LIMITATIONS OF LIABILITY
You can find our current warranty conditions and limitations of liability at: http://www.adamhall.com/media/shop/downloads/documents/manufacturersdeclarations.pdf. To request warranty service for a product, please contact Adam Hall GmbH, Daimler Straße 9, 61267 Neu Anspach / Email: Info@adamhall.com / +49 (0)6081 / 9419-0. To enquire about the current declaration of conformity, please contact info@adamhall.com.

CORRECT DISPOSAL OF THIS PRODUCT
(Valid in the European Union and other European countries with a differentiated waste collection system) This symbol on the product, or on its documents indicates that the device may not be treated as household waste. This is to avoid environmental damage or personal injury due to uncontrolled waste disposal. Please dispose of this product separately from other waste and have it recycled to promote sustainable economic activity. Household users should contact either the retailer where they purchased this product, or their local government office, for details on where and how they can recycle this item in an environmentally friendly manner. Business users should contact their supplier and check the terms and conditions of the purchase contract. This product should not be mixed with other commercial waste for disposal.
DEUTSCH
natural_image
Line drawing of a cord with earbuds and plug (no text or symbols)Kopfhörer
natural_image
Line drawing of a Netzteil transformer with cable and connector (no text or symbols)
natural_image
Two battery cells with positive and negative charge markings (no text or symbols)Batterien (2 x AA)

GERÄTEFRONT SENDER
natural_image
Two technical line drawings of mechanical components with no visible text or symbolsSO TRAGEN SIE DEN TASCHENEMPFÄNGER OPTIMAL
natural_image
Diagram of a device with two circular components and directional arrows indicating flow or movement (no text or symbols)1
2
3
4
5
6
7
Batterieanzeige:
8
9
Récepteur HF

natural_image
Line drawing of an écouteur with earbuds and cord (no text or symbols on the device itself)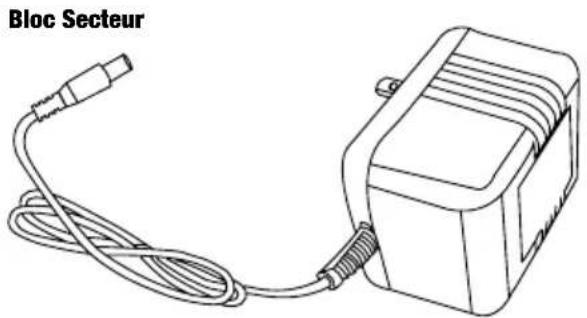
natural_image
Line drawing of a Bloc Secteur electric motor with cable and connector (no text or symbols on the device itself)
natural_image
Two battery cells with positive and negative charge markings (no text or symbols)Piles (2 x LR06, AA)
FACE AVANTÉMETTEUR
1 PRISE CASQUE
2 RÉGLAGE DE VOLUME DE LA SORTIE CASQUE
natural_image
Two technical line drawings of mechanical components with no visible text or symbolsCETTE PINCE PERMET DE PORTER LE RÉCEPTEUR DE POCHE SANS GÊNER
natural_image
Diagram of a device with two circular components and directional arrows indicating flow or movement (no text or symbols)1
2
3
4
5
6
7
8
Indicateur mode Stereo/Mono:
9
natural_image
Line drawing of a cord with earbuds and connector (no text or symbols)Auriculares
natural_image
Two battery cells with positive and negative charge markings (no text or symbols)natural_image
Two technical line drawings of mechanical components with no visible text or symbolsCÓMO LLEVAR EL RECEPTOR DE PETACA
natural_image
Diagram of a device with two circular components and directional arrows indicating flow or movement (no text or symbols)1

2
3
4
5
6
7
8
9
Odbiornik

natural_image
Line drawing of a cord with earbuds and connectors (no text or symbols)Słuchawki
Zasilacz sieciowy
natural_image
Line drawing of a Zushacz slocowy electrical adapter with cable and connector (no text or symbols)
natural_image
Two battery cells with positive and negative charge markings (no text or symbols)Baterie (2 x AA)

PRZÓD NADAJNIKA
1 ZŁĄCZE SŁUCHAWKOWE
2 REGULATOR GŁOŚNOŚCI DLA ZŁĄCZA SŁUCHAWKOWEGO
natural_image
Two technical line drawings of mechanical components with no visible text or symbolsOPTYMALNY SPOSÓB NOSZENIA ODBIORNIKA KIESZONKOWEGO
natural_image
Diagram of a device with two circular components and directional arrows indicating flow or movement (no text or symbols)1

2
3
4
5
6
7
Wskaźnik baterii:
8
natural_image
Line drawing of a cord with earbuds and plug (no text or symbols)Auricolari

natural_image
Line drawing of an Alimentatore electrical adapter with cable and connector (no text or symbols on the device itself)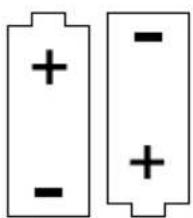
natural_image
Two battery cells with positive and negative charge markings (no text or symbols)Batterie (n. 2 AA)
PANNELLO FRONTALE TRASMETTITORE

1 PRESA AURICOLARI
2 REGOLAZIONE VOLUME PER IL COLLEGAMENTO DEGLI AURICOLARI
natural_image
Two technical line drawings of mechanical components with no visible text or symbolsTRASPORTO OTTIMALE DEL RICEVITORE PORTATILE
natural_image
Diagram of a microwave oven with two circular chambers and a digital display, showing bidirectional arrows indicating flow or movement (no text or symbols)1
2
3
4
5
6
7
8
9


- LDMEI100G²
- ENGLISH
- DEUTSCH
- PREVENTIVE MEASURES
- FOR EQUIPMENT THAT CONNECTS TO THE POWER MAINS:
- CAUTION:
- CAUTION – HIGH VOLUME LEVELS WITH AUDIO PRODUCTS!
- INTRODUCTION
- SYSTEM COMPONENTS
- STEREO/MONO SWITCH
- XLR/6.3 MM JACK SOCKET (COMBO) INPUT LEFT
- XLR/6.3 MM JACK SOCKET (COMBO) INPUT RIGHT
- INPUT LEVEL
- INPUT LEVEL
- ANTENNA JACK
- ANTENNA
- RF SIGNAL LED
- ③ EARPHONE/HEADPHONE CONNECTOR 3.5 MM STEREO JACK
- ON/OFF SWITCH AND VOLUME CONTROL FOR EARPHONE/HEADPHONE OUTPUT
- LC DISPLAY
- ARROW DOWN, DECREASE VALUE
- SET
- ARROW UP, INCREASE VALUE
- WEARING THE BODY PACK RECEIVER
- SYSTEM SETUP
- Select a GROUP and/or CHANNEL:
- Audio input level display:
- LC display options:
- Battery indicator:
- Stereo/mono mode indicator:
- SETUP AND TROUBLESHOOTING
- SETUP
- Set designation: LDMEI100G2
- MANUFACTURER'S DECLARATIONS
- MANUFACTURER'S WARRANTY & LIMITATIONS OF LIABILITY
- CORRECT DISPOSAL OF THIS PRODUCT
- GERÄTEFRONT SENDER
- SO TRAGEN SIE DEN TASCHENEMPFÄNGER OPTIMAL
- Batterieanzeige:
- FACE AVANTÉMETTEUR
- CETTE PINCE PERMET DE PORTER LE RÉCEPTEUR DE POCHE SANS GÊNER
- Indicateur mode Stereo/Mono:
- CÓMO LLEVAR EL RECEPTOR DE PETACA
- PRZÓD NADAJNIKA
- OPTYMALNY SPOSÓB NOSZENIA ODBIORNIKA KIESZONKOWEGO
- Wskaźnik baterii:
- TRASPORTO OTTIMALE DEL RICEVITORE PORTATILE
Brand : LD Systems
Model : MEI 100 G2 B5
Category : Earplug