DuoScents WA328 - Aroma diffuser OREGON SCIENTIFIC - Free user manual and instructions
Find the device manual for free DuoScents WA328 OREGON SCIENTIFIC in PDF.
| Product type | Aroma diffuser |
| Brand | Oregon Scientific |
| Model | DuoScents WA328 |
| Dimensions (L x W x H) | 21.5 x 7.3 x 18 cm |
| Weight | 1.10 kg |
| Power supply | DC 6V 1000 mA power adapter (included) |
| Backup battery | CR2032 (included) |
| Capacity of provided bottles | 2 x 30 ml |
| Number of nozzles | 2 (left and right) |
| Diffusion intensity | 3 levels (low, medium, high) |
| Customizable programs | 2 (P1 and P2) |
| Ambient light | 7 colors + loop |
| Room size setting | 10 to 50 m² (100 to 500 ft²) |
| Operating temperature | 10 °C to 40 °C |
| Storage temperature | -20 °C to 60 °C |
| Maintenance | Clean air tunnel with isopropyl alcohol |
| Safety | Do not immerse, do not block openings |
| Spare parts available | Bottles, tubes, power adapter |
| Repairability | Reset via Reset button |
| General information | Brand Oregon Scientific, model DuoScents WA328 |
Frequently Asked Questions - DuoScents WA328 OREGON SCIENTIFIC
User questions about DuoScents WA328 OREGON SCIENTIFIC
0 question about this device. Answer the ones you know or ask your own.
Ask a new question about this device
Download the instructions for your Aroma diffuser in PDF format for free! Find your manual DuoScents WA328 - OREGON SCIENTIFIC and take your electronic device back in hand. On this page are published all the documents necessary for the use of your device. DuoScents WA328 by OREGON SCIENTIFIC.
USER MANUAL DuoScents WA328 OREGON SCIENTIFIC
For first time use....2
Power supply 2
Connect to power source 2
Battery installation....2
Location selection....2
Settings 3
Manually set clock....3
Room size 3
Spray the aroma manually....3
Room size 3
Spray the aroma manually....3
Oil diffusion intensity 3
Mood light....3
Customize aroma oil diffusion program 3
Specifications....4
Troubleshooting....4
Important safety instructions ....4
Precautions....5
Care and maintenance....5
About Oregon Scientific....5
EU-declaration of conformity....5
INTRODUCTION
Thank you for selecting the Oregon Scientific™ DuoScents Aroma Diffuser (Model: WA328.) The Diffuser can easily be adjusted to suit your required aroma intensity, according to your room size. Using two different scents of essential oil you can create different environments by using the mood lighting and programming the oil to be diffused at your preferred times.
OVERVIEW
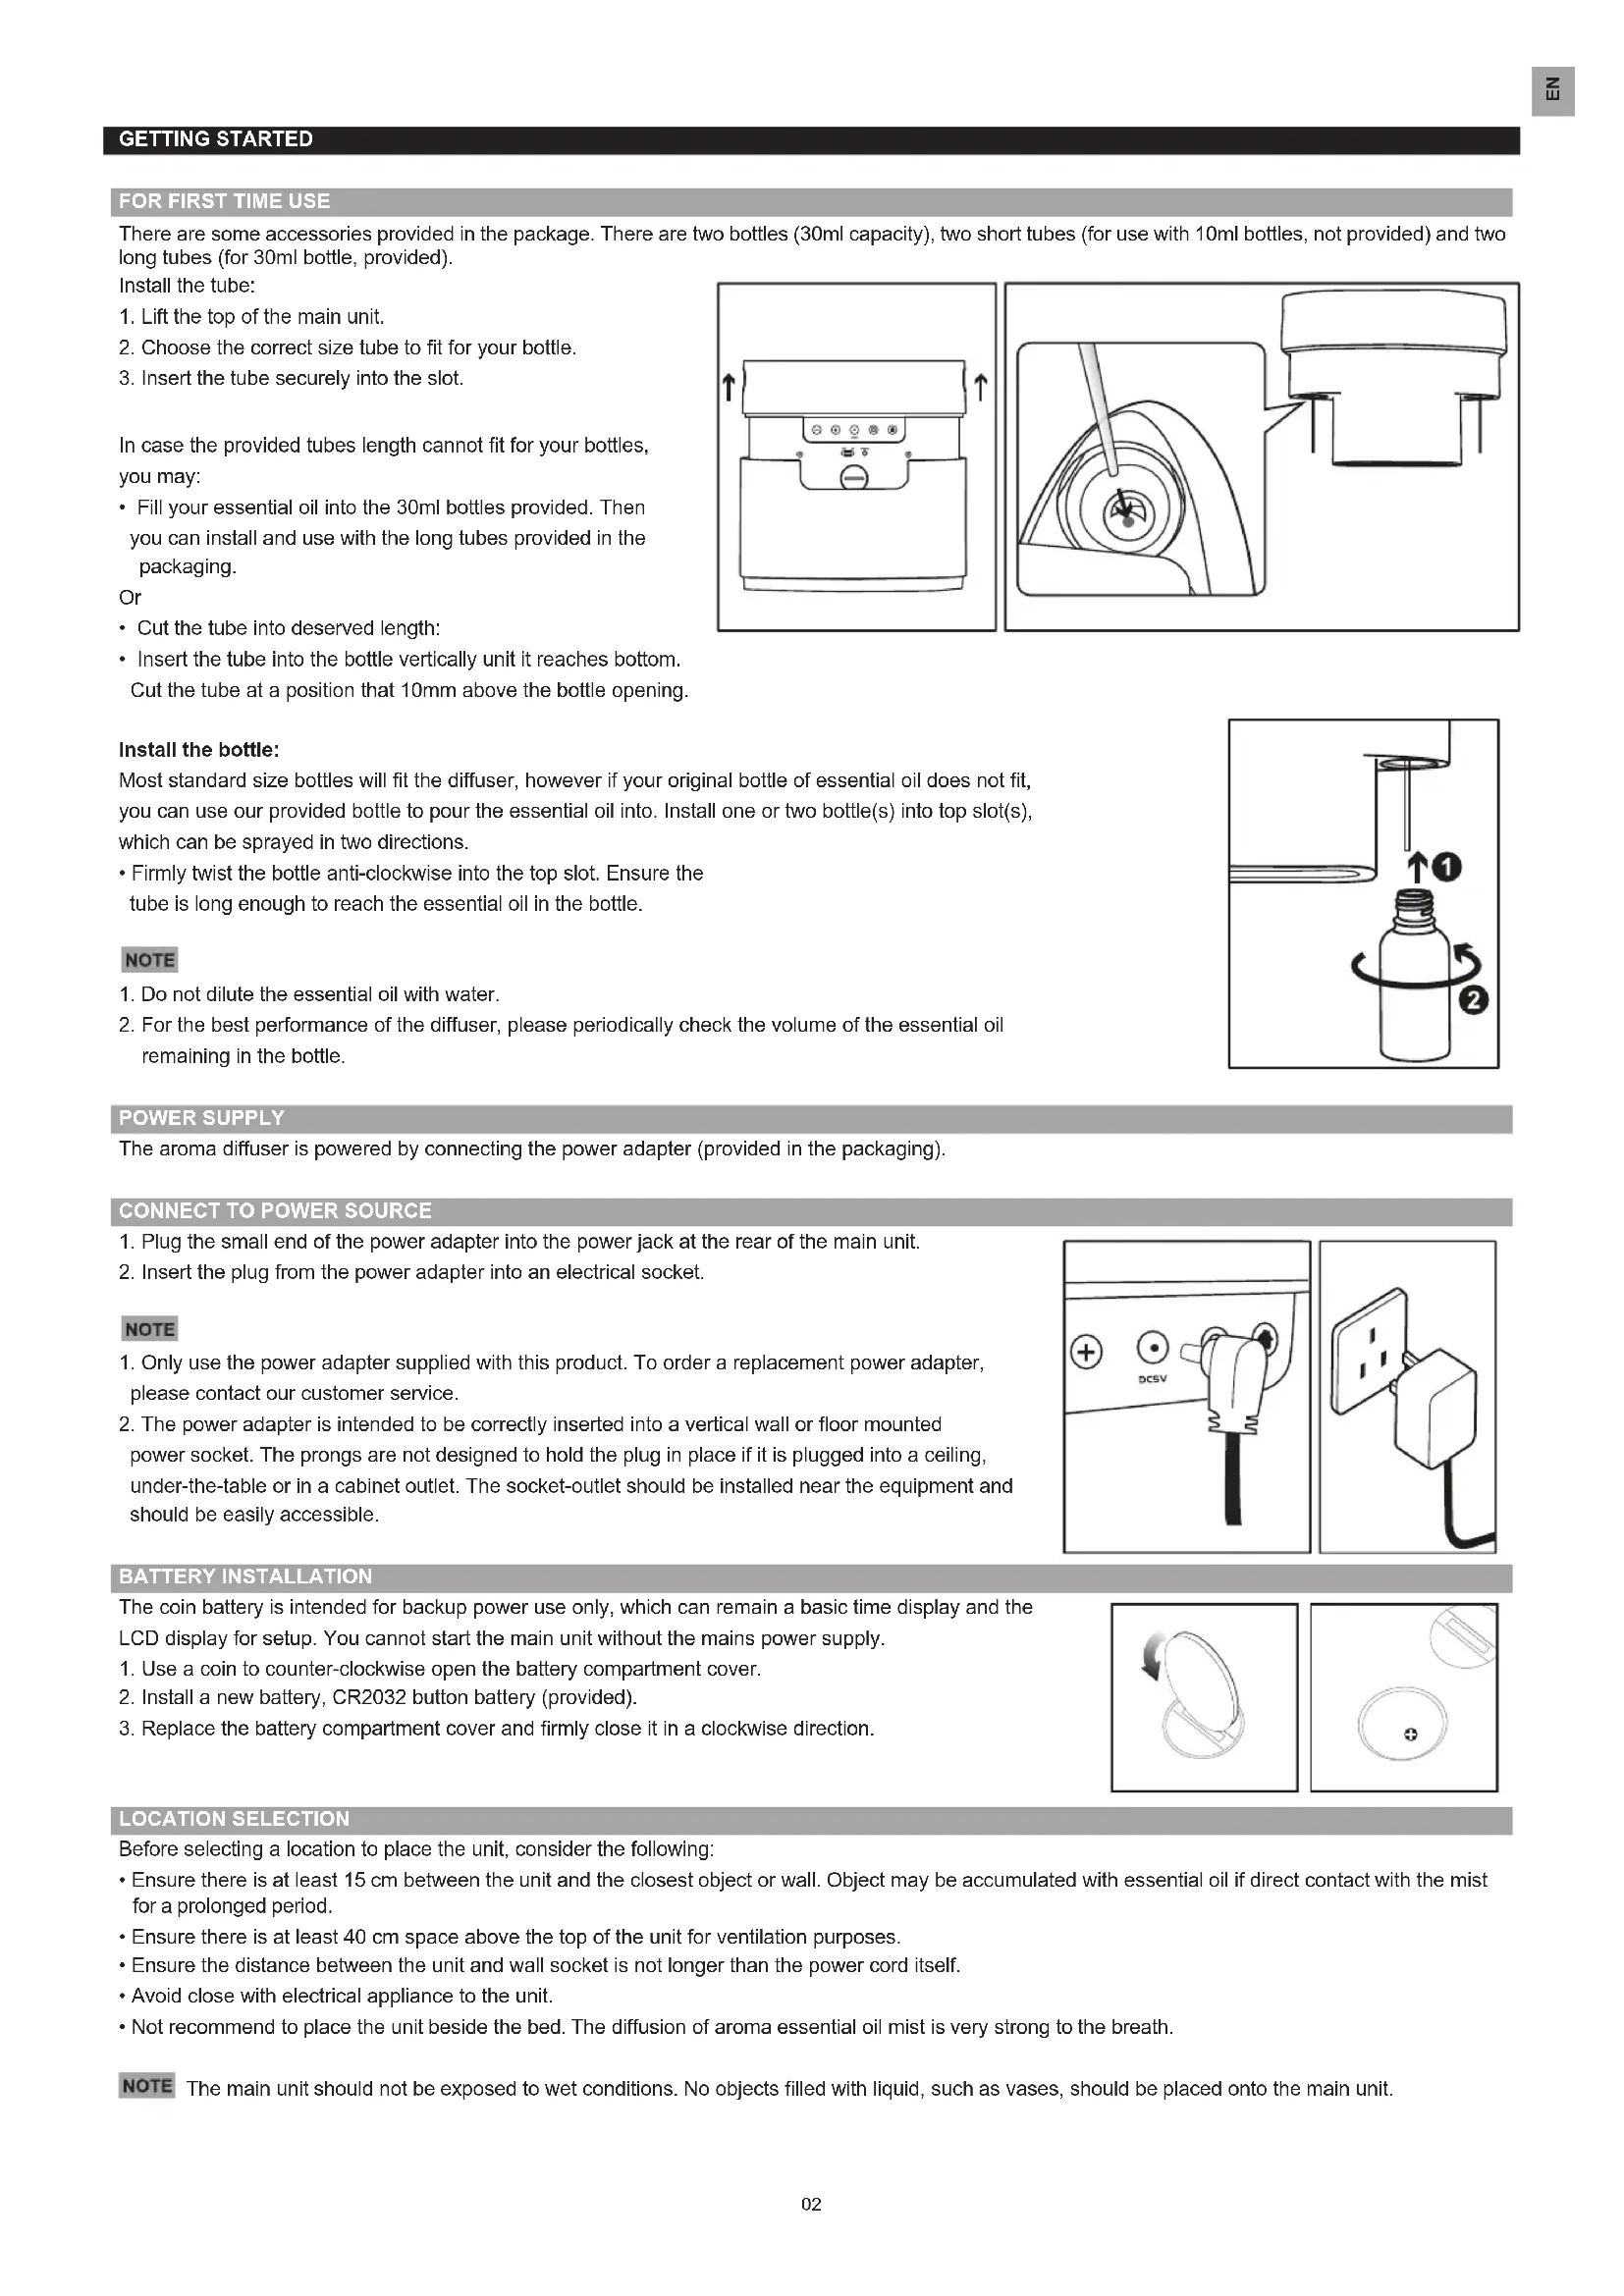
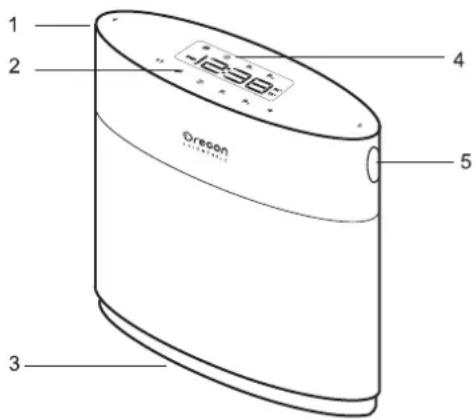
FRONT VIEW
text_image
1 2 3 4 5 Oregon- Left spray nozzle
- Touch-screen setting buttons
- Mood light
- Display screen
- Right spray nozzle
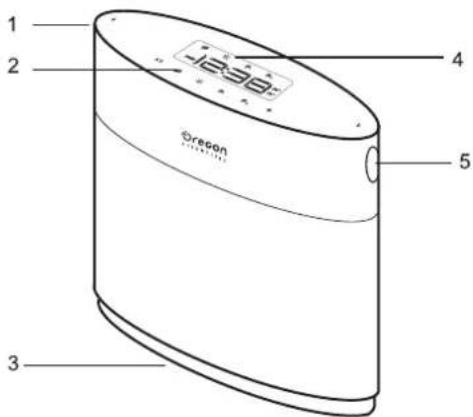
REAR VIEW
text_image
Technical diagram of a device with numbered components and directional arrows indicating assembly or status.- Power jack
- Control buttons
- Reset button
- ft ^2 /m ^2 switch
- Backup battery
GETTING STARTED
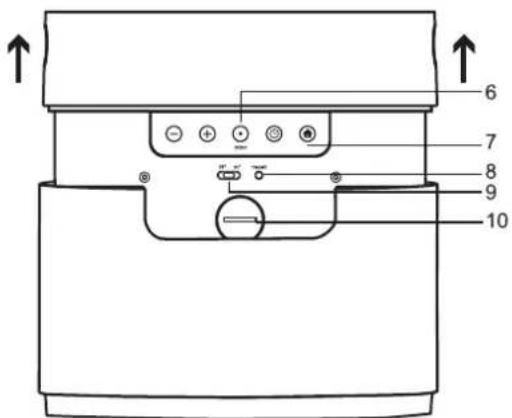
FOR FIRST TIME USE
There are some accessories provided in the package. There are two bottles (30ml capacity), two short tubes (for use with 10ml bottles, not provided) and two long tubes (for 30ml bottle, provided).
Install the tube:
- Lift the top of the main unit.
- Choose the correct size tube to fit for your bottle.
- Insert the tube securely into the slot.
In case the provided tubes length cannot fit for your bottles, you may:
- Fill your essential oil into the 30ml bottles provided. Then you can install and use with the long tubes provided in the packaging.
Or
- Cut the tube into deserved length:
- Insert the tube into the bottle vertically unit it reaches bottom.
Cut the tube at a position that 10mm above the bottle opening.
natural_image
Simple line drawing of a refrigerator with buttons and a door, no text or symbols present
natural_image
Technical line drawing of a mechanical assembly with a tool inserted into a circular component and a separate view showing a cylindrical component (no text or symbols present)Install the bottle:
Most standard size bottles will fit the diffuser, however if your original bottle of essential oil does not fit, you can use our provided bottle to pour the essential oil into. Install one or two bottle(s) into top slot(s), which can be sprayed in two directions.
- Firmly twist the bottle anti-clockwise into the top slot. Ensure the tube is long enough to reach the essential oil in the bottle.
NOTE
- Do not dilute the essential oil with water.
- For the best performance of the diffuser, please periodically check the volume of the essential oil remaining in the bottle.

text_image
Diagram illustrating a mechanical or fluidic process with labeled steps ① and ②, showing a bottle with rotating flow arrows.POWER SUPPLY
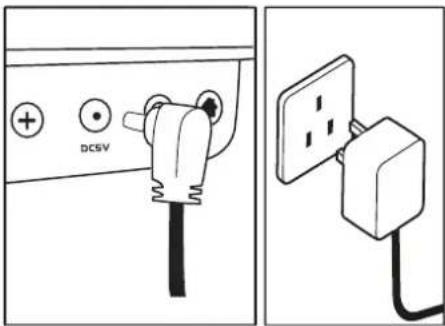
The aroma diffuser is powered by connecting the power adapter (provided in the packaging).
CONNECT TO POWER SOURCE
- Plug the small end of the power adapter into the power jack at the rear of the main unit.
- Insert the plug from the power adapter into an electrical socket.
NOTE
- Only use the power adapter supplied with this product. To order a replacement power adapter, please contact our customer service.
- The power adapter is intended to be correctly inserted into a vertical wall or floor mounted power socket. The prongs are not designed to hold the plug in place if it is plugged into a ceiling, under-the-table or in a cabinet outlet. The socket-outlet should be installed near the equipment and should be easily accessible.
text_image
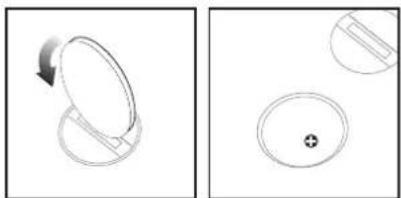
DC6VBATTERY INSTALLATION
The coin battery is intended for backup power use only, which can remain a basic time display and the LCD display for setup. You cannot start the main unit without the mains power supply.
- Use a coin to counter-clockwise open the battery compartment cover.
- Install a new battery, CR2032 button battery (provided).
- Replace the battery compartment cover and firmly close it in a clockwise direction.
natural_image
Two diagrams showing a circular object with an arrow and a cross symbol, no text or labels present.LOCATION SELECTION
Before selecting a location to place the unit, consider the following:
- Ensure there is at least 15 cm between the unit and the closest object or wall. Object may be accumulated with essential oil if direct contact with the mist for a prolonged period.
- Ensure there is at least 40 cm space above the top of the unit for ventilation purposes.
- Ensure the distance between the unit and wall socket is not longer than the power cord itself.
- Avoid close with electrical appliance to the unit.
- Not recommend to place the unit beside the bed. The diffusion of aroma essential oil mist is very strong to the breath.
NOTE The main unit should not be exposed to wet conditions. No objects filled with liquid, such as vases, should be placed onto the main unit.
SETTINGS
You can customize your required settings prior to the start of the unit diffusing.
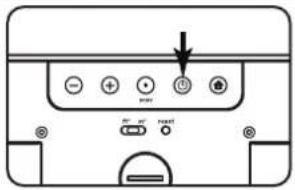
MANUALLY SET CLOCK
To set the clock on the main unit:
- After the power adapter is plugged in, lift the top of the main unit. Press Ⓑ at the rear of the main unit, the main unit automatically enters to clock setting mode.
- The setting sequence is 12/24 hr format, hour and minute.
- Press ⊕/⊖ to change the settings slowly, or press and hold ⊕to rapidly change the settings.
- Press Ⓤ to confirm setting.
text_image
Diagram of a device rear panel with labeled buttons and an arrow pointing to the top button
text_image
24hr→12hr pm 12:38ROOM SIZE
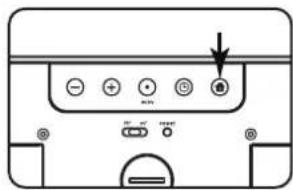
You can adjust the strength of the aroma according to the size of the room where the device is located. The time interval between each spray depends on the size of the room. It usually takes approx. 5-minutes per spraying cycle.
- Press ⚙ to enter setting mode.
- Slide ft^2/m^2 switch to select a measurement unit.
- Press ⓤ to adjust the room size; the setting sequence is 10m^2 , 20m^2 , 30m^2 , 40m^2 and 50m^2 ( 100ft^2 , 200ft^2 , 300ft^2 , 400ft^2 and 500ft^2 ).
- The setting will automatically be saved.
natural_image
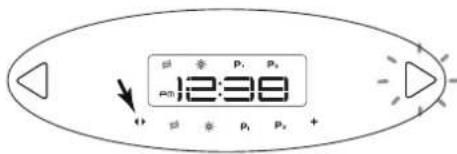
Diagram of a device rear panel with labeled buttons and an arrow pointing to the button (no text or symbols present)You can select a desired nozzle to spray the aroma manually.
- Make sure the aroma oil filled into the bottle for spraying.
- Press ◀/▶ at the top control panel to change the nozzle.
- When selecting the nozzle, there will be a light indication on the side of the selected nozzle.
- The setting sequence is Right Nozzle, Left Nozzle and Stop (no light).
- The setting will automatically be saved.
text_image
12:38 + * P₁ P₂ +OIL DIFFUSION INTENSITY
You can set up your desired aroma oil diffusion intensity, you have three options.
- Press ≈ on the top control panel to select intensity: (intensive), (medium) and (low).
- The setting will automatically be saved.

text_image
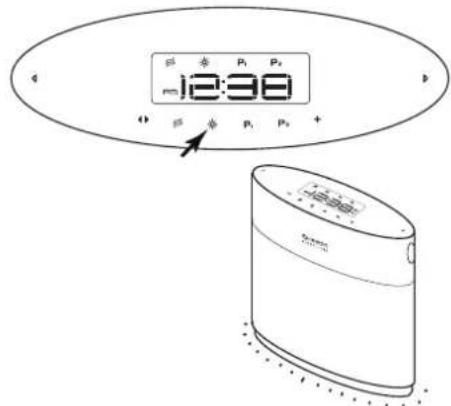
≡ 番 P₁ P₂ re:12:38 " ≡ * P, P, +MOOD LIGHT
Your aroma diffuser has a colourful mood light in the base of the unit. You can select
one colour or set all of the colours on a loop.
- Press ✉ on the top control panel, you can select OFF, 01 (red), 02 (pink), 03 (orange), 04 (yellow), 05 (green), 06 (blue), 07 (purple) and LOOP. The colour will light up, as you are selecting.
- The setting will automatically be saved.
text_image
12:38 P1 P2 P1 P2 +CUSTOMIZE AROMA OIL DIFFUSION PROGRAM
You can customise two programs (P1/P2) for two different schedule.
To activate & deactivate a program:
- Press P1/P2 to activate the program. P1/P2 will be displayed on the LCD.
- Press P1/P2 to turn the program OFF.

- To setup a program.
- Press and hold P1/P2 to enter setting mode.
- When the nozzle indicator is flashing, press + to select your desired direction.
Press P1/P2 to save the setting and enter next step (aroma oil diffusion intensity setting).

- Press + on the top control panel to adjust the aroma intensity, mood light, program start time and duration time. Press P1/P2 to save the setting and enter next step.
OR
During program setting, pressing any other button will save and exit the set up process.

text_image
0 |Hr → 02Hr .... 08Hr ↑ Pi Pi PtIMPORTANT You cannot make both nozzles work at the same time; please adjust the time for P1/P2 program to avoid the time overlapping. In case of overlapping, the late coming program will override the previous program.
SPECIFICATIONS
| Type Description | |
| Dimension(L x W x H) | 21.5 x 7.3 x 18cm(8.5 x 2.9 x 7.1 inches) |
| Weight 1.10 kg | |
| Operation temperature | |
| Temperature range (operation) 10 °C to 40 °C | |
| Temperature range (storage) -20 °C to 60°C | |
| Power DC6V 1000 mA | |
TROUBLESHOOTING
| Problem Possible cause Solutions/Remarks | ||
| The main unit does not work. | Power supply | Ensure the plug has been firmly plugged into the wall socket. |
| Ensure there is no power failure. | ||
| The main unit does not work. | Normal use | Press theresetbutton at the rear of the main unit. |
| Check the bottle is containing enough essential oil and is securely installed into the main unit. | ||
| When setting functions, the unit does not respond. | Normal use | Connect the power adapter again or pressresetat the rear of the main unit. |
| The appliance will then be reset to factory default settings. | ||
| There is no aroma diffused. | Installation & Activation | Make sure the bottle contains enough essential oil. If you customise a program, activate the program before use. |
| The aroma is not enough for my room size | Wrong adjustment | Select a different room size setting on the main unit. |
| Adjust the aroma oil diffusion intensity to high level. | ||
| I do not see mood light. | Function disabled | Adjust the mood light to beONor shown in loop. |
| If you are in a customised program, you need to enter the program and set the mood light. | ||
| I customised a program, but it is not activated on time. | Wrong adjustment | Make sure you set the clock time correctly before use. |
| Make sure you turn on the program and showP1/P2on the display. |
IMPORTANT SAFETY INSTRUCTIONS
WHEN USING ELECTRICAL PRODUCTS, ESPECIALLY WITH CHILDREN PRESENT, BASIC SAFETY PRECAUTIONS SHOULD ALWAYS BE FOLLOWED, INCLUDING THE FOLLOWING:
DANGER
- This appliance can be used by children aged from 8 years and above and persons with reduced physical, sensory or mental capabilities or lack of experience and knowledge, if they have been given supervision or instructions explaining the use of the appliance in a safe way and understand the hazards involved.
-- Children should not play with the appliance
-- Cleaning and user maintenance should not be carried out by children without supervision.
• This appliance is only to be used with the recommended vaporizing medium. The use of other substances may give rise to a toxic or fire risk. - The appliance is only to be used with the detachable power supply unit provided.
- Always follow instructions in 'Care and Maintenance' when cleaning the unit.
- To avoid electric shock and/or a fire hazard, do not immerse the unit in liquid.
- Do not pull the electrical cord to move or unplug the unit.
- Do not disassemble the unit when it is plugged into a power supply or in operation.
• To avoid electric shock and/or a fire hazard, do not clean the power jack with water detergent or any other liquid.
WARNING
- Do not operate this unit in a manner other than its intended use or beyond the technical data specified. Improper use can be a danger to health or life.
- This product is not intended for use by children or persons with diminished physical, sensory or mental capabilities, unless they receive supervision or instruction concerning use of the unit by a person responsible for their safety. Read all instructions before using this product.
PRECAUTIONS
DOs
- Handle the unit and resin cover with care.
- Remove dust regularly with a dry cloth. Accumulated dust poses a potential fire hazard.
- Place the unit on a dry, level, water-resistant raised surface with the mist directed into an open area.
- Children and pets should be supervised to ensure that they do not play with the unit or its components.
- The contents of this manual may not be reproduced without the permission of the manufacturer.
- Clean the air tunnel regularly by filling with isopropyl alcohol into glass bottles provided, then plug into the main unit and operate with the normal diffuser mode for 5 cycles. Please refer to Care and Maintenance for details.
DON'Ts
- DO NOT turn the unit upside down without removing the liquid content from the essential oil bottles.
- DO NOT let water, detergent or any other liquid enter the opening to the unit.
- DO NOT tamper with the unit's internal components. This invalidates the warranty.
- DO NOT subject the unit to excessive force, shock, dust, temperature or humidity.
- DO NOT cover the unit with newspaper, curtains etc. during operation.
- DO NOT direct the mist towards any electrical appliance, furniture, plants, paint or heat source.
- DO NOT inhale mist directly from the mist outlet.
- DO NOT obstruct the air inlet or air outlet on the unit.
- DO NOT place the unit directly on the floor. Flooring may be damaged if in direct contact with the mist for a prolonged period.
• DO NOT use in humid locations. - DO NOT immerse the unit in water. If you spill liquid on the unit, dry it immediately with a soft, lint-free cloth.
- DO NOT clean the unit with abrasive or corrosive materials.
NOTE Images in the manual may differ slightly from actual product.
CARE AND MAINTENANCE
• Always unplug the unit before cleaning.
• To avoid electric shock and/or fire hazard, do not immerse the unit or the power dock in liquid or allow detergent enter the unit.
- Clean the unit regularly with a dry soft cloth to prevent dust accumulation.
- Do not let water, detergent or any other liquid enter the mist opening.
- Clean the air tunnel regularly:
- Fill in 10ml of isopropyl alcohol into the glass bottles provided.
- Install the bottles and tubes into the top slots.
- Set the Room Size to 50m2/500ft2 and Intensity to 3. Please refer to Room Size and Aroma Intensity section
NOTE Ensure the surrounding air ventilation is good.
- Press ◀/▶ to turn on the desired cleaning nozzle manually.
- After 50sec spraying from the nozzle, please retrigger the same nozzle by toggling ◀/▶ manually again.
- Repeat the above process for 5 times.
ABOUT OREGON SCIENTIFIC
Visit our website www.oregonscientific.com to learn more about Oregon Scientific products.
For any enquiry, please contact our Customer Services at info@oregonscientific.com.
Oregon Scientific Global Distribution Limited reserves the right to interpret and construe any contents, terms and provisions in this user manual and to amend it, at its sole discretion, at any time without prior notice. To the extent that there is any inconsistency between the English version and any other language versions, the English version shall prevail.
EU-DECLARATION OF CONFORMITY
Hereby, Oregon Scientific, declares that this WA328 DuoScents Aroma Diffuser is in compliance with EMC directive 2004/108/EC and LVD directive 2006/95/EC. A copy of he signed and dated Declaration of Conformity is available on request via our Oregon Scientific Customer Service.

Oregon
SCIENTIFIC
Thank you for selecting the Oregon Scientific™ DuoScents Aroma Diffuser (Model: WA328.) The Diffuser can easily be adjusted to suit your required aroma intensity, according to your room size. Using two different scents of essential oil you can create different environments by using the mood lighting and programming the oil to be diffused at your preferred times.
OVERVIEW
FRONT VIEW
text_image
1 2 4 5 Oregon 3text_image
Technical diagram of a device with numbered components and directional arrows indicating assembly or status.natural_image
Simple line drawing of a refrigerator with no text or symbols
natural_image
Technical line drawing of a mechanical assembly with a tool inserted into a circular component and a separate view showing a cylindrical component (no text or symbols present)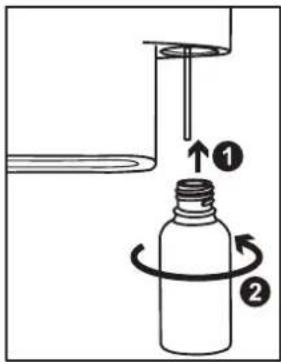
text_image
Diagram illustrating a mechanical or fluidic process with labeled steps ① and ②, showing directional arrows and a bottle-shaped object.NOTA
natural_image
Two diagrams showing a rotating disc and a circular component with a handle, no text or symbols present.text_image
Diagram of a device rear panel with labeled buttons and an arrow pointing to the button
text_image
24Hr ⇌ 12Hr
GRANDEZZA STANZA
natural_image
Diagram of a device rear panel with buttons and an arrow pointing to the button (no text or symbols present)NEBULIZZAZIONE MANUALE DEL PROFUMO
text_image
12:38 ≤ P₁ P₂ + P₁ P₂ +INTENSITA' DIFFUSIONE DELL'AROMA
text_image
P₁ P₂ → P₃ P₄ ... P₅ P₆IMPORTANTE
text_image
Technical diagram of a device with numbered components and directional arrows indicating assembly or status.natural_image
Line drawing of a refrigerator front panel with buttons and indicator lights (no text or symbols)
natural_image
Technical line drawing of a mechanical component with a pin inserted into a circular housing and a separate view showing a top component (no text or symbols)
text_image
Diagram illustrating a mechanical or fluidic process with labeled steps ① and ②, showing directional arrows and a bottle-shaped object.REMARQUE
RACCORDEMENT A LA SOURCE D'ALIMENTATION
natural_image
Two diagrams showing a circular object being shifted, with one on top and the other on bottom (no text or symbols)SÉLECTION DE L'EMPLACEMENT
text_image
Diagram of a device rear panel with labeled buttons and indicator lights, showing ports and status indicators.
text_image
24hr ⇌ 12hr
TAILLE DE LA PIÈCE
text_image
Diagram of a device rear panel with labeled buttons and an arrow pointing to the buttonVAPORISATION D'AROME MANUELLE
text_image
≤ P₁ P₂ P₂ 12:38 + P₁ P₂ +PERSONNALISATION DU PROGRAMME DE DIFFUSION DES HUILES
text_image
Diagram of a device rear panel with numbered labels pointing to ports and buttonsnatural_image
Simple line drawing of a refrigerator with no text or symbols
natural_image
Technical line drawing of a mechanical component with a tool inserted, showing cross-sectional view (no text or symbols)
text_image
Diagram illustrating a mechanical or fluidic process with labeled steps ① and ②, showing a bottle with rotating flow arrows.HINWEIS
natural_image
Two technical diagrams showing a rotating disc and a circular component with a plus symbol, no text or labels present.text_image
Diagram of a device rear panel with labeled buttons and indicator lights, showing power and ground connections.
text_image
24Hr ⇌ 12Hr
ZIMMERGRÖSSE
text_image
Diagram of a device rear panel with labeled buttons and an arrow pointing to the buttonAROMAÖL MANUELL VERSPRÜHEN
text_image
0 0 P₁ P₂ =12:38 0 0 0 P₁ P₂ +STIMMUNGSLICHT
text_image
Diagram of a device rear panel with numbered labels pointing to ports and buttonsnatural_image
Simple line drawing of a refrigerator with no text or symbols
natural_image
Technical line drawing of a mechanical assembly with a tool inserted into a circular component and a separate view showing a cylindrical component (no text or symbols)Instale la botella:
text_image
Diagram illustrating a mechanical or fluidic process with labeled steps ① and ②, showing a bottle with rotating flow arrows.NOTA
natural_image
Two technical diagrams showing a circular component being rotated and then tilted, with no visible text or symbols.text_image
Diagram of a device rear panel with labeled buttons and an arrow pointing to the button
text_image
24hr ⇌ 12hr
text_image
Diagram of a device rear panel with labeled buttons and an arrow pointing to the buttonROCIAR EL AROMA DE FORMA MANUAL
text_image
P≤ P₁ P₂ 12:30 4 ≤ P₁ P₂ +text_image
≤ P1 P2 =12:38 + ≤ P1 P2 +text_image
Technical diagram of a device with numbered components and directional arrows indicating assembly or status.natural_image
Simple line drawing of a refrigerator with buttons and a door, no text or symbols present
natural_image
Technical line drawing of a mechanical assembly with circular components and a separate view showing a cylindrical component (no text or symbols)
text_image
Diagram illustrating a mechanical or fluidic process with labeled components and directional arrows indicating motion or circulation.Instale o frasco:
natural_image
Two technical diagrams showing a circular component with an arrow indicating rotation and a cross symbol inside (no text or labels)SELECÇÃO DO LOCAL
text_image
Diagram of a device rear panel with labeled buttons and indicators, including an arrow pointing to the button.24hr ⇌ 12hr
PM 12:38
DIMENSÃO DA SALA
text_image
Diagram of a device rear panel with labeled buttons and an arrow pointing to the buttonPULVERIZAR MANUALMENTE O AROMA
text_image
12:38 " = φ P₁ P₂ +INTENSIDADE DE DIFUSÃO DO ÓLEO
text_image
p3 @ p1 p2 p1 12:38 + p2 α p1 p2 +
natural_image
Line drawing of a portable air conditioner unit with control panel and buttons (no text or symbols)PERSONALIZE O PROGRAMA DE DIFUSÃO DE ÓLEO AROMÁTICO
text_image
Technical diagram of a device with numbered components and directional arrows indicating assembly or status.- Voedingsaansluiting
- Bedieningsknoppen
- Reset-knop
- ft²/m²schakelaar
- Back-up batterij
BEGINNEN
INGEBRUIKNAME
natural_image
Line drawing of a refrigerator with buttons and ventilation slots (no text or symbols)
natural_image
Technical line drawing of a mechanical assembly with no visible text or symbols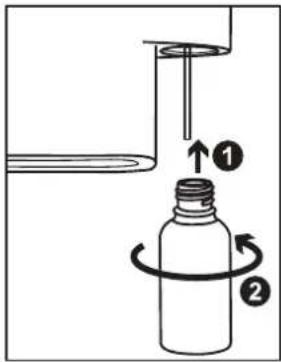
text_image
Diagram illustrating a mechanical or fluidic process with labeled steps ① and ②, showing directional arrows and a bottle-shaped object.VOEDING
natural_image
Two diagrams showing a circular object with an arrow and a separate circular component with a plus symbol (no text or labels)EEN PLAATS SELECTEREN
text_image
Diagram of a device rear panel with labeled buttons and an arrow pointing to the button
text_image
24hr ⇌ 12hr
text_image
Diagram of a device front panel with labeled buttons and an arrow pointing to the buttonGEUR HANDMATIG VERSPREIDEN
text_image
12:30 P₁ P₂ ON ⇌ OFF P₁ P₂Anpassa aroma oil diffusions program ....3
Specifikationer....4
Felsökning 4
text_image
Diagram of a device rear panel with numbered labels pointing to ports and buttonsnatural_image
Simple line drawing of a refrigerator with buttons and a door, no text or symbols present
natural_image
Technical line drawing of a mechanical assembly with a tool inserted into a circular component and a separate view showing a cylindrical component (no text or symbols present)Installera flaskan:
text_image
Diagram illustrating a mechanical or fluidic process with labeled steps ① and ②, showing a bottle with rotating flow arrows.NOTERA
natural_image
Two diagrams showing a rotating disc and a circular component with a cross symbol, no text or labels present.PLATSVAL
text_image
Diagram of a refrigerator front panel with indicator lights and a downward arrow pointing to the top panel.
text_image
84hr ⇌ 18hr pm 12:30RUMMETS STORLEK
text_image
Diagram of a device rear panel with labeled buttons and an arrow pointing to the buttonSPRAYA DOFTEN MANUELLT
text_image
p1 @ P1 P2 P2:12:38 + p3 @ P1 P2 +STÄMNINGSBELYSNING
text_image
Technical diagram of a device with numbered components and directional arrows indicating assembly or status.natural_image
Line drawing of a refrigerator front panel with control buttons and indicator lights (no text or symbols)
natural_image
Technical line drawing of a mechanical assembly with circular components and a separate view (no text or symbols)安装瓶子:
text_image
Diagram illustrating a mechanical or fluidic process with labeled steps ① and ②, showing a bottle with rotating flow arrows.電源
natural_image
Two technical diagrams showing a rotating disc and a circular component with a small circle, no text or symbols present.選擇擺放位置
text_image
Diagram of a device rear panel with labeled buttons and an arrow pointing to the top panel
text_image
24Hr ⇌ 12Hr
房間大小
text_image
Diagram of a device rear panel with labeled buttons and an arrow pointing to the button手動噴瀉香氣
text_image
Technical diagram of a device with numbered components and directional arrows indicating assembly or movement.natural_image
Simple line drawing of a refrigerator with buttons and a door (no text or symbols)
natural_image
Technical line drawing of a mechanical assembly with a tool inserted into a circular component and a separate view showing a cylindrical component (no text or symbols present)安装瓶子:
text_image
Diagram illustrating a laboratory filtration setup with labeled steps ① and ② showing fluid flow and movement.电源
natural_image
Two diagrams showing a circular object being shifted, with one on top and the other on bottom (no text or symbols)选择放置位置
text_image
Diagram of a refrigerator front panel with labeled buttons and indicator lights
text_image
844hr ⇌ 126hr pm 12:30房间大小
natural_image
Front view of a computer monitor with indicator lights and an arrow pointing to the button (no text or symbols visible)手动散发香气
text_image
≤ * P₁ P₂ P=12:30 " ≤ * P₁ P₂ +P1

P
或