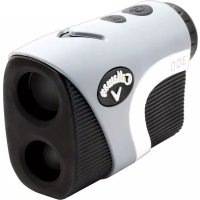
C70115 - Rangefinder Callaway - Free user manual and instructions
Find the device manual for free C70115 Callaway in PDF.
User questions about C70115 Callaway
0 question about this device. Answer the ones you know or ask your own.
Ask a new question about this device
Download the instructions for your Rangefinder in PDF format for free! Find your manual C70115 - Callaway and take your electronic device back in hand. On this page are published all the documents necessary for the use of your device. C70115 by Callaway.
USER MANUAL C70115 Callaway
© 2016 CALLAWAY GOLF COMPANY. Callaway Golf and the Chevron device are trademarks of Callaway Golf Company. IZZO Golf is an official licensee of Callaway Golf Company.
Callaway

text_image
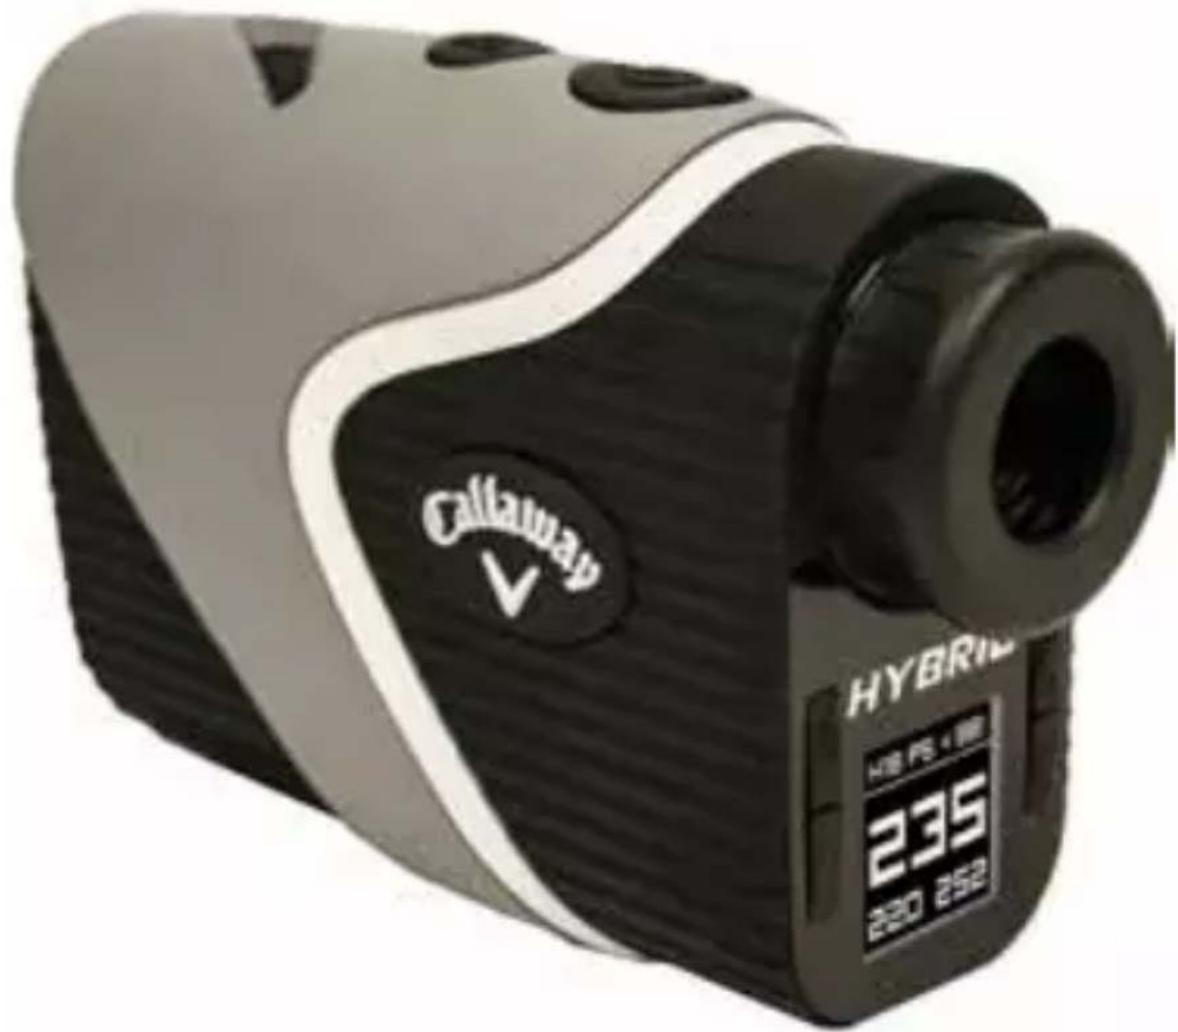
Calaman V HYBRIN HIS FS 4.5K 235 220 250HYBRID RANGEFINDER

text_image
CallawayINTRODUCTION
The Callaway Hybrid Rangefinder combines the pin-seeking precision of a laser with the added convenience of a GPS - all in one compact device! Whether trying to carry a bunker off the tee, hit your approach shot to the middle of the green or firing at the flag, the Callaway Hybrid Rangefinder maximizes distance information from tee to green, and lets you take aim with confidence.
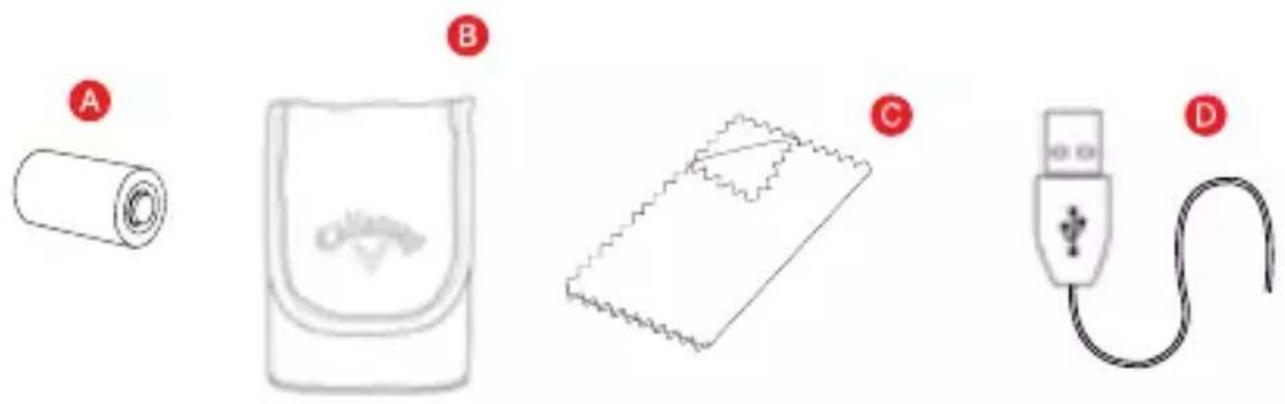
INCLUDES
A. CR2 - 3VOLT LITHIUM BATTERY
B. Carry Case
C. Cleaning Cloth
D. USB Cable
natural_image
Four-step diagram showing a rolled-up cable, a closed notebook, a textured card, and a plug with a curved cable (no text or symbols)2 INTRODUCTION
SPECIFICATIONS
| Product Callaway Hybrid Rangefinder | |
| Model Hybrid | |
| Dimensions 4.49" x 3" x 1.64" | |
| Weight 7.34 oz. | |
| Battery CR2 3 -Volt Lithium Battery and Internal Lithium Ion Battery (for GPS) | |
| Display LCD Display | |
| Magnification 6X | |
| Max Range 5-1000 yd | |
| Range To Flag 5-300 yd | |
| Accuracy +/- 1 yd | |
| Unit of Measure Yards/Meters | |
| Water/Fog Resistant Yes IPX3 Designation | |

text_image
CallawayUSING THE LASER RANGEFINDER
text_image
158yBATTERY INSTALLATION
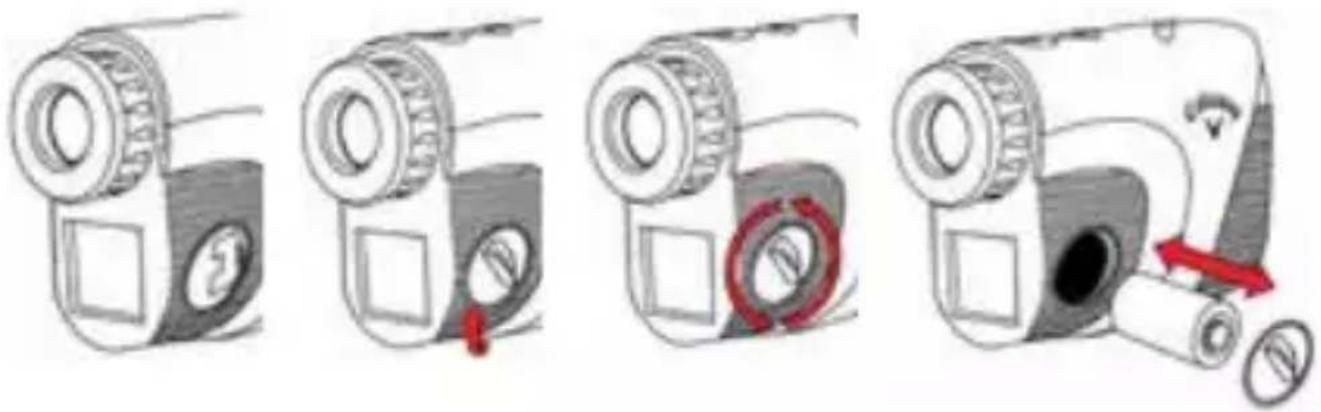
The Laser Rangefinder uses a replaceable CR2 3-volt lithium battery. To install, remove the battery cap located on the side of the device. Insert battery negative end first (flat end) and close battery cap.
- Lift hatch tab.
- Turn counterclockwise to open.
- Insert battery into chamber (negative end first).
- Replace battery cap and tighten by turning clockwise.
text_image
Illustration showing four steps of a camera with a red circular button highlighting the innermost lens, followed by a magnifying glass and a rolled paper.NOTE: When the Low Battery Icon first appears on LCD display, there are approximately 200 ranges left until the battery is completely drained. The Low Battery Icon will flash if the battery life is very low. In this case, the battery needs to be replaced before next use.
NOTE: The HYBRID RANGEFINDER uses two different batteries. The Laser Rangefinder only uses the CR2 3V (replaceable) battery. The internal GPS module uses the internal lithium ion rechargeable (non-replaceable) battery. This GPS feature requires charging (see Page 13 for GPS charging instructions).
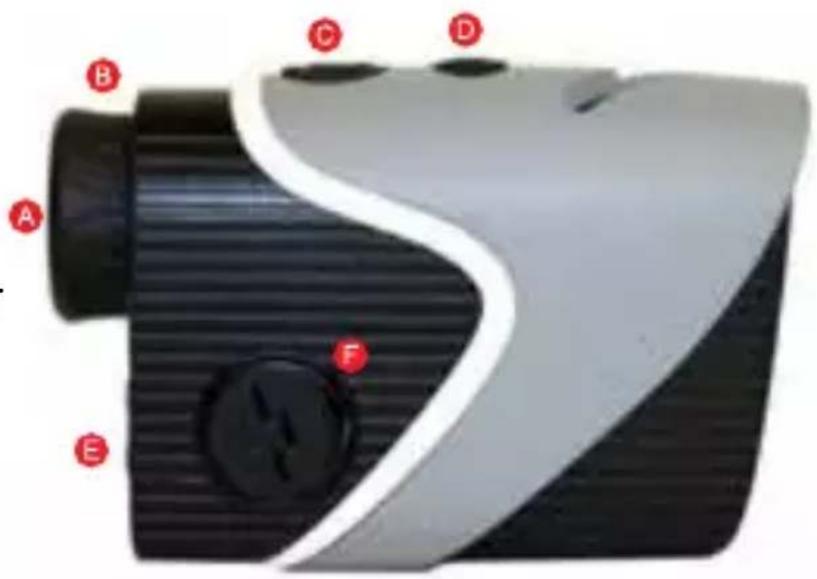
RANGEFINDER DIAGRAM
A. Eye Piece
B. Diopter Adjustment
C. Power Button
D. Mode Button (M)
E. GPS Display
F. CR2-3V Battery Chamber
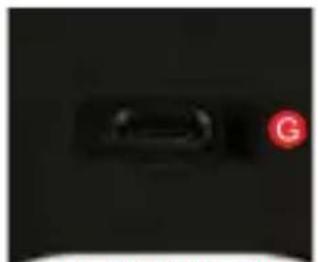
G. Charging Port
natural_image
Close-up of a black electronic component with a red circular indicator labeled 'G' (no readable text or symbols beyond the indicator)BOTTOM VIEW
text_image
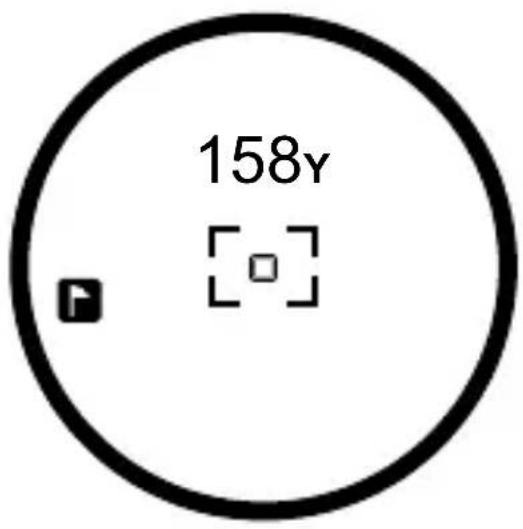
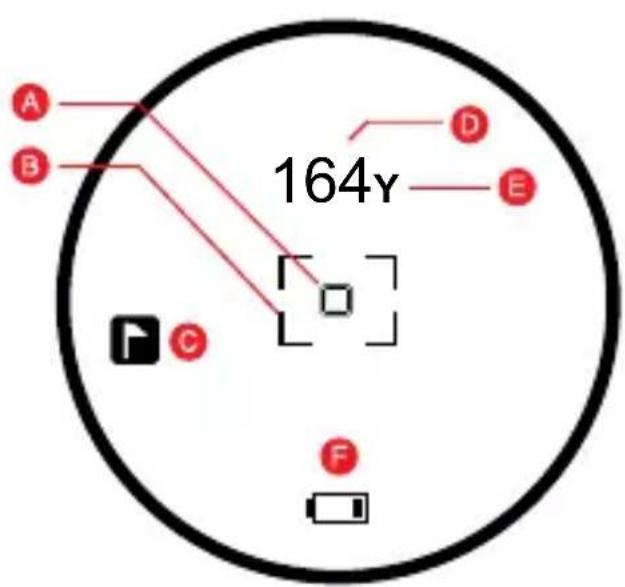
A B C D E FLASER LCD DISPLAY

text_image
A B 164y D E C FA. ☐ Zero-In Aiming Square
Laser Indicator Box
C. P.A.T. Mode Indicator
D. 164_y Distance
E. Y/M Unit of Measure
F. Low Battery

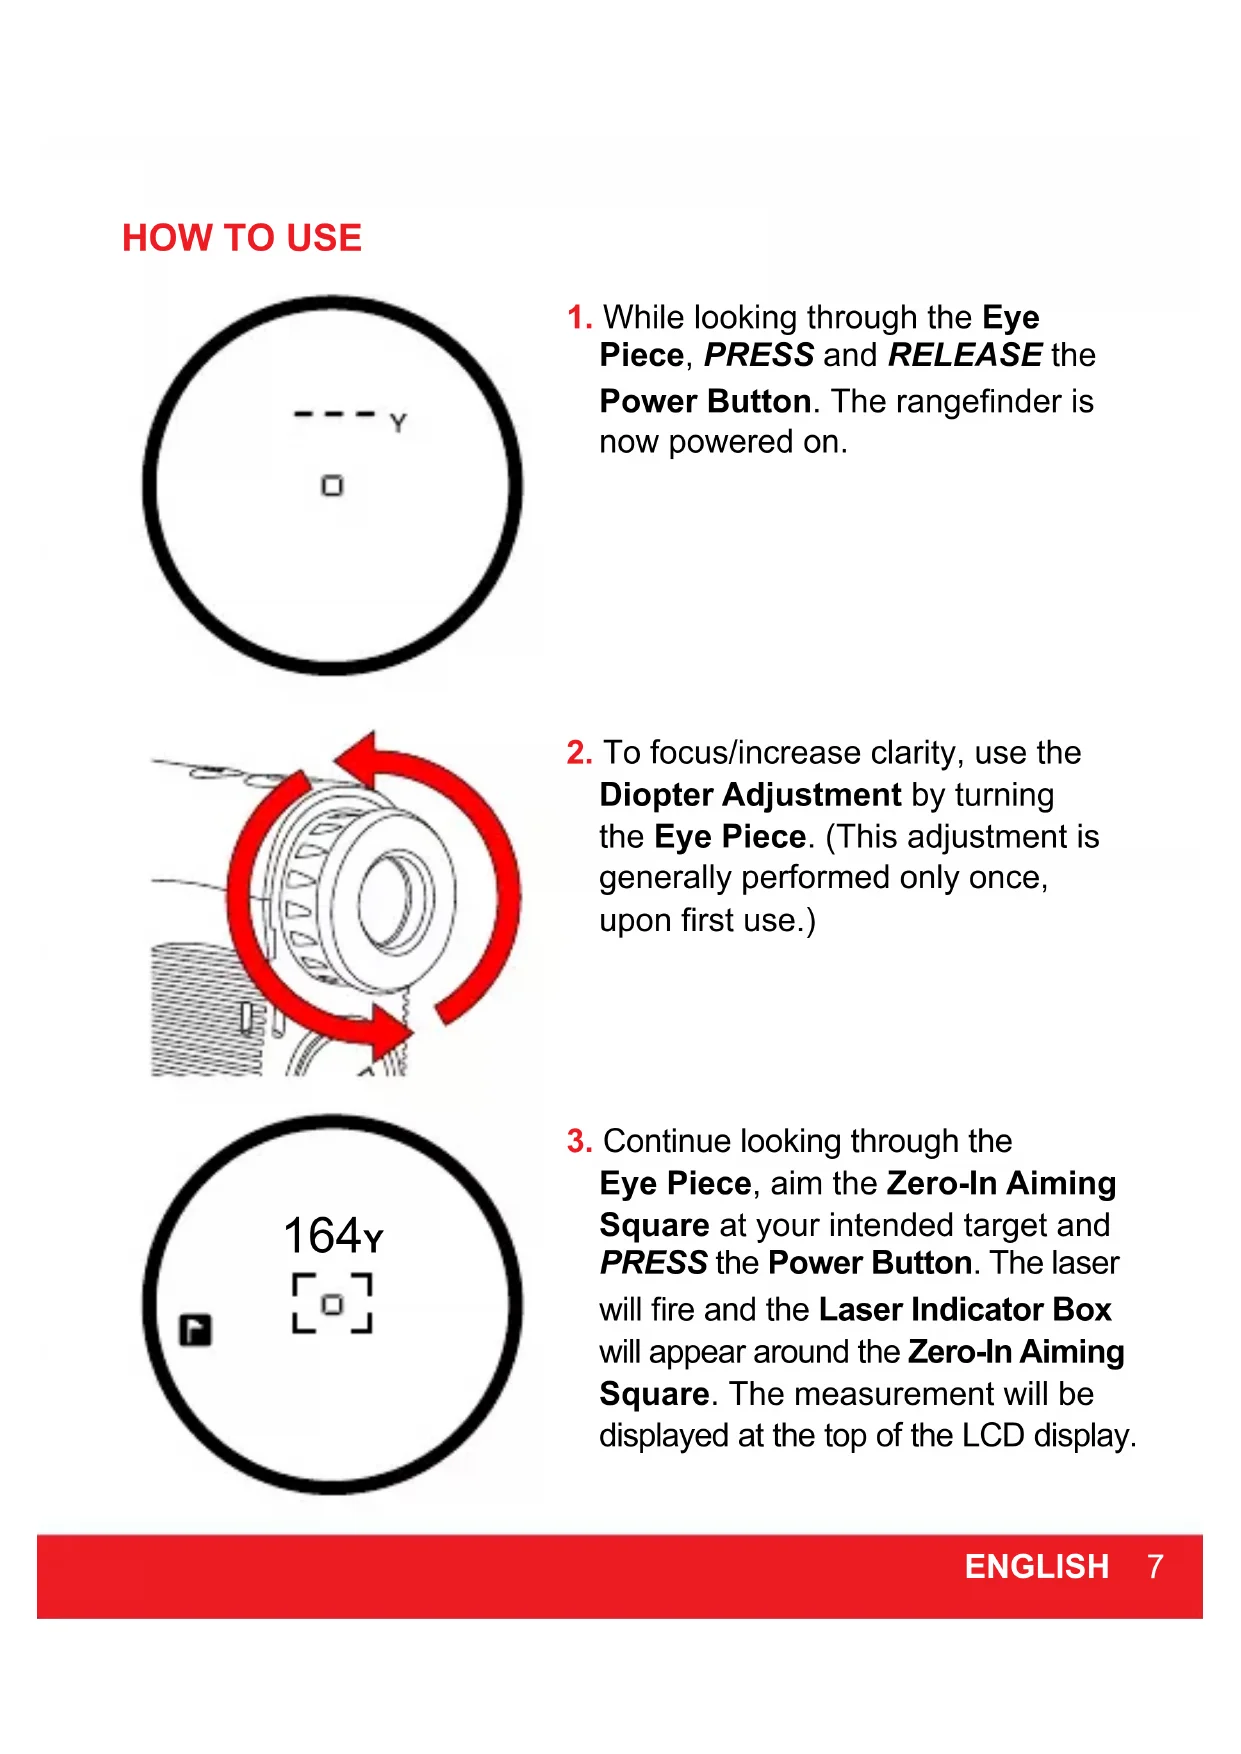
HOW TO USE

text_image
y □- While looking through the Eye Piece, PRESS and RELEASE the Power Button. The rangefinder is now powered on.
natural_image
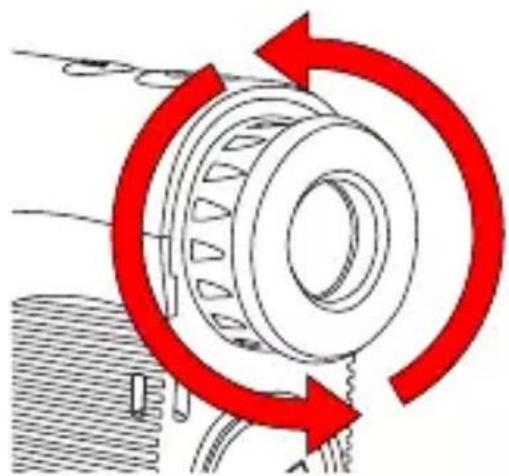
Mechanical diagram showing a rotating bearing with red curved arrows indicating rotational motion (no text or symbols)- To focus/increase clarity, use the Diopter Adjustment by turning the Eye Piece. (This adjustment is generally performed only once, upon first use.)

text_image
164y- Continue looking through the Eye Piece, aim the Zero-In Aiming Square at your intended target and PRESS the Power Button. The laser will fire and the Laser Indicator Box will appear around the Zero-In Aiming Square. The measurement will be displayed at the top of the LCD display.
MEASUREMENT MODES
- Standard - Standard Mode is recommended when measuring distances to larger objects. (Fig. A)
- P.A.T. (Pin Acquisition Technology) - P.A.T. Mode is best used when measuring the distance to a flagstick or smaller objects. To toggle between Standard and P.A.T Mode, PRESS the Mode Button (M). When P.A.T. Mode is activated, the flagstick icon will appear on the left side of the LCD display. (Fig. B)

text_image
A --- y □
text_image
B F y □Birdie Technology: Device will "chirp" when locked onto the pin using P.A.T Mode.
- Scanning - To measure distances to multiple targets in succession, HOLD Power Button. The Laser Indicator Box will flash and the laser will continuously fire. Measurements will change as you scan the landscape and change targets.
NOTE: While scanning in P.A.T. Mode, the measurement will only change when a shorter distance is measured. (This is useful when measuring the distance to a flagstick when there are trees or other objects in the background.)
- Unit of Measure - To change the unit of measure from Yards to Meters, PRESS Power Button to power on, then HOLD Mode Button (M). The unit of measure is indicated by a "Y" or "M" shown directly to the right of the distance displayed.
OPERATIONAL NOTES
- The maximum measurement range is 5-1000 yards to objects and 5-300 yards to a flagstick with +/- 1 yard accuracy.
NOTE: Maximum range can depend on several factors, including target characteristics and environmental conditions. For instance, longer maximum distances may be obtained to targets that are large in size, brightly colored, or have a reflective finish. Ranging capability can also be affected by the angle to the target and lighting conditions.
- Auto Shutoff - To conserve battery life, the device will automatically power off when idle for more than 5 seconds.
- Weather Conditions - Heavy rain and thick fog can potentially limit the maximum range of the device.
- Waterproof - The device is waterproof to IPX3 designation (It is protected against rain and splashing water).
MAINTENANCE
- To clean, use only a soft, clean cloth to prevent scratches.
- Do not submerge in liquid or apply any cleaning products.
- Do not store in extremely hot/cold temperatures (<50°F ->110°F).
- Store in carrying case when not in use.
TROUBLESHOOTING
Rangefinder is consistently providing inaccurate measurements.
- Make sure the device is set to the desired unit of measure (Yards or Meters).
- Weak battery signal can affect the accuracy of the device. If the Low Battery Indicator is present on the LCD display, replace the battery.
- Make sure there isn't anything obstructing your view such as leaves, branches, your finger, etc.
When looking through the Eye Piece, the view is blurry.
- Use the Diopter Adjustment by turning the Eye Piece to focus/increase clarity.
- Make sure there isn't anything obstructing your view such as leaves, branches, your finger, etc.
- Use a soft, clean cloth to clean lens.
When should the battery be replaced?
- If the Low Battery Indicator is present on the LCD display.
- If the rangefinder is consistently providing inaccurate measurements.
- If the LCD display is not present when PRESSING the Power Button.
What type of battery does the rangefinder use?
• CR2 3-Volt Lithium Battery.
TROUBLESHOOTING (CONTINUED)
When should P.A.T. Mode be used?
- When measuring the distance to smaller targets such as a flagstick.
- When scanning the landscape to measure distances to a smaller target such as a flagstick and there are trees or other objects in the background.
WARNING
- NEVER look directly into the sun or intense light when using the laser rangefinder.
• DO NOT aim/point laser rangefinder at another person. - DO NOT aim/point laser rangefinder at anyone's eyes or face.
• DO NOT attempt to disassemble the laser rangefinder.
• DO NOT submerge in any liquid. - DO NOT store the laser rangefinder in extreme cold/hot temperatures ( >50^ - <110^ ).
If you have any other questions or concerns, please call 1-888-606-4634 or go to www.callawaydmd.com.

text_image
CallawayUSING GPS

text_image
H18 PS 235 220 252CHARGING BATTERY
- Insert one end of the USB cord into the connection port located on the bottom of the device.
- Plug the other end of the USB cord into a PC or AC adapter (not included).
NOTE: The HYBRID RANGEFINDER uses two different batteries. The Laser Rangefinder module only uses the CR2 3V (replaceable) battery. The GPS module only uses the internal lithium ion rechargeable (non-replaceable) battery.
BUTTON DESCRIPTION

text_image
[Power] [OK] HYBRID [Up] 235 220 252 [Down]• [Power] Button- Hold to Power on/off
- [OK] Button- Press to select options, Press to toggle between distances to Green or Hazards in Play Mode. Hold to return to Main Menu.
- [Up] Button- Press to scroll up, advance to next hole.
- [Down] Button- Press to scroll down, return to previous hole.
MAIN MENU

text_image
14:52 PLAY GOLF SETTINGS REVERSE-Play Golf: Initiates satellite fix to start your round of golf.
- Settings: Adjust features of the device.
- Reverse: Invert the color of the screen.
AT GOLF COURSE
- Hold [Power] button for 3 seconds to power on.
- Use [Up/Down] buttons to scroll to Play Golf. Press [OK] button to select.
- Device will begin searching for satellite fix. Once satellite connection is established the 5 nearest golf courses will be listed.
- Use [Up/Down] buttons to scroll to desired golf course then press [OK] button to select.

text_image
LOCATING
text_image
SEARCH...
text_image
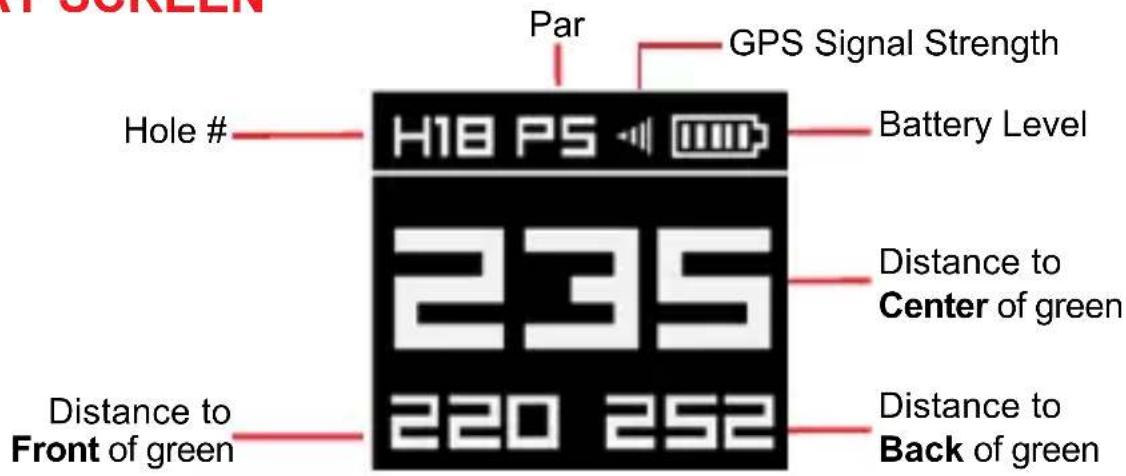
CROOKED PINES BLUE HERON CC COBBLESTONE RAVENWOOD GREYSTONE GCPLAY SCREEN
text_image
GPS Signal Strength Par H18 PS Battery Level Hole # 235 Distance to Center of green 220 252 Distance to Front of green Distance to Back of green- Press [Up/Down] buttons to change holes.
-
Hold [OK] button to access Play Menu.
-
Main Menu - Select to exit round
- Settings - Adjust features of the device
- Reverse - Invert the color of the screen
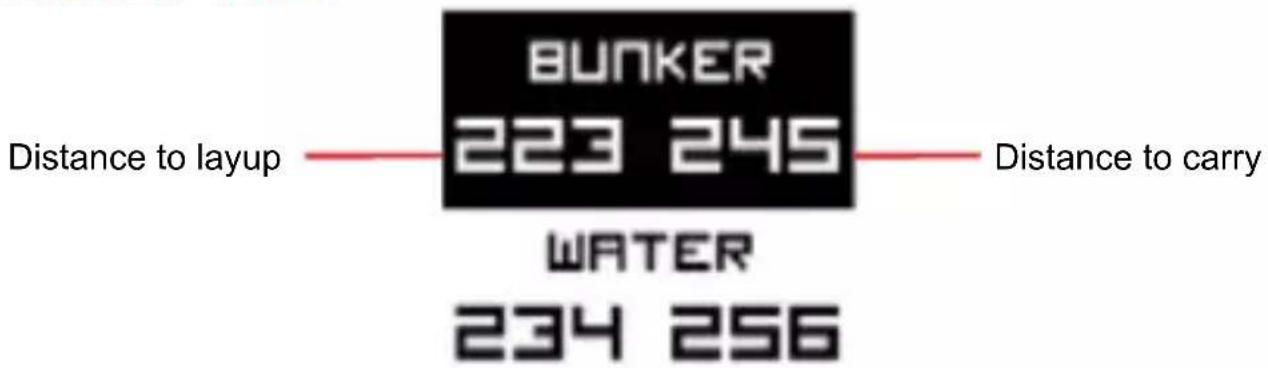
HAZARD VIEW
text_image
BUNKER 223 245 Distance to layup —— Distance to carry WATER 234 256- Press and release the [OK] button quickly to view distances to the front and back of hazards & doglegs.
- Press and release the [OK] button quickly again to return to the Play Screen (distances to green).
- Only 2 Hazards can be displayed on the screen at one time. Press the [Down] button to scroll down and view more hazards.
AUTO-HOLE ADVANCE
- While traveling from the green to the next tee box, the device will automatically advance to the next hole.
- To manually advance to the next hole, PRESS [UP] button. To return to the previous hole, PRESS [DOWN] button.
END ROUND
- To end your round of golf, HOLD [OK] button to access Play Menu, then select Main Menu.
- HOLD [POWER] button until device powers off.
SETTINGS
- Sleep Time: Set the amount of idle time before the back light turns off to conserve battery life. Select from 30 sec, 1 min, 2 min, off.
NOTE: Press any button to turn back light on again. NOTE: Device is set to 30 sec. by Default to conserve battery life.
-
Power Down: Set the amount of idle time before the device powers off. Select from 30 min, 1 hr, 2 hr, off.
-
Brightness: Adjust the brightness of the screen display. Select from 1, 2, 3, 4, 5.
NOTE: Selecting a lower Brightness will conserve Battery life.
-
DST: Toggle Daylight Saving Time on/off.
-
Adjust Time: The time will set automatically once connected to satellites. Use this option to manually adjust the time by hour (If needed)
-
Meter/Yard: Select unit of measure, Yards or Meters.
-
Fcty Rst: Return the device to default settings.
- About: View device information.
- Back: Return to Main Menu.
WARRANTY POLICY
This product is warranted to be free from defects for up to (1) year from the original purchase date. IZZO Golf cannot refund your purchase unless purchased directly from IZZO Golf. IZZO Golf will replace or repair any unit that is determined defective under normal use within the warranty period. Please call Customer Service at 888-606-4634 to request a Return Authorization. All defective products with a Return Authorization must be returned to:
IZZO Golf
Attn: Returns Dept.
1635 Commons Parkway
Macedon, NY 14502
RA #: ____
Please include a note with your Name, Address, Phone # and the Return Authorization #. Your replacement will be shipped once we diagnose the returned unit.
To register your product visit: www.callawaydmd.com/registration
For any other questions or concerns, please call 1-888-606-4634 or go to www.callawaydmd.com
© 2016 CALLAWAY GOLF COMPANY. Callaway Golf and the Chevron device are trademarks of Callaway Golf Company. IZZO Golf is an official licensee of Callaway Golf Company.
CAUTION
Global Position System (GPS) was developed and is managed by the United States Department of Defense (DOD) which is responsible for its normal operation and position precision control; the U.S. is not entitled to affect function or position precision of the whole system without prior notification or announcement based on its political considerations or safety of national defense. In order to use the device correctly and safely, you must be aware of the following information prior to operating the device:
- The device was only designed for the purpose of leisure and recreation and is not applicable for industrial or special measurement.
- The device is only an auxiliary device. IZZO Golf will not accept any legal liability for accidents due to mistaken operation, or any use of the device for measurement.
- Please do not try to disassemble the device or repair any part of the device.
- Please do not store the device in places exposed to direct sunlight or in extremely high temperatures.
- This product complies with FCC Part 15B, and the GPS module has only receiving function and no transmission.
FC FDA CE

text_image
Model No.: Callaway Hybrid Rangefinder FCC ID: ROB-IZZOHybridA. WWW. Callawaydmd .com Made in ChinaCallaway
text_image
Callaway V HYBRIV 48 PS 1.99 235 250 252TÉLÉMÈTRE HYBRID

text_image
CallawayINTRODUCTION
natural_image
Four line drawings of household items: rolled paper, open book, folded paper, and plug (no text or symbols)2 INTRODUCTION
CARACTÉRISTIQUES
text_image
Illustration showing four steps of a device's internal components, including a magnifying glass and battery with red arrows indicating movement.natural_image
Mechanical diagram showing a rotating bearing with red curved arrows indicating rotational motion (no text or symbols)www.callawaydmd.com/registration
natural_image
Four-step diagram showing a rolled-up cable, a closed notebook, a textured card, and a plug with a curved cable (no text or symbols)2 INTRODUCCIÓN
ESPECIFICACIONES
text_image
Illustration showing four steps of a device's operation: adding a button, rotating a circular component, opening a hole, and finally adjusting a switch.natural_image
Dark abstract image with a faint, elongated dark shape on the left (no text or symbols)VISTA INFERIOR

text_image
A B C D E FPANTALLA LCD LÁSER
text_image
A B 164Y D E C Fnatural_image
Mechanical diagram showing a rotating bearing with red curved arrows indicating rotational motion (no text or symbols)text_image
[Power] [OK] HYBRID [Up] [Down]natural_image
Four-step diagram showing a rolled-up cable, a closed notebook, a textured card, and a plug with a curved cable (no text or symbols)2 EINLEITUNG
TECHNISCHE DATEN
text_image
Illustration showing four steps of a camera with a red circular button highlighting the innermost lens, followed by a magnifying glass and a rolled paper.natural_image
Dark image with a faint, indistinct dark shape on the left (no text or symbols visible)UNTERE ANSICHT

text_image
A B C D E FLASER LCD-DISPLAY

text_image
A B 164y D E C Fnatural_image
Mechanical diagram showing a rotating bearing with red curved arrows indicating rotational motion (no text or symbols)www.callawaydmd.com/registration