
250+ - Rangefinder Callaway - Free user manual and instructions
Find the device manual for free 250+ Callaway in PDF.


| Product Type | Laser Rangefinder |
| Brand | Callaway |
| Model | 250+ |
| Dimensions | 4.5 x 2.9 x 1.5 inches |
| Weight | 6.5 oz (184 g) |
| Power Source | CR2 3V Lithium Battery |
| Maximum Range | 600+ yards (550+ m) |
| Accuracy | ±1 yard (0.9 m) |
| Magnification | 6x |
| Objective Lens Diameter | 21 mm |
| Laser Type | Class 1, eye-safe |
| Display | LCD with red or black reticle |
| Measurement Modes | Distance, Slope, Pin, Scan |
| Slope Adjustment | Yes, with on/off toggle for tournament legal use |
| Water Resistance | IPX4 splash-proof |
| Operating Temperature | -10°C to 50°C (14°F to 122°F) |
| Storage Temperature | -20°C to 60°C (-4°F to 140°F) |
| Case Included | Yes, soft carrying case with belt loop |
| Battery Life | Approximately 2,000 measurements |
| Warranty | 2-year limited warranty |
| Cleaning | Clean lens with soft microfiber cloth; avoid solvents |
| Storage | Store in a dry place at room temperature; remove battery if not used for extended period |
| Safety | Do not stare into laser beam; keep away from children |
Frequently Asked Questions - 250+ Callaway
User questions about 250+ Callaway
0 question about this device. Answer the ones you know or ask your own.
Ask a new question about this device
Download the instructions for your Rangefinder in PDF format for free! Find your manual 250+ - Callaway and take your electronic device back in hand. On this page are published all the documents necessary for the use of your device. 250+ by Callaway.
USER MANUAL 250+ Callaway
natural_image
Teal Callaway V 250+ precision surveying tool (no text or symbols on body)250+ LASER RANGEFINDER
INTRODUCTION
Thank You for choosing the Callaway 250+ Laser Rangefinder featuring P.A.T. (Pin Acquisition Technology) with Pulse Technology & Slope Mode. Designed to deliver precise distance measurements, P.A.T. locks onto the flagstick up to 300 yards away, ensuring accuracy even when trees and other objects are in the background.
SPECIFICATIONS
| Product Callaway 250+ Laser Rangefinder | |
| Model 250+ | |
| Dimensions 3.74” x 2.80” x 1.57” | |
| Weight 5.4 oz. (155g) (Without Battery) | |
| Battery CR2 3-Volt Lithium Battery | |
| Display LCD display | |
| Magnification 6X | |
| Max Range 5-950 yd | |
| Range To Flag 5-300 yd | |
| Accuracy +/- 1 yd | |
| Slope Measurement Range -89° - 90° | |
| Unit of Measure Yards/Meters | |
| Water/Fog Proof Weather Resistant (IPX3) | |
INCLUDES
A. CR2 - 3-Volt Lithium Battery
B. Carry Case
C. Cleaning Cloth
A
B

natural_image
Line drawing of a bag with a handle and a circular emblem on the side (no text or symbols)
natural_image
Simple line drawing of a folded paper or document with a red circular icon labeled 'C' in the top-left corner (no text or symbols on the diagram itself)BATTERY INSTALLATION
- Lift hatch tab.
- Turn counterclockwise to open.
- Remove protective plastic battery cover.
- Replace battery cap & tighten by turning clockwise.
NOTE: If the Low Battery Icon is present on LCD display, there are approximately 200 ranges left until the battery is completely drained. The Low Battery Icon will flash if the battery life is very low. In this case, the battery needs to be replaced before next use.
RANGEFINDER DIAGRAM
A. Eye Piece
B. Diopter Adjustment
C. Power Button
D. Battery Door

LCD DISPLAY

A. ☐ Zero-In Aiming Square
E. 164_Y Distance
F. Y/M Unit of Measure
G. Low Battery
H. --- Slope Adjusted Distance


HOW TO USE

- While looking through the Eye Piece, PRESS and RELEASE the Power Button. The rangefinder is now powered on.
natural_image
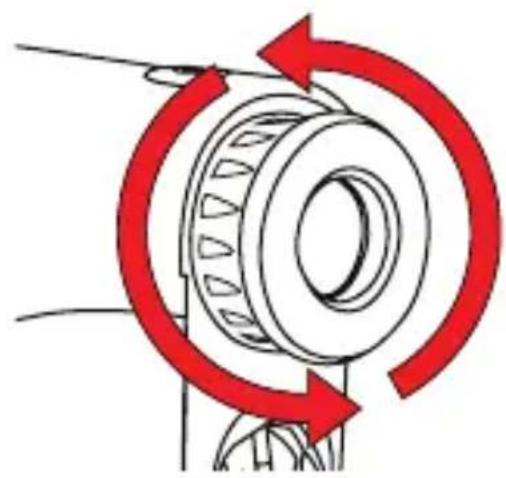
Diagram of a mechanical bearing with red circular arrows indicating rotational direction (no text or symbols)- To focus/increase clarity, use the Diopter Adjustment by turning the Eye Piece.
![164y [ ]](/content/2026/05/956933/images/fe4c9b9fe6e90005764612ea5b59f9daa68fc654627fcf023676eb087e9395a8.jpg)
- Continue looking through the Eye Piece, aim the Zero-In Aiming Square at your intended target and PRESS the Power Button. The laser will fire and the Laser Indicator Box will appear around the Zero-In Aiming Square. The measurement will be displayed at the top of the LCD display.
MEASUREMENT MODES
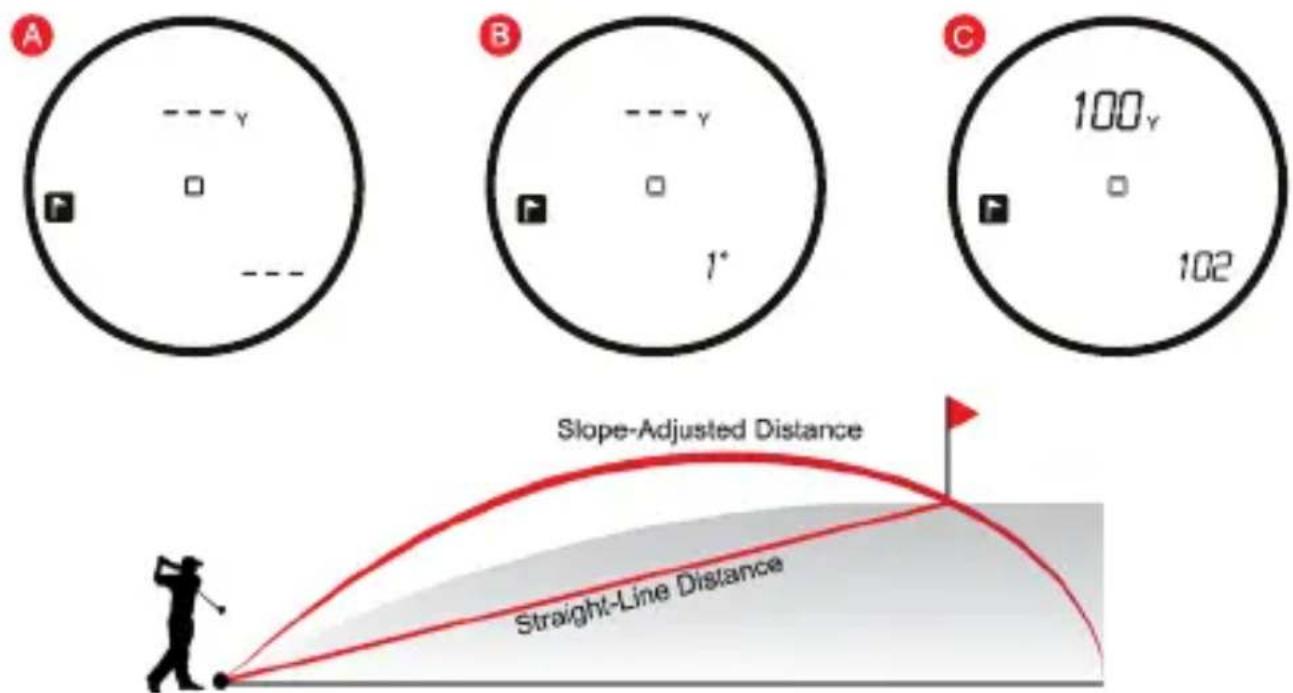
- Standard - Standard Mode is recommended when measuring distances to larger objects. (Fig. A)
- P.A.T. with Pulse Technology - P.A.T. Mode is best used when measuring the distance to a Flagstick or smaller objects. Device will provide a short vibration to confirm that the laser has locked on to the pin. To toggle between Standard and P.A.T Mode, quickly PRESS the Power Button Twice while device is powered on. When P.A.T. Mode is activated, the flagstick icon will appear on the left side and the Pulse icon will appear on the right side of the LCD display. (Fig. B)


NOTE: To disable Pulse Technology but keep P.A.T. Mode activated, start with the device powered off. Next, HOLD the Power Button for 5 seconds. The Pulse icon on the right side of the screen will flash & turn off. To enable Pulse Technology again, repeat this process.
- Scanning - To measure distances to multiple targets in succession, PRESS & RELEASE the Power Button to power on. Then HOLD Power Button, the Laser Indicator Box will flash and the laser will continuously fire. Measurements will change as you scan the landscape and change targets.
NOTE: While scanning in P.A.T. Mode, the measurement will only change when a shorter distance is measured. This is useful when measuring the distance to a flagstick when there are trees or other objects in the background.
- Slope Mode - Device will measure the angle of incline/decline (Fig. B) then calculate and display the slope adjusted distance in the bottom right of the LCD display. (Fig. C)
• To turn Slope Measurement On/Off:
NOTE: The slope measurement & adjusted yardage will appear in the bottom right corner of the LCD display when the function is enabled
- With the unit off, HOLD the Power Button for three seconds until the slope function appears in the bottom right corner of the LCD display. Once the slope function appears, RELEASE the Power Button.
-
Repeat this process if you need to turn The Slope Measurement off. The Slope function will not appear unless enabled.
-
Unit of Measure - To change the unit of measure from Yards to Meters, start with the device powered off. Then HOLD the Power Button for 7 sec. The unit of measure is indicated by a "Y" or "M" shown directly to the right of the distance displayed.
OPERATIONAL NOTES
- The maximum measurement range is 5-950 yards to objects and 5-300 yards to a flagstick with +/- 1 yard accuracy.
NOTE: Maximum range can depend on several factors, including target characteristics and environmental conditions. For instance, longer maximum distances may be obtained to targets that are large in size, brightly colored, or have a reflective finish. Ranging capability can also be affected by the angle to the target and lighting conditions.
- Auto Shutoff - To conserve battery life, the device will automatically power off when idle for more than 10 seconds.
- Weather Conditions - Heavy rain and thick fog can potentially limit the maximum range of the device.
- Weather Resistant - Protected against light rain.
STORING THE LASER
- Do not leave the eyepiece in direct sunlight. The condenser effect of the lens may damage the internal display surface.

MAINTENANCE
- To clean, use only a soft, clean cloth to prevent scratches.
- Do not submerge in liquid or apply any cleaning products.
- Do not store in extremely hot/cold temperatures (<50°F ->110°F).
- Store in carrying case when not in use.
TROUBLESHOOTING
Rangefinder is consistently providing inaccurate measurements.
- Make sure the device is set to the desired unit of measure (Yards or Meters).
- Weak battery signal can affect the accuracy of the device. If the Low Battery Indicator is present on the LCD display, replace the battery.
- Make sure there isn't anything obstructing your view such as leaves, branches, your finger, etc.
When looking through the Eye Piece, the view is blurry.
- Use the Diopter Adjustment by turning the Eye Piece to focus/increase clarity.
- Make sure there isn't anything obstructing your view such as leaves, branches, your finger, etc.
- Use a soft, clean cloth to clean lens.
When should the battery be replaced?
- If the Low Battery Indicator is present on the LCD display.
- If the rangefinder is consistently providing inaccurate measurements.
- If the LCD display is not present when PRESSING the Power Button.
What type of battery does the rangefinder use?
• CR2 3-Volt Lithium Battery.
TROUBLESHOOTING (CONTINUED)
When should P.A.T. Mode be used?
- When measuring the distance to smaller targets such as a flagstick.
- When scanning the landscape to measure distances to a smaller target such as a flagstick and there are trees or other objects in the background.
If you have any other questions or concerns, please call 1-888-606-4634 or go to www.callawaydmd.com.
WARRANTY POLICY
This product is warranted to be free from defects for up to (1) year from the original purchase date. IZZO Golf cannot refund your purchase unless purchased directly from IZZO Golf. IZZO Golf will replace or repair any unit that is determined defective under normal use within the warranty period. Please call Customer Service at 888-606-4634 to request a Return Authorization. All defective products must be returned to:
IZZO Golf
Attn: Returns Dept.
1635 Commons Parkway
Macedon, NY 14502
Please include a note with your Name, Address, Phone # and the Return Authorization #. Your replacement will be shipped once we diagnose the returned unit.
WARNING
- NEVER look directly into the sun or intense light when using the laser rangefinder.
• DO NOT aim/point laser rangefinder at another person. - DO NOT aim/point laser rangefinder at anyone's eyes or face.
• DO NOT attempt to disassemble the laser rangefinder.
• DO NOT submerge in any liquid. - DO NOT store the laser rangefinder in extreme cold/hot temperatures (<50°F - >110°F).
FC CE FDA
IZZO GOLF, INC.
Tel:888-606-4634

1635 Commons Parkway Macedon, NY 14502 CLASS 1 LASER PRODUCT INVISIBLE LASER RADIATION AVOID DIRECT EXPOSURE
Complies with FDA performance standards for laser products except for deviations pursuant to Laser Notice No. 50, dated June 24, 2007 905 nm, Max < LmW
© 2019 CALLAWAY GOLF COMPANY. Callaway Golf and the Chevron device are trademarks of Callaway Golf Company. IZZO Golf is an official licensee of Callaway Golf Company.
Callaway
FC CE FDA
IZZO GOLF, INC.
Tel:888-606-4634


1635 Commons Parkway Macedon, NY 14502 CLASS 1 LASER PRODUCT INVISIBLE LASER RADIATION AVOID DIRECT EXPOSURE
Complies with FDA performance standards for laser products except for deviations pursuant to Laser Notice No. 50, dated June 24, 2007 905nm, Max <1mW
© 2019 CALLAWAY GOLF COMPANY. Callaway Golf and the Chevron device are trademarks of Callaway Golf Company. IZZO Golf is an official licensee of Callaway Golf Company.




- INTRODUCTION
- INCLUDES
- BATTERY INSTALLATION
- RANGEFINDER DIAGRAM
- HOW TO USE
- MEASUREMENT MODES
- OPERATIONAL NOTES
- STORING THE LASER
- MAINTENANCE
- TROUBLESHOOTING
- Rangefinder is consistently providing inaccurate measurements.
- When looking through the Eye Piece, the view is blurry.
- When should the battery be replaced?
- What type of battery does the rangefinder use?
- TROUBLESHOOTING (CONTINUED)
- When should P.A.T. Mode be used?
- WARRANTY POLICY
- WARNING
- FC CE FDA
- Callaway
Brand : Callaway
Model : 250+
Category : Rangefinder