— Soundbar — Mode d'emploi PDF")
LIFE E64058 (MD 80022) - Soundbar MEDION - Free user manual and instructions
Find the device manual for free LIFE E64058 (MD 80022) MEDION in PDF.
| Product type | 2.0 Soundbar |
| Brand | Medion |
| Model | LIFE E64058 (MD 80022) |
| Dimensions (soundbar) | 835 x 60 x 60 mm |
| Dimensions (speaker columns) | 60 x 435 x 60 mm (each) |
| Power supply | 220-240 V ~ 50/60 Hz |
| Power consumption | 30 W |
| Output power | 2 x 20 W RMS |
| Wireless connectivity | Bluetooth 3.0 + EDR, NFC |
| Bluetooth range | Up to 8 m (depending on environmental conditions) |
| Audio inputs | AUX (3.5 mm jack), optical, HDMI ARC (with CEC) |
| Sound functions | Flat, Music, Movie modes |
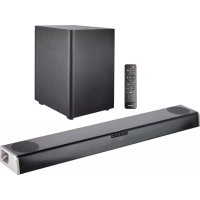
| Package contents | 2 soundbars, power cord, audio cable (3.5 mm jack), 2 feet, mounting hardware, remote control with CR2025 battery |
| Remote control | CR2025 button cell included, range approx. 6 m |
| Wall mounting | Possible with supplied brackets (screw distance: 744 mm) |
| Care and cleaning | Clean with a dry cloth, avoid solvents and corrosive products |
| Safety | Do not open the casing, avoid moisture, do not expose to heat sources |
| Repairability | Have any repairs carried out by an approved professional (contact Medion) |
| Intended use | Domestic use, indoor only |
Frequently Asked Questions - LIFE E64058 (MD 80022) MEDION
User questions about LIFE E64058 (MD 80022) MEDION
0 question about this device. Answer the ones you know or ask your own.
Ask a new question about this device
Download the instructions for your Soundbar in PDF format for free! Find your manual LIFE E64058 (MD 80022) - MEDION and take your electronic device back in hand. On this page are published all the documents necessary for the use of your device. LIFE E64058 (MD 80022) by MEDION.
USER MANUAL LIFE E64058 (MD 80022) MEDION
natural_image
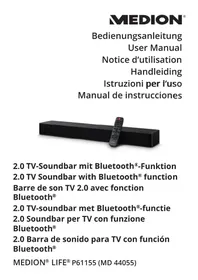
Black rectangular TV with a silver tab and control knob, shown from front and side (no text or symbols visible)TV-Soundbar mit Bluetooth-Funktion Barre de son TV avec fonction Bluetooth TV-Soundbar met Bluetooth 2.0 Channel Soundbar with Bluetooth
MEDION® LIFE® E64058 (MD 80022)
Inhalt
1. Allgemeines 5
natural_image
Simple line drawing of a hand pressing a button on a device (no text or symbols)

natural_image
Technical line drawing of a cylindrical mechanical component with internal components and directional arrows indicating movement (no text or symbols)natural_image
Illustration of a flat-screen TV mounted on a cylindrical base (no text or symbols)natural_image
Diagram of a mechanical device with a magnified inset showing internal components (no text or symbols)natural_image
Technical line drawing of a mechanical assembly with a tool and component, no visible text or symbols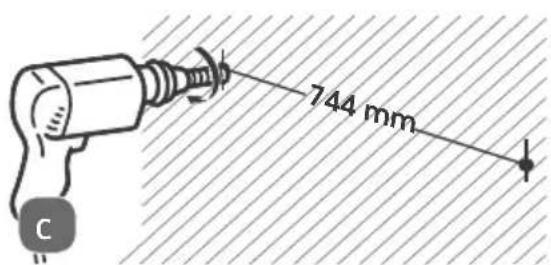
natural_image
Illustration of a hand using a hammer to measure a surface with diagonal hatching (no text or symbols)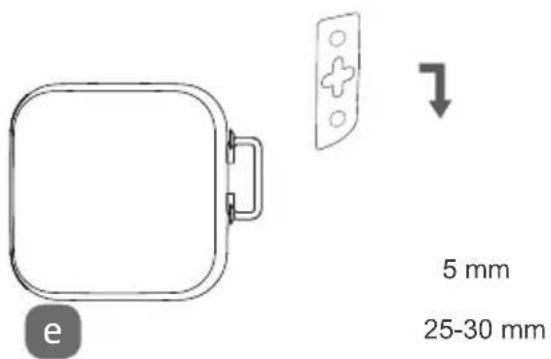
Bluetooth Profile: A2DP, AVRCP, NFC
natural_image
Diagram of a hand holding a device with a lightning bolt indicating rotation (no text or symbols)natural_image
Technical line drawing of a cylindrical mechanical component with internal components and directional arrows, no text or symbols present.natural_image
Illustration of a flat-screen TV mounted on a cylindrical base (no text or symbols)natural_image
Technical illustration of a mechanical device with a tool and circular motion arrow (no text or symbols)natural_image
Technical line drawing of a mechanical assembly with a circular inset showing a component (no text or symbols)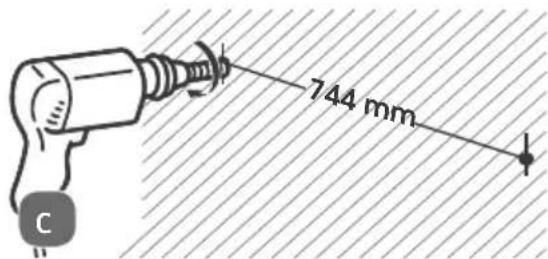
natural_image
Illustration of a hand using a hammer to cut a surface with diagonal hatching (no text or symbols)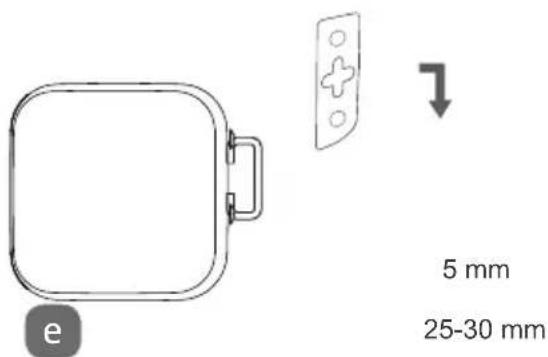
natural_image
Line drawing of a hand pressing a button with a downward arrow indicating motion (no text or symbols)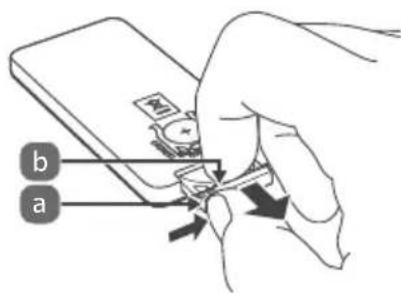
7. Soundbar monteren
natural_image
Technical line drawing of a cylindrical mechanical component with internal components and directional arrows, no text or symbols present.natural_image
Illustration of a flat-screen TV mounted on a cylindrical base (no text or symbols)natural_image
Technical illustration of a mechanical device with a circular component and directional arrows indicating motion (no text or symbols)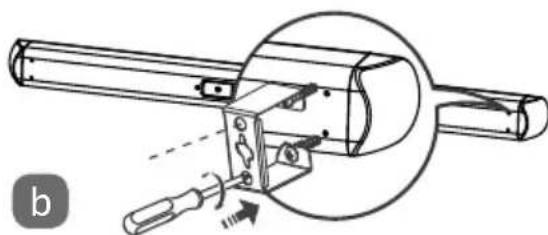
natural_image
Technical line drawing of a mechanical assembly with a tool and component, no visible text or symbolsnatural_image
Illustration of a hand holding a hammer with a nail, next to a hatched background (no text or symbols)
1.1. Reading and safekeeping of operating instructions 83
1.2. Explanation of symbols 83
2. Package contents
3. Proper use
4. Safety information
4.1. Safe installation 8
4.2. Power supply....87
4.3. Handling batteries....88
4.4. Repairs....88
5. Product diagram....89
5.1. Remote control....90
6. Inserting the batteries in the remote control .....91
7. Installing the sound bar....91
7.1. Upright loudspeakers 92
7.2. Horizontal sound bar 92
7.3. Wall-mounted sound bar 93
8. Connecting audio equipment 94
8.1. AUX connections....95
8.2. Optical connections....96
8.3. HDMI (ARC) connections....96
9. Bluetooth connection....97
9.1. NFC-enabled smart device 98
10. Sound bar mains connection 99
11. Switching on the sound bar 99
12. Audio source selection ....100
13. Volume setting....100
14. Audio playback in AUX/Bluetooth mode 100
15. Sound effect setting 101
- Maintenance 101
- Cleaning 101
- Troubleshooting 101
- Disposal 102
- Technical data 103
- Conformity information....103
- Legal notice 104
1. General points
1.1. Reading and safekeeping of operating instructions

These operating instructions relate to the MD 80022 sound bar. They contain important information about set-up and operation.
Please read this information through carefully and follow all the instructions given in order to guarantee reliable operation and a longer life expectancy for the loudspeakers. Always store these instructions near the loudspeakers. Keep the operating instructions so that you can pass them on with the loudspeakers if you sell them.
1.2. Explanation of symbols
The following symbols and keywords are used in these operating instructions, on the sound bar or on the packaging.

DANGER!
Warning of immediate risk of fatal injury!
WARNING!
Warning of possible risk of fatal injury and/or serious irreversible injuries!

CAUTION!
Please follow the instructions to prevent injuries and property damage!
IMPORTANT!
Please follow the instructions to avoid property damage!

PLEASE NOTE!
Additional information on using the product.
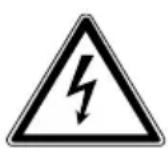
WARNING!
Warning of risk of electric shock!

Heed the advice in the operating instructions

Recycling symbol
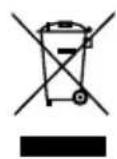
WEEE symbol (in accordance with the directive on electrical waste)
Symbol indicating that batteries must be disposed of separately
DC current
2. Package contents
After unpacking the product, please ensure that the following parts have been supplied:
- 2x sound bar
- Mains cable
• Audio cable (cinch -> 3.5 mm jack) - 2x stand
- Fixing material
- Remote control including battery (3V CR2025 button cell, already fitted)
- Operating instructions, including warranty card
3. Proper use
The product is used to transmit audio signals. The sound bar is designed to be connected to televisions. Other units can be connected, such as portable CD players, MP3 players, computers, notebooks, smartphones and stereo systems.
The product is intended for private use only and not for industrial/commercial use.
Please note that we shall not be liable in cases of improper use: - Do not modify the product without our consent and do not use any auxiliary equipment which we have not approved or supplied.
- Use only spare parts and accessories that we have supplied or approved.
- Heed all the information in these operating instructions, especially the safety information. Any other use is deemed improper and can cause personal injury or property damage.
- Do not use the product in areas where there is a risk of explosion, e.g. tank systems, fuel storage depots, or areas in which solvents are being used. Nor may the product be used in areas where the air is contaminated with fine particles (e.g. flour dust or sawdust).
- Do not expose the product to extreme conditions; it is intended for indoor use only.
The following should be avoided:
• High levels of humidity or moisture
- Extremely high or low temperatures
- Direct sunlight
- Naked flames
4. Safety information

DANGER Risk of suffocation!
There is a risk of suffocation from plastic packaging.
- You should therefore keep plastic packaging out of the reach of children.

WARNING Risk of injury due to improper handling
- This product is not intended for use by people (including children) with reduced physical, sensory or mental abilities or by people who lack the experience or knowledge to use it, unless they are supervised by a person responsible for their safety or have been instructed on its use.
- Do not let children play with electrical devices without supervision. Children are not always aware of potential hazards.
4.1. Safe installation

WARNING
Risk of injury from electric shock!
There is a risk of electric shock from live wires.
- Choose a suitable location to install the product and take care not to damage any concealed electric or wiring cables when drilling.

IMPORTANT
Product may be damaged by improper handling
- In the first few hours of use, new products can give off a typical, unavoidable but totally harmless smell which wears off with time.
We recommend that you ventilate the room at regular intervals to counteract the smell. We have taken appropriate measures during the development of this product to ensure that levels are well below legal limits.
- Do not place containers filled with liquid, such as vases, on or in the vicinity of the product and the mains cable. The container may tip over and the liquid may impair the electrical safety of the product.
- Protect the product and all connected devices from moisture and water in droplet and spray form. To prevent malfunctions, avoid dust, heat and direct sunlight.
- Do not place naked flames, such as lit candles, on or near the product.
- Do not cover the mains plug on the product with objects (newspapers, blankets, etc.) in order to avoid overheating.
- Do not place any objects on the cables as they may be damaged.
- Set up and operate all the components on a stable, level and vibration-free surface to prevent the product from falling down.
- Keep the product at a distance of at least one metre from high-frequency and magnetic sources of interference (televisions, other loudspeakers, mobile telephones, etc.) in order to prevent malfunctions.
4.2. Power supply

DANGER
Risk of injury from electric shock!
- The sockets must be close to the product and easily accessible. Position the cables so that they cannot be stepped on or tripped over.
- To disconnect the power supply from the product, pull the mains plug on the product from the socket outlet. Always hold the plug firmly when unplugging it from the socket. To prevent damage, never pull on the cable.
- Only operate the product on earthed 220-240 V \~ 50/60 Hz sockets. If you are not sure about the power supply at the place of installation and use, please ask your power supplier.
- Do not continue to use the mains plug on the product if the housing or the supply lead to the product is damaged.
- Never open the product housing. Touching live parts or modifying the electrical or mechanical assembly could put you at risk and cause the product to malfunction.

IMPORTANT
Product may be damaged by improper handling
- Unplug the product from the mains during a storm or when it is not going to be used for an extended period.
- When not in use, pull the mains plug from the socket outlet or use a master-slave power strip to prevent power consump-
tion when switched off.
4.3. Handling batteries
The remote control for the product is battery-operated.

WARNING
Risk of injury due to improper handling
- Do not throw batteries into naked flames, do not short circuit or use force to open them.
- Never attempt to charge the batteries – risk of explosion!
- Ensure correct polarity.
- Use approved batteries only.
- Always use batteries of the same type.
- Keep batteries away from children (risk of swallowing). In the event of swallowing, seek medical advice immediately.
- Remove the batteries if you are not going to use the product for an extended period of time.
- Never expose the batteries to excessive heat, such as sunshine, fire or similar sources!
- Remove flat or leaking batteries from the product immediately. Avoid contact with skin, eyes and mucous membranes. In the event of contact, rinse the affected areas with plenty of clean water and consult a doctor immediately.
Clean the contacts before inserting new batteries. There is a risk of chemical burns from battery acid. - Remove flat or leaking batteries from the product and dispose of them in an environmentally friendly manner.
4.4. Repairs
Please contact our service centre if you have technical problems with the product.
5. Product diagram
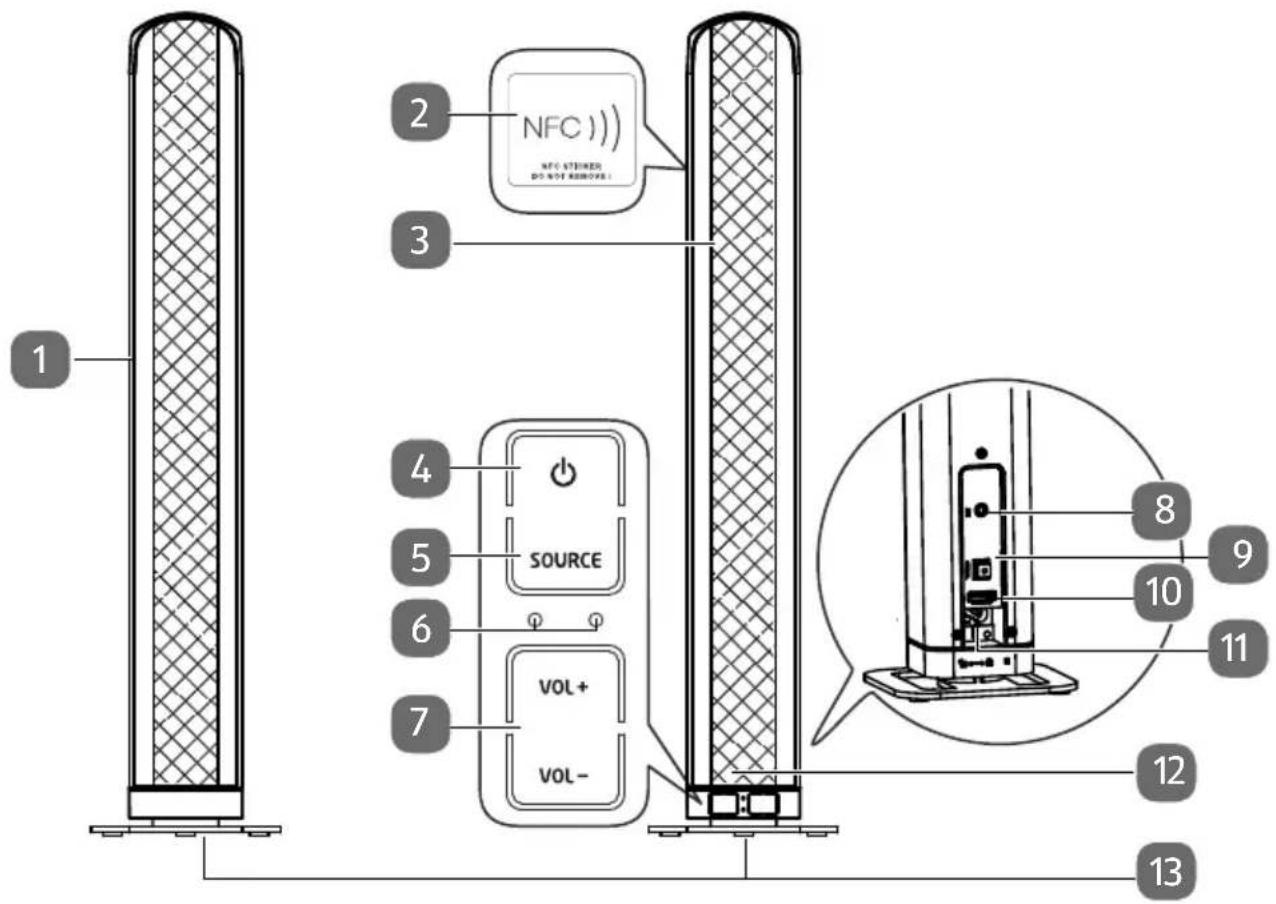
1 Left loudspeaker
2 NFC zone (Near Field Communication)
3 Right loudspeaker
4 ⏻: On/off switch
5 SOURCE: Audio source selector
6 LED operating displays
7 VOL+/VOL-: Volume control
8 AUX: Socket for TV and other audio equipment
9 OPTICAL: Optical input for TV and other audio equipment
10 HDMI: Input for (ARC-capable) TV, computer and other audio equipment
11 AC\~: Mains cable socket
12 Remote control sensor
13 Stand
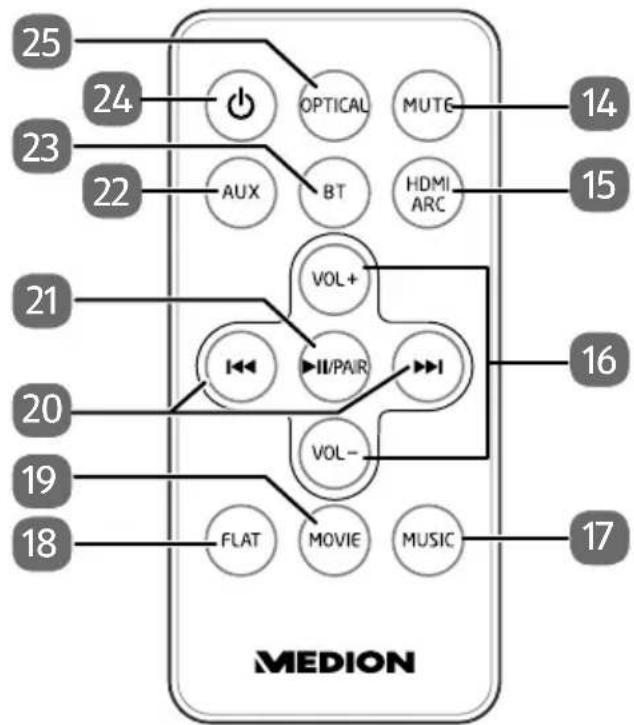
5.1. Remote control
flowchart
graph TD
    A["OPTICAL"] --> B["AUX"]
    C["BT"] --> D["HVOL+"]
    E["MUTG"] --> F["HDMI ARC"]
    G["VOL-"] --> H["II/PAIR"]
    I["FLAT"] --> J["MOVIE"]
    K["MUSIC"] --> L["MUSIC"]
    M["14"] --> N["15"]
    O["16"] --> P["17"]
    Q["21"] --> R["20"]
    S["22"] --> T["23"]
    U["23"] --> V["24"]
    W["25"] --> X["24"]
14 MUTE: Mute switch
15 HDMI ARC: HDMI ARC input selector
16 VOL+/VOL-: Volume control
17 MUSIC sound effect setting
18 FLAT setting (no sound effects)
19 MOVIE sound effect setting
20 I◄◄/►.► previous track/next track
21 ▶II: Play/Pause: Start/stop audio playback; PAIR: Establish Bluetooth connection
22 AUX: AUX input selector
23 BT: Select Bluetooth mode
24 ⏻: On/off switch
25 OPTICAL: Optical input selector
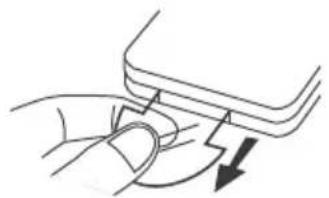
6. Inserting the batteries in the remote control
The remote control is supplied with a 3V CR2025 lithium battery already inserted.

NOTE
When you use the remote control for the first time, pull out the transparent strip without opening the battery compartment.
natural_image
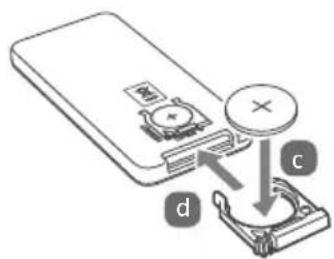
Line drawing of a hand pressing a button with a downward arrow (no text or symbols)If the product fails to respond or is slow to respond to the remote control, you will need to change the battery. Proceed as follows to change the battery:
-
Press the catch (b) and remove the battery holder complete with battery (a) from the remote control. Comply with the legal requirements when disposing of the used battery.
-
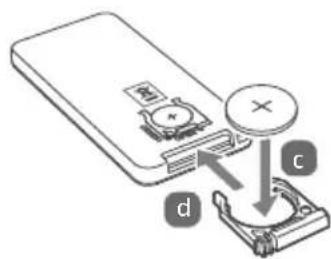
Insert a new 3V CR2025 battery in the holder (c) with the positive terminal facing upwards. Always make sure the battery is the right way round.
-
Push the battery holder complete with battery back into the remote control slot (d) as far as it will go.

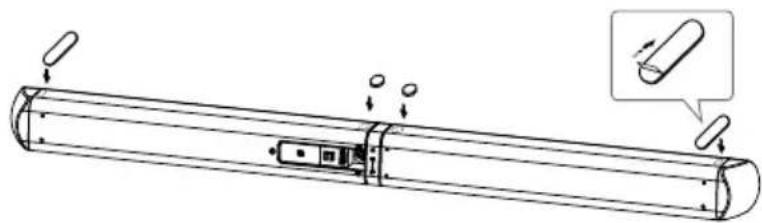
7. Installing the sound bar
There are three different ways in which you can use the sound bar: upright as two tower loudspeakers, horizontal or mounted on the wall.
7.1. Upright loudspeakers

- Take the right 3 and left 1 loudspeakers and connect each of them with the matching stand 13.
- Make sure that the loudspeaker connection matches the connection on the stand (see Figs. a and b).
- Hold the stand firmly and turn the loudspeaker towards the closed pad-lock symbol.
- Place the loudspeakers on a firm, even surface near a plug socket.
- Connect the cables on both loudspeakers as illustrated in Fig. c.
7.2. Horizontal sound bar
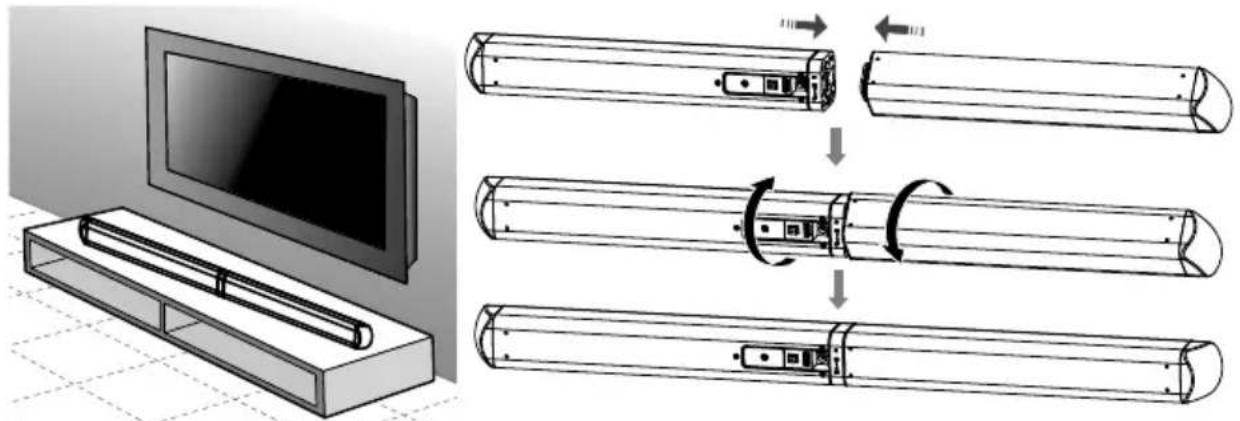
- Take both loudspeakers and connect them as shown in the diagram.
- Make sure that the connection on one loudspeaker matches the connection on the other.
- Hold one loudspeaker firmly and turn the other towards the closed pad-lock symbol.
natural_image
Technical line drawing of a cylindrical mechanical component with internal components and mounting holes, shown with an inset magnified view (no text or symbols)- Stick the rubber pads to the underside of the sound bar as illustrated above.
- Place the sound bar on a firm, even surface near a plug socket.
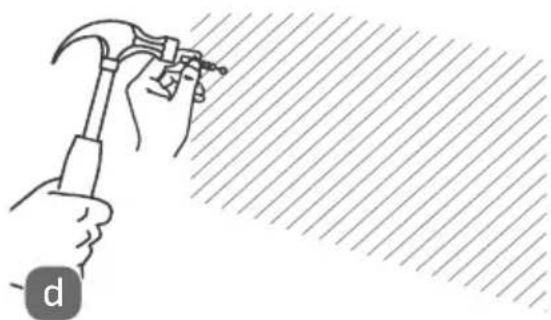
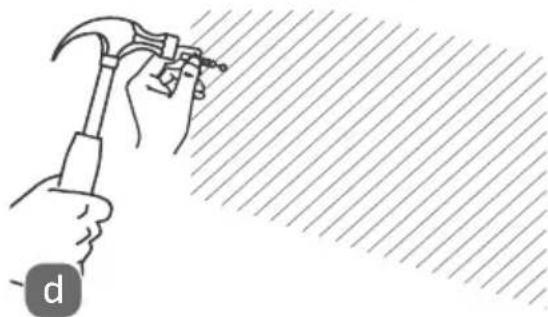
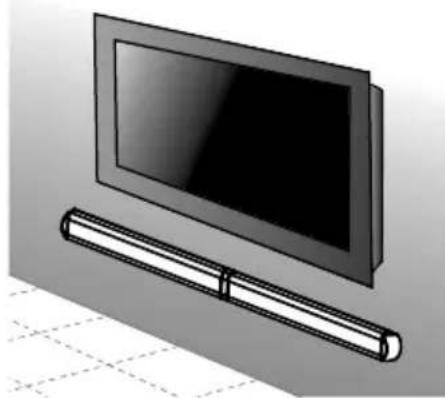
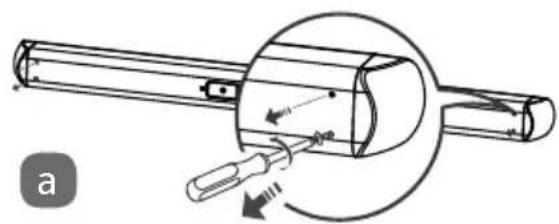
7.3. Wall-mounted sound bar
natural_image
Illustration of a flat-screen TV mounted on a wall-mounted cable (no text or symbols visible)First connect the two loudspeakers as shown in section "7.2. Horizontal sound bar".
WARNING Risk of injury from electric shock!
There is a risk of electric shock from live wires.
- Choose a suitable location to install the product and take care not to damage any concealed electric or wiring cables when drilling.
-
Remove the two screws at each end of the sound bar.
-
Screw the two wall mountings on the ends of the sound bar with the screws which you have just removed.
-
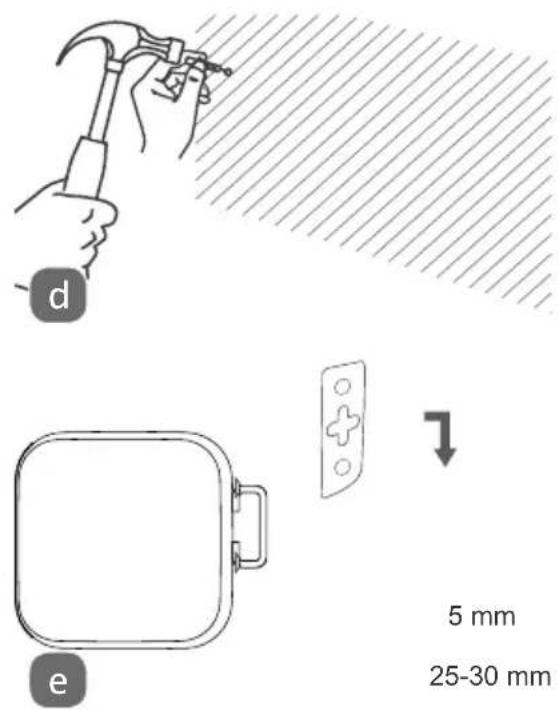
Drill two parallel holes in the wall (∅ 3-8 mm depending on the type of wall), allowing a distance of 744 mm between the holes.
natural_image
Diagram of a mechanical device with a tool inserted, showing motion direction (no text or symbols)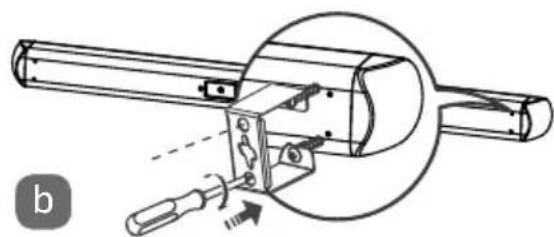
natural_image
Technical line drawing of a mechanical assembly with a circular inset showing a component (no text or symbols)
-
Insert wall plugs in the holes. Fit the screws in the wall plugs leaving the heads about 5 mm from the wall.
-
Fit the sound bar on the screw heads by the wall mountings and push the sound bar down slightly until the screws engage in the wall mountings.
8. Connecting audio equipment
- Please read the instructions in section "4. Safety information" (Page 83 ff.).
- Please also read the operating instructions of the device to which you want to connect the sound bar.
- Switch off all the devices before connecting them to each other.
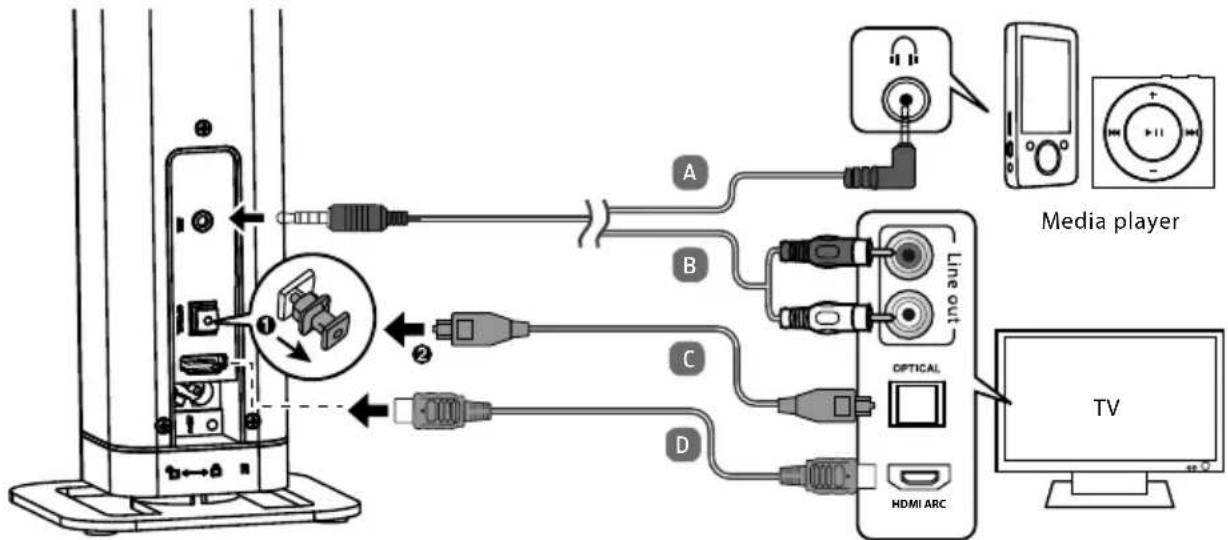
You can connect a number of different audio devices to this product, e.g. an MP3 player, a CD player, the receiver of your stereo system, a computer or even your television.
8.1. AUX connections
8.1.1. Audio cable with 2 x 3.5mm ∅ jack
You will need an audio cable with a 2 x 3.5mm ∅ jack (supplied with the product) to connect to a headphone socket, e.g. on a CD player or MP3 player (see connection A in diagram).
- Set the volume to medium on the MP3 player. Then switch it off.
- Plug the jack into the AUX socket on the sound bar.
- Plug the connector into the headphone output socket on the MP3 player.
8.1.2. Audio cable with cinch connectors
You will need an audio cable with cinch connectors (1 x 3.5mm jack -> 2 x cinch) (see connection B in diagram).
- Set the audio device to a medium volume. Then switch it off.
- Plug the single cinch connector into the AUX socket on the sound bar.
- Then plug the red and the white cinch connectors on the other end of the cable into the audio output sockets of the corresponding colours on the output device.

NOTE
Pieces of equipment like stereo receivers or television sets usually have one red and one white audio output socket. These are usually marked OUT, AUDIO OUT, LINE OUT or similar.
8.2. Optical connections
The OPTICAL connection can be used for digital amplifiers or television sets (see connection C in diagram). You will need an optical digital cable (fi-bre-optic cable – not supplied with the product – available from specialist retailers).
- Set the audio device to a medium volume. Then switch it off.
- Remove the protective cap from the optical connection. Plug the connector into the OPTICAL socket on the soundbase.
- Plug the connector into the corresponding digital output socket on your digital receiver or television set.

NOTE
If no audio signals are emitted, switch the output audio format on your output device to PCM mode (Pulse Code Modulation).
8.3. HDMI (ARC) connections
You will need an HDMI cable (see connection D in diagram). The HDMI cable is not supplied with the product.
- Set the audio device to a medium volume. Then switch it off.
- Connect the HDMI port to the HDMI IN socket on your television set.
- Activate the ARC and CEC functions and switch the audio output to PCM on the connected devices, referring to the operating instructions for these devices.
With ARC it is possible with two connected devices not only to receive audio signals via HDMI but to send them back again via the same cable.
CEC (Consumer Electronics Control) enables the communication of all devices connected via HDMI. This connection then allows you to control the volume and mute setting with the remote control for the television.

NOTE
ARC only works with devices which are HDMI ARC-capable and with an HDMI 1.4 cable (or higher).
9. Bluetooth connection
The Bluetooth mode enables the wireless reception of audio signals from an external Bluetooth-compatible audio output device. Please note that the distance between the two devices should not exceed eight metres.
Follow the instructions below to connect a Bluetooth-compatible audio output device:
- Switch the sound bar on by pressing the ⏻ button on the product or on the remote control.
- Then press the Source button on the sound bar or the BT button on the remote control until the power light turns blue and flashes slowly.
- If the product is not in search mode, press and hold the PAIR button on the remote control for about 3 seconds.
- When the product is in search mode you will hear the message PAIRED.
- Switch on the Bluetooth function on your audio output device and activate the search mode in order to pair the devices with one another.

NOTE
If necessary, please refer to the relevant operating instructions for information on the Bluetooth function on your audio output device.
The sound bar name MD 80022 will be displayed as soon as the signal is found.
If you are asked for a password, please enter 0000.
The pairing process is complete when you hear the message PAIRED and the power light turns blue.
If the connection is interrupted, you will hear the word DISCONNECTED.
9.1. NFC-enabled smart device
The NFC function (Near Field Communication) enables the wireless reception of close-range audio signals from an NFC-enabled audio output device.
- Switch the sound bar on by pressing the button on the product or on the remote control.
- Then press the Source button on the sound bar or the BT button on the remote control until the power light turns blue and flashes slowly.
- Switch on the NFC function and Bluetooth function on your smart device. The device is in search mode.
- Hold your NFC-enabled smartphone in the immediate vicinity of the sound bar over the zone marked 2.
- When asked to respond to the prompt Connect to MD 80022, press Yes to confirm. Wait 5 to 8 seconds until you have moved your smart device away from the loudspeaker.
The pairing process is complete when you hear the message PAIRED and the power light turns blue. - Select a medium volume level and start playback on your smart device.
- To disconnect the devices, hold your smart device over the marked zone again until you hear the message DISCONNECTED.
10. Sound bar mains connection
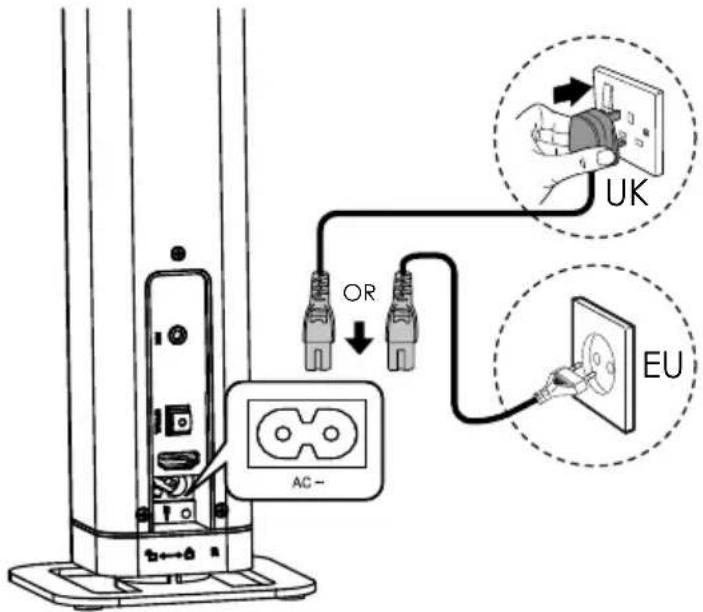
- Connect the power lead in the AC\~ socket for mains cables.
- Make sure that all the required devices are connected.
- Plug the power lead into a 220-240 V \~ 50/60 Hz socket.
11. Switching on the sound bar
- Switch the sound bar on by pressing the button on the remote control or on the sound bar.
- Switch on the audio device, select a medium volume and start playback.

NOTE
If there is a TV or external device connected via the AUX or HDMI sockets, the sound bar will switch on automatically after a few moments if the television or external device is switched on.
If the TV or external device is disconnected or switched off, the sound bar will switch itself off automatically after about 15 minutes.
The sound bar will also switch off after about 15 minutes if the volume on the television or external device is too low (only if connected via the AUX socket).
12. Audio source selection
Select the required audio source (AUX, BT, HDMI ARC or Optical) by pressing the SOURCE button on the sound bar or the OPTICAL, AUX, BT or HDMI ARC buttons on the remote control.
The operating mode selected in any given case is displayed by the coloured LED indicators 6:
| Power light Flashing Permanently on | |
| Red Standby | |
| Green HDMI AUX | |
| Orange Optical | |
| Blue Bluetooth |
13. Volume setting
Use the VOL+/VOL- buttons on the sound bar or on the remote control to adjust the volume to the required level:
- Increase volume
- Reduce volume
The volume can be turned off completely by pressing the MUTE button on the remote control.
Press the MUTE button again to restore the audio output.
14. Audio playback in AUX/Bluetooth mode
If you have connected the sound bar to a device which supports the A2DP profile and AVRCP profile (Audio/Video Remote Control), the sound bar will be used as an output medium and the audio signals will be emitted by the sound bar only.

NOTE
If you have connected the sound bar to a Bluetooth-enabled mobile telephone, the music playback will be interrupted if a call comes in and resumed after the call has ended.
Press the ▶ button on the remote control to start or stop the audio playback.
Press the I buttons on the remote control to select tracks as required:
▶▶I button next track
◀◀ button previous track
15. Sound eff ect setting
The buttons FLAT, MOVIE and MUSIC on the remote control are used to switch on the MOVIE or MUSIC sound effect or to switch the sound effect back off (FLAT).
16. Maintenance

WARNING
Risk of injury from electric shock!
- Never try to open or repair the product yourself. There is a risk of electric shock!
Please contact our Service Centre if you have any technical problems with the product. Repairs should be performed by our authorised service partners only.
Please contact your customer service centre in the following cases:
- Fluid has seeped inside the product.
- The product is not working properly.
- The product has fallen or the housing is damaged.
17. Cleaning
- Do not use solvents, corrosive agents or aerosol-based cleaning agents. Pieces of furniture often have various varnish finishes or synthetic coatings and are treated with a wide range of care products. Some of these substances contain components which can affect and weaken the loudspeaker feet.
- Use a non-slip underlay to prevent this problem where applicable.
18. Troubleshooting
If the product malfunctions, please check first if you can remedy the
problem yourself with the help of the following hints.
Never try to repair the product yourself. Please contact our Service Centre or another professional repair shop if a repair is necessary.
| Problem Remedy | |
| Fault with connections and cables | - Check all the cable connections for signs of damage. Check that the cabling is correct. Check the Bluetooth connection.- Make sure that all the connected devices are being supplied with power. |
| No sound Check the volume | on the output device. Increase the volume if necessary. |
| Distorted sound - Change | the position of the sound bar in order to avoid interference from external sources.- Clear the area around the product of any potential sources of interference (mobile telephones, etc.). |
19. Disposal
Packaging

Packaging and packaging materials which are no longer required can and should be recycled.
Correct disposal of this product
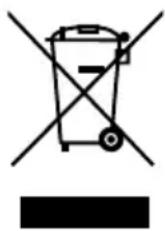
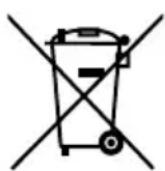
Within the EU this symbol indicates that this product may not be thrown away with the household refuse. Old devices contain valuable recyclable materials which should be disposed of through the proper channels in the interests of the environment and human health. Therefore please use the collection systems provided or send the product back to the place where you bought it so that it can be disposed of correctly and recycled as appropriate.
Batteries
Do not dispose of used batteries and defective rechargeable batteries in the household rubbish. Take the batteries to a collection point for used batteries.
20. Technical data
Mains connection 220-240 V \~ 50/60 Hz
Power output: Loudspeakers: 2 x 20W RMS
Rated input: 30 W
Connections: 1 x 3.5mm audio input jack
1 digital audio input (optical)
HDMI (ARC) with CEC
Mains cable connection
Bluetooth specification: V3.0 + EDR, Class II
Bluetooth profile: A2DP, AVRCP, NFC
Range: Max. 8 m (depending on ambient conditions)
Dimensions (WxHxD) 835 x 60 x 60 mm as sound bar
60 x 435 x 60 mm as upright loudspeaker
100 x 100 mm stand
Remote control: 1 x 3 V
battery, CR2025 button cell
(supplied with the product)
Range: approx. 6 m
21. Conformity information
C€0197 Medion AG hereby declares that the product MD 80022 complies with the following European requirements:
• R&TTE Directive 1999/5/EC
• EMC Directive 2004/108/EC
• Low Voltage Directive 2006/95/EC
• Ecodesign Directive 2009/125/EC
• RoHS Directive 2011/65/EU
Full declarations of conformity are available at www.medion.com/conformity.
22. Legal notice
Copyright © 2015
All rights reserved.
This operating manual is protected by copyright.
Mechanical, electronic and any other form of reproduction is prohibited without the written permission of the manufacturer
Copyright is owned by the company:
Medion AG
Am Zehnthof 77
45307 Essen
Germany
The operating manual can be reordered via the service hotline and is available for download via the service portal at www.medion.com/gb/service/start/.
You can also scan the QR code above and download the operating manual onto your mobile device via the service portal.