153015 - Rangefinder Westfalia - Free user manual and instructions
Find the device manual for free 153015 Westfalia in PDF.

| Product type | Laser distance meter |
| Brand | Westfalia |
| Model | 153015 |
| Measuring range | 0.05 m to 40 m |
| Accuracy | ±2 mm |
| Measurement units | meters, feet, inches |
| Laser class | 2 (red laser 650 nm) |
| Power supply | 2 AAA 1.5 V batteries |
| Battery life | Approx. 5000 measurements |
| Display | Backlit LCD screen |
| Main functions | Distance, area, volume measurement, continuous measurement, addition/subtraction, Min/Max, 20 measurement memory |
| Protection | IP54 (splash resistant) |
| Dimensions | 120 x 50 x 25 mm |
| Weight | Approx. 100 g |
| Material | ABS plastic |
| Maintenance and cleaning | Clean with a dry cloth; do not use solvents |
| Safety | Do not point laser at eyes; class 2 |
| Spare parts and repairability | Replacement batteries available; no user-serviceable parts; contact customer service |
Frequently Asked Questions - 153015 Westfalia
User questions about 153015 Westfalia
0 question about this device. Answer the ones you know or ask your own.
Ask a new question about this device
Download the instructions for your Rangefinder in PDF format for free! Find your manual 153015 - Westfalia and take your electronic device back in hand. On this page are published all the documents necessary for the use of your device. 153015 by Westfalia.
USER MANUAL 153015 Westfalia
text_image
Battery Tewler G/16 Vorr LASS CONTROL TWE SALAWA SALAWA SALAWA SALAWA SALAWA SALAWA SALAWA SALAWA SALAWA SALAWA SALAWA SALAWA SALAWA SALAWA SALAWA SALAWA SALAWA SALAWA SALAWA SALAWA SALAWB SALAWB SALAWB SALAWB SALAWB SALAWB SALAWB SALAWB SALAWB SALAWB SALAWB SALAWB SALAWB SALAWB SALAWB SALAWB SALAWB SALAWB SALAWB SALAWB SALAWBC SALAWBC SALAWBC SALAWBC SALAWBC SALAWBC SALAWBC SALAWBC SALAWBC SALAWBC SALAWBC SALAWBC SALAWBC SALAWBC SALAWBC SALAWBC SALAWBC SALAWBC SALAWBC SALAWBC SALAWSC SALAWSC SALAWSC SALAWSC SALAWSC SALAWSC SALAWSC SALAWSC SALAWSC SALAWSC SALAWSC SALAWSC SALAWSC SALAWSC SALAWSC SALAWSC SALAWSC SALAWSC SALAWSC SALAWSC SALAWC
Original Instructions
100 Ampere Battery Load Tester
Article No. 15 30 15


natural_image
Illustration of a person in camouflage gear using a tool to dig or write through water, with a hat nearby (no text or symbols)
Dear Customers
Instruction manuals provide valuable hints for using your new device. They enable you to use all functions, and they help you avoid misunderstandings and prevent damage.
Please take the time to read this manual carefully and keep it for future reference.
text_image
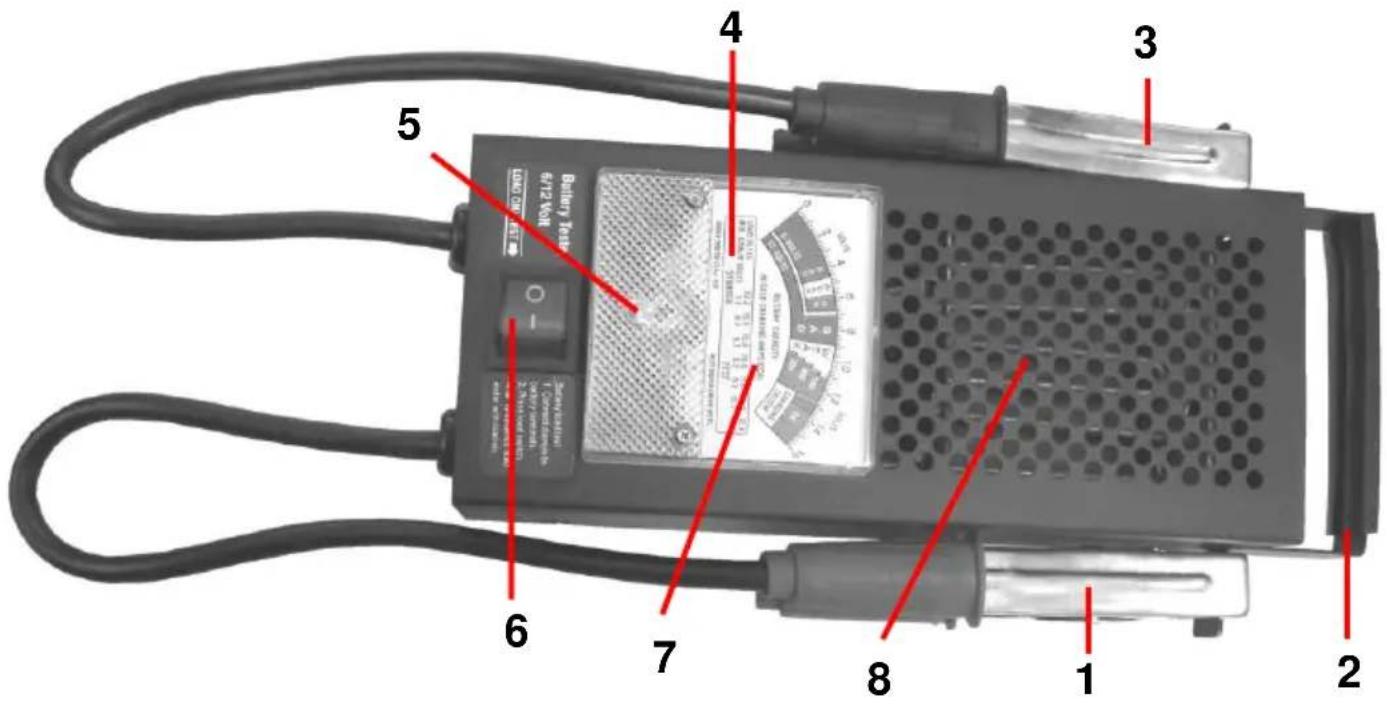
Battery Test 4/12 VAC Voltage Test 5 3 4 6 7 8 1 2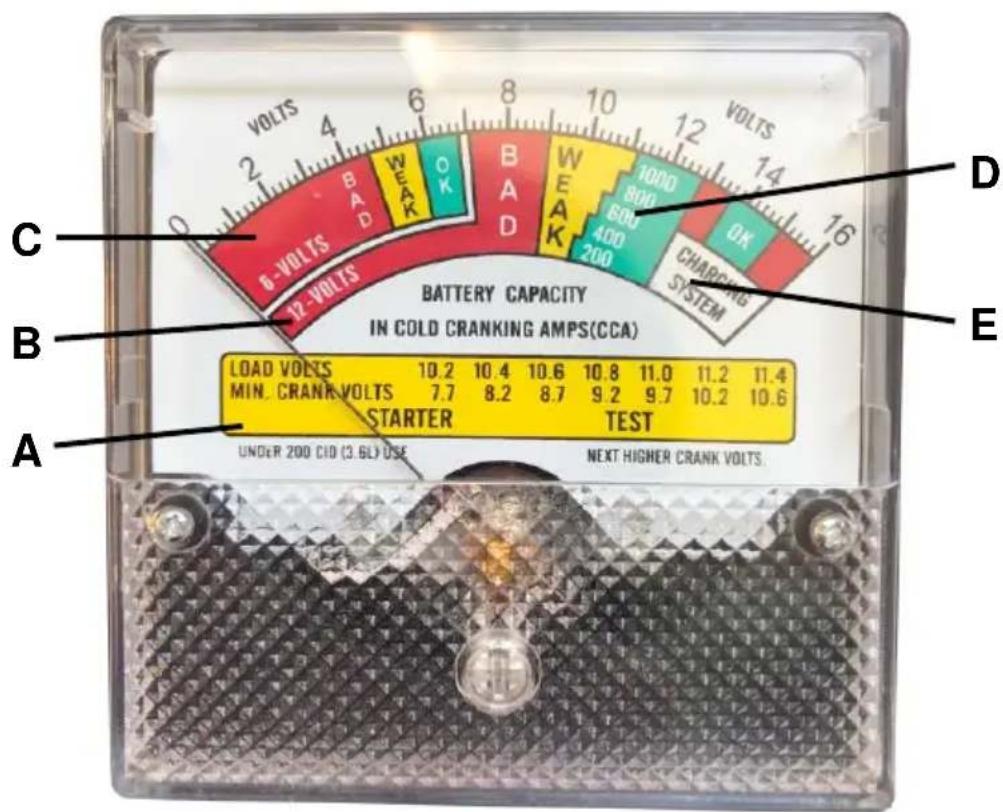
text_image
C 6-VOLTS BAD WEAK OK BAD WEAK 1000 800 60V 400 200 OK CHARGING SYSTEM BATTERY CAPACITY IN COLD CRANKING AMPS(CCA) LOAD VOLTS 10.2 10.4 10.6 10.8 11.0 11.2 11.4 MIN. CRANK VOLTS 7.7 8.2 8.7 9.2 9.7 10.2 10.6 STARTER TEST A UNDER 200 CID (3.6L) USE NEXT HIGHER CRANK VOLTS. D E


Additional Hints for Lead Acid Batteries......Page 14
Introduction......Page 15
Cold Cranking Amperes Page 15
Temperature Compensation......Page 15
Battery Load Test......Page 15
Measuring the specific Gravity for Battery Acid ...... Page 18
Starter Test......Page 18
Testing the Charging System......Page 19
Cleaning and Storing......Page 20
Technical Data ...... Page 21

Please note the following safety notes to avoid malfunctions, damage or physical injury:
- This manual belongs to the product. It contains important notes on operating the unit. Please pass it on along with the unit if it is handed over to a third party!
- Persons with limited physical, sensorial or mental abilities are not allowed to use the unit, unless they are supervised and briefed for their safety by a qualified person.
- Dispose of the packaging materials carefully; the plastic bags may become a deadly toy for children.
- Do not continue to use the battery load tester if the unit or the cables are damaged. Repair work must be done by a qualified service technician.
- Do not lead the cables over sharp edges and avoid contact with hot parts.
- The battery load tester may only be connected to the required voltage. Observe the technical data. Other use than described may lead to the damage of the testing object and the battery load tester.
- Do not undertake measurements in rain, storm, snowfall, moisture or high atmospheric humidity, e. g. fog.
- Always place the battery load tester on its rubber feet with the voltmeter facing upwards.
- Do not use the battery load tester in the vicinity of high HF radio frequency or magnetic fields to avoid possible fault readings.
- Never cover the battery load tester. The ventilation holes prevent the unit from becoming overheated and have to be free all the time.
- Keep flammable materials such as paper away from the unit. Do not use the battery load tester close to combustible liquids, gases, dust and vapours.
- If differences in temperature and condensation occur allow the battery load tester to come to room temperature and condensation to evaporate before using the unit.
- Do not expose the battery load tester to vibrations, moisture, splash water or heat.
Safety Notes
■ After each use disconnect the battery load tester from the test object.
- When measuring battery voltage under load on a motor vehicle, observe the following safety hints:
a) Always keep a carbon dioxide fire extinguisher permanently available.
b) Observe the rules for fire protection and store flammable materials and solvents in separate rooms.
c) When working in the engine bay always wear safety glasses and protective gloves to protect your eyes and hands from e. g. battery acid, gasoline and flying off motor parts.
d) Do not touch rotating parts when the motor is running.
e) Wear tight clothing, tie up long hair and remove jewellery such as necklaces and rings.
f) Ensure sufficient ventilation in confined rooms as exhaust fumes are extremely poisonous.
g) Avoid contact with exhaust pipe or cooling system. There is risk of burns!
h) Make sure the parking break is firmly set and the vehicle is in Park or Neutral position.
- Make sure the battery load tester is designed for testing the desired test object! In case of doubt ask a professional.
- If the battery load tester is damaged, does not work correctly or was stored under unfavourable conditions and it is ascertained that safe operation is no longer possible, do not use the unit further more.
- Always use the measuring cables attached tightly for your measurements and make sure the isolation of the cables is undamaged.
- Caution! Working in the vicinity of lead-acid batteries is dangerous! Therefore observe the additional hints for lead-acid batteries.
- Do not disassemble the unit or attempt to repair it yourself. It does not contain parts serviceable by you. In the case of questions or problems, turn to our customer support.

Additional Hints for Lead-acid Batteries
- During normal operation lead-acid batteries might generate explosive gases. Explosive gas can be ignited by a cigarette or an open flame and can damage the battery. Thereby acid will splash out and causes serve chemical burns!
- When handling lead-acid batteries always wear safety goggles and avoid contact of battery acid with skin and clothing. Wear safety gloves!
- Do not smoke in the vicinity of batteries. Avoid open flames.
- Ensure sufficient ventilation! Discharged lead-acid batteries freeze at extremely low temperatures! Never test a frozen lead-acid battery!
- Never place the battery load tester on the object to be tested! Never perform measurements on a lead-acid battery for more than 10 seconds.
- In case of eye contact with battery acid, flush eyes for at least 5 minutes with water and consult a physician! In no circumstances apply medication or eye drops without asking a physician.
- The efficiency of a lead-acid battery decreases with dropping temperatures. A fully charged battery has a capacity of 40 % at an ambient temperature of -18 °C.
- Most batteries are damaged while over charging.
- All batteries loose their charge after some time if temperature increases. Self-discharging of maintenance-free batteries is lower than discharging of common lead-acid batteries.
- Preferably store batteries in cool temperatures to avoid self-discharging to a minimum.
- Attention! Do not allow a battery to freeze!
- A fully charged battery will freeze at approx. -65 °C, a half discharged battery at -26 °C and a battery that is charged up to 25 % will freeze at -15 °C.
- A battery that has been stored uncharged for long period of time will “sulphurize” very easily and looses its capacity because sulphur will deposit on the plates.
- A fully charged and fault-free battery has a no-load voltage of 12.7 V or more. A defective or discharged battery has no-load voltage of 10.5 V or less.
Introduction
The battery load tester is intended for checking the battery status of 12 V resp. 6 V lead-acid batteries with a capacity of at least 36 Ah. Furthermore you can check the charging system the voltage of the battery under load.
Cold Cranking Ampere (CCA)
First determine the CCA for the battery in order to read the correct measuring range on the scale of the battery load tester.
Cold cranking ampere (CCA) is the amount of current a battery can provide at -18 ^ ( 0^ ) for the duration of 30 seconds.
The cold cranking ampere is often stated as “CCA” on the battery. If the CCA is not stated on your battery, refer to the recommended values from the following table:
| Battery Capacity | Cold Cranking Amperes (EN) |
| 5 – 14 Ah | 30 – 140 A |
| 20 – 40 Ah | 120 – 330 A |
| 52 – 70 Ah | 320 – 630 A |
| 74 – 80 Ah | 450 – 740 A |
| 95 – 110 Ah | 570 – 920 A |
Temperature Compensation
Correct readings depend on the battery temperature. To achieve correct readings you have to perform temperature compensation if the temperature is below -7 °C. Observe the stated CCA on the battery and decrease the CCA value by 50 Amps (1 Step) if the temperature is -7 °C.
Example: The CCA of a battery is 360 A minus 100 A (2 Steps) if the temperature is -18 °C (result 260 A). At -29 °C you have to reduce the CCA value from the battery up to 150 A (3 Steps).
Battery Load Test
With the battery load test you can determine if the battery's capacity is sufficient to start a motor vehicle even under adverse climatic conditions. While measuring, the battery is loaded with approx. 100 A.
Operation
During testing, the voltage in the electric system of the vehicle may drop sharply, especially if the battery is discharged or defective. Please keep in mind that this may trigger the alarm system or anti-theft devices, e. G. in the radio.
Therefore it is advisable to take precautions or disconnect the battery for testing in advance.
- Switch off the engine and turn off all consumers such as light, fan, rear window heating, booster etc. except of the clock and the radio's storage. Pull the key.
- Connect the black clamp (3) directly to the negative terminal (NEG, N, -) of the battery.
- Connect the red clamp (1) directly to the positive terminal (POS, P, +) of the battery.
The voltmeter (7) will now display a voltage which depends on the charging state of the battery. If the displayed voltage is below 12.4 V resp. 6.2 V, the battery should be recharged before a full test.
If the voltage is still under 12.4 V (6.2 V) after charging, the battery should be replaced.
If the needle moves to the extreme end of the scale, the battery is connected with switched polarity!
- Press the testing switch (6) for max. 10 seconds.
Attention: The housing of the battery load tester becomes very hot during operation. There is risk of burns.
-
Read the value from the voltmeter (7). Select the suitable line for the CCA value (D) of the tested battery. Notice in which sector the needle comes to a stop. Compare the measured value with the table on the next page to identify the condition of the battery.
-
Finally, note the position of the needle after performing the battery load test for 10 seconds. You will need this value when undertaking the starter test and detecting the condition of the battery.

Operation
| Load Test after 10 Seconds | Battery Condition |
| Green Zone OK | The capacity of the battery is in good condition. The battery is possibly, but not necessarily, fully charged. Measuring the SG of the battery acid will give a precise indication of the battery condition. If the battery is not fully charged, it is advisable to check the charging system. |
| Yellow Zone WEAK but Stable | The capacity of the battery is insufficient. The battery is either defective or partly discharged. Measuring the SG of the battery acid will give a precise indication of the battery condition. |
| Red Zone BAD Condition | The battery is probably tired or massively discharged. Observe the volt meter after releasing the testing switch. If the voltage raises quickly to 12 V or more, the battery is probably tired. If the voltage slowly rises, the battery is probably massively discharged. Measuring the SG of the battery acid will give a precise indication of the battery condition. |
Allow the battery load tester to cool down for at least 1 minute before undertaking new tests. Do not perform more than 3 tests within 5 minutes.
Measuring the specific Gravity of Battery Acid
In a maintenance-free battery the acid specific gravity (SG) cannot be measured. If charging status is not satisfactory, charge the battery once more.
In conventional, non maintenance-free batteries the SG can be specified with an acid pipette. The range should be at least 1.25 up to 1.28 g/cm ^3 .
The SG in a well-conditioned battery has to be equal in all 6 cells. When the density in the cells is different - the highest and the lowest value - and vary up to more than 0.025 (25 points), this might be a hint for possible problems in the cells.
When the SG does not show the same state after recharging the battery, the battery might have sulphurized. If the value remains below 1.24 g/cm ^3 - even after charging - the battery is discharged and should be replaced. A battery is used up after approx. 5 – 8 years.
| SG of Battery Acid in g/cm3 | Charging State | Step |
| 1,25 – 1,28 | Charged | Perform Measurement |
| 1,20 – 1,24 | Semi charged | Charging is recommended |
| < 1,20 | Insufficiently charged | Charge immediately |
Starter Test
With this test you can easily measure whether the starter motor of the vehicle does not take too much current from the battery. In some cases currents of about 200 Ampere can be produced and weak the battery.
Before performing this test, the battery load test has to be made and the battery's condition should be OK.
- Pull the spark plug cables from the spark plug in order to avoid the engine to get started.
- Now turn the key to try to start the engine.
- DO NOT press the testing switch during this test! Only check the voltmeter (7) and read the decreasing voltage value during the starting time.
Operation
- Now compare the previously noted value form the battery load test (LOAD VOLTS) with the voltage value of the starter test (MIN, CRANK VOLTS) and check with the aid of the table (A).
| LOAD VOLTS | 10.2 | 10.4 | 10.6 | 10.8 | 11.0 | 11.2 | 11.4 |
| MIN, CRANK VOLTS | 7.7 | 8.2 | 8.7 | 9.2 | 9.7 | 10.2 | 10.6 |
If the value for MIN, CRANK VOLTS substantially differs from the table, the starter motor might be defective or there is bad cable connection e. g. at the transmission resistance or the battery is under-sized, i.e. too small for the engine.
Example: First measuring value shows 10.4 V for load volts and second voltage value for min. crank volts drops to 9.5 V. According to the table the min crank volt can drop up to 8.2 V and is still acceptable. If the voltage value for min crank volts is below 8.2 V, this might be a sign for too much current consumption.
Testing the Charging System (Test the Alternator)
With this measurement you can test the charging system of your vehicle. Continuous charging or permanent discharging of a battery might lead to damage the battery. First undertake a battery load test and if the capacity of the battery is sufficient, undertake the charging system test.
The charging system is tested with the engine running. The engine should run to operating temperature.
- Stay away from moving and rotating parts and make sure jewellery, clothing and hair cannot become caught; there is a danger of injury.
- Please also keep in mind that the engine compartment contains hot parts.
a) Connect the black clamp (3) to the negative terminal (NEG, N, -) of the battery and the red clamp (1) to the positive terminal (POS, P, +) of the battery.
b) For the test, run the engine at a moderate speed (between 1200 and 1500 rpm).
c) DO NOT press the testing switch, but only check the voltage value from the voltmeter (7). At the right end of the scale there is a sector labelled “Charging System” (E).
If the charging system is in good condition, the needle should be in the green area of this sector and remain stable.
Operation
If the needle is in the lower red sector around 12.5 V, the charging system does not work correctly and the battery is not fully charged.
If the needle is in the upper red area above 15 V, there is also a problem; the charging system overloads the battery. Have the vehicle checked by a professional.
d) Now, turn on full beam headlights and windscreen heater and set fan to the highest level. The value should not change for more than 0.1 to 0.3 V.
If the value increases or decreases for more than 0.3 V, have your charging electrical equipment such as headlights, regulators, brushes, drive-belts, cables, mass points or cable plug connectors examined by a mechanic.
Cleaning and Storing
- This battery load tester is a precision measuring instrument and must be handled with care. Do not modify the device or alter the internal circuits.
- Maintenance and repair of the device should only be performed by a qualified technician!
- Accurate measurement results are only guaranteed if the device is handled with care and well maintained.
- Only clean the device with a soft moist cloth.
- Only use common mild detergents for cleaning.
- Do not use aggressive substances or similar for cleaning.
- Store the battery load tester in a dry place and protect it from dust and dirt.

Technical Data
| Operating Time per Test | 10 s |
| Dimensions | 320 x 160 x 80 mm |
| Weight | 1140 g |
| Operating Temperature | 0 °C to +55 °C |
| Storing Temperature | 0 °C to +70 °C |
| Battery Capacity | max. 165 Ah |

declare by our own responsibility that the product
Article No. 15 30 15
is according to the basic requirements, which are defined in the European Directives and their amendments.
2011/65/EU Restriction of the Use of certain hazardous Substances in electrical and electronic Equipment (RoHS)
The technical documentations are on file at the QA department of the Westfalia Werkzeugcompany.
natural_image
Symbol of a trash bin crossed with two diagonal lines, no text or labels present
Werter Kunde,
Please help avoid waste materials.
If you at some point intend to dispose of this article, then please keep in mind that many of its components consist of valuable materials, which can be recycled.
Please do not discharge it in the rubbish bin, but check with your local council for recycling facilities in your area.