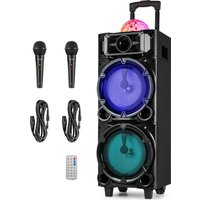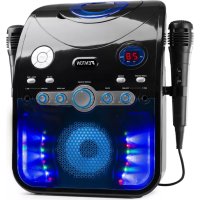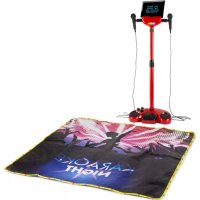
KSM15R - Speaker Fenton - Free user manual and instructions
Find the device manual for free KSM15R Fenton in PDF.


User questions about KSM15R Fenton
0 question about this device. Answer the ones you know or ask your own.
Ask a new question about this device
Download the instructions for your Speaker in PDF format for free! Find your manual KSM15R - Fenton and take your electronic device back in hand. On this page are published all the documents necessary for the use of your device. KSM15R by Fenton.
USER MANUAL KSM15R Fenton
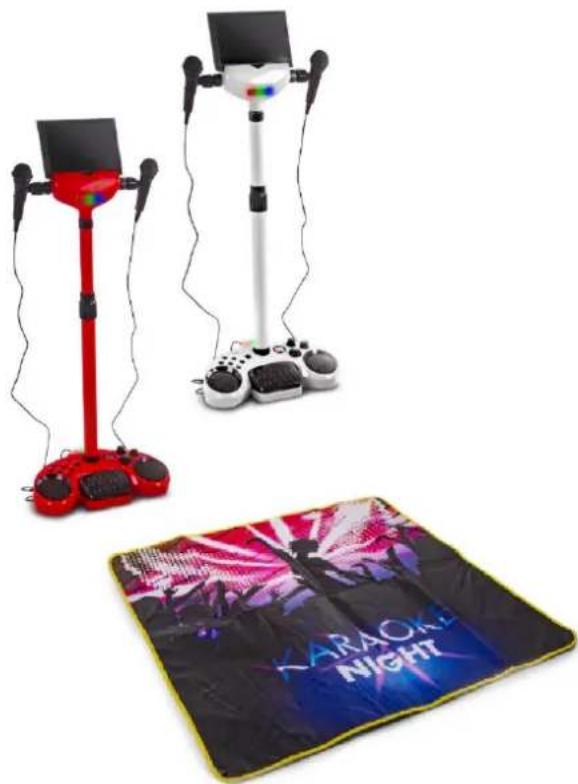
KSM Karaoke Stage Set
Ref. nr.: 130.162 & 130.163
natural_image
Three electronic devices with red and white stands next to a colorful striped card labeled 'KARAKI NIGHT' (no readable text on devices or background)INSTRUCTION MANUAL GEBRUIKSAANWIJZING BEDIENUNGSANLEITUNG MANUAL DE INSTRUCCIONES MANUEL D'INSTRUCTIONS
V1.2
Congratulations to the purchase of this Fenton product. Please read this manual thoroughly prior to using the unit in order to benefit fully from all features.
Read the manual prior to using the unit. Follow the instructions in order not to invalidate the warranty. Take all precautions to avoid fire and/or electrical shock. Repairs must only be carried out by a qualified technician in order to avoid electrical shock. Keep the manual for future reference.
- Do not use the unit in places which are extremely hot, cold, dusty or humid.
- Place the unit on a flat and even surface.
- Do not restrict the air flow of the unit by placing it in a place with poor ventilation, by covering it with a cloth or by placing it on a carpet.
- When left in a heated room where it is warm and damp, water droplets or condensation may form inside the unit.
- When there is condensation inside the unit, the unit may not function normally.
- Let it stand for 1 to 2 hours before turning the power on, or gradually heat the room up and dry the unit before use.
- This system is equipped with non-skid rubber 'feet' to prevent the product from moving when you operate the controls. These 'feet' are made from non-migrating rubber material specially formulated to avoid leaving any marks or stains on your furniture. However certain types of oil based furniture polishes, wood preservatives, or cleaning sprays may cause the rubber 'feet' to soften, and leave marks or a rubber residue on the furniture.
- To prevent any damage to your furniture we strongly recommend that you purchase small self-adhesive felt pads, available at hardware stores and home improvement centers everywhere, and apply these pads to the bottom of the rubber 'feet' before you place the product on fine wooden furniture.

This mark attracts the attention of the user to high voltages that are present inside the housing and that are of sufficient magnitude to cause a shock hazard.

This mark attracts the attention of the user to important instructions that are contained in the manual and that he should read and adhere to.
The unit has been certified CE. It is prohibited to make any changes to the unit. They would invalidate the CE certificate and their guarantee!
NOTE: To make sure that the unit will function normally, it must be used in rooms with a temperature between 5^ C/ 41^ F and 35^ C/ 95^ F.

Electric products must not be put into household waste. Please bring them to a recycling centre. Ask your local authorities or your dealer about the way to proceed. The specifications are typical. The actual values can slightly change from one unit to the other. Specifications can be changed without prior notice.
Do not attempt to make any repairs yourself. This would invalid your warranty. Do not make any changes to the unit. This would also invalid your warranty. The warranty is not applicable in case of accidents or damages caused by inappropriate use or disrespect of the warnings contained in this manual. Fenton cannot be held responsible for personal injuries caused by a disrespect of the safety recommendations and warnings. This is also applicable to all damages in whatever form.
UNPACKING INSTRUCTION
CAUTION! Immediately upon receiving the product, carefully unpack the carton, check the contents to ensure that all parts are present, and have been received in good condition. Notify the shipper immediately and retain packing material for inspection if any parts appear damage from shipping or the package itself shows signs of mishandling. Save the package and all packing materials. In the event that the product must be returned to the factory, it is important that the product be returned in the original factory box and packing.
If the device has been exposed to drastic temperature fluctuation (e.g. after transportation), do not switch it on immediately. The arising condensation water might damage your device. Leave the device switched off until it has reached room temperature.
POWERSUPPLY
On the label on the backside of the product is indicated on this type of power supply must be connected. Check that the mains voltage corresponds to this, all other voltages than specified, the light effect can be irreparably damaged. The product must also be directly connected to the mains and may be used. No dimmer or adjustable power supply.

Always connect the device to a protected circuit (circuit breaker or fuse). Make sure the device has an appropriate electrical ground to avoid the risk of electrocution or fire.
CAUTION:
-
This product contains small parts. Only adults should install this product.
• The Tablet /Smartphone holder and stand are designed for light weight and small size tablets and smartphones only. -
Carefully remove all packing materials to find parts below for assembly.
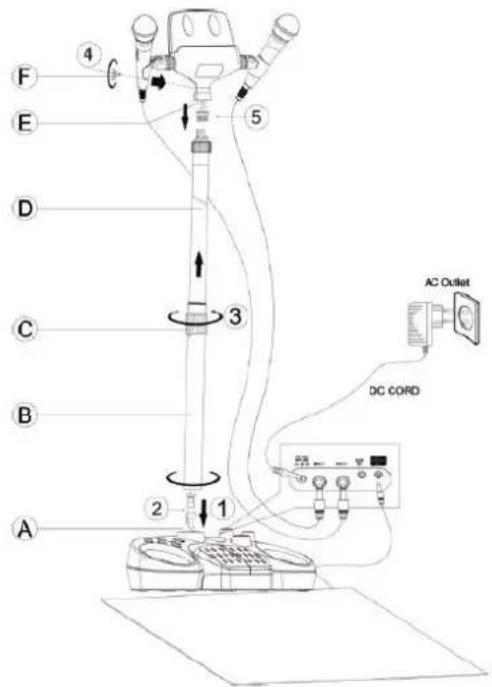
A. Microphone stand and base Connector
B. Microphone stand (wider outer pole)
C. Height adjusting knob
D. Microphone stand (upper pole)
E. Microphone holder and cradle connector
F. Fixing screw
G. Main Unit Base
-
Fully insert the Microphone stand (wider outer pole) into the base connector (1).
-
Connect the microphone bracket (wider outer pole) socket to the base connector plug (2).
-
The microphone bracket (wider outer pole) socket and Microphone holder and cradle connector plug (5).
-
Fully insert the cradle connector into the Microphone stand (upper pole) and fix it by fixing screw (included) (4).
-
Turn the height adjusting knob in counter-clockwise direction to loosen the joint, then move upper pole up and down to adjust the microphone stand to desired height.
Notes:
- For your safety, please do not insert your tablet or smartphone into the Tablet/Smartphone holder to avoid accidental falling during stand height adjustment.
- Use one hand to hold upper pole of microphone stand while using the other hand to loosen the knob to avoid sudden falling of upper pole assembly.
text_image
F ④ E 5 D C 3 B 2 1 A AC Outlet DC CORD- After microphone stand height is set, tighten it up by turning the height adjusting knob in clockwise direction (3).
- Move the unit to the location you want to play and connect accessories by following operations in the user manual.
WARNING: When moving the unit to other locations, please use both hands to hold the base. Do not grip the mic stand to move the unit. If you do, the heavy base may accidentally fall to the ground which may result in damage. This will void the warranty.
OVERVIEW
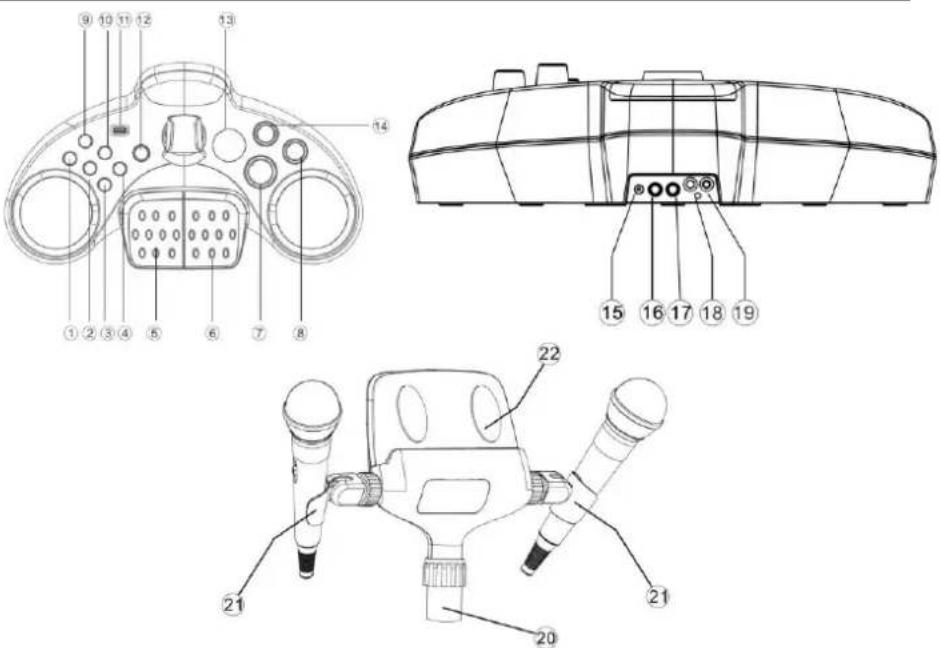
- Light show Button
- Skip Backward Button
- Skip Forward Button
- Play / Pause Button
- Left Pedal (Play / Pause Button)
- Right Pedal (Skip Forward Button)
- Master Volume Control Knob
- Echo Control Knob
- Function Button
- AVC Button,+10 Button
- USB Playback Port
- Power ON/OFF Button
- LED Display
- Mic. Volume Control Knob
- DC 12V Input Jack
- Mic. 1 Input Jack
- Mic. 2 Input Jack
- Aux in Jack
- Mat Control Out Connector
- Height adjustable Mic Stand
- Mic Holders
- Tablet/Smartphone Holder
text_image
Technical diagram of a device with numbered parts and exploded views, including labeled components.GETTING STARTED
Plug the supplied AC adapter into the DC jack (12V DC input) on the rear panel of the unit and connect it to a standard AC wall outlet.
Press the POWER ON/OFF button on the Karaoke system to turn on.
Note: When the unit is not operated for long periods of time, unplug the AC adapter from the unit and wall outlet.
CONNECTING LIGHTED STAGE MAT
WARNING: Please ensure the floor that you are going to use the lighted stage mat on is completely dry to avoid slipping.
To prevent the lighted stage mat from getting damaged:
• To keep away from water.
- Do not step on the LED strip surrounding 4 sides of mat.
- Do not fold the LED strip.
• Take off shoes before you step on the mat.
- Plug the lighted stage mat into the MAT CONTROL OUT connector at rear panel of the base.
- LED surrounding 4 sides of the mat will be lighting and changing with the music.
Note: If the brightness is glaring, turn on room lights.
Caution: Tapping or dropping the microphone while it is on can permanently damage your microphone. Do not swing the microphone around by the cord.
Note: To prevent feedback or whistling from occurring, please be sure that the microphone is not too close to unit's speaker. Turn the ON/OFF switch located on the Microphone to the OFF position when you put the microphone into Mic Holder.
natural_image
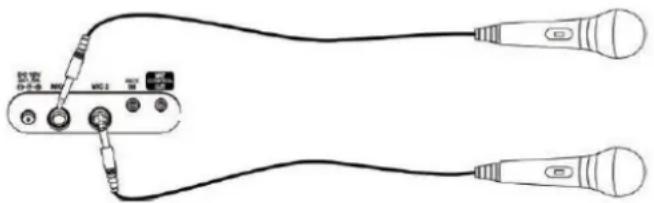
Diagram of a handheld audio device with two speakers and cables (no text or symbols)- Connect the supplied Microphone to either one of the MIC input jacks.
- Press the POWER ON/OFF button to turn on the unit.
- Slide the ON/OFF switch located on the Microphone to the ON position and speak or sing into the Microphone. The Microphone sensitivity and loudness can be adjusted as required by turning the MIC VOLUME control and/or MASTER VOLUME control.
- Turn off the unit after use by pressing the POWER ON/OFF button again. Place the microphone (s) in the Mic Holder (s) of the stand.
AUX INPUT
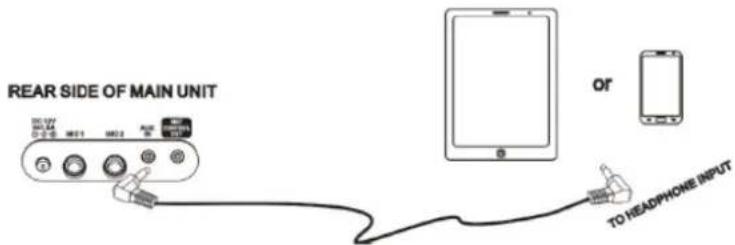
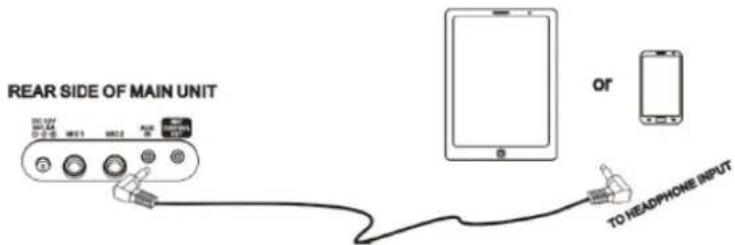
This feature allows you to plug a tablet or smartphone (both not included) which contains music and lyrics for Karaoke singing.
- Placed your external device in the Tablet/Smartphone holder on microphone Stand.
- Plug a 3.5mm audio cable (included) into the headphone jack of your tablet or smartphone and connect the other end (3.5mm plug) into the AUX IN jack on the rear side of this unit.
Caution: Please take extra care when plugging your external device into the AUX IN jack. Do not accidentally plug into the MAT CONTROL OUT connector. Doing so may cause damage to your device.
- Press the POWER button to turn on the unit, your external device as well.
- Tap the FUNCTION button to select AUX mode,
- Select a Karaoke song stored in your tablet or smartphone to play. Slide the ON/OFF switch located on the Microphone to the ON position and speak or sing into the Microphone. The Microphone sensitivity and loudness can be adjusted as required by turning the MIC VOLUME control and/or MASTER VOLUME control.
- Adjust the volume control of your audio player and then the MASTER VOLUME CONTROL of the unit to obtain the desired audio sound level. Start your performance!! Adjust the ECHO control if necessary.
- Turn off both the external audio player and this unit after use, unplug the audio cable from AUX IN jack.
EXAMPLE OF EXTERNAL TABLET/SMART PHONE
text_image
REAR SIDE OF MAIN UNIT OR TO HEADPHONE INPUTCaution: Do not use excessive force to tap your tablet or smartphone screen when it's placed in the Tablet/Smartphone holder. It may result in the stand accidentally falling down and causing damage to your external device.
USB OPERATION
The system is able to playback MP3 files which are stored in the memory media with USB thumb drive.
Note: If music stored in your USB thumb drive does not conform to the MP3 standard, it may not play properly.
- Plug-in the USB plug and make sure it is inserted completely.
Press the POWER button to turn on the unit, tap the FUNCTION button to select USB mode. - System unit starts to play songs stored in USB thumb drive automatically.
PLAY / PAUSE button: Press the PLAY/PAUSE button once to pause the music playback, Press it again to resume music playback.
SKIP UP / SKIP DOWN button: During MP3 music playback, tap the button once to skip to the next track. During MP3 playback, tap the button once to skip to the previous track.
-
Adjust the MASTER VOLUME CONTROL of the unit to obtain the desired audio sound level.
-
USB mode defaults in repeat All tracks playback, press the POWER button to turn off the unit after using.
REMARKS: If connecting the system to MP3 player via the USB port, due to variances in MP3 encoding format, some MP3 players may not be able to play via the USB port. This is not a malfunction of the system.
- There are numerous USB thumb drive producers. Solutions and formats are variable between each other. Therefore, we do not guarantee this unit can support all USB thumb drive from every brand.
- USB thumb drives supported: Support FAT 32 format, 64 GB maximum.
BT OPERATION
The unit has a BT function that can receive a signal within 8 meters. Pairing the unit with a BT device to listen to music:
- Press the POWER button to turn on the unit, tap the FUNCTION button to select BT mode.
- If the unit is not paired with any BT device, the display will flash "BT".
- Activate your BT device and select the search mode.
- "KSM15" will appear on your BT device list.
- Select "KSM15" and enter "0000" for the password if necessary.
- To disconnect the BT function, press the FUNCTION button to switch to another mode or disconnect the function from your BT device.
NOTE:
• If the signal strength is weak, your BT receiver may disconnect, but it will re-enter pairing mode automatically.
- For a better signal reception, remove the obstacles between the unit and the BT device.
- This unit supports A2DP (Advanced Audio Distribution Profile) and AVRCP (Audio Video Remote Control Profile) functions. This can only be paired with one BT device at one time.
- Compatibility with all devices and media types is not guaranteed.
- Some mobile phones with the BT function may connect and disconnect as you make and end calls. This is not an indication of a problem with your unit.
RESETTING THE UNIT
If the system does not respond or exhibits erratic or intermittent operation, you may have experienced an electrostatic discharge (ESD) or a power surge that triggered the internal microcontroller to shut down automatically. If this occurs, simply disconnect the AC Adapter. Wait for at least 3 minutes and then setup the unit again as if you were using it for the very first time.
NEDERLANDS
text_image
Labeled diagram of a game controller with numbered parts for identification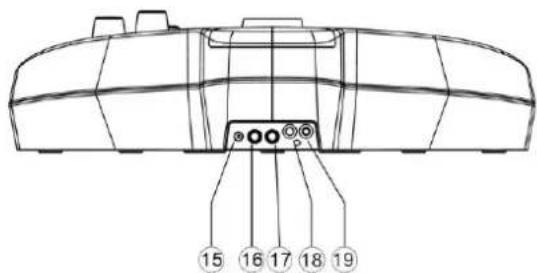
text_image
15 16 17 18 19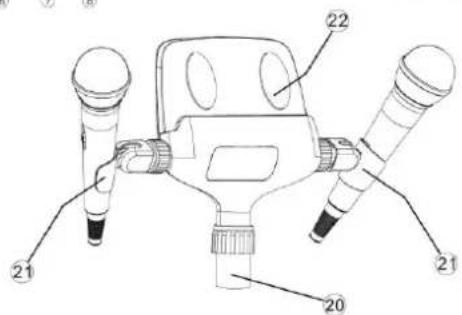
text_image
Technical diagram of a mechanical device with numbered components labeled 20, 21, and 22AAN DE SLAG GAAN
natural_image
Simple line drawing of a device with two connected ports and cables (no text or symbols)EXAMPLE OF EXTERNAL TABLET/SMART PHONE
text_image
REAR SIDE OF MAIN UNIT OR TO HEADPHONE INPUTtext_image
Labeled diagram of a game controller with numbered parts for identification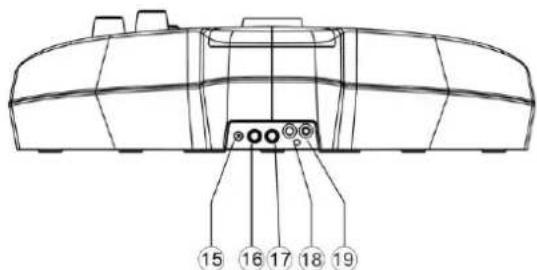
text_image
15 16 17 18 19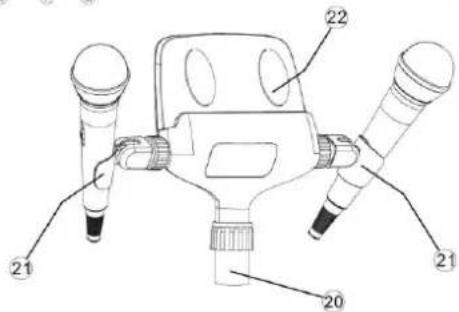
text_image
Technical diagram of a mechanical device with numbered parts labeled 20, 21, and 22INBETRIEBNAHME
natural_image
Diagram of two connected audio equipment devices with cables and connectors (no text or symbols)EXAMPLE OF EXTERNAL TABLET/SMART PHONE

text_image
REAR SIDE OF MAIN UNIT OR TO HEADPHONE INPUTtext_image
Technical diagram of a device casing with numbered components and exploded view, likely for assembly or labeling purposes.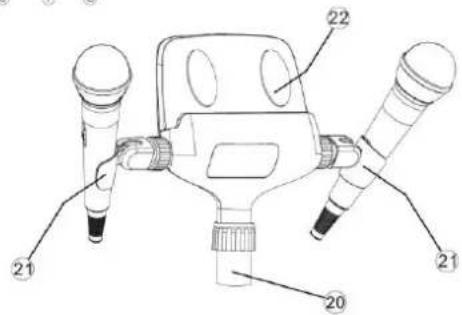
text_image
Technical diagram of a mechanical device with numbered parts labeled 20, 21, and 22POUR DEMARRER
Weight (per unit) : 3.0 kg
The specifications are typical. The actual values can slightly change from one unit to the other. Specifications can be changed without prior notice.
The products referred to in this manual conform to the European Community Directives to which they are subject:
European Union
Tronios B.V.,
7602KR Almelo, The Netherlands
2014/35/EU
2014/30/EU
2011/65/EC
2014/53/EU

United Kingdom
Tronios Ltd.,
130 Harley Street,
London W1G 7JU, United Kingdom
S.I. 2016:1101
S.I. 2016:1091
S.I. 2012:3032
S.I. 2017:1206

Specifications and design are subject to change without prior notice.
www.tronios.com
Copyright © 2022 by Tronios The Netherlands