
Series 7 7740s - Shaver BRAUN - Free user manual and instructions
Find the device manual for free Series 7 7740s BRAUN in PDF.

| Product type | Rechargeable electric shaver |
| Power supply | Rechargeable battery, charge via special very low voltage cable, full charge in 1 hour for 50 minutes of runtime |
| Use in water | Yes, cordless in the shower or bath |
| Main functions | Pivoting head, flexible foils, retractable trimmer for long hair, power adjustment from sensitive to intensive (5 levels), shaving head lock |
| Display | LED screen with charge indicators (green), low battery (red) and cassette replacement indicator |
| Power adjustment | Buttons - and +, modes from light blue (gentle) to green (intensive), memorization of last setting |
| Cleaning | Under running water (shaver on, cordless), possible with non-abrasive liquid soap; brush cleaning (without brushing the cassette) |
| Maintenance | Occasionally oil the trimmer and the top of the cassette with a drop of light oil after water cleaning |
| Parts replacement | Foil and cutter block (cassette) 70S/70B, approximately every 18 months or when the indicator lights up |
| Reset after replacement | Press the reset button with a pen for 3 seconds |
| Safety | Cordless use in bath/shower; do not use with damaged foil or cable; suitable for children from 8 years with supervision |
| Included accessories | Travel pouch, power cable (design may vary) |
| Warranty | 2 years, free repair of manufacturing defects, excluding normal wear (cassette) |
| Charging temperature | Between 5°C and 35°C |
| Shaving temperature | Between 15°C and 35°C |
| Brand | Braun |
| Model | Series 7 7740s |
Frequently Asked Questions - Series 7 7740s BRAUN
User questions about Series 7 7740s BRAUN
0 question about this device. Answer the ones you know or ask your own.
Ask a new question about this device
Download the instructions for your Shaver in PDF format for free! Find your manual Series 7 7740s - BRAUN and take your electronic device back in hand. On this page are published all the documents necessary for the use of your device. Series 7 7740s by BRAUN.
USER MANUAL Series 7 7740s BRAUN
natural_image
Black BRANAM-branded hairbrush with Series 7 label and 'wet&dry' branding (no additional text or symbols)Type 5697
www.braun.com
7893s
7855s
7842s
7840s
7740s
Deutsch 6
English 11
Français 16
Español 21
Português 26
Italiano 31
Nederlands 36
Dansk 41
Norsk 46
Svenska 51
Suomi 56
Polski 61
Český 67
Slovenský 72
Magyar 77
Hrvatski 82
Slovenski 87
Türkçe 92
Română (RO/MD) 99
Ελληνικά 104
Български 110
Русский 115
Українська 122

Braun GmbH
(Sharecall charged at local rates)
flowchart
graph TD
    A["Shower"] --> B["Water Drop"]
    B --> C["Add Water Droplets"]
    C --> D["Series"]
    D --> E["Shipped Water Droplets"]
    E --> F["Series 7"]
    F --> G["Shipped Water Droplets"]
Deutsch
Our products are engineered to meet the highest standards of quality, functionality and design. We hope you thoroughly enjoy using your Braun product.
Read these instructions completely, they contain safety information. Keep them for future reference.
Warning
Your shaver is provided with a special cord set, which has an integrated Safety Extra Low Voltage power supply. Do not exchange or tamper with any part of it, otherwise there is risk of an electric shock. Only use the special cord set provided with your appliance.
If the appliance is marked ➡—C 492, you can use it with any Braun power supply coded 492-XXXX.
Do not shave with a damaged foil or cord.

This appliance is suitable for cleaning under running water and use in a bathtub or shower. For safety reasons it can only be operated cordless.
This appliance can be used by children aged from 8 years and above and persons with reduced physical, sensory or mental capabilities or lack of experience and knowledge if they have been given supervision or instruction concerning the safe use of the appliance and understand the hazards involved. Children should not play with the appliance. Cleaning and user maintenance should not be made by children unless they are older than 8 years and supervised.
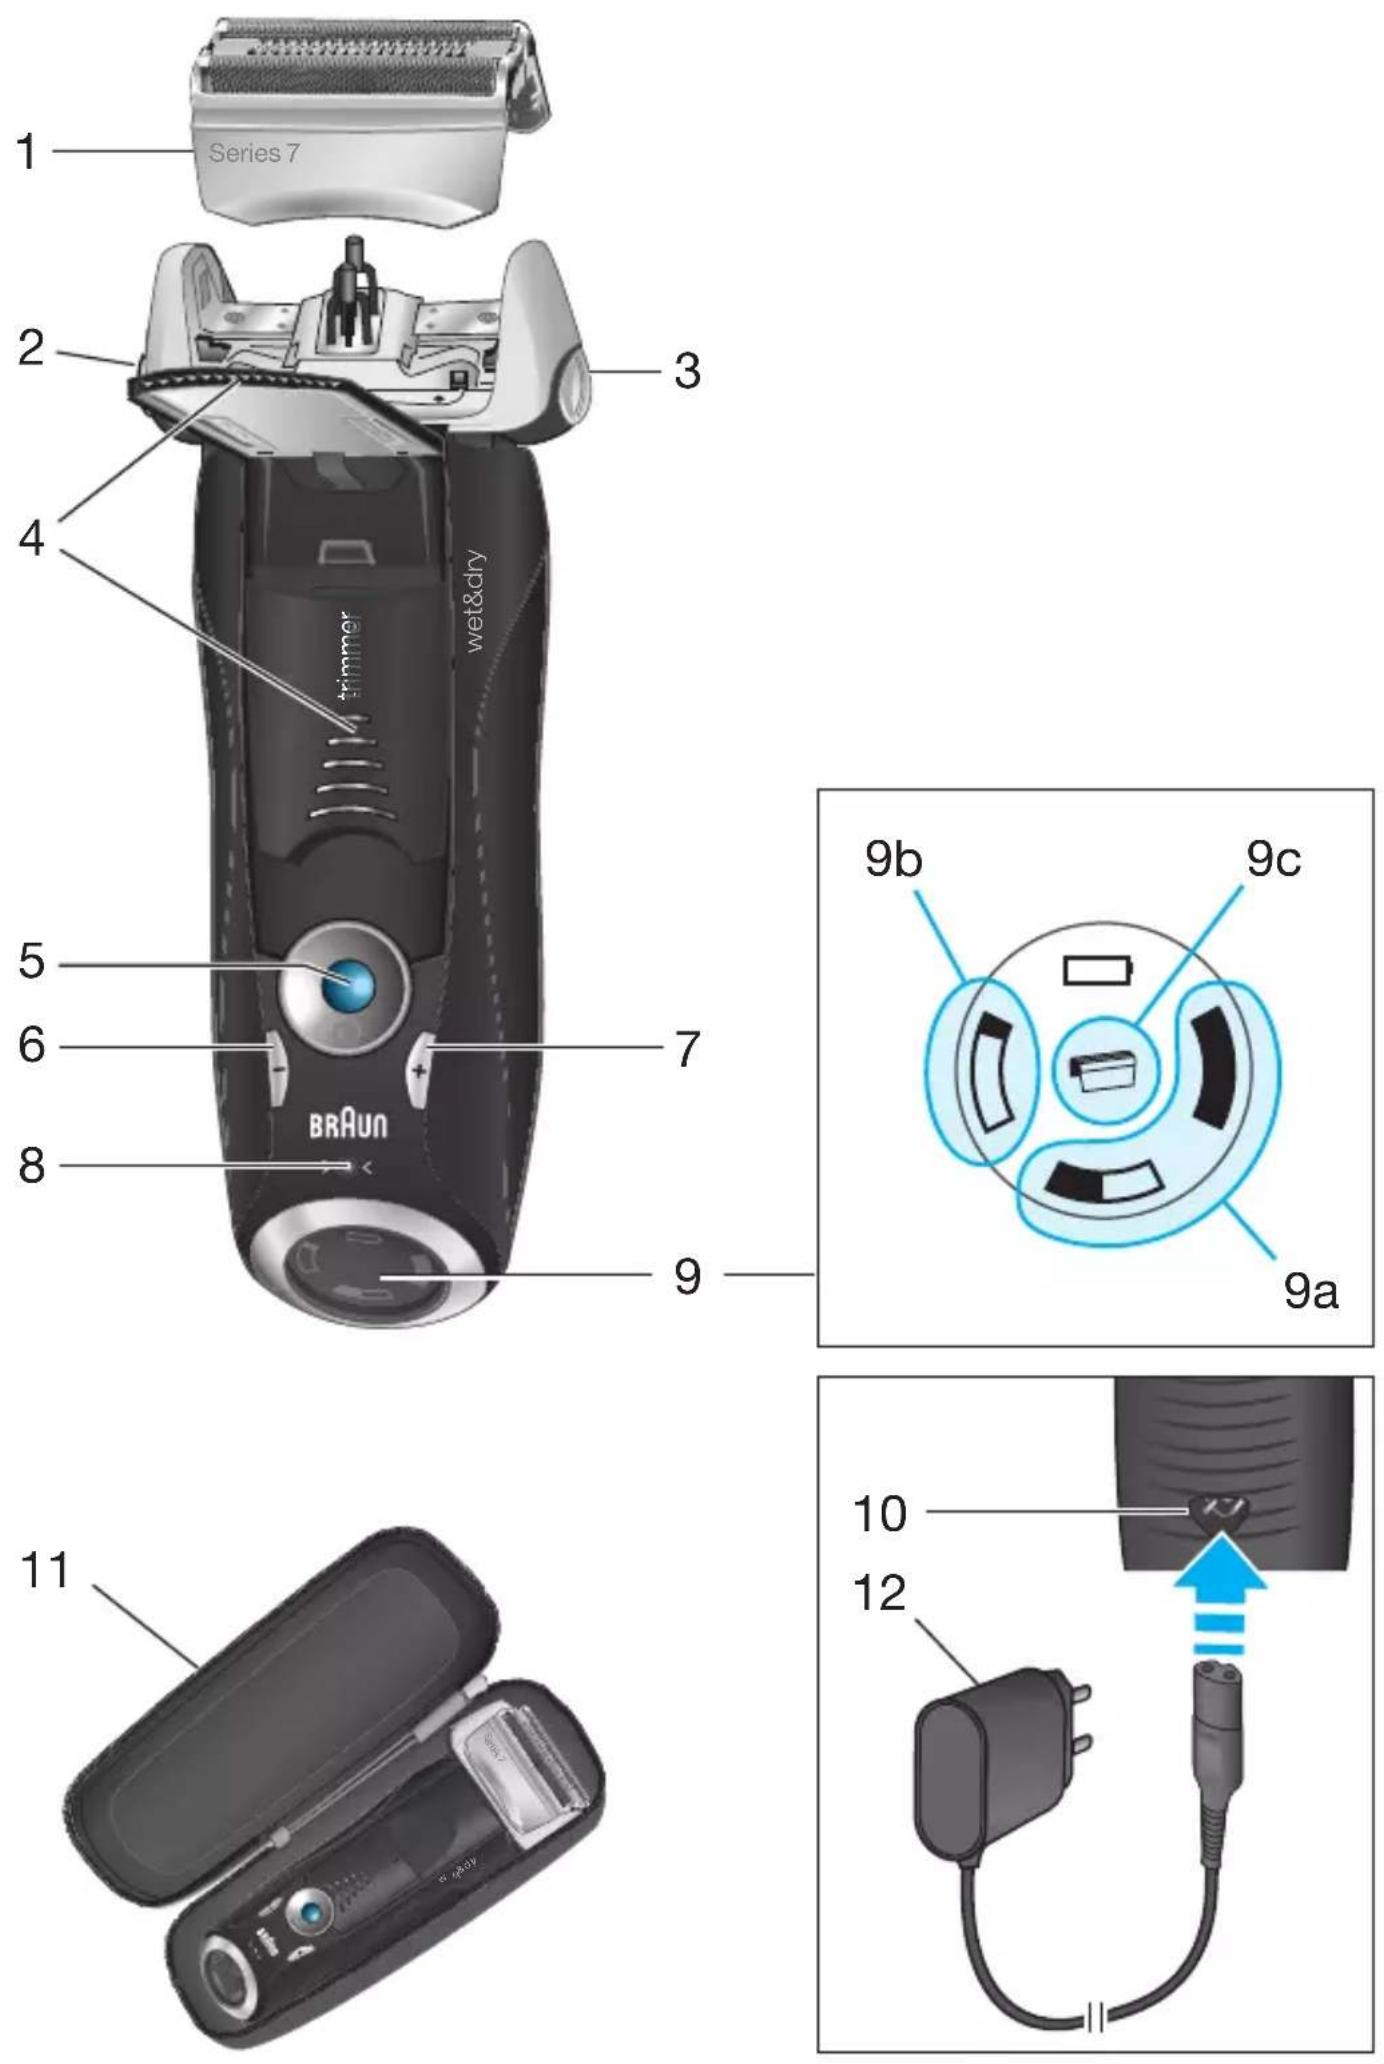
Description
1 Foil & Cutter cassette
2 Cassette release button
3 Shaver head lock switch
4 Pop-out long hair trimmer
5 On/off switch
6 - setting button (sensitive)
7 + setting button (intensive)
8 Reset button
9 Shaver display
9a Charging lights (green)
9b Low-charge light (red)
9c Replacement indicator
10 Shaver power socket
11 Travel case
12 Special cord set (design can differ)
Charging
Recommended ambient temperature for charging is 5 °C to 35 °C. The battery may not charge properly or at all under extreme low or high temperatures. Recommended ambient temperature for shaving is 15 °C to 35 °C. Do not expose the shaver to temperatures higher than 50 °C for extended periods of time.
- Using the special cord set (12), connect the shaver to an electrical outlet with the motor switched off and charge it for at least one hour.
- A full charge provides up to 50 minutes of cordless shaving time. This may vary according to your beard growth.
Charging lights (9a)
The green charging lights show the charge status of the batteries. The green charging light blinks when the shaver is being charged or switched on. When the battery is fully charged, all green charging lights shine permanently, provided the shaver is connected to an electrical outlet.
Some minutes after completing the charging, the shaver switches to the stand-by-mode: The display turns off.
Low-charge light (9b)
The red low-charge light flashes when the battery is running low. The remaining battery capacity is sufficient for 2 to 3 shaves.
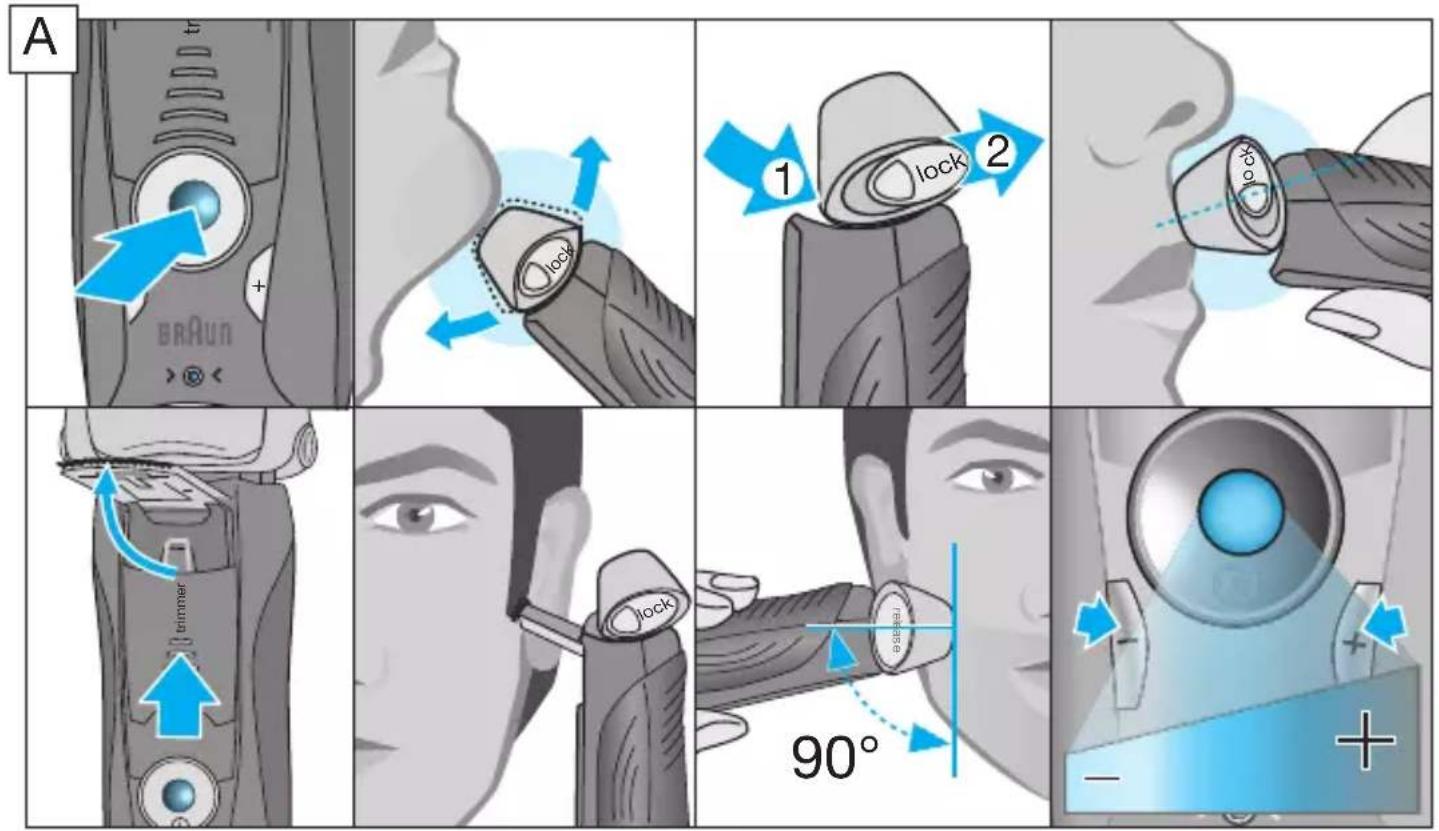
Using the shaver
How to use
Press the on/off switch (5) to operate the shaver:
- The pivoting shaver head and floating foils automatically adjust to every contour of your face.
- To shave hard to reach areas (e.g. under the nose), first slide the shaver head to the back position, afterwards move the head lock switch to the back. The pivoting head is locked at this angle.
- To trim sideburns, moustache or beard, slide the pop-out long hair trimmer (4) upwards.
Tips for the perfect dry shave
For best shaving results, Braun recommends you to follow 3 simple steps:
- Always shave before washing your face.
- At all times, hold the shaver at right angles (90°) to your skin.
- Stretch your skin and shave against the direction of your beard growth.
Personalizing your shaver
By holding down the accelerator button -/+ (6) or (7) you can adjust the shaving power to your individual needs in the different areas of your face from sensitive to intensive.
The pilot light in the on/off switch (5) changes within the following range:
(-) sensitive shave
- light blue
- dark blue
- green
(+) intensive shave
For a thorough and fast shave we recommend the green (intensive) setting. When switching on next time, the last used setting will be activated.
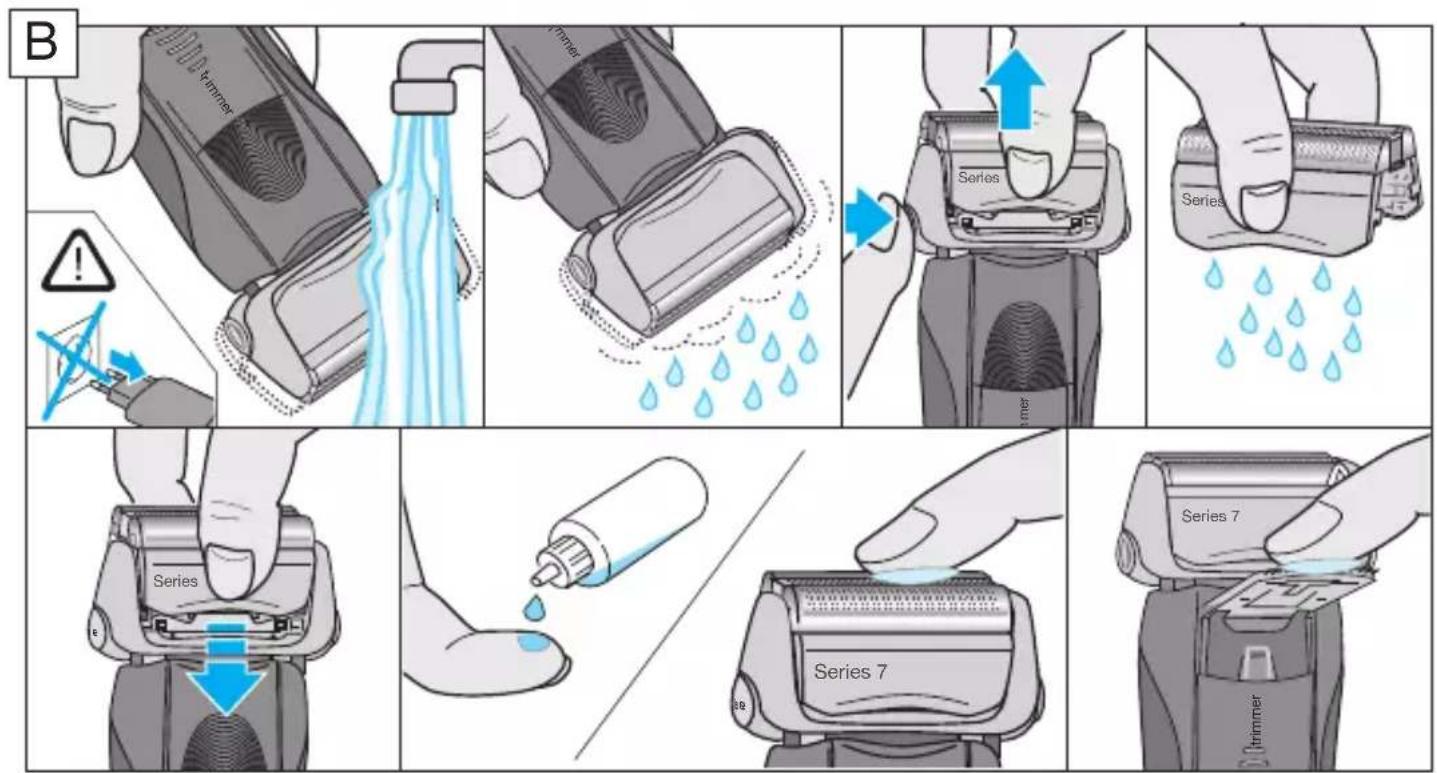
Cleaning
Regular cleaning ensures better shaving performance. Rinsing the shaver head under running water after each shave is an easy and fast way to keep it clean:
Cleaning under running water:
- Switch the shaver on (cordless) and rinse the shaver head under hot running water until all residues have been removed. You may use liquid soap without abrasive substances. Rinse off all foam and let the shaver run for a few more seconds.
- Next, switch off the shaver, press the release button (2) to remove the Foil & Cutter cassette (1) and let it dry.
- If you regularly clean the shaver under water, then once a week apply a drop of light machine oil (not included) on top of the Foil & Cutter cassette and the long hair trimmer.
The shaver should be cleaned after each foam usage.
Cleaning with a brush:
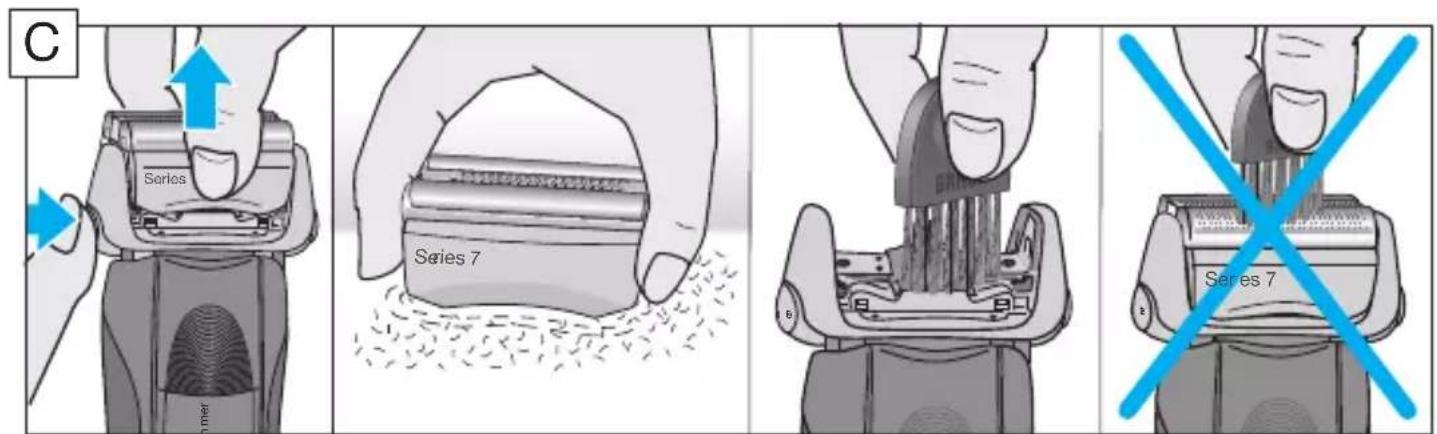
- Switch off the shaver. Remove the Foil & Cutter cassette (1) and tap it out on a flat surface. Using a brush, clean the inner area of the pivoting head. However, do not clean the foil and cutter cassette with the brush as this may damage it.
Keeping your shaver in top shape
Replacing the Foil & Cutter cassette / reset
To maintain 100% shaving performance, replace the Foil & Cutter cassette (1), when the replacement indicator lights up on the shaver display (9) (after about 18 months) or when cassette is worn.
The replacement indicator will remind you during the next 7 shaves to replace the Foil & Cutter cassette. Then the shaver will automatically reset the display.
After you have replaced the Foil & Cutter cassette, use a ball-pen to push the reset button (8) for at least 3 seconds to reset the counter.
While doing so, the replacement indicator blinks and goes off when the reset is complete. The manual reset can be done at any time.
Accessories
Available at your dealer or Braun Service Centres:
- Foil & Cutter cassette 70S/70B
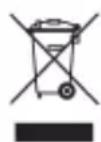
Environmental notice
Product contains batteries and/or recyclable electric waste. For environment protection do not dispose of in household waste, but for recycling take to electric waste collection points provided in your country.
Subject to change without notice.
For electric specifications, see printing on the special cord set.
Guarantee
We grant a 2 year guarantee on the product commencing on the date of purchase.
Within the guarantee period we will eliminate any defects in the appliance resulting from faults in materials or workmanship, free of charge either by repairing or replacing the complete appliance at our discretion.
This guarantee extends to every country where this appliance is supplied by Braun or its appointed distributor.
This guarantee does not cover: damage due to improper use, normal wear and tear (e.g. shaver foil or cutter block) as well as defects that have a negligible effect on the value or operation of the appliance. The guarantee becomes void if repairs are undertaken by unauthorised persons and if original Braun parts are not used.
To obtain service within the guarantee period, hand in or send the complete appliance with your sales receipt to an authorised Braun Customer Service Centre (address information available online at www.service.braun.com).
For UK only:
This guarantee in no way affects your rights under statutory law.
Trouble-Shooting
| Problem: Possible reason: Remedy: | ||
| Unpleasant smell from the shaver head. | Shaver head is cleaned with water. | When cleaning the shaver head with water only use hot water and from time to time some liquid soap (without abrasive substances). Remove Foil & Cutter cassette to let it dry. |
| Battery performance dropped significantly. | 1. Foil and cutter are worn which requires more power for each shave.2. Shaver head is regularly cleaned with water but not lubricated. | 1. Renew Foil & Cutter cassette.2. If the shaver is regularly cleaned with water, apply a drop of light machine oil on top of the foil once a week for lubrication. |
| Shaving performance dropped significantly. | 1. Foil and cutter are worn.2. Personal setting of shaving performance has been changed.3. Shaving system is clogged. | 1. Renew Foil & Cutter cassette.2. For a thorough and fast shave we recommend the green (intensive) setting.3. Soak the Foil & Cutter cassette into hot water with a drop of dish liquid. Afterwards rinse it properly and tap it out. Once dry apply a drop of light machine oil on the foil. |
| Shaver turns off with fully charged battery. | Foil and cutter are worn which requires more power than the motor can deliver. The appliance turns off. | - Renew Foil & Cutter cassette.- Regularly oil the shaving system, especially when cleaning with water only. |
| Battery segments in the display are skipped with decreasing battery capacity. | Foil and cutter are worn which requires more power for each shave. | - Renew Foil & Cutter cassette.- Regularly oil the shaving system, especially when cleaning with water only. |
| Shaving parts have been changed recently but replacement symbol lights up. | Reset button has not been pushed. | - Push the reset button for at least 3 seconds to reset the counter. |
Français
Available at your dealer or Braun Service Centres:
- Foil & Cutter cassette 70S/70B
Country of origin: Germany
Year of manufacture
To determine the year of manufacture, refer to the 3-digit production code located near the type plate. The first digit of the production code refers to the last digit of the year of manufacture. The next two digits refer to the calendar week in the year of manufacture.
Example: "427" – The product was manufactured in week 27 of 2014.
بلد المنشأ发展中يا
تاريخ الصنع
Please note down the suggested replacement date (in 18 months from now) below replacement part reference number.
70S/70B
