Series 9 9297cc - Shaver BRAUN - Free user manual and instructions
Find the device manual for free Series 9 9297cc BRAUN in PDF.

User questions about Series 9 9297cc BRAUN
0 question about this device. Answer the ones you know or ask your own.
Ask a new question about this device
Download the instructions for your Shaver in PDF format for free! Find your manual Series 9 9297cc - BRAUN and take your electronic device back in hand. On this page are published all the documents necessary for the use of your device. Series 9 9297cc by BRAUN.
USER MANUAL Series 9 9297cc BRAUN
text_image
Series 9 Wu+new BRAUN9297cc 9299s
9296cc 9293s
9295cc 9260s
9292cc 9242s
9291cc 9240s
9290cc
9280cc
Wet&dry
Thank you for purchasing a Braun product.
We hope you are completely satisfied with your new Braun shaver.
If you have any questions, please visit
www.service.braun.com or call:
US residents 1-800-BRAUN-11
1-800-272-8611
Canadian residents 1-800-387-6657
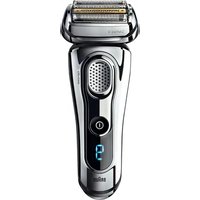
natural_image
Close-up of a white and gray electronic device with a speaker grille and control knob (no visible text or symbols)
natural_image
Illustration of hands operating a handheld device with a blue arrow indicating the action (no text or symbols present)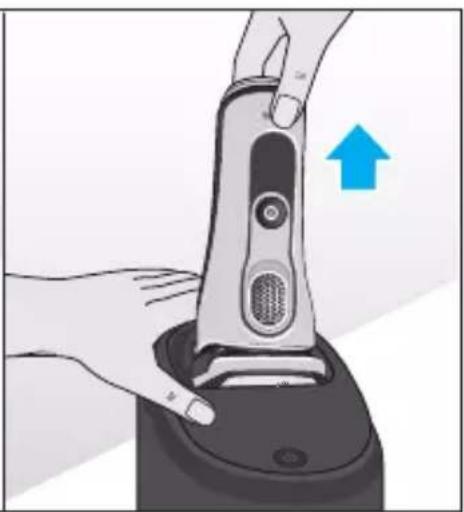
natural_image
Illustration of hands using a hairdryer on a device, with a blue arrow indicating the upward movement (no text or symbols present)F
natural_image
Close-up of a car interior with a circular button and a water symbol, no visible text or labels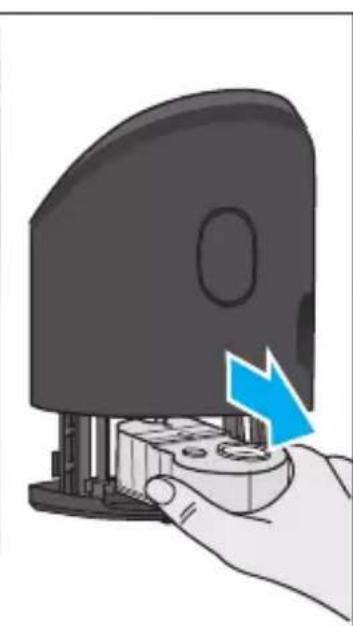
natural_image
Hand inserting a small electronic component into a device (no text or symbols visible)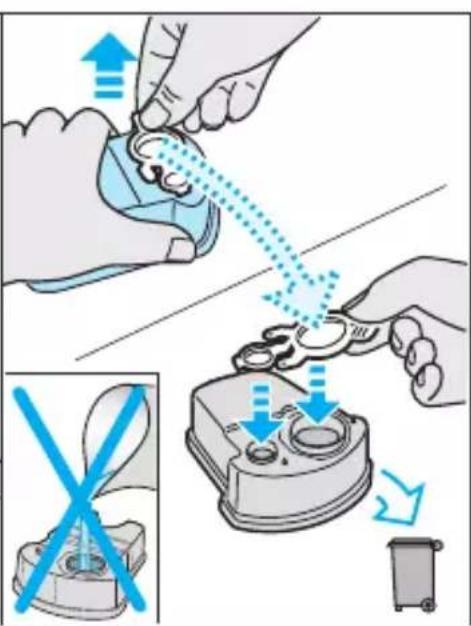
text_image
Diagram illustrating mechanical assembly steps with blue arrows indicating direction and magnified views of a device component.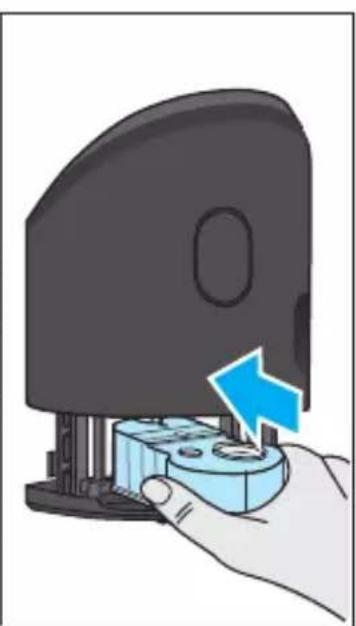
natural_image
Hand holding a device with a blue arrow pointing to the button (no text or symbols visible)IMPORTANT SAFETY INSTRUCTIONS
When using an electrical appliance, basic precautions should always be followed, including the following:
Read all instructions before using this appliance.
When disconnected, the hand-held part of this shaving appliance may be used in a bath or shower. For safety reasons, the appliance can only be operated cordless.
DANGER
To reduce the risk of electric shock:
- The charger unit is not for immersion in water or for use in shower.
- Do not reach for a charger that has fallen into water. Unplug immediately.
- Do not place, store or charge the appliance where it can fall or be pulled into a tub or sink. Do not place in or drop into water or other liquid.
- Except when charging, always unplug this appliance from the electrical outlet immediately after using.
- This appliance is provided with a special cord set with integrated Safety Extra Low Voltage power supply. Do not exchange or manipulate any part of it.
- Do not use an extension cord with this appliance.
- Unplug this appliance before cleaning.
WARNING
To reduce the risk of burns, fire, electric shock, or injury to persons:
- Close supervision is necessary when this appliance is used by, on, or near children or persons with disabilities.
- Use this appliance only for its intended use as described in this manual. Do not use attachments not recommended by the manufacturer.
- Never operate this appliance if it has a damaged cord or plug, if it is not working properly, if it has been dropped or damaged, or if the power supply has been dropped into water. Return the appliance to a service center for examination and repair.
- Keep the cord away from heated surfaces.
- Never drop or insert any object into any opening of the appliance.
- Do not use outdoors or operate where aerosol (spray) products are being used or where oxygen is being administered.
- Do not use this appliance with a damaged or broken foil, as serious skin injuries may occur.
- Always attach plug to appliance first, then to outlet. To disconnect, turn all controls off, then remove plug from outlet.
- When plugging to an electrical outlet outside North America, use a plug adapter to match the outlet's pin configuration.
- Caution: The battery used in this device may present a fire or chemical burn hazard if mistreated. Do not disassemble, heat above 100 °C ( 212 °F ), or incinerate.
- To recharge the battery, only use the detachable power supply provided with this appliance. If the appliance is marked 492, only use Braun power supplies coded 492-XXXX.
SAVE THESE INSTRUCTIONS
Our products are designed to meet the highest standards of quality, functionality and design. Thank you for your trust in Braun's quality, and we hope you enjoy your new Braun shaver.
Important
Do not open the appliance! Only at the end of the product's useful life, disassemble the rechargeable battery for disposal reasons as shown in the battery removal section. This product is for household use only.
Warning
Clean&Charge Station (not with all models)
To prevent the cleaning fluid from leaking, ensure that the Clean&Charge Station is placed on a flat surface. When a cleaning cartridge is installed, do not tip, move suddenly or transport the station in any way as cleaning fluid might spill out of the cartridge.
Do not place the station inside a mirror cabinet, nor place it on a polished or lacquered surface.
The cleaning cartridge contains a highly flammable liquid so keep it away from sources of ignition. Do not expose to direct sunlight and cigarette smoking nor store it over a radiator.
Do not refill the cartridge and use only original Braun refill cartridges.
Shaver
1 Foil & Cutter cassette
2 Cassette release buttons
3 MultiHeadLock switch
4 On/off switch
5 Shaver display*
6 Long hair trimmer
7 Shaver-to-station contacts
8 Release button for long hair trimmer
9 Shaver power socket
10 Special cord set*
10a Charging stand* (not with all models)
11 Travel case
* design can differ
First use and Charging
Connect the shaver to an electrical outlet by snapping the special cord set (10) into the power socket (9) / the charging stand (10a) or for cc models via the Clean&Charge Station (see Chapter «Clean&Charge Station»).
Charging and basic operating information
- When charging for the first time, charge continuously for 1 hour.
- A full charge provides up to 50 minutes of cordless shaving time. This may vary according to your beard growth and environmental temperature.
- Recommended ambient temperature for charging is 41 °F to 95 °F / 5 °C to 35 °C. The battery may not charge properly or at all under extreme low or high temperatures.
- Recommended ambient temperature for shaving is 60 °F to 95 °F / 15 °C to 35 °C.
- Do not expose the shaver to temperatures higher than 122^ / 50^ for extended periods of time.
- When the shaver is connected to an electrical outlet, it may take some minutes until the display illuminates.
Shaver display
Charge status
The shaver display (5) shows the charge status of the battery when connected to an electrical outlet:
- During charging the respective battery segment will blink.
- When fully charged all battery segments will light up for a few seconds then the display turns off.
Low charge
The low-charge light flashes red when the battery is running low. You should be able to finish your shave. With switching off the shaver a beep sound reminds of the low charge status. The last 9 minutes of remaining shaving time are displayed in digits (depending on your model / display).
Cleaning status (only models with Clean & Charge Station)
The cleaning indicator lights up when the shaver needs to be cleaned in the Clean&Charge Station.
Travel lock
The lock symbol lights up when the shaver has been locked to avoid unintended starting of the motor (e.g. for storing in a suitcase).
Using the shaver (see fig. A)
Press the on/off switch (4) to operate the shaver.
Tips for a perfect dry shave
- Always shave before washing your face.
- At all times, hold the shaver at the right angle (90°) to your skin.
- Stretch your skin and shave against the direction of your beard growth.
MultiHeadLock switch (head lock)
To shave hard-to-reach areas (e.g. under the nose) slide the MultiHeadLock switch (3) down to lock the shaver head. The shaver head can be locked in five positions.
To change position, move the shaver head with your thumb and forefinger back or forth. It will automatically click into the next position.
Only models with Clean & Charge Station: For automatic cleaning in the Clean&Charge Station the head lock should be released.
Long hair trimmer
To trim sideburns, moustache or beard press the release button (8) and slide the long hair trimmer (6) upwards.
Travel lock
- Activation: By pressing the on/off switch (4) for 3 seconds the shaver is locked. This is confirmed by a beep sound and the lock symbol in the display. Afterwards the display turns off.
- Deactivation: By pressing the on/off switch for 3 seconds the shaver is unlocked again.
Manual cleaning of the shaver (see fig. B/C)
Cleaning under running water
- Switch on the shaver (cordless) and rinse the shaver head under hot running water until all residues have been removed. You may use liquid soap without abrasive substances. Rinse off all foam and let the shaver run for a few more seconds.
- Next, switch off the shaver, press the release buttons (2) to remove the Foil & Cutter cassette (1) and let it dry completely.
- If you regularly clean the shaver under water, then once a week apply a drop of light machine oil (not included) on top of the Foil & Cutter cassette and the long hair trimmer.
The shaver should be cleaned after each foam usage.
Cleaning with a brush
- Switch off the shaver. Remove the Foil & Cutter cassette (1) and tap it out on a flat surface. Using the brush, clean the inner area of the pivoting head. Do not clean the cassette with the brush as this may damage it!
The Foil & Cutter cassette can be attached either way. There is no impact on the shaving performance.
Clean&Charge Station (not with all models)
The Clean&Charge Station has been developed for cleaning, charging, lubricating, drying and storing your Braun shaver.
DANGER : FLAMMABLE. CONTENTS MAY CATCH FIRE. Do not smoke. Use only in well-ventilated areas. Keep away from flames such as pilot light, and any object that sparks such as electric motor. Keep locked up. KEEP OUT OF REACH OF CHILDREN. CAUTION : MAY IRRITATE EYES. Do not get in eyes.
FIRST AID TREATMENT: Contains ethanol. If swallowed, call a Poison Control Centre or doctor immediately. Do not induce vomiting. If in eyes, rinse with water for 15 minutes.
12 Station power socket
13 Lift button for cartridge exchange
14 Station-to-shaver contacts
15 Clean&Charge Station display
15a Level indicator
15b Status light
15c Cleaning program indicators
16 Start button
17 Cleaning cartridge (not with all models)
Installing the Clean&Charge Station (see fig. D)
- Press the lift button (13) at the rear side of the Clean&Charge Station to lift up the housing.
- Hold the cleaning cartridge (17) down on a flat, stable surface (e.g. table).
- Carefully remove the lid from the cartridge.
- Slide the cartridge from the rear side into the base of the station until it snaps into place.
- Slowly close the housing by pushing it down until it locks.
- Connect the station to an electrical outlet by snapping the special cord set (10) into the power socket (12).
Charging the shaver in the Clean&Charge Station (see fig. D)
Insert the shaver head with the front showing and released head lock into the cleaning station. Important: The shaver needs to be dry and free from any foam or soap residue!
The contacts (7) on the back of the shaver need to align with the contacts (14) in the station. Push the shaver in the correct position. A beep sound confirms that the shaver sits properly in the station. Charging will start automatically.
Cleaning the shaver (see fig. D)
When the cleaning indicator lights up in the shaver display, insert the shaver into the Clean&Charge Station, as described above and press the start button (16).
The hygiene status will be analyzed and is shown by the cleaning program indicators (15c) in the Clean&Charge Station display.
If status light (15b) does not shine (Clean&Charge Station switches to stand-by after ca. 10 minutes), press start button twice. Otherwise cleaning will not start. For best shaving results, we recommend cleaning after each shave.
The cleaning process consists of several cycles, in which cleaning fluid is flushed through the shaver head. Depending on the program selected, the cleaning time takes up to 3 minutes, followed by an active drying phase of about 40 minutes, during which a fan is running.
Afterwards charging will resume, which is indicated in the shaver display. When the shaver is fully charged the display turns off.
Cleaning programs
◆ short economical cleaning
normal level of cleaning
high intensive cleaning
Removing the shaver from the Clean&Charge Station (see fig. E)
Hold the Clean&Charge Station with one hand and tilt the shaver slightly to the front to release it.
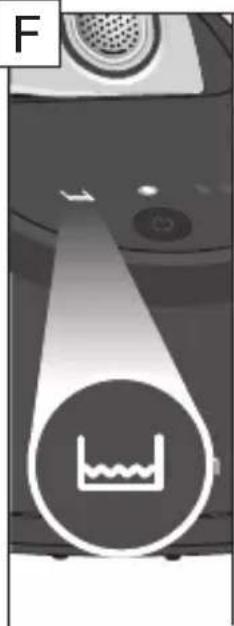
Cleaning Cartridge / Replacement (see fig. F)
When the level indicator L(15a) lights up permanently red, the remaining fluid in the cartridge is sufficient for about 3 more cycles. When the level indicator blinks red, the cartridge needs to be replaced (about every 3 weeks when used daily).
After having pressed the lift button (13) to open the housing, wait for a few seconds before removing the used cartridge to avoid any dripping. Before discarding the used cartridge, make sure to close the openings using the lid of the new cartridge, since the used cartridge will contain contaminated cleaning solution.
The hygienic cleaning cartridge contains alcohol or isopropanol (specification see cartridge), which once opened will naturally evaporate slowly. Each cartridge, if not used daily, should be replaced after approximately 8 weeks. The cleaning cartridge also contains lubricants for the shaving system, which may leave residual marks on the outer foil frame and the cleaning chamber of the Clean&Charge Station. These marks can be removed easily by wiping gently with a damp cloth.
Accessories
Braun recommends changing your shaver's Foil & Cutter cassette every 18 months to maintain your shaver's maximum performance.
Available at your dealer or Braun Service Centres:
- Foil & Cutter cassette: 92S/92B
- Cleaning cartridge Clean&Charge Station: CCR
- Braun Shaver cleaner spray
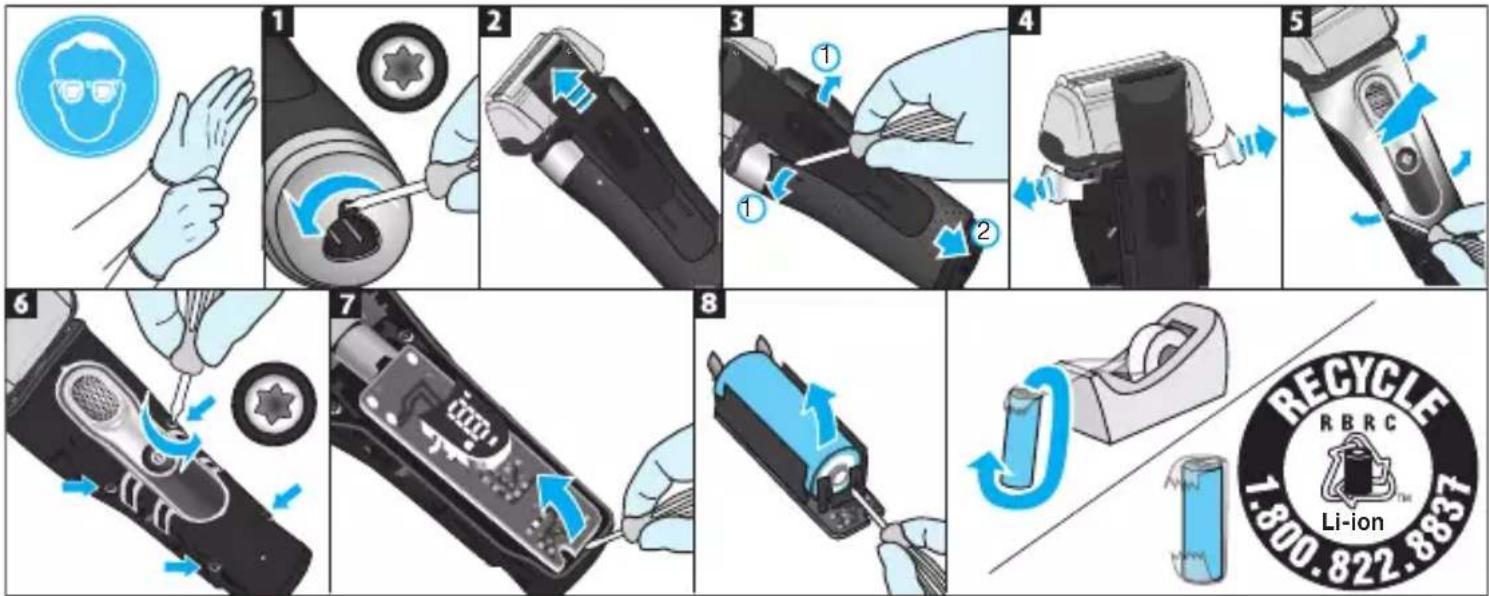
Battery removal
This appliance contains a rechargeable battery. Before disposing of the appliance, disassemble the housing as shown, remove the rechargeable battery and recycle or dispose of properly, according to local guidelines.
Caution: Disassembling the appliance will destroy it and invalidate the warranty.
The cleaning cartridge can be disposed of with regular household waste.
Subject to change without notice.
For electric specifications, see printing on the special cord set.
Trouble-Shooting
| Problem Possible | e reason Remedy | |
| SHAVER | ||
| Shaver does not start when pressing the start button. | 1. Travel lock is activated.2. This appliance can only be operated cordless. | 1. Press the on/off switch for 3 seconds to unlock the shaver.2. Unplug the shaver. |
| Shaver does not charge completely and keeps blinking. | Ambient temperature is out of valid range. | Recommended ambient temperature for charging is 41 °F to 95 °F / 5 °C to 35 °C. |
| Charging does not start when connected to power socket or put in charging stand / Clean&Charge Station. | 1. Shaver is not placed properly in the charging stand / Clean&Charge Station.2. Sometimes charging could start delayed (e.g. after long storage).3. Ambient temperature is out of valid range.4. Special cord set is not plugged in properly. | 1. Contacts of shaver need to align with contacts in the Clean&Charge Station.2. Wait a few minutes, if charging will start automatically.3. Recommended ambient temperature for charging is 41 °F to 95 °F / 5 °C to 35 °C.4. Special cord set needs to snap into place. |
| Unpleasant smell from the shaver head. | 1. Shaver head is cleaned with water.2. Cleaning cartridge is in use for more than 8 weeks. | 1. When cleaning the shaver head with water only use hot water and from time to time some liquid soap (without abrasive substances). Remove Foil & Cutter cassette to let it dry.2. Change cleaning cartridge at least every 8 weeks. |
| Battery performance dropped significantly. | 1. Shaver head is regularly cleaned with water but not lubricated.2. Foil and cutter are worn which requires more power for each shave. | 1. If the shaver is regularly cleaned with water, apply a drop of light machine oil on top of the foil once a week for lubrication.2. Replace Foil & Cutter cassette. |
| Shaving performance dropped significantly. | 1. Shaving system is clogged.2. Foil and cutter are worn. | 1. Soak the Foil & Cutter cassette in hot water with a drop of dish liquid. Afterwards rinse it properly and tap it out. Once dry apply a drop of light machine oil on the foil.2. Replace Foil & Cutter cassette. |
| Shaver turns off with fully charged battery. | Foil and cutter are worn which requires more power than the motor can deliver. The appliance turns off. | - Replace Foil & Cutter cassette.- Regularly oil the shaving system, especially when cleaning with water only. |
| Shaver head is damp. | 1. Drain of the Clean&Charge Station is clogged.2. Cleaning cartridge has been used for quite a while. | 1. Clean the drain with a wooden toothpick.2. The alcohol proportion has decreased while the oil proportion has increased. Remove residue with a cloth. |
| CLEAN&CHARGE STATION | ||
| Cleaning does not start when pressing the start button. | 1. Shaver is not placed properly in the Clean&Charge Station.2. Cleaning cartridge does not contain enough cleaning fluid (level indicator blinks red).3. Appliance is in stand-by mode. | 1. Insert shaver into the Clean&Charge Station (contacts of the shaver need to align with contacts in the station).2. Insert new cleaning cartridge.3. Press start button again. |
| Increased consumption of cleaning fluid. | Drain of the Clean&Charge Station is clogged. | - Clean the drain with a wooden toothpick.- Regularly wipe the tub clean. |
How to obtain service in the USA
Should your Braun product require service, please call 1-800-BRAUN 11 (272-8611) to be referred to the Authorized Braun Service Center closest to you or visit www.service.braun.com
To obtain service:
A. Carry the product in to the Authorized Braun Service Center of your choice or,
B. Ship the product to the Authorized Braun Service Center of your choice. Pack the product well.
Ship the product prepaid and insured (recommended).
Include a copy of your proof of purchase to verify warranty coverage, if applicable.
To obtain original Braun replacement parts and accessories:
Contact a Braun Authorized Service Center.
Please call 1-800-BRAUN 11 (272-8611) to be referred to the Authorized Braun Service Center closest to you or visit www.service.braun.com.
To speak to a Braun Consumer Service Representative:
Please call 1-800-BRAUN 11 (272-8611).
How to obtain service in Canada
Should your Braun product require service, please call 1-800-387-6657 to be referred to the Authorized Braun Service Center closest to you or visit www.service.braun.com.
To obtain service:
A. Carry the product in to the Authorized Braun Service Center of your choice or,
B. Ship the product to the Authorized Braun Service Center of your choice. Pack the product well.
Ship the product prepaid and insured (recommended).
Include a copy of your proof of purchase to verify warranty coverage, if applicable.
To obtain original Braun replacement parts & accessories:
Contact a Braun Authorized Service Center.
Please call 1-800-387-6657 to be referred to the Authorized Braun Service Center closest to you or visit www.service.braun.com.
To speak to a Braun Service Representative:
Please call 1-800-387-6657.
60 day money back satisfaction guarantee for men's grooming products
Braun Shavers
Braun Beard Trimmers
Once you have tried your new Braun shaver or beard trimmer, we are confident you will appreciate its performance. We suggest using the product regularly for 2 to 3 weeks. If you are not satisfied with the product, please call 1-800-211-6661 for instructions on how to return the product. Return the unit and all parts within 60 days of purchase. Retain original cash receipt, product and all product parts, including the box. Do not return to the retailer for guarantee fulfillment.
Please note: No refunds will be made for any product damaged by accident, neglect or unreasonable use.
Your product must be shipped in its original packaging, with your original sales slip indicating the date of purchase.
Please include the following information when you return your product:
Name
Street
City
State
Zip code
Telephone number
Please allow 6-8 weeks for handling.
FOR USA ONLY
2 year limited warranty
(foil and cutter block excluded)
Braun warrants this Braun shaver (except foil and cutter block) to be free of defects in material and workmanship for a period of two years from the date of original purchase.
If the shaver exhibits such a defect, Braun will, at its option, either repair or replace it for the consumer without charge.
Please call 1-800-Braun 11 (800-272-8611) to be referred to the authorized Braun Service Center closest to you or visit www.service.braun.com.
This warranty does not cover foil and cutter cassette or damage resulting from accident, misuse, abuse, dirt, water, tampering, unreasonable use, normal wear, servicing performed or attempted by unauthorized service agencies or failure to provide reasonable and necessary maintenance, including recharging.
ALL IMPLIED WARRANTIES, INCLUDING ANY IMPLIED WARRANTY OF MERCHANTABILITY OR FITNESS FOR ANY PARTICULAR PURPOSE, ARE LIMITED IN DURATION TO 2 YEARS FROM DATE OF ORIGINAL PURCHASE. IN NO EVENT WILL BRAUN BE RESPONSIBLE FOR CONSEQUENTIAL DAMAGES RESULTING FROM THE USE OF THIS PRODUCT. Some states do not allow the exclusion or limitation of incidental or consequential damages, so the above limitation or exclusion may not apply to you.
This warranty gives you specific legal rights, and you may also have other legal rights which vary from state to state.
FOR CANADA ONLY
2 year limited warranty
(foil and cutter block excluded)
In the event a Braun Shaver fails to function within 2 years from date of purchase, because of defects in material or workmanship, and the consumer returns the unit to an authorized service center, Braun Canada, will, at its option, either repair or replace the unit without additional charge to the consumer.
This guarantee does not cover any product, which has been damaged by dropping, tampering, wrong current, servicing performed or attempted by unauthorized service agencies, misuse or abuse, kinks in the shaver foil as well as the normal wear of the shearing parts.
Exclusion of Warranties: The foregoing warranty is the sole warranty offered by Braun Canada. Braun Canada hereby disclaims any implied warranty or merchantability or fitness for any particular purpose. In no event will Braun Canada be responsible for consequential damages resulting from the use of this product.