
Seattle AJ145S - Fireplace ALPINA - Free user manual and instructions
Find the device manual for free Seattle AJ145S ALPINA in PDF.
| Product type | Wall-mounted electric fireplace with LED flame effect |
| Brand | Alpina |
| Model | Seattle AJ145S (AJ145-S) |
| Dimensions (L x D x H) | 94 x 12 x 48 cm |
| Weight | Approximately 12 kg |
| Supply voltage | 220-240 V ~ 50 Hz |
| Nominal power | 1600-1800 W (1.6-1.8 kW) |
| LED lighting | 9 W |
| Flame effect | Yes, 3 brightness levels (L1, L2, L3) |
| Heating temperature range | 17 °C to 27 °C |
| Timer | 30 min, 1 h, 2 h, 3 h, 4 h, 5 h, 6 h, Off |
| Weekly timer | Yes, programming by day |
| Open window detection | Yes (automatic stop if temperature drops 3 °C in 30 min) |
| Remote control | Yes, range up to 4 m |
| Mounting type | Wall-mounted (wall fixing with screws and wall plugs) |
| Materials | Glass, metal, plastic |
| Package contents | Unit, remote control, 3 screws, 3 wall plugs, safety bracket, decorative stones, instruction manual |
| Frame care | Clean with a slightly damp cloth |
| Glass care | Damp cloth and glass cleaner |
| Ventilation grilles care | Vacuum cleaner to prevent dust accumulation |
| Safety | Do not cover, wear protective gloves, do not use outdoors |
| Warranty | 2 years from date of purchase |
| Repairability | Only by a qualified electrician, parts not user-serviceable |
Frequently Asked Questions - Seattle AJ145S ALPINA
User questions about Seattle AJ145S ALPINA
0 question about this device. Answer the ones you know or ask your own.
Ask a new question about this device
Download the instructions for your Fireplace in PDF format for free! Find your manual Seattle AJ145S - ALPINA and take your electronic device back in hand. On this page are published all the documents necessary for the use of your device. Seattle AJ145S by ALPINA.
USER MANUAL Seattle AJ145S ALPINA
natural_image
Flame with bright orange-yellow core and white base, no visible text or symbolsUK: This product is only suitable for well insulated spaces or occasional use.
DE: Dieses Produkt ist nur für gut isolierte Räume oder gelegentlichen Gebrauch geeignet.
FR: Ce produit est uniquement adapté aux espaces bien isolés ou pour une utilisation occasionnelle.
NL: Dit product is alleen geschikt voor goed geïsoleerde ruimtes of incidenteel gebruik.
IT: Questo prodotto è adatto unicamente a spazi adeguatamente isolati o a utilizzi occasionali.
ES: Este producto solo es adecuado para espacios bien aislados o uso esporádico.
ITEM: 871125217849
A.I.&E. Adriaan Mulderweg 9-11
5657 EM Eindhoven, The Netherlands
Edco UK Ltd, 1st Floor Two Chamberlain Square
B3 3AX, Birmingham, UK

UK Electric heater with fireplace effect AJ145-S USER MANUAL
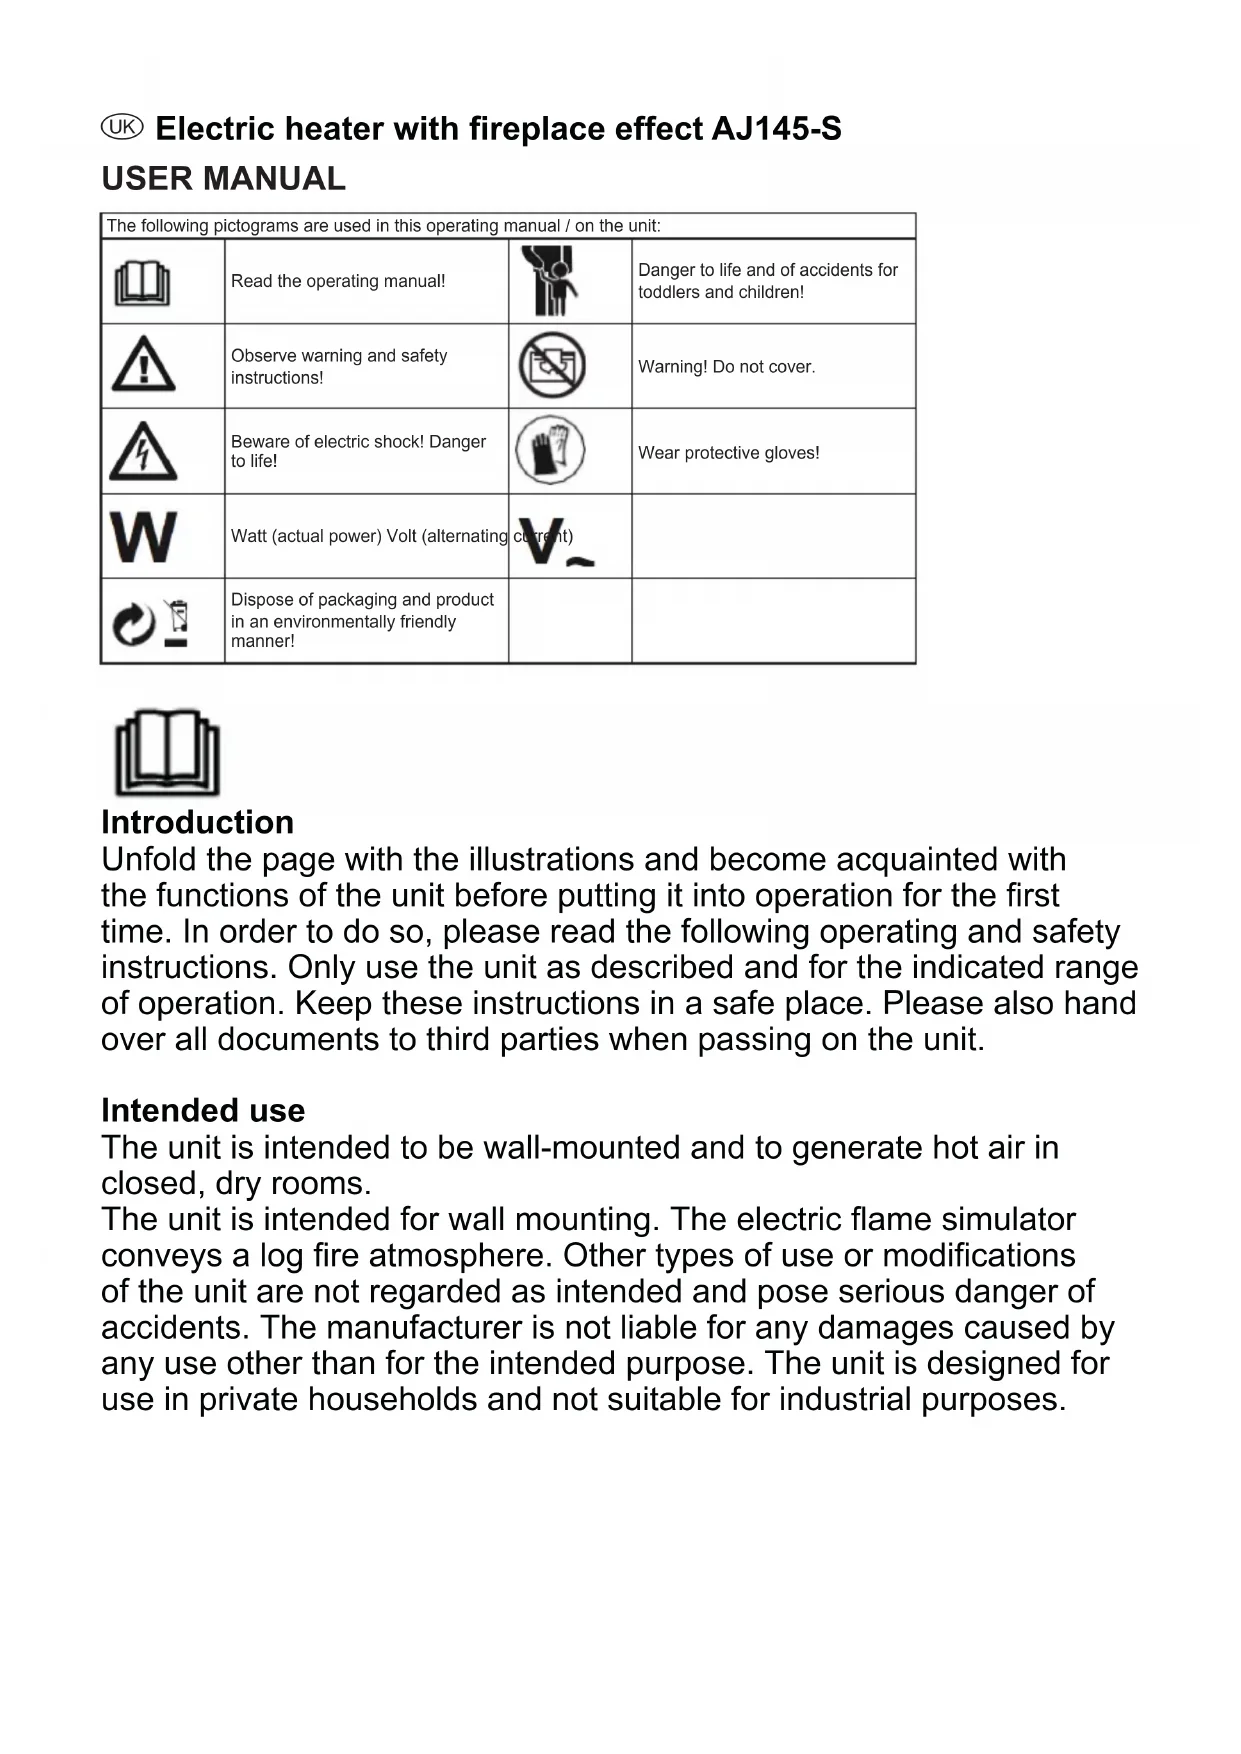
| The following pictograms are used in this operating manual / on the unit: | |||
 | Read the operating manual! |  | Danger to life and of accidents for toddlers and children! |
 | Observe warning and safety instructions! |  | Warning! Do not cover. |
 | Beware of electric shock! Danger to life! |  | Wear protective gloves! |
 | Watt (actual power) Volt (alternating |  | |
 | Dispose of packaging and product in an environmentally friendly manner! | ||

Introduction
Unfold the page with the illustrations and become acquainted with the functions of the unit before putting it into operation for the first time. In order to do so, please read the following operating and safety instructions. Only use the unit as described and for the indicated range of operation. Keep these instructions in a safe place. Please also hand over all documents to third parties when passing on the unit.
Intended use
The unit is intended to be wall-mounted and to generate hot air in closed, dry rooms.
The unit is intended for wall mounting. The electric flame simulator conveys a log fire atmosphere. Other types of use or modifications of the unit are not regarded as intended and pose serious danger of accidents. The manufacturer is not liable for any damages caused by any use other than for the intended purpose. The unit is designed for use in private households and not suitable for industrial purposes.
Technical specifications
Nominal voltage: 220-240 V
Rated power: 1800-2000 W
Illumination: 9W LED
Dimensions: 94 x 12 x 48 cm (w x d x h)
Weight: approx. 12 kg
Scope of delivery
Immediately after unpacking please check that the delivery is complete and all product parts are in good condition.
1 Electric wall heater
1 Remote control
3 Screws
3 Plugs
1 Safety bracket
1 Operating instructions
Decoration stones
Introduction / Safety Instructions Description of parts
- Ventilation slots
- Safety bracket
- Glass panel
- Power cord and plug
- ON/OFF switch
- Control panel
- Remote control
- Digital display unit
- Function indicator
- Power ON/OFF button
- Flame control button
- Thermostat button
- Timer button
- Week timer
- Week timer adjustment

flowchart
graph TD
    A["3"] --> B[" "]

flowchart
graph TD
    A["1"] --> B["6"]
    B --> C["1"]
    C --> D["5"]
    D --> E["2"]
    E --> F["4"]
    F --> G["8"]

text_image
C 270mm 135mm 262mm
text_image
D 2
text_image
E 13 11 12 14 15 7Safety Instructions

WARNING! Do not cover!
WARNING! Please read all safety instructions.
Failure to adhere to the safety instructions can cause electric shock, fire and/or serious injuries
SAVE ALL SAFETY INSTRUCTIONS FOR FUTURE REFERENCE!
WARNING! DANGER OF DEATH OR SERIOUS INJURY TO TODDLERS AND CHILDREN!
Never leave children unattended with the packaging material or the unit. Packaging material poses a danger of suffocation and there is a danger of death by electric shock. Children often underestimate the dangers of electrical devices. Always keep children away from the unit. This unit is not intended to be used by persons (including children) with limited physical, sensory or mental capabilities or lack of experience and/or knowledge unless they are supervised by a person responsible for their safety or have been given instructions from such a person on how the unit should be operated.
Avoid danger to life by electric shock
- Do not operate the unit with a damaged power line or damaged power plug.
ATTENTION! Damaged power lines represent danger to life by electric shock. - Check the power lines regularly for damages and aging. If the power line is damaged, it must be replaced by the manufacturer, his / her representative or a similarly qualified person in order to avoid safety hazards.
- Protect the power line against sharp edges, mechanical strain and hot surfaces.
- Only operate the unit with an earthed outlet.
- Do not operate the unit outdoors. Make sure that the power line never gets wet or damp during operation.
- Do not switch on the unit if you notice visible damages (e.g. tears or cracks) or if you assume that the unit is damaged (e.g. after having fallen down).
- Never operate the unit in the immediate vicinity of a bathtub, shower or wash basin or a pool.
- In the case of disturbances immediately pull the power plug out of the outlet.
- Only let an electrical technician conduct repairs on illuminants or their replacement.
- Pull the power plug out of the outlet when you are not using the
electric fireplace insert for a longer period of time.
- Children should be supervised to ensure that they do not play with the appliance.
- This appliance can be used by children aged from 8 years and above and persons with reduced physical, sensory or mental capabilities or lack of experience and knowledge if they have been given supervision or instruction concerning use of the appliance in a safe way and understand the hazards involved. Children shall not play with the appliance. Cleaning and user maintenance shall not be made by children without supervision.
- Children of less than 3 years should be kept away unless continuously supervised.
- CAUTION--Some parts of this product can become very hot and cause burns. Particular attention has to be given where children and vulnerable people are present.
- Do not install the appliance immediately below a socket-outlet.
- Do not use this heater in the immediate surroundings of a bath, a shower or a swimming pool.
Safety Instructions/ Before operation
Avoid injuries and damages of the electric unit
- ATTENTION! Never leave the electric wall heater unattended when it is in operation. There is a risk of injury in the case of non-observance.
- Prevent the power line from becoming a trip hazard. Therefore, always run it away from the unit from the back.
- Wear protective gloves for all maintenance work on the unit. The edges of the electric wall heater are very sharp!
- Make sure that children or pets are not endangered by the operation of the unit.
- ATTENTION! Never operate the unit using external switchgear such as a time switch for example. Never connect the unit to an electric circuit which is regularly switched on and off by a mechanism. Injuries as well as damage to the product could result.
- Disconnect the power supply by pulling the power plug out of the outlet. Never pull on the power line.
• Always install the product on a flat, dry surface. - Do not install or operate the unit in vehicles.
- Pull the power plug before moving the unit to a different location.
- Pull the power plug before you clean the unit.
- Store the unit in a dry, dust- and vibration-free place. Avoid damage to the unit.
Avoid danger to life by environmental effects
WARNING! Please make sure that the unit is not covered with towels, curtains or similar objects. Otherwise there is danger of overheating.
Therefore, always pay attention that the ventilation slots 1 are kept clear.
- Do not operate the unit in rooms in which dampness can develop or in which it can come in contact with water.
- Do not install the unit directly beneath a wall outlet.
WARNING: in order to avoid overheating, do not cover the heater.
Before operation
ATTENTION! Do not place the unit directly beneath a wall outlet. In the case of non-observance danger of injury and / or damage to the unit can result.
ATTENTION! Please pay attention that you do not pinch the power line and protect it against sharp edges. Damaged power lines increase the risk of an electric shock.
Note: Make sure that the electric wall heater is correctly installed. In case of any doubt, please contact a specialist.
Instructions: Please keep in mind that the power cord must also remain accessible after installation of the electric fireplace.
The product has to be installed on a flat surface with 3 screws. Ensure that the wall is suitable for mounting the product with the supplied screws/plugs (the product is supported by 2 screws only. The bottom screw is meant for securing the product.). When looking for a suitable location for installing the electric wall heater, take all safety instructions into account. The product has to be mounted level.
At least 60cm of free space is required at the top of the product and at least 20cm of free space at left, right and bottom side.
- Drill the holes (Ø7mm) in the wall according to picture C.
- Put the plugs in the holes and fix the two upper screws.
- Mount the heater to the wall by means of the two upper screws.
- Mount the safety bracket on the back side of the product.
- Tighten the bottom screw.
- Put the decoration stones on the brim on the front side of the
product.
- Mount the glass by using the four pins at the sides of the product.
- Insert the power plug 4 into an earthed outlet.
Note: Please observe that the power plug must still be able to be reached after installation of the electric fireplace insert.
Operation
The voltage of the power source must comply with the specifications on the name plate of the heater. Devices marked with 230 V can also be operated with 220 V. Before operation it is imperative to make sure that the installation location corresponds to the requirements of the safety instructions.
Note: When the heater is turned on for the first time, a slight, harmless odour can develop. This odour develops due to the heating up of the inner heating elements. Provide sufficient ventilation.
This product equipped open window detection function, when the products detected the room temperature decreased over 3 comparing to the temperature set within 0.5 hour, the unit will stop providing the heat and the display screen will show “00”.
USING THE MANUAL AND REMOTE CONTROLS
Note:
Before using the fireplace please make sure set the toggle switch(5) to the position I. Set the toggle switch(5) to the position 0 if you would like to turn off the unit. On the top-right side plate of the electric fireplace is the control panel(6). This panel contains the buttons to properly operate the electric fireplace. The buttons on the control panel on the side of the electric fireplace and the remote control function in the same way. The remote control has an effective range of up to 13 feet.

text_image
8 9 11 10 13 12 13 14 11 15 12- Ventilation slots
- Safety bracket
- 3Glass panel
- Power cord and plug
- ON/OFF switch
- Control panel
- Remote control
- Digital display unit
- Function indicator
- Power ON/OFF buton
- Flame control button
- Thermostat button
- Timer button
- Week timer
- Week timer adjustment
USING THE POWER ON/OFF BUTTON
Pressing the Power on/off button(10) once to turns the unit on. Pressing the Power on/off button(10) again will turn the unit off. If you find that none of the other buttons appear to work, check to make sure that the Power on/off button(10) is turned on.
USING THE FLAME CONTROL BUTTON
Pressing the flame control button (11) to turn on the flame effect. To press the flame control button (11) to adjust the flame brightness, there are 3 levels of flame brightness, L3-L2-L 1-L3.
USING THE THERMOSTAT CONTROL BUTTON
Pressing the thermostat control button(12) to tum on the heating function. Pressing the thermostat control button(12) again to tum on the heating function. Continue to press the thermostat button(12) to cycle through the different heat settings, 17C-18.C-19C-..... -26C-27"C-ON-OFF. To display the temperature setting in either Fahrenheit or Celsius, press the thermostat button (12) of control panel once, then press and hold the power on/off button (11) of the control panel for 5 seconds. The display will switch between Fahrenheit or Celsius.
USING THE TIMER CONTROL BUTTON
Pressing the timer control button (13) will set the timer. This interval period is shown in the display (8) on the control panel on the side of the electric fireplace. There are total 8 levels timer settings, from 0.5hr - 1 hr - 2hr - 3hr - 4hr - 5hr - 6hr - OFF.
USING THE WEEK TIMER CONTROL BUTTON
Note:
Besides a regular timer function, this unit also equipped with week timer function, to setup the time when to turn on and off the heater with desired temperature, one group each day and max. 7 days/ group available. if stop pressing any of those buttons for more than 5 seconds, will quite the week timer function and confirm the previous setting.
Using the timer button(13) on control panel to setup the week timer
Press and hold the timer button(13) on control panel for 5 seconds to input current local time(01,02,03, ... 21,22,23) by pressing flame button(11) or thermostat control button(12), then press timer button(13) again to confirm previous setup and the digital display will show “1d” to start setup 1st group and re-press the timer button(13) once and right after the digital display showing “--” to setup the UNIT-ON-TIMER by pressing flame button(11) or thermostat control button(12), and press timer button(13 again and after digital display showing “--” to setup UNIT-OFF-TIMER by pressing flame button(11) or thermostat control button(12), then press the timer button(13) once to confirm the previous settings and after the digital display showing “--” to setup the temperature desired; and repeat to setup 2d,3d, .. ,7d; to skip a specified day/group, by continue pressing timer button(13) to select and setup the timer function o the specified date desired.
Using the remote control to setup the week timer
Press the week timer button(14) 1st time to activate the function and setup the current local time by pressing week timer adjustment buttons(15) “+”/“-” and re-press the week timer button(14) and display(B) will show"1d", and press again the week timer button(14) to enter the adjustment mode and the digital display showing “--”, then press the week timer adjustment buttons(15) “+”/“-” to setup the time to turn on and turn off the unit, and press the week button (14) 4th time to setup the temperature.
Repeat the actions above to setup the time and temperature for other groups and different days.
Maintenance and cleaning/Disposal/Information Cleaning the frame
- In no case should aggressive or corrosive cleaning agents be used. Otherwise damage to the product could result.
- Clean the frame with a slightly dampened cloth.
- Clean the ventilation slots regularly and thoroughly 1 (e.g. with a vacuum cleaner) so that no dust can accumulate.
- Clean the glass plate 3 with a damp cloth and if necessary with a glass cleaner.
Cleaning the interior
ATTENTION! RISK OF INJURY! The edges of the electric wall heater are very sharp. Therefore, please wear protective gloves during all maintenance work.
ATTENTION! In no case should aggressive or corrosive cleaning agents be used. Otherwise product damage could result.
ATTENTION! Please make sure that the glass plate 3 does not fall. Otherwise damage to the product could result.
- Now clean the frame with a damp cloth and if necessary with a mild cleaning agent.
- Clean the glass plate 3 with a damp cloth and if necessary with glass cleaner.
Disposal
All the packaging and packaging material consists of environmentally friendly materials. They can be disposed of in local containers.
This product does not use a standard bulb for its flame effect. The appliance uses an electrically controlled LED system to create the effect, therefore, no parts need to be replaced. There are no user-seviceable parts in this appliance. Under no circumstances, should the appliance be serviced by anyone other than a qualified electrician.
Information
You receive a 2-year warranty on this unit from the date of purchase. The unit was carefully manufactured and diligently inspected before being dispatched. Damage which is attributed to improper use as well as wearing parts are not included in the warranty.
WARNING! Only let your units be repaired by qualified specialists using only original spare parts. This ensures that the safety of your unit is maintained.
WARNING! Always have the manufacturer of the unit or his/ her customer service conduct the replacement of the power plug 4 or the power line. This ensures that the safety of your unit is maintained The lamps in this product are part of the flame effect system. They are not suitable for household room illumination.
Declaration of conformity CE
EC Low Voltage Directive (2014/35 EU)
Electromagnetic Compatibility (2014/30/EU)
Name of the unit:
Electric heater with fireplace effect AJ145-S
For models with remote control:
The maximum range of use is 5 meters. The buttons on the remote control have the same function as switches on the heater. Warning: it takes time for the receiver to respond to the transmitter. Do not press the buttons more than once within two seconds for correct operation.

The symbol above and on the product means that the product is classed as Electrical or Electronic equipment and should not be disposed with other household or commercial waste at the end of its useful life.
The Waste of Electrical and Electronic Equipment (WEEE) Directive has been put in place to recycle products using best available recovery and recycling techniques to minimise the impact on the environment, treat any hazardous substances and avoid the increasing landfill.
Contact local authorities for information on the correct disposal of Electrical or Electronic equipment.
| Table for information requirements for electric local space heaters | P | ||||
| Model identifier(s): AJ145-S | |||||
| Item Symbol Value Unit Item | Unit | ||||
| Heat output Type of heat input, for electric local space | heaters only (select one) | ||||
| Nominal heat output Pnom 2,0 kW Manual heat charge control with integrated thermostat | [no] | ||||
| Minimum heat output (indicative) | Pmin N/A kW Manual heat charge control with room and/or outdoor temperature feedback | [no] | |||
| Maximum continuous heat output | Pmax 2,0 kW Electronic heat charge control with room and/or outdoor temperature feedback | [no] | |||
| Auxiliary electricity consumption Fan assisted heat output | [no] | ||||
| At nominal heat output | elmax | N/A | kW | Type of heat output/room temperature control (select one) | |
| At minimum heat output elmin | N/A kW Single stage | heat output and no room temperature control | [no] | ||
| In standby mode | eISB | 0,41 | W | Two or more manual stages, no room temperature control | [no] |
| With mechanic thermostat room temperature control | [no] | ||||
| With electronic room temperature control | [no] | ||||
| Electronic room temperature control plus day timer | [no] | ||||
| Electronic room temperature control plus week timer | [yes] | ||||
| Other control options (multiple selections possible) | |||||
| Room temperature control, with presence detection | [no] | ||||
| Room temperature control, with open window detection | [yes] | ||||
| With distance control option | [no] | ||||
| With adaptive start control | [no] | ||||
| With working time limitation | [no] | ||||
| With black bulb sensor | [no] | ||||
| Contact details: | Adriaan Mulderweg 9–11, 5657 EM Eindhoven, the Netherlands | ||||
| Remark:For electric local space heaters, the measured seasonal space heating energy efficiency ηs cannot be worse than the declared value at the nominal heat output of the unit. | |||||