
DWC127633 - Dishwasher Emerio - Free user manual and instructions
Find the device manual for free DWC127633 Emerio in PDF.

| Brand | Emerio |
| Model | DWC127633 |
| Product Type | Dishwasher |
| Capacity | 2 place settings |
| Power Supply | 220-240 V ~ 50 Hz |
| Power | 950 W |
| Water Pressure | Min 0.04 MPa / Max 1 MPa |
| Wash Programs | Standard, Rapid, Intensive, Eco, Fruits, Dry |
| Program Duration | Standard 69 min, Rapid 29 min, Intensive 89 min, Eco 59 min, Fruits 19 min, Dry 60 min + 73 h storage |
| Water Consumption | 5 L per cycle (all programs) |
| Energy Consumption | 0.01 to 0.48 kWh depending on program |
| Maximum Temperature | 75 °C (Intensive program rinse) |
| Water Supply Modes | Tank or faucet |
| Tank Capacity | 3 cups (approx. 0.75 L) |
| Door Material | Glass |
| Spare Parts | Available via customer service |
| Warranty | 2 years |
| Filter Cleaning | Recommended 1 to 2 times per week |
| Spray Arm Cleaning | Recommended 1 to 2 times per week |
| Safety Instructions | Unplug before cleaning; do not open door during operation; do not wash unsuitable items |
Frequently Asked Questions - DWC127633 Emerio
User questions about DWC127633 Emerio
0 question about this device. Answer the ones you know or ask your own.
Ask a new question about this device
Download the instructions for your Dishwasher in PDF format for free! Find your manual DWC127633 - Emerio and take your electronic device back in hand. On this page are published all the documents necessary for the use of your device. DWC127633 by Emerio.
USER MANUAL DWC127633 Emerio
natural_image
White and black electric oven with visible internal structure and control panel (no text or symbols)Dishwasher Compact (EN)
Before use make sure to read all of the below instructions in order to avoid injury or damage, and to get the best results from the appliance. Make sure to keep this manual in a safe place. If you give or transfer this appliance to someone else make sure to also include this manual.
In case of damage caused by user failing to follow the instructions in this manual the warranty will be void. The manufacturer/importer accepts no liability for damages caused by failure to follow the manual, a negligent use or use not in accordance with the requirements of this manual.
- Read and save these instructions. Attention: pictures in the instruction manual are for reference only.
- This appliance can be used by children aged from 8 years and above and persons with reduced physical, sensory or mental capabilities or lack of experience and knowledge if they have been given supervision or instruction concerning use of the appliance in a safe way and understand the hazards involved. Children shall not play with the appliance. Cleaning and user maintenance shall not be made by children without supervision.
- If the supply cord is damaged, it must be replaced by the manufacturer, its service agent or similarly qualified persons in order to avoid a hazard.
- This appliance is intended to be used in household and similar applications such as: staff kitchen areas in shops, offices and other working environments; farm houses; by clients in hotels, motels and other residential type environment; bed and breakfast type environments.
- Packaging material could be dangerous for children!
- This appliance is for indoor household use only.
-
Unplug before cleaning and performing maintenance on the appliance.
-
Before inserting the plug into the mains socket, please check that the voltage and frequency comply with the specifications on the rating label.
-
Always plug the appliance into an earthed plug socket.
-
Ensure that the mains cable is not hung over sharp edges and keep it away from hot objects and open flames.
-
Do not immerse the appliance or the mains plug in water or other liquids. There is danger to life due to electric shock!
-
To remove the plug from the plug socket, pull the plug. Do not pull the power cord.
-
Do not touch the appliance if it falls into water. Remove the plug from its socket, turn off the appliance and send it to an authorized service center for repair.
-
Do not plug or unplug the appliance from the electrical outlet with a wet hand.
-
Never attempt to open the housing of the appliance, or to repair the appliance yourself. This could cause electric shock.
-
Do not use the appliance for other than intended use.
-
Do not wind the cord around the appliance and do not bend it.
-
Do not abuse, sit on, or stand on the door or dish rack of the dishwasher.
-
Do not operate your dishwasher unless all enclosure panels are properly in place.
-
Do not open the door during use to avoid hot water flying out causing any hurts. There is a risk of water squirting out.
-
Do not place any heavy objects on or stand on the door when it is open. The appliance could tip forward.
-
When loading items to be washed:
- Locate sharp items so that they are not likely to damage the door seal;
- Warning: knives and other utensils with sharp points must be loaded in the basket with their points facing down or placed in a horizontal position.
- Do not wash plastic items unless they are marked “dishwasher safe” or the equivalent. For unmarked plastic items, check the manufacturer’s recommendations.
- Use only detergent and rinse agents recommended for use in an automatic dishwasher.
- Never use soap, laundry detergent, or hand washing detergent in your dishwasher.
- The door should not be left open, since this could increase the risk of tripping.
- Do not tamper with controls.
- The appliance needs to be connected to the main water valve using a new hose set. Old sets should not be reused.
- The maximum permissible inlet water pressure is 1MPa.
- The minimum permissible inlet water pressure is 0.04MPa.
- The openings must not be obstructed by a carpet.
- Up to 2 sets of tableware can be cleaned at one time.
- Do not place the appliance in the environment under 0^ C.
- Do not place and use the appliance in the platform which is not stable, wet or inflammable avoiding any damage.
- Do not place and use the appliance within 150mm far from gas stoven or heater.
- Do not tilt or move the appliance when washing.
- Knives and other items with sharp points shall not face towards persons avoiding any hurts when opening the door.
- Do not touch or block the side air outlet.
- IMPORTANT After usage turn off the water tap.
PARTS DESCRIPTION

text_image
Technical diagram of a refrigerator with numbered parts and exploded view, including water filter, sink, and cup.- Water inlet
- Control panel
- Spray arm
- Filter
- Glass door
- Door handle
- Storage rack
- Cutlery basket
- Tableware basket
- Inlet hose X 1
- Drain hose X 1
- Fruit basket X 1
- Cup X 1
- Hose collar X 1
Control panel
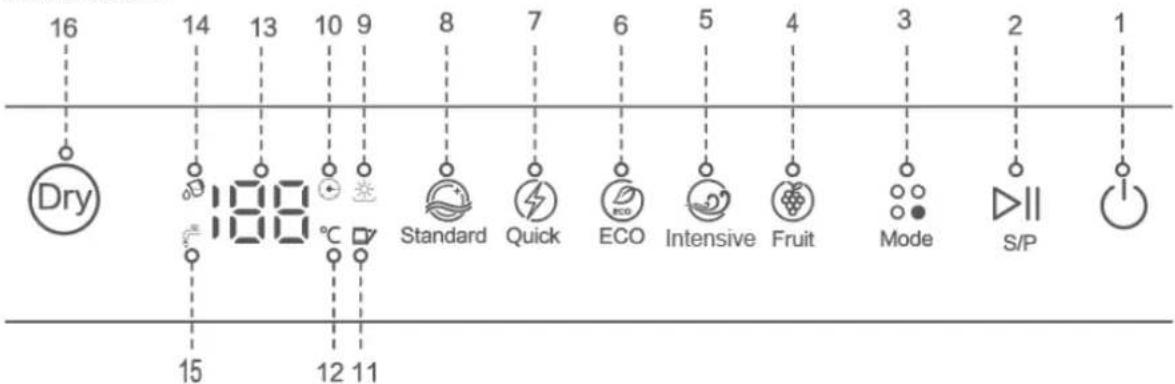
text_image
16 Dry 14 13 10 9 8 7 6 5 4 3 2 1 15 12 11 Standard Quick ECO Intensive Fruit Mode S/P- Standby button
- Start / pause button
- Program selection button
- Fruit mode icon
- Intensive mode icon
- Eco mode icon
- Quick mode icon
- Standard mode icon
- Dry icon
-
Time icon
-
Door open icon
- Temperature icon
- Display screen
- Tank mode
- Tap mode
- Dry mode + storage mode button
INSTALLATION
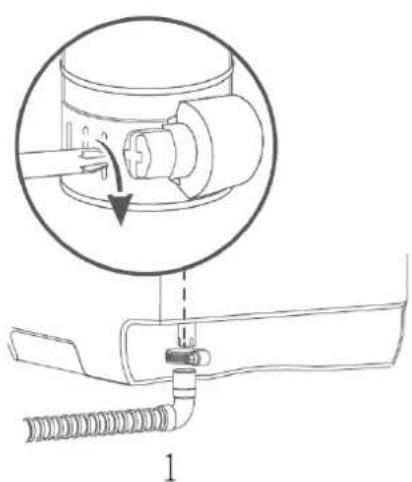
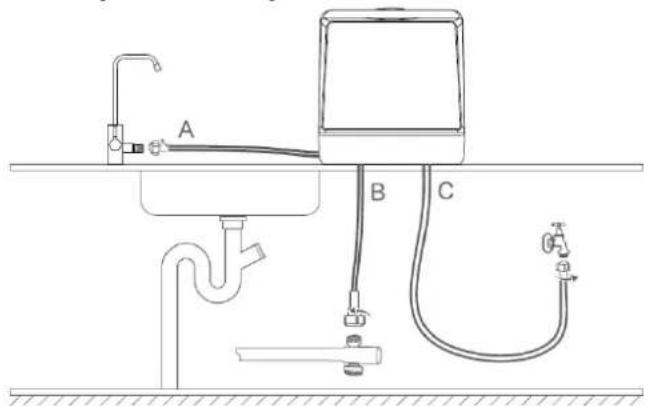
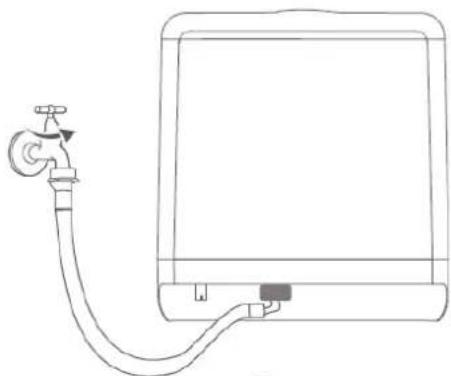
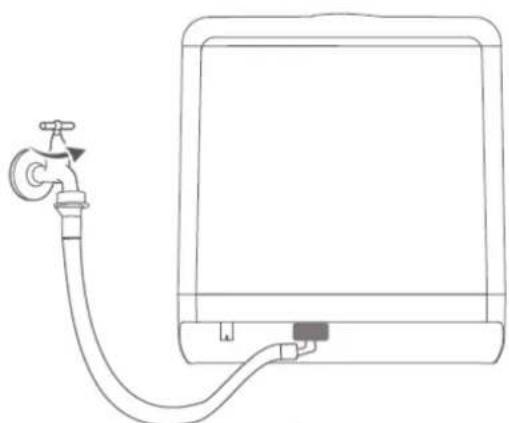
1. Inlet hose installation
1) Connect to the appliance Insert the inlet hose elbow into the water inlet behind the appliance and tighten the screw.
2) Connect to the tap
There are three options (A, B, C) for the tap connection, but for B and C options you will need to make a hole on or behind the cabinet so that the hose can go through the cabinet.
Note: the size of the inlet hose elbow is 3/4' with internal thread, the tap size must be 3/4' with outer thread.

natural_image
Line drawing of a device with a circular inset showing internal components and a handle, labeled '1' at bottom (no text or symbols on main diagram)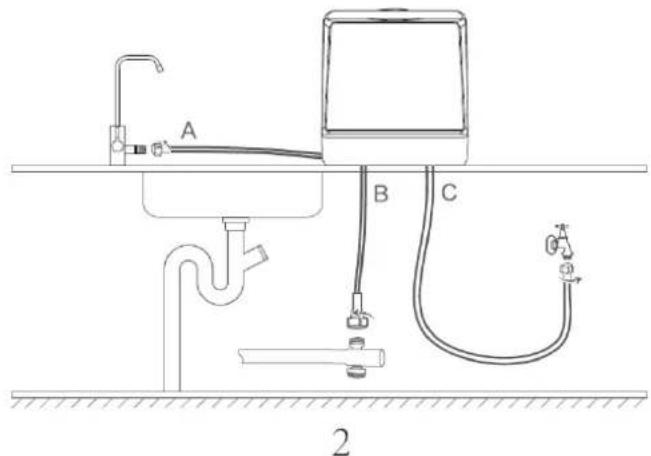
text_image
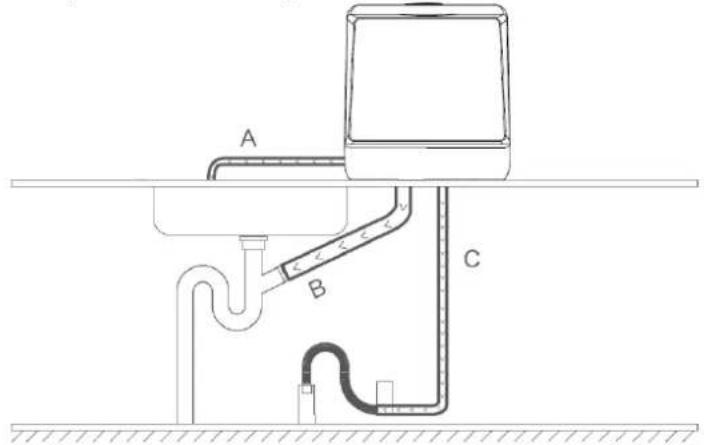
A B C 22. Drain hose installation
1) Connect to the appliance
Insert the drain hose elbow to the water outlet behind the appliance and tighten the collar.
2) Connect to the sewer
There are three options (A, B, C) for the sewer connection. For B and C options you will need to make a hole on or behind the cabinet so that the pipe can go through the cabinet.
Fix the drain hose to avoid the wastewater flowing out to the other place.
natural_image
Technical line drawing of a mechanical assembly with a magnified inset showing a component being inserted (no text or symbols present)
text_image
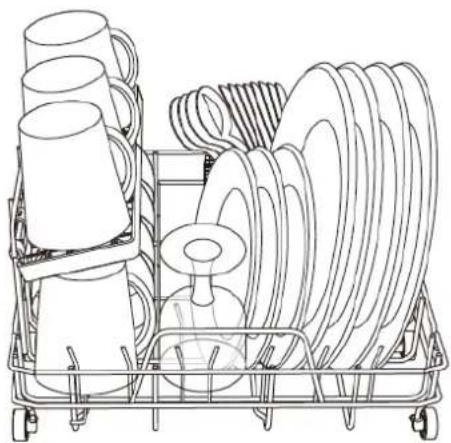
A B C 2TABLEWARE LOADING
Get rid of the large food residue on the tableware, avoiding to block the water hose. Make a reference to the picture for tableware display and quality of the tableware. Loading the household dishwasher up to the capacity indicated by the manufacturer will contribute to energy and water savings.
Note:
In order to fully clean the tableware, please tilt the tableware internally or put stained face down.
| Tableware | Quality |
| 190mm dessert plate | 3 |
| 130mm dessert bowl | 1 |
| 70mm Mug | 1 |
| 60mm glass | 2 |
| Fork | 2 |
| Knife | 2 |
| Soup spoon | 2 |
| Dessert spoon | 2 |
| Tea spoon | 2 |
| 230mm soup plate | 1 |
| 140mm saucer | 1 |
| 78mm cup | 1 |
| 213mm bowl | 1 |
| Serving fork | 1 |
| 195mm dessert plate | 1 |
natural_image
Line drawing of a shopping cart filled with various household items including mugs, spools, and a sink (no text or symbols)OPERATION
1. Power on
Plug in, the appliance will be in standby mode. Touch “ 🔊 ”, the other icons in the display screen will appear. Touch “ ” for 3 seconds to switch back to the standby.
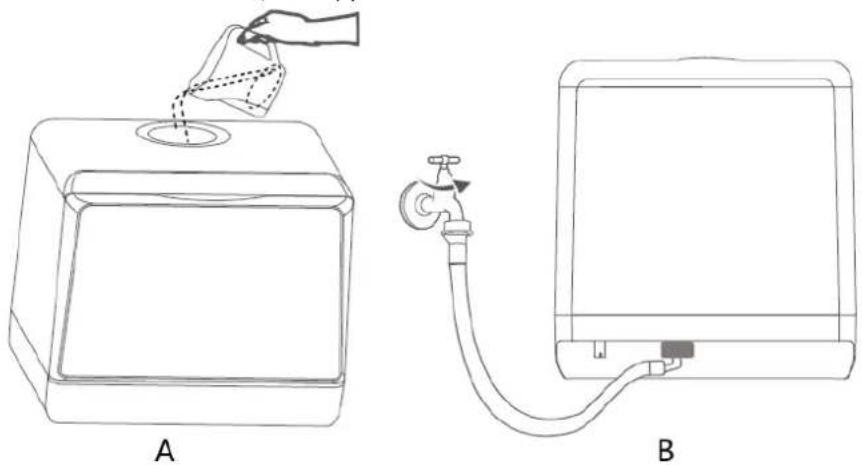
2. Add detergent
Open the door, add moderate detergent powder, or 1pc detergent block into the appliance; then close the door.
Note:
- No detergent is needed when using the fruit washing mode.
• Use the detergent which is special for dishwashers.
- The dosage: 8-10g each washing circle. Please use the proper dosage of detergent, too little detergent will not clean the dishes well; too much detergent will cause the residue.
3. Program selection
Touch “○○”,the program icons will light one by one, select the program you want to start.
Eco program is suitable to clean normally soiled tableware. It is the most efficient program in terms of its combined energy and water consumption.
The program "Dry" has two steps: 60 minutes drying time and 73 hours circular fresh air (storage).
If needed, you can select the program "Standard", then touch the icon "Dry"; you will have 1 more hour of drying time and 73 hours circular fresh air for storage.
| Program | Program execution | Time | Detergent | Temperature | Drying time | Storage |
| Standard | Hot water washingCold water rinsingCold water rinsingHot water rinsing | 69 Min | 8g | Washing 55°C Rinsing 68°C | 60 Min | / |
| Quick | Hot water washingCold water rinsingHot water rinsing | 29 Min | 8g | Washing 50°C Rinsing 62°C | 60 Min | / |
| Intensive | Hot water washingHot water rinsingCold water rinsingHot water rinsing | 89 Min | 12g | Washing 55°C Rinsing 55°C Rinsing 75°C | 60 Min | / |
| Eco | Hot water washingCold water rinsingHot water rinsing | 59 Min | 8g | Washing 55°C Rinsing 68°C | 60 Min | / |
| Fruit | Cold water rinsingCold water rinsing | 19 Min | / | / | / | / |
| Dry | / | / | / | / | 60 Min | Circulating fresh air73 hours |
Water and energy consumption:
| Standard | Quick | Intensive | Eco | Fruit | Dry | |
| Water consumption | 5L | 5L | 5L | 5L | 5L | 5L |
| Energy consumption | 0.45Kwh | 0.31Kwh | 0.48Kwh | 0.40Kwh | 0.01Kwh | 0.162Kwh |
Note:
1) Washing tableware in a household dishwasher usually consumes less energy and water in the use phase than hand dishwashing.
2) Do not manual pre-rinse the tableware before putting it in the dishwasher, as this will increase water and energy consumption.
3) The values given for programs other than the eco program are indicative only.
4. Run program
Touch “S/P” to run the selected program, the appliance will check water supply automatically.
Note:
1) The appliance will check the tap or the tank model automatically before running the program, if the indicators “” “” become red, you need to open the tap or fill the tank.
2) Touch "S/P" to pause the appliance during washing;
3) Touch " ⏻ " for 3 seconds to quit the program, the appliance will drain away the water, and then stop;
5. Wash
The appliance has two water supply modes:
1) Tank mode (A): Open the water inlet cover, fill 3 cups of water into the tank. A warning sound will be heard when the tank is full. The indicator “illuminates white.”
2) Tap mode (B): Remember to open the water tap before operation, the indicator "☐" illuminates white.
Note: If the tank is full, the appliance will switch into tank mode automatically.
natural_image
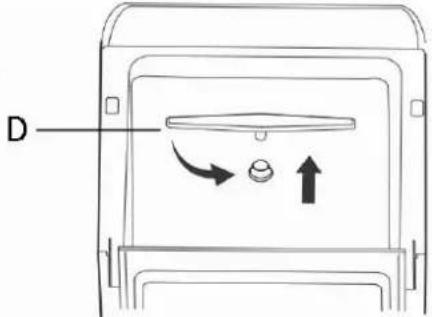
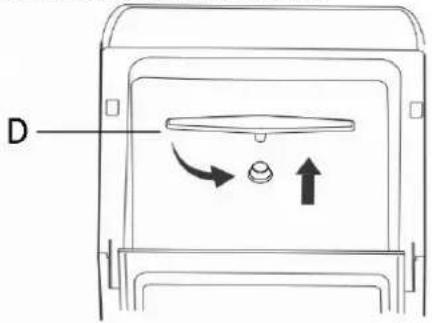
Line drawings of a water dispenser and its connected device (no text or symbols)CLEANING AND MAINTANANCE
Note: Clean the appliance once or twice a week (depending on usage).
1. Clean the surface
Use a soft cloth moistened with mild soap, and then use a dry cloth to wipe it again.
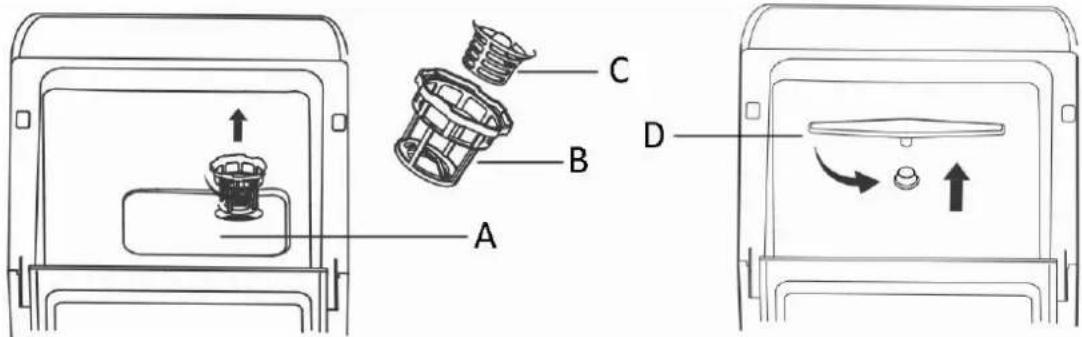
2. Clean the filter and heating plate
1) Open the door and take out the basket. Rotate anticlockwise to disassemble the filter set, which have 3 parts, filter mesh (A), main filter (B) and fine filter (C).
2) Use water to flush and brush each part of the filter set.
3) Use a damp cloth to clean the heating plate which is under the filter mesh (A) (if there is any limescale).
4) After cleaning, replace the filter set.
5) Clean the filter once or twice a week (depending on usage).
3. Clean the spray arm
1) Open the door, take out the basket, then pull out the spray arm upwards.
2) Use water to flush and brush the spray arm.
4) Clean the filter one or twice a week (depending on usage).
3) After cleaning, press the spray arm back into position, make sure the spray arm can move smoothly.
text_image
Technical diagram showing labeled components of a device or appliance, including parts A, B, C, D with directional arrows and rotation indicators.FAULT & PROBLEM
Fault codes
| Code | Fault | How to deal with |
| E2 | Draining | 1. Check drain pipe, be sure the pipe is straight, no bending;2. Power off to check if anything blocks the filter or drain pipe;3. Be sure all pipes are not blocked by something. |
| E3 | Overflowing | Tilt the machine to 30-45 degree, let water flow out. |
| E4 | Temperature fault | Restart the appliance, if still fault, please contact our service department. |
| E5 | Communication fault | |
| E6 | Heating plate fault | |
| E7 | Hydraulic pressure fault |
Problems
| Fault | Reason | How to deal with |
| Tableware is not clean | Incorrect tableware loading | Be sure enough gap between the tableware. |
| Spray arm trapped | Be sure noting trap the spray arm. | |
| Blocked spray arm | Clean the spray arm. | |
| Blocked filter | Clean the filter set. | |
| Incorrect filter installation | Correctly assemble the filter set. | |
| Incorrect program selection | Select appropriate washing program. | |
| No detergent | Add detergent (block/powder/liquid). | |
| Appliance does not start | Water shortage | Add water till the indicator light illuminates white |
| The door is not closed fully | Check the door and close the door fully. | |
| Cannot select the program | The appliance is working. | Touch “” for 3 seconds to quit the program-in-progress or wait for the program finishing. |
| Tableware is wet | Inappropriate program | Select appropriate program |
| Poor dry effect for plastic tableware | Wipe to dry by hand | |
| Incorrect tableware loading | Correct the tableware loading | |
| Drying program not finish | Wait till the drying program finishes | |
| Wooden tableware | Wipe to dry by hand | |
| Discoloration of plastic tableware | Washing temperature is too high | Select program with lower temperature |
| Detergent left | Blocked spray arm, no water flushes the detergent | Be sure the spray arm moves smoothly |
| Detergent with poor quality | Use qualified detergent | |
| Amount of foam in the appliance | Used incorrect detergent | Use the special detergent for dishwasher |
| Open the appliance, wipe out the foam by hand | ||
| Fill 2-3L water into the appliance, select any program, after 1-2 minutes, the foam will be drained; repeat the process if needed. | ||
| Abnormal sound in the appliance | Spray arm is knocking the tableware | Correctly set the tableware |
| Tableware moves slightly | Correctly set the tableware | |
| Egg custard left on the tableware | Protein solidification | Clean the tableware with egg custard by hand |
| Water drops left inside of the appliance | Drying time is not enough | Select “dry” program |
TECHNICAL DATA
Operating voltage: 220-240V \~ 50Hz
Power consumption: 950W
Note: You can find the model identifier on the Rating Label, and for more data information, please scan the QR code on the energy label.
GUARANTEE AND CUSTOMER SERVICE
Before delivery our devices are subjected to rigorous quality control. If, despite all care, damage has occurred during production or transportation, please return the device to your dealer. In addition to statutory legal rights, the purchaser has an option to claim under the terms of the following guarantee:
For the purchased device we provide 2 years guarantee, commencing from the day of sale. If you have a defective product, you can directly go back to the point of purchase.
Defects which arise due to improper handling of the device and malfunctions due to interventions and repairs by third parties or the fitting of non-original parts are not covered by this guarantee. Always keep your receipt, without the receipt you can't claim any form of warranty. Damage caused by not following the instruction manual, will lead to a void of warranty, if this results in consequential damages then we will not be liable. Neither can we hold responsible for material damage or personal injury caused by improper use or if the instruction manual are not properly executed. Damage to accessories does not mean free replacement of the whole appliance. In such case please contact our service department. Broken glass or breakage of plastic parts is always subject to a charge. Defects to consumables or parts subjected to wearing, as well as cleaning, maintenance or the replacement of said parts are not covered by the warranty and are to be paid.
The guarantee period of the spare parts is 2 years. If you need replacement, please contact our customer service.
ENVIRONMENT FRIENDLY DISPOSAL

Recycling – European Directive 2012/19/EU
This marking indicates that this product should not be disposed with other household wastes. To prevent possible harm to the environment or human health from uncontrolled waste disposal, recycle it responsibly to promote the sustainable reuse of material resources. To return your used device, please use the return and collection systems or contact the retailer where the product was
purchased. They can take this product for environmental safe recycling.
For professional repair and ordering spare parts, please contact our customer service.
Emerio B.V.
Oudeweg 115
2031 CC Haarlem
The Netherlands
Customer service:
T: +31 (0) 23 3034369
www.emerio.eu/service
Kundeninformation:
T: +49 (0) 3222 1097 600
www.emerio.eu/service
Klantenservice:
T: +31 (0) 23 3034369
www.emerio.eu/service
text_image
Technical diagram of a refrigerator with numbered parts and labeled parts for assembly or maintenance reference.natural_image
Line drawing of a device with a circular inset showing a component, no text or symbols present1
text_image
A B C2
natural_image
Technical line drawing of a mechanical assembly with a circular component and threaded connector (no text or symbols)1
text_image
A B C2
BELADEN DER SPÜ LMASCHINE
natural_image
Line drawing of a cleaning or laundry rack with multiple mugs and coiled sheets (no text or symbols)BETRIEB
1. Einschalten
natural_image
Line drawing of a hand pouring liquid into a container with a circular top (no text or symbols)A

natural_image
Line drawing of a water tap connected to a rectangular device with a handle (no text or symbols)B
text_image
Technical diagram showing a device with labeled parts A and B, including a component inside a container.C

text_image
Dtext_image
Technical diagram of a refrigerator with numbered parts and exploded view, including water filter, washing machine, and sink.natural_image
Technical line drawing of a mechanical component with a circular inset showing a pin inserted into a cylindrical housing (no text or symbols)1

text_image
A B C2
CHARGEMENT DE LA VAISSELLE
natural_image
Line drawing of a shopping cart filled with various kitchen utensils and mugs (no text or symbols)FONCTIONNEMENT
natural_image
Line drawing of a hand pouring liquid into a container with a circular top (no text or symbols)A
natural_image
Line drawing of a water heater connected to a control panel (no text or symbols)B
NETTOYAGE ET ENTRETIEN
text_image
Technical diagram showing a device with labeled parts A and B, including a component inside a container.C
text_image
DPANNES ET PROBLÈMES
Codes d'erreur
text_image
Technical diagram of a refrigerator with numbered parts and exploded view, including water filter, washing machine, and sink.natural_image
Line drawing of a multi-tiered cleaning machine with multiple cups and coiled sheets (no text or symbols)ANVÄNDNING
1. Påslagning
natural_image
Line drawing of a hand pouring liquid into a container with a circular top (no text or symbols)A
natural_image
Line drawing of a water heater connected to a device (no text or symbols)B
RENGÖ RING OCH UNDERHÅLL
text_image
Technical diagram showing exploded view of a device with labeled components A, B, C, D and directional arrows indicating movement or assembly.FEL OCH PROBLEM
Felkoder
text_image
Technical diagram of a refrigerator with numbered parts and labeled parts for assembly or maintenance reference.natural_image
Diagram of a device with a circular inset showing internal components and a tool, labeled '1' at bottom (no text or symbols on main diagram)
text_image
A B C 2natural_image
Technical diagram of a mechanical assembly with a circular component and threaded pipe, no text or symbols present
text_image
A B C 2HET APPARAAT VULLEN
natural_image
Line drawing of a shopping cart filled with various household items including mugs, spools, and a bottle (no text or symbols)WERKING
1. Inschakelen
natural_image
Line drawing of a hand pouring liquid into a container (no text or symbols)A

natural_image
Line drawing of a water tap connected to a rectangular device with a handle (no text or symbols)B
REINIGING EN ONDERHOUD
text_image
Technical diagram showing a device with labeled parts A and B, including a component inside a container.C
text_image
DPROBLEEMOPLOSSING
Foutcodes
text_image
Technical diagram of a refrigerator with numbered parts and exploded view, including water filter, sink, and cup.natural_image
Technical diagram showing a mechanical assembly with a magnified inset of a component (no text or symbols)
text_image
A B C 2WKŁADANIE NACZYŃ
natural_image
Line drawing of a multi-tiered cleaning machine with multiple cups and coiled sheets (no text or symbols)UŻYTKOWANIE
1. Włączanie
text_image
Technical diagram showing a device with labeled parts A, B, C, D and directional arrows indicating movement or flow.USTERKI I PROBLEMY
Kody usterek
text_image
Technical diagram of a refrigerator with numbered parts and labeled parts for assembly or maintenance reference.natural_image
Line drawing of a shopping cart filled with various household items including mugs, spools, and towels (no text or symbols)MODO DE EMPLEO
1. Encendido
natural_image
Line drawing of a hand pouring liquid into a container (no text or symbols)A

natural_image
Line drawing of a water tap connected to a rectangular device (no text or symbols)B