BG310M - Video camera Berger & Schröter - Free user manual and instructions
Find the device manual for free BG310M Berger & Schröter in PDF.
| Product Type | 4G Hunting Trail Camera |
| Brand | Berger & Schröter |
| Model | BG310M |
| Dimensions | 115 × 81 × 45 mm |
| Weight | 174 g (without batteries) |
| Power Supply | 2 rechargeable 18650 batteries (not included) or USB 5V/2A power supply |
| Image Sensor | 3 MP CMOS |
| Photo Resolution | 18 MP (day) / 14 MP (night); options 12 MP and 5 MP |
| Video Resolution | 1280 × 720 (720p) or 640 × 480 |
| Display | 1.44 inch TFT |
| Infrared | 2 black 940 nm LEDs, illumination range approx. 30 m |
| Motion Detection | PIR sensor, range 22 m, adjustable sensitivity |
| Storage | TF (microSD) card up to 32 GB (not included) |
| Connectivity | 4G/LTE, MMS, email, mobile app (iOS/Android), Molnus cloud |
| Antenna | Included (removable) |
| Audio | Built-in audio recording |
| Trigger Time | 0.7 seconds |
| Video Duration | 5 to 60 seconds (adjustable in 5 s steps) |
| Photo Burst | 1 to 3 photos per detection |
| PIR Interval | 0 s to 60 minutes |
| Remote Control | By SMS, mobile app, or PC software |
| Security | 4-digit password; certifications FCC, CE, RoHS |
| Warranty | 24 months |
| Operating Temperature | -20 °C to +60 °C |
| Operating Humidity | 5 % to 90 % |
| Package Contents | 1 camera, 2 batteries 18650, 1 strap, 1 antenna, 1 manual |
Frequently Asked Questions - BG310M Berger & Schröter
User questions about BG310M Berger & Schröter
0 question about this device. Answer the ones you know or ask your own.
Ask a new question about this device
Download the instructions for your Video camera in PDF format for free! Find your manual BG310M - Berger & Schröter and take your electronic device back in hand. On this page are published all the documents necessary for the use of your device. BG310M by Berger & Schröter.
USER MANUAL BG310M Berger & Schröter
text_image
BolyGuardInhaltsverzeichnis
1. Erste Schritte 3
natural_image
Line drawing of a surveillance device with antenna, control panel, and power outlet (no text or symbols)natural_image
Line drawing of a surveillance device with antenna, control panel, and solar panel (no text or symbols)text_image
USB Mass storage Power charging2.2 TF Karten Information
text_image
BMC CONFIG 29.03 Products Select Product Remember My Choice OK (Y) EXIT (N)text_image
BMC CONFIG : For MG983G-30M Boly Media Communications Co., Ltd. (BMC) WAP / Internet Setting Select Country Step 1 Select Operator Australia China-Mobile Austria China-Unicom Canada China-Unicom-3G China Others...... China HongKong Camera Setting Click "Default Setting" button if you don't know how to modify camera parameters ! Default Setting (D) Step 2 Check WAP / Internet Parameters (L) Change Setting (C) Step 4 Customer Information Setting Admin...Number : 150XXXX1234 Receive Email 1 : bolyguard@bolymedia.com Phone Number 2 : 150XXXX1234 Receive Email 2 : sales_sz@bolymedia.com Phone Number 3 : Receive Email 3 : bolyguard@gmail.com Phone Number 4 : Receive Email 4 : Attention Please ,The Data Above Will Be Saved in The Following File: E:\GSM\MG983G-30M.TXT Step 5 SAVE (Y) EXIT (N)
text_image
WAP / Internet Parameters Current WAP / Internet Parameters As Follows, You Can Modify Highlighted 4 Items If Necessary ! WAP Setting MMS URL : http://rmsec.monternet.com MMS APN : startup PORT : 80 MMS IP : 10 0 0 172 ACCOUNT : PASSWORD : CLEAR PARAMETERS (C) Internet Setting SEND EMAIL ADDR : holyguard@bolymedia.com SEND EMAIL PWD : ****** SEND EMAIL SERVER : smpt.bolymedia.com GPRS APN : start port : 80 GPRS ACCOUNT : GPRS PASSWORD : OK (Y) Cancel (N) Advanced... (V) Advanced Setup SMTP Server Enable encryption (E) This service requires SSL (S) This service requires STARTTLS (T) OK (Y) Cancel (N)text_image
My Devices Setting My Devices Get Features AdvancedSCHRITT 1

text_image
BGTools Add A Device Name Add A Device Sim Card Add A Product AddSCHRITT 2
text_image
Select Mail Server Boly Email Service Other Email ServiceSCHRITT 4
text_image
My Devices Setting A13 Device F24 Device SedimentSCHRITT 5

text_image
Get Photos Cellphone Email My home Internet ActiveSCHRITT 6 SCHRITT 7

text_image
Advanced Set password Super User Information SD Format System Checking Arming Disarming Version Number 2.1text_image
Setup Version Enter Exit OK Enter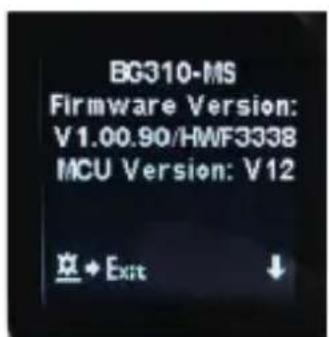
text_image
BG310-MS Firmware Version: V1.00.90/HWF3338 MCU Version: V12 草 + Exit ↓
text_image
BG310-MS Control Code: 129388 IMEI: 860425040166207E 空◆ Exit ↓text_image
Setup Send to Moinus Exit OK Save4G / LTE Scouting camera with PIR motion sensor, 2 black LEDs with 940nm, BG310 series Item No. 32052
text_image
BotyGuard MENUContent
-
Getting Started 28
-
Camera Operations 29
2.1 Batteries / Power Supply 29-30
2.2 TF Card Information 31
2.3 SIM Card Information 31
2.4 Camera Modes 32
2.5 Manage Images and/or Videos 33
2.6 Sending via MMS/ 4G / 3G / 2G /Molnus 33
2.7 Password Setup 34
- Camera Setup Settings & Display 35
3.1 Settings Interface & Display 35
3.2 Wireless Model Setup 36
3.2.1 Mobile Communication 36
3.2.2 Setup Software of PC 36-38
3.2.3 Setup for Mobile applications 38-40
3.3 Cloud Service - Molnus 41-42
3.4 Camera Setup Options 42-46
-
Troubleshooting 47
-
PIR Detection Zone 48
-
Technical Specifications 49
-
Parts List 50
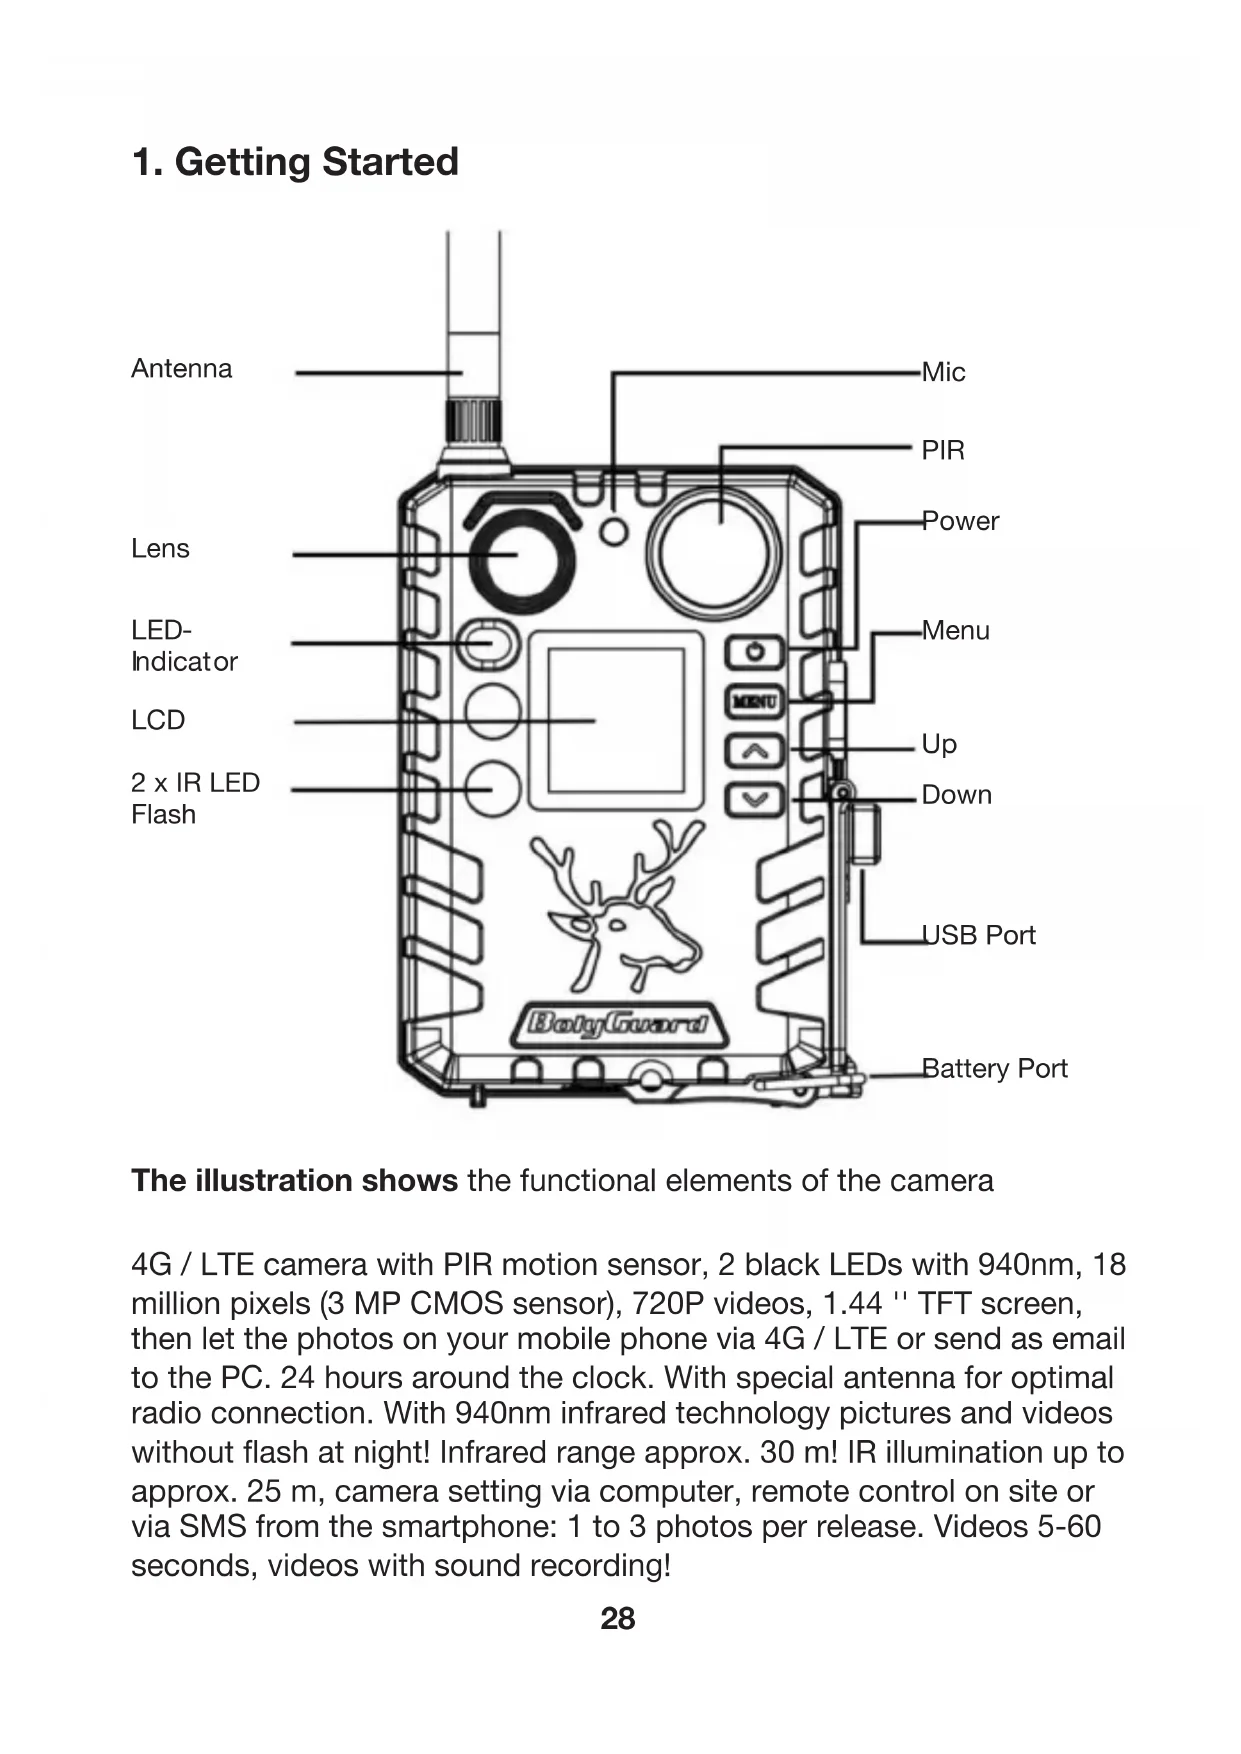
1. Getting Started
text_image
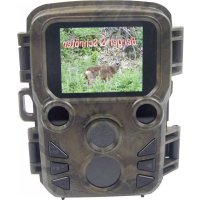
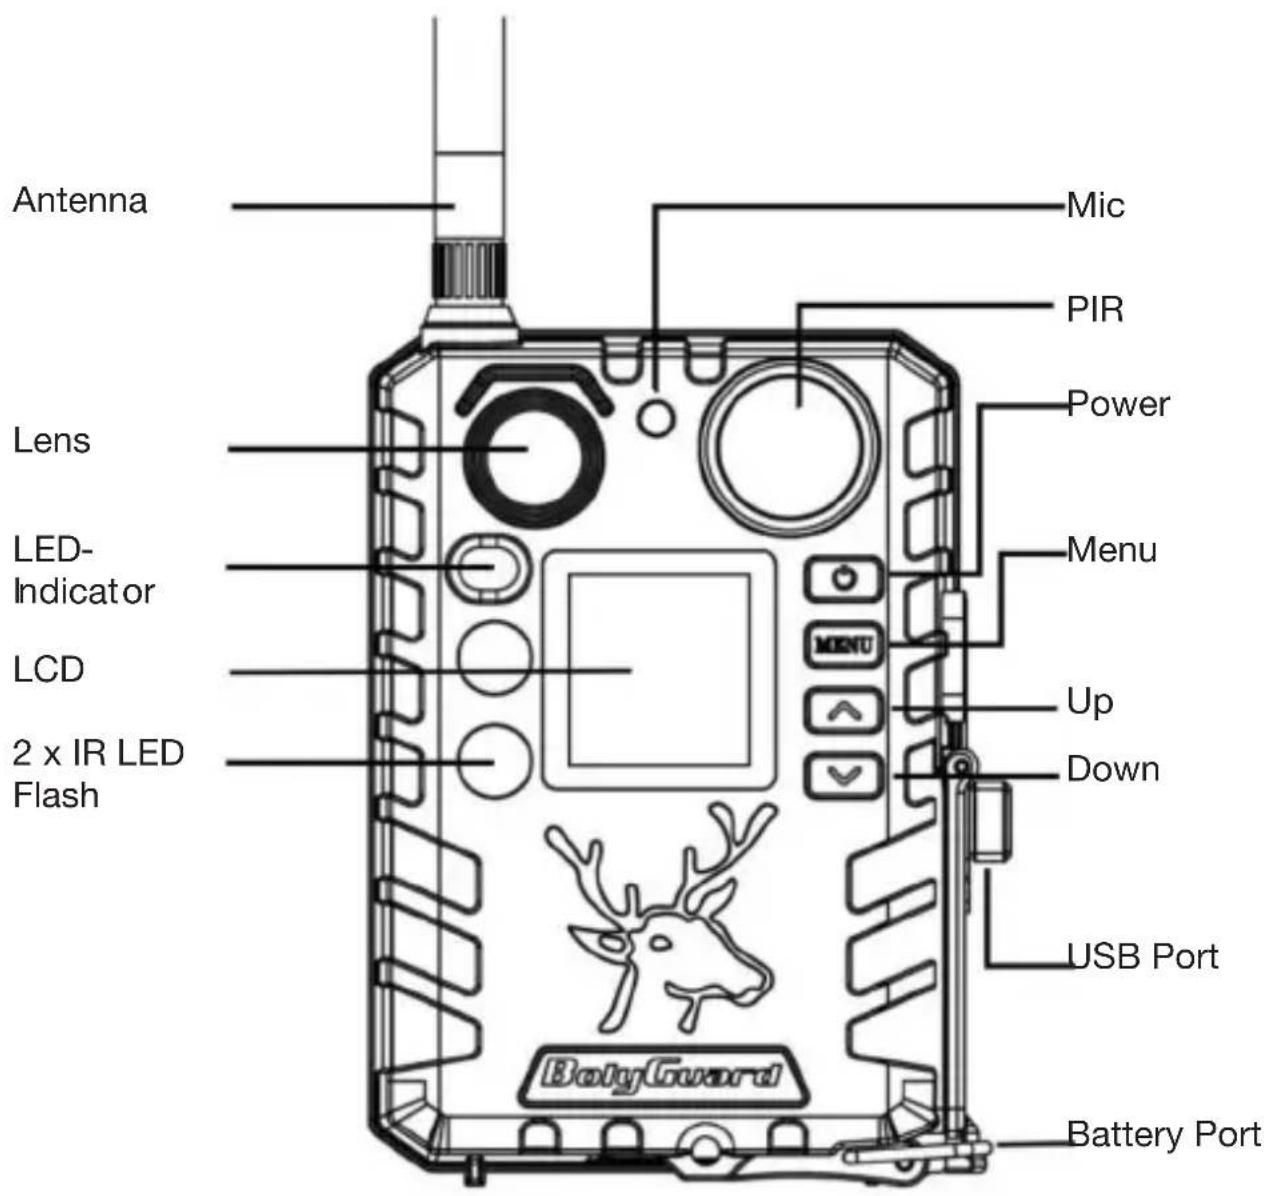
Antenna Lens LED-Indicator LCD 2 x IR LED Flash Mic PIR Power Menu Up Down USB Port Battery Port BotygwareThe illustration shows the functional elements of the camera
4G / LTE camera with PIR motion sensor, 2 black LEDs with 940nm, 18 million pixels (3 MP CMOS sensor), 720P videos, 1.44 " TFT screen, then let the photos on your mobile phone via 4G / LTE or send as email to the PC. 24 hours around the clock. With special antenna for optimal radio connection. With 940nm infrared technology pictures and videos without flash at night! Infrared range approx. 30 m! IR illumination up to approx. 25 m, camera setting via computer, remote control on site or via SMS from the smartphone: 1 to 3 photos per release. Videos 5-60 seconds, videos with sound recording!
2. Camera Operations
2.1 Batteries / Power Supply
●Battery
The camera is powered by 2x18650 batteries. (pointed head, 18650 battery, length: 67\~69mm)
- Keep lithium-ion batteries away from extreme temperatures, fire and contact with liquids.
- Make sure that the lithium-ion battery is not damaged and is not exposed to mechanical loads. Avoid falling on the floor! Even with tiny damage, the battery must be replaced immediately for safety reasons.
- If you discover moisture or residues, this may be the first indication of a degassing of the lithium-ion battery. Take the defective battery to the hazardous waste.
- Only charge batteries under supervision. Use a suitable, high-quality charger. It should stop charging automatically when the charging voltage is reached.
- Do not bring lithium-ion batteries into contact with metallic objects. Otherwise there is a risk of short circuit. Get a protective box in which you can take your batteries with you. (This means, for example, that you must not put batteries in your pocket with your car key.)
- Do not use batteries after deep discharge.
- Do not use damaged batteries, even if the damage is minimal.
- If a battery gets hot, it is defective and should be removed and stored in a fire-proof place.
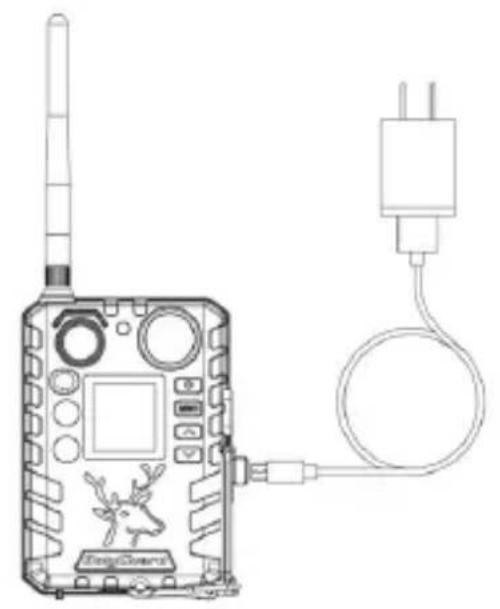
●External power supply
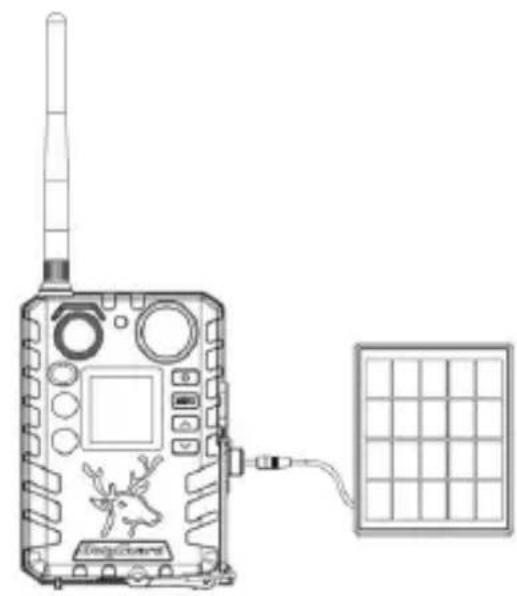
It is also possible to power the device or charge the 18650 battery in the device via an external USB power supply adapter(5V/2A) or solar panel. (External power supply not included)
natural_image
Line drawing of a surveillance device with antenna, control panel, and cable (no text or symbols)Charging by USB power supply

natural_image
Line drawing of a surveillance device with antenna, driver, and solar panel (no text or symbols)Charging by solar panel
USB port function, in this mode mass storage or charging mode is displayed when the USB cable is plugged in.
●Charging function
In this mode, USB charges the camera's 18650 batteries.
●Memory and charging function.
When you select the Save mode, the camera functions as a storage device. You can read or copy the photos or videos on the TF card. When you select the Charging mode, charges the camera's 18650 batteries.

text_image
USB Mass storage Power charging2.2 TF Card Information
This camera uses a TF card, to take full advantage of the latest technologies, we recommend Class 10 TF cards or better, which have fast transfer speeds and long durability for extensive shooting in the most extreme outdoor conditions.
●Insert the TF card into the camera before turning on the camera
This camera supports up to a 32GB capacity TF card and has no built-in internal memory. The camera will not function without the TF card properly inserted into the camera.
●Do not remove the TF card while the camera is on
Removing the TF card while the camera is on risks damaging the internal components of the camera.
●If you experience any problems with an inserted TF card
Try reformatting the TF card by using the camera's main settings option.
2.3 SIM Card Information
Insert the SIM card into the camera before turning on the camera
The camera SIM card slot is sized for a standard SIM card. If you have a nano or micro size SIM card, utilizing a SIM card adapter (included with most of our cameras) will be required to connect your camera to the cellular network via SIM card.
NOTE: The camera will still function without a SIM card. The SIM card is needed only for the wireless/cellular messaging capabilities.
2.4 Camera Modes
The different modes are accessed by pressing the OK button, marked on the camera.
●OFF Mode
To turn off the camera when the display screen is active, press and hold the OK button until the screen powers off. The camera will still consume a small amount of battery power while in OFF mode. We recommend removing the batteries if the camera will not be used for a long period of time.
- SETUP Mode [Test Mode]
To turn on the camera, press and hold the OK button until the display screen activates,
In this mode, you can customize the camera settings or playback pictures and videos the camera has taken on the LCD display.
After switching the camera to the ON position and if the camera is left alone for more than 20 seconds, the camera will automatically switch to Hunting Mode, as described below.
●On [Hunting Mode]
The camera will take pictures or videos when motion is detected and/or at specific time intervals, according to the programmed settings. Hunting mode is automatically activated if the camera is turned on and left alone for 20 seconds (BG310-M 60 seconds). Before entering Hunting Mode, the front (red) LED light will continuously blink for approximately 10 seconds and then turn off. This preset time allows you to adjust the camera's position if needed before the camera becomes active. To “wake” the camera and access the camera menu functions, press and hold the OK button until the display becomes active.
2.5 Manage Images and/or Videos
Place the camera in TEST/SETUP mode and press the POWER button to view images or videos, the latest image or video will be shown on the LCD screen. Press the ▲/ Up or ▼/ Down buttons to cycle through the pictures and videos were taken.
NOTE: Video cannot be viewed directly on the camera.
2.6 Sending via MMS/ 4G / 3G / 2G /Molnus
Images can be sent directly to your wireless device/email/Molnus, based on the Send Mode settings.
1) Insert the SD & SIM card into the camera before turning on the camera.
2) Turn on the camera in TEST/SETUP mode. Make sure the SIM card is recognized, and signal strength is adequate.
Indicates the camera recognizes the SIM card.
X Indicates the camera do not recognize the SIM card or the SIM card is not working due to connection/activation issues.
3) Select the send mode setting and fill in the correct parameters. You have the options of Molnus (default setting), Phone MMS, Email MMS, or Email / 4G / 3G / 2G. Video files will compressed to less than 20 Mbytes.
4) Press "Power" to view the photos stored on the camera.
5) Find the picture you want to send manually.
6) Press the MENU button to pull up the Send To option.
7) Press Menu again to send the picture via the messaging option chosen in your camera settings.
2.7 Password Setup
For encryption settings, enter your four-digit pre-set password to enter the camera. This function helps protect your privacy.
This function is off by default. To use this function:
2.7.1 Press ▲ / ▼, to adjust the number from 0\~9, and ◀ / ▶ to change the password.
2.7.2 The same password must be entered twice to take effect.
2.7.3 After the password is set up, you will be required to enter the same password on the next boot to enter the camera.
If you forgot your password, please contact us for assistance.
3. Camera Setup Settings & Display
3.1 Settings Interface & Display
To update the camera settings, turn the camera on to activate the display screen.
OK/Power:
Switch on and off, save parameter settings, enter or exit playback mode.
Menu: Enter or exit Menu
▲/ Up: Setting items switching
▼/ Down: options parameter switching, manually take a photo or record a video.
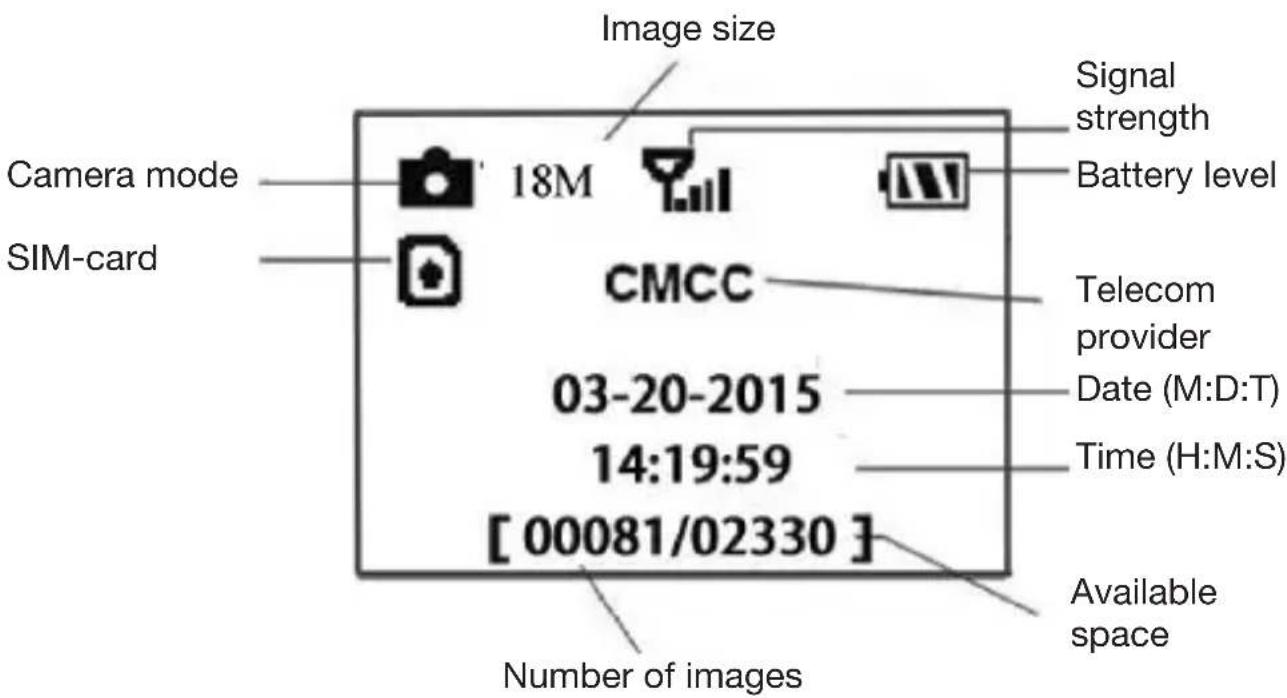
When the camera is in the ON Mode, the screen will activate and display the following:
text_image
Image size Camera mode SIM-card 18M CMCC 03-20-2015 14:19:59 [00081/02330] Signal strength Battery level Telecom provider Date (M:D:T) Time (H:M:S) Available space Number of imagesIndicates the camera recognizes the SIM card.
X Indicates the camera or the SIM card do not recognize the SIM card is not working due to connection/activation issues.
Note: SIM card/Signal strength/Telecom provider only appear in models with a communication function.
3.2 Wireless Model Setup
The features described in this section only support communication models.
3.2.1 Mobile Communication
The camera can receive and respond to commands sent via SMS, Molnus and the Apple or Android application, as long as the camera is correctly connected to a wireless carrier.
To enable the SMS functionality using the mobile application, you must complete the following steps:
●Place the camera in Test/Setup Mode and go into the menu Setup options
●Set SMS control to ON
For MMS/GPRS/Molnus functionality, the following menu Setup options will need to be set:
●MMS network settings (varies depending on carrier)
●GPRS network settings (varies depending on carrier)
●Molnus (varies depending on carrier)
3.2.2 Setup Software of PC
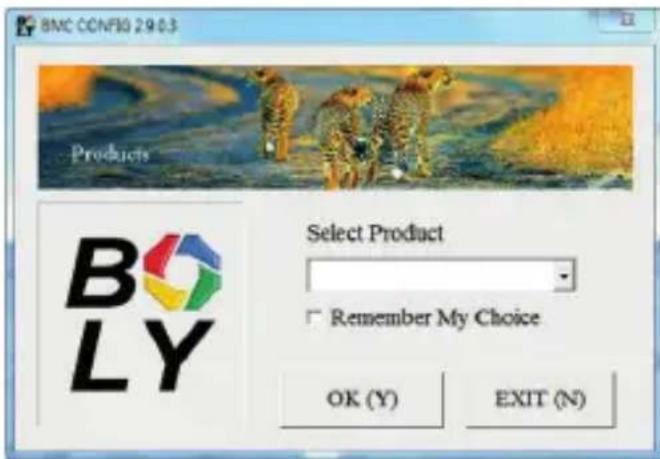
Download the camera setup application (BMC_config.zip), from our website: www.bolymedia.com/index/Support, open the software and select camera model.
text_image
BMC CONFIG 2.9.0.3 Products Select Product Remember My Choice OK (Y) EXIT (N)STEP 1> Select your country and carrier.
STEP 2> Check WAP/Internet Parameters.
Fill out the required fields (marked with an asterisk), enter Email server such as “smtp.gmail.com” or “smtp.bolymedia.com.”
text_image
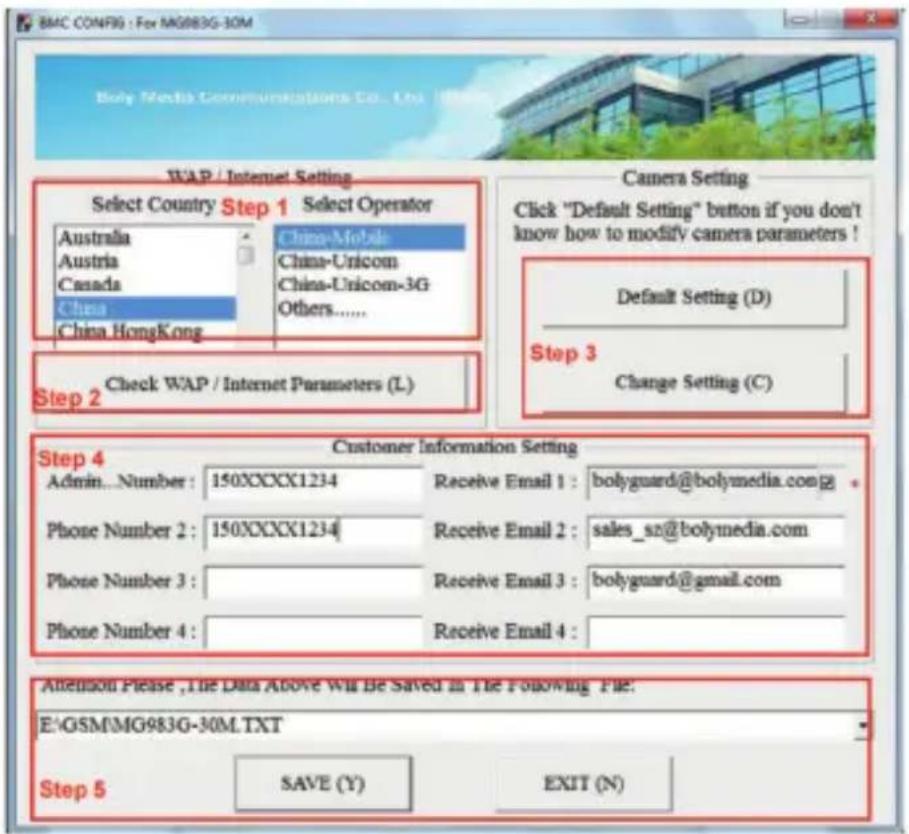
BMC CONFIG : For MG983G-30M Boly Media Communications Co., Ltd. WAP / Internet Setting Select Country Step 1 Select Operator Australia China-Mobile Austria China-Unicom Canada China-Unicom-3G China Others...... China Hong Kong Camera Setting Click "Default Setting" button if you don't know how to modify camera parameters ! Default Setting (D) Step 2 Check WAP / Internet Parameters (L) Change Setting (C) Step 4 Customer Information Setting Admin...Number : 150XXXXX1234 Receive Email 1 : bolyguard@bolymedia.com Phone Number 2 : 150XXXXX1234 Receive Email 2 : sales_sz@bolymedia.com Phone Number 3 : Receive Email 3 : bolyguard@gmail.com Phone Number 4 : Receive Email 4 : Attention Please ,The Data Above Will Be Saved in The Following File: E:\GSM\MG983G-30M.TXT Step 5 SAVE (Y) EXIT (N)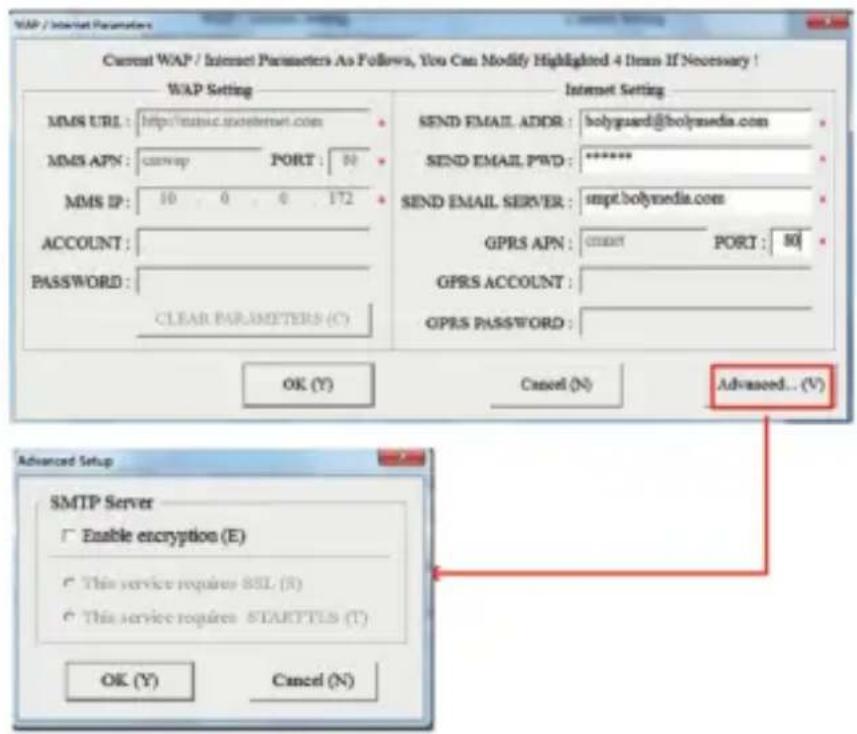
text_image
WAP / Internet Parameters Current WAP / Internet Parameters As Follows, You Can Modify Highlighted 4 Items If Necessary ! WAP Setting MMS URL : http://mmsc.mosinternet.com MMS APN : curlup PORT : 00 MMS IP : 10 0 0 172 ACCOUNT : PASSWORD : CLEAR PARAMETERS (C) Internet Setting SEND EMAIL ADDR : bolysued@bolynmedia.com SEND EMAIL PWD : ****** SEND EMAIL SERVER : smpt.bolynmedia.com GPRS APN : cmnet PORT : 50 GPRS ACCOUNT : GPRS PASSWORD : OK (Y) Cancel (N) Advanced... (V) Advanced Setup SMTP Server Enable encryption (E) This service requires SSL (S) This service requires STARTTES (T) OK (Y) Cancel (N)STEP 3> Choose between default or manual settings. For first time users, we suggest using the default settings.
STEP 4> Enter the phone number of the phone to receive/send the remote commands and images in the “administrator number” field and email address in “Receive Email 1” field (This is NOT the phone number of the inserted SIM card that resides in the camera).
STEP 5> Save the .txt file in the GSM folder of SD card after all settings are complete. The program names the .txt file. The txt file must be loaded into the specific camera's GSM folder.
If your country or SIM card provider is not listed, select “Others.” You will need to ask the SIM card provider for their specific MMS, URL, MMS APN, Port, MMS IP, Account, Password, GPRS APN, GPRS account, GPRS password. For sending emails, your email service provider will be able to provide the send email server and port settings.
3.2.3 Setup for Mobile applications
When the camera is switched to the ON mode, you can change some of the basic camera settings on the mobile application. There are currently apps supported by Android and Apple devices.
Charges
or fees may apply when sending text messages to the camera depending on your cellular provider.
●For Android, you can search BGTools from the Google store or download the application directly from our website, under the Downloads section:
http://www.bolymedia.com/index/Support
●For Apple, search BGTools in the official Apple Apps store.
BG Tools Usage Instructions for Android App
The Android APP makes it easy to communicate with the camera, so you don't need to edit the SMS.
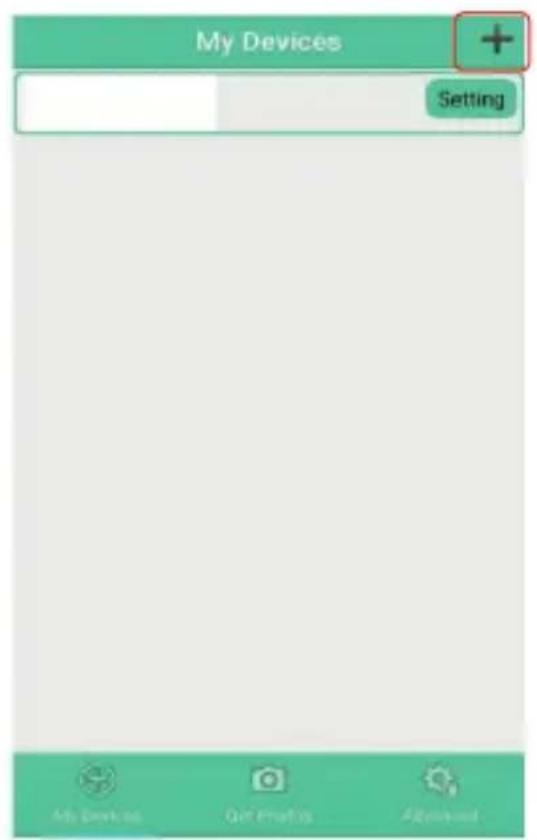
STEP 1: Open the BG Tools app and click on the icon +, to add a new device.
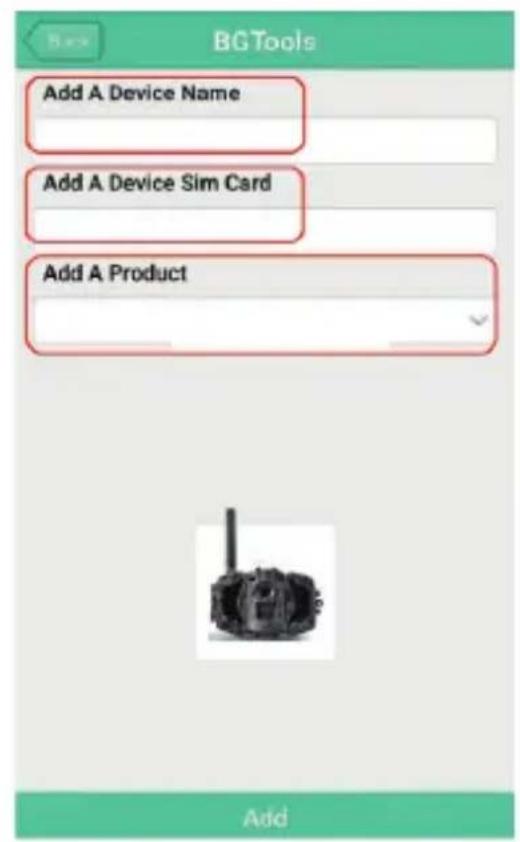
STEP 2: Input the model of your camera.
Input your SIM card number which is inserted in your camera. Select your camera model number then click "Add" to finalize.
text_image
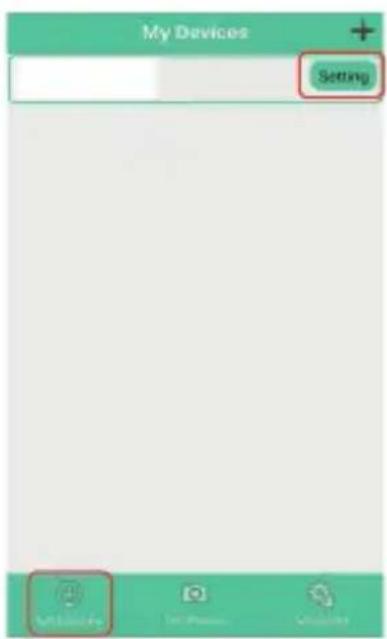
My Devices Setting My Devices Get Features AdvancedSTEP 1
text_image
BGTools Add A Device Name Add A Device Sim Card Add A Product AddSTEP 2
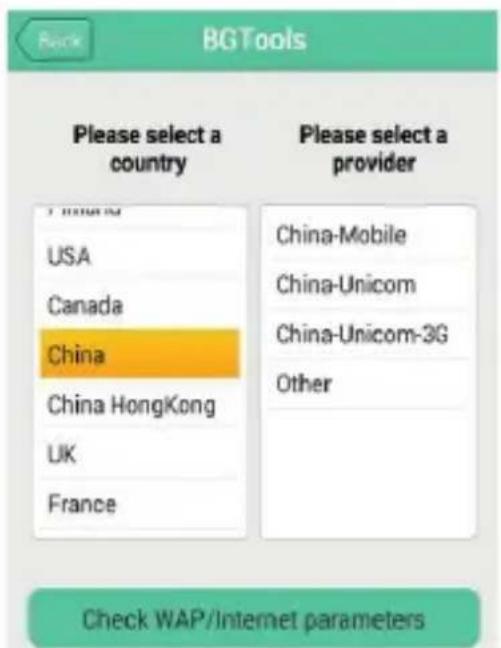
STEP 3: Click “send,” then choose the country and provider that corresponds with your SIM card (which is inserted in your camera). After that, choose “Check WAP/Internet Parameters” to check whether you have all the required parameters filled in. The “User name and User Password” is your MMS name and password.
text_image
Back BGTools Please select a country USA Canada China China HongKong UK France Please select a provider China-Mobile China-Unicom China-Unicom-3G Other Check WAP/Internet parametersSTEP 3
text_image
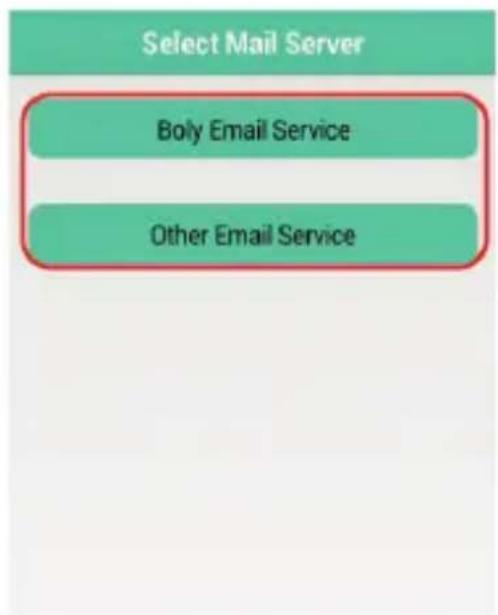
Select Mail Server Boly Email Service Other Email ServiceSTEP 4
STEP 4: In the Select Mail Server: you can decide on using a Boly Email or Other Email service. Select “my device” to add or delete a device.
STEP 5: Select "Setting" to set users parameters or set to default.
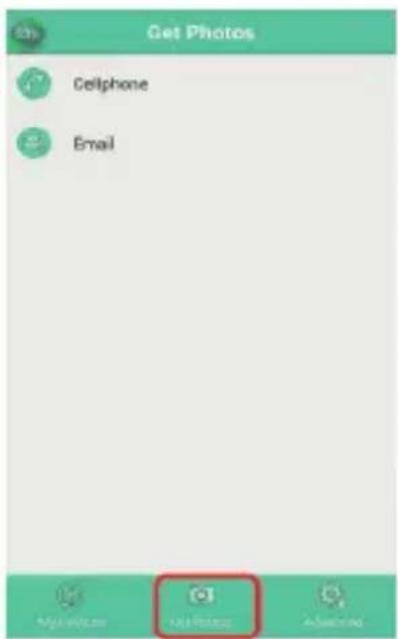
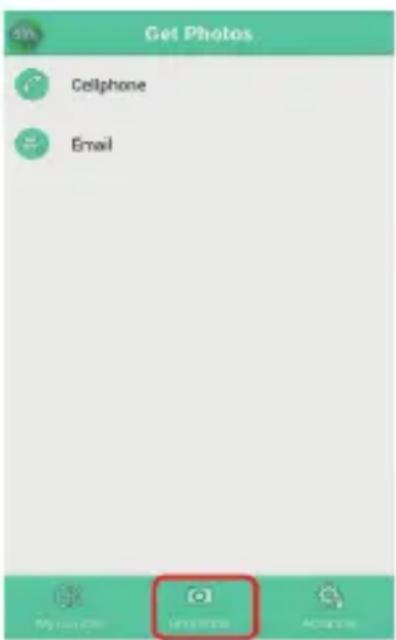
STEP 6: Select "Get Photos" means you can get a photo from your camera device. There are two ways to send an image via:
Cellphone: Send MMS to phone.
Email: Send an email by GPRS.
text_image
My Devices Setting M1000000 To Press ClickSTEP 5
text_image
Get Photos Cellphone Email Add PhotoSTEP 6 STEP 7

text_image
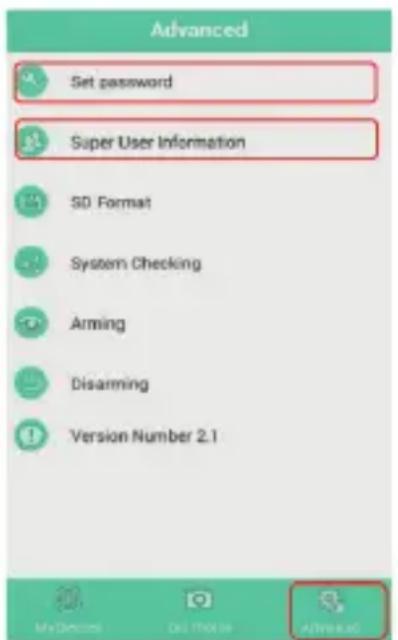
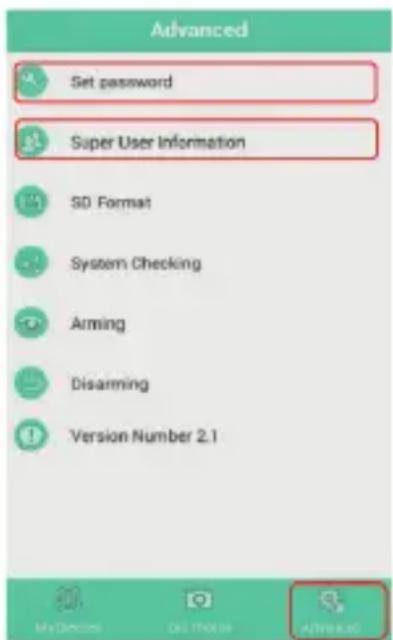
Advanced Set password Super User Information SD Format System Checking Arming Disarming Version Number 2.1STEP 7: For more settings, select “Advanced” to set Super user information, change the password, format the SD card, system checking, arming, or disarming.
Set password:
If you forget your superuser password, you can get a new one.
Add or Delete a device:
Android: Select "My Device" to add a device, a long click on the device to select the delete option.
IOS: Click“ , “ to add a device and choose your device, or slide to the left to delete it.
3.3 Cloud Service - Molnus
Molnus is a cloud service that allows users to access to transfer and store images taken through the cameras with the use of compatible devices or a computer.
To get started, you need to supply the camera with batteries and a SIM-card that has internet access.
You also need to have the phone number and the APN name to the SIM-card you will use for the camera.
The operator of the SIM card provides the APN name. Each operator has its own APN name. If not present in any documents sent along with the SIM-card, then please check the operator's homepage for APN settings.
IMEI, Control Code can be found on your camera. You will need a SIM-card that has internet access. Start the camera in SETUP mode, look for the operator's name in camera display, then check the Version.

text_image
Setup Version Enter OK+ Exit OK+ Enter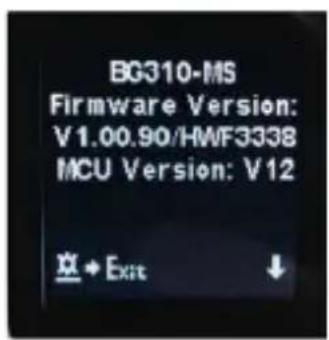
text_image
BG310-MS Firmware Version: V1.00.90/HWF3338 MCU Version: V12 Exit + Exit ↓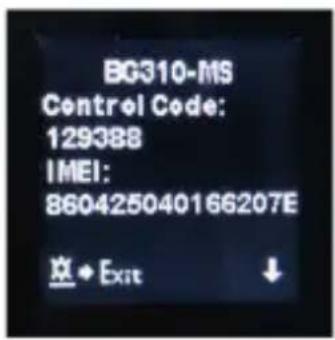
text_image
BG310-MS Control Code: 129388 IMEI: 860425040166207E ExitStep 1: Register your Molnus account. (In Molnus).
Step 2: Log in to your Molnus account and go to the My Cameras page. (In Molnus).
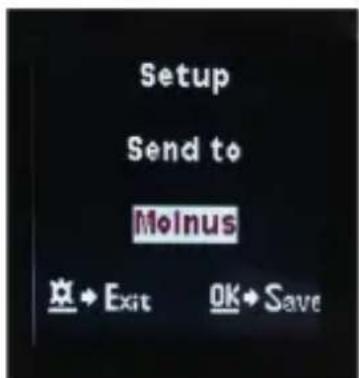
Step 3: Slide the functions switch to SETUP position on your camera, and make sure Send mode is "Molnus." (On camera).
text_image
Setup Send to Moinus Exit OK SaveStep 4: Press the Register camera button to register your camera. (In Molnus).
Step 5: Slide the functions switch to ON position on your camera. Quickly place the device with the camera facing an area with no movement, for example, against the wall. (On camera).
Step 6: Press the Register button in Molnus, and wait for about 5 minutes. (In Molnus).
The registration should now be done, and the camera should now be able to upload images to Molnus.
Test the function by moving in front of the camera. Within a few seconds to a minute, the images will show up in the gallery in Molnus.
If you would like to use Molnus on your smartphone, please download the app on Google Play or Apple App Store. For more details please check on the website: https://www.molnus.com/
3.4 Camera Setup Options
To view the camera settings menu, press OK to “wake up” the camera. When the screen is active, press MENU to enter into the menu settings. Use the
▲/ Up key to select the different items, use
▼/ Down key to select the different options.
Press OK to save the setting and press MENU to exit the camera settings menu.
Main Options Descriptions
| Language Language options include: English, Czech, German, French, Spanish, Swedish, Finnish.Default: English |
| Camera Mode There are three camera modes:Photo: to take a photoVideo: to record a videoPicture + Video: to take a picture with a video clip.This mode disables the photo burst function.Default: Photo |
| Set Clock Set the date and time of the camera. The date format is month/day/year and the time format are hour: minute: second. |
| Photo Size Choose the image size. 18 MP Day - 14 MP Night,12 MP Day - 10 MP Night, 5 MP Day - 5 MP NightDefault: 18 MP Day - 14 MP Night |
| Photo Burst Choose the number of photos taken after the camera is triggered: 1 Photo, 2 Photo, or 3 Photo.If Pic+Video is selected, Photo burst defaults to 1 photo regardless of the entered value.Default: 1 Photo |
| Video Size Choose the video size: 1280x720 or 640x480.Default: 1280x720 |
| Video Length Choose the duration of the video recording. Valid values extend from 5-60 seconds in 5 second increments.Default: 10 seconds |
| Time Lapse The camera can capture images or videos at a preset time interval regardless of motion detection. Changing this setting to a non-zero value turns on Time Lapse mode, and the camera will take photos at the set interval time.If PIR Trigger/Sensitivity and Time Lapse options are BOTH OFF, the camera will not capture any photos or videos.Default: Off |
Main Options Descriptions
| PIR Trigger / This setting is for the sensitivity of the PIR sensor. There are Sensitivity four sensitivity parameters: High, Normal, Low, and Off. It is recommended to use HIGH sensitivity in areas with little environmental interference and warmer, humid climates. Use LOW sensitivity for areas that have a lot of interference. The sensitivity of the PIR is affected by temperature. Higher temperatures lead to a lower sensitivity.If PIR Trigger/Sensitivity and Time Lapse options are BOTH OFF, the camera will not capture any photos or videos.Default: Normal |
| PIR-Interval This setting indicates how long the PIR sensor will be disabled after each camera triggering. During this time the PIR sensor will not react to any detected motion. The PIR Interval can be set between zero seconds to a maximum of 1 hour. |
| Work Day Choose the days of the week you want the camera to workThis setting is only available in Hunting Mode.Default: All |
| Work Hour This parameter defines a certain time in a day when the camera can be triggered, while the device will shut off during non-working hours. The effective value ranges from 00:00 to 23:59. When this parameter is set to Off, the camera works at all times. When the timer switch is ON, the camera works only during the time according to the preset settings.Default: Off |
| Camera Position Used for multiple cameras in an area. You can set an A-Z indicator for each of your cameras to distinguish between which photos are from a specific camera.Default: Off |
Main Options Descriptions
| Recycle Storage | In hunting mode, if the SD card is full, the oldest images or videos will be overwritten by new pictures or videos. This keeps you from having to retrieve your memory card manually. In SETUP mode, this option is disabled.Default: Off |
| Send To Send the image to your phone or email options. | |
| ●TPhone [MMS]: Send the image to the cellular device via WAP.●Email [MMS]: Send the image to an email address via WAP.●Email [GPRS]: Send the image to an email address via SMTP.●Molnus: Send the image/video to Molnus via WAP.Default: Molnus | |
| Sendemodus | There are 3 options for this setting.Photo Mode: This setting will send summarized information, and the last picture was taken at the end of the time you had set.Video Mode: The summarized information will include how many videos were taken and the last video taken at the end of time you had set (less than 10M).Pic+Video Mode: The summarized information will include how many videos and pictures were taken and the last picture taken at the end of time you have set.●Instant: Only works in ON mode. The camera will send a message instantly after it captures a photo or video.●OFF: Disables all communication functions.NOTE: Some cellular carriers limit the size of files being sent. Some image and video files may be too large to send.Default: Instant |
Main Options Descriptions
| SMS Control SMS Control enables mobile communication functionality. When SMS Control to ON, the camera can receive and respond to your SMS commands. Default: Off |
| Attachment Size Setting the picture size which will be sent to your phone or email. There are 3 options for this setting.Low: Sends a severely compressed picture.Normal: Sends a slightly compressed picture.*High: Sends the original pictures.Default: Low |
| Password Set Enter your four digits password to enter your camera when powering it on.Default: Off |
| Format SD All information on the SD card will be deleted. Make sure to make a backup of important data already on the SD card. |
| Default Settings Restores all settings back to default values. |
| Version Shows firmware Version. |
Note: After changing EACH setting in the Setup menu, you must press OK, or the camera will not save new settings.
4. Trouble Shooting
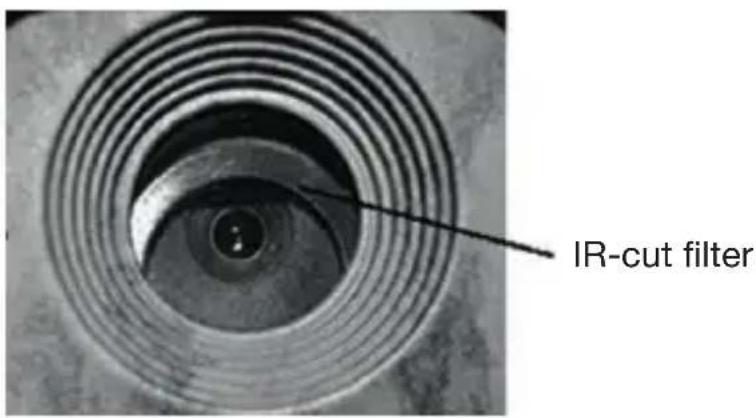
1 There is something in front of the camera lens. Is the camera broken?
text_image
IR-cut filterA: The camera is not broken. It's an IR-cut filter. When the camera is powered on, the IR-cut will be reset and cover the lens. Only when the camera is powered off, the IR-cut will be at a random place.
2 The display screen is suddenly black.
A: The camera may be in “Hunting mode.” Press MENU to wake it up. If there is no response, the camera may be powered off. Please check if the batteries are still good and in place. Once battery power and placement is verified, press and hold down the OK/POWER button until the display turns on, indicating the camera powering up.
3 Why my phone can't receive MMS?
A: MMS/GPRS function needs the SIM cards in both your camera and phone to have enough balance and to be opened to data exchange.
5. PIR Detection Zone
This camera has a new patented PIR design which allows the detection range to reach to 22 m in good environments. The following picture shows the compared detection zone between normal PIR and the new patented PIR.

radar
| Angle | normal PIR | new patented PIR | |-------|------------|------------------| | 0° | ~1.5 | ~2.8 | | 5° | ~1.2 | ~2.0 | | 10° | ~1.0 | ~1.5 | | 15° | ~0.8 | ~1.0 | | 20° | ~0.6 | ~0.7 | | 25° | ~0.4 | ~0.4 | | 30° | ~0.2 | ~0.2 |The PIR detection angle ( ) is smaller than the field of view (FOV) ( ). The advantage of this design is to reduce empty an empty picture's rate and capture most, if not all, objects in motion.

text_image
α β α = Detection angle β = F. O. V. Angle6. Technical Specifications
| Image Sensor 3MP CMOS Sensor, Lens F/NO=2.4; (FOV, Field of View)=57° | |
| Black IR LED Type 940nm | |
| Black IR LED Number 2 piece | |
| PIR Detection Range 22m/70ft | |
| Illumination Distance approx 30 m | |
| Display Screen 1,44” TFT | |
| Memory Card From 8 MB to 32 GB | |
| Image Resolution 18 MP day - 14 MP night | |
| 12 MP day - 10 MP night | |
| 5 MP day - 5 MP night | |
| Video resolution 1280x720,640x480 | |
| PIR Sensitivity Adjustable (High/Normal/Low/OFF) | |
| Trigger Time 0,7 sec. | |
| Weight without batteries 174 g | |
| Operation/Storage Temperature | -20 - +60°C / -30 - +70°C |
| PIR-Intervall | 0 sec. - 60 min. |
| Photo Burst | 1-3 |
| Video Length | 5-180 sec. |
| Power Supply | 2 x 18650 batteries |
| Sound Recording | Available |
| Mounting | Belt |
| Dimensions | 115x81x45 mm |
| Operation Humidity 5 % - 90 % | |
| Security Authentication | FCC, CE, RoHS |
Parts List
Part Name Quantity
| Digital Camera One |
| 18650 Akku Two |
| Belt One |
| User’s Manual One |
| Antenna One |

Dear Customer! Please note! Depending on battery regulations you are required to used or defective batteries and accumulators, at no cost to you, return it to us

Every consumer is legally obliged to dispose of WEEE separately from the household waste and to dispose of at a collection site of his community / City District for example. Electric appliances are marked with the crossed out dustbin, accepted there for free.
Guarantee: We grant on this product a guarantee of 24 months, according to the pertinent statutory regulations, from the date of the purchase by the initial user.
This guarantee covers all material or production defects; however, it does not cover the following: Faults and defects resulting from normal wear, including wearing parts, seals etc.; damages or defects arising or as a result of alteration.
We reserve the right to reject a guarantee claim if the purchase cannot be proven, or if the product was improperly serviced or was obviously erroneously maintained (not or insufficiently maintained; cleaning and servicing).
Please retain the proof of purchase documentation because this is valid as proof of date of purchase.
In case of a guarantee claim, the machine must be returned to the dealer in a clean state, and in its original packaging if possible, and not disassembled in any way. Proof of purchase must also be included.
Copyright by
Bangen & Schröten
All rights reserved. It is not permitted without written approval from Berger + Schröter to reproduce these operating instructions. It is also not permitted to reproduce extracts in any form that have been created or processed by use of electronic, mechanical or chemical procedures. Technical changes can be made at any time without prior announcement. The operating instructions are corrected regularly. We assume no liability for technical and typographical errors and their results.
(F) MODE D'EMPLOI
text_image
BolyGuardContenu
natural_image
Line drawing of a weather monitoring device with antenna, control panel, and power outlet (no text or symbols)Chargement via l'alimentation USB
natural_image
Line drawing of a surveillance device with antenna, control panel, and solar panel (no text or symbols)text_image
USB Mass storage Power chargingtext_image
BMC CONFIG : For MG983G-30M Boly Media Communications Co., Ltd. (BMC) WAP / Internet Setting Select Country Step 1 Select Operator Australia China-Mobile Austria China-Unicom Canada China-Unicom-3G China Others...... China HongKong Camera Setting Click "Default Setting" button if you don't know how to modify camera parameters ! Default Setting (D) Step 2 Check WAP / Internet Parameters (L) Change Setting (C) Step 4 Customer Information Setting Admin...Number : 150XXXX1234 Receive Email 1 : bolyguard@bolymedia.com Phone Number 2 : 150XXXX1234 Receive Email 2 : sales_sz@bolymedia.com Phone Number 3 : Receive Email 3 : bolyguard@gmail.com Phone Number 4 : Receive Email 4 : Attention Please ,The Data Above Will Be Saved in The Following File: E:\GSM\MG983G-30M.TXT Step 5 SAVE (Y) EXIT (N)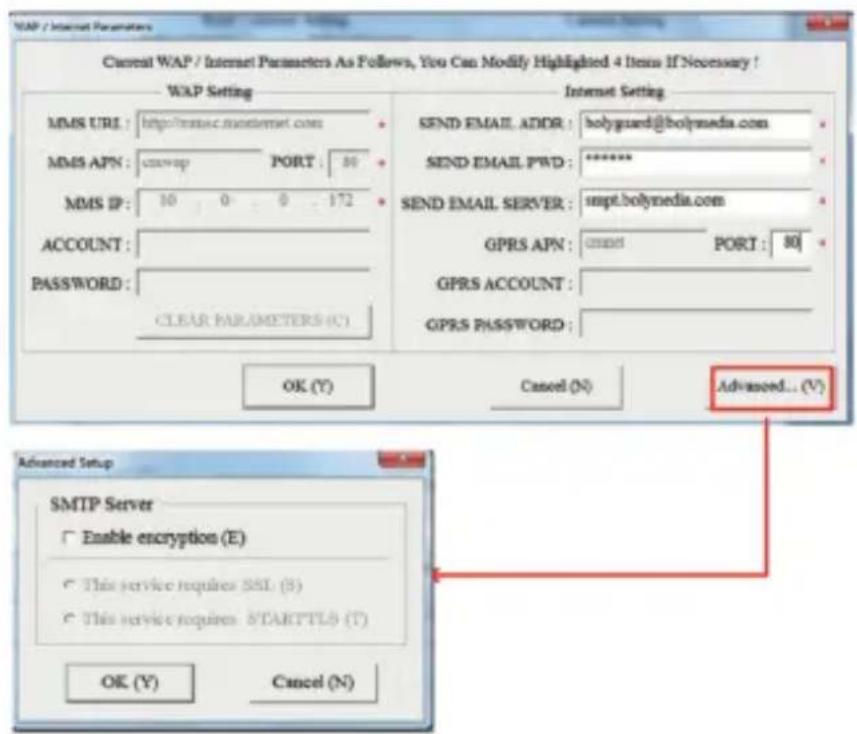
text_image
WAP / Internet Parameters Current WAP / Internet Parameters As Follows, You Can Modify Highlighted 4 Items If Necessary ! WAP Setting MMS URL : http://rmsec.monternet.com MMS APN : startup PORT : 80 MMS IP : 10 0 0 172 ACCOUNT : PASSWORD : CLEAR PARAMETERS (C) Internet Setting SEND EMAIL ADDR : holyguard@bolymedia.com SEND EMAIL PWD : ****** SEND EMAIL SERVER : smpt.bolymedia.com GPRS APN : start port : 80 GPRS ACCOUNT : GPRS PASSWORD : OK (Y) Cancel (N) Advanced... (V) Advanced Setup SMTP Server Enable encryption (E) This service requires SSL (S) This service requires STARTTLS (T) OK (Y) Cancel (N)text_image
My Devices Setting My Devices Get Features AdvancedÉTAPE 1

text_image
BGTools Add A Device Name Add A Device Sim Card Add A Product AddÉTAPE 2
text_image
Select Mail Server Boly Email Service Other Email ServiceÉTAPE 4
text_image
My Devices Setting A13 Device F24 Device SedimentÉTAPE 5
text_image
Get Photos Cellphone Email My home Internet ActiveÉTAPE 6 ÉTAPE 7
text_image
Advanced Set password Super User Information SD Format System Checking Arming Disarming Version Number 2.1text_image
Setup Version Enter Exit OK Enter
text_image
BG310-MS Firmware Version: V1.00.90/HWF3338 MCU Version: V12 草 + Exit ↓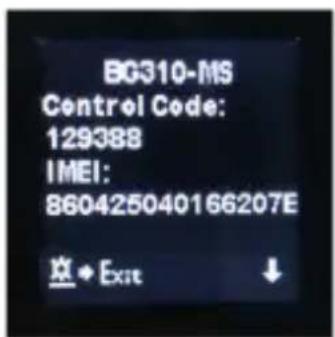
text_image
BG310-MS Control Code: 129388 IMEI: 860425040166207E 空◆ Exit ↓text_image
Setup Send to Moinus Exit OK Savetext_image
USB Mass storage Power chargingtext_image
BMC CONFIG 29.03 Products Select Product Remember My Choice OK (Y) EXIT (N)STAP 1> Selecteer uw land en mobiele provider. STAP 2> Controleer de WAP / Internet parameters.
text_image
BMC CONFIG : For MG983G-30M Body Media Communications Co., Ltd. (2006) WAP / Internet Setting Select Country Step 1 Select Operator Australia China-Mobile Austria China-Unicom Canada China-Unicom-3G China Others...... China HongKong Step 2 Check WAP / Internet Parameters (L) Camera Setting Click "Default Setting" button if you don't know how to modify camera parameters ! Default Setting (D) Step 3 Change Setting (C) Step 4 Customer Information Setting Admin...Number: 150XXXX1234 Receive Email 1: bolyguard@bolymedia.com Phone Number 2: 150XXXX1234 Receive Email 2: sales_sz@bolymedia.com Phone Number 3: Receive Email 3: bolyguard@gmail.com Phone Number 4: Receive Email 4: Attention Please ,The Data Above Will Be Saved in The Following File: E:\GSM\MG983G-30M.TXT Step 5 SAVE (Y) EXIT (N)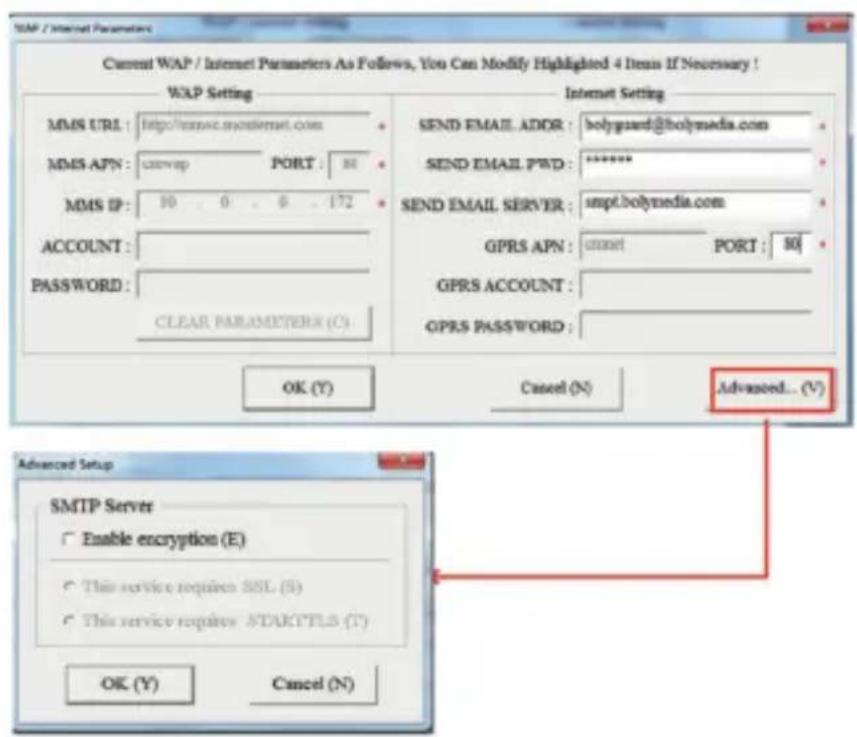
text_image
SMTP / Internet Parameter Current WAP / Internet Parameters As Follows, You Can Modify Highlighted 4 Items If Necessary ! WAP Setting MMS URL : http://esmac.mosInternet.com MMS APN : cswap PORT : 80 MMS IP : 10 0 6 172 ACCOUNT : PASSWORD : CLEAR PARAMETERS (C) Internet Setting SEND EMAIL ADDR : holyguard@bolymedia.com SEND EMAIL PWD : ****** SEND EMAIL SERVER : smpt.bolymedia.com GPRS APN : cmnet PORT : 80 GPRS ACCOUNT : GPRS PASSWORD : OK (Y) Cancel (N) Advanced... (V) Advanced Setup SMTP Server Enable encryption (E) This service requires SSL (S) This service requires STARTTLS (T) OK (Y) Cancel (N)text_image
My Devices Setting My Devices Get Features ApprovedSTEP 1

text_image
BGTools Add A Device Name Add A Device Sim Card Add A Product AddSTEP 2
text_image
Select Mail Server Boly Email Service Other Email ServiceSTEP 4
text_image
Get Photos Cellphone Email My home Internet ActiveSTEP 6 STEP 7
text_image
Advanced Set password Super User Information SD Format System Checking Arming Disarming Version Number 2.1text_image
Setup Version Enter Exit OK Enter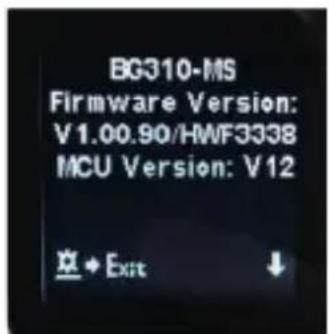
text_image
BG310-MS Firmware Version: V1.00.90/HWF3338 MCU Version: V12 草◆Exit ↓
text_image
BG310-MS Control Code: 129388 IMEI: 860425040166207E 空◆ Exit ↓Stap 1: Registreer uw Molnus-account (In Molnus).
text_image
Setup Send to Moinus Exit OK SaveSTAP 4: Druk op de knop Registreer camera om uw camera te registre- ren. (In Molnus).