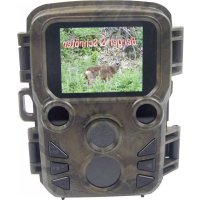
XTrail HD - Video camera Berger & Schröter - Free user manual and instructions
Find the device manual for free XTrail HD Berger & Schröter in PDF.
| Product type | Surveillance video camera |
| Brand | Berger & Schröter |
| Model | XTrail HD |
| Photo resolution | 5 MP (2592x1944), 8 MP (3264x2448), 12 MP (4000x3000) |
| Video resolution | 720P (1280x720), 640x320, 320x160 |
| Sensor | 5/8/12 MP color CMOS |
| Viewing angle | 52° |
| Infrared range | Up to 20 m with 40 IR LEDs |
| PIR detector | Range 12-15 m, angle 60°, adjustable sensitivity (high/medium/low) |
| Screen | 2-inch TFT LCD |
| Power supply | 4 or 8 AA alkaline batteries (6 V) or 12 V adapter |
| Battery life | Up to 8 months with 8 AA batteries (depending on use) |
| Memory | SD card from 8 to 32 GB |
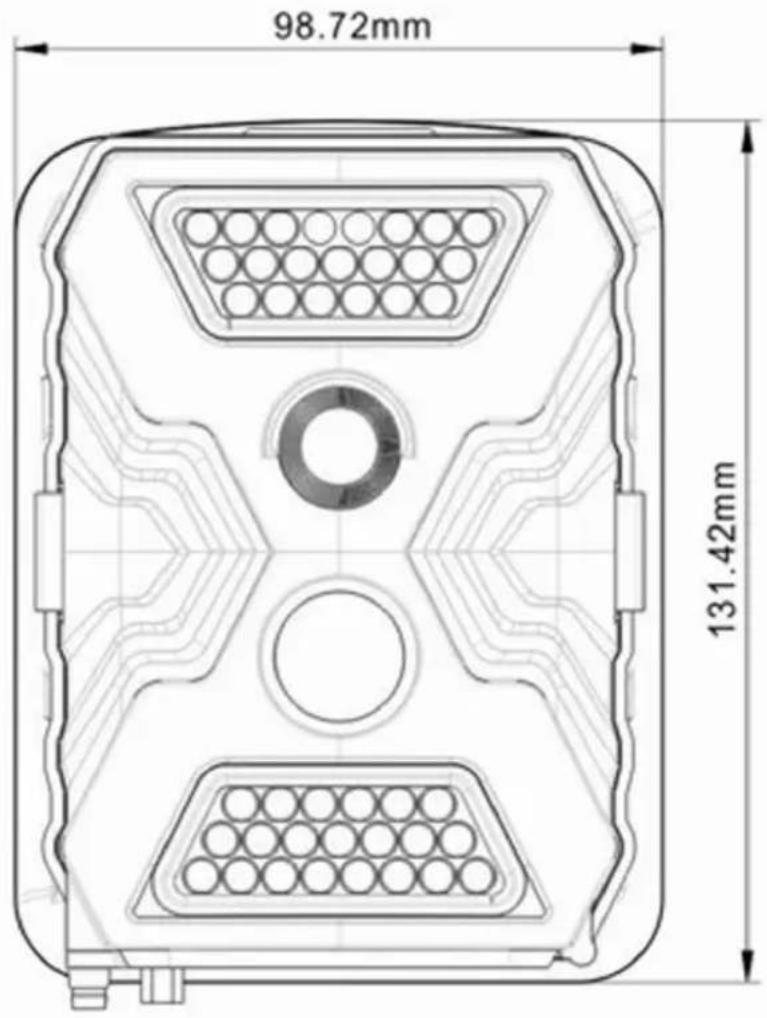
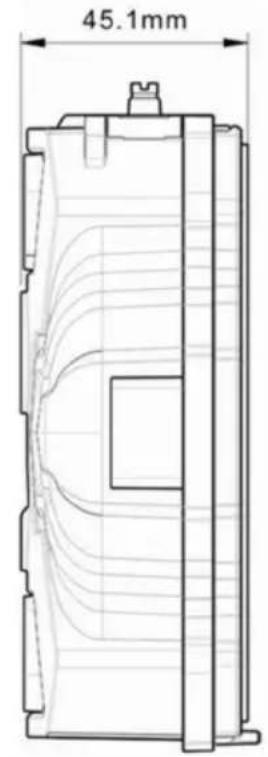
| Dimensions | 132 x 99 x 78 mm |
| Weight | 300 g |
| Protection rating | IP54 |
| Operating temperature | -25°C to 60°C |
| Main functions | Photo/video mode, PIR trigger, time-lapse, 1-7 photo burst, 2x-4x digital zoom, audio recording, date/time/moon phase display, TV output |
| Maintenance | Use new alkaline batteries, format SD card before first use, avoid heat sources in front of the detector |
| Security | Password protection (up to 6 characters), auto power off after 1 min in test mode |
| Repairability | Spare parts not specified; contact after-sales service |
Frequently Asked Questions - XTrail HD Berger & Schröter
User questions about XTrail HD Berger & Schröter
0 question about this device. Answer the ones you know or ask your own.
Ask a new question about this device
Download the instructions for your Video camera in PDF format for free! Find your manual XTrail HD - Berger & Schröter and take your electronic device back in hand. On this page are published all the documents necessary for the use of your device. XTrail HD by Berger & Schröter.
USER MANUAL XTrail HD Berger & Schröter
12MP X-trail game camera with 40 x 940 nm Black LED `s Item No. 31417
Contents
1. Introduction - 15 -
1.2 Application - 15 -
1.3 Power Supply - 15 -
1.4 Attention - 16 -
1.5 Key Features - 16 -
2. Whole View and Details of Camera - 17 -
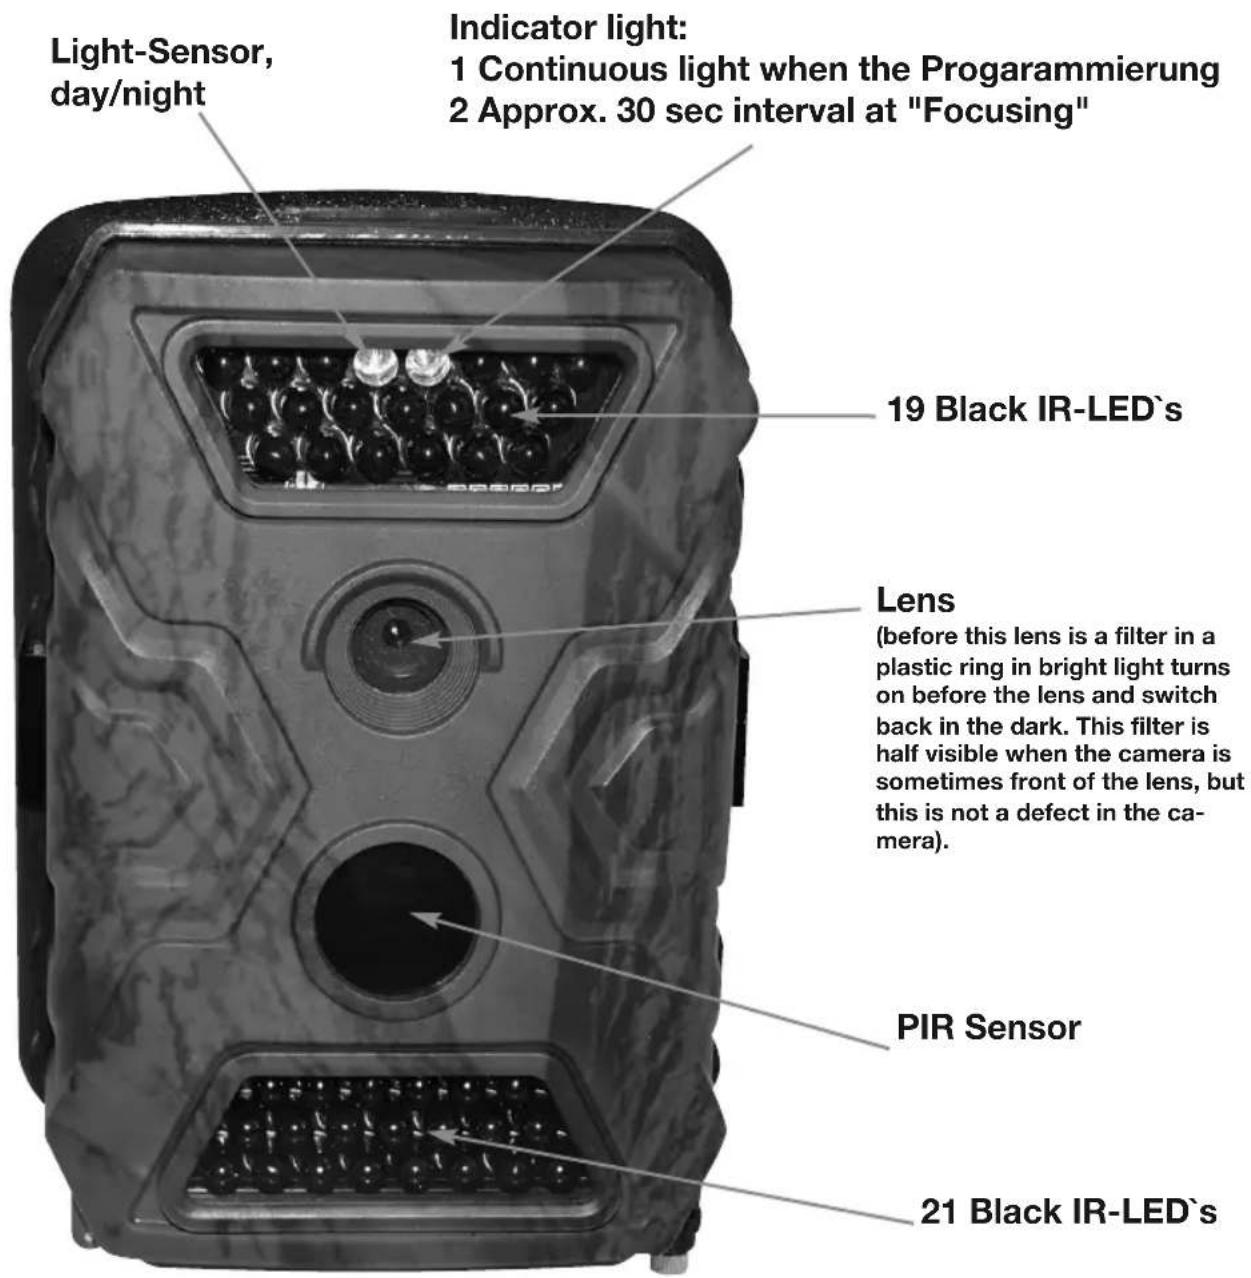
2.1 Figure 1: Front View of Camera; - 17 -
2.2 Figure 3.2: Bottom View of Camera; -17 -
2.3 Figure 3.3: Side View of Camera. - 17 -
2.4 Figure 3.4: Internal View of Camera - 18 -
2.5 Function Keys & Other Details - 19 -
3. Quick Start - 19 -
3.1 How to start the camera? - 19 -
3.2 How to set the functions? -19-
4. Operation List
4.1 Video/Photo Playback - 20 -
4.2 Delete: -20-
4.3 Format of SD Card -20-
4.4 Operation Menu -20-
5. Functions Description
6. Specification
7. SD Cards Selection and Battery Life Test Report
7.1 SD Card Selection -23-
7.2 Battery Life Test Report for Reference - 23 -
8. Trouble Shooting
8.1 Photos Do Not Capture Subject of Interest -24-
8.2 Camera stops taking images or won't take images - 24 -
1. Introduction
Thank you for choosing one of our easy operation highly qualified products. You now may enjoy the excellences reflected on this series product. This 12MP HD digital camera was totally R&D by our diligent and smart engineers based on feedbacks and requirements from customers globally. May you also enjoy and adore this product as we do. And our company is always open-minded with willing to adopt creative ideas from you.
1.2 Application
This digital camera is an ideal product for housing security, warehouse surveillance, and monitoring wild animals with its camouflage appearance and nice shape. It is convenient to install or fasten, could be used to take photographs manually and carry on long-time videos in Test mode.
a. Instant surveillance camera for home, office, construction site, and warehouse, etc.;
b. Motion-triggered infra-red night vision surveillance;
c. Animal observation and hunting;
1.3 Power Supply
A. AA Alkaline Batteries
This camera can either work with 4 or 8 AA Alkaline batteries. Pls note that the voltage of rechargeable AA batteries (1.2V) is insufficient to power this device. Batteries should be inserted as indicated inside the battery case. Upside down batteries electrode may cause device malfunction. Also, we strongly recommend changing the batteries when power icon on camera screen is empty or when you receive lower battery SMS alert (GPRS Model only).
1.4 Attention
- Insert the SD memory card correctly, camera does not support SD card hot swap (insertion).
- Please use AA battery with good quality in order to prevent battery cells from corrosion of leaked acid.
- Use right adaptor (6V/1A or 2A) of this camera to supply power, and do not invert the electrode when put in batteries.
- In Test mode, camera will automatically power off in 1min without any operations. Please manually turn ON it as if you want to use it again.
- Don't interrupt power supply during system upgrade, please deliver it back to factory if the device doesn't work after upgrading.
- Do not frequently insert or pull out SD card and battery or plug in and out the adaptor when the camera is on.
- Do not have any floating objects, such as leaves, strings, or ribbons in the 3M motion detection zone of cameras, to avoid mistaking photograph or videos.
- Do not keep camera next to hot irrelevant objects, air conditioner exhaust vents, and light, etc. to avoid mistaking photos or videos.
1.5 Key Features
a. Programmable 5/8/12 Megapixel high-quality resolution;
b. Especially designed function buttons for user's conveniences;
c. Optional to turn on/off camera speaker;
d. 40 pcs IR LEDs for flash range as 20 meters:
e. Adjustable PIR sensitivity:
f. Multi-shot pictures (up to 7 pics per trigger);
q. Impressive quick trigger time: 0.8-1s (GPRS trigger time is 1.2s);
h. Support standard 6~12V solar panel;
i. Color pictures during day; black and white at night.
i. Adjustable delay between motions:
k. With 8 AA alkaline batteries, the longest standby time is up to 6 months:
1. Available operation temperature: -20 to 60 :
m. Time Lapse for automatically and constantly shooting of pictures/videos at preset interval:
n. With specified Timer, camera can be programmed to work only during preset time period every day;
o. Stamp of USER LABEL, date, time, temperature and moon phase on every picture enables you to identify where and when the camera shot photos;
p. Built-in 2.0" TFT color screen to review photos and videos in camera.
a. Audio Recording brings you heart pumping like ever before:
r. Two different TV OUT settings help you review photos/videos even from Television.
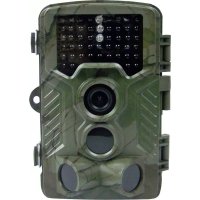
2. Whole View and Details of Camera
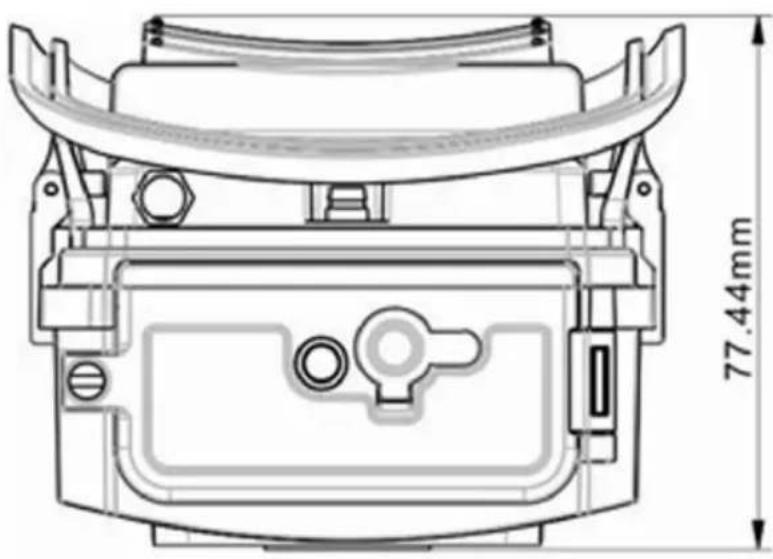
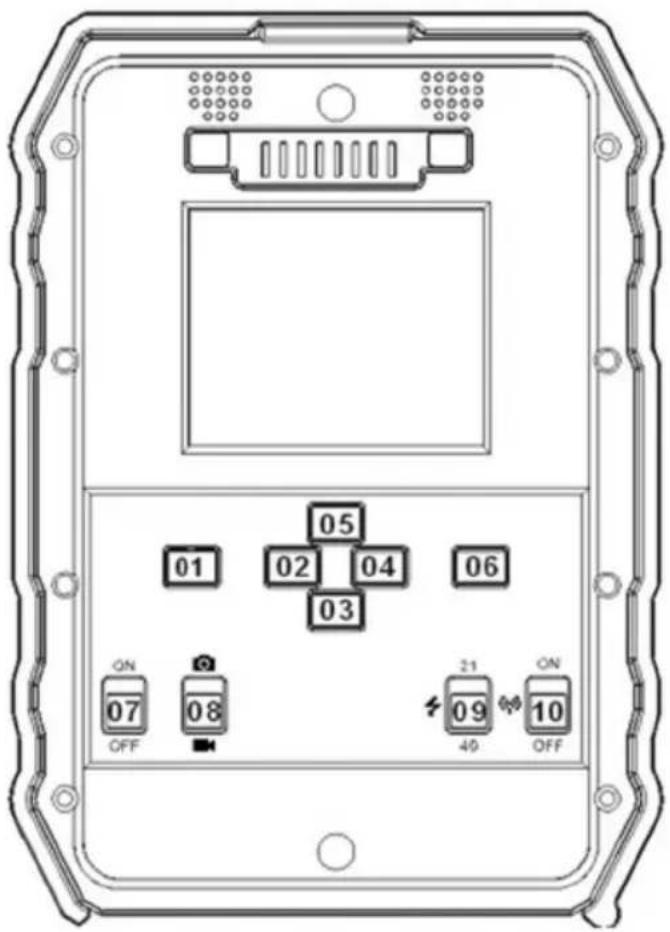
2.1 Figure 1: Front View of Camera;
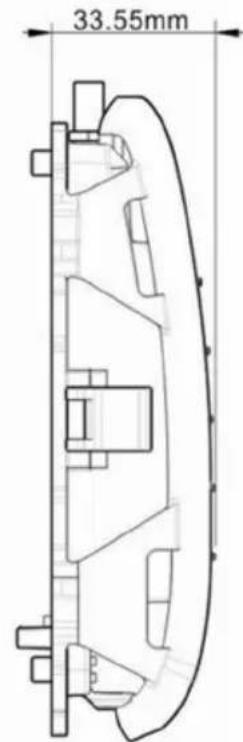
2.3 Figure 3.3: Side View of Camera.
2.2 Figure 3.2: Bottom View of Camera;
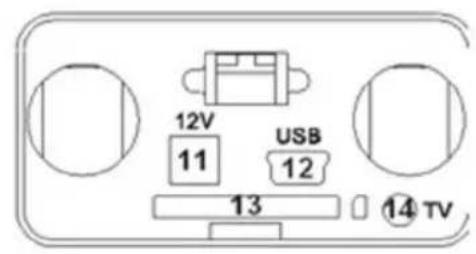
2.4 Figure 3.4: Internal View of Camera
Introduction of each button
a) Press Buttons
01: Menu; 02/03/04/05: navigation arrow buttons; 06: OK
b) Switch Buttons
07: Power Switch; 08: Camera/Video Switch; 09: IR LEDs Group Switch; 10: GPRS Switch (No function)
c) Interfaces
11: 12V DC in; 12: USB Port; 13: SD Card Slot; 14: TV Out.
2.5 Function Keys & Other Details
A. Switch Buttons
| Power Switch Switch up: Power On-PIR intelligent automatically monitoring; light sensor flashes 5 times before entering Mode “Power On” Switch “On”, press “OK” once to wake up camera LCD screen to enter TEST Mode; Press and hold button “OK” for 5 sec to get back to mode “Power On” Switch down: OFF-Camera stops working. | |
| Video/Photo Switch Switch up: Pic-Photographing Switch down: Video-Video Recording | |
| IR LEDs Group Switch | Switch up: 19-up side 19 pcs IR LEDs work Switch down: 40-all 40 IR LEDs work |
| GPRS Switch (No function) | |
B. Navigation buttons
a) Power Switch by "On", press "OK" once to wake up camera LCD screen to enter TEST Mode;
b) Test mode, Press "Menu" once to enter camera setting menu; Press "OK" to shoot photo(s) or video clips.
c) To navigate the interface by pressing “<”, “↑”, “→”, or “↓”, press “OK” for selection. To modify the selection, press “↑” and “↓” again and press “OK” to confirm. To return to the previous menu, press “Menu”.
d) Press and hold button "OK" for 5 sec to get back to mode "Power On"
3. Quick Start
3.1 How to start the camera?
enter TEST Mode.)
3.2 How to set the functions?
D. To navigate menu interface by pressing “←”, “↑”, “→”, or “↓”, press “OK” for selection. To modify the selection, press “↑” and “↓” again and press “OK” to confirm. To return to the previous menu, press “Menu”.
automatically by itself.
4. Operation List
4.1 Video/Photo Playback
In Test Mode without pressing button "Menu": press arrow button "↑" to enter Playback; press " " and " " for selection, "OK" to play photo/video. Press button "↑" again to return. Press "Menu" button to initiate Deletion of files or Format of SD card.
4.2 Delete:
a. Delete one: delete selected photo/video:
b. Delete All.
press"↑" and "↓"for selection, "OK" to confirm, "menu" return back to previous interface.
4.3 Format of SD Card
a. No
b. Yes: to format SD card via camera.
press"↑" and "↓"for selection, "OK" to confirm, "menu" return back to previous interface.
4.4 Operation Menu
aTest mode, Press "Menu" once to enter camera setting menu; to navigate setting interface by pressing , , , or , press "OK" for selection, and "Menu" to return back to previous menu.
5. Functions Description
| Main Menu Default | Functions Description Setting | |
| 1. User Label OFF Select “ON” to set 4 digits/ alphabets for each camera. Such function can help user to identify photos are from where and which camera. | ||
| 2. Camera + Video OFF Select “ON”, camera shoots photo(s) first, then video upon same trigger event based on Video Length and Multi-shot user configured. | ||
| 3. Multi-Shot 1P Optional 1/2/3/4/5/6/7 photos per trigger | ||
| 4. Image Size 5MP 12MP/8MP/5MP - 4000x3000, 3264x2448, 2592x1944 | ||
| 5. Video Size 640 HD/640/320: 1080x720/640x480/320x160 | ||
| 6. Video Frame 30FPS 30fps/15fps, programmable | ||
| 7. Digital Zoom NO Lens focus room in 2/3/4 times. | ||
| 8. Video Length 5 Sec 5-60s video clips | ||
| 9. PIR Sensitivity Middle High/ Middle/ Low; Higher sensitivity is 1) more sensitive to movements by smaller subjects; 2) longer detection distance; 3) easier for sensor to detect difference between body heat and outdoor temperature; 4) easier to trigger camera to record. In high temperature environment, body heat of subjects and environment temperature is hard to tell by camera, suggest set High. | ||
| 10. Timer OFF Select “ON”, to set the beginning time and end time (hour/minute); camera will only work during the time user set. | ||
| 11. Time Lapse OFF Select “ON”, to set the interval; PIR sensor of camera will be turned off; camera will shoot pics or video clips automatically upon the interval user set. Configurable interval: 5 seconds to 24 hours. | ||
| 12. Delay OFF The pre-set time interval you desire between photo/video recordings upon motion. This option prevents from taking too many photos or videos. Example: Camera will wait 1 minute between photo/video recordings with motion Configurable delay time: 5 seconds to 2 hours. | ||
| 13. Audio Recording ON Select “ON”, audio available in video clips. | ||
| 14. TV Out N NTSC/PAL | ||
| 15. Stamp ON To select or cancel imprinting of programmed user label, moon phase, temperature, date, and time on photos. | ||
| 16. Frequency 50Hz Improper setting may cause camera screen flicker | ||
| 17. Language English... | ||
| 18. Time/Date 01/01/2011 Date/Time; Date: “month/ date/ year”; Time: “hour/minute” | ||
| 19. Camera Sound ON Select “OFF” to turn off camera speaker. | ||
| 20. Cycle Recording OFF Select “ON”, camera will continue to record photos/videos by deleting earliest photos or video clips recorded in SD card. | ||
| 21. Password OFF Select “ON” to enable password protection for your camera; support totally 6 digits/ alphabets long password access. | ||
| 22. Reset No Select “Yes” to reset camera back to factory default setting. | ||
6. Specification
| Image Sensor 5 / 8 / 12 Mega Pixels Color CMOS | |
| Effective Pixels 2560x1920 | |
| Day/Night Mode Yes | |
| IR arrange 20m | |
| IR Setting Top: 19 LED, Foot: 21LED | |
| Memory SD Card (8MB - 32 GB) | |
| Operating keys 10 | |
| Lens F=3.0; FOV=52°; Auto IR-Cut-Remove (at night) | |
| LCD Screen 2" TFT, RGB, 262k | |
| PIR Sensitivity 3 sensitive levels: High / Normal / Low | |
| PIR distance 12m - 15m | |
| PIR Angle 60° | |
| Picture size 5MP/8MP/12MP = 2592x1944/3264x2448/4000x3000 | |
| Picture Format | JPEG |
| Video resolution | 720P (1280x720), 640x320, 320x160 |
| Video Format | AVI |
| Video Length | 1-60sec. programmable |
| Shooting Numbers | 1-7 |
| Trigger Time | 0.8-1s |
| Trigger Interval | 2s-5s |
| Camera + Video | Yes |
| Playback Zoom in | 2x, 3x, 4x |
| Device Serial No. | Yes |
| Time Lapse | Yes |
| Beep Sound | ON/OFF |
| SD Card cycle | ON/OFF |
| Operation Power | Battery: 6V; DC: 12V |
| Battery Type | 8AA |
| External DC | 12V |
| Stand-by Current | 0.15mA |
| Stand-by Time 4~6 months (4xAA~8xAA) | |
| Auto Power Off | auto switch to mode "ON" in 60s without any operations |
| Power Consumption | 150mA (+650mA when whole 40 IR LEDs light up) |
| Low battery Alert | 4.8V (4.8V: alert; 4.6V: power off) |
| Interface | TV out/USB/SD Card/DC Port |
| Mounting | Strap; Tripod |
| Operating Temperature | -25°C to 60°C |
| Storage temperature | -30 °C to 70°C |
| Operation Humidity | 5%-90% |
| Waterproof spec | IP54 |
| Dimensions | 131.42 x98.72 x77.44mm |
| Weight | 300g |
| Certification | CE FCC RoHs |
7. SD Cards Selection and Battery Life Test Report
7.1 SD Card Selection
Using a memory card is required to operate the camera. When the camera is "ON" and no memory card is used, the screen displays "Pls insert memory card". The SD slot of the camera has a 32 GB memory capacity. Before inserting or removing the memory card, the camera must be turned "OFF". Failing to do so may cause loss of or damage the pictures already recorded from the memory card. When the SD card is full, the viewing screen indicates "Memory Full". The following data shows an approximate quantity of photos which can be recorded by the camera depending on the memory card capacity.
Chart below will show you the approximate capacity of different size SD cards. PIs check to see which size card can fit your needs best.
| SD Size | ||||||
| Camera | ||||||
| Capacity | 1GB 2 GB | 4 GB 8 GB | 16 GB | 32 GB | ||
| Photo (pictures) | ||||||
| 5MP 705 | 1373 | 2823 | 517 | 11141 | 244962 | |
| 8MP 452 | 82 | 1813 | 3544 | 71 | 57 14241 | |
| 12MP | 201 | 392 | 806 | 1575 | 3181 | 6326 |
| Video (hours) | ||||||
| 720P HD | 00:09:27 | 00:18:32 | 00:38:15 | 01:14:53 | 02:31:20 | 04:53:40 |
| 640x480 | 00:26:01 | 00:50:48 | 01:44:33 | 03:24:27 | 06:52:58 | 13:09:27 |
| 320x160 | 01:14:07 | 02:24:28 | 04:57:04 | 09:40:39 | 19:32:30 | 39:15:10 |
7.2 Battery Life Test Report for Reference
| Test Condition: LCD screen off. Mode: “Power On”_PIR intelligent automatically monitoring | ||||||
| 8AA Alkaline Batteries | ||||||
| Photos shot per day | Working time | Video clips shot per day | Working time | |||
| IR LEDs On | IR LEDs On | |||||
| 5MP | 100 photos | 51 days | 320× 240 | 10 sec | 10 clips | 43 days |
| 8MP | 100 photos | 49 days | 640× 480 | 10 sec | 10 clips | 42 days |
| 12MP | 100 photos | 45 days | 1280× 720 | 10 sec | 10 clips | 40 days |
| IR LEDs Off | IR LEDs Off | |||||
| 5MP | 100 photos | 59 days | 320× 240 | 10 sec | 20 clips | 119 days |
| 8MP | 100 photos | 55 days | 640× 480 | 10 sec | 20 clips | 113 days |
| 12MP | 100 photos | 51 days | 1280× 720 | 10 sec | 20 clips | 101 days |
9. Trouble Shooting
8.1 Photos Do Not Capture Subject of Interest
- Check the "Sensor Level" (PIR sensitivity) parameter setting. For warm environmental conditions, set the Sensor Level to "High" and for cold weather use, set the sensor for "Low".
- Try to set your camera up in an area where no heat resources are in the camera's field of view.
- In some cases, set the camera near water will make the camera take images with no subject in them. Try to aim the camera over ground.
- Try to set camera on stable and immovable objects, i.e.: large trees.
- At night, motion detector may detect beyond range of the IR illumination. Reduce distance setting by adjusting sensor sensitivity.
- Rising sun or sunset can trigger sensor. Camera must be reoriented.
- If person/animal moves quickly, it may move out of the camera's field of view before photo is taken. Move camera further back or redirect camera.
8.2 Camera stops taking images or won't take images
- Please make sure that the SD card is not full. If the card is full, camera will stop taking images. Or user can turn on Cycle Recording to avoid such problem.
- Check batteries to make sure that alkaline or lithium AA batteries left power is enough for camera to work.
- Make sure that the camera power switch is in the "On" position and not in the "Off" or "Test" modes.
- Please format the SD card with camera before using or when camera stops taking images.
(F) Mode d'emploi
12MP X-trail wildcamera