
SCESC2206R - Coffee machine SCHNEIDER - Free user manual and instructions
Find the device manual for free SCESC2206R SCHNEIDER in PDF.
| Product type | Capsule coffee machine |
| Brand | Schneider |
| Model | SCESC2206R |
| Supply voltage | 220-240 V ~ |
| Frequency | 50/60 Hz |
| Power | 1450 W |
| Pump pressure | 19 bars |
| Water tank capacity | 0.6 L |
| Compatible coffee types | Capsules (two types of adapters), ground coffee, paper pods |
| Included accessories | Capsule holder A, capsule holder B, ground coffee filter, paper pod filter |
| Automatic shut-off function | Yes, after 15 minutes of inactivity (standby mode) |
| Brew volume adjustment | Yes, programmable from 10 to 90 seconds |
| Maximum water temperature | 35 °C |
| Intended use | Household and indoor |
| Maintenance | Clean the exterior with a damp cloth; wash the water tank, drip tray and capsule holders with clean water |
| Descaling | Every 300 to 400 cups or 1 to 2 months, with a commercial descaler |
| Safety | Do not immerse; unplug before cleaning; do not open handle during brewing; hot surface |
| Reparability | Power cable replaceable only by the manufacturer or a qualified professional |
| Compliance | Directives 2014/35/EU and 2014/30/EU |
| Warranty | Does not cover wear parts or damage due to non-compliant use |
| After-sales service | Contact the reseller or the manufacturer |
Frequently Asked Questions - SCESC2206R SCHNEIDER
User questions about SCESC2206R SCHNEIDER
0 question about this device. Answer the ones you know or ask your own.
Ask a new question about this device
Download the instructions for your Coffee machine in PDF format for free! Find your manual SCESC2206R - SCHNEIDER and take your electronic device back in hand. On this page are published all the documents necessary for the use of your device. SCESC2206R by SCHNEIDER.
USER MANUAL SCESC2206R SCHNEIDER
We invite you to read this user guide carefully and completely before installing and using your device.
It is important that this user guide be kept with the device for any further consultation. If this device should be transferred to another person, ensure that the user guide follows the device so that the new user can be informed of the operation of the device.
-
Check that the mains voltage corresponds to that indicated on the espresso machine before using the appliance.
-
To reduce the risk of fire, electric shock and injury to persons, do not immerse the appliance in water or any other liquid. Unplug the device from the mains after each use. Be sure to allow it to cool before assembling or disassembling parts
and before cleaning.
- Do not use attachments not recommended by the manufacturer to avoid the risk of fire, electric shock and injury.
- If the power cable is damaged, it must be replaced by the manufacturer, its after-sales service or similarly qualified persons in order to avoid a hazard.
-
This device is intended for use in household and similar applications such as:
-
staff kitchen areas in shops, offices and other work environments;
-on farms;
-use by hotel guests,
-motels and other residential type environments; -
bed and breakfast type environments.
-
CAUTION: Avoid overflow on the connector.
-
CAUTION: Improper use may result in injury.
-
Do not let the power cord hang over the edge of the table or counter, or touch hot surfaces.
- Do not place the appliance near a hot gas or electric burner, or in a hot oven.
- Disconnect the appliance from the mains, then remove the mains plug from the wall socket, holding the plug. Never pull on the power cord to disconnect the plug.
- Be careful not to burn yourself.
- Some parts of the appliance become hot during operation.
- This appliance is intended for household and indoor use only. The product must be installed in compliance with national installation rules.
- The socket of the installation must always be equipped with an earth connection. If the power supply is not connected to earth, you should not connect the device.
- This appliance can be used by people with reduced physical,
sensory or mental capacities or whose experience or knowledge is not sufficient, provided that they are supervised or have received instructions as to safe use of the device and fully understand the potential dangers.
Children should not use the device as a toy.
- This appliance can be used by children aged 8 and over, provided that they are supervised or have received instructions on the safe use of the appliance and that they fully understand the dangers involved. Cleaning and user maintenance shall not be made by children, unless they are over the age of 8 and under adult supervision. Keep the device and its cable out of the reach of children under 8 years of age.
- Do not operate the device without water.
- If you do not use the product for a long time, please empty the water
tank and unplig it.
-
CAUTION: To avoid a hazard due to a thermal cutout override, this device must not be powered by an external interrupting system, such as a timer, or connected to a circuit that is regularly turned on and off by its usefulness.
-
CAUTION: Do not open the fill port during use.
- RISK OF BURN!! Do not remove the adapter when espresso is working.

Designed for use in contact with food
IMPORTANT
It is absolutely forbidden to replace the power cable yourself. If this is damaged, it must be replaced by the manufacturer, its after-sales service or a similarly qualified person in order to avoid a hazard.
If your device is dropped, have it examined by a professional before turning it back on. Internal damage can pose an accident hazard.
Any complaint about your product must be made to your retailer or its after-sales service.
All repairs must be made by the manufacturer's after-sales service. The after-sales service of your retailer or a similarly qualified person in order to avoid a danger
Disposal and environmental responsibility
In order to be respectful of the environment, we encourage you to dispose of the device correctly. You can contact local authorities or recycling centers for more information.
Read the instructions carefully before use.
This product complies with the requirements of Directive 2014/35/EU (which replaces Directive 73/23/EEC amended by Directive 93/68/EEC) and 2014/30/EU (replaces Directive 89/336/EEC).

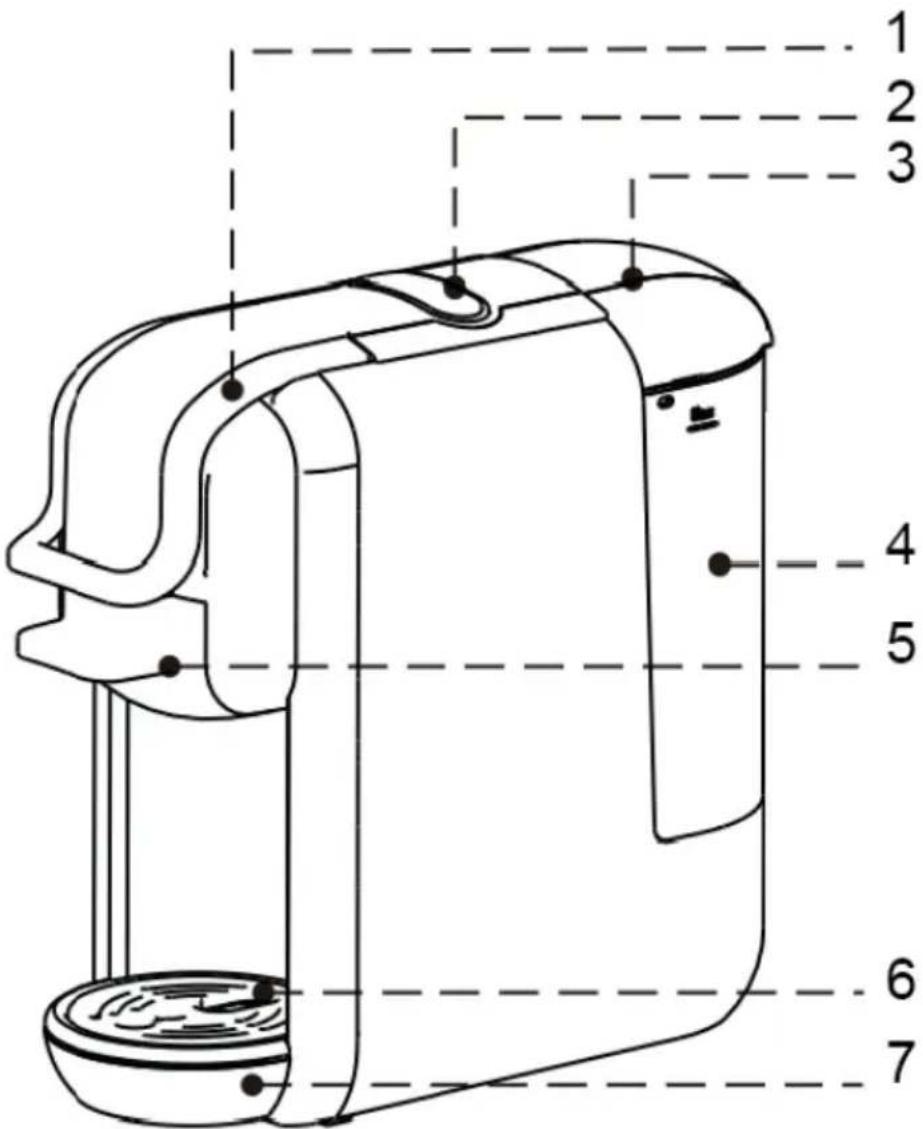
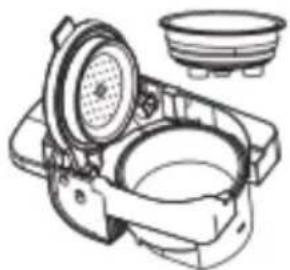
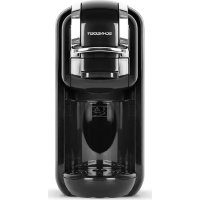
- Handle
- Buttons
- Water tank cover
- Water reservoir
- Capsule holder
- Drip tray grid
- Drip tray (removable)
USING YOUR DEVICE FOR THE FIRST TIME
Remove the espresso capsule machine from its packaging.
Remark :
- Check that the voltage of the power supply corresponds to that indicated on the current rating label of the machine.
There may be a small amount of water left in the machine.
To ensure that the machine works perfectly, it has been tested with water beforehand.
- Please refer to the short procedure below, using the hose to manually fill the water circuit before turning on the machine for the first water addition, this action helps the pump to have a self-function priming.
Step 1. Insert the hose into the water inlet.
Step 2. Fill the water pipe.
Step 3. Inject the water from the pipe into the machine so that the internal circuit is filled with water.

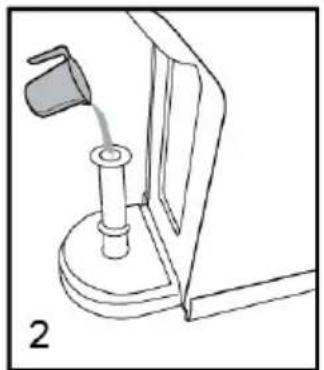
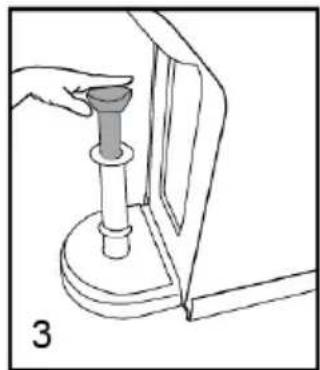
After performing the above steps, the machine will be able to pump water normally.
Notes: You can repeat the steps 2 or more times if necessary.
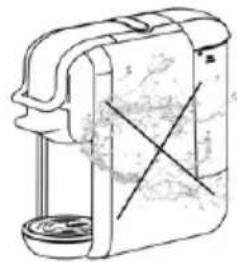
WARNING : Improper handling of electrical equipment is dangerous, and can even be fatal. Observe the safety precautions indicated in this manual, and in particular the following points:
SCALD HAZARD: BEWARE OF HOT WATER!
- Do not operate the machine if the water tank is empty or the water level is below the MINIMUM.
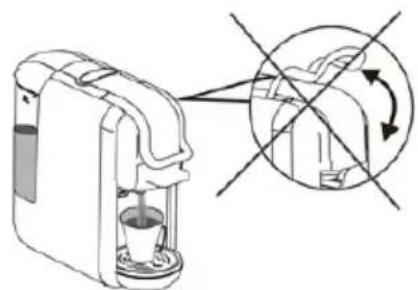
- Do not open the handle while the machine is brewing.
Always unplug the power plug before cleaning the machine.
Use the machine only in a dry room. - Thoroughly rinse the water tank with clean water before using it for the first time. Clean the coffee machine with a damp cloth only.
Before the first use or after a long period of non-use of the latter, this quick procedure can purge and clean the internal circuits correctly.
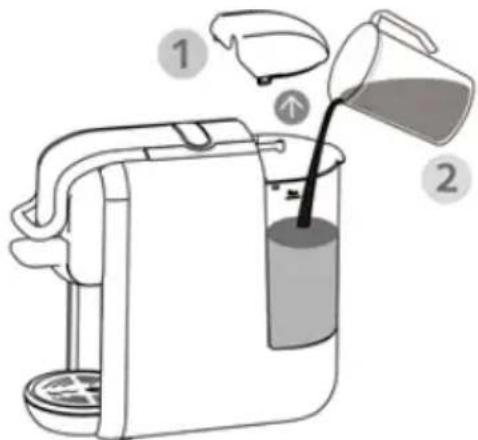
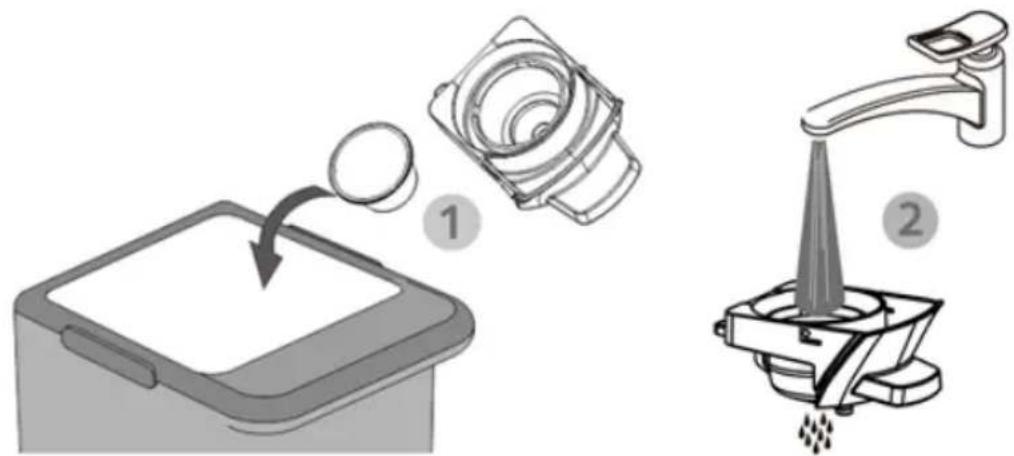
You can fill the water tank in two ways:
1. Fill without removing the tank
- Open the water tank cover. (1)
- Fill the tank with clear water (the maximum water temperature is 35^ ). (2)
The maximum capacity is 0.6 liters. - Put the tank cover back in place.
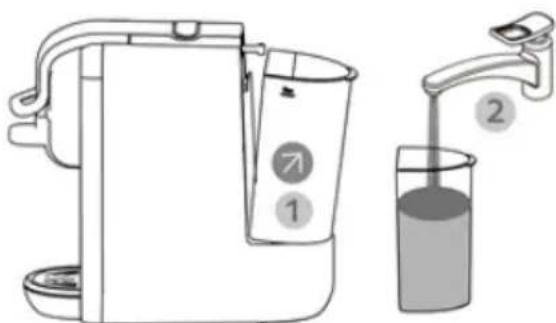
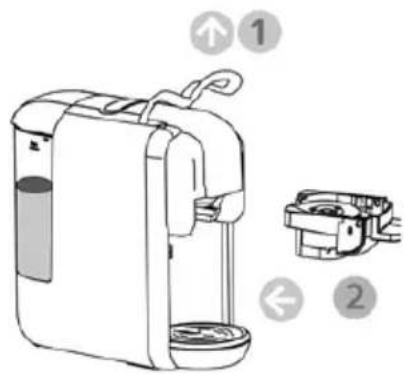
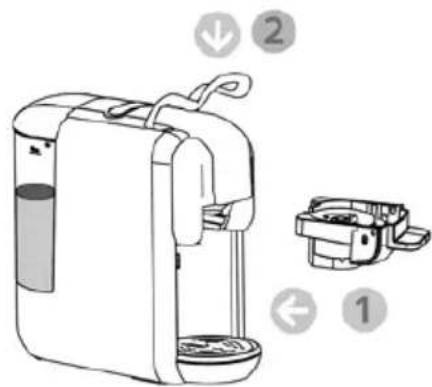
2. Fill by removing the tank
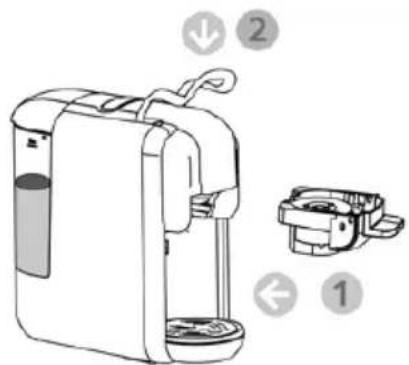
- Hold the water tank handle at the angle shown and pull in the direction shown to remove the water tank from the machine. (1)
- Fill the water tank with cold water up to the "MAX" marking (the maximum capacity is 0.6 liters). (2)
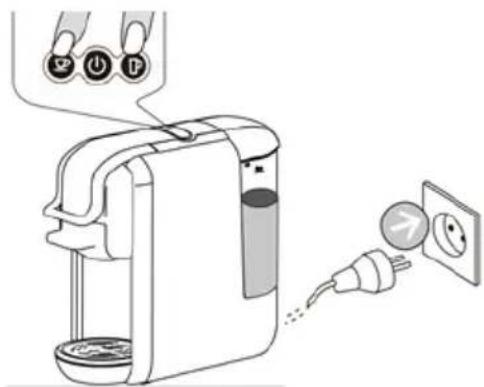
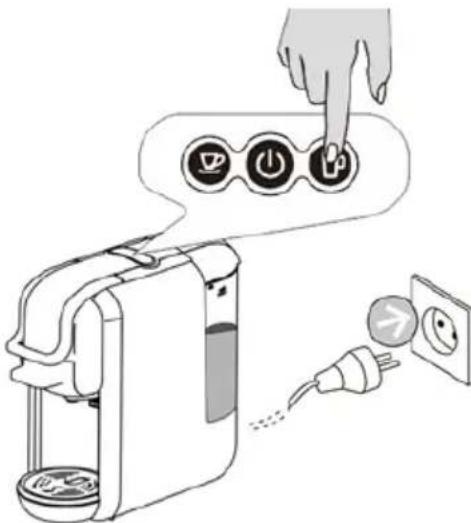
- Slide the water tank gently onto the base. When the water tank outlet is inserted into the supply receptacle, firmly push the tank handle in the direction shown to lock it.
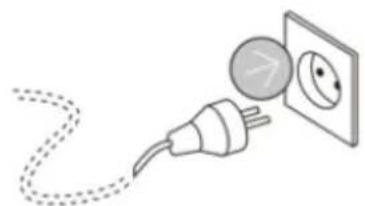
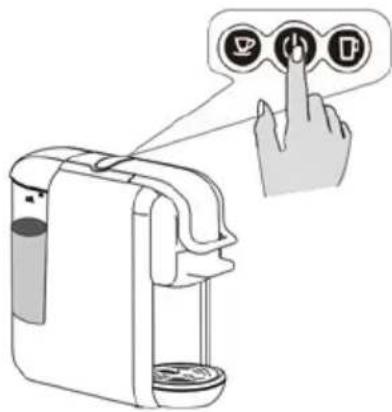
- Connect the power source.
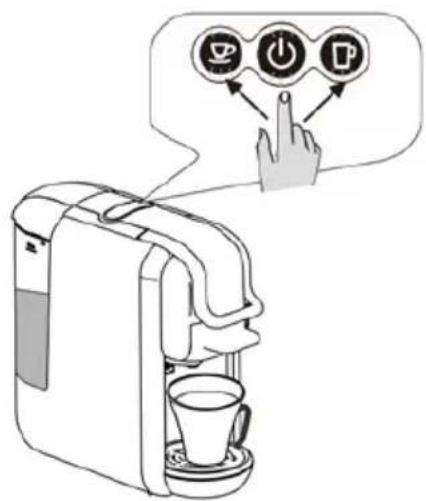
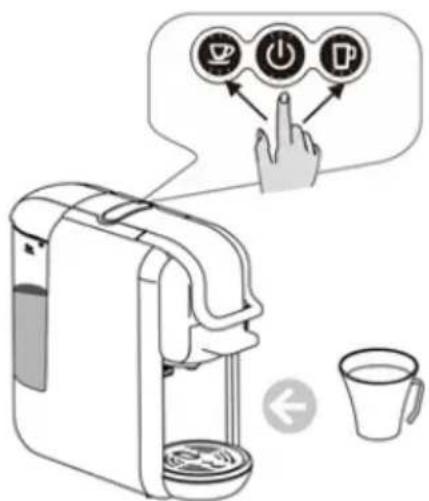
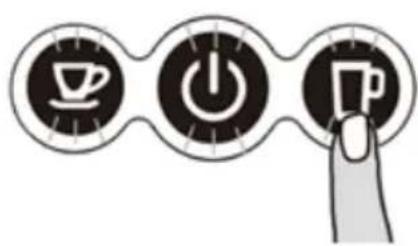
- Press the switch.
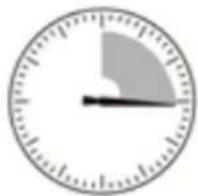
- The lights come on as the machine heats up. It takes 45 seconds.

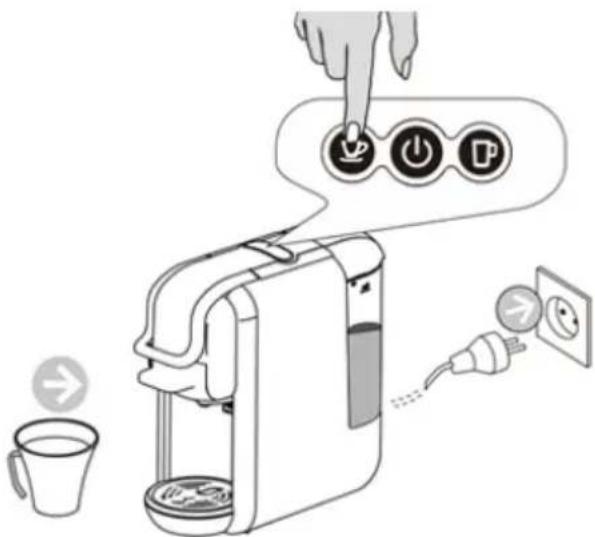
- Press the brew button, and wait for the machine to drain all the water.
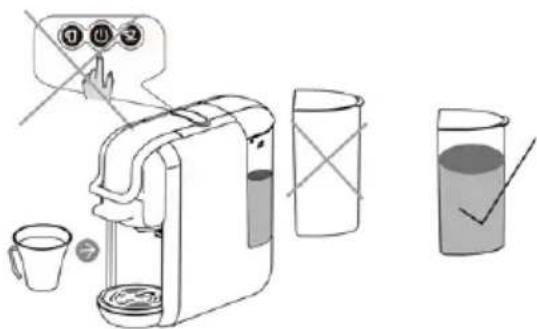
Before pressing the button, check that:
The handle is closed with no capsule present.
- The water tank is full.
- The water tank is firmly inserted, otherwise water may leak.
- A large cup (250 ml or more) is placed under the spout.
- Press the brew button to start the flow.
- Open the handle when the flow process ends automatically.
- Empty the bowl.
The purge cycle is complete.
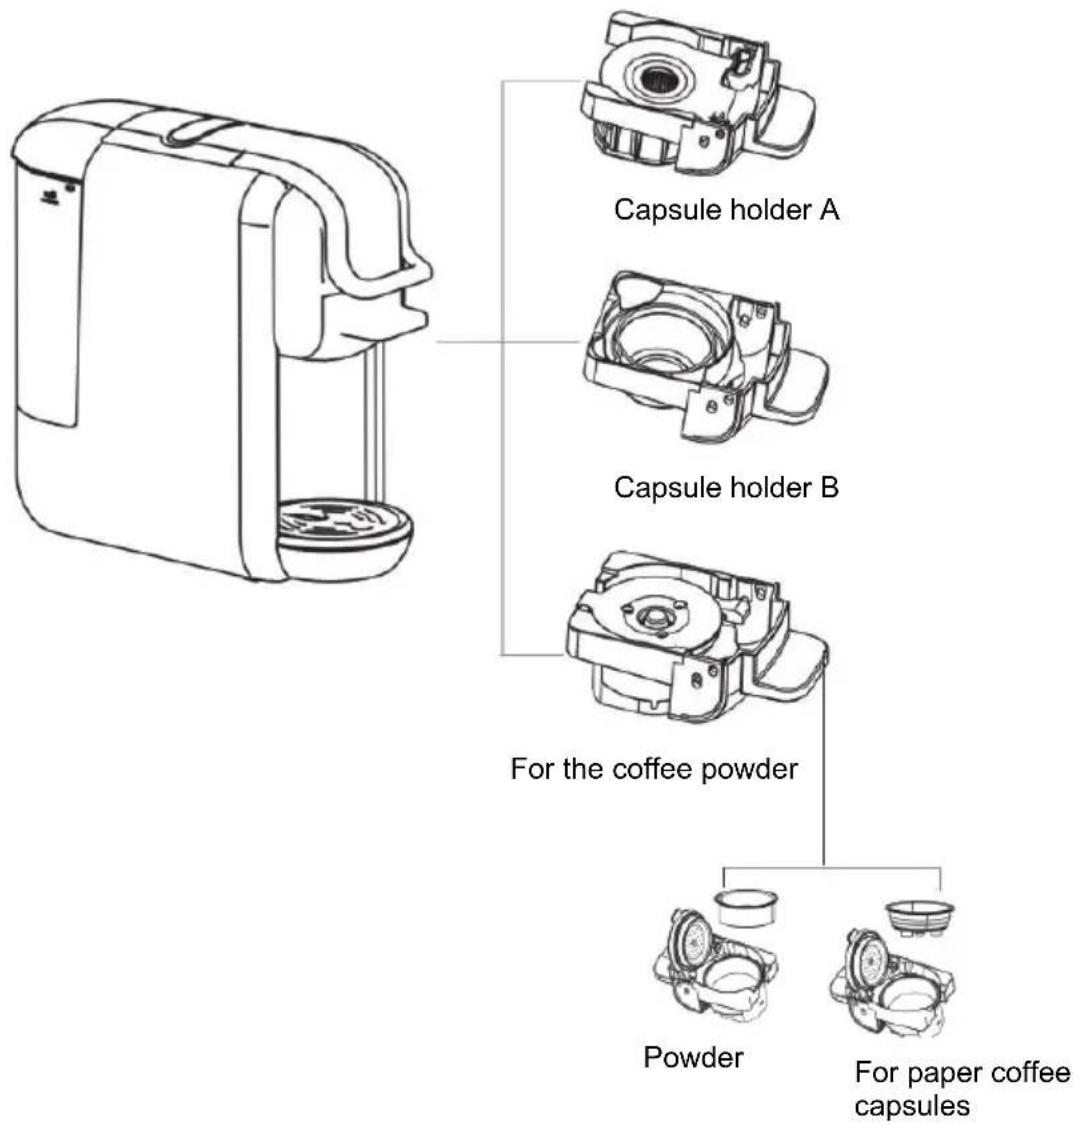
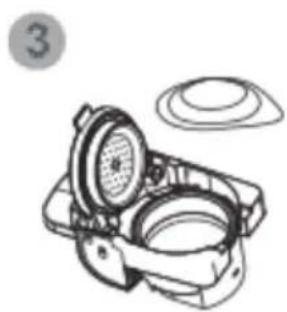
Tips: The machine uses different adapters for different capsules.
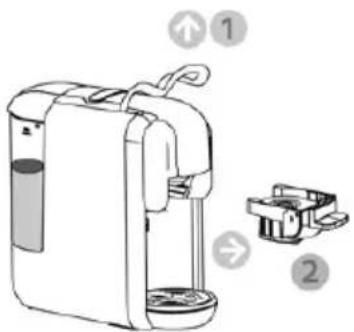
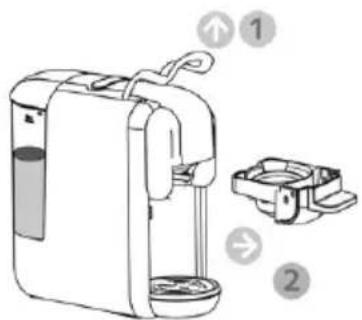
For capsule holder A
- Open the handle. (1)
2.Pull capsule holder A. (2)
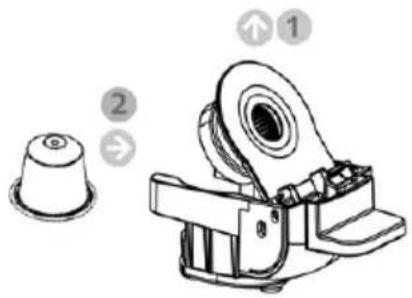
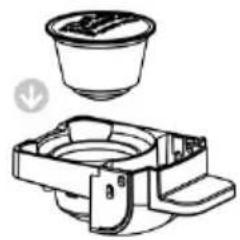
- Pr ess on the cover of the capsule holder cover (1)
- Insert a compatible capsule into the capsule holder. (2)
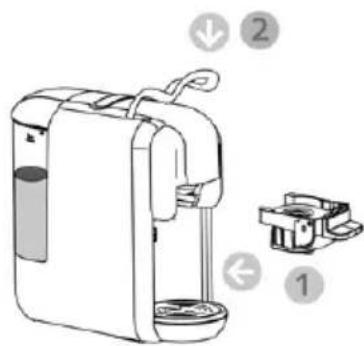
- Push the capsule holder containing the capsule to insert it. (1)
- Close the handle. (2)
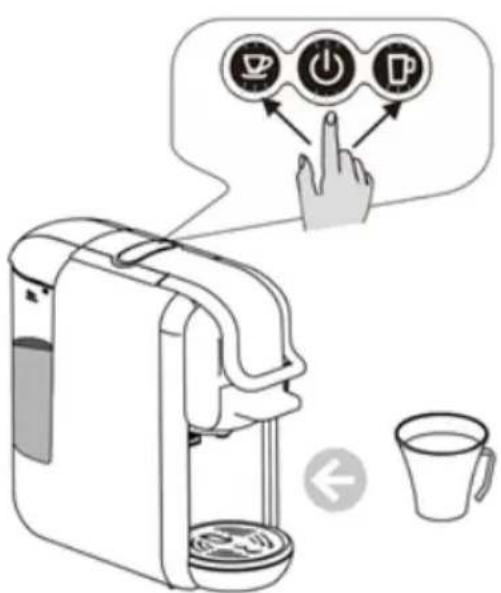
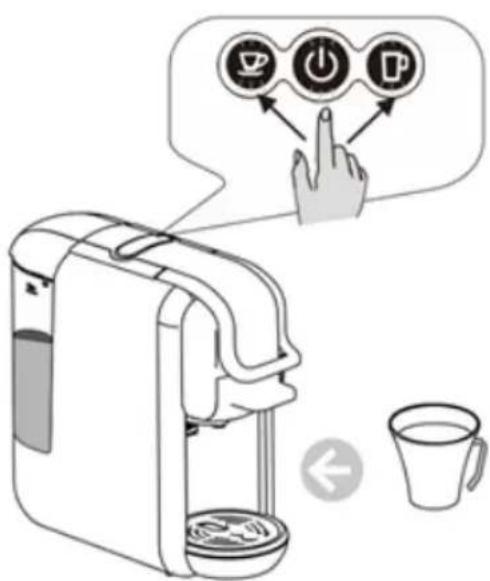
- PI ace a cup under the spout.
- Press the desired brew button once only.
- The selected button will flash and the machine will start the brewing process and stop automatically when the default brewing time has elapsed (16s for a short espresso, and 25s for a coffee). The default setting can be programmed, see the instructions "how to program the brewing time".
- Lift the handle and pull the capsule holder to remove the used capsule. Tips: When you press the desired button, the LED light will flash for a few seconds first, then brewing begins. The flashing indicates the heating time, and this is normal.

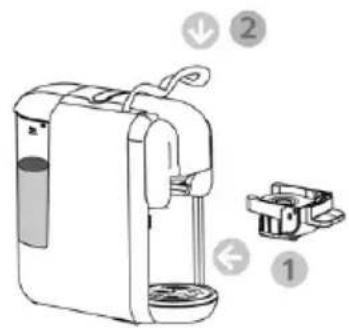
For capsule holder B
- Open the handle. (1)
2.Pull capsule holder B. (2)
- Insert a capsule into the capsule holder.
- Push the capsule holder containing the capsule to insert it. (1)
- Close the handle. (2)
- PI ace a cup under the spout.
- Press the desired brew button once only
- The selected button will flash and the machine will start the brewing process and stop automatically when the default brewing time has elapsed (16s for a short espresso, and 25s for a coffee). The default setting can be programmed, see the instructions "how to program the brewing time".
- Lift the handle and pull the capsule holder to remove the used capsule Tips: When you press the desired button, the LED light will flash for a few seconds first, then brewing begins. The flashing indicates the heating time, and this is normal.
For the coffee powder
- Open the handle, (1)
Pull out the filter holder dedicated to coffee powder. (2)
- Fill with coffee powder and squeeze everything. (3)
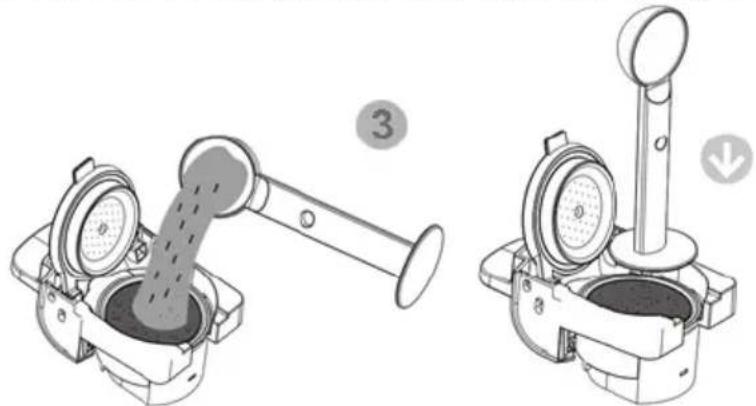
- Push the filter holder containing the coffee powder. (1) Close the handle. (2)
-
PI ace a cup under the spout,
-
Press the desired brew button once only.
-
The selected button will flash and the machine will start the brewing process and stop automatically when the default brewing time has elapsed (25s for a short espresso, and 47s for a coffee). The default setting can be programmed, see the instructions "how to program the brewing time". Lift the handle and pull the capsule holder to remove the used capsule Tips: when you press the desired button, the LED light will flash for a few seconds first, then the infusion begins. The flashing indicates the heating time, and this is normal.
For paper coffee pods
- Open the handle, (1) Pull the capsule holder from the paper pods. (2)
- Fill with coffee powder and press it. (3)

Change the coffee powder filter to the paper pod filter.
Place the paper pod in the adapter.
- Push t he paper pod capsule holder (1) Close the handle. (2)
- Place a cup under the spout,
- Press the desired brew button once only.
- The selected button will flash and the machine will start the brewing process and stop automatically when the default brewing time has elapsed (25s for a short espresso, and 47s for a coffee). The default setting can be programmed, see the instructions "how to program the brewing time".
- Lift the handle and pull the capsule holder to remove the used capsule.
Tips: When you press the desired button, the LED light will flash for a few seconds first, then
brewing begins. The flashing indicates the heating time, and this is normal.
Standby
Default settings: 15 min sleep mode
- The machine will turn off after 15 minutes, and all indicator lights will turn off.
- Press the switch to turn the machine back on if it is in sleep mode.
15 min
Standby mode setting:
- Hold the small or large cup selector buttons pressed and insert the plug into the socket.
- The power button lights up.
- Press the small cup button, its light goes out and sleep mode is deactivated.
- Press the small cup button, its indicator lights up and standby mode is activated.

Cleaning mode function
- Place a cup in front of the machine.
- Pour de water with a little detergent in the tank.
- Press and hold the small cup button and simultaneously plug in the power plug.
- The switch and the small cup button light up. Press the small cup button to start cleaning. The process takes 120 s. Press the small cup button to stop it.
Coffee volume settings
Small cup volume adjustment
- Place the coffee cup under the spout.
- The machine is in normal operating mode. Press and hold the small cup button and release it when the desired amount of coffee has been dispensed (min: 10 sec, max: 90 sec).
Adjusting the volume of a large cup
- Place the coffee cup under the spout.
- The machine is in normal operating mode. Press and hold the large cup button and release it when the desired amount of coffee has been dispensed (min: 10 sec, max: 90 sec).
Default settings
Press the big cup as shown, and plug in the power plug. The button indicator lights will flash twice. This indicates that the machine's default settings have been restored.


RISK OF FATAL ELECTROCUTION AND FIRE.
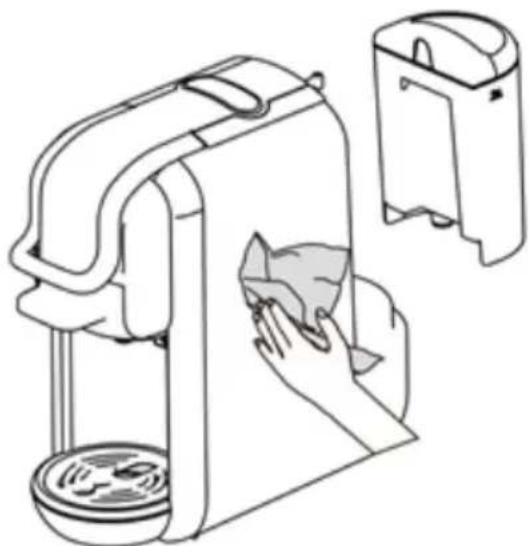
Never immerse the machine in whole or in part in water. Always be sure to unplug the machine before cleaning.
Do not use harsh cleaning agents or solvents.
Do not use sharp objects, brushes or abrasive utensils.
Do not put the machine in the dishwasher.
Cleaning the capsule holder
Exterior cleaning
Clean the machine with a clean, dry cloth, tissue or piece of paper towel, then reassemble all the parts. Clean the spout and the inside of the machine regularly with a damp cloth.
WARNING INSTRUCTIONS
Itsi forbidden to pour water on the machine
- Its forbidden to open the handle during the infusion.
- Besre brewing, make sure the water reservoir contains more than 20ml of water.
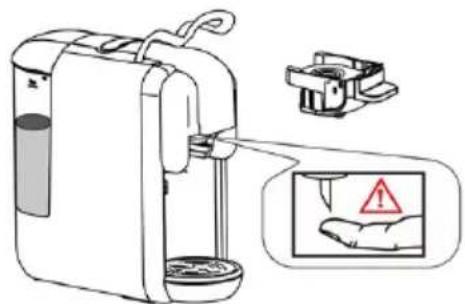
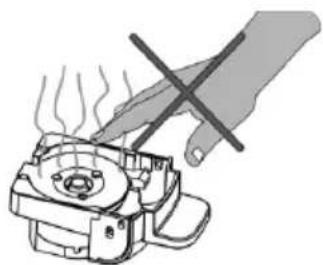
- A sarp needle is present above the capsule adapter. It is forbidden to place the hand or fingers near the needle when the adapter is removed.
RISK OF INJURY!
- Ta adapter remains very hot after brewing.
BURN HAZARD!
Power saving mode
The machine enters power saving mode automatically after 15 minutes of inactivity. The LEDs of both buttons and the power indicator will then be off. To activate the power saving mode, please press the power button. The device begins to heat up and the lights flash. When they illuminate continuously, the machine is ready to brew coffee.
Dscaling/ Maintenance
Water quality varies by region. Limestone particles in mineral-rich water settle as residue in the machine, which can clog pipes and cause damage. To avoid this, be sure to descale the machine after at least 300-400 cups of coffee, or if you notice the amount of coffee being produced drastically reduced, after a month or two.
Descaling must be done correctly to avoid damage. It is therefore essential to follow these instructions.
REMARKS :
- Never clean the machine with vinegar. This can damage the machine and give the coffee a bad taste.
- Damage caused by improper descaling or lack of descaling is not covered by the warranty.
CAUTION: BE CAREFUL OF HOT WATER!
- Recommendations: buy a commercially available descaler.
(ascending liquid), diluted according to the manufacturer's instructions.
Pour the mixture into the water tank. - Make sure there are no capsules in the machine.
- Place a bowl under the spout to collect the descaling liquid, with the scale residues.
- Fill the water tank to the maximum level with the descending solution, making sure the solution is completely dissolved.
- Press the button to dispense the descending water as you normally would for a coffee, and repeat the operation several times to empty the water tank completely.
- Repeat the process with another tank of water mixed with the descaling liquid.
- Repeat the process to flush the internal circuit with a tank of clean water (without descending solution) to completely clean the pipes.
TROUBLESHOOTING
| Symptom | cause | Fixes |
| The coffee is not brewed. | The water tank is empty. | Fill the water tank. |
| The coffee is not hot enough. | The cups/mug are cold. Scale has built up in the machine. The machine is cold. | Preheat the cup/mug. Descale the machine. If the machine is cold, run a cup of water through it to warm the circuit. |
| Water is leaking from the machine. | The water tank is leaking. The drip tray is full. | Check that the water tank valve is not clogged. Empty the drip tray. |
| The handle cannot be closed. | The brew basket is not properly installed. | Push the brew basket into the correct position. |
TECHNICAL DESCRIPTION
Voltage: 220-240V~
Frequency: 50/60Hz
Power: 1450 W
Pump pressure: 19 bar Water
tank capacity: 0.6L
Defects due to improper use of the device and damage due to intervention or repair by a third party or due to the installation of non-original parts are not covered by the responsibility of the provider.
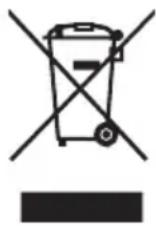
This logo affixed to the product means that it is a device whose treatment as waste falls within the scope of Directive 2012/19/EC of July 4, 2012, relating to waste electrical and electronic equipment. (WEEE).
The presence of hazardous substances in electrical and electronic
equipment can have potential effects on the environment and human health in the reprocessing cycle of this product.
Thus, at the end of the life of this device, it must not be disposed of with unsorted municipal waste.
As the end consumer, your role is essential in the cycle of reuse, recycling and other forms of recovery of this electrical and electronic equipment. Recovery and collection systems are made available to you by local authorities (waste centres) and distributors.
You have the obligation to use the selective collection systems made available to you.
The warranty does not cover wear parts of the product, or problems or damage resulting from:
(1) surface damage due to normal wear of the product;
(2) defects or deterioration due to contact of the product with liquids and due to corrosion caused by rust or the presence of insects;
(3) any incident, abuse, misuse, unauthorized modification, disassembly or repair;
(4) any improper maintenance, use not in accordance with the product instructions or connection to an incorrect voltage;
(5) any use of accessories not supplied or approved by the manufacturer.
The warranty will be void if the nameplate and/or serial number of the product is removed.
UW APPARAAT BEDIENEN
WAARSCHUWING INSTRUCTIES:
- IMPORTANT
- Disposal and environmental responsibility
- Read the instructions carefully before use.
- USING YOUR DEVICE FOR THE FIRST TIME
- Remark :
- SCALD HAZARD: BEWARE OF HOT WATER!
- Fill without removing the tank
- Fill by removing the tank
- For capsule holder A
- For capsule holder B
- For the coffee powder
- For paper coffee pods
- Standby
- Default settings: 15 min sleep mode
- Standby mode setting:
- Cleaning mode function
- Coffee volume settings
- Small cup volume adjustment
- Adjusting the volume of a large cup
- Default settings
- RISK OF FATAL ELECTROCUTION AND FIRE.
- Cleaning the capsule holder
- Exterior cleaning
- WARNING INSTRUCTIONS
- Power saving mode
- Dscaling/ Maintenance
- REMARKS :
- CAUTION: BE CAREFUL OF HOT WATER!
- TROUBLESHOOTING
- TECHNICAL DESCRIPTION
- UW APPARAAT BEDIENEN
- WAARSCHUWING INSTRUCTIES:
Brand : SCHNEIDER
Model : SCESC2206R
Category : Coffee machine