GELATO 5Ksc - Ice machine NEMOX - Free user manual and instructions
Find the device manual for free GELATO 5Ksc NEMOX in PDF.

| Brand | Nemox |
| Model | GELATO 5Ksc |
| Product type | Professional ice cream machine (gelato machine) |
| Power supply | Single-phase, 60 Hz, 16 A, with cord and grounding plug |
| Maximum preparation capacity (gelato/sorbet) | 1.25 kg of mixture |
| Maximum preparation capacity (granita) | 1 kg with standard paddle, up to 1.5 kg with special paddle (sold separately) |
| Number of automatic programs | 4 (Italian gelato, Semi-soft gelato, Granita, Rapid cooling) |
| Conservation cycles | 4 per program (16 total), with increasing consistency |
| Operating modes | Manual and automatic |
| Features | Automatic paddle stop at end of production, possible delayed start, lid opening safety |
| Maximum ambient temperature | 43°C (climate class T) |
| Minimum distance around the appliance | 20 cm for ventilation |
| Average production time | 15 to 20 minutes depending on recipe and quantity |
| Maintenance and cleaning | Wash removable parts in dishwasher or with hot water; clean the tub with hot water and non-foaming detergent; periodic disinfection mandatory |
| Safety | Paddle stop device when lid is open, overload protection, automatic stop in case of excessive consistency |
| Spare parts supplied | Seal kits (for spout and drain plug), paddle inserts, locking pads, spatula, brush |
| Repairability | Interventions reserved for authorized after-sales service; specific grease available |
| Installation precautions | Let the machine rest horizontally for 8 to 12 hours before first use; flat surface; do not obstruct ventilation grilles |
| Intended use | Preparation and conservation of gelato, sorbets, granitas and similar preparations |
Frequently Asked Questions - GELATO 5Ksc NEMOX
User questions about GELATO 5Ksc NEMOX
0 question about this device. Answer the ones you know or ask your own.
Ask a new question about this device
Download the instructions for your Ice machine in PDF format for free! Find your manual GELATO 5Ksc - NEMOX and take your electronic device back in hand. On this page are published all the documents necessary for the use of your device. GELATO 5Ksc by NEMOX.
USER MANUAL GELATO 5Ksc NEMOX
text_image
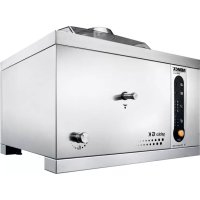
NEMCX CREQ 500V gelato 5 K sc mode in Italy
gelato 5Ksc
crea serie
20
20
ATTENTION:
Pls keep the packaging boxes. They will be necessary in case you should return the machine for repair or you should return it for any other reason. If the machine will be sent back with a packaging box not suitable for transportation all repairing charges will be at charge of the sender, even if the machine is under warranty. If the machines doesn't need to be repaired and the package will not be suitable the machine will be returned to the sender too.
ATTENTION:
When using electrical appliances, basic safety precautions should always be observed, including the following:
- Read all instructions carefully.
- To protect against risk of electric shock, do not put the main body of appliance in water or any other liquid.
- This appliance has not been designed to be used by persons (including children) with physical, sensory or mental impairments or who are lacking in experience or knowledge, unless they have been given the necessary supervision and prior instructions about how to use this appliance by a person responsible for their safety. Young children should be supervised to ensure that they do not play with the appliance.
- Unplug from outlet when not in use, before putting on or taking off parts, and before cleaning.
- Avoid contact with moving parts.
- Do not operate any appliance with a damaged cord or plug, or after the appliance malfunctions, or is dropped or damaged in any manner. Return the appliance to an authorised Service Center for examination, repair or electrical or mechanical adjustment.
- The use of attachments not recommended or sold by the appliance manufacturer may result in fire, electric shock or injury.
- Do not use outdoors.
- Do not let cord hang over edge of table or counter, or touch hot surfaces.
SAVE THESE INSTRUCTIONS
CAUTION
- An authorised service representative should perform any servicing other than cleaning and user maintenance. Authorised service personnel only should do repair.
- After removing the appliance from the packaging, check it for damage. If in doubt, do not use the appliance and contact an authorised service centre.
- Plastic bags, polystyrene, nails, etc. must not be left within reach of children as they are potentially dangerous.
- The appliance's manufacturer and vendor reject any responsibility for failure to comply with the instructions provided in this user manual.
- Check that the voltage shown on the rating plate corresponds to the voltage of the mains.
- Do not use sharp utensils inside the bowl! Sharp objects will scratch and damage the inside of the bowl. A rubber spatula or metal spoon may be used, when the appliance is in the “OFF” or “0” position.
- Never clean with scouring powders or hard implements.
- Do not place or use the appliance on or near hot surfaces, such as stoves, hotplates, or near open gas flames.
- Do not unplug the unit by pulling on the cord.
- The appliance must be connected to an electrical system and power supply socket with a minimum capacity of 16A, equipped with an efficient earth contact. The manufacturer is not responsible for damages to things or people in the event that the prescribed safety norms have not been respected.
- Before carrying out any maintenance or cleaning operations, make sure that the appliance has been disconnected from the electrical mains by removing the plug from the power supply socket.
- Never wash the appliance using water jets or place it in water!
- This appliance is suitable for use with 43^ max. ambient temperature (climatic class "T").
English
The following information has been included in the manual as safety and regulatory guidelines. For complete installation instructions, please see the Installation Checklist.
Installer Safety
- In all areas of the world, equipment should be installed in accordance with existing local codes. Please contact your local authorities if you have any questions.
- Care should be taken to ensure that all basic safety practices are followed during the installation and servicing activities related to the installation and service of equipment.
- Only authorized personnel should perform installation and repairs on the equipment.
- Authorized service personnel should consult OSHA Standard 29CFRI910.147 or the applicable code of the local area for the industry standards on lockout/tagout procedures before beginning any installation or repairs.
- Authorized service personnel must ensure that the proper PPE is available and worn when required during installation and service.
- Authorized service personnel must remove all metal jewellery, rings, and watches before working on electrical equipment.
- The main power supply(s) to the freezer must be disconnected prior to performing any repairs. Failure to follow this instruction may result in personal injury or death from electrical shock or hazardous moving parts as well as poor performance or damage to the equipment.
Site Preparation
- Review the area the unit is to be installed in before uncrating the unit, making sure that all possible hazards the user or equipment may come into have been addressed.
- This unit must NOT be installed in an area where a water jet or hose can be used. NEVER use a water jet or hose to rinse or clean the unit. Failure to follow this instruction may result in electrocution.
- This unit must be installed on a level surface to avoid the hazard of tipping. Extreme care should be taken in moving this equipment for any reason.
Electrical Hook-Up Installation For 60 Cycles, 1 Phase, Supplied With Cord and Plug.
- This equipment is supplied with a 3- wire cord and grounding type plug for connection to a single phase, 60 cycle, branch circuit supply. This unit must be plugged into a properly grounded receptacle.
- Check the data label, located on the back panel, for electrical specifications.
-
Permanent wiring may be employed if required by local codes. Instructions for conversion to permanent wiring are as follows:
-
Be sure the machine is electrically disconnected.
- Remove the appropriate panel and locate the electrical connection where the supply cord is connected.
3.Remove the connection tabs and the strain relief hook. Remove the factory- installed cord. - Route incoming permanent wiring through the hole and a conduit in order to avoid any folding.
- Install the field-wiring terminals and connect to them the power supply leads. Connect two power supply leads. Attach ground (earth) wire to the grounding lug inside.
6.Be sure the unit is properly grounded before applying power.
This Ice Cream Machine contains its own refrigerant which must be allowed to settle after transport. Leave the Ice Cream Machine on a horizontal surface for at least 12 hours after purchase or after any move which might have stored the machine the wrong way up.
Leave at least 20 cm on each side of the machine to allow free air circulation. Make sure the vent slots are free and unobstructed.
English
You have purchased a latest generation NEMOX ice cream machine.
In addition to producing all the ice cream, sorbet and Granita you want, you can also conserve the preparations in the pot, so they are always at the ideal serving temperature and density.
An onboard computer will help you get the job done in the best way, enhancing your professionalism and hard work and saving you valuable time.
Your ice cream machine has two types of operation:
- Manual mode, the operation of the compressor and paddle are independent so as to make the most of your experience. The preservation system can be started on its own if you consider it appropriate. An electronic device stops the paddle when the consistency of the preparation is excessive, thus preventing compromising the mechanical functions of the machine. The cooling system will continue to run until it is manually stopped.
- In automatic mode, you can first choose one of the 4 programs available (classic Italian gelato, semi-soft gelato, Granita, fast cooling) and 4 preservation programs for every production type.
With this operating mode you will not have to worry about anything, once the selections are made and the ice cream machine is started, it
produces ice cream and automatically switches to the desired preservation mode. You just have to serve the ice cream to your customers, always with the correct consistency.
FIRST USE
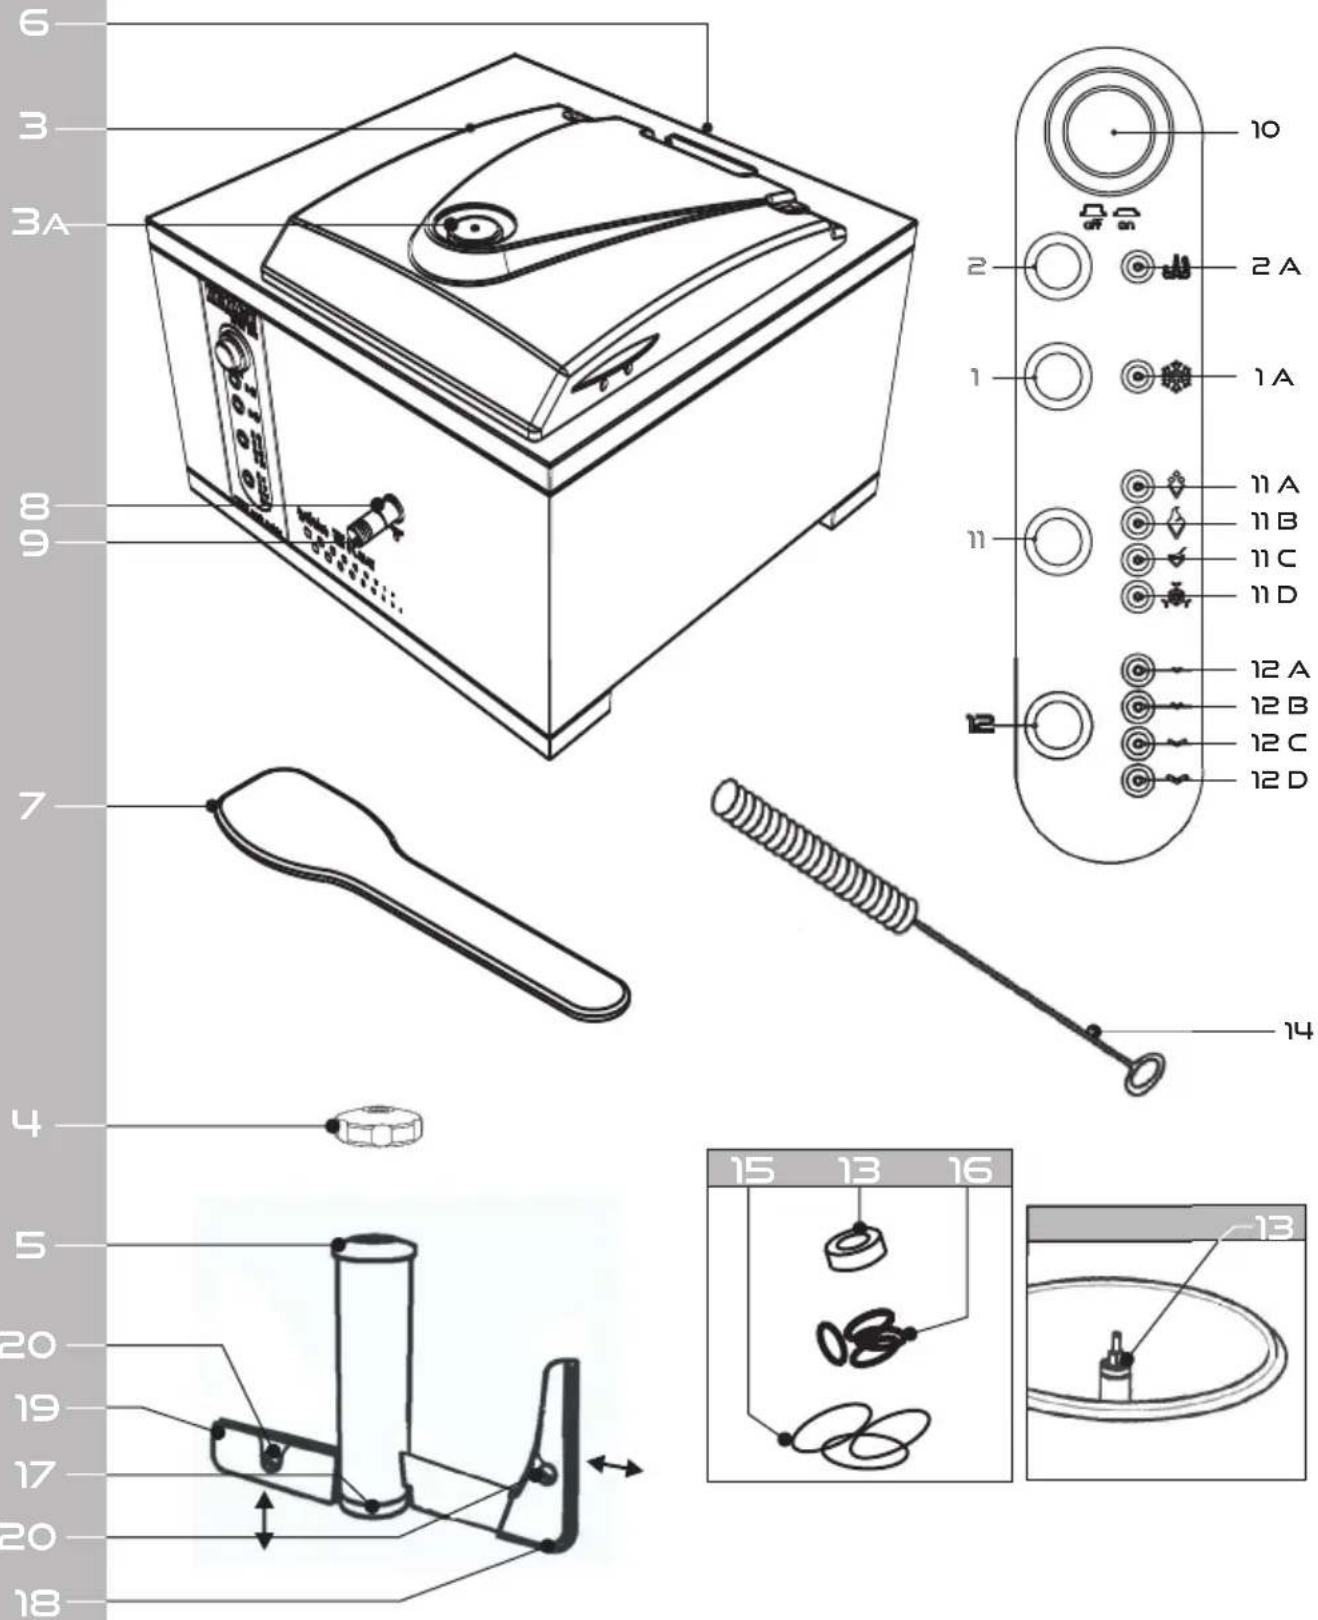
- Place GELATO 5Ksc CREA on a flat surface, make sure that the ventilation grids (6) are not obstructed. Leave a minimum clearance of 10 cm. around the ventilation grids.
- During use, the appliance must be kept clear of walls or furniture so as to not obstruct the inflow and outflow of cooling air. The leakage of warm or hot air is an integral part of the operation of the device, that exchanges heat with the outside for refrigeration.
- Leave the machine in a horizontal position for 8 hours or more before first use, as if it has been tilted during transport, the cooling agents must re-settle in the correct position.
- Before starting to use the machine, carefully clean the parts that are in direct or indirect contact with processed foods (pot, mixing paddle, paddle inserts, locking ring, lid etc).
• Hygiene is extremely important when dealing with food. Carefully follow the provisions of hygiene standards applicable in your country (HACCP or equivalent).
PREPARING THE MIXTURE
Select the recipe and prepare the mixture, paying attention to the following:
- Handle the ingredients as required by the
English
hygiene standards applicable in your country (HACCP or equivalent).
- For the preparation of ice creams and sorbets, do not introduce more than 1.25kg of mixture, in order to allow for proper volume increase while mixing.
- For the preparation of Granitas, the maximum recommended amount is 1kg. mixed with the paddle provided. It can process up to 1.5kg. of Granita using the special Granita paddle that can be purchased separately.
- It is recommended to pour the mixture at a temperature between +10^ and +20^ . Higher temperatures may also considerably increase the processing time.
DIRECTIONS FOR USE
- Check that the voltage indicated on the data plate corresponds to the local network. Insert the power plug into the power outlet and operate the main switch (10); the light will indicate the presence of voltage. The electronic board will run an initialization check, triggering all the LEDs on the control panel in sequence.
- Check that discharge fitting (8) is close with the special plug (9) until i is fully locked.
- Insert the mixing paddle (5) in the pot, turning it clockwise until it is positioned in the bottom of the pot.
- Tighten the locking ring (4) to the bottom so that the mixing paddle is securely attached.
- Pour the previously prepared mixture.
- Close the lid (3).
MANUAL MODE
- Start the cooling system by pressing the Button (1); the LED (1a) will light up.
IMPORTANT: if the machine is turned off due to sudden and temporary suspension of power supply or incorrect operation using the power keys of the refrigerant, wait a few minutes before restarting. - Press button (2) to start the paddle; the LED (2a) lights up, the production cycle begins. The preparation time varies depending on the quantity, initial temperature of the mixture, product type (creamed, sorbet or Granita) and ambient temperature.
IMPORTANT: The movement of the paddle is entirely independent of the cooling system. A safety device stops the movement of the paddle when the lid is lifted.
If the lid remains raised for prolonged periods, the cooling system will continue to operate. Consequently, when the lid is lowered again the paddle may not start or stop due to the excessive consistency of the mixture. In this case, the electronic control will permanently stop the paddle and LED (2a) will flash to indicate the fault.
If the preparation is not yet complete, turn off the compressor by pressing the button (1) and the paddle via the button (2), wait until the mixture becomes softer and restart production.
- According to the recipe and the amount of ingredients used, average production time is 15/20 minutes.
- Through the opening (3a) on the lid, you can add additional ingredients (e.g. to make ripple ice cream during the last preparation phase).
- When the preparation has reached the desired consistency, turn off the cooling system by pressing button (1) and stop the paddle by pressing button (2). To easily remove the preparation from the pot, remove the mixing paddle (5) by loosening the appropriate locking ring (4).
MANUAL START OF THE PRESERVATION CYCLE
- Should it become necessary to start the preservation cycle manually, you can do this at any time. Keep paddle button (2) and compressor button (1) pressed simultaneously for 3 seconds. The machine will immediately switch to preservation cycle related to the classic Italian gelato production program. The LED (12a) will turn on.
- Should you need to run a preservation cycle related to a different production program, before switching from manual mode to preservation mode, select the desired production program (see section "CHANGING THE PRESERVATION CYCLE").
AUTOMATIC MODE
The GELATO 5Ksc CREA machine has a series of programs which automate the production and preservation process.
- Follow the steps described in the section "DIRECTIONS FOR USE".
- Press button (11) to start up the machine in automatic mode by selecting the first operation program. The LED flashes for 3 seconds during which, if you keep on pressing
English
the button (11), you will be able to select other programs in sequence.
- When the LED becomes steadily lit, the associated program starts up and begins the production cycle.
- The machine has 4 production programs and 4 preservation cycles for each of them. When the program selected starts up you can choose the preservation cycle desired. Chose the preservation cycle by pressing the button (12) repeatedly. When switching from the first preservation program to the fourth, gelato consistency increases gradually.
- When the ice cream reaches the right consistency, the production program stops automatically and the preset preservation cycle is enabled.
- Every production program has a preset threshold time after which the machine enters in preservation cycle, regardless of the current production phase.
- If deemed appropriate, it is possible to enable the selected preservation cycle at any time, ending the production program. Select the preservation cycle desired via the key 12 (sequence selection). Keep the paddle button (2) an compressor button (1) pressed simultaneously for 3 seconds. The machine will immediately switch from production cycle to preservation cycle.
- CLASSIC ITALIAN GELATO AND SORBET PROGRAM. By pressing button (11) once, the LED (11a) will light up and activate the production program. At the end of the production cycle, the LED (11a) flashes indicating that the selected preservation cycle has been activated.
If the preparation was ready before reaching the operation time limit, the whipping paddle locks. The preservation function is automatically activated.
- . By pressing SEMI-SOFT GELATO PROGRAM button (11) twice, LED (11b) will light up and activate the processing program. At the end of the production cycle, the LED (11b) flashes indicating that the selected preservation cycle has been activated.
If the preparation was ready before reaching the operation time limit, the whipping paddle locks. The preservation function is automatically activated.
• . By pressing button (11) GRANITA PROGRAM
three times causes LED (11c) to light up and activate Granita processing. At the end of the production cycle, the LED (11c) flashes indicating that the selected preservation cycle has been activated.
If the preparation was ready before reaching the operation time limit, the whipping paddle locks. The preservation function is automatically activated.
- Pressing button FAST C (11) four times causes LED (11d) to light up and activate the fast cooling program. At the end of the production cycle, the LED (11d) flashes indicating that the selected preservation cycle has been activated.
This program is used when processing mixtures with high initial temperatures. The program quickly brings down the temperature without adding too much air into the mixture, saving time and improving the quality of the ice cream made.
SELECTED PROGRAM VARIATION
Should it become necessary to select a different program when a program is running, you can simply press button (11). When the new program is selected, the currently running program will stop. The new program will be active immediately with its own execution times that will restart from the initial values.
SWITCHING FROM AUTOMATIC TO MANUAL OPERATION
During the processing program, it is possible to switch to manual mode at any time.
Holding down button (11) for 3 seconds switches the machine to manual mode while enabling the paddle LEDs (2a) and compressor (1a).
The preservation cycle selected will be deactivated.
TURNING OFF THE MACHINE DURING AUTOMATIC OPERATION MODE
If you need to turn off the machine before the completion of the active processing program, you first need to switch to manual mode by pressing and holding button (11) for 3 seconds and then pressing paddle (2) and compressor (1) to stop any activity. Do not act directly on the main switch (10)!
PRESERVATION CYCLE VARIATION WHILE A PROGRAM IS RUNNING
During the preparation phase it is possible to
English
automatically vary the preservation cycle set at any time. Repeatedly press button (12) until the LED that corresponds to the desired cycle is activated. The LED will flash for 3 seconds and becomes steadily lit: the new preservation cycle is selected at this point and will be performed at the end of the program. Each preparation program will activate at the end of the selected preservation cycle.
OLING PROGRAM PADDEE LOCK UPON LID OPENING
The opening of the lid (3) only stops paddle (5) and does not affect the preparation program.
The closure of the lid (3) starts the motion of the paddle (5) (where, at that time it is provided by the selected program). If the mixture proves excessively thick to prevent the movement of the paddle, the machine will automatically activate the previously selected preservation cycle.
AUTOMATIC PRESERVATION
There are 4 preservation cycles available for every whipping program (total of 16 cycles) devised to meet a wide range of needs.
- In automatic mode, if the machine is not stopped, at the end of each production cycle is enabled the ice cream preservation cycle selected.
•The activation of the preservation function is indicated by flashing of the LED corresponding to the processing program of the ice cream selected. - The desired cycle selection can take place either at the beginning or during the processing phase.
- Depending on the type of recipe and/or the quantity prepared, every set of preservation cycles enables keeping gelato, Granita and sorbet or other whipped products at the desired conditions.
- Pressing the button (12) several times causes the selection LEDs of the various preservation cycles to light up in sequence. If you switch from the first (LED (12a) active) to the fourth (LED (12d) active) preservation program, the density of gelato increases gradually.
- Once you have selected the desired cycle, the corresponding LED will flash for 3 seconds and will become steadily lit, enabling the selection.
VARIATION OF THE PRESERVATION CYCLE
You can always select a different preservation
cycle either during the active phase and during the pause phase of the running cycle.
Repeatedly press button (12) until the LED that corresponds to the desired cycle is activated. The LED will flash for 3 seconds and become steadily lit: The new preservation cycle is now selected and it will be run for the set execution times
Should it become necessary to switch to a preservation cycle associated to a different program, you must enable the corresponding program priorly, by pressing the button (11). Once you have enabled the program, switch to the preservation cycle by pressing buttons (2) and (1) simultaneously for 3 seconds. The machine will enable the preservation cycles associated to the preset program.
SWITCHING FROM PRESERVATION PHASE TO A PRODUCTION PROGRAM
With the preservation active, you can activate an automatic program simply by selecting it by pressing button (11). The LED corresponding to the selected program will flash for 3 seconds and become steadily lit; the machine will exit the preservation cycle and run the selected program.
Subsequently, the preservation cycles associated to the selected program ill be enabled.
PADDLE LOCK UPON LID OPENING
The opening of the lid (3) only stops the paddle (5) and does not affect the preservation cycle. The closure of the lid (3) enables the paddle operation (5) (on the condition that it is provided by the selected preservation cycle in that moment). If the mixture proves excessively hard and prevents the movement of the paddle, the machine will automatically re-activate the preservation cycle from the start.
TURNING OFF THE MACHINE DURING PRESERVATION
To turn off the machine, hold down button (11) for 3 seconds and then act on the main switch (10). Do not act directly on the main switch (10)! IMPORTANT
• Each preservation cycle continues until the user decides to stop it.
- The machine is not designed for use either for storage or as a refrigerator! Store the preparation in the pot for no longer than 12 hours.
English
- The cooling fan of the cooling system will always remain in operation for the entire duration of the preservation period.
- After use, ALWAYS turn the machine off using the main switch (10).
TIPS
- Using ingredients at refrigerator temperature will reduce the processing time. Furthermore, it is possible to reduce the temperature of the ingredients if hot with the appropriate fast cooling program.
- Be careful not to insert ingredients that are too cold or nearly froze, as whipping may have a poor quality.
- For a correct volume increase during mixing, use maximum 1.25kg of ingredients for the preparation of ice cream and sorbet.
- For the preparation of Granita, the maximum amount of ingredients is 1Kg with the paddle supplied with the machine.
It can process up to 1.5kg of Granita using the special Granita paddle that can be purchased separately.
CLEANING THE POT
GELATO 5Ksc CREA is designed to facilitate pot cleaning. Proceed as follows:
- Turn off the cooling system, remove the paddle and pour at least 2 litres of hot water and a low-foaming detergent into the pot.
- Wash the pot with a sponge. Do not use sharp utensils inside the pot.
- Place an empty container of at least 3 litres under the drain (8).
- Remove the plug (9). The water in the pot begins to flow into the container below.
- Repeat the operation using hot, clean water and rinse thoroughly.
- When the pot is empty, clean the discharge pipe using the cleaner (14) previously cleaned.
- Clean the plug (9). Reposition the plug (9) until the pot discharge is fully closed.
- Repeat the cycle until the pot is completely cleaned.
• Dry with a disposable paper towel.
- Proceed with the cleaning of the rest of the machine.
MAINTENANCE AND CLEANING OF THE MACHINE
- Before cleaning the machine, make sure that it is turned off (main switch (10) to OFF) and
unplugged from the power plug.
- Remove the paddle scrapers (18) and (19) by pulling outwards.
- Remove the steel pin and remove the transparent lid (3) from the machine.
- The paddle (5), paddle inserts (18) and (19), transparent lid (3), the transparent lid cap (3a), the silicon cap, the plug (9) and locking ring (4) can be washed in the dishwasher or in hot water with suitable detergent.
- If the paddle inserts are damaged or worn out, they must be replaced to prevent mixing ingredients less effectively.
- Clean the body of the machine and the non-removable parts with the specific product given in SANITIZATION chapter.
IMPORTANT: never wash the machine with jets of water! It contains electrical parts.
WARNING: when cleaning the stainless steel parts of the machine do not use any chloride based product (as the hydrochloric acid), nor any bleach-hypochlorous-acid based products nor any product containing strong acid (such as those for the removal of cement mortar) nor silver cleaning special products. Avoid using any metal tool or abrasive pad.
- Clean the ventilation grids (6) on the rear part and the bottom of the machine at least once a year.
- Regularly (at least once every 3 months) check the oil seal (13) on top of the transmission shaft: if necessary replace or lubricate with H1 category grease or higher. Specially designed grease can be purchased at any Authorized Service Centre. An oil seal replacement (13) is supplied with the machine.
• Regulatory lubricate the gaskets of the plug (9).
• Proceed with the sanitization (see the SANITIZATION chapter) in order to avoid any bacteria growth at least one time in a week.
SANITIZATION
Sanitizing operations, if properly carried out, allow for the removal of a significant proportion of micro-organisms whose cells and spores find, thanks to processing residues, favourable conditions for survival and proliferation. Must be carried out at the end of daily production cycle or more often, if necessary.
WARNING: standby mode should not be used in lieu of proper cleaning and sanitization
English
procedures at the frequencies required by the federal, state, or local regulatory agency.
Sanitizing involves two phases:
- Remove dirt (coarse residues) CLEANSING and rinse with lukewarm water immediately after work; cleaning action is provided by manual friction and water pressure. The use of a chemical detergent reduces, but does not cancel, the manual cleaning requested above. CAUTION: cleansing only, even if accurate, does not ensure complete removal of microbiotic contaminants. Proceed as follows:
- Leave out the paddle (5) and the nut (4) from the pot, remove the lid (3) from the machine.
- Rinse the pot with water hotter than 45^ first, to dissolve grease and facilitate its removal, but below 60^ to avoid "cooking" proteins, sugar or fat and make them stick even firmly to the surfaces subjected to cleaning.
- Remove the coarse dirt mechanically from the pot. Use an appropriate tool or the hard bristle pipe cleaner (14) previously cleaned. Avoid use any metal tool. Rinse the cleaning tool with the hot water (between 45°C and 60°C) every time you complete a single cleansing operation.
- Apply detergent: due to the fact that most of food residues (proteins and fat) cannot be dissolved in water, their complete removal requires the use of a detergent that detaches dirt form the surface and enables its further removal by rinsing.
- Carefully clean the recessed and hidden zones like the central sleeve, the thread where the ring (4) is screwed and the bottom of the bowl. Use a cleaner or any appropriate cleaning tool. The hard bristle pipe cleaner (14) can be used. After any operation, the cleaning tool must be carefully rinsed with warm water.
- Pull out the tap (9) and let the water+detergent flows out.
- By flowing out the hot water, carefully clean the discharge tube (8) by introducing an appropriate cleaning tool. The hard bristle pipe cleaner (14) can be used. After any operation, the used tool must be carefully rinsed with warm water. Repeat the operation with a new hot water + detergent solution.
- Finally rinse the pot and the discharge tube (8) with a hot water.
- All the tools and removable parts of the equipment must be cleaned in a separate basket filled with hot water (between 45^ and 60^ ) and detergent and must rest fully immersed for at least 15 minutes.
- Pull out the scrapers (18) and (19) (simply by pulling them), the interlocking buffers (20) (by pushing them out from the blade) and the bush (17) from the paddle. Leave them all fully immersed in the basket with the solution prepared above for the time required.
- Leave the paddle immersed in the basket with the solution prepared above for the time required, then use an hard bristle tool to carefully clean the paddle (5). The hard bristle pipe cleaner (14) can be used. Pay attention to the internal side of the paddle sleeve and to the areas near the interlocking buffers (20) hole.
- By using the hard bristle pipe cleaner (14) or any other appropriate tool, carefully clean the body and the recessed and/or hidden areas of the inserts (18) and (19), especially the zones where the metal blade of the paddle gets stuck. Leave them all immersed in the basket with the solution prepared above for the time required.
- Separate the ORs gaskets from the bush (17). Leave them all fully immersed in the basket with the solution prepared above for the time required then, by using the hard bristle pipe cleaner (14) or any other appropriate tool, carefully clean the body and the recessed and/or hidden areas of the bush (17) like the ORgasket throats.
- Separate the ORs gaskets from the tap (9). Leave them all fully immersed in the basket with the solution prepared above for the time required then, by using the hard bristle pipe cleaner (14) or any other appropriate tool, carefully clean the body and the recessed and/or hidden areas of the tap (9) like the ORs throats.
- Pull out the OR from the ring (4). Leave them all fully immersed in the basket with the solution prepared above for the time required then, by using the hard bristle pipe cleaner (14) or any other appropriate tool,
English
carefully clean the body of the ring and the recessed and/or hidden areas of the nut (4) like the OR gasket throat and the thread hole.
- Leave the lid (3), the lid cap (3a) and his silicon cap fully immersed in the basket with the solution prepared above for the time required then, by using the hard bristle pipe cleaner (14) or any other appropriate tool, carefully clean the body and the recessed and/or hidden areas. Careful to not scratch the lid.
- Final rinsing with water at tap temperature for at least 5 minutes fully immersed.
- Rinse carefully the hard bristle pipe cleaner (14) and/or all others tool used in the cleansing operations.
- Repeat the process at least one time or until the machine will be perfectly cleaned. Remount all the gasket and reposition the pieces on the machine, then proceed with the disinfection operations.
- . Disinfection or DISINFECTION decontamination involves the verified destruction of non spore forming pathogenic bacteria and significant reduction of non pathogenic and non spore forming bacteria. Cleansing and disinfecting operations must be performed separately. After cleansing, proceed with disinfection. Proceed as follows:
- Use a specific disinfecting agent suitable for food industry sector. For the best result in the disinfection operations we suggest to use the Purdy Products company Stera-Sheen™ Green Label (2oz per 2gal (7.5g per litre) water diluted solution for at least 5 minutes surface contact time). Carefully read the instruction provided by manufacturer of the sanitizing agent.
- Dilute the disinfecting product following the instructions given by the manufacturer. Attention: using less disinfecting product than recommended may promote bacteria proliferation at dangerous levels, as well as using excess active principle does not improve efficiency.
- Leave the disinfecting agent to act for the time required, in any case no less than 5 minutes. If left less time than required, disinfection may be ineffective.
- Leave the hard bristle pipe cleaner (14), the cloth you'll use to disinfect the machine and any other appropriate tool you'll use in the disinfection procedures fully immersed in a separate basket filled with sanitizing solution for the time required (no less than 5 minutes). Before using, apply (or spray) the disinfecting agent directly on the tools. Repeat the sanitization procedure of the tools anytime you complete any disinfection operation. Assemble all sanitized components into the machine by wearing sanitary gloves.
- Place 1/2-gallon of cool rinse water into the bowl. Brush clean bowl.
- Plug the machine to the mains, turn on the main power switch (10), turn on the paddle by pushing the bottom (2) and agitate for 2 minutes. Drain rinse water by pulling the plug (9). Turn off the paddle. Repeat rinsing procedure until water is clear.
- Dissolve 1/2-Oz. (half packet) Stera-Sheen Green label, in 1/2-gallon of warm water. Pour the solution into the bowl. Brush clean bowl and outlet hole.
- Turn on the paddle by pushing the button (2) to agitate for at least 5-minutes. Drain all solution by pulling the plug (9). Turn off the paddle. Switch off the machine by pushing the power switch (10) and unplug from the mains.
- Leave out the paddle (5) and the ring (4) from the pot, remove the tap (9) and the lid (3) from the machine.
- By using the wet cloth previously immersed in the sanitizing solution, carefully apply the disinfecting agent on the bowl (pay utmost attention to the bottom of the bowl), on the central sleeve of the bowl, on terminal part of the shaft (where the ring (4) is screwed), on the discharge bowl opening and inside the discharge tube (8). Check that all the surfaces or recessed and/or hidden areas, especially which can coming in contact with food, are fully covered by disinfecting agent. Use the cleaner (14) or any other tool previously sanitized in order to facilitate the operation. Leave the disinfecting agent for the time required (no less than 5 minutes).
- Clean carefully the discharge opening by flowing out at least 1/2 gallon of sanitizing
solution. Then, insert the hard bristle pipe cleaner (14) or any other tool previously sanitized in the opening in order to clean any recessed and/or hidden area with mechanical action. In the meantime pour at least 1 gallon of sanitizing solution in the bowl and let it flow out by the discharging tube. Repeat the process twice.
- Pull out the scrapers (18) and (19) (simply by pulling them), the interlocking buffers (20) (by pushing them out from the blade) and the bush (17) from the paddle.
- Separate the ORs gaskets from the bush (17), from the tap (9) and from the ring (4).
- Fill 2 separated baskets with sanitizing solution and fully immerse in the first basket for the time required by the disinfecting agent (no less than 5 minutes) the paddle (5), the inserts (18) and (19), the buffers (20), the tap (9), the ring (4), the spoon (7), the lid (3), the lid cap (3a) and his rubber small cap and all the ORs gaskets.
- By using the hard bristle pipe cleaner (14) or any other appropriate tool, carefully clean the body and the recessed and/or hidden areas of the paddle (5). Pay utmost attention in cleaning the internal sleeve, the blades and the zone around the interlocking buffers (20). Leave it fully immersed in the second basket with the solution prepared above for the time required (no less than 5 minutes).
- By using the hard bristle pipe cleaner (14) or any other appropriate tool, carefully clean the body and the recessed and/or hidden areas of the bush (17) and the tap (9). Pay utmost attention in cleaning the ORs throats. Leave them all fully immersed in the second basket with the solution prepared above for the time required (no less than 5 minutes).
- By using the hard bristle pipe cleaner (14) or any other appropriate tool, carefully clean the body and the recessed and hidden areas of the retainer (4). Pay utmost attention in cleaning the OR throat and the thread. Leave it fully immersed in the second basket with the solution prepared above for the time required (no less than 5 minutes).
- By using the hard bristle pipe cleaner (14) or
any other appropriate tool, carefully clean the body and the recessed and hidden areas of the inserts (18) and (19), especially the zones where the metal blade of the paddle gets stuck. Repeat the operation twice. Fully immerse the parts each time into an unused disinfecting agent solution. Leave them all fully immersed in the second basket with the solution prepared above for the time required (no less than 5 minutes).
- By using the wet cloth previously immersed in the sanitizing solution, carefully clean all the ORs gaskets, the interlocking buffers (20), the lid (3), the lid cap (3a) and the silicon cap. Leave them all fully immersed in the second basket with the solution prepared above for the time required (no less than 5 minutes).
- By using the wet cloth previously immersed in the sanitizing solution, carefully apply the disinfecting agent on all other parts of the machine that can coming in contact with food. In order to carry out the various operations correctly, you must proceed from up downwards, finishing with the floor. Leave the disinfecting agent to act for the contact time required (no less than 5 minutes). If left less time than required, disinfection may be ineffective.
- For the vertical enclosures of the machines and all the zones not in contact with food, use a disposable towel wet with the sanitizer and wipe down all the surfaces of the machine.
- After applying disinfecting agent, remove residues with a final potable water rinse. If you use a suggested Stera-Sheen™ Green Label sanitizer as per suggested dosage (see the paragraph of the DISINFECTION section) you can avoid rinsing. Repeat the sanitizing operation twice in order to avoid any bacteria growth.
- Dry thoroughly with a disposable towel the surfaces to avoid bacteria proliferation due to moisture.
- Pull out from the basket all the removable parts and dry them with a disposable towel. Remount all the gaskets and reposition the pieces on the machine.
• We recommend you alternate every 6 months the type of disinfecting agent to
English
avoid developing resistant forms of bacteria. Bacteria spores are the most resistant biological forms and, therefore, it is recommended you use chloride-based products.
TROUBLESHOOTING
• Machine does not cool:
- Check that the power plug is properly inserted and the appliance has electrical energy.
- The safety device of the compressor comes into action: wait 5-10 minutes before restarting the machine. Rapid and continued start-up attempts do nothing but prolong the period of inactivity of the machine.
- Check that the machine is correctly positioned with the ventilation grids (6) free of any obstructions.
- Check that the machine is not running a preservation cycle (LED (11a,b,c,d) flashing) that stops the compressor.
- Check that when the machine (switch (10)) turns on, the control panel shows the correct initialization procedure by turning on all LEDs in sequence.
• The paddle does not turn:
- Check that the paddle (5) is properly attached to the tube and locked with a special locking ring (4).
- Make sure it is free from obstacles that prevent it from rotating.
- Make sure the lid is closed in the correct position: a safety device stops the paddle when the lid is opened.
- Check that the LED paddle (2a) is not
flashing. In this case, press the button (2) twice to restart the paddle. Make sure that the mixture is not too thick to prevent the rotation of the paddle.
- Make sure that the machine is not running a preservation cycle (LEDs (11a-b-c-d) flashing) that stops the paddle.
•The machine is noisy:
- Some noise is part of the normal operating specifications, but if it becomes excessive contact the Service Centre to avoid further and more serious problems.
•The water discharge pipe leaks:
- Replace the gaskets of the water discharge tap (9). Two additional gaskets sets (16) are provided with the machine. Lubricate the gaskets before fit the tap (9) into the water discharge tube.
- The plastic sleeve (17) on the lower part of the paddle is tto easy to separate.
- Replace the gasket with the new one. Four additional gasket (15) are provided with the machine.
- The paddle does not scrape properly the sides of the bowl.
- Check that the scrapers (18) and (19) are not damaged or worn. An additional set is provided with the machine.
- Check that the resilient pads (20) are not distorted. If they are distorted replace them. An additional set is provided with the machine.
| ACTION | KEY COMBINATION |
| BLADE ACTIVATION | 2 |
| COMPRESSOR ACTIVATION | 1 |
| PROGRAM ACTIVATION | 11 |
| PRESERVATION ACTIVATION | 1+2 (3 seconds) |
| TURN OFF FROM PROGRAM | 11 (3 seconds) then 1 and 2 |
| TURN OFF FROM PRESERVATION | 11 (3 seconds) |
| PROGRAM CHANGE | 11 |
| PRESERVATION CHANGE | 12 |
| PROGRAM ACTIVATION FROM PRESERVATION* | 11** |
| PROGRAM ACTIVATION FROM PRESERVATION*** | 11 |
| * If preservation is activated after a program. ** To activate the program whose LED is flashing, first select a different program. *** If conservation is activated without running programs. | |
Français
INSTRUCTIONS GENERALES DE SECURITE
• PROGRAMA GELATO SEMI S OFT.
NEMOX International S.r.l.