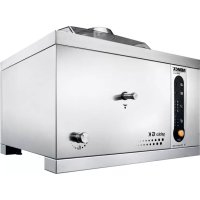
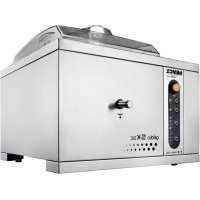
Pro 1700 - Ice machine NEMOX - Free user manual and instructions
Find the device manual for free Pro 1700 NEMOX in PDF.

| Product Type | Ice Cream Maker (Sorbet Maker) |
| Brand | NEMOX |
| Model | Pro 1700 |
| Maximum Capacity | 1.1 kg (fill to half maximum) |
| Power Supply | Mains, 220-240 V, 10 A, grounded plug |
| Main Functions | Independent cooling, mixing paddle, ice preservation system (buttons L, M, N) |
| Included Bowls | Fixed bowl and removable bowl (aluminum) |
| Provided Accessories | Paddle for fixed bowl, paddle for removable bowl, transparent lid, tightening nut, spatula, measuring scoop (50 ml) |
| Ambient Operating Temperature | Up to 32 °C (climate class N) |
| Preservation System | Automatic, maintains ice up to 12 h (hygiene) |
| Maintenance and Cleaning | Clean paddle, lid, nut and removable bowl with warm soapy water; do not immerse the main body |
| Dishwasher | Not recommended for any part |
| Safety | Do not immerse in water, do not touch moving parts, unplug before cleaning |
| Repairability | Repairs exclusively by an authorized center; do not open yourself |
| Warranty | Standard (details not provided) |
| Standards | CE, Low Voltage Directive 2006/95/EC, EMC 2004/108/EC |
Frequently Asked Questions - Pro 1700 NEMOX
User questions about Pro 1700 NEMOX
0 question about this device. Answer the ones you know or ask your own.
Ask a new question about this device
Download the instructions for your Ice machine in PDF format for free! Find your manual Pro 1700 - NEMOX and take your electronic device back in hand. On this page are published all the documents necessary for the use of your device. Pro 1700 by NEMOX.
USER MANUAL Pro 1700 NEMOX
natural_image
Modern kitchen microwave oven with glass lid and four chocolate-shaped cavities, accompanied by a set of heart-shaped food items in a glass bowl (no text or symbols visible)INSTRUCTION BOOK
MODE D'EMPLOI
text_image
Technical diagram of a microwave oven with labeled parts from innermost to outermost, including a gas stove and water heater.U.K.: INSTRUCTION OF USE Pag. 4 F.: MODE D'EMPLOI Pag. 8 E.: INSTRUCCIONES PARA EL USO Pag. 12
Materials and articles destined for use in contact with food products are conform to the EC Regulation 1935/2004. This appliance complies with the requirements of the Low Voltage Directive 2006/95/EC, and the Electromagnetic Compatibility Directive 2004/108/EC. IMPORTANT INFORMATION FOR CORRECT DISPOSAL OF THE PRODUCT IN ACCORDANCE WITH EC DIRECTIVE 2002/96/EC.
At the end of its working life, the product must not be disposed of as urban waste. It must be taken to a special local authority differentiated waste collection centre or to a dealer providing this service. Disposing of a household appliance separately avoids possible negative consequences for the environment and health deriving from inappropriate disposal and enables the constituent materials to be recovered to obtain significant savings in energy and resources. As a reminder of the need to dispose of household appliances separately, the product is marked with a crossed-out wheeled dustbin.
FRANÇAIS
When using electrical appliances, basic safety precautions should always be observed, including the following:
- Read all instructions carefully.
• To protect against risk of electric shock, do not put the main body of appliance in water or any other liquid. - This appliance has not been designed to be used by persons (including children) with physical, sensory or mental impairments or who are lacking in experience or knowledge, unless they have been given the necessary supervision and prior instructions about how to use this appliance by a person responsible for their safety. Young children should be supervised to ensure that they do not play with the appliance.
- If the supply cord is damaged, it must be replaced by the manufacturer, its service agent or similar qualified persons in order to avoid a hazard.
- Unplug from outlet when not in use, before putting on or taking off parts, and before cleaning.
- Avoid contact with moving parts.
- Do not operate any appliance with a damaged cord or plug, or after the appliance malfunctions, or is dropped or damaged in any manner. Return the appliance to an authorized Service Center for examination, repair or electrical or mechanical adjustment.
- The use of attachments not recommended or sold by the appliance manufacturer may result in fire, electric shock or injury.
- Do not use outdoors.
- Do not let cord hang over edge of table or counter, or touch hot surfaces.
SAVE THESE INSTRUCTIONS
CAUTION
- An authorized service representative should perform any servicing other than cleaning and user maintenance. Authorized service personnel only should do repair.
- After removing the appliance from the packaging, check it for damage. If in doubt, do not use the appliance and contact an authorised service centre.
- Plastic bags, polystyrene, nails, etc. must not be left within reach of children as they are potentially dangerous.
- The appliance's manufacturer and vendor reject any responsibility for failure to comply with the instructions provided in this user manual.
- Check that the voltage shown on the rating plate corresponds to the voltage of the mains.
- Do not use sharp utensils inside the bowl! Sharp objects will scratch and damage the inside of the bowl. A rubber spatula or metal spoon may be used, when the appliance is in the “OFF” or “0” position.
- Never clean with scouring powders or hard implements.
- Do not place or use the appliance on hot surfaces, such as stoves, hotplates, or near open gas flames.
- Do not put any part in the dishwasher.
- Do not unplug the unit by pulling on the cord.
- The appliance must be connected to an electrical system and power supply socket with a minimum capacity of 10A, equipped with an efficient earth contact. The manufacturer is not responsible for damages to things or people in the event that the prescribed safety norms have not been respected.
- Before carrying out any maintenance or cleaning operations, make sure that the appliance has been disconnected from the electrical mains by removing the plug from the power supply socket.
- Never wash the appliance using water jets or place it in water!
- This appliance is suitable for use with 32^ max. ambient temperature (climatic class "N").
IMPORTANT:
This Ice Cream Machine contains its own refrigerant which must be allowed to settle after transport. Leave the Ice Cream Machine on a horizontal surface for at least 12 hours after purchase or after any move which might have stored the machine the wrong way up.
Leave at least 20 cm on each side of the machine to allow free air circulation. Make sure the vent slots are free and unobstructed.
UK USERS ONLY
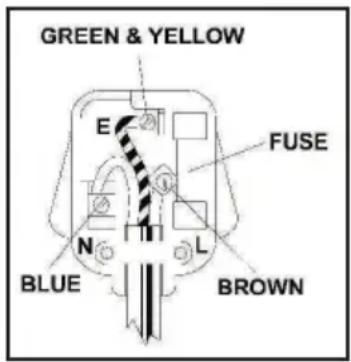
HOW TO CONNECT THE CORD TO A U.K. PLUG: IMPORTANT
The wires in the mains lead are coloured in accordance with the following code:
- Green and yellow: Earth
- Blue: Neutral
- Brown: Live
Please, read the instructions given below before connecting the cord to a plug. If in doubt, please, consult a qualified electrician. As the colours of the wires in the mains lead of this appliance may not correspond with the coloured markings identifying the terminals in your plug, proceed as follows: the wire that is coloured Green and Yellow must be connected to the terminal in the plug which is marked with the letter E or the Earth symbol ( ① ), or coloured Green or Green and Yellow.
The wire that is coloured Brown must be connected to the terminal which is marked with the letter L or coloured Red. The wire that is coloured Blue must be connected to the terminal which is marked with the letter N or coloured Black.
text_image
GREEN & YELLOW E FUSE N BLUE L BROWNSAFETY POINTS FOR REWIRABLE OR MOULDED PLUG
The mains lead of this appliance may be already fitted with a BS1363 13A plug.
- If your socket outlet is not suitable for the plug, then the plug must be removed (cut off if it is a moulded on plug), the flexible cord insulation should be stripped back as appropriate and a suitable 3 pin plug fitted.
- WARNING: Dispose of a plug that has been cut from the power supply cord, as such a plug is hazardous if inserted in a live 13A socket outlet elsewhere in the house.
- Should the fuse need to be replaced an ASTA marked fuse, approved to BS 1362, of the same rating must be used.
- Always replace the fuse cover after fitting a fuse. The plug must NOT be used if the cover is omitted or lost until a replacement is obtained. Make certain that only the correct fuse cover is used and fitted.
- For plugs with detachable fuse cover, the replacement must be the same as the colour insert in the base of the plug, or as directed by the embossed wording on the base of the plug.
- If the detachable fuse cover is lost a replacement may be purchased from a Service Centre.
• Information for supply may also be obtained from the plug manufacturer.
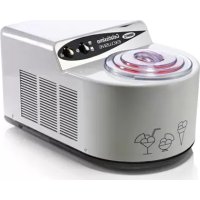
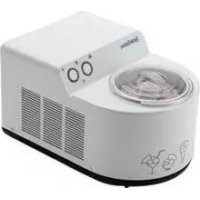
ICE CREAM MAKER "GELATO PRO 1700"
The appliance is sold complete with all the accessories for use with fixed or removable bowl. In the original package, the removable bowl is stored inside the fixed bowl.
IMPORTANT ABOUT THE USE OF THE APPLIANCE
- Hygiene is the most important aspect of ice cream making. Make sure all the parts, in particular those coming in direct contact with the ice cream, are scrupulously clean.
- Never turn off the freezing switch (L) when the machine is working. In case you accidentally switch it off or the power fails, wait at least 10 minutes before turning it on again. The compressor is fitted with a safety device to prevent any possible damage to the motor unit. Should you restart the machine immediately after it has been switched off, the compressor will not freeze.
- The paddle movement and the freezing plant are independent: the (L) button turns ON and OFF the refrigeration and the (M) button turns ON or OFF the mixing paddle. To stop the machine, press both (M) and (L) buttons. After the machine has been switched off, wait approximately 10 minutes before making another
ice cream.
- Variations in speed and noise during ice-cream making are also to be expected and in no way affect the unit's normal functioning. In case the ice cream become too hard, the motor stops by itself. A safety device protects the motor from possible damages. Should not the motor begin to work again, wait till the motor cools.
- Keep the appliance far enough from walls and furniture, which might restrict air circulation, necessary for cooling the unit. It is normal for warm or hot air to flow from the lateral air vents. The refrigeration process requires this.
USING THE FIXED BOWL
1). Carefully clean all parts in direct contact with ingredients. Warning: make sure unit is unplugged before starting cleaning.
2). Insert the mixing paddle (B) securely into the drive shaft in the fixed bowl.
3). Lock the paddle in place by screwing (clockwise) the knob (C) over the shaft.
4). Press the (L) switch to start the cooling. Pre-cool the machine for 5 minutes.
5). Press (M) switch to start the mixing paddle.
English
6). Pour the mixture into the bowl. For best results, it is suggested to pre-mix ingredients in a separate bowl so as to obtain a smooth, lump-free mixture. Always use ingredients at fridge temperature so as to reduce temperature differences and cut down preparation time.
7). Place the transparent cover (D) on the bowl. Preparation time varies according to quantity, temperature of the mix, type of ice cream (cream-style or sherbet), and room temperature.
8). When ice cream has reached the desired consistency, switch off (L) and (M) switches.
9). Unscrew knob (C) anticlockwise and pull out the paddle.
10). When taking out the ice cream for serving or storing, use the spatula (E). Avoid all metal tools!
11). Allow the motor to cool down (approximately 10 minutes); it is then possible to make a new batch of ice cream by repeating all the above operations.
12). Unplug the unit when finished.
USING REMOVABLE BOWL
Use of the removable bowl makes it easier to make consecutive batches of ice cream. The removable bowl is also easier to clean. When using the removable bowl:
1). Remove the lid (D), unscrew the knob (C) and remove the mixing paddle (B).
2). Pour two measuring cups (H) (50ml) full of brandy or other liquor into the fixed bowl. As alternative, you can use a solution of salt and water (40ml water and 10g salt). The wall of removable bowl must be completely wet: this operation is most important to allow the good cold transmission from fixed to removable bowl.
3). Insert the removable bowl (G) securely; making sure it is level with the top part of the unit.
4). Insert the mixing paddle for the removable bowl (F) and secure the paddle into place by locking knob (C) clockwise. The appliance is now ready for use.
5). Follow the procedure described in the paragraph "USING THE FIXED BOWL" from item 4 to item 10.
6). To remove the bowl unscrew knob (C) anticlockwise. Pull out the bowl (G). If you wish, you may leave the ice cream in the bowl and use the latter to store the product in the freezer compartment (-12°C**).
7). Unplug the unit when finished.
ICE CREM STORAGE SYSTEM
The machine storage function consists in being able to store the ice-cream in the machine, once this is made, at the right temperature, consistency and fluffiness for the desired period of time. An electronic system constantly monitors ice-cream consistency.
Once this has reached the established value, the paddle and compressor stop automatically. During the period of time that the paddle motor and compressor are
stopped, the light indicator referring to the ice-cream storage mechanism flashes.
Paddle and compressor are automatically restarted just as soon as the consistency of the ice-cream falls below the set level. While the paddle and compressor are operating, the light indicator of the storage mechanism remains constantly on. To activate the ice cream storage system press the (N) switch.
NOTE: When the storage mechanism is operative - switch (N) pressed - the paddle (M) and freezing plant switches (L) are bypassed.
USEFUL HINTS
- Mix and blend ice-cream ingredients in a separate bowl.
- Use pre-cooled ingredients.
- Do not fill the bowl more than half full (max. 1.1Kg of ingredients). This will allow the volume to increase during churning to maximum bowl capacity.
- To avoid the forming of ice or frost, do not leave the ice cream in the bowl for too long with the refrigeration on. Turn off the unit as soon as the ice cream has reached the desired consistency. Serve the ice cream into pre-cooled recipients.
HOW TO MAKE AN EXCELLENT ICE-CREAM
Making good, healthy, natural ice cream, with the right consistency, depends on the following factors:
- An appliance in good working order: leave enough space on the sides of the unit so as to allow air to circulate freely. This air is necessary to cool the compressor.
• Good, fresh ingredients.
- A good recipe: a perfect blend of ingredients and perfect processing.
CLEANING THE MACHINE
- Make sure the machine has been switched off and unplugged before performing any cleaning operations.
- Wash the paddle, the clear lid, the locking knob and the removable bowl in a warm, soapy water.
- Use a damp cloth to clean the body of the machine. NEVER IMMERSE THE MAIN BODY OF THE ICE CREAM MAKER IN WATER!
- When the removable aluminum bowl is used, it is essential to eliminate every trace of salt/water solution from the parts that come in contact whit it, in order to prevent corrosion.
STORING ICE-CREAM
- In the ice cream maker. When the ice cream is ready you can keep it covered in the ice cream maker for approximately 10-20 minutes. Before serving, start the motor and stir it again for a few minutes to the right consistency and smoothness. You can activate also the ice cream storage system by pressing the (N) switch to store the ice cream into the machine for a max. 12h (for hygienic reason).
English
- In the freezer.
The ice cream can also be stored in the freezer for up to 1-2 weeks, depending on the ingredients used. Do not store it for too long, in any case never more than two weeks, as it will lose flavour and quality. Should you wish to store the ice cream in the freezer pay attention to the following:
- Store the ice cream in a clean, well sealed bowl suitable for freezing.
- Storage temperature must be at least -14°C.
- Attach a label to the bowl with the date when it was made and what kind of ice cream it is.
WARNING!
- The ice cream is sensible to the bacteria. Consequently it is very important that the ice cream maker and the utensils used are well cleaned and dried.
• TAKE CARE NEVER TO REFREEZE THE ICE CREAM ONCE IT HAS MELT.
- Remove the ice cream from the freezer half an hour before to serve it. Eventually you could leave it for 10/15 minutes at the room temperature to let it reach the adequate serving temperature.
STORING TIME
| Ice cream made of raw ingredients | ±1 week |
| Sherbets | 1-2 weeks |
| Ice cream made of cooked ingredients | ±2 weeks |
HELPFUL HINTS
- Certain recipes involve cooking. Prepare them at least a day previously to ensure they chill completely and expand. It is always advisable to chill the basic mixture.
- In the case of cold mixtures, the best results are obtained by beating the eggs and sugar with an electric whisk. This helps increase the volume of the mixture.
- The majority of mixtures consist of cream, milk, eggs and sugar. You can use whatever cream you wish, but the flavour and texture will change greatly according to the quality of cream chosen. The higher the percentage of fat in the cream, the richer the ice cream will be. For example, whole cream contains a minimum of 36% fat, whipped cream 30% , cream for coffee or skimmed cream 18% and half cream plus half milk 10% . In all cases, the important thing is to always maintain the same quantity of liquid. For example, the lightest ice cream can be made by using more milk than cream, or by eliminating the cream altogether. You can also use skimmed milk, but the texture of the ice cream will be very different.
- The ice cream mixture can be kept in the refrigerator for a number of days. Shake it well before pouring it into the cylinder.
- Add the mixture until the cylinder is no more than half full. The mixture increases in volume during preparation.
- Alcoholic ingredients slow down the chilling process. Liqueurs should therefore be added during the final minutes of preparation.
- The flavour of sorbets depends largely on the degree of ripeness and sweetness of the fruit and juice used. Taste the fruit before adding to the recipe. If it is too acid, add sugar. If it is very ripe, add less sugar or leave it out altogether. Remember that cold reduces sweetness.
- Sweeteners can be used in place of sugar. In this case, add the sweetener to the mixture and mix until completely dissolved.
- Mixtures which require heating must not be poured into the cylinder until they are completely cold.
- If you want to make the mixture sweeter during preparation, do not add sugar directly into the cylinder (it does not dissolve). You are recommended to dissolve the sugar in a little water or skimmed milk and pour the resulting syrup (cooled) into the cylinder.
- The fruit used in the recipes must always be washed and dried before use. Even when not specified, fruit must always be peeled, shelled, destoned, etc.
- To reduce the quantity of ice cream, the quantities indicated can be broken down or halved.
- When using raw eggs, make sure they are fresh by breaking them one at a time into a container and checking that:
1). They do not have a bad smell.
2). The white is not watery but dense and adhering to the yolk.
3). The yolk is round and swollen.
WHAT COULD GO WRONG?
Under normal conditions, ice cream preparation does not require more than 40-50 minutes. If the ice cream is still not formed after 40-50 minutes, check the following points before contacting an authorised service centre.
- The ingredients must be poured into the ice cream maker at room temperature or, preferably, at refrigerator temperature. Ice cream cannot be made from hot ingredients.
- The cylinder must not be more than half filled. If the quantity of ingredients is excessive, the time required to form the ice cream increases considerably and the result may not be satisfactory.
- The compressor is fitted with a safety device. In the event of power failure, or if the appliance is turned off then on again for any reason, operation of the chilling system is interrupted. If this device trips, the appliance must be left for 10 minutes before turning on again. If the ten minutes pause is not respected, operation will not commence, even if the chilling button is in the ON position and the relative indicator light is on.
Français
INSTRUCTIONS GENERALES DE SECURITE
USO CON MARMITA EXTRAIBLE
ATTENTION: PIs keep the packaging boxes. They will be necessary in case you should return the machine for repair or you should return it for any other reason. If the machine will be sent back with a packaging box not suitable for transportation all repairing charges will be at charge of the sender, even if the machine is under warranty. If the machines doesn't need to be repaired and the package will not be suitable the machine will be returned to the sender too.