
Zero+ WiFi - Air purifier Winix - Free user manual and instructions
Find the device manual for free Zero+ WiFi Winix in PDF.

| Product type | Air purifier |
| Brand | Winix |
| Model | Zero+ WiFi (AZPU373-HWE) |
| Dimensions (W x D x H) | 415 x 245 x 600 mm |
| Weight | 8.5 kg |
| Power supply | AC 220-240 V, 50/60 Hz |
| Power consumption | 90 W |
| Max. recommended area | 120 m² |
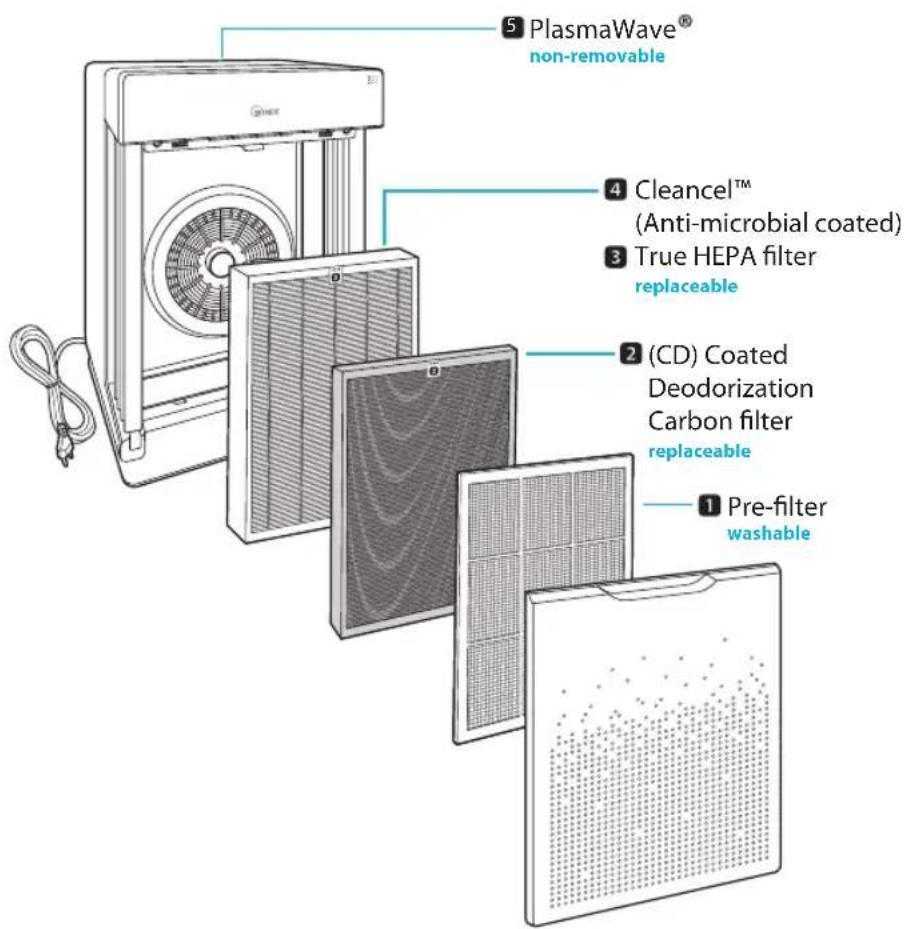
| Purification technology | 5 stages: washable pre-filter, CD carbon filter, True HEPA filter with Cleancel™, PlasmaWave®, intelligent sensor |
| Operating modes | Auto, Sleep, Manual (Low, Medium, High, Turbo) |
| Timer | 1h, 4h, 8h |
| Connectivity | Wi-Fi 802.11 b/g/n 2.4 GHz, WINIX SMART app (Android/iOS) |
| Air quality sensor | Intelligent particle sensor |
| Air quality indicator | LED: Blue (good), Green (average), Orange (average), Red (poor) |
| PlasmaWave® | Can be activated/deactivated, enabled by default |
| Child lock | Yes (press and hold Plasma button for 3 seconds) |
| Pre-filter | Washable (every 14 days), permanent |
| CD carbon filter | Replaceable (every 6 to 12 months), do not wash |
| True HEPA filter with Cleancel™ | Replaceable (duration varies based on environment) |
| Replacement filter reference | 117130 (filter set) |
| Pre-filter reference | 4521-0012-01 |
| Automatic shut-off | Yes, when front panel is opened |
| Warranty | 2 years |
| Package contents | Air purifier, filters (pre-installed), power cord with connector, user manual |
Frequently Asked Questions - Zero+ WiFi Winix
User questions about Zero+ WiFi Winix
0 question about this device. Answer the ones you know or ask your own.
Ask a new question about this device
Download the instructions for your Air purifier in PDF format for free! Find your manual Zero+ WiFi - Winix and take your electronic device back in hand. On this page are published all the documents necessary for the use of your device. Zero+ WiFi by Winix.
USER MANUAL Zero+ WiFi Winix
natural_image
Front view of a white industrial device labeled 'WINIX' with a grid pattern and dot pattern (no readable text or symbols)Model
- Please read and follow all safety rules and instructions in this manual before operating.
- The product warranty is printed on the back of this guide, so please keep it in a safe place for future use.
CONTENTS
5-STAGE AIR PURIFICATION 3
CONTROLS 4
WHERE TO USE 5
INSTALLING THE FILTERS 6
SAFETY AND CAUTIONS 8
INITIAL OPERATION 9
AUTO AND SLEEP 10
MANUAL MODE, TIMER AND PLASMAWAVE ^® 11
CHILD LOCK, AIR QUALITY LED 12
WINIX SMART 13
FILTER CARE 15
PARTICLE SENSOR CARE 19
CLEANING CARE 20
FREQUENTLY ASKED QUESTIONS 21
UNIT SPECIFICATIONS 23
PRODUCT WARRANTY 24
French 26
Spanish 51
German 76
Italian 101
Dutch 126
Polish 151
This product is suitable for 220 \~ 240 V only.
5-STAGE AIR PURIFICATION
PACKAGE CONTENTS
natural_image
Line drawing of a cleaning or dust removal device with a grid-patterned interior (no text or symbols)Product
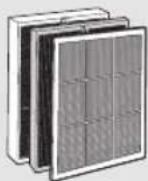
Pre-filter/CD Carbon Filter/
True HEPA filter with Cleancel™
(Included with the product.)
Power cord with plug
User Manual
CONTROLS
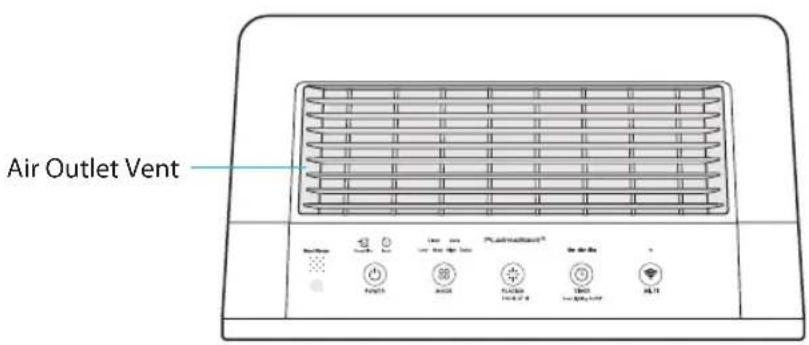
Light Sensor
Detects the amount of ambient light within the environment, to adjust the brightness of the LED indicators.
Reset Button
After replacing a filter, press the RESET button for at least 5 seconds.
Timer Indicator
If timer has been set, the LED light indicates the set time of operation.
![adjust the brightness of the LED indicators. Smart Sensor Automatically detects indoor air quality. PlasmaWave® Indicator Indicates whether PlasmaWave® is enabled or disabled. Wi-Fi Button Enables or disables Wi-Fi function. Check Filter Indicator LED light indicates when it is time to change the filter. Mode / Fan Speed Button Power Button Turns the unit on or off. PlasmaWave®/ Child Lock Button Enables or disables PlasmaWave®. Press and hold for 3 seconds to enable or disable the Child Lock mode. Timer / Air Quality Button Press to cycle through and set desired length of operation (1hr, 4hr, 8hr, [NO TIMER]). Press and hold for 3 seconds to enable or disable the Air Quality light.](/content/2026/04/614904/images/829edeea8c39b6f2729c4052022fd105d1eb7913cd0ef52db9c20507a191e43f.jpg)
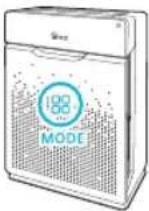
Mode / Fan Speed Button
Every time the Mode button is pressed, the Mode LED light will cycle through the settings. (Auto, Sleep, Low, Medium, High, Turbo)
Child Lock Indicator
LED light indicates whether Child Lock mode is enabled or disabled.
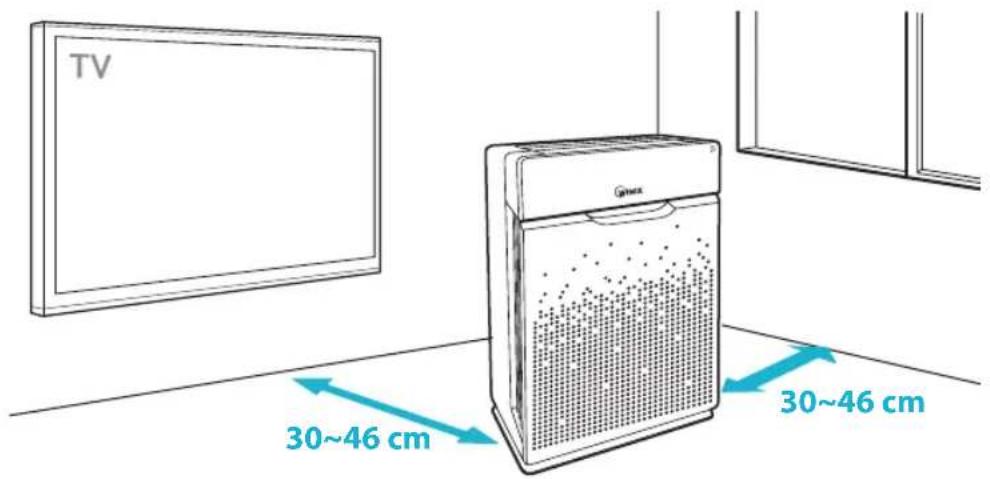
WHERE TO USE
Allow 30 \~ 46 cm. of space between TVs, radios, and other electronic products electromagnetic interference from certain electronics may cause product malfunction.
Place indoors away from direct sun light direct exposure may cause product malfunction or failure.
Only place on hard, flat surfaces flimsy or slanted surfaces may result in abnormal noise and vibrations.

WARNING
Follow these instructions to reduce the risk of serious injury or death and to reduce risk of damaging the unit.

Do not use around mist or fumes from industrial oil or around large quantities of metallic dust.

Do not place around heating elements.

Do not install in any sort of motor or transport vehicle (trucks, boats, ships, etc.).

Do not place in an area with excessive amounts of noxious gases.

Do not place near any flammable materials (aerosols, fuel, gases etc.).

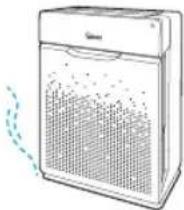
Do not have unit facing into wind or draft.

Do not place below any electrical outlet.

Do not place in excessively humid areas where unit may become wet.
※ This unit is not intended to be used to preserve documents or in art conservation.
INSTALLING THE FILTERS
This product comes with all of the required filters. The protective plastic wrap must be removed from the filters before use.
※ Operating the unit without removing the plastic wrap may result in product failure.
※ Unplug and make sure the unit is turned off before installing filters.
※ The unit will automatically power off when front panel is opened.
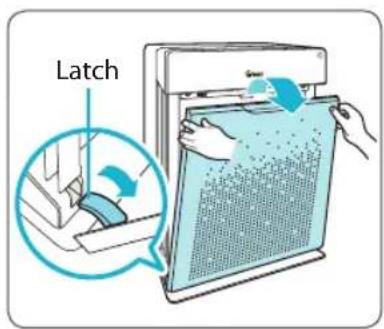
① Remove the front panel by grasping its upper edge and gently pulling towards yourself.
- To remove the front panel, the latch at the lower edge of the panel must be released from its position.
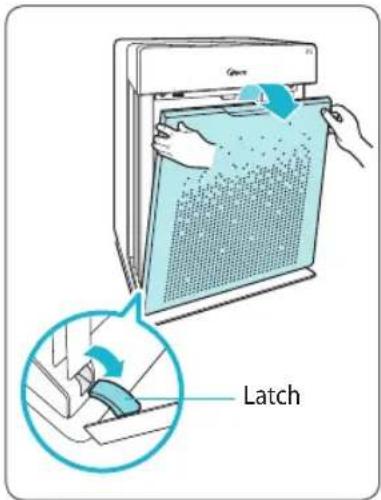
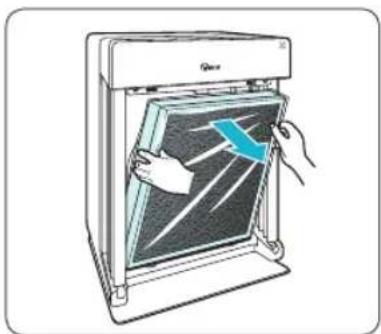
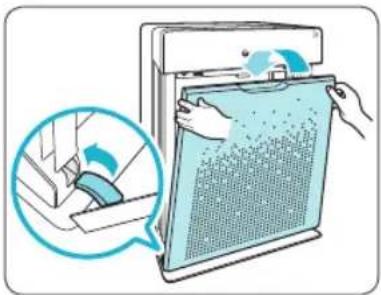
② Remove the filters from the unit, they are protected inside a plastic wrap.
natural_image
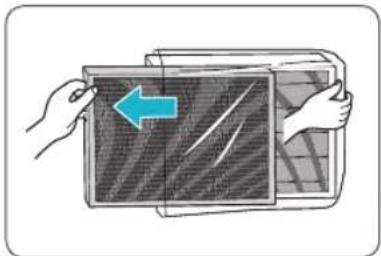
Illustration of a refrigerator with hands installing or adjusting a panel (no text or symbols visible)③ Remove filters from protective plastic wrap.
- Operating the unit without removing filters from plastic may cause abnormal noise, deformation, or fire as a result of overheating.
natural_image
Illustration of hands holding a rectangular device with a blue arrow pointing to the screen (no text or symbols)
Note
- Refer to pages 15 - 18 for detailed information on filter care and how to replace them.
INSTALLING THE FILTERS
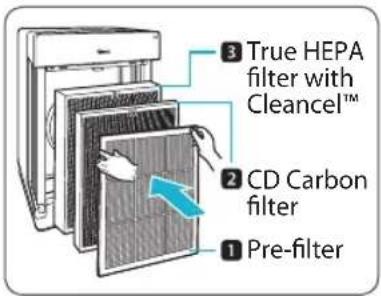
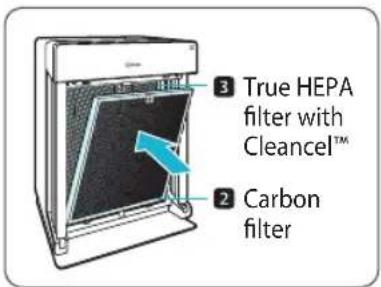
④ Install the filters until they fit securely in place.
Filters must be installed in this order:
3 True HEPA filter with Cleancel™ (rear)
2 CD Carbon filter (middle)
1 Pre-filter (front)
- To install the pre-filter, insert bottom tabs into the slots on either side of the lower part of the unit, then rotate upward to insert the upper tabs into the slots at the top part of the unit until both sides audibly click into place.
⑤ Replace the front panel by first inserting the latch at the bottom edge into the base of the unit, then rotate the panel upward toward the top of the unit until it magnetically snaps closed.
natural_image
Illustration of a hand cleaning a large air conditioner unit with a magnified inset showing airflow direction (no text or symbols)⑥ When to service and replace filters:
| Filter Indicator Light | When to service | When to replace | |
| 1 Pre-filter none | Clean once every 14 days | Permanent | |
| 2 CD Carbon filter | Check Filter | Can NOT be WASHED | Lasts up to 6~12 months |
| 3 True HEPA filter with CleancelTM | |||
※ Intervals between filter replacement may vary depending on environment.
※ For optimal use, Pre-filter can be cleaned every 14 days which can extend the life of other filters.

SAFETY AND CAUTIONS
Before operating this equipment, carefully read and follow these safety cautions and instructions to avoid damage and ensure safe use.
Ensure filters are inserted before running unit
running unit without filters can shorten the units life and cause electric shock or injury.
Be sure foreign objects are NOT inserted into the vents on the unit objects can include pins, rods, and coins.
Do not touch any part of the interior of the unit with wet hands
the high voltage may cause electric shock.
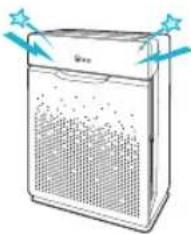
Ensure unit intake and outlet vents do not become blocked
blockage may lead to increased internal temperatures causing product failure and deformation.
Do not use the unit as a step stool or place heavy objects on it
personal injury may occur or product failure and deformation.

WARNING
Follow these instructions to reduce the risk of serious injury or death and to reduce risk of damaging the unit.

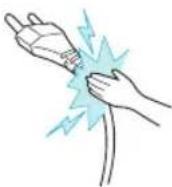
Do not pull on the power cord when unplugging the unit.

Do not tie or knot power cord when unit is in operation.

If the unit becomes submerged in water, unplug it and contact customer service.

Do not unplug or move the unit while in operation.

Do not plug additional appliances into the same outlet or power supply.

Do not touch the plug with wet hands.

Unplug unit when not in operation for extended periods of time.

Cord can become damaged by forcefully bending, pulling, twisting, bundling, pinching or placing heavy objects on it.
※ If the supply cord is damaged, it must be replaced by a special cord or assembly available from the manufacturer or its service agent.
※ This appliance is not intended for use by a person (including children) with reduced physical sensory or mental capabilities, or lack of experience and knowledge, unless they have been given supervision or instruction concerning use of the appliance by a person responsible for their safety.
Children should be supervised to ensure that they do not play with the appliance.
INITIAL OPERATION
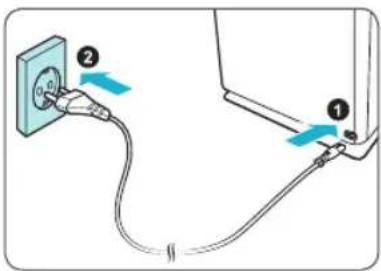
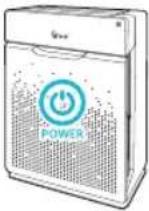
① Insert the unit plug into an electrical outlet.
• The Control Panel lights will turn on and off.
② Press the 'Power' button.


Note
- During the first 4 minutes of power up, the Air Quality light will flash as the Smart Sensors measure the air quality in the environment, after which normal operation will begin.
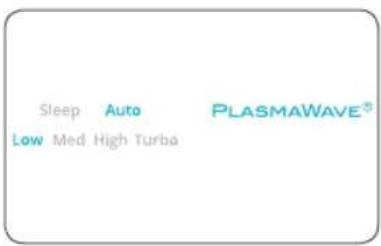
③ By default, when the unit first powers on, the mode will be set to Auto with PlasmaWave® enabled.
- When in Auto Mode the fan speed will be automatically adjusted according to the environments air quality.
- PlasmaWave ^ works to remove harmful airborne contaminants.

Note
- In Auto mode, as the indoor air quality improves, the fan speed will automatically be reduced to Low.
- When the unit is running, you may hear a chirping or buzzing sound. The sound is from large particles passing through PlasmaWave ^ , it is normal and does not signify product failure. To disable PlasmaWave ^ , see page 11.
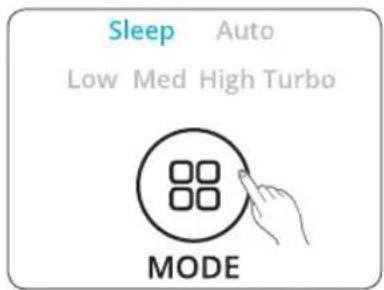
AUTO AND SLEEP
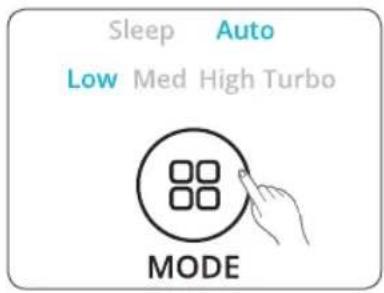
Every time the Mode button is pressed, the Mode LED light will cycle through the settings. (Auto, Sleep, Low, Medium, High, Turbo)
1. Auto Mode
Enables Auto operation based on the unit's air quality Smart Sensors.
① Press the Mode button to select Auto mode.
- The mode LED light will indicate when 'Auto' mode has been selected, and operation will begin.
• Each time the Mode button is pressed, the modes will be cycled. (Auto, Sleep, Low, Medium, High, Turbo).

Note
- When in Auto Mode the fan speed is automatically adjusted according to the indoor air quality. As the indoor air quality improves, the fan speed will automatically be reduced. If the indoor air quality decreases the fan speed will automatically be increased.
- When unit is first started, Auto Mode is enabled and set to Low fan speed.
2. Sleep Mode
① Press the Mode button to select Sleep mode.
- The mode LED light will indicate when 'Sleep' mode has been selected, and operation in that mode will begin.

Note
- When Sleep mode is selected, the fan speed is automatically set to Low. Fan speed can be changed by pressing the Fan Speed (Mode) Button.
- When Sleep Mode is enabled, the Air Quality light is disabled.
MANUAL MODE, TIMER AND PLASMAWAVE®
Every time the Mode button is pressed, the Mode LED light will cycle through the settings. (Auto, Sleep, Low, Medium, High, Turbo)
3. Manual Mode (setting fan speed)
Users can opt to manually set the fan speed to Low, Medium, High or Turbo.
① Press the Mode button to select the desired fan speed.
- The mode LED light will indicate the selected fan speed, and operation will begin.


Note
- When Manual Mode is in use, Auto and Sleep modes are automatically disabled.
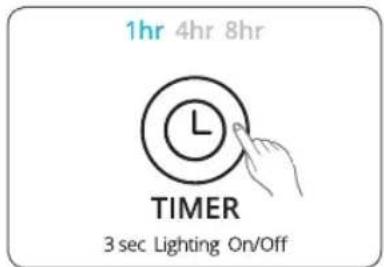
4. Timer
The timer can be set for when you want the unit to run for a specified period of time.
① Select the desired period by pressing the Timer button.
- The Timer LED light will indicate the selected length of operation.
- Every time the Timer button is pressed the Timer LED light will cycle through the settings.
(1hr, 4hr, 8hr, [NO TIMER]).

Note
- The WINIX SMART app will display how much time is remaining on the timer.
5. PlasmaWave®
By default, PlasmaWave ^® is enabled whenever the unit is powered on.
① Press the Plasma button when the power is on to enable or disable this feature.

CHILD LOCK, AIR QUALITY LED
6. Child Lock
This feature prevents children from tampering with the control panel.
① Press and hold the Plasma/Child Lock button for 3 seconds to enable or disable the feature.
- When the Child Lock indicator is lit, the feature is enabled.
- When Child Lock is enabled, the control panel is locked and the settings cannot be changed.
• To disable, press and hold the Child Lock button again for 3 seconds.

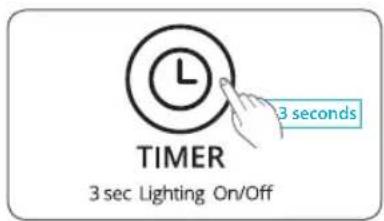
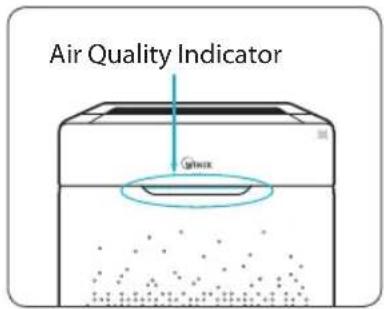
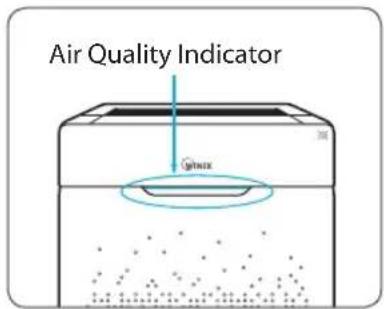
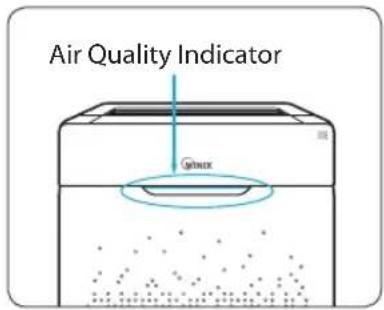
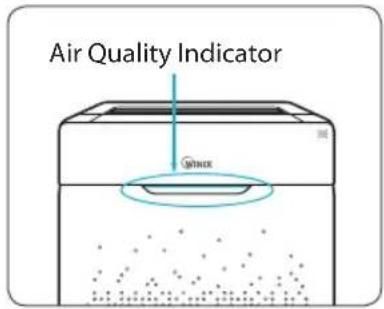
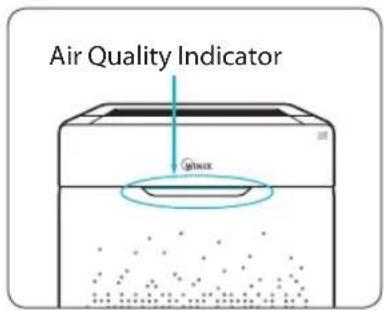
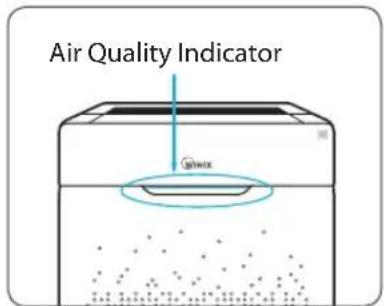
7. Air Quality LED Light
The Air Quality LED light may be turned on or off.
① To turn the Air Quality LED light on or off, press and hold the Timer button for 3 seconds.
- When on, the LED light will indicate the current indoor air quality according to four levels BLUE (good), GREEN (average), AMBER (fair), RED (poor).

Note
- When Auto Mode is enabled the Air Quality LED light may or may not be on, depending on the amount of ambient light in the room.
- When Sleep Mode is activated, the Air Quality Indicator light is turned off.
WINIX SMART
8. Connecting to WINIX SMART
WINIX SMART allows you to conveniently control your air purifier from any location.
WINIX SMART is optimized for the following specifications. Depending on your smart phone capabilities and service parameters, some functions may not be supported.

Note

ANDROID (ICS 4.12 Jellybean or later recommended)
iOS (6.0 or later recommended - iPhone 4S or later)
※ Before connecting to Smart Home
- A Wi-Fi wireless router must be installed within range of the air purifier to use WINIX SMART.
- Ensure Wi-Fi router matches the following specifications; 802.11b/g/n 2.4GHz or for a dual-band wireless router (2.4GHz/5GHz), be sure to select 2.4GHz.
- Be sure to have the Wi-Fi password handy.
- During registration, please keep the air purifier, wireless router, and smart device within a 32 ft. radius.
- Obstacles between the air purifier, wireless router, and smart device may cause weak reception.
- Before connecting, users with a "Smart Network Switch" on their device should temporarily disable it.
- Once WINIX SMART has been connected, the "Smart Network Switch" on your device can be enabled.
WINIX SMART
Setup
① Download the WINIX SMART app on your device.
• available via Google Play store or iTunes App store.
② Run the app and follow the setup guide to connect your device to the unit.
- Select "New Unit" and choose ZERO+ WiFi to connect to this model.
- Read the notice and select "OK".
- Enter the password to your Wi-Fi network.
- Press and hold the Wi-Fi button on the unit's control panel until it beeps. *The Wi-Fi strength indicator will begin to blink*
- Connect to the WINIX SMART network via your device's network menu.
- Selecting "Next" will connect your unit to your device.
- Define the unit settings (Name and Location).
- When set up is complete, the WINIX SMART Indicator will light up.


FILTER CARE
1. Changing Filters
When the Check Filter indicator LED is on, it is time to replace both the True HEPA filter with Cleancel™ and CD Carbon filters.
| Filter Indicator Light | When to service | When to replace | |
| 1 Pre-filter none | Clean once every 14 days | Permanent | |
| 2 CD Carbon filter |  Check Filter Check Filter | Can NOT be WASHED | Lasts up to 6~12 months |
| 3 True HEPA filter with CleancelTM | |||
※ Intervals between filter replacement may vary depending on environment.
※ For optimal use, Pre-filter can be cleaned every 14 days which can extend the life of other filters.
FILTER CARE
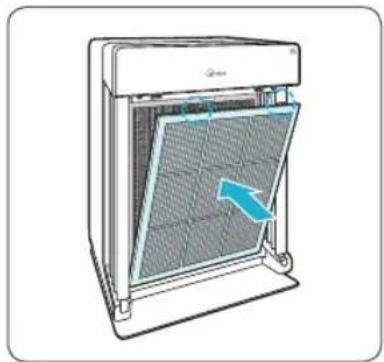
2. Removing Filters
Ensure the unit is turned off and unplugged before removing filters.
※ The unit will automatically power off when front panel is opened.
① Remove the front panel by grasping its upper edge and gently pulling towards yourself.
- To remove the front panel, the latch at the lower edge of the panel must be released from its position.
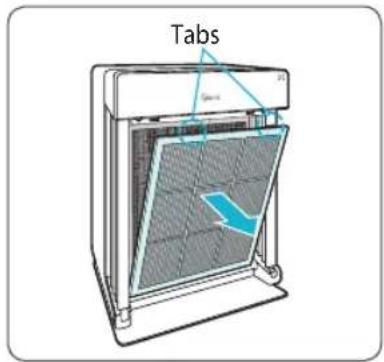
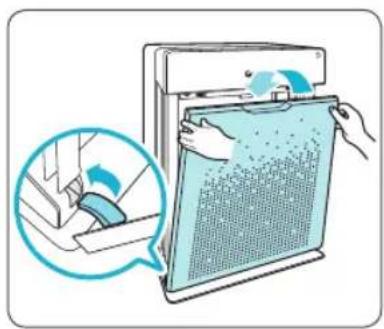
② Press the tabs on the top edge to remove the 1 Pre-filter.
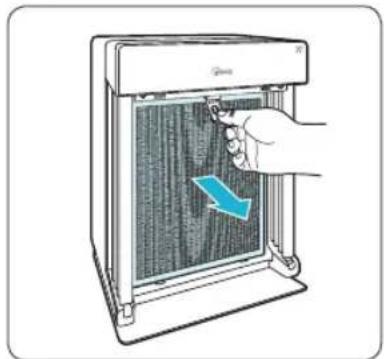
③ First remove the 2 CD Carbon filter and then the 3 True HEPA filter with Cleancel™ by pulling on the numbered tags at the top of each filter.
natural_image
Illustration of a hand opening a refrigerator with a blue arrow indicating airflow or heat transfer (no text or symbols)
NOTICE
- For optimal performance, only genuine Winix filters should be used with this unit.
FILTER CARE
3. Filter Assembly and Replacement
Filters should be re-installed in the reverse order of their removal.
① Insert the replacement
3 True HEPA filter with Cleancel™ (rear)
2 CD Carbon filter (middle)
- Remove the protective plastic wrap from new filters. Operating the unit without removing the protective plastic wrap may cause abnormal noise, deformation, or fire as a result of overheating.
② Insert the 1 Pre-filter (front)
- To install the pre-filter, insert bottom tabs into the slots on either side of the lower part of the unit, then rotate upward to insert the upper tabs into the slots at the top part of the unit until both sides audibly click into place.
natural_image
Diagram of a large air purifier with airflow direction indicated by arrows (no text or symbols)③ Replace the front panel by first inserting the latch at the bottom edge into the base of the unit, then rotate the panel upward toward the top of the unit until it magnetically snaps closed.
natural_image
Illustration of hands cleaning a window with a magnified view of the device (no text or symbols)④ After replacing the filters, turn the power back on and then use a thin object, such as a paper clip, to press the RESET switch for 5 seconds.

FILTER CARE
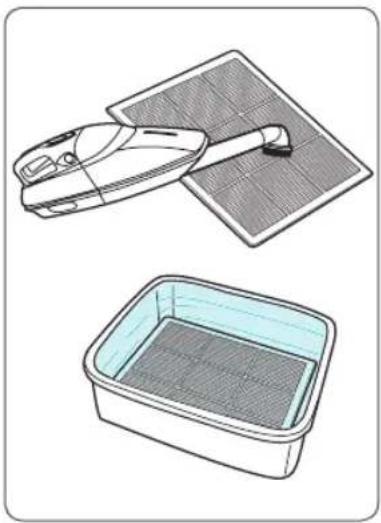
4. Cleaning the Pre-filter
Intervals between filter cleanings may vary depending on the air quality.
① Use a vacuum cleaner or soft brush to clean the Pre-filter. If it is excessively dirty, wash with room temperature water.
• Use only water, do not use volatile substances such as alcohol or acetone.
natural_image
Illustration of a solar panel installation and its internal meshing (no text or symbols)※ If the pre-filter becomes damaged or in any way needs replacement: Please contact your local dealer

NOTICE
- Do not use benzene, alcohol, or other volatile fluids, which may cause damage or discoloration.
• The Pre-filter is reusable after cleaning. - Do not use hot water over 104°F or volatile fluids such as paint thinner.
- After washing the pre-filter, allow it to dry completely in a wellventilated area. Otherwise, it may develop a bad odor.
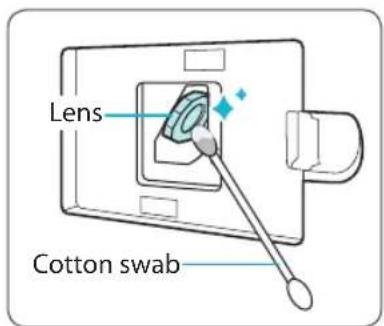
PARTICLE SENSOR CARE
Particle Sensors Care
For optimal performance of the Particle Sensor, which detects airborne dust and ultrafine particles, clean it every two months. Clean it more frequently when the unit is running in a place with high dust levels.
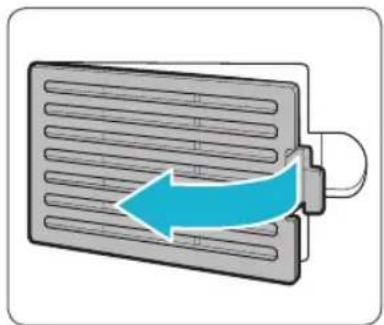
① Open the Particle Sensor cover.
natural_image
Illustration of a heat exchanger with airflow direction indicated by a blue arrow (no text or symbols)② Use a damp cotton swab to wipe the lens and intake area of the Particle Sensor.
• To clean the sensor area, use only water. Do not use volatile substances such as alcohol or acetone.
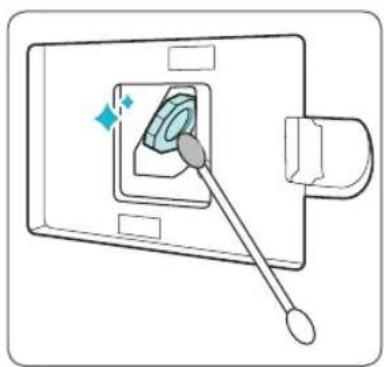
③ Wipe away any remaining moisture with a dry cotton swab.
natural_image
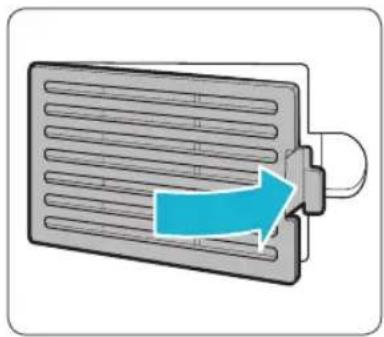
Diagram of a switch or socket with a bulb inserted into a rectangular housing (no text or symbols)④ Close the Particle Sensor cover.
• The Particle Sensor cover may be cleaned using a vacuum cleaner.
natural_image
Illustration of a heat exchanger with a blue arrow indicating airflow direction (no text or symbols)CLEANING CARE
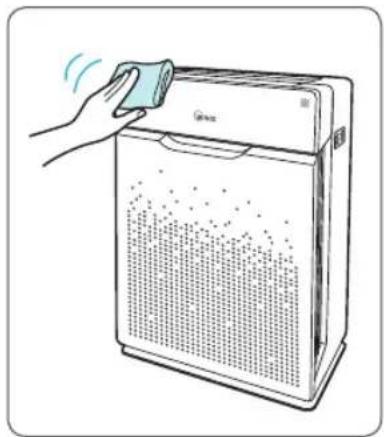
Cleaning the exterior and interior
Cleaning the exterior
Wipe with a soft damp cloth using room temperature water. Afterwards, wipe it down with a clean dry cloth.
- For optimal performance, clean the front panel 1-2 times a month.
natural_image
Illustration of a hand cleaning a large air purifier with a cloth (no text or symbols)Cleaning the interior
Open the front panel and clean the interior with a vacuum cleaner.
- For optimal performance, clean the interior 1-2 times a month.
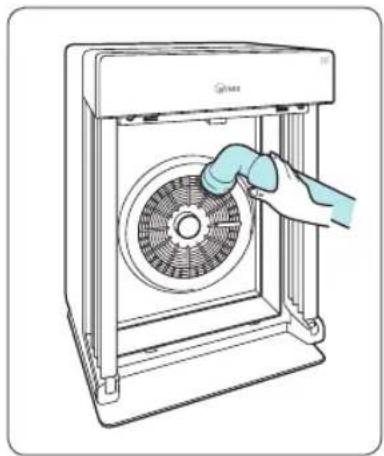
natural_image
Line drawing of a hand cleaning a circular fan inside a washing machine (no text or symbols)
NOTICE
- When cleaning the unit, always unplug the power cord first and then wait until the unit has cooled off.
- Never disassemble, repair or modify this unit yourself.
- Do not use flammable sprays or liquid detergents.
- Do not allow children to clean or maintain the unit
- Before cleaning or maintaining, ensure unit is off and unplugged.
FREQUENTLY ASKED QUESTIONS
| Problem Check / Actions to take | |
| It does not turn on at all. | |
 | • Is there a power outage?– Check to see if other lights and electrical equipment are working and try again. |
| It doesn’t work in Auto mode. | |
| • Has Auto mode been selected?– Press the Mode button until Auto mode is selected. | |
 | • Is the sensor blocked or clogged?– Clear the sensor using a vacuum cleaner. view page 19. |
| It vibrates and makes a lot of noise. | |
 | • Is it running on a slanted surface?– Move the unit to a hard, flat area of the floor. |
FREQUENTLY ASKED QUESTIONS
| Problem Check / Actions to take | |
| The power plug and outlet feel hot. | |
 | • Is the plug securely plugged in?– Make sure the plug is properly plugged into the outlet. |
| There is a strange smell. | |
 | • Is it being used in a place with a lot of smoke, dust, or odors?– Clean the air intakes on the front sides of the unit and clean the pre-filter.– Contact customer service to confirm the exact cause.– Replace the CD Carbon filter and True HEPA filter with CleancelTM. |
| The product is not purifying the air enough. | |
 | • Is the Check Filter indicator light on?– Replace the filters as required. |
UNIT SPECIFICATIONS
| Model Name ZERO+ WiFi (AZPU373-HWE) | |
| Power Voltage AC220 - 240V, 50 / 60Hz | |
| Power Rate 90 W | |
| Max Room Capacity 120 m | 2 |
| Dimensions 415 mm(W) x 245 mm(D) x 600 mm(H) | |
| Weight 8.5 kg | |
| Replacement Filter | Filter J / item : 117130 |
| Pre-Filter | Part : 4521-0010-01 |
※ The exterior, design, and product specifications may be changed to improve product performance without prior notice.
PRODUCT WARRANTY
The terms of the warranty are as follows.
1 This product is manufactured under stringent quality control and inspections.
2 Warranty void if product failure is a result of negligence or misuse by the consumer, shipping and service fees may be incurred even during the warranty period.
3 The warranty must be presented upon bringing the product for service.
4 Store the warranty in a safe place, as it cannot be reissued.
5 This warranty is valid only in the Europe.
| Product Name | Air Purifier | |
| Model Name | ZERO+ WiFi | |
| Purchase Date | ||
| Warranty period | Two (2) years | |
| Customer | Address | |
| Name | ||
| Tel. | ||
※ After purchase, be sure to complete all of the above information.


2610-0169-00 Rev.00

Contact your local dealer for product related inquiries and customer service
WWW.WINIX.COM/EU
PURIFICATEUR D'AIR WINIX

natural_image
Front view of a WINIX washing machine with dotted pattern and control panel (no visible text or symbols)
Modello
GARANTIE DU PRODUIT 49
Français 26
Espanol 51
Allemand 76
Italian 101
Néerlandais 126
Polonais 151
natural_image
Illustration of a door with a blue arrow indicating a handle, showing hand positioning inside (no text or symbols)natural_image
Illustration of hands holding a device with a blue arrow indicating left motion (no text or symbols)
NOTE
natural_image
Illustration of a hand cleaning a large air conditioner cover with a magnified inset showing airflow direction (no text or symbols)SÉCURITÉ ET MISES EN GARDE


NOTE
VERROUILLAGE ENFANT, VOYANT LED QUALITÉ DE L'AIR

NOTE
natural_image
Illustration of a hand inserting a component into a device with a blue arrow indicating direction (no text or symbols)
NOTICE
natural_image
Diagram of a large air conditioner unit with cooling panel and airflow direction arrows (no text or symbols)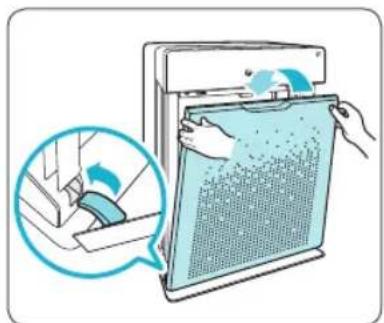
natural_image
Illustration of a hand cleaning a large screen with a magnified view of the device (no text or symbols)
natural_image
Illustration of a solar panel installation and its internal meshing (no text or symbols)natural_image
Illustration of a heat exchanger with a blue arrow indicating airflow direction (no text or symbols)natural_image
Diagram of a switch or power outlet with a bulb inserted, showing internal components and a handle (no text or symbols)natural_image
Illustration of a heat exchanger with a blue arrow indicating airflow direction (no text or symbols)CONSIGNES D'ENTRETIEN
natural_image
Illustration of a hand cleaning a large air purifier with a cloth (no text or symbols)natural_image
Line drawing of a hand cleaning a fan inside a stainless steel appliance (no text or symbols)
NOTICE
natural_image
Front view of a white industrial device labeled 'WINIX' with dot pattern and ventilation grille (no readable text or symbols)Modelo
natural_image
Illustration of a portable electronic device with grid pattern and indicator lights (no text or symbols)Producto
natural_image
Front view of a portable air conditioner unit with heat exchanger and control buttons (no text or symbols visible)Sensor de luz
natural_image
Illustration of a refrigerator with hands installing or adjusting the panel (no text or symbols visible)natural_image
Illustration of hands holding a rectangular device with a blue arrow pointing to the screen (no text or symbols)
NOTE
natural_image
Illustration of hands cleaning a window with a magnified view of the blade (no text or symbols)

NOTE

NOTE
natural_image
Illustration of a hand inserting a component into a device with a blue arrow indicating direction (no text or symbols)
NOTICE
natural_image
Diagram of a large air conditioner unit with cooling panel and airflow direction arrows (no text or symbols)natural_image
Illustration of a hand cleaning a window with a magnified view of the process (no text or symbols)natural_image
Illustration of a solar panel installation and its internal meshing (no text or symbols)natural_image
Illustration of a heat exchanger with airflow direction indicated by a blue arrow (no text or symbols)natural_image
Diagram of a switch or socket with a bulb inserted into a housing (no text or symbols)natural_image
Illustration of a heat exchanger with a blue arrow indicating airflow direction (no text or symbols)LIMPIEZA
natural_image
Illustration of a hand cleaning a large air purifier with a cloth (no text or symbols)natural_image
Illustration of a hand cleaning a large fan inside a stainless steel appliance (no text or symbols visible)
NOTICE
natural_image
Front view of a white industrial device labeled 'WINIX' with dot pattern and ventilation grille (no readable text or symbols)Modell
natural_image
Line drawing of a portable electronic device with a grid-patterned front panel (no text or symbols)Produkt
natural_image
Illustration of a door with a blue arrow indicating a handle, showing hands installing or adjusting a panel (no text or symbols present)natural_image
Illustration of hands holding a tablet with a blue arrow pointing to the screen (no text or symbols)
NOTE
natural_image
Illustration of a hand cleaning a window with a magnified view of the blade (no text or symbols)

NOTE

NOTE
CHILD LOCK, AIR QUALITY-LED
6. Child Lock

NOTE
natural_image
Illustration of a hand inserting a component into a server rack with a blue arrow indicating the direction (no text or symbols present)
NOTICE
natural_image
Diagram of a large air conditioner unit with cooling panel and airflow direction arrows (no text or symbols)natural_image
Illustration of hands cleaning a clean document with a magnified inset showing the blade being cut (no text or symbols)natural_image
Illustration of a solar panel installation and its internal meshing (no text or symbols)natural_image
Illustration of a heat exchanger with airflow direction indicated by a blue arrow (no text or symbols)natural_image
Diagram of a switch or socket with a bulb inserted into a rectangular housing (no text or symbols)natural_image
Illustration of a heat exchanger with a blue arrow indicating airflow direction (no text or symbols)natural_image
Illustration of a hand cleaning a large air purifier with a cloth (no text or symbols)natural_image
Illustration of a hand cleaning a large air conditioner unit with a fan inside (no text or symbols)
NOTICE
natural_image
Front view of a white industrial device labeled 'WINIX' with a grid pattern and dot pattern (no readable text or symbols)
Modello
natural_image
Illustration of a device with hands installing or adjusting a panel, showing internal structure and no text or symbols.natural_image
Illustration of hands holding a rectangular device with a blue arrow pointing to the screen (no text or symbols)
Note
natural_image
Illustration of a hand cleaning a clean air conditioner cover with a magnified inset showing the blade being cut (no text or symbols)SICUREZZA E PRECAUZIONI


NOTE
BLOCCO BAMBINI, LED QUALITÀ ARIA
6. Blocco bambini

NOTE
8. Connessione a WINIX SMART
natural_image
Illustration of a hand inserting a component into a device with a blue arrow indicating direction (no text or symbols)
NOTICE
natural_image
Diagram of a large air conditioner unit with cooling panel and airflow arrows indicating airflow direction (no text or symbols)natural_image
Illustration of a hand cleaning a grid-patterned device with a magnified view of the component (no text or symbols)natural_image
Illustration of a solar panel installation and its internal meshing (no text or symbols)natural_image
Illustration of a heat exchanger with a blue arrow indicating airflow direction (no text or symbols)natural_image
Diagram of a wall-mounted electrical socket with a bulb inserted, showing internal components and wiring (no text or symbols)natural_image
Illustration of a heat exchanger with a blue arrow indicating airflow direction (no text or symbols)PULIZIA
Pulire le parti esterna e interna
natural_image
Illustration of a hand cleaning a large air purifier with a cloth (no text or symbols)natural_image
Line drawing of a hand cleaning a green air conditioner unit with a fan inside (no text or symbols)
NOTICE
natural_image
Front view of a white industrial device labeled 'WINIX' with dot pattern and ventilation grille (no readable text or symbols)Model
HET APPARAAT PLAATSEN 130
DE FILTERS INSTALLEREN 131
VEILIGHEIDSVOORSCHRIFTEN EN WAARSCHUWINGEN 133
EERSTE GEBRUIK 134
Lichtsensor
HET APPARAAT PLAATSEN
natural_image
Illustration of a device with hands installing or adjusting a panel, no text or symbols presentnatural_image
Illustration of hands holding a rectangular device with a blue arrow pointing to the screen (no text or symbols)
NOTE
natural_image
Illustration of a hand holding a filter device with a magnified inset showing airflow or cooling process (no text or symbols)VEILIGHEIDSVOORSCHRIFTEN EN WAARSCHUWINGEN

NOTE

NOTE
KINDERVERGRENDELING, LEDINDICATIE LUCHTKWALITEIT
6. Kindervergrendeling

NOTE
natural_image
Illustration of a hand inserting a component into a server rack (no text or symbols visible)
NOTICE
natural_image
Diagram of an air purifier with airflow arrows indicating cooling zone (no text or symbols)natural_image
Illustration of a hand cleaning a large screen with a magnified inset showing the blade being cut (no text or symbols)natural_image
Illustration of a solar panel installation and its internal container (no text or symbols)natural_image
Illustration of a heat exchanger with a blue arrow indicating airflow direction (no text or symbols)natural_image
Diagram of a wall-mounted electrical outlet with a bulb inserted, showing internal components and wiring (no text or symbols)natural_image
Illustration of a heat exchanger with a blue arrow indicating airflow direction (no text or symbols)REINIGING
natural_image
Illustration of a hand cleaning a large air purifier with a cloth (no text or symbols)natural_image
Illustration of a hand cleaning a circular fan inside a stainless steel appliance (no text or symbols visible)
NOTICE
natural_image
Front view of a WINIX washing machine with dotted pattern and control panel (no visible text or symbols)Model
GWARANCJA NA PRODUKT 174
Francuski 26
Hiszpański 51
Niemiecki 76
Włoski 101
Holenderski 126
Polski 151
natural_image
Illustration of a device with hands installing or adjusting a panel, no text or symbols presentnatural_image
Illustration of hands holding a rectangular device with a blue arrow pointing to the screen (no text or symbols)
Uwaga
natural_image
Illustration of a hand cleaning a clean air conditioner cover with a magnified inset showing the device's airflow (no text or symbols)BEZPIECZEŃSTWO I ŚRODKI ZARADCZE


Uwaga
3 sec Lighting On/Off
5. Modul PlasmaWave®
BLOKADA RODZICIELSKA, WSKAŹNIK JAKOŚCI POWIETRZA


Uwaga
natural_image
Illustration of a hand inserting a component into a server rack with a blue arrow indicating direction (no text or symbols)
UWAGA
natural_image
Diagram of a front-loading air conditioner unit with a blue arrow indicating airflow direction (no text or symbols)natural_image
Diagram of a front-loading air conditioner unit with a grid panel and airflow direction arrow (no text or symbols)natural_image
Illustration of a hand cleaning a large air conditioner cover with cooling effect (no text or symbols)natural_image
Illustration of a solar panel installation and its internal meshing (no text or symbols)natural_image
Illustration of a heat exchanger with a blue arrow indicating airflow direction (no text or symbols)natural_image
Diagram of a switch or power outlet with a bulb and screwdriver inserted, no text or symbols presentnatural_image
Illustration of a heat exchanger with a blue arrow indicating airflow direction (no text or symbols)CZYSZCZENIE
natural_image
Illustration of a hand cleaning a large air purifier with a cloth (no text or symbols)Czyszczenie wnętrza
natural_image
Line drawing of a hand cleaning a circular fan inside a stainless steel appliance (no text or symbols)
UWAGA
GWARANCJA NA PRODUKT

- CONTENTS
- CONTROLS
- Light Sensor
- Reset Button
- Timer Indicator
- Mode / Fan Speed Button
- Child Lock Indicator
- WHERE TO USE
- WARNING
- INSTALLING THE FILTERS
- Note
- SAFETY AND CAUTIONS
- INITIAL OPERATION
- AUTO AND SLEEP
- Auto Mode
- Sleep Mode
- MANUAL MODE, TIMER AND PLASMAWAVE®
- Manual Mode (setting fan speed)
- Timer
- PlasmaWave®
- CHILD LOCK, AIR QUALITY LED
- Child Lock
- Air Quality LED Light
- WINIX SMART
- Connecting to WINIX SMART
- ※ Before connecting to Smart Home
- Setup
- FILTER CARE
- Changing Filters
- Removing Filters
- NOTICE
- Filter Assembly and Replacement
- Cleaning the Pre-filter
- PARTICLE SENSOR CARE
- Particle Sensors Care
- CLEANING CARE
- Cleaning the exterior and interior
- Cleaning the exterior
- Cleaning the interior
- FREQUENTLY ASKED QUESTIONS
- UNIT SPECIFICATIONS
- PRODUCT WARRANTY
- The terms of the warranty are as follows.
- PURIFICATEUR D'AIR WINIX
- SÉCURITÉ ET MISES EN GARDE
- VERROUILLAGE ENFANT, VOYANT LED QUALITÉ DE L'AIR
- CONSIGNES D'ENTRETIEN
- Sensor de luz
- LIMPIEZA
- CHILD LOCK, AIR QUALITY-LED
- SICUREZZA E PRECAUZIONI
- BLOCCO BAMBINI, LED QUALITÀ ARIA
- Blocco bambini
- Connessione a WINIX SMART
- PULIZIA
- Pulire le parti esterna e interna
- Lichtsensor
- HET APPARAAT PLAATSEN
- VEILIGHEIDSVOORSCHRIFTEN EN WAARSCHUWINGEN
- KINDERVERGRENDELING, LEDINDICATIE LUCHTKWALITEIT
- Kindervergrendeling
- REINIGING
- Uwaga
- BEZPIECZEŃSTWO I ŚRODKI ZARADCZE
- Modul PlasmaWave®
- BLOKADA RODZICIELSKA, WSKAŹNIK JAKOŚCI POWIETRZA
- CZYSZCZENIE
- Czyszczenie wnętrza
- GWARANCJA NA PRODUKT
Brand : Winix
Model : Zero+ WiFi
Category : Air purifier