
AJPCD2G - Memory card reader PANASONIC - Free user manual and instructions
Find the device manual for free AJPCD2G PANASONIC in PDF.
| Product Type | P2 memory card reader (single slot) |
| Brand | Panasonic |
| Model | AJPCD2G (AJ-PCD2G) |
| Dimensions (W × H × D) | 97 mm × 25.5 mm × 113 mm |
| Weight | 200 g (without packaging) |
| Power supply | 5 V DC (USB bus power, two USB cables required) |
| Power consumption | 0.5 A |
| Interface | USB 2.0 (Hi-Speed) |
| Supported card formats | P2 card (PC Card Type II / CardBus) |
| Number of slots | 1 |
| Supported operating systems | Windows XP/Vista/7 (32/64 bit), Mac OS X 10.5/10.6 |
| Operating temperature | 0 °C to 40 °C |
| Operating humidity | 10 % to 85 % (without condensation) |
| Main functions | Reading and writing P2 content to P2 card, high-speed transfer, direct editing |
| Included accessories | 2 USB cables (1.0 m), 1 CD-ROM (drivers and manual) |
| Maintenance and cleaning | Do not expose to moisture; use a dry cloth for cleaning; do not use solvents |
| Safety | Do not open the case; avoid moisture and heat sources; use only recommended accessories |
| Spare parts and repairability | Entrust any repairs to qualified personnel; lost USB cables can be replaced with USB 2.0 cables of 1.0 m or less |
| General information | Portable reader for field work; USB bus powered (two cables); do not use in vertical position |
Frequently Asked Questions - AJPCD2G PANASONIC
User questions about AJPCD2G PANASONIC
0 question about this device. Answer the ones you know or ask your own.
Ask a new question about this device
Download the instructions for your Memory card reader in PDF format for free! Find your manual AJPCD2G - PANASONIC and take your electronic device back in hand. On this page are published all the documents necessary for the use of your device. AJPCD2G by PANASONIC.
USER MANUAL AJPCD2G PANASONIC
natural_image
Line drawing of a rectangular electronic device with internal ports and a label (no readable text or symbols)Before operating this product, please read the instructions carefully and save this manual for future use.
- To reduce the risk of fire or electric shock, do not expose this equipment to rain or moisture.
- To reduce the risk of fire or electric shock, keep this equipment away from all liquids. Use and store only in locations which are not exposed to the risk of dripping or splashing liquids, and do not place any liquid containers on top of the equipment.
CAUTION:
In order to maintain adequate ventilation, do not install or place this unit in a bookcase, built-in cabinet or any other confined space. To prevent risk of electric shock or fire hazard due to overheating, ensure that curtains and any other materials do not obstruct the ventilation.
CAUTION:
To reduce the risk of fire or electric shock and annoying interference, use the recommended accessories only.
CAUTION:
Do not remove panel covers by unscrewing them. To reduce the risk of electric shock, do not remove the covers. No user serviceable parts inside. Refer servicing to qualified service personnel.
indicates safety information.
The rating plate is on the underside of the unit.
EEE Complies with Directive of Turkey.
FCC NOTICE (USA)
Declaration of Conformity
Model Number: AJ-PCD2G
Trade Name: Panasonic
Responsible Party: Panasonic Corporation of North America
One Panasonic Way, Secaucus, NJ07094
Support contact: 1-800-524-1448
This device complies with Part 15 of the FCC Rules.
Operation is subject to the following two conditions:
(1) This device may not cause harmful interference, and (2) this device must accept any interference received, including interference that may cause undesired operation. To assure continued compliance, follow the attached installation instructions and do not make any unauthorized modifications.
Note:
This equipment has been tested and found to comply with the limits for a class B digital device, pursuant to Part 15 of the FCC Rules. These limits are designed to provide reasonable protection against harmful interference in a residential installation. This equipment generates, uses, and can radiate radio frequency energy, and if not installed and used in accordance with the instructions, may cause harmful interference to radio communications. However, there is no guarantee that interference will not occur in a particular installation. If this equipment does cause harmful interference to radio or television reception, which can be determined by turning the equipment off and on, the user is encouraged to try to correct the interference by one of the following measures:
- Reorient or relocate the receiving antenna.
- Increase the separation between the equipment and receiver.
- Connect the equipment into an outlet on a circuit different from that to which the receiver is connected.
- Consult the dealer or an experienced radio/TV technician for help.
The user may find the booklet “Something About Interference” available from FCC local regional offices helpful.
Warning:
To assure continued FCC emission limit compliance, follow the attached installation instructions and the user must use only shielded interface cables when connecting to host computer or peripheral devices. Also, any unauthorized changes or modifications to this equipment could void the user's authority to operate this device.
NOTIFICATION (Canada)
This class B digital apparatus complies with Canadian ICES-003.
Software used by this product
This product contains software provided under the GNU General Public License (GPL) and the GNU Lesser General Public License (LGPL). The user has the right to obtain, change and redistribute the source code as he/she wishes.
For details on GPL and LGPL, refer to the files stored in the LDOC folder on the supplied CD-ROM. (Note that this information is provided in the original (English language) text.)
To obtain the source code, visit the following web site.
http://pro-av.panasonic.net/
Please do not make enquiries regarding the source code you obtain.
Table of Contents
Read this first!...... E-1
Before Use....E-5
Overview....E-5
Features...... E-5
Supplied Accessories (AJ-PCD2G)...... E-6
Operating Environment Required for Installation ...... E-6
Parts and their Functions ...... E-7
Connecting the P2 Drive to a Personal Computer.... E-8
Removing the P2 Drive from a Personal Computer ....E-9
Inserting a P2 Card.... E-10
Removing a P2 Card....E-11
Write-protecting a P2 Card ....E-11
Installing a USB Driver for Windows ...... E-12
Installing a USB Driver for Macintosh E-12
Before Calling for Service.... E-13
Specifications ...... E-14
Microsoft, Windows and Windows Vista are trademarks of Microsoft Corporation of the United States.
Macnintosh, Mac OS and PowerBook are trademarks of Apple Inc. of the United States.
Other names of companies and products are trademarks or registered trademarks of the respective companies.
- In these instructions, Microsoft® Windows®, Windows® 2000, Windows® XP Professional, Windows Vista® Business, Windows Vista® Ultimate, Windows® 7 Professional and Windows® 7 Ultimate are given as “Windows”, “Windows 2000”, “Windows XP Professional”, “Windows Vista Business”, “Windows Vista Ultimate”, “Windows 7 Professional” and “Windows 7 Ultimate” respectively.
- Similarly, in these instructions, Macintosh ^® , Mac ^® Pro, Mac OS ^® X and PowerBook ^® are given as “Macintosh”, “Mac Pro”, “Mac OS X” and “PowerBook” respectively.
Before Use
- While the AJ-PCD2G is connected to a computer, install the required drivers from the CD-ROM.
Refer to the installation manual in the "Manuals" folder on the CD-ROM for information on how to install the drivers for Windows.
Refer to “Installing a USB driver for Macintosh” on page E-12 in this manual for information on how to install drivers for Macintosh. - The AJ-PCD2G may become warm during use, but this is not a malfunction.
Overview
The AJ-PCD2G (referred to as “P2 drive” below) is a single-slot drive for reading and writing P2 content on P2 cards (1 card at a time) when connected to a Windows PC or Macintosh via USB 2.0 (two USB cable connections that provide bus power).
The P2 drive is capable of making high-speed transfers of clip data shot with a memory card camera-recorder for P2 cards to a personal computer (Windows/Apple Macintosh).
This device supports not only the transferring and copying of clips recorded on P2 cards, but also direct editing.
Features
- Single-slot P2 card drive with USB 2.0 interface
- Light and compact construction makes it portable and ideal for field work with a notebook PC
• Supports both Windows and Macintosh operating systems - USB bus power eliminates need for AC adapter* ^1
*1: Two USB cables are required.
Supplied Accessories (AJ-PCD2G)
| USB cables (2) CD-ROM (1) |
Operating Environment Required for Installation
The host computer requires the following operating environment to operate the P2 drive.
USB 2.0 connectors: two or more
For one P2 drive, two USB 2.0 (Hi-Speed) connectors, i.e., SIGNAL (data transfer/power supply) and POWER (power supply), are needed. Up to two P2 drives can be connected to one personal computer.

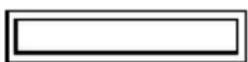
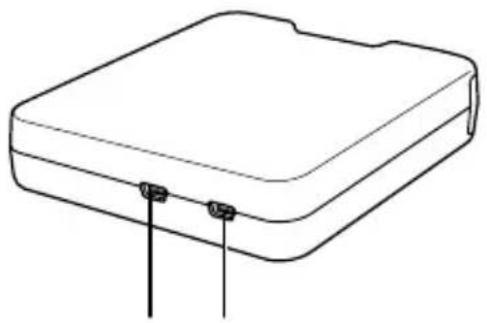
natural_image
Line drawing of a rectangular electronic device with two connectors at the bottom (no text or symbols)① Access indicator
Lights green during P2 card access.
NOTE:
- Do not remove a P2 card during access. The file data could be corrupted or the P2 card could be damaged.
The indicator blinks rapidly when the USB 2.0 connector (POWER) is not connected. Refer to “Before Calling for Service” (page E-13).
② P2 Card slot
Insert a P2 card.
The P2 drive is designed for P2 cards and does not work with other cards.
③ EJECT button
Press this button to remove a P2 card from the P2 drive.
④ USB 2.0 connector (SIGNAL connector)
Use the supplied USB cables to connect this connector to a USB 2.0 port on a personal computer to transfer data and to power the P2 drive from the computer.
⑤ USB 2.0 connector (POWER connector)
Use the supplied USB cable to connect this connector to a USB 2.0 port on a personal computer to power the P2 drive from the computer.
NOTE:
- Do not use the P2 drive in an upright position. Otherwise malfunction or damage to the P2 drive may occur.
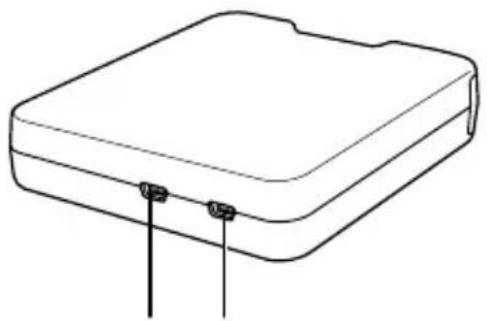
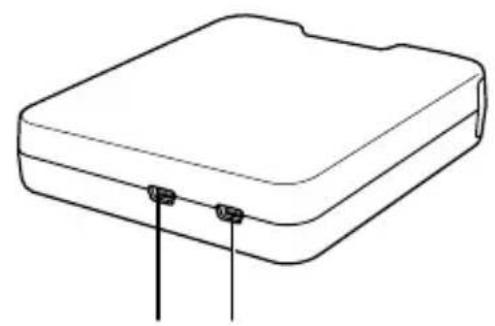
Connecting the P2 Drive to a Personal Computer
1 Connect the supplied USB cables to each USB 2.0 connector (SIGNAL, POWER) on the P2 drive.
2 Connect the other end of each USB cable to USB 2.0 ports on a personal computer.
The access indicator blinks and then goes out and a drive letter for the P2 drive appears on the personal computer.
3 For the first time you use the P2 drive, proceed with the USB driver installation.
→ Refer to "Installing a USB Driver for Windows" (page E-12)
→ Refer to "Installing a USB Driver for Macintosh" (page E-12)
natural_image
Diagram of a device with three connected resistors (no text or symbols)Two USB cables are required to connect the P2 drive.
USB cables
- Use the supplied 1.0 m USB cables. If you lose the supplied USB cables, purchase two 1.0 m or shorter USB cables (USB 2.0 compliant). The P2 drive may not work with USB cables of different length.
- Do not transport the P2 drive with USB cables connected. The P2 drive could be damaged.
USB cable connection
- Two USB cables are required to connect the P2 drive.
- When only the USB (SIGNAL) connector on the P2 drive is connected to a personal computer, the corresponding driver letter appears, but the content of an inserted P2 card will not appear. The access indicator will then blink rapidly for two seconds and go off for one second. This status repeats.
- When only the (POWER) USB connector on the P2 drive is connected to a personal computer, the corresponding drive letter does not appear.
■ Using a USB hub
- Use only self-powered USB hubs (self-powered hubs supply their own power via an AC adapter). (A bus-powered USB hub may not work with this device.)
- Use USB 2.0 (Hi-Speed USB) hubs with this device. (A USB 1.1 hub may not work with this device.)
■ Connecting two P2 drives in Windows XP and Windows Vista
Connect the USB 2.0 (SIGNAL) connectors on the two P2 drives directly to the USB ports on the personal computer. If both of the P2 drives appear as “Panasonic P2 Series USB Device” when you select “Safe Hardware Removal” in the task tray, the device driver is applied. If one of the P2 drives appears as “USB Mass Storage Device”, the device driver is not applied. In this case, refer to the installation manual and install the device driver again.
If the problem persists after reinstallation, it is recommended to use only one P2 drive.
NOTE:
- If the USB 2.0 (SIGNAL) connectors on the two P2 drives are connected to the USB hub, the P2 drives may not be recognized, the device driver may not be applied, and other problems may occur.
Removing the P2 Drive from a Personal Computer
Windows XP and Windows Vista
Select "Safely Remove Hardware" in the task tray to stop "Panasonic P2 Series USB Device" before disconnecting the two USB cables.
Windows 7
If a P2 card is inserted in the P2 drive, click the up arrow icon in the task tray, select "Safely Remove Hardware and Eject Media", select "Remove P2 drive" before disconnecting the two USB cables.
When there is no P2 card in the drive, the USB cables can be removed without the need for any computer operations.
■ Mac OS X 10.5 and 10.6
If a P2 card is inserted in the P2 drive, drag the P2 card icon to the Trash, check that the P2 card icon has disappeared before disconnecting the two USB cables. When there is no P2 card in the P2 drive, the USB cables can be removed without the need for any computer operations.
NOTE:
• After safely removing hardware in Windows, you can make the computer recognize the P2 drive again by connecting both USB cables.
Inserting a P2 Card
1 Insert a P2 card in the P2 card slot.
Press in the card until the EJECT button pops up.
NOTE:
- Be sure to insert the P2 card horizontally. Forcing the card in at an angle may damage it.
- Do not remove a P2 card while it is being accessed or right after insertion. Otherwise, the card may be damaged.
- Do not transport the drive with a P2 card inserted. Otherwise, the P2 drive may be damaged.
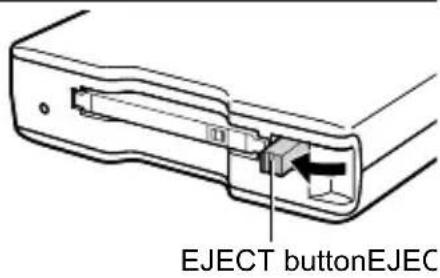
2 Fold the EJECT button in the direction of the arrow.
NOTE:
- Do not use the P2 drive with the EJECT button fully extended. Otherwise, the EJECT button could be damaged.
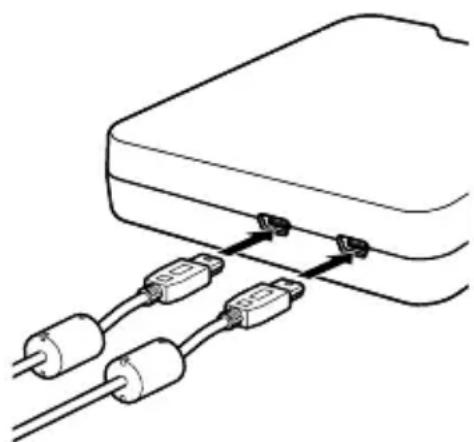
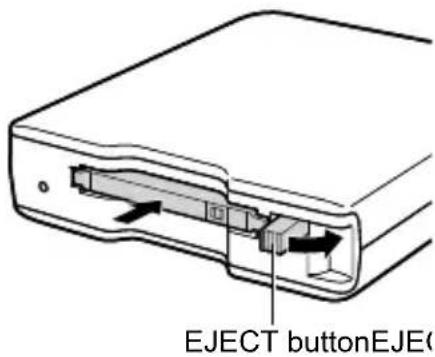
Removing a P2 Card
1 Flip up the EJECT button in the direction of the arrow.
2 Press the EJECT button.
The P2 card will slide out far enough to allow you to remove it.

natural_image
Cross-sectional diagram of a device showing internal components (no text or symbols)NOTE:
- To remove a P2 card on a Macintosh, drag the P2 card icon to the Trash. Then check that the icon has disappeared and the access indicator on the P2 drive has turned off before physically removing the P2 card.
- Do not remove a P2 card that is being accessed. Removing a P2 card during access may cause the P2 drive to malfunction. Should this happen, reconnect the two USB cables.
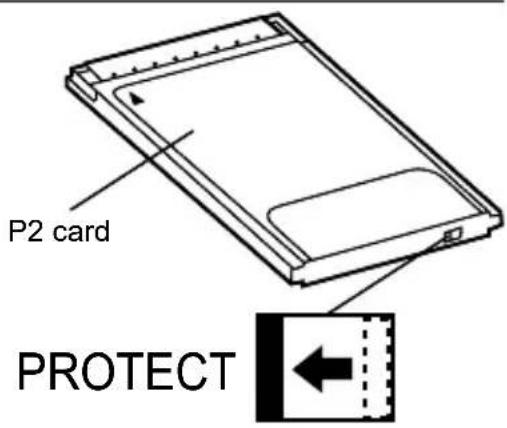
Write-protecting a P2 Card
P2 cards come equipped with a write-protect switch. Slide this switch to the "PROTECT" side to prevent overwriting and deletion of data.
Note that the write-protect switch will not work on a card that is inserted in the drive. In order for the drive to recognize the switch setting, remove the P2 card from the drive, set the switch and reinsert the card in the drive.
Refer to the installation manual in the “Manuals” folder on the CD-ROM for information on how to install the Windows drivers.
Installing a USB Driver for Macintosh
This driver software enables a Macintosh to access content on a P2 card inserted in the P2 drive.
Perform the following steps to install the driver.
1 Insert the supplied CD-ROM.
2 Double-click the "Macintosh" folder on the CD-ROM.
3 For Mac OS X 10.5:
Double click the “Leopard” folder on the CD-ROM.
For Mac OS X 10.6:
Double click the “Snow Leopard” folder on the CD-ROM.
4 Double click the "P2Drive" folder.
5 Double click the "P2DriveFamilyDriver Install.dmg" disk image module in the "P2Drive" folder.
6 Double click the "P2DriveFamilyDriver Install.pkg".
7 The driver software installation process will now start. Follow the instructions given in the installation screen.
NOTE:
- If the USB driver is not installed, a sufficient transfer rate may not be obtained.
For the latest information on software drivers, visit the following Web site. http://pro-av.panasonic.net/
The access indicator blinks rapidly and the P2 drive does not work.
→Connect the USB 2.0 connector (POWER) and the USB 2.0 connector (SIGNAL) to USB ports on a personal computer using the two supplied USB cables. If the USB 2.0 connector (POWER) is not connected, the access indicator will blink rapidly for two seconds and go off for one second. This status repeats.
The personal computer does not recognize the P2 drive when it is connected with the two USB cables.
→If they are connected to USB 1.1 ports on the personal computer, reconnect them to USB 2.0 ports.
→If the USB cables are longer than 1.0 m, reconnect using the two supplied 1.0 m USB cables.
→Do not use bus-powered USB hubs but self-powered USB hubs (self-powered hubs supply their own power via an AC adapter).
■ PCMCIA Type II cards other than P2 cards cannot be used.
→The P2 drive is designed for P2 cards and does not support PCMCIA Type II cards other than P2 cards.
■ P2 cards cannot be accessed after resume from sleep or hibernation.
→Some personal computers may not be able to access a P2 card in the P2 drive after resuming from sleep or hibernation. Should this happen, reconnect the two USB cables.
Specifications
Rated voltage: 5 V DC (powered by USB2.0)
Rated current consumption: 0.5 A
indicates safety information.
External dimensions (W × H × D)
97 mm × 25.5 mm × 113 mm (3- 78 inches × 1- 116 inches × 4- 12 inches)
(excluding protruding parts)
Weight
200 g (0.44 lb) (excluding packing materials)
Connector configuration
[Environment conditions]
Operating temperature
0 °C to 40 °C (32 °F to 104 °F)
Operating humidity
10 % to 85 % (no condensation)
[Personal computer operating requirements]
Supported operating systems
Windows XP Professional (SP3) 32 bit
Windows Vista Business (SP2), Ultimate (SP2) 32/64 bit
Windows 7 Professional, Ultimate 32/64 bit
Mac OS X 10.5.6 (Intel processor)
Mac OS X 10.6.2 (Intel processor)
Main memory
512 MB or more is recommended
1 GB or more is recommended for Windows Vista, Windows 7 and Mac OS X 10.6
Interface
USB Ver. 2.0 compliant
[Card slot]
PC card Type II (1) (CardBus compliant)
Please note that specifications and appearance are subject to change, for improvement purpose, without notice.
Information on Disposal for Users of Waste Electrical & Electronic Equipment (private households)

This symbol on the products and/or accompanying documents means that used electrical and electronic products should not be mixed with general household waste.
For proper treatment, recovery and recycling, please take these products to designated collection points, where they will be accepted on a free of charge basis.
Alternatively, in some countries you may be able to return your products to your local retailer upon the purchase of an equivalent new product.
Disposing of this product correctly will help to save valuable resources and prevent any potential negative effects on human health and the environment which could otherwise arise from inappropriate waste handling. Please contact your local authority for further details of your nearest designated collection point.
Penalties may be applicable for incorrect disposal of this waste, in accordance with national legislation.
For business users in the European Union
If you wish to discard electrical and electronic equipment, please contact your dealer or supplier for further information.
Information on Disposal in other Countries outside the European Union
This symbol is only valid in the European Union.
If you wish to discard this product, please contact your local authorities or dealer and ask for the correct method of disposal.
WARNUNG:
natural_image
Line drawing of a rectangular electronic device with two connectors at the bottom (no text or symbols)① Zugriffsanzeige
natural_image
Diagram of a device with three connected resistors (no text or symbols)natural_image
Cross-sectional diagram of a device showing internal components (no text or symbols)◆ HINWEIS:
natural_image
Line drawing of a USB cable with two connectors (no text or symbols)
natural_image
Diagram of a device with three connected resistors (no text or symbols)natural_image
Diagram of a device showing internal components with arrows indicating flow or movement (no text or symbols)Bouton EJECTBou
natural_image
Cross-sectional diagram of an electronic device showing internal components (no text or symbols)◆ REMARQUE :
Mac OS X 10.5.6 (Intel processor)
Mac OS X 10.6.2 (Intel processor)
Mémoire principale

natural_image
Line drawing of a rectangular electronic device with two connectors at the bottom (no text or symbols)natural_image
Diagram of a device with three connected resistors (no text or symbols)natural_image
Cross-sectional diagram of a device showing internal components (no text or symbols)NOTA:
natural_image
Line drawing of a USB cable with two connectors (no text or symbols)
natural_image
Line drawing of a rectangular electronic device with two connectors at the bottom (no text or symbols)④ Conector USB 2.0 (Conector SIGNAL)
natural_image
Line drawing of a device with three connected resistors (no text or symbols)natural_image
Diagram of a device showing internal ports and connectors (no text or symbols)natural_image
Cross-sectional diagram of a device showing internal components (no text or symbols)NOTA:

natural_image
Line drawing of a rectangular electronic device with two connectors at the bottom (no text or symbols)① アクセスインジケーター
natural_image
Diagram of a device showing internal components with arrows indicating flow or movement (no text or symbols)EJECTボタンEJE
natural_image
Cross-sectional diagram of a device showing internal components (no text or symbols)◆ノート:
natural_image
Symbol of a trash bin with crossed lines indicating no waste or discharge, and a solid black rectangle below (no text or labels)Panasonic Broadcast & Television Systems Co.
3 Panasonic Way, 2E-7 Secaucus, NJ 07094 Tel: 201-348-5300
http://www.panasonic.com/broadcast e-mail: pbtsinfo@us.panasonic.com
Panasonic Canada Inc.
5770 Ambler Drive, Mississauga, Ontario L4W 2T3 Tel: 905-624-5010
Professional & Broadcast IT Systems Business Unit Europe
Panasonic AVC Systems Europe a Division of Panasonic Marketing Europe GmbH
Hagenauer Str. 43, 65203 Wiesbaden-Biebrich Deutschland Tel: +49-611-235-481
Panasonic Systems Asia Pacific (Broadcast Regional Operation Center)
2 Jalan Kilang Barat, Panasonic Building, Singapore 159346 Tel: +65-6270-0110
- CAUTION:
- FCC NOTICE (USA)
- Declaration of Conformity
- Note:
- Warning:
- NOTIFICATION (Canada)
- Software used by this product
- Table of Contents
- Before Use
- Overview
- Features
- Supplied Accessories (AJ-PCD2G)
- Operating Environment Required for Installation
- Connecting the P2 Drive to a Personal Computer
- USB cables
- USB cable connection
- ■ Using a USB hub
- ■ Connecting two P2 drives in Windows XP and Windows Vista
- Removing the P2 Drive from a Personal Computer
- Windows XP and Windows Vista
- Windows 7
- ■ Mac OS X 10.5 and 10.6
- Inserting a P2 Card
- Insert a P2 card in the P2 card slot.
- Fold the EJECT button in the direction of the arrow.
- Removing a P2 Card
- Write-protecting a P2 Card
- Installing a USB Driver for Macintosh
- Specifications
- External dimensions (W × H × D)
- Weight
- Connector configuration
- [Environment conditions]
- Operating temperature
- Operating humidity
- [Personal computer operating requirements]
- Supported operating systems
- Main memory
- Interface
- [Card slot]
- Information on Disposal for Users of Waste Electrical & Electronic Equipment (private households)
- For business users in the European Union
- Information on Disposal in other Countries outside the European Union
- WARNUNG:
- ◆ HINWEIS:
- ◆ REMARQUE :
- NOTA:
- ◆ノート:
Brand : PANASONIC
Model : AJPCD2G
Category : Memory card reader