
UBZLJ9SET - Talkie Walkie KENWOOD - Free user manual and instructions
Find the device manual for free UBZLJ9SET KENWOOD in PDF.

User questions about UBZLJ9SET KENWOOD
0 question about this device. Answer the ones you know or ask your own.
Ask a new question about this device
Download the instructions for your Talkie Walkie in PDF format for free! Find your manual UBZLJ9SET - KENWOOD and take your electronic device back in hand. On this page are published all the documents necessary for the use of your device. UBZLJ9SET by KENWOOD.
USER MANUAL UBZLJ9SET KENWOOD
UBZ-LJ9SETT (UK Version)
BEDIENUNGSANLEITUNG
JVCKENWOOD Corporation

natural_image
Line drawing of a Kenwood walkie-talkie device (no text or symbols on the device body)Inhaltsverzeichnis
Inhalt Seite
First Floor, Gleneagles, the Belfry, Colonial Way, Watford, Hertfordshire WD24 4WH UNITED KINGDOM
natural_image
Line drawing of a walkie-talkie device with directional arrows indicating movement or force (no text or symbols)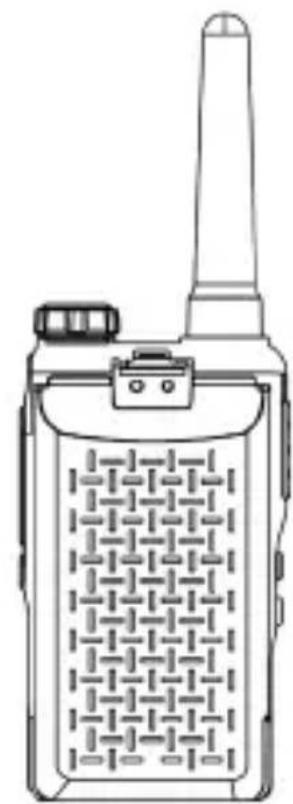
natural_image
Line drawing of a walkie-talkie device with antenna and keypad (no text or symbols)Achtung!
natural_image
Line drawing of a Kenwood mobile phone with attached cable (no text or symbols on device body)2.5 Montage des Gürtelclips
natural_image
Technical line drawings of a walkie-talkie and its internal components (no text or symbols)natural_image
Technical line drawing of a walkie-talkie device with attached sensor and connector components (no text or symbols)PMR446 FM Transceivers
UBZ-LJ9SETE (EU version)
UBZ-LJ9SETT (UK version)
INSTRUCTION MANUAL
JVCKENWOOD Corporation

natural_image
Line drawing of a Kenwood walkie-talkie device with no visible text or symbols on the device bodyTable of contents
Content Page
- Safety instructions 3
1.1 Precautions 3
1.2 Battery information 4
1.3 Declaration of Conformity 5
1.4 EU / UK contact address 5
- Before Start-up 6
2.1 Unpacking 6
2.2 Components and functions 6
2.3 Install Li-ion battery 7
2.4 Charging the battery 8
2.5 Installation of the belt clip 8
2.6 Using an optional headset 9
- Using the transceiver 10
3.1 Switching the device On and Off 10
3.2 Adjusting the volume 10
3.3 Sending and receiving 10
3.4 Full Reset Function 10
- Setting the transceiver 11
4.1 Switching channels 12
4.2 Squelch 12
4.4 Voice controlled transmission Set up (VOX) 13
4.5 Ringing tone 14
4.6 Key tone 14
4.7 Roger beep 14
4.8 Feedback tone 14
4.9 Battery charge level 15
4.10 Monitor function 15
4.11 Channel search (Scan) 15
4.12 Energy saving function 15
-
Troubleshooting 16
-
Disposal 16
-
Technical specifications 17
-
Guarantee 18
-
SAR values 19
1. Safety instructions
IMPORTANT SAFETY INSTRUCTIONS
Attention: Read this page carefully to ensure safe operation of the device.
Read instructions carefully!
- Follow all safety and operating instructions when using this product.
Keep the instructions in a safe place!
- You should keep the safety and operating instructions for future reference.
Follow the warning instructions!
- You should strictly follow all warnings provided on the product and listed in the operating instructions.
1.1 Precautions
- Do not charge the transceiver or battery when they are wet.
- Make sure that no metallic objects get between the transceiver and the battery.
- Only use accessories recommended by KENWOOD.
- If any part of the transceiver is damaged, do not touch the damaged parts.
When connecting headphones or a headset, reduce the volume of the transceiver. Also note that turning off the squelch can change the volume. - Do not place a clip microphone cord with the earphone/holder around your neck while around machinery where the cord may become entangled.
- Do not place the transceiver on an unstable surface. If the transceiver turns On/Off due to dropping or severe shock, the volume and channel configurations may be reset.
- Be careful not to injure your eyes with the end of the antenna.
- Do not immerse the transceiver in water.
• Always switch off the transceiver when connecting accessories. - The device is disconnected from the mains at the power supply. Make sure that the power supply plug is easily accessible.
- When disposing of the batteries, the applicable legal regulations and local regulations in your country or region must be complied with.
- If a commercially available neck strap is used, be careful not to get the neck strap caught in nearby machine parts.
Warning!
Turn off the transceiver in these locations:
- In an explosive atmosphere (flammable gas, dust particles, metal powder, wood dust, etc.).
- When refuelling and when staying at gas stations.
- In locations where there is a risk of explosion or where blasting work is taking place.
- On the plane. (Any use of the transceiver may only be carried out by order and according to the instructions of the crew.)
- Wherever there are signs, etc. asking to switch off transceivers, among other things, among other, in medical institutions.
• In the vicinity of people with pacemakers.
Caution!
- Do not modify the transceiver.
- Do not place the transceiver on or near airbags while driving. When the airbag is deployed, the transceiver can become a projectile and hit the driver or passenger.
- Do not touch the antenna connector while transmitting, or transmit if metal is exposed on the antenna cover. There is a risk of high frequency burns.
- If the transceiver emits an unusual smell or smoke, switch the transceiver off immediately, remove the battery and contact your KENWOOD dealer.
- The use of the transceiver while driving can violate the road traffic regulations. Check and observe the traffic regulations in your area.
- Do not expose the transceiver to extreme heat or cold.
- Do not carry the battery with metal objects as this can short-circuit the battery contacts.
- Risk of explosion if the battery is incorrectly replaced; Replace only with batteries of the same type.
- If the transceiver is used in areas with dry ambient air, electrical charges can easily build up (static electricity). If an earphone is used as an accessory in such conditions, there is a possibility that an electric shock could be transmitted from the transceiver to the ear. Do not use earphones/microphone accessories in areas where static electricity is easily generated.
- When attaching a commercially available hand strap, check that it is hard-wearing. Never swing the transceiver back and forth on the belt; You could accidentally hit and injure someone with the device.
1.2 Battery information
The battery contains flammable substances such as organic solvent. If handled incorrectly, the battery can burst and catch fire or release extreme heat, deteriorate in its performance or develop other damage. Please pay particular attention to these instructions, which treatment is prohibited.
Danger!
Do not disassemble or repair the battery!
The battery has a safety function and a protective circuit. If these are defective or disabled, the battery can generate heat, smoke, burst and catch fire.
Do not short-circuit the battery!
The positive pole (+) and the negative pole (-) must not be connected to one another with a metal object (e.g. a paper clip or a piece of wire). Therefore, do not carry or store the battery in containers together with metallic objects (tools, metal jewellery, hair clips, etc.). A short-circuited battery pack has a high current flowing through it and the battery pack can generate heat, smoke, burst, and catch fire. The bridging metal object also becomes hot.
Do not burn the battery or expose it to high temperatures!
If the insulator melts, the gas vent or safety device will be damaged or the electrolyte ignited. The battery can generate heat and smoke, burst and catch fire.
Do not use or store the battery in the vicinity of open flames, ovens or other heat sources (places where temperatures exceed 60°C)!
If the heat melts the polymer separator, the individual cells can short circuit internally and the battery can generate heat, smoke, burst, and catch fire. Even the separator is not damaged, battery may inflate, deform, or cracked. Do not use such battery.
Do not immerse the battery in water or allow it to get wet in any other way!
If the protective circuit of the battery is defective, the battery can be overcharged and an unexpected chemical reaction can occur. The battery can generate heat and smoke, burst and catch fire.
Caution!
Danger of explosion if the battery is replaced by an incorrect type;
- High or low extreme temperatures to which a battery may be exposed during use, storage or transport;
- Low air pressure at high altitude;
- The replacement of a battery by an incorrect type that can bypass a fuse (for example, some lithium battery types);
- The disposal of a battery in fire or a hot oven, or the mechanical crushing or cutting of a battery;
- Leaving a battery in an environment with extremely high temperatures, which can lead to an explosion or leakage of flammable liquids or gases; a battery that is exposed to extremely low air pressure, which can lead to an explosion or the escape of flammable liquids or gases.
1.3 Declaration of Conformity
For EU:
Hereby, JVCKENWOOD Europe B.V. declares that the radio equipment type [KENWOOD] UBZ-LJ9E complies with Directive 2014/53/EU. The full text of the “EU Declaration of Conformity” is available at the following Internet address: https://www.kenwood.com/cs/com/ecdoc/
For UK:
Hereby, JVCKENWOOD U.K. Limited declares that the radio equipment type [KENWOOD] UBZ-LJ9E complies with the Radio Equipment Regulations 2017. The full text of the “Declaration of Conformity” is available at the following internet address: https://www.kenwood.com/cs/com/ecdoc/
Manufacturer:
JVCKENWOOD Corporation
3-12. Moriya-cho, Kanagawa-ku, Yokohama-shi, Kanagawa 221-0022, JAPAN
1.4 EU / UK Contact Address
EU Contact Address:
JVCKENWOOD Europe B.V.
Amsterdamseweg 37, 1422 AC Uithoorn, THE NETHERLANDS
UK Contact Address:
JVCKENWOOD U.K. Limited
First Floor, Gleneagles, the Belfry, Colonial Way, Watford, Hertfordshire WD24 4WH, UNITED KINGDOM
2. Before Start-up
2.1 Unpacking
Carefully unpack the devices and make sure all accessories are present:
• UBZ-LJ9E transceiver x 2
• Li-ion battery KNB-86L x 2
- Belt clip incl. screws x 2
• USB power supply with two ports
• USB-C charging cable x 2
• These Operating Instructions
2.2 Components and functions
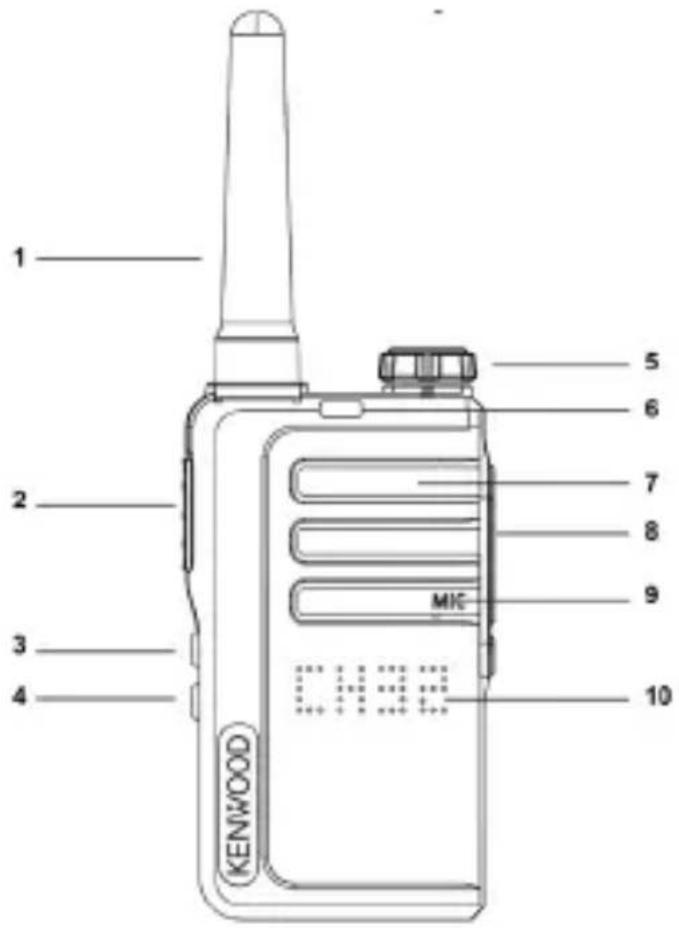
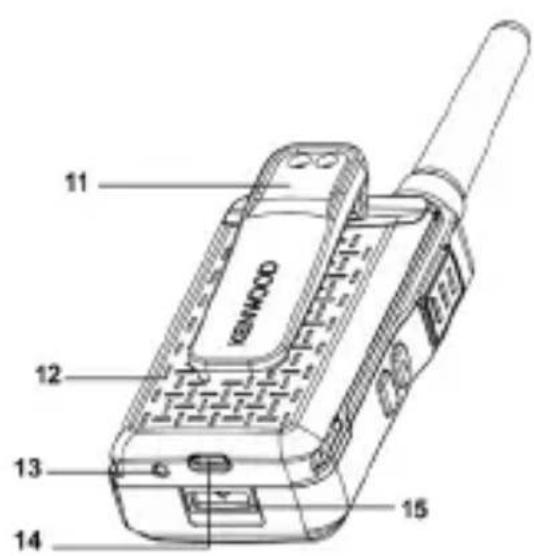
1 - Antenna 9 - Microphone
2 - Push-to-talk key - PTT 10 - LED Function Display
3 - Function key up 11 - Belt clip
4 - Function key down 12 - Li-ion battery
5 - On / Off / Volume 13 - LED Charge Indicator
6 - RX / TX LED 14 - USB-C Charging Socket
7 - Speaker 15 - Battery release button
8 - Headphone / Microphone jack
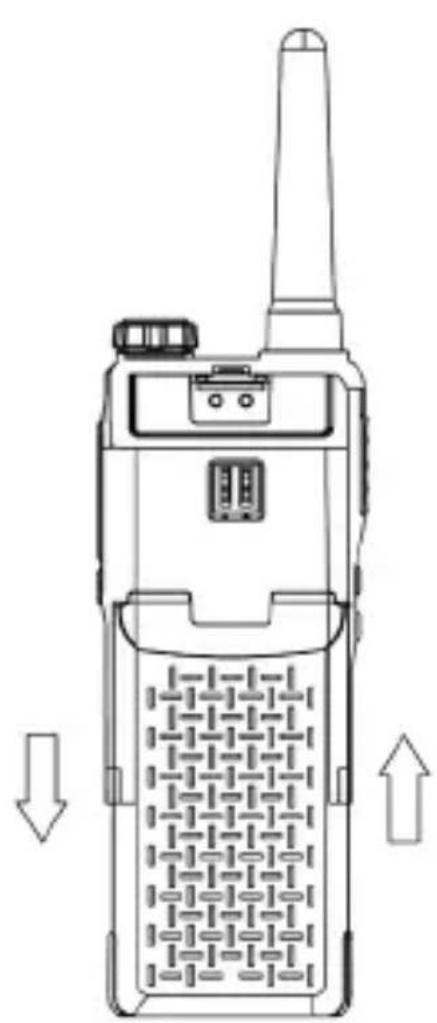
2.3 Install Li-ion battery
- Align the tabs on the battery cover with the slots on the transceiver, then hold the cover and press up until you hear a "click".
- To remove the battery, please switch off the transceiver first, then press and hold the battery lock button, slide the battery 5 mm backwards and then pull the battery up and out.
natural_image
Line drawing of a walkie-talkie device with no visible text or symbols
natural_image
Line drawing of a walkie-talkie device with antenna and keypad (no text or symbols)Attention!
• Only original batteries may be used.
- Do not short-circuit the connector terminals or expose the battery to high temperatures or fire.
- Do not try to open the housing of the battery pack.
- Do not install the battery in hazardous locations as sparks can cause an explosion.
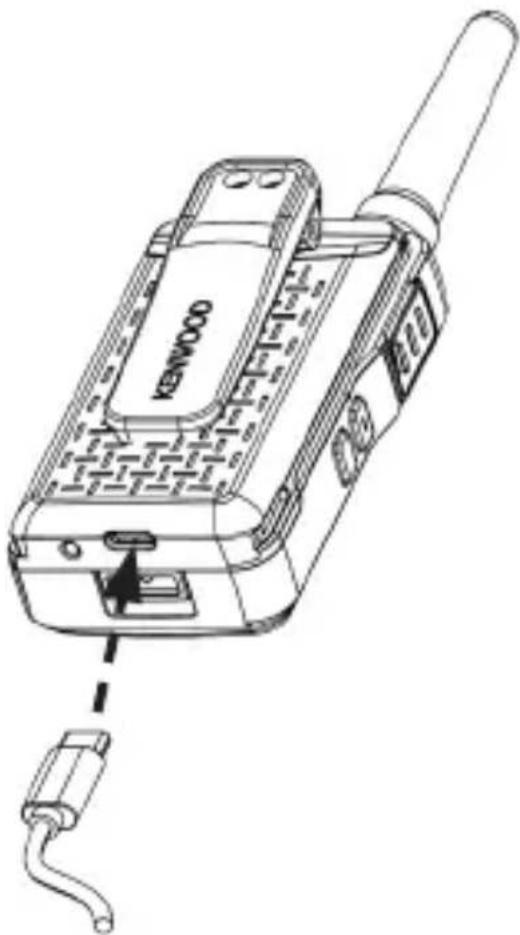
2.4 Charging the battery
Please fully charge the battery before use.
- Plug the USB power supply into a mains socket and connect the USB-C charging cable to the battery charging port on the transceiver and the USB port on the power supply. Using the power supply, 2 batteries can be charged at the same time. The battery can also be charged separately without the transceiver.
- During the charging process, the charging indicator lights up red, indicating that the battery is being charged. When the battery is fully charged, the display changes to green.
Attention!
• Use only the original power supply.
- Please only charge the battery indoors.
- When the charging process is complete, disconnect the USB cable from the battery and the power supply from the mains socket.
natural_image
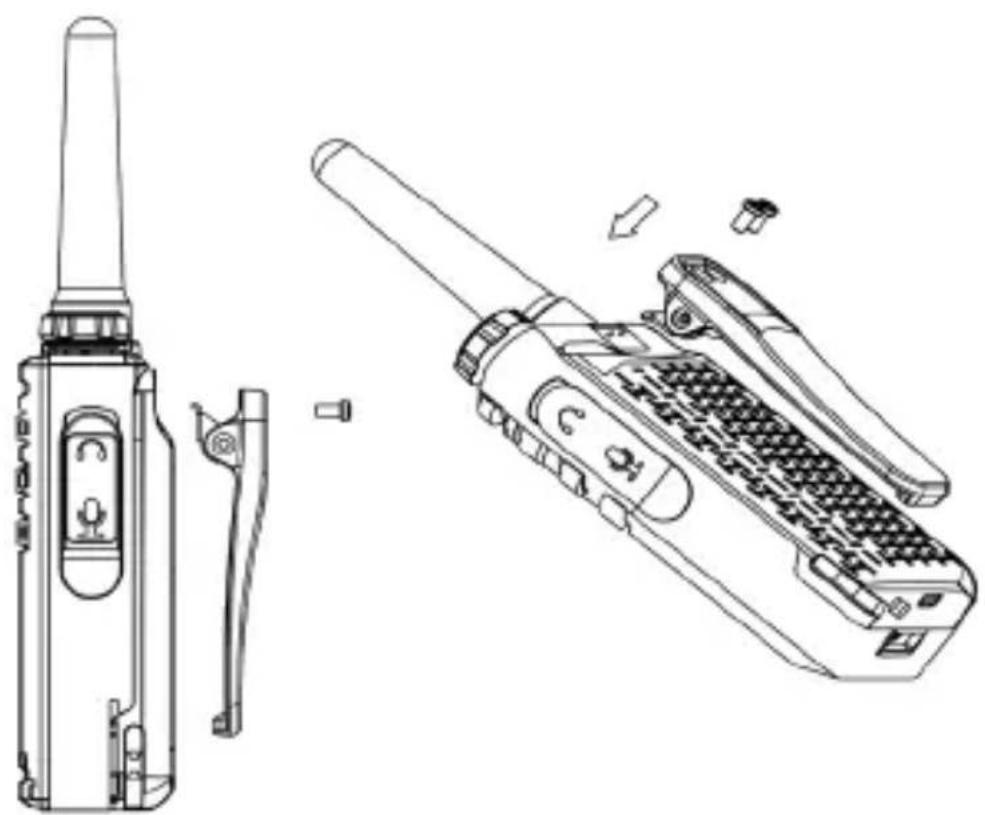
Line drawing of a Kenwood mobile phone with attached cable (no text or symbols on device body)2.5 Installation of the belt clip
Align the belt clip with the attachment points on the back of the transceiver and secure it with the screws provided. Use a suitable screwdriver. Removing the battery facilitates installation.
natural_image
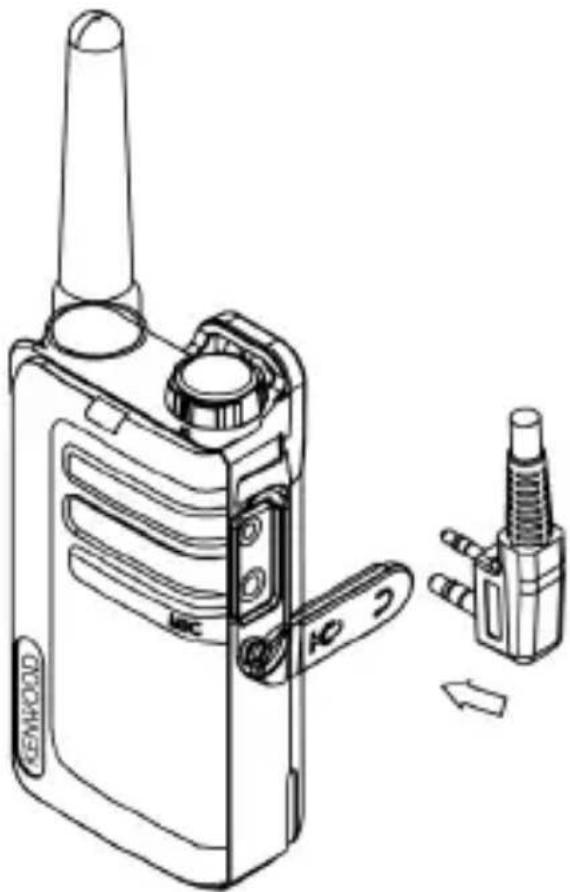
Technical line drawings of a walkie-talkie device and its internal components (no text or symbols)2.6 Using an optional headset
You can connect headsets with a Kenwood double jack (2.5 / 3.5 mm) to this transceiver. For information on compatible accessories, see the KENWOOD website.
- Slightly lift the plastic tab of the cover at the top and carefully turn it clockwise 90 degrees backwards.
- Insert the plugs completely into the jack sockets. If the jack plug is not inserted correctly, contact errors can occur and cause noise. If the headset is equipped with a PTT key, this can be used accordingly.
Attention!
To prevent hearing damage, please reduce the volume of the transceiver before using a headset.
natural_image
Technical line drawing of a walkie-talkie device with attached sensor and connector components (no text or symbols)3. Using the transceiver
3.1 Switching the device On and Off
Turn the volume control clockwise past the rest-point to turn on the transceiver. The LED display lights up completely, the charge status of the battery and the current transceiver channel are briefly displayed. The device then goes into standby mode. To switch off the transceiver, turn the volume control past the rest-point in the other direction.
3.2 Adjusting the volume
Turn the volume control clockwise to increase the volume and counterclockwise to decrease it.
3.3 Sending and receiving
When switched on, the transceiver is in "Receive" mode and can receive voice or audio signals on the set channel. To send a message, press the PTT button and speak into the microphone. Press and hold the
Note: Both transceivers must be set to the same channel and the same QT/DQT code. If the
3.4 Full Reset Function
To reset the transceiver to factory settings, please proceed as follows:
Press and hold the
4. Setting the transceiver
In order to make settings such as channel selection or QT/DQT code, this transceiver has a settings menu. This menu is operated as follows:
- A long press on the
switches to the first menu level. Each further long press of the key advances one level. - In the respective menu, the settings are made by briefly pressing the
or keys. - Press the
exits the settings menu and the transceiver is back in reception mode.
Note: If no buttons are pressed for 10 seconds, the settings menu is closed and the device is in reception mode again.
Settings menu overview:
| Level Function Settings | Display | ||
| 0 | Reception mode | ||
| 1 | Channel selection | CH01 - CH32 |  |
| 2 | Squelch level | SQ 0 - SQ 9 |  |
| 3 | QT/DQT code | OFF, CT01 - CT38, DT01 - DT83 |  |
| 4 VOX | V.of / 1/2/3 |  | |
| 5 | Ringing tone | CA01 - CA20 |  |
| 6 Key tone KTOF / KTON |  | ||
| 7 Roger beep RBOF / RBOn |  | ||
| 8 | Feedback Tone | FTOF / FTON |  |
| 9 | Battery charge level | 3/2/1/0 |  |
4.1 Switching channels
To switch to another channel, please proceed as follows:
- Press 1 x long on the
key, the current channel number flashes in the display. - The desired channel can be set by briefly pressing the
or keys. - Press the
exits the settings menu and the transceiver is back in reception mode.
Note: Channels 1 to 16 are available by default. Channels 17 to 32 need to be activated by user before they can be selected. Channels 17 to 32 should only be used in countries where these frequencies are allowed by government authorities.
To activate channels 17 to 32, please proceed as follows:
- Press and hold
To deactivate channels 17 to 32, please proceed as follows:
- Press and hold
4.2 Squelch
With the setting of the squelch level you determine the strength of the incoming signal up to which the transceiver remains muted. This means that the higher the level is set, the stronger the incoming signal has to be in order to be audible. You can adjust the level between "0" and "9", with "3" being the default setting. To change the settings, please proceed as follows:
- Press 2 x long on the
key and the current setting will flash on the display. - The desired value (0 - 9) can be set by briefly pressing the
or keys. - Press the
exits the settings menu and the transceiver is back in reception mode.
QT and DQT are functions that reject unwanted signals on your channel. You will only hear a call if you receive a signal that contains a suitable QT tone or DQT code. If a call with a different tone or code is received, the squelch function remains active and you will not hear this call. The receiving station must also have a suitable tone or code in order to hear your call when you transmit with QT or DQT.
Please note that third parties can still hear your calls if they set their transceiver set to the same tone or code. To change the settings, please proceed as follows:
- Press 3 x long on the
, key and the current setting will flash on the display. - The desired QT or DQT code can be set by briefly pressing on the
or keys. - Press the
exits the settings menu and the transceiver is back in reception mode.
The KENWOOD QT/DQT default settings for each channel are shown in the table below. For a complete list, see page 20 of this manual.
| Ch. Freq. (MHz) QT/DQT Ch. Freq. (MHz) QT/DQT | |||||
| 1 446 | .00625 CT10 / 94 | 8 Hz 17* 446.10625 | CT10 / 94.8 Hz | ||
| 2 446 | .09375 CT08 / 88 | 5 Hz 18* 446.19375 | CT08 / 88.5 Hz | ||
| 3 446 | .03125 CT13 / 10 | 3.5 Hz 19* 446.13125 | CT13 / 103.5 Hz | ||
| 4 446 | .06875 CT05 / 79 | 7 Hz 20* 446.16875 | CT05 / 79.7 Hz | ||
| 5 446 | .04375 CT17 / 11 | 8.8 Hz 21* 446.14375 | CT17 / 118.8 Hz | ||
| 6 446 | .01875 CT18 / 12 | 3.0 Hz 22* 446.11875 | CT18 / 123.0 Hz | ||
| 7 446 | .08125 CT19 / 12 | 7.3 Hz 23* 446.18125 | CT19 / 127.3 Hz | ||
| 8 446 | .05625 CT07 / 85 | 4 Hz 24* 446.15625 | CT07 / 85.4 Hz | ||
| 9 446 | .00625 CT14 / 10 | 7.2 Hz 25* 446.10625 | CT14 / 107.2 Hz | ||
| 10 446 | .09375 CT15 / 11 | 0.9 Hz 26* 446.19375 | CT15 / 110.9 Hz | ||
| 11 446 | .03125 CT16 / 11 | 4.8 Hz 27* 446.13125 | CT16 / 114.8 Hz | ||
| 12 446 | .06875 CT06 / 82 | 5 Hz 28* 446.16875 | CT06 / 82.5 Hz | ||
| 13 446 | .04375 DT20 / D | 32N 29* 446.14375 | DT20 / D132N | ||
| 14 446 | .01875 DT24 / D | 55N 30* 446.11875 | DT24 / D155N | ||
| 15 446 | .05625 DT21 / D | 34N 31* 446.15625 | DT21 / D134N | ||
| 16 446 | .08125 DT33 / D | 243N 32* 446.18125 | DT33 / D243N | ||
*Channels 1 to 16 are available by default. Channels 17 to 32 need to be activated by user before they can be selected. Channels 17 to 32 should only be used in countries where these frequencies are allowed by government authorities.
4.4 Voice controlled transmission Set up (VOX)
The transceiver is able to transmit voice-controlled (VOX). In VOX mode, the transceiver sends a signal when activated by your voice or other noises in your environment. The sensitivity can be set in 3 levels (1/2/3), with level 3 being the most sensitive level.
To change the settings, please proceed as follows:
- Press 4 x long on the
, key and the current setting will flash on the display. - The desired value (V.OF - V. 3) can be set by briefly pressing the
or keys. - Press the
exits the settings menu and the transceiver is back in reception mode.
Note: Pressing the
4.5 Ringing tone
Ring tones help identify yourself to other participants and inform them of your call. 20 different signal tones (CA01 - CA20) are available for this.
If each participant uses a different tone, the caller is easy to identify. The ringing tone is triggered by pressing and holding the
- Press 5 x long on the
, key and the current setting will flash on the display. - The desired value (CA01 - CA20) can be set by briefly pressing the
or keys. - Press the
exits the settings menu and the transceiver is back in reception mode.
4.6 Key tone On / Off
If the key tone is activated, the transceiver gives an acoustic feedback when keys are pressed. You can switch the key tone On or Off (KTOF / KTOn). To change the settings, please proceed as follows:
- Press 6 x long on the
, key and the current setting will flash on the display. - The desired value (KTOF / KTON) can be set by briefly pressing the
or keys. - Press the
exits the settings menu and the transceiver is back in reception mode.
4.7 Roger Beep On / Off
The Roger Beep is a sound signal generated by the transceiver that is automatically transmitted at the end of each transmission. This signals to the remote station that you have ended your call. You can switch the Roger Beep On or Off (RBOF / RBOn). To change the settings, please proceed as follows:
- Press 7 x long on the
, key and the current setting will flash on the display. - The desired value (RBOF / RBOn) can be set by briefly pressing the
or keys. - Press the
exits the settings menu and the transceiver is back in reception mode.
4.8 Feedback Tone On / Off
The feedback tone is a tone generated by the transceiver that gives the sender of a ringing tone (see point 4.5) feedback at its own device that the ringing tone is currently being heard at the remote device by sounding the same tone at the same time at its own device. You can switch the feedback tone on or off (FTOn / FTOF). To change the settings, please proceed as follows:
- Press 8 x long on the
, key and the current setting will flash on the display. - The desired value (FTOn / FTOF) can be set by briefly pressing the
or keys. - Press the
exits the settings menu and the transceiver is back in reception mode.
4.9 Battery charge level
The battery charge level is indicated by bar symbols. In addition, a signal tone sounds when the battery level is low and the charge indicator flashes red.
| Battery fully charged |  | ||
| Battery 2/3 charged |  | ||
| Battery 1/3 charged |  | ||
| Battery empty |  |
To display the battery charge level, please proceed as follows:
- Press 9 x long on the
, key and the current charge level is shown in the display. - Press the
exits the settings menu and the transceiver is back in reception mode.
4.10 Monitor function
The monitor function can be used to receive weaker signals on the current channel. You can activate the monitoring as follows:
- By briefly pressing the
Note: The monitor function works independently of the set QT/DQT code.
4.11 Channel search (Scan)
With the channel search you can search for active channels. If a corresponding channel is found, the search stops and communication is played back. If the transmission ends on the found channel, the channel search is automatically continued.
To start the channel search, please proceed as follows:
- Press 1 x long on the
, key and the search from channel 1 to channel 16 (or channels 1 to 32, depending on the setting) will start. - If you briefly press the
or keys during the search, the sequence of the search is reversed.
Note: If you press the
4.12 Energy saving function
If the transceiver is not used for more than 10 seconds, it automatically switches to energy-saving mode. This has no effect on the reception of transmissions and the normal mode is automatically reactivated as soon as a signal is detected.
5. Troubleshooting
Notes on troubleshooting
| Problem Solution | |
| The transceiver does not turn on. | · The battery is discharged. Charge the battery or replace the batteries.· The battery is not inserted correctly. Remove and reinsert the battery. |
| If the battery is charged repeatedly, the battery performance deteriorates. | · The battery life is exhausted. Replace the battery with a new one. |
| You cannot hear or speak to the other group members. | · Make sure you are using the same channel and QT/DQT settings as the other group members.· The other group members are too far away. Make sure you are within range of the other transceivers. |
| Other transceiver participants (except group members) can be heard on the channel. | · Change the QT/DQT settings. Make sure that all group members change the settings on their transceivers to match the new QT/ DQT settings. |
Note: If the problem persists, please contact the KENWOOD service.
6. Disposal
Disposal of used electrical and electronic equipment and batteries.


The crossed-out wheeled bin symbol on the product or its packaging indicates that this product must not be treated as normal household waste, but must be returned to a collection point for the recycling of electrical and electronic equipment and batteries. By helping to properly dispose of this product, you are protecting the environment and the health of your fellow human beings. Improper or incorrect disposal endangers the environment and health. For more information about the recycling of this product, please contact your local authority or your municipal waste disposal service.
Information on disposal in Turkey can be found in Turkish on page 18.
- Technical Specifications UBZ-LJ9E
| Frequency range 446,0 - 446,2 MHz (PMR446) | |
| Channels 32 | |
| Subcodes QT 38 + DQT 83 | |
| Radio-frequency power ≤ 500mW ERP | |
| Maximum transmission power Max. 26,59 dBm | |
| Reach Up to 6 km* | |
| Operating temperature -20°C to +55°C | |
| Operating voltage 3.7 V | |
| Protection class IP32 | |
| Operating time / Charging time Max. 18 hrs.* / approx. 3 hrs. | |
| Dimensions (W x H x D) 52 x 157 x 28 mm | |
| Weight incl. battery & belt clip 138 g | |
| * May vary depending on terrain and conditions. | |
| Li-ion battery | |
| Type KNB-86L | |
| Voltage 3.7 V | |
| Capacity | 1150 mAh |
| Energy content | 4.3 Wh |
| UN number | UN3481 Lithium-Ion Batteries contained in / packed with equipment |
| Power supply | |
| Manufacturer power supply | SHENZHEN MERRYKING ELECTROINCS CO., LTD. 801, Bldg B, No. 1, Tianyang 2nd Road, Oriental Community, Songgang Street, Bao'an District, Shenzhen 518105, Guangdong, CHINA" |
| Power supply brand and model identifier | MKC-0502000VEUT / MKC-0502000VUKT |
| Input voltage | AC voltage 100 - 240 V |
| Input AC frequency | 50 / 60 Hz |
| Output voltage / current / power | DC voltage 5.0 V / 2.0 A / 10.0 W. |
| Average active efficiency | 81.1 % |
| No-load power Consumption | 0.07 W |
| Technical modifications reserved. | |
8. Guarantee
Dear Customer,
Thank you for purchasing this KENWOOD product. If this product is found to be defective in materials or workmanship under normal use, we will repair or replace it free of charge in accordance with the applicable warranty terms.
The warranty does not cover consumables or parts subject to wear and tear, such as rechargeable batteries, which must be replaced as part of normal servicing.
UK Contact Address:
JVCKENWOOD U.K. Limited
First Floor, Gleneagles, the Belfry, Colonial Way,
Watford, Hertfordshire WD24 4WH, UNITED KINGDOM
Email : Enquiries@uk.jvckenwood.com
www.kenwoodsupport.co.uk
EU Contact Address:
JVCKENWOOD Europe B.V.
RF EXPOSURE LIMITS FOR UBZ-LJ9E TRANSCEIVER ATTENTION:
Before using this PMR446 transceiver, read this simple guide.
This PMR446 transceiver uses radio frequency (RF) electromagnetic energy to allow communication between two or more users over a distance.
It uses radio frequency (RF) energy or radio waves to send and receive calls.
KENWOOD UBZ-LJ9E transceiver is designed, manufactured and tested to meet Council Recommendation 1999/519/EC RF exposure limits, and exposure limits provide recommended exposure levels to the general public.
To keep RF exposure within acceptable limits, do not transmit for more than 50% of the transceiver total usage time.
Transmitting over 50% of the total use time may exceed the limits in accordance to the FCC RF exposure requirements.
To ensure compliance, hold the transceiver in a vertical position in front of your face, with the microphone and other parts of the transceiver including the antenna at least 2.5 cm away from the nose or lips.
Longer distance between your face and the antenna reduces RF exposure.
| QT-Codes | ||||
| CT01/67.0 Hz | CT14/107.2 Hz | CT27/167.9 Hz | CT02/71.9 Hz | CT15/110.9 Hz |
| CT28/173.8 Hz | CT03/74.4 Hz | CT16/114.8 Hz | CT29/179.9 Hz | CT04/77.0 Hz |
| CT17/118.8 Hz | CT30/186.2 Hz | CT05/79.7 Hz | CT18/123.0 Hz | CT31/192.8 Hz |
| CT06/82.5 Hz | CT19/127.3 Hz | CT32/203.5 Hz | CT07/85.4 Hz | CT20/131.8 Hz |
| CT33/210.7 Hz | CT08/88.5 Hz | CT21/136.5 Hz | CT34/218.1 Hz | CT09/91.5 Hz |
| CT22/141.3 Hz | CT35/225.7 Hz | CT10/94.8 Hz | CT23/146.2 Hz | CT36/233.6 Hz |
| CT11/97.4 Hz | CT24/151.4 Hz | CT37/241.8 Hz | CT12/100.0 Hz | CT25/156.7 Hz |
| CT38/250.3 Hz | CT13/103.5 Hz | CT26/162.2 Hz | ||
| DQT-Codes | ||||
| DT01/D023N | DT29/D174N | DT57/D445N | DT02/D025N | DT30/D205N |
| DT58/D464N | DT03/D026N | DT31/D223N | DT59/D465N | DT04/D031N |
| DT32/D226N | DT60/D466N | DT05/D032N | DT33/D243N | DT61/D503N |
| DT06/D043N | DT34/D244N | DT62/D506N | DT07/D047N | DT35/D245N |
| DT63/D516N | DT08/D051N | DT36/D251N | DT64/D532N | DT09/D054N |
| DT37/D261N | DT65/D546N | DT10/D065N | DT38/D263N | DT66/D565N |
| DT11/D071N | DT39/D265N | DT67/D606N | DT12/D072N | DT40/D271N |
| DT68/D612N | DT13/D073N | DT41/D306N | DT69/D624N | DT14/D074N |
| DT42/D311N | DT70/D627N | DT15/D114N | DT43/D315N | DT71/D631N |
| DT16/D115N | DT44/D331N | DT72/D632N | DT17/D116N | DT45/D343N |
| DT73/D654N | DT18/D125N | DT46/D346N | DT74/D662N | DT19/D131N |
| DT47/D351N | DT75/D664N | DT20/D132N | DT48/D364N | DT76/D703N |
| DT21/D134N | DT49/D365N | DT77/D712N | DT22/D143N | DT50/D371N |
| DT78/D723N | DT23/D152N | DT51/D411N | DT79/D731N | DT24/D155N |
| DT52/D412N | DT80/D732N | DT25/D156N | DT53/D413N | DT81/D734N |
| DT26/D162N | DT54/D423N | DT82/D743N | DT27/D165N | DT55/D431N |
| DT83/D754N | DT28/D172N | DT56/D432N | ||
KENWOOD
Transceptor FM portátil PMR446
natural_image
Line drawing of a KENWOOD walkie-talkie device with no visible text or symbols on the device bodyÍndice de contenido
Contenido
Página
First Floor, Gleneagles, the Belfry, Colonial Way, Watford, Hertfordshire WD24 4WH UNITED KINGDOM
natural_image
Line drawing of a Kenwood mobile phone with attached cable (no text or symbols on device body)natural_image
Technical line drawings of a walkie-talkie and its internal components (no text or symbols)natural_image
Technical line drawing of a walkie-talkie device with attached sensor and connector components (no text or symbols)natural_image
Line drawing of a KENWOOD walkie-talkie device with no visible text or symbols on the device bodySommaire
Sommaire Page
First Floor, Gleneagles, the Belfry, Colonial Way, Watford, Hertfordshire WD24 4WH, UNITED KINGDOM
natural_image
Technical line drawings of two walkieh machines, one with a grid-patterned body and arrow indicating direction (no text or symbols)Attention!
natural_image
Line drawing of a Kenwood mobile phone with attached cable (no text or symbols on device body)natural_image
Technical line drawing of a handheld device with two views: one showing a left-side device and the other showing a right-side device (no text or symbols present)natural_image
Technical line drawing of a walkie-talkie device with attached sensor and connector components (no text or symbols)JVCKENWOOD EUROPE B.V. Succursale France
7 Allee des Barbanniers,
92632 Gennevilliers CEDEX
Tel. 09-69-390-811 www.kenwood-electronics.fr
natural_image
Line drawing of a KENWOOD walkie-talkie device with no visible text or symbols on the device bodyIndice
Contenuto Pagina
First Floor, Gleneagles, the Belfry, Colonial Way, Watford, Hertfordshire WD24 4WH,
UNITED KINGDOM
natural_image
Technical line drawings of two walkieh machines, one with a grid-patterned case and arrow indicating direction (no text or symbols)Attenzione!
natural_image
Line drawing of a Kenwood mobile phone with attached cable (no text or symbols on device body)natural_image
Technical line drawing of a handheld device with two views: one showing a left-side device and the other showing a right-side device (no text or symbols present)natural_image
Technical line drawing of a walkie-talkie device with attached sensor and connector components (no text or symbols)3. Uso della radio
4.8 Feedback Tone on/off
natural_image
Line drawing of a KENWOOD walkie-talkie device with no visible text or symbols on the device bodyInhoudsopgave
Inhoud Pagina
First Floor, Gleneagles, the Belfry, Colonial Way, Watford, Hertfordshire WD24 4WH, UNITED KINGDOM